Developing Your First Integration Solution
Integration developers need efficient tools to build and test all the integration use cases required by the enterprise before pushing them into a production environment. The following topics will guide you through the process of building and running an example integration use case using WSO2 Integration Studio. This tool contains an embedded WSO2 Micro Integrator instance as well as other capabilities that allows you to conveniently design, develop, and test your integration artifacts before deploying them in your production environment.
What you'll build
We are going to use the same use case we considered in the Quick Start Guide. In the quick start guide, we just executed the already-built integration scenario. Here, we are going to build the integration scenario from scratch. Let’s recall the business scenario:
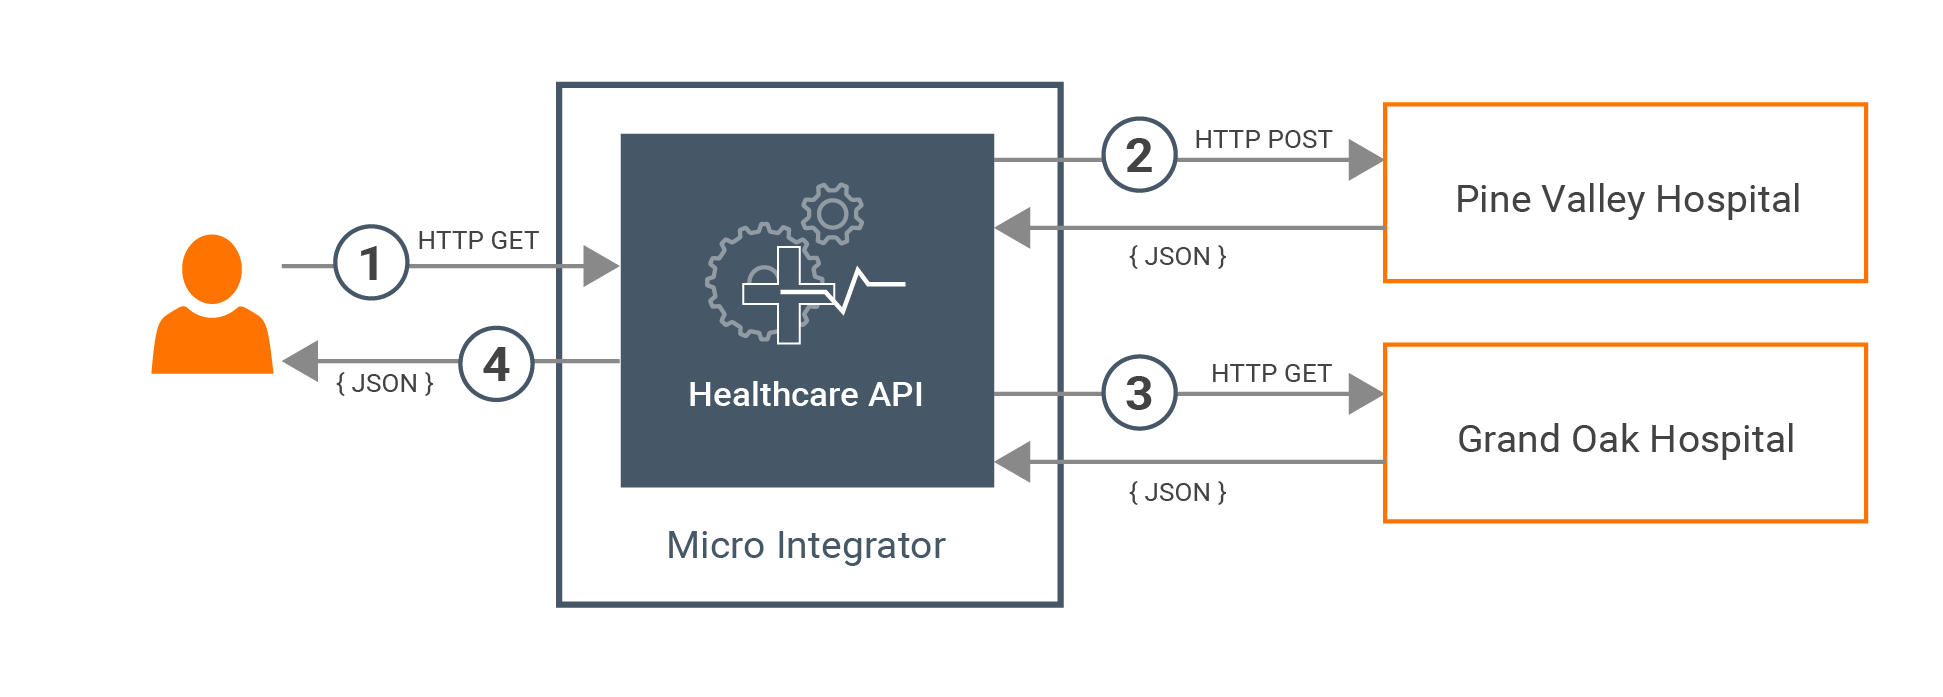
The scenario is about a basic healthcare system where WSO2 Micro Integrator is used as the integration middleware. Most healthcare centers use a system to help patients book doctor appointments. To check the availability of doctors, patients will typically use every online system that is dedicated to a particular healthcare center or personally visit the healthcare centers.
We will simplify this process of booking doctor appointments by building an integration solution that orchestrates the isolated systems in each healthcare provider and exposes a single interface to the users.
Both the Grand Oak service and Pine Valley service are exposed over the HTTP protocol.
-
The Grand Oak service accept GET requests in the following service endpoint URL:
http://<HOST_NAME>:<PORT>/grandOak/doctors/<DOCTOR_TYPE> -
The Pine Valley service accepts POST requests in the following service endpoint URL:
http://<HOST_NAME>:<PORT>/pineValley/doctorsThe expected payload should be in the following JSON format:
{
        "doctorType": "<DOCTOR_TYPE>"
}
Let’s implement a simple Rest API that can be used to query the availability of doctors for a particular category from all the available healthcare centers.
Step 1 - Set up the workspace
Download the relevant WSO2 Integration Studio based on your operating system. For more information, see Installing WSO2 Integration Studio.
Step 2 - Develop the integration artifacts
Create the integration project
Let's create an integration project with the required modules (to store artifacts) in WSO2 Integration Studio.
-
Open WSO2 Integration Studio and click New Integration Project in the Getting Started view as shown below.

-
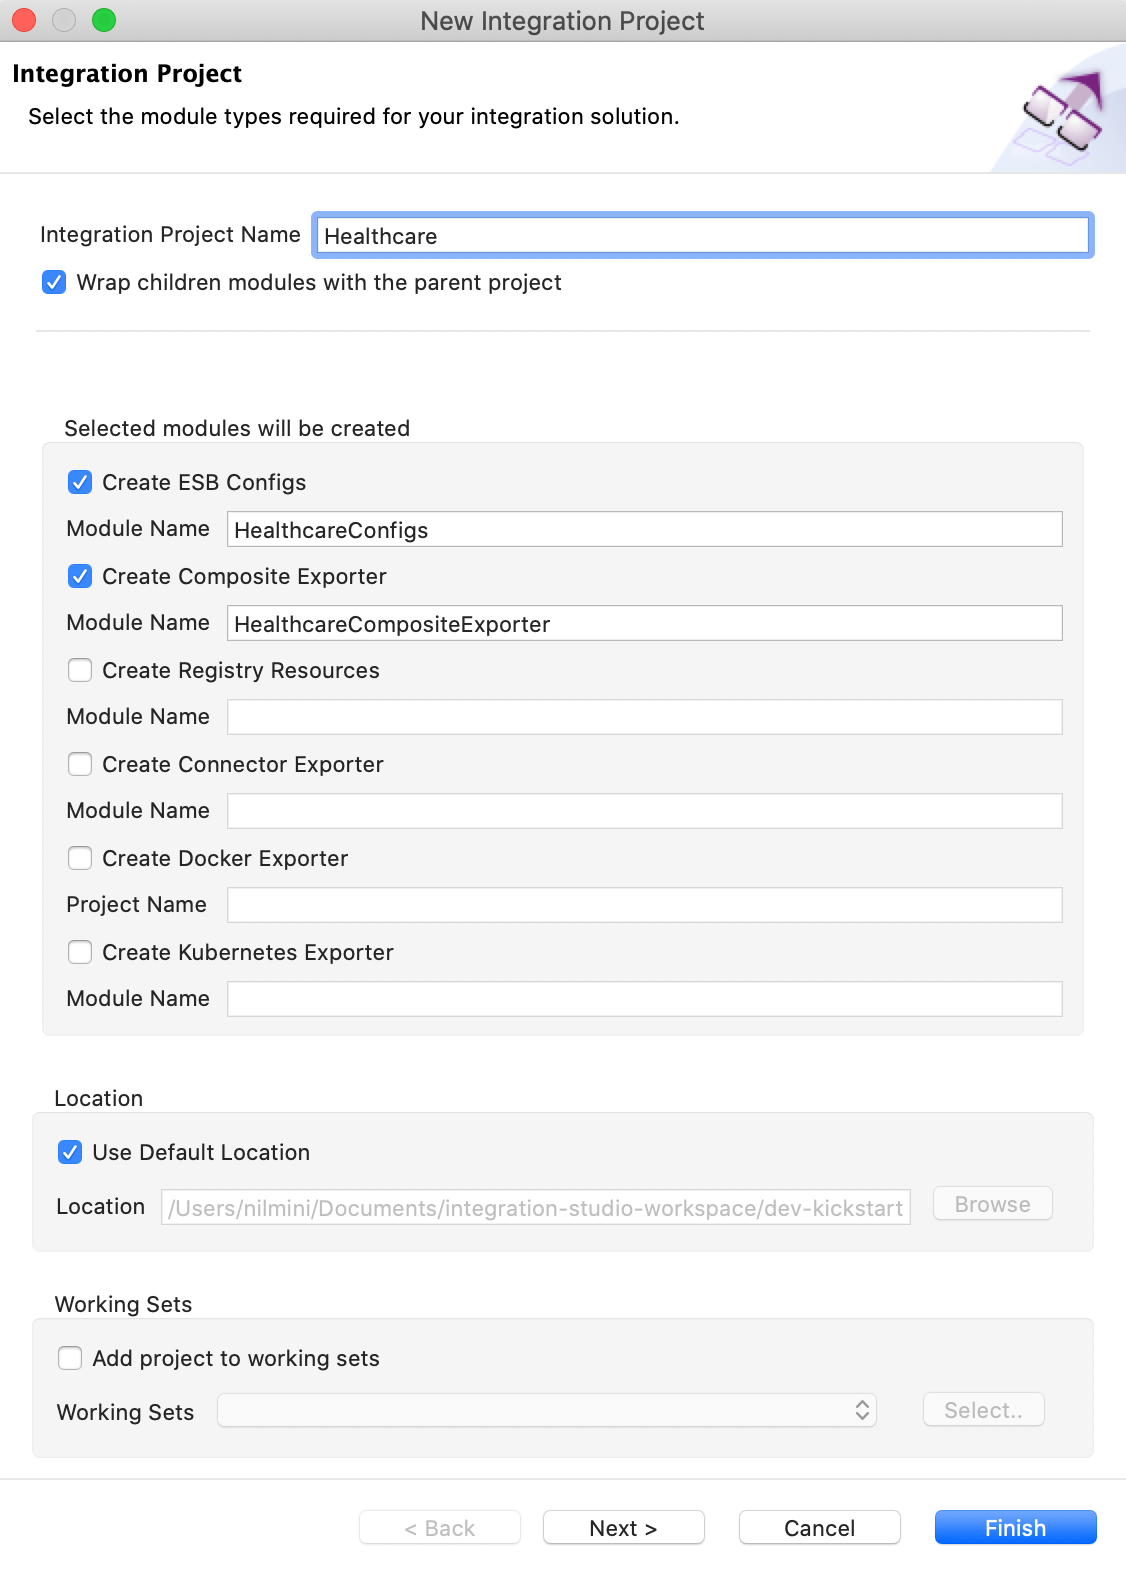
In the New Integration Project dialog box that opens, enter
Healthcareas the project name. This is a maven multi module project.Be sure to leave the Create ESB Configs and Create Composite Exporter check boxes selected as shown below.
-
Click Finish.
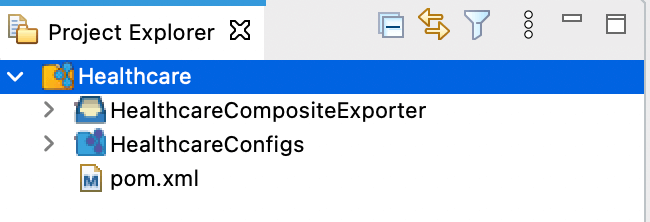
The integration project with the ESB Config module (HealthcareConfigs) and Composite Exporter module (HealthcareCompositeExporter) are created as shown below.
Create Endpoints
The actual back-end services (healthcare services) are logically represented in the integration solution as Endpoint artifacts.
Let's create two Endpoint artifacts for the two healthcare services:
-
Right-click
HealthcareConfigsand go to New → Endpoint to open the New Endpoint Artifact dialog box.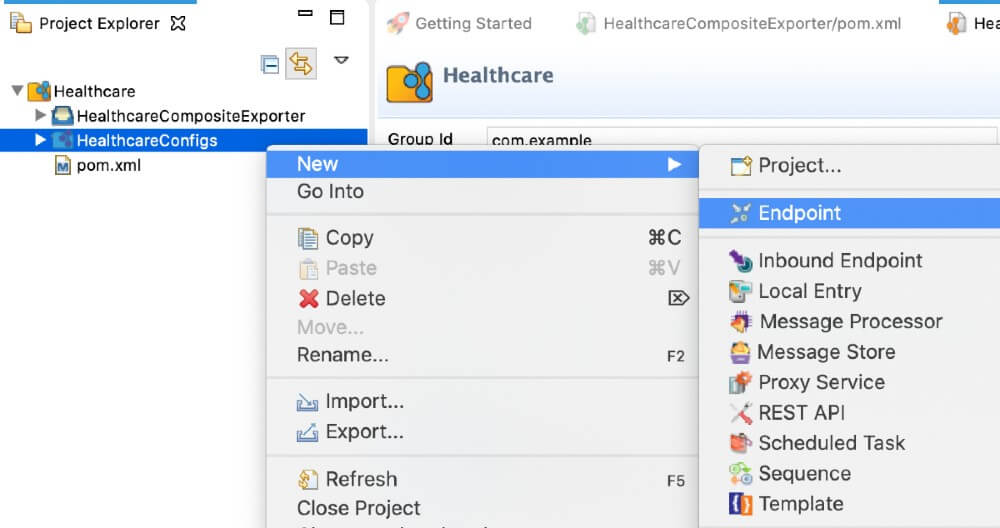
-
In the New Endpoint Artifact dialog box that opens, select Create a New Endpoint and click Next.
-
For the ‘Grand Oak hospital service’, let’s use the following values:
Parameter Value Endpoint Name GrandOakEndpoint Endpoint Type HTTP Endpoint URI Template http://localhost:9090/grandOak/doctors/{uri.var.doctorType}Method GET 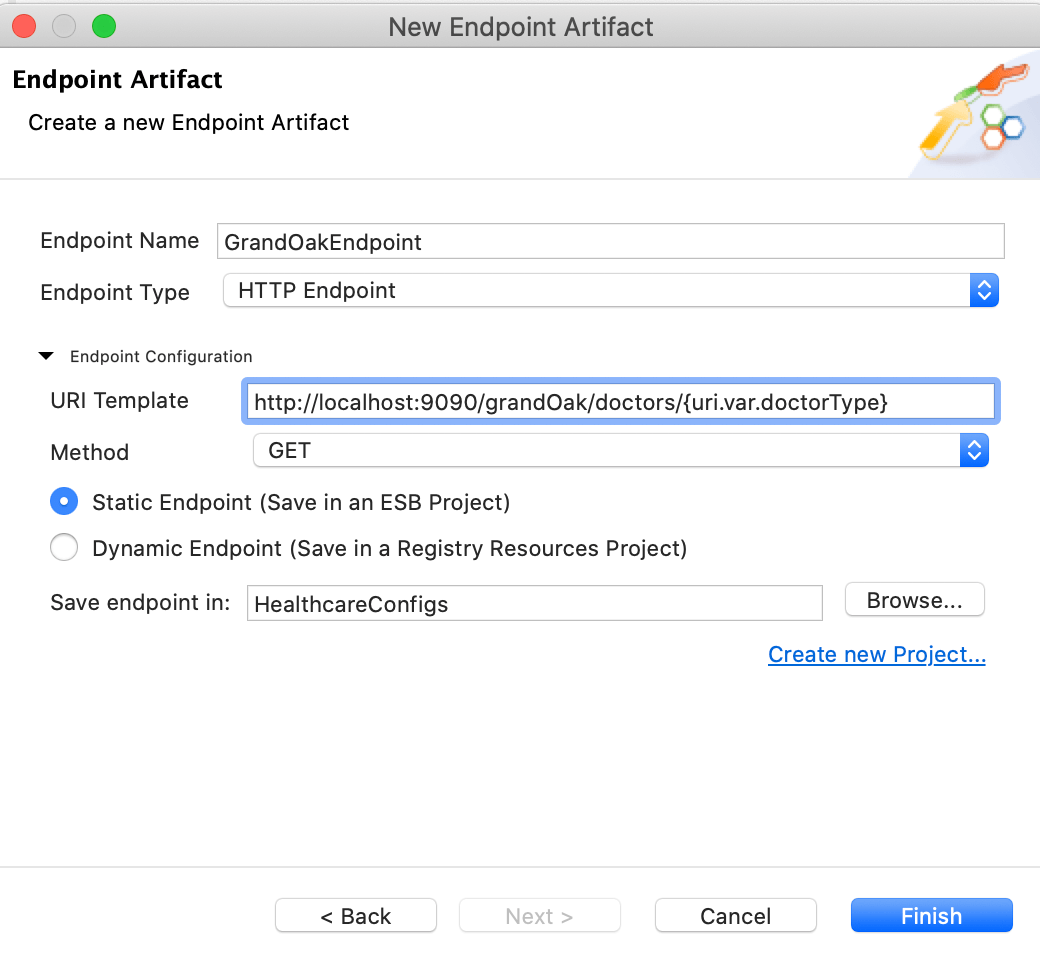
-
Click Finish to save the endpoint configuration.
-
Follow the same steps to create an endpoint for ‘Pine Valley Hospital’. Use the following parameter values:
Parameter Value Endpoint Name PineValleyEndpoint Endpoint Type HTTP Endpoint URI Template http://localhost:9091/pineValley/doctorsMethod POST
Create the REST API
We are orchestrating multiple services and exposing a single API to the clients. The main integration artifact is going to be a REST API.
- Right-click
HealthcareConfigsin the project explorer and go to New → REST API to open the API Artifact Creation Options dialog box. - Select Create A New API Artifact and click Next.
-
Specify values for the required REST API properties:
Parameter Value Name HealthcareAPI Context /healthcare 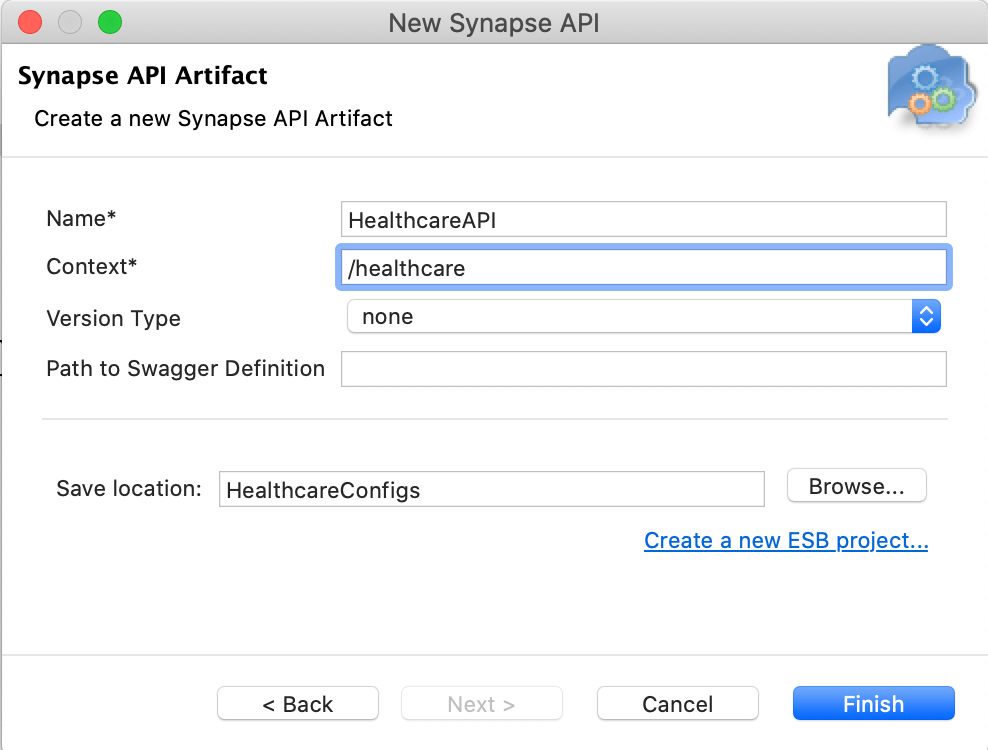
-
Click Finish. The REST API is created in the
src/main/synapse-config/apifolder underHealthcareConfigs. -
Open the new artifact from the project explorer. You will see the graphical view of the
HealthcareAPIwith its default API Resource.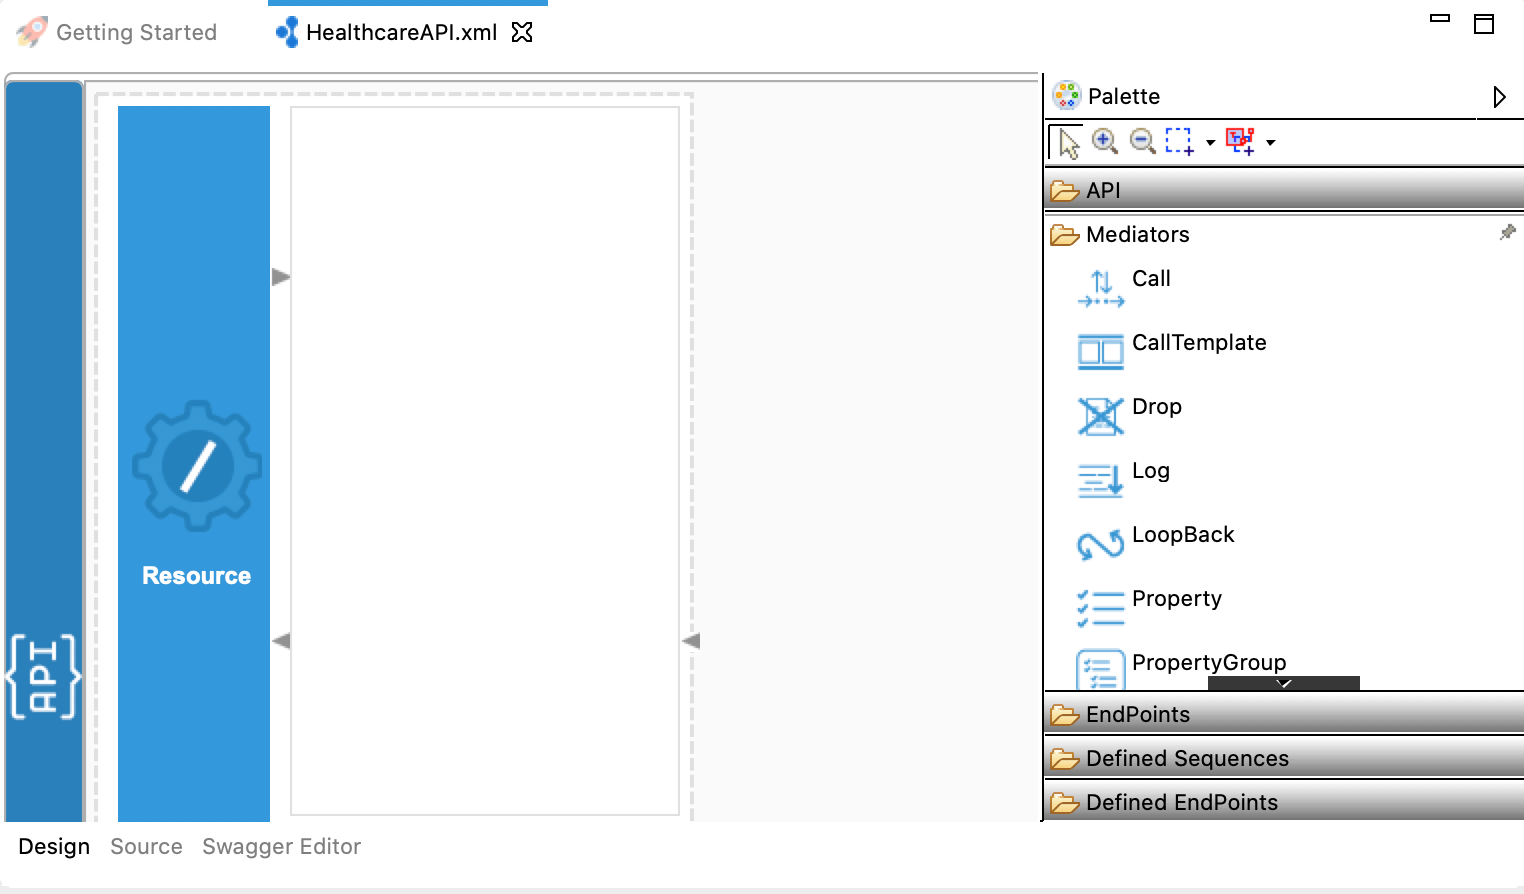
To the right of the editor, you will see the Mediators palette containing various mediators that can be dragged and dropped into the canvas of the API Resource.
-
Double-click the API resource to open the Properties view:
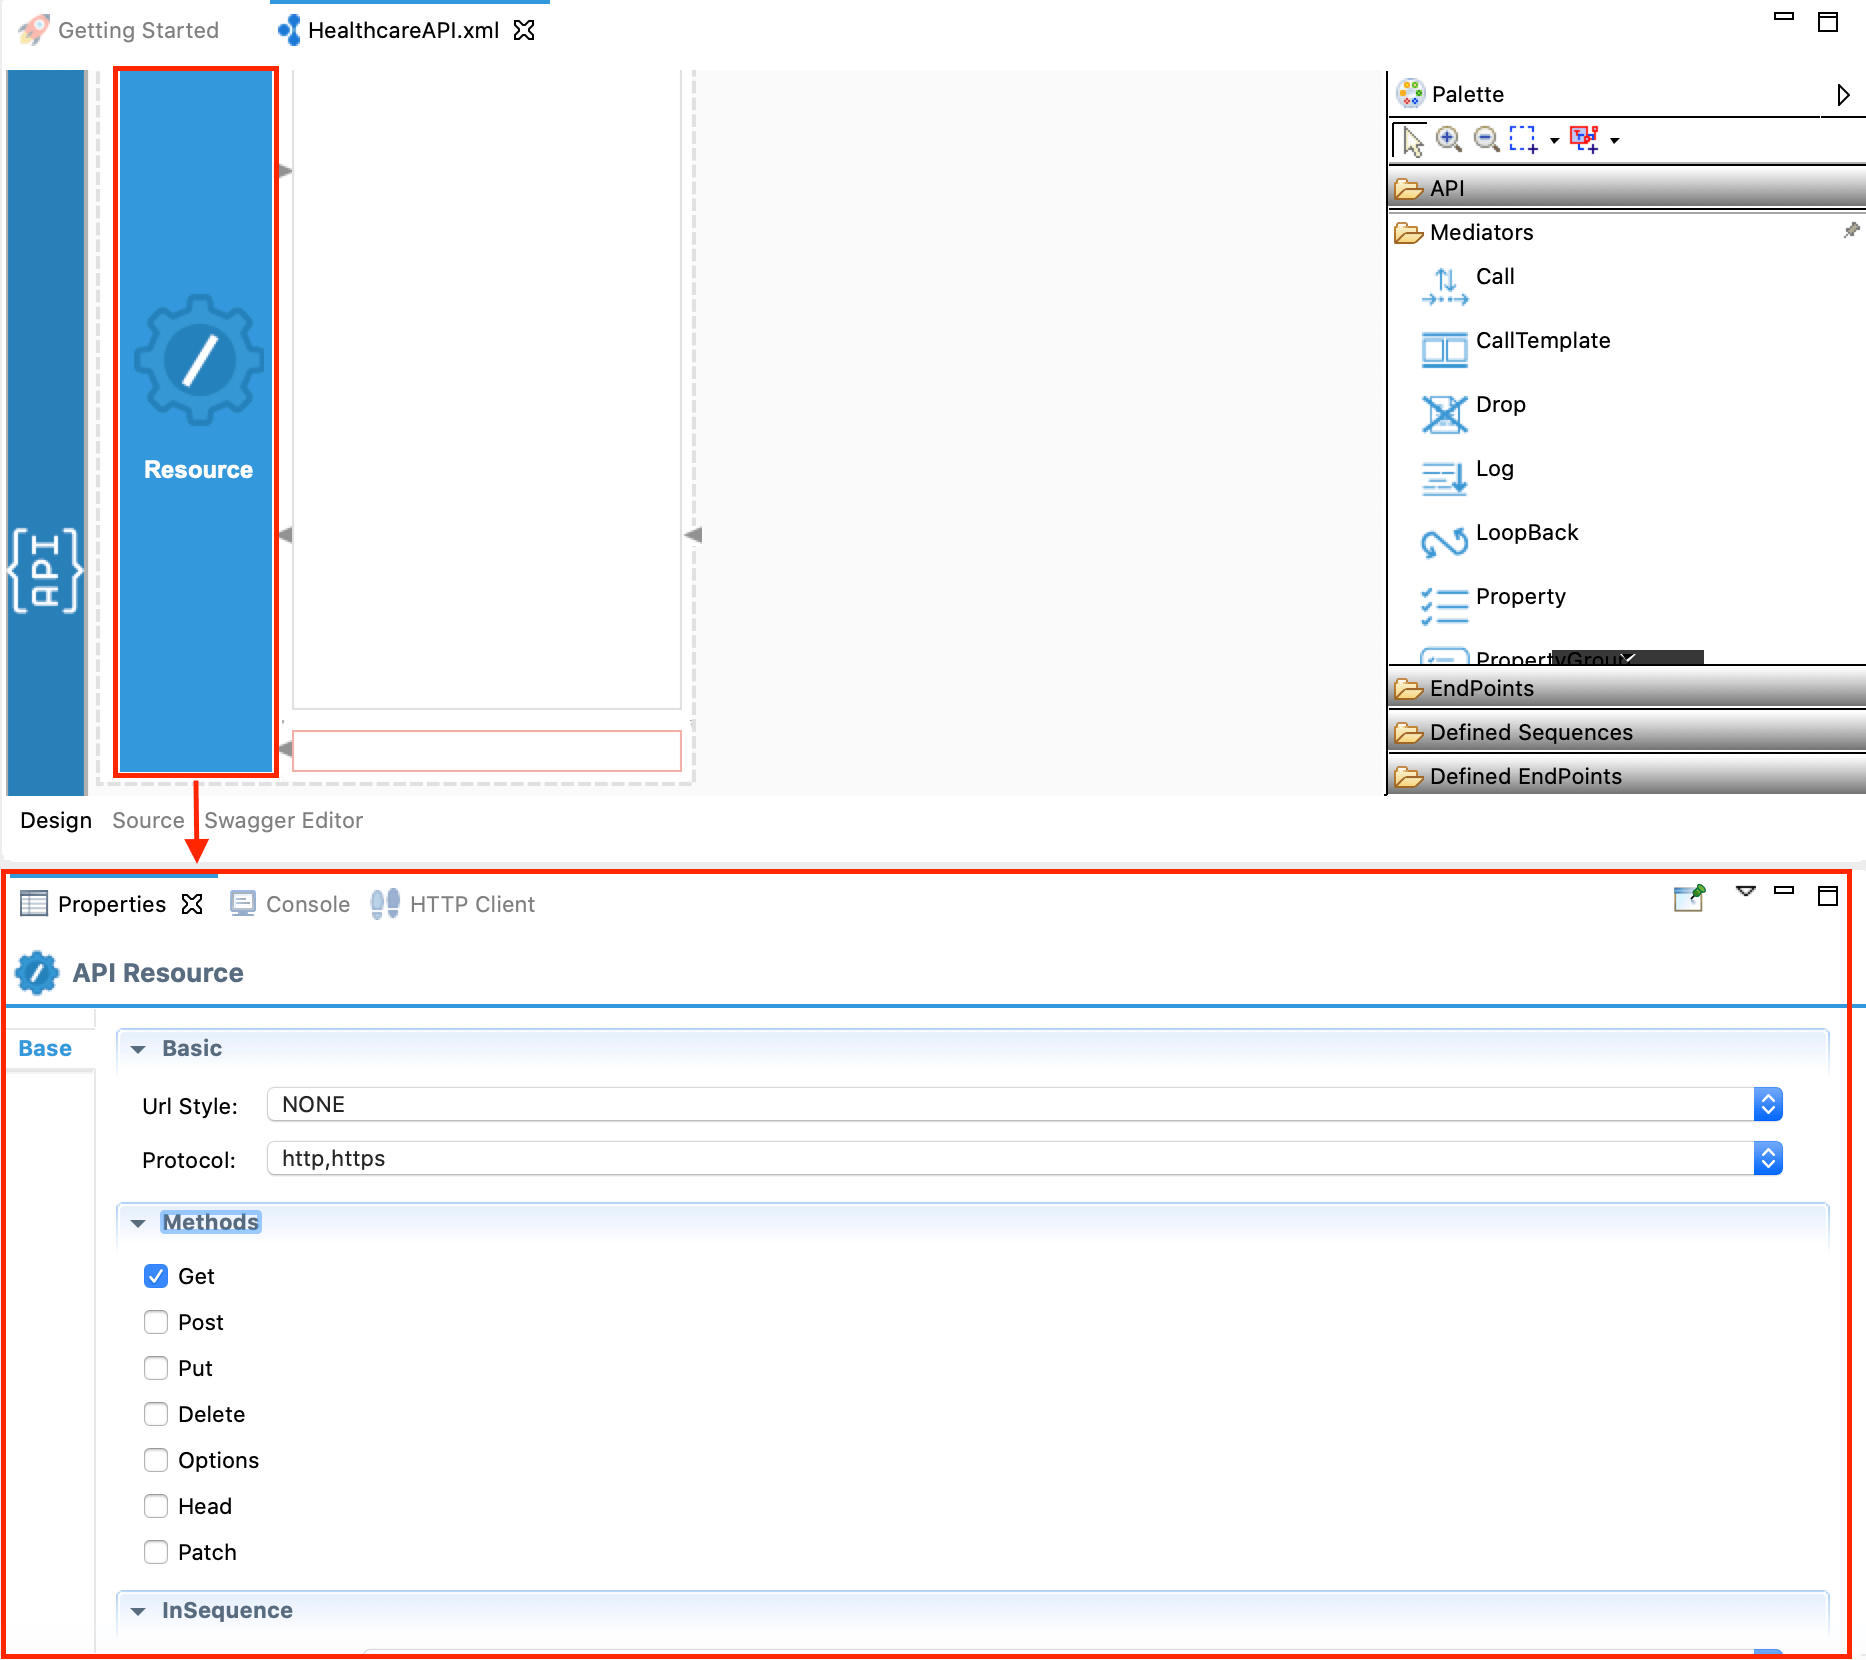
Specify values for the required resource properties:
Parameter Value Url Style URL_TEMPLATE Uri Template /doctor/{doctorType}Note that '{doctorType}' is a uri variable that gets resolved to the path parameter value in the runtime. We can access the value of the uri variable in the mediation flow using the variable (property) called ‘uri.var.doctorType’.Methods Get
Create the mediation logic
-
Create two parallel message flows:
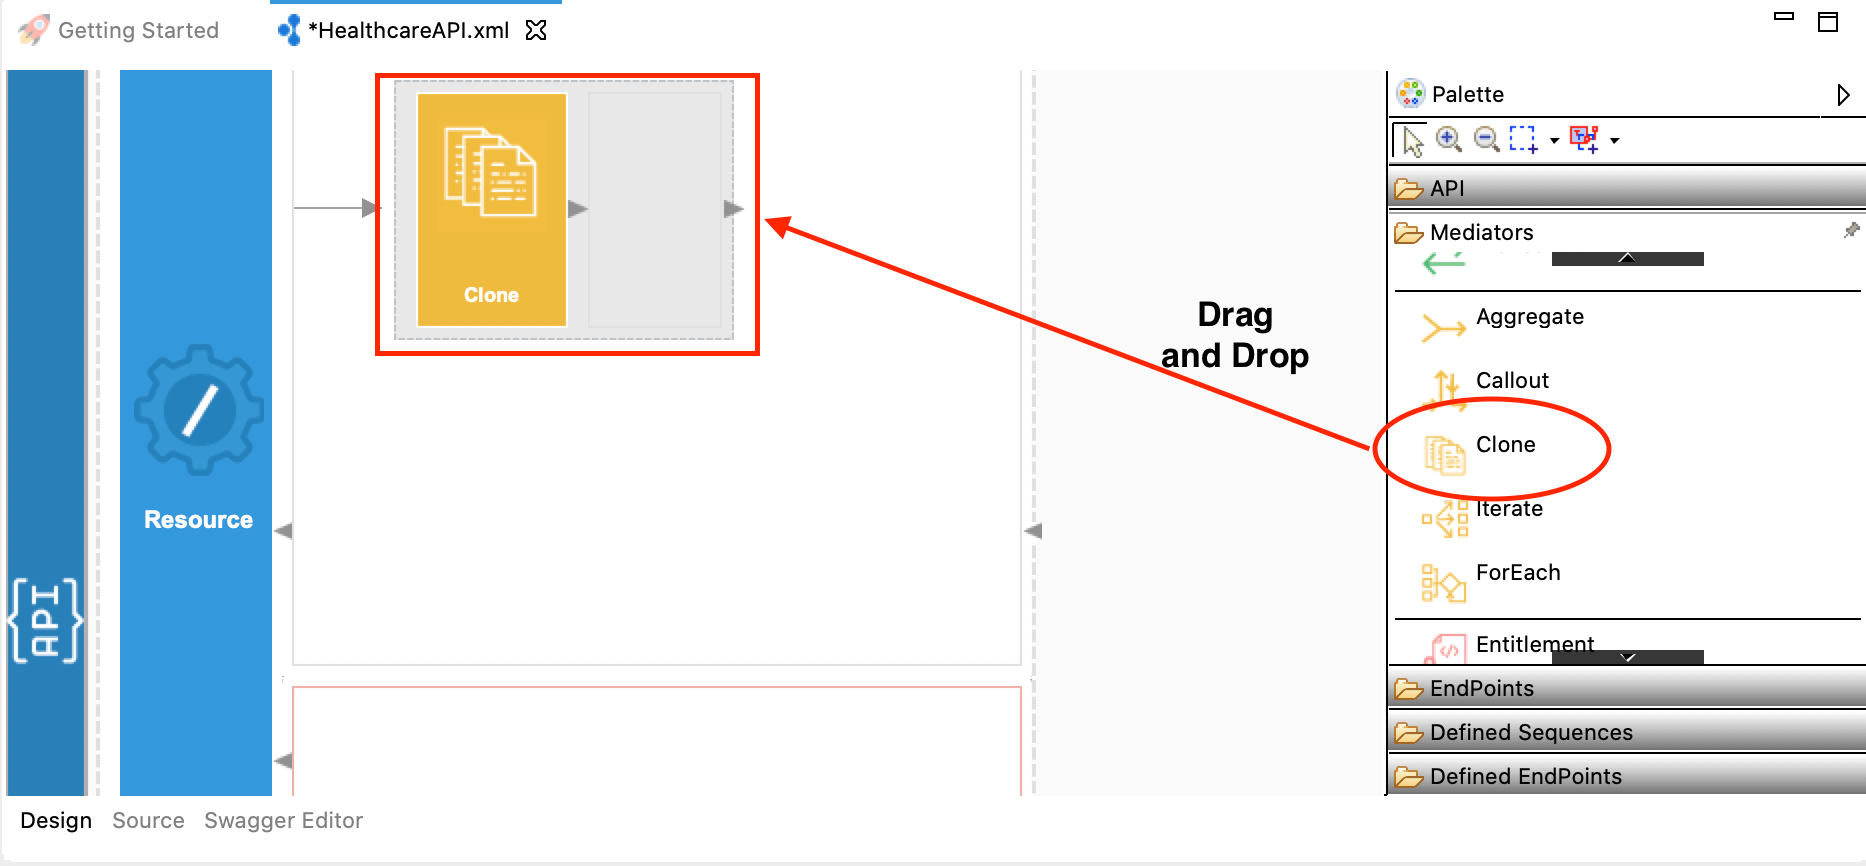
In this scenario, the Healthcare API receives an HTTP GET request, which should be delivered to two different back-end services. That is, we need to clone the message into two branches and process them in parallel. To do that, we can use the Clone Mediator.
Drag the Clone mediator from the mediator palette and drop it into the request path (in sequence) of the API Resource canvas.
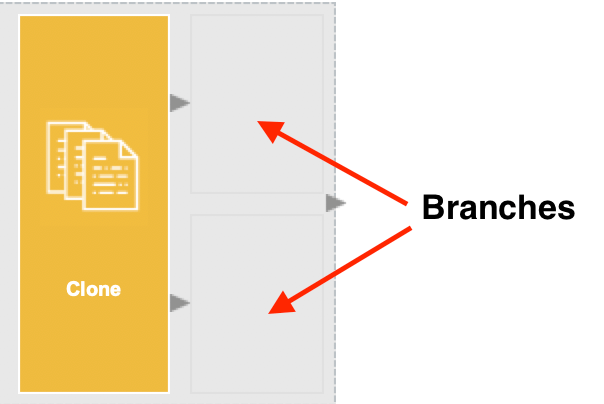
Right-click the Clone mediator and select Add/Remove Target... In the Add Target Branches window, set the number of branches to 2. You will now see two branches inside the Clone mediator.
-
Invoke the GrandOak Endpoint:
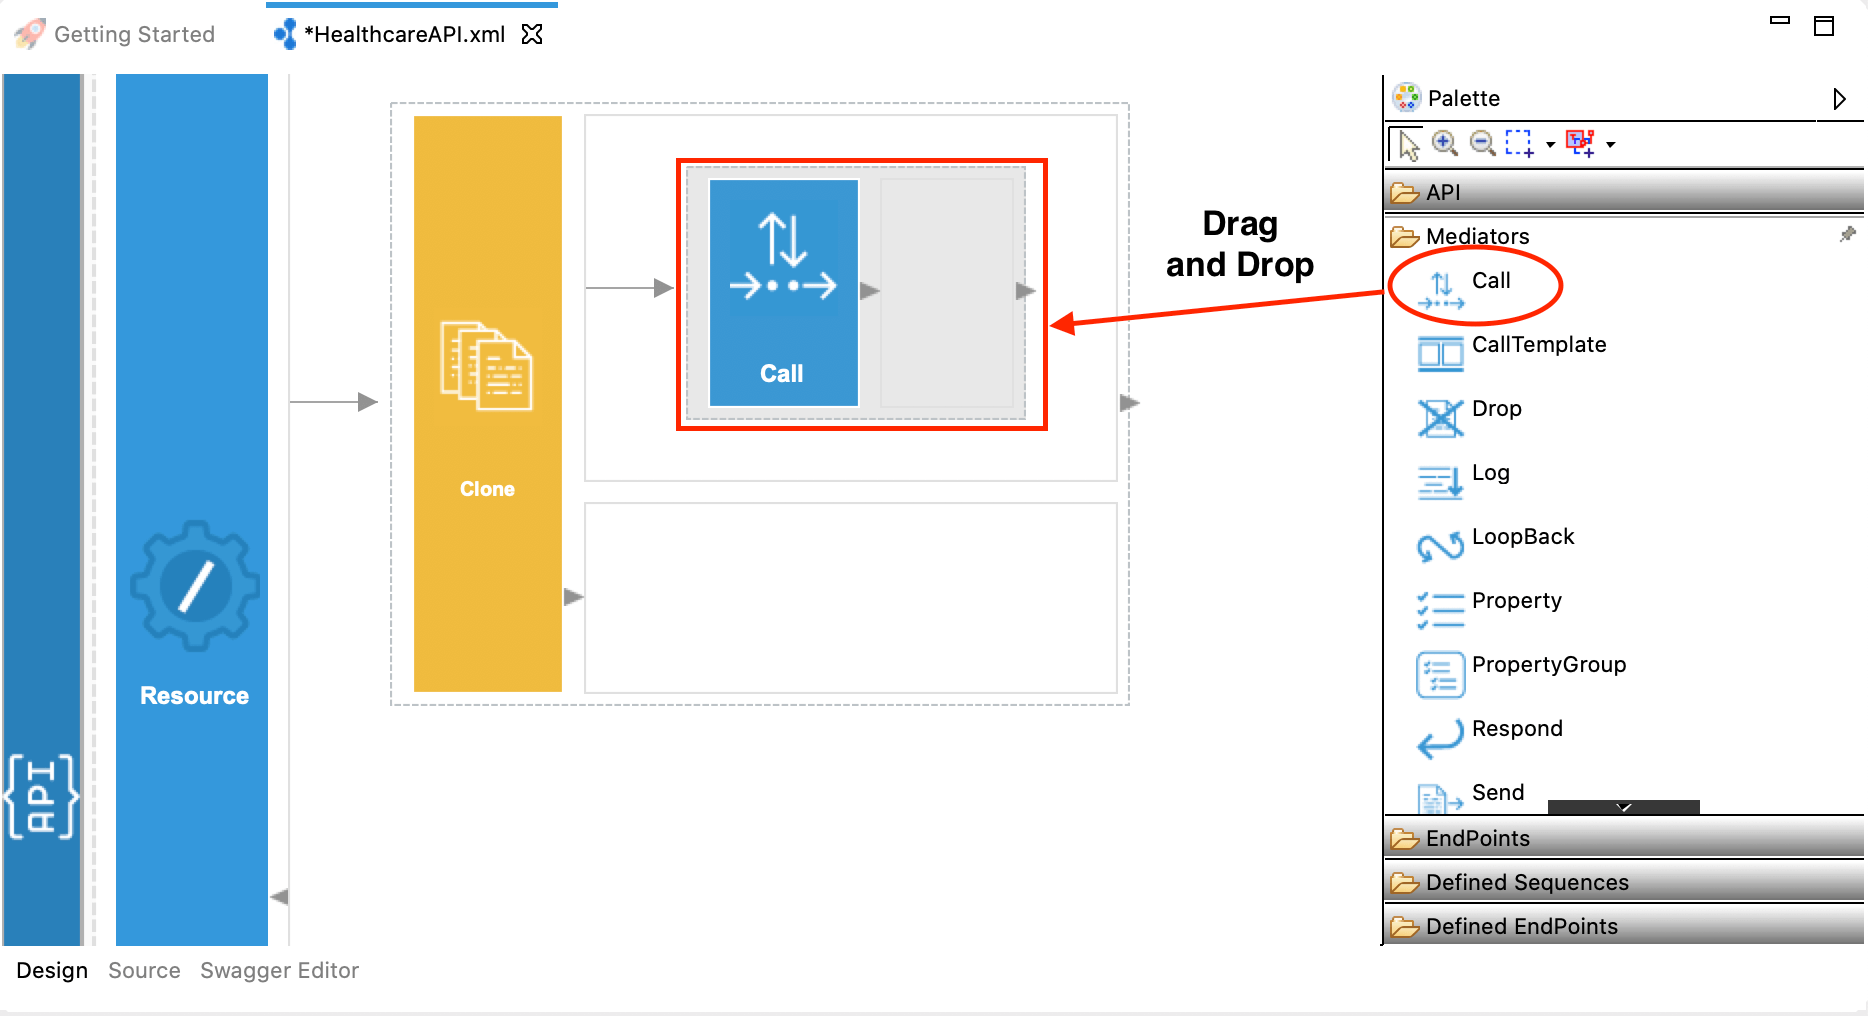
The Call mediator is used to invoke a back-end service. In Step 2, we have already created an Endpoint to represent the GrandOak endpoint.
Drag the Call mediator from the mediator palette into one branch of the Clone mediator.
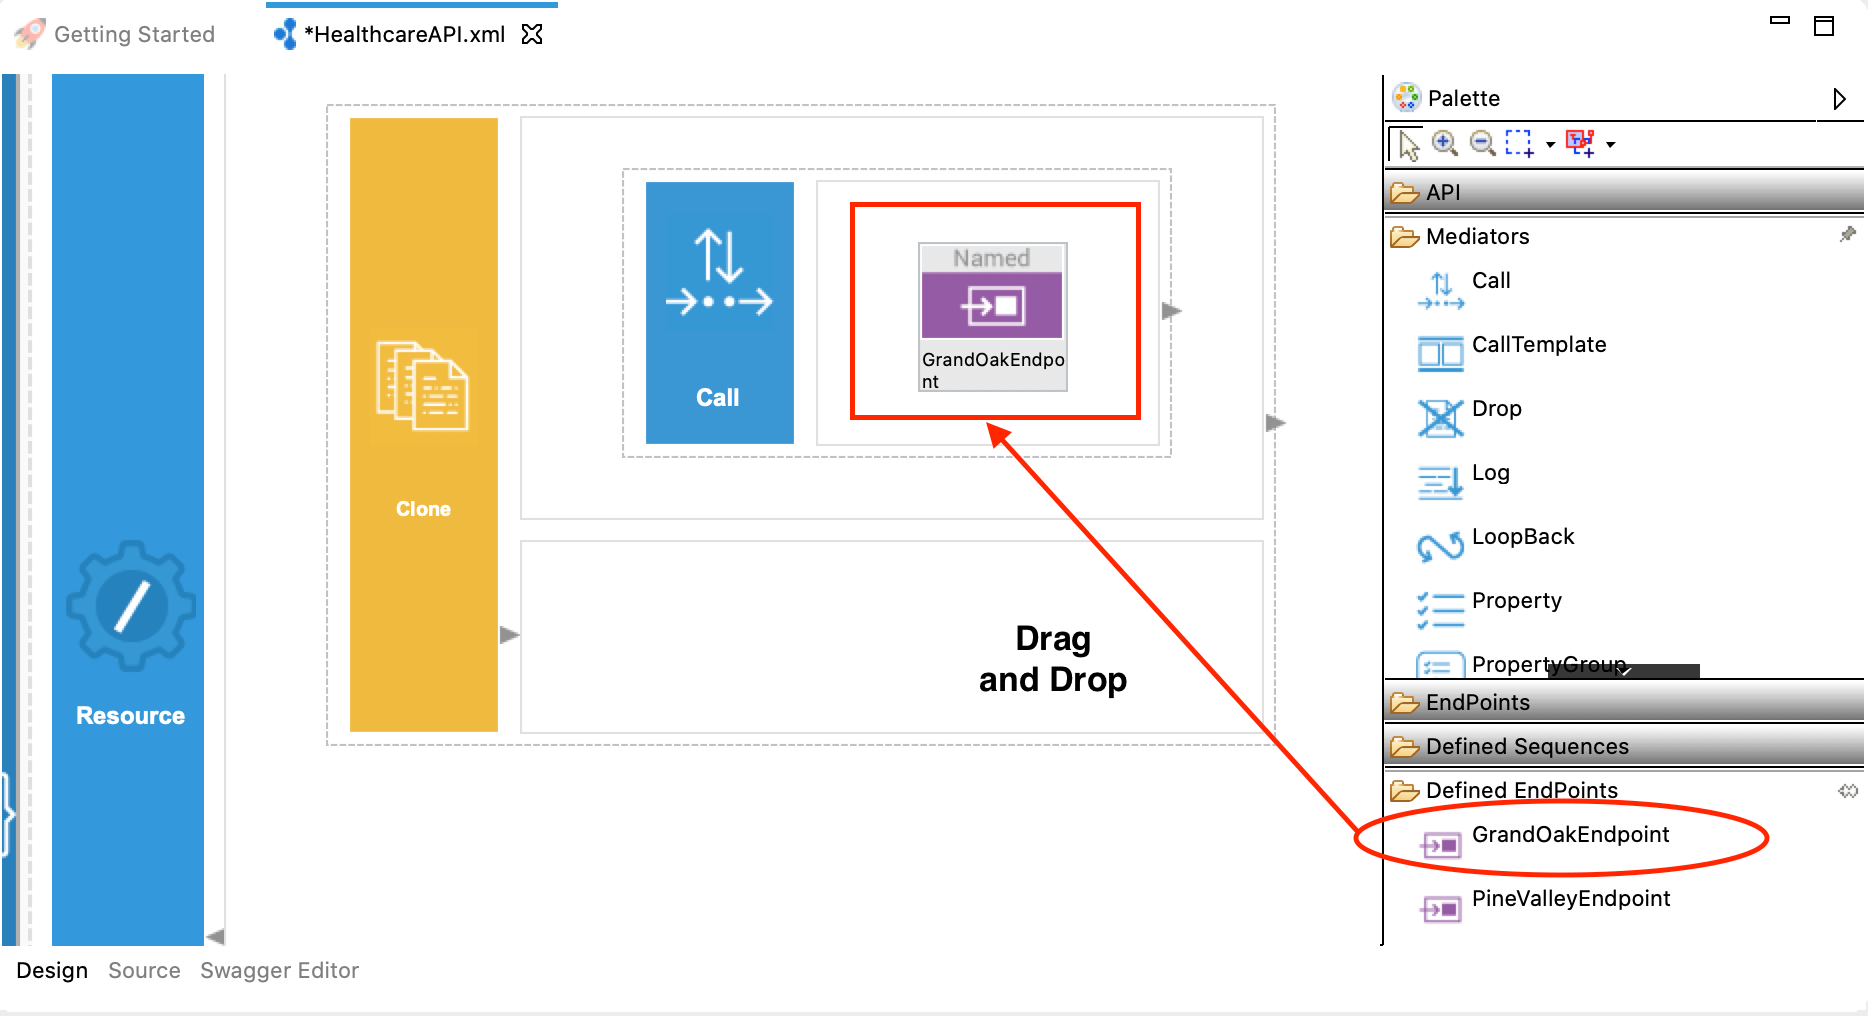
Then, drag the already-defined GrandOak endpoint artifact, which is available under the Defined Endpoints section of the palette, into the Call mediator.
-
Construct message payload for the PineValley Endpoint:
Unlike the GrandOAK endpoint, which accepts a simple GET request, the PineValley endpoint requires a POST request with the following JSON message:
{
    "doctorType": "<DOCTOR_TYPE>"
}
Therefore, we need to first construct the required message payload. There are several Transformation mediators for constructing messages. Let's use the PayloadFactory mediator. Drag the PayloadFactory mediator into the 2nd branch of the Clone mediator as shown below.

Specify values for the required PayloadFactory properties:
Parameter Value Payload Format Inline Media Type json Payload { "doctorType": "$1" } Args $ctx:uri.var.doctorType Note the
$1in the Payload format. It denotes a parameter that can get a value assigned dynamically. The value for the parameters needs to be assigned using Arguments (Args). Args can be added using the PayloadFactoryArgument dialog box, which appears when you click the ( ) sign.
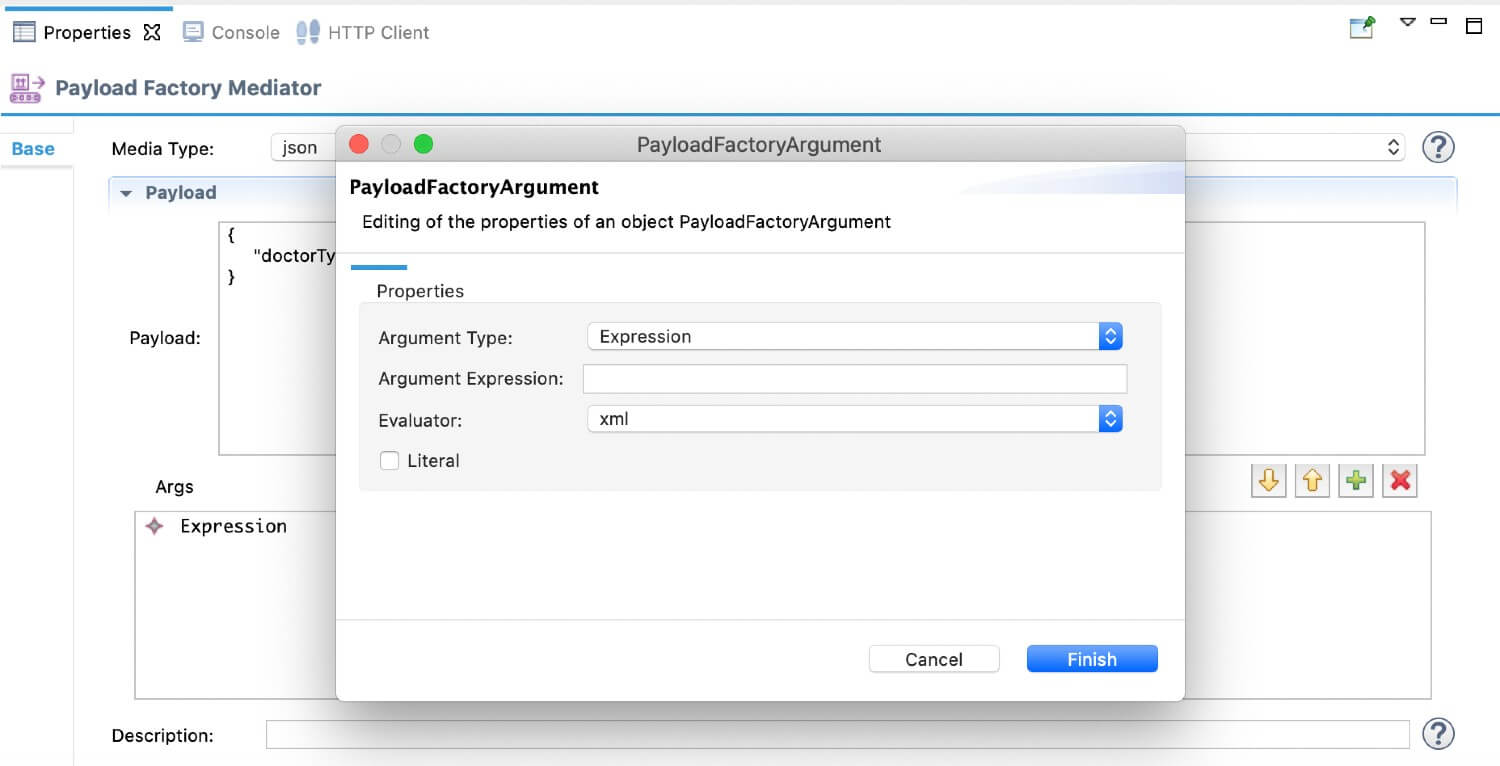
In the
PayloadFactoryArgumentdialog box, select Expression as the Argument Type, and click Argument Expression. You will then see the Expression Selector dialog box. Enter $ctx:uri.var.doctorType as the value for the expression. -
Invoke the PineValley Endpoint:
Use the Call mediator to invoke the PineVallery Endpoint. Follow the same steps you used under ‘Invoke GrandOak Endpoint’.
-
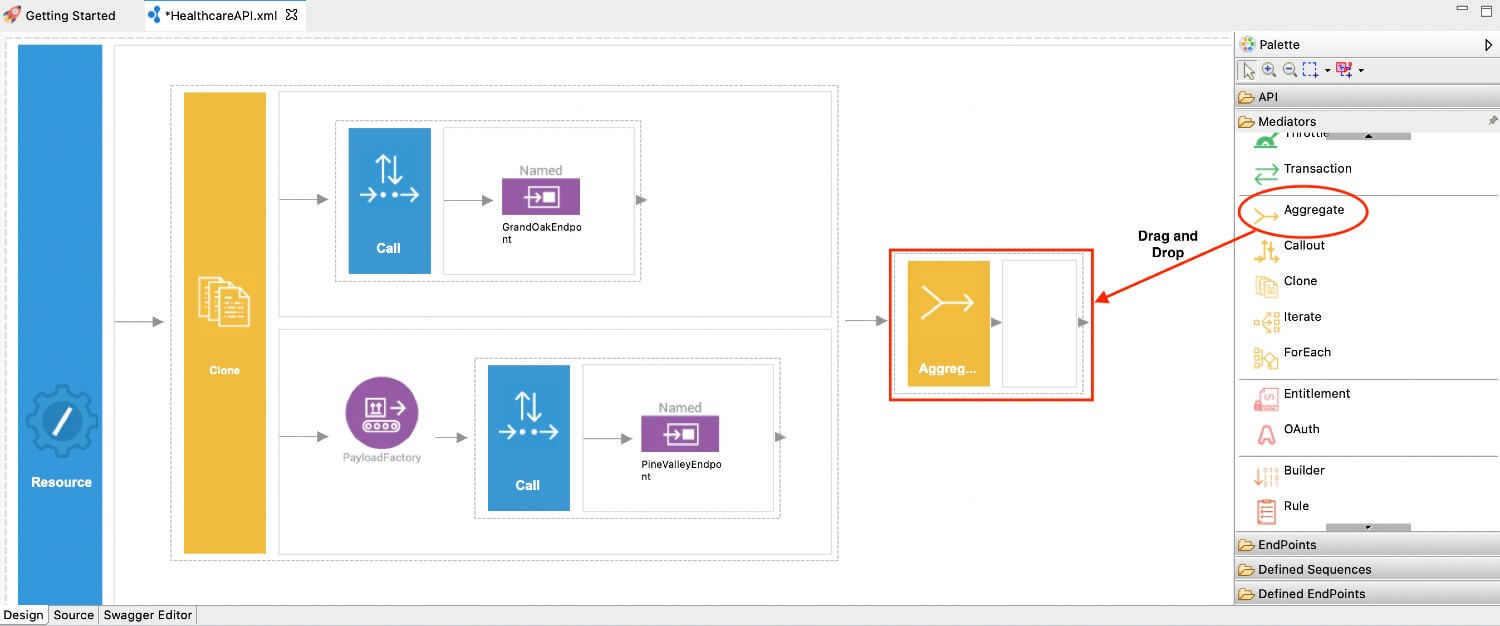
Aggregating response messages:
Since we are cloning the messages and delivering them into two different services, we will receive two responses. So we need to aggregate those two responses and construct a single response. To do that, we can use the Aggregate mediator.
Drag the Aggregate mediator and drop it next to the Clone mediator as shown below.
Specify values for the required Aggregate mediator properties.
Parameter Value Aggregation Expression json-eval($.doctors.doctor) -
Send a response back to the client :
To send the response back to the client, we can use the Respond mediator. Add the Respond mediator as shown below.
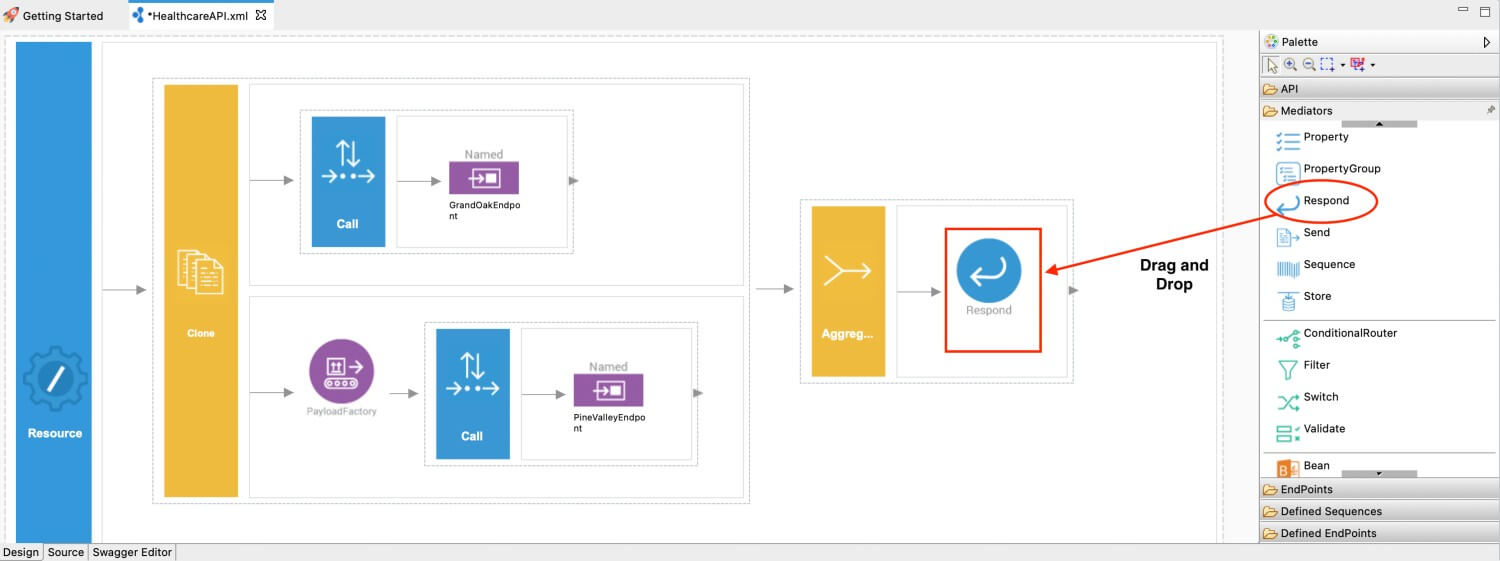
The final mediation configuration looks similar to the above diagram.
Following is what you will see in the Source View of WSO2 Integration Studio.
<?xml version="1.0" encoding="UTF-8"?>
<api context="/healthcare" name="HealthcareAPI" xmlns="http://ws.apache.org/ns/synapse">
<resource methods="GET" uri-template="/doctor/{doctorType}">
    <inSequence>
  <clone>
      <target>
    <sequence>
        <call>
      <endpoint key="GrandOakEndpoint"/>
        </call>
    </sequence>
      </target>
      <target>
    <sequence>
        <payloadFactory media-type="json">
      <format>{
            "doctorType": "$1"
               }
      </format>
      <args>
          <arg evaluator="xml" expression="$ctx:uri.var.doctorType"/>
      </args>
        </payloadFactory>
        <call>
      <endpoint key="PineValleyEndpoint"/>
        </call>
    </sequence>
      </target>
  </clone>
  <aggregate>
      <completeCondition>
    <messageCount max="-1" min="-1"/>
      </completeCondition>
      <onComplete expression="json-eval($.doctors.doctor)">
    <respond/>
      </onComplete>
  </aggregate>
    </inSequence>
    <outSequence/>
    <faultSequence/>
</resource>
</api>
Step 3 - Build and run the artifacts
There are several ways to deploy and run the integration scenario.
Option 1: Using WSO2 Integration Studio
-
Right-click
HealthcareCompositeExporterand click Export Project Artifacts and Run.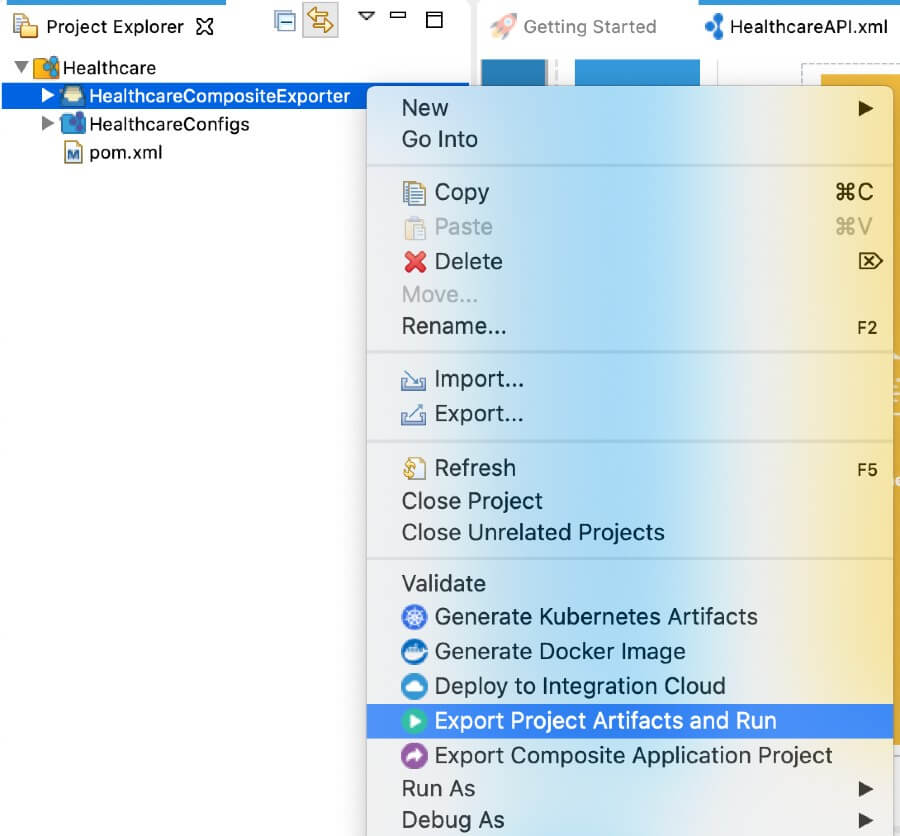
-
You will see the following dialog box. Select the
HealthcareConfigsfolder in the artifact list and click Finish.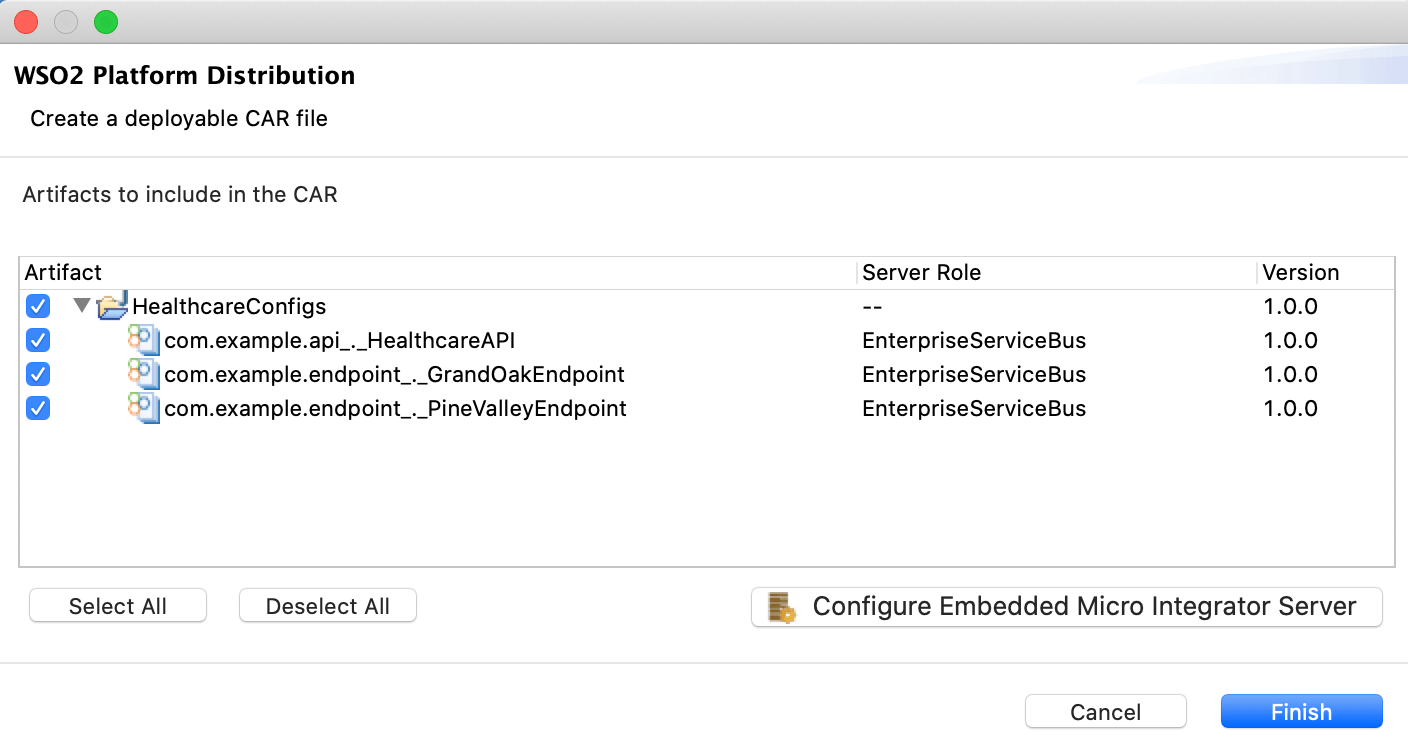
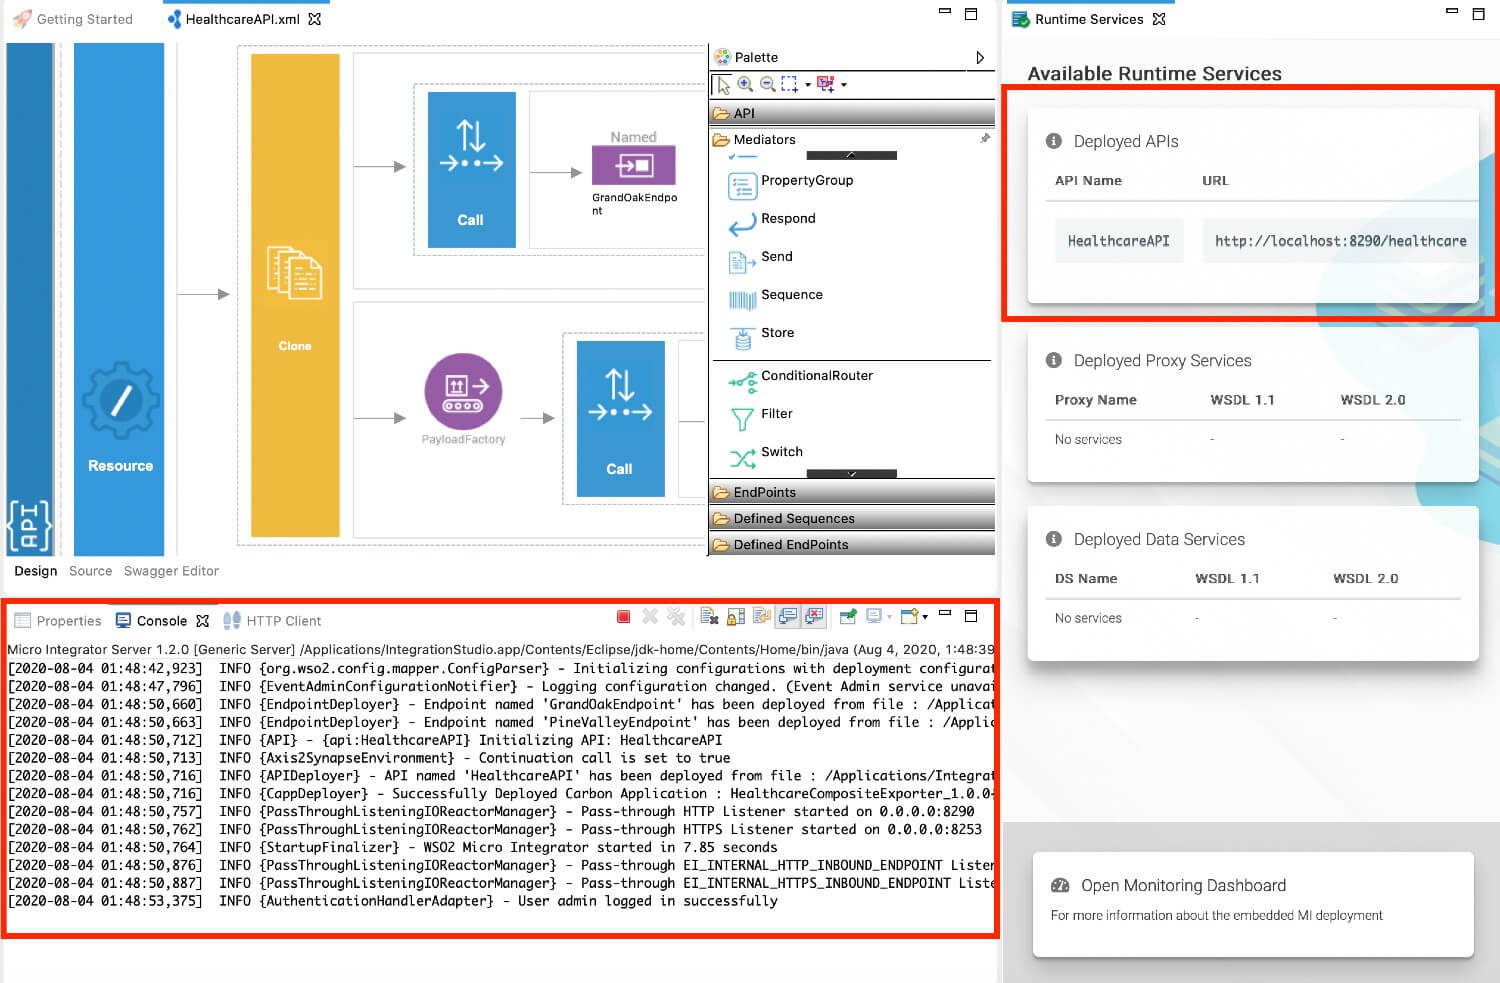
The embedded Micro Integrator starts with the deployed artifacts. You will see the server startup log in the Console tab, and the endpoints of the deployed services in the Runtime Services tab as shown below.
Option 2: Using a local Micro Integrator instance
Before you begin, be sure to install the Micro Integrator on your machine:
- Go to the WSO2 Micro Integrator web page, click Download, and then click Zip Archive to download the Micro Integrator distribution as a ZIP file.
- Extract the ZIP file. This will be the
<MI_HOME>folder.
Once you have downloaded and set up the Micro Integrator locally, follow the steps given below.
-
Export the artifacts as a deployable CAR file: Right-click
HealthcareCompositeExporterin WSO2 Integration Studio and select Export Composite Application Project. -
Deploy the Healthcare service: Copy the exported CAR file of the Healthcare service to the
MI_HOME/repository/deployment/server/carbonappsdirectory. -
Start the Micro Integrator:
- Open a terminal and navigate to the
<MI_HOME>/binfolder. -
Execute one of the commands given below.
./micro-integrator.shmicro-integrator.bat
- Open a terminal and navigate to the
Step 4 - Observe deployed artifacts
Once you have deployed the artifacts and started the Micro Integrator server, you can install and start the Dashboard to observe details of the deployed artifacts.
If you are running the embedded Micro Integrator, click Open Monitoring Dashboard in the Runtime Services tab as shown below.

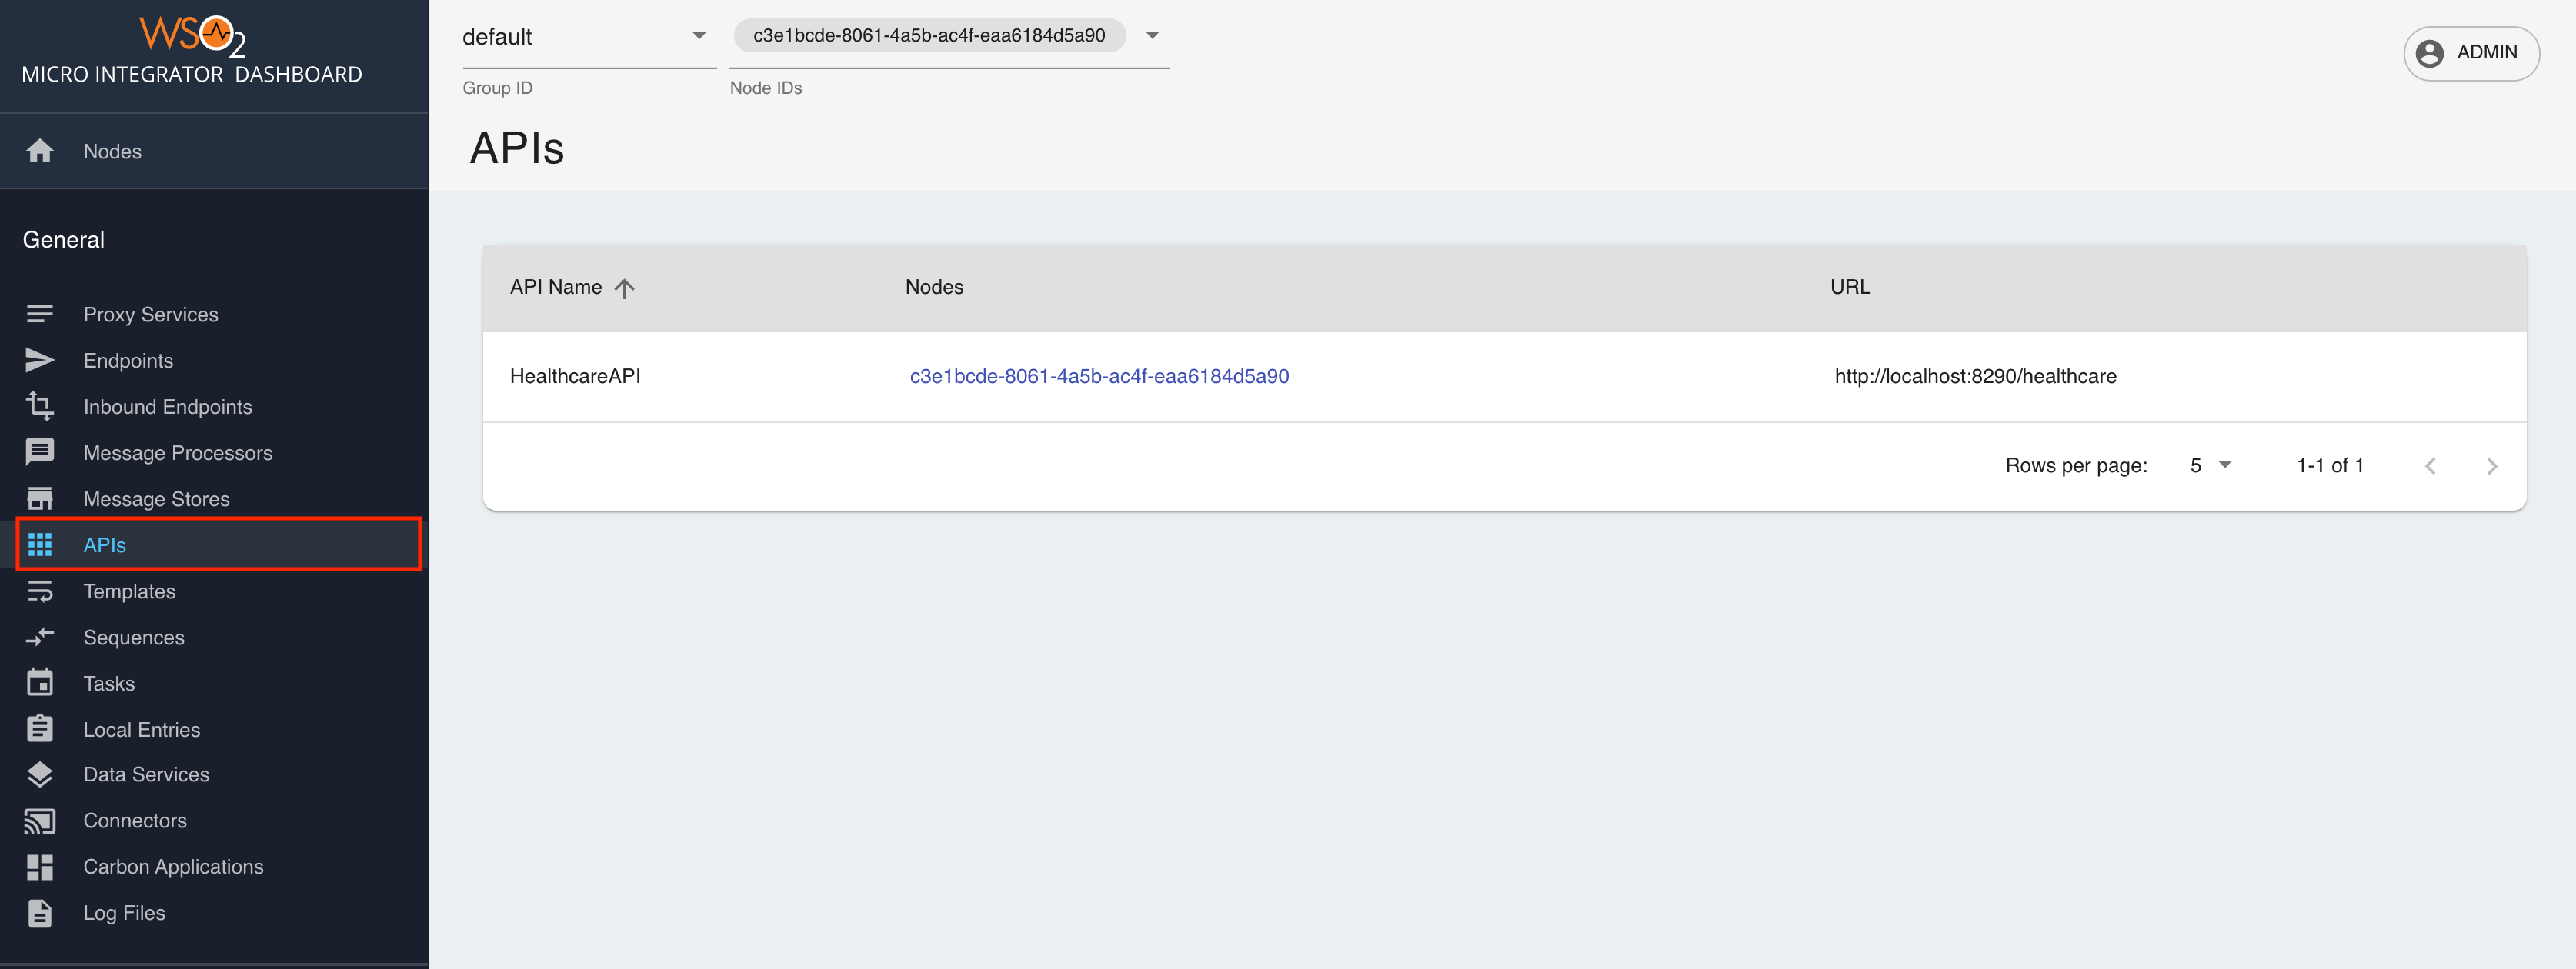
You will be directed to the sign-in screen of the Dashboard from your default browser as shown below. Sign in using admin as the user name and password.

Once you sign in, click the required artifact type to view details.
Step 5 - Test the use case
Now, let's test the integration service.
Start back-end services
Let's start the mock back-end services for this use case:
- Download the
DoctorInfo-JDK11.jarfile. This contains two healthcare services. -
Open a terminal, navigate to the location of the downloaded
DoctorInfo-JDK11.jarfile, and execute the following command to start the services:java -jar DoctorInfo-JDK11.jar
Invoke the Healthcare service
There are two ways to invoke the service:
-
Option 1: Using Postman
Let's invoke the API from Postman as follows:
- Open the Postman application. If you do not have the application, download it from here : Postman
- Create a collection with appropriate name. Ex : 'IntegrationStudio collection'.
- Add a new request to this collection and name it appropriately. Ex: 'Healthcare request'.
- In the 'Enter request URL' section paste our endpoint URL :
http://localhost:8290/healthcare/doctor/Ophthalmologist - Select 'GET' as http method and click 'Send' button.
-
Option 2: Using your terminal
If you want to send the client request from your terminal:
- Install and set up cURL as your REST client.
-
Open a terminal and execute the following curl command to invoke the service:
curl -v http://localhost:8290/healthcare/doctor/Ophthalmologist
You will receive the following response:
[
    [
        {
            "name": "John Mathew",
            "time": "03:30 PM",
            "hospital": "Grand Oak"
        },
        {
            "name": "Allan Silvester",
            "time": "04:30 PM",
            "hospital": "Grand Oak"
        }
    ],
    [
        {
            "name": "John Mathew",
            "time": "07:30 AM",
            "hospital": "pineValley"
        },
        {
            "name": "Roma Katherine",
            "time": "04:30 PM",
            "hospital": "pineValley"
        }
    ]
]