Configuring a Single Node
This page walks you through how to manually configure and deploy WSO2 API Manager in a single standalone instance, without using a distributed or HA deployment patterns.
Follow the instructions below to configure and deploy API-M using a single node:
Step 1 - Create a SSL Certificate
Info
All WSO2 products are by default shipped with a keystore file and truststore file stored in the
<PRODUCT_HOME>/repository/resources/security/ directory. The default keystore that is shipped with a WSO2 product,
wso2carbon.jks is configured with private key and self signed public key pair for all purposes, such as encrypting
sensitive information, communicating over SSL etc.
In a production setup, it is advised to set up several different keystores with separate trust chains for different use cases. For more information, see Recommendations for setting up keystores in WSO2 products.
To create an all purpose keystore or multiple keystores for authentication and protection of data, follow the steps in Creating New Keystores.
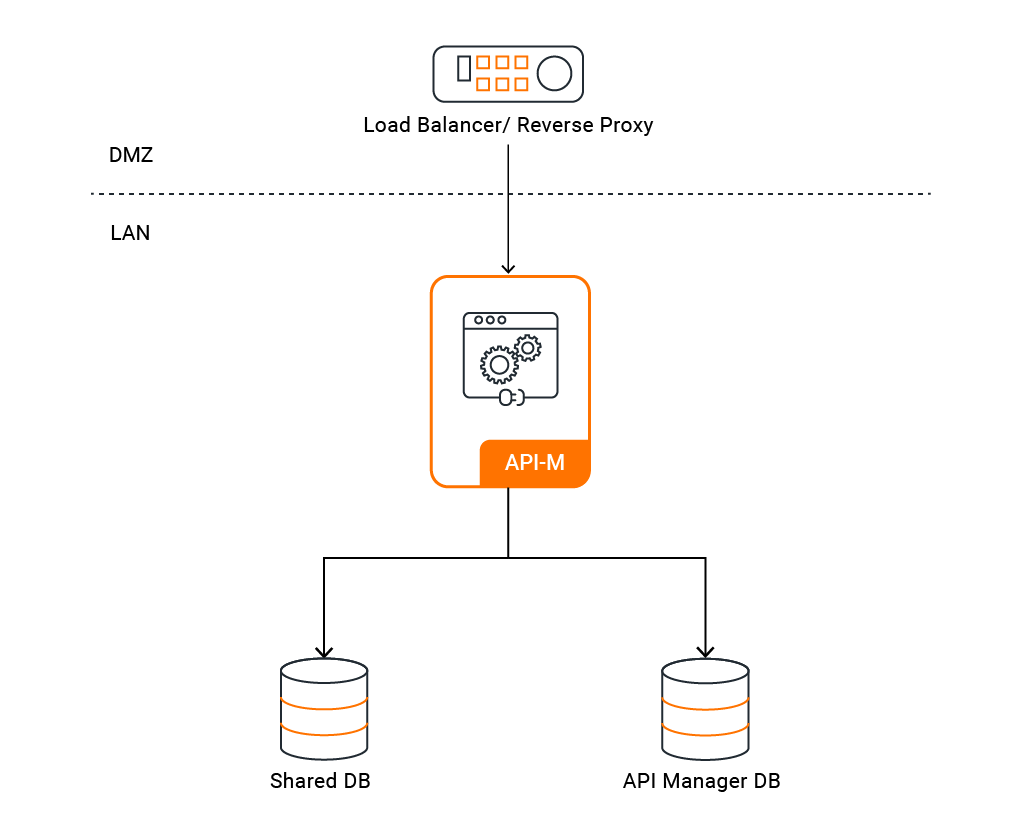
Step 2 - Configure the Load Balancer
In order to access the WSO2 API-M Portals and Gateway in both WSO2 API-M instances, you need to front the system with a load balancer. You can use any load balancer that is available to your system.
Follow the steps in Configuring the Proxy Server and the Load Balancer to configure the load balancer/reverse proxy which is fronting the API-M instance in the demiliterized zone (DMZ).
Tip
For example, if you are using the hostname api.am.wso2.com is used to access all portals (publisher, store, admin, and carbon) and gw.am.wso2.com is used to invoke APIs, the deployment.toml in <API-M_HOME>/repository/conf directory, should have the following reverse proxy configurations.
NOTE : Following is a sample configuration. Therefore parameter values might be different.
[server]
hostname = "api.am.wso2.com"
[transport.https.properties]
proxyPort = 443
Step 3 - Configure the Databases
WSO2 API-M is shipped with H2 databases by default. However, in a production setup, it is recommended to use an industry-standard RDBMS databases for WSO2AM_DB and WSO2SHARED_DB. For more information on default databases and changing them into RDBMS databases, see Working with Databases.
Tip
If you have configured the apim and shared databases correctly, the deployment.toml in <API-M_HOME>/repository/conf
directory, should have the following configurations.
NOTE : Following is a sample configuration for MySQL 8.0. Therefore parameter values might be different.
[database.apim_db]
type = "mysql"
url = "jdbc:mysql://mysql.wso2.com:3306/WSO2AM_DB?useSSL=false"
username = "wso2carbon"
password = "wso2carbon"
driver="com.mysql.cj.jdbc.Driver"

[database.shared_db]
type = "mysql"
url = "jdbc:mysql://mysql.wso2.com:3306/WSO2SHARED_DB?useSSL=false"
username = "wso2carbon"
password = "wso2carbon"
driver="com.mysql.cj.jdbc.Driver"
Step 4 - Configure Gateway URLs to Expose APIs
You need to configure the environment URLs which are used to expose the deployed APIs in the Gateway. Add the Gateway
hostname when you configure environments in the <API-M_HOME>/repository/conf/deployment.toml file.
Update the endpoints with your chosen hostname for Gateway as shown below.
In this case, let's use gw.am.wso2.com as the hostname.
[[apim.gateway.environment]]
name = "Default"
type = "hybrid"
display_in_api_console = true
description = "This is a hybrid gateway that handles both production and sandbox token traffic."
show_as_token_endpoint_url = true
service_url = "https://localhost:${mgt.transport.https.port}/services/"
username= "${admin.username}"
password= "${admin.password}"
ws_endpoint = "ws://gw.am.wso2.com:9099"
wss_endpoint = "wss://gw.am.wso2.com:8099"
http_endpoint = "http://gw.am.wso2.com:${http.nio.port}"
https_endpoint = "https://gw.am.wso2.com:${https.nio.port}"
Step 5 - Configure Dev Portal URL in Publisher
Update the DevPortal URL with your chosen hostname to expose the portals. This is for the redirection of
View in Dev Portal link in Publisher portal.
In this case, let's use api.am.wso2.com as the hostname:
[apim.devportal]
url = "https://api.am.wso2.com/devportal"
Step 6 - Configure API-M Analytics
API Manager Analytics is delivered via the API Manager Analytics cloud solution. You need to configure the API Manager Gateway to publish analytics data into the cloud.
See the instructions on configuring the API Gateway with the cloud-based analytics solution.
Step 7 - Configure Production Hardening
In a production setup, ensure that you have taken into account the respective security hardening factors (e.g., changing and encrypting the default passwords, configuring JVM security etc.) and other production deployment guidelines (e.g., tuning parameters, backup and recovery recommendations etc.) before deploying WSO2 API-M node.
For more information on security hardening guidelines, see Security Guidelines for Production Deployment.
For more information on other production deployment guidelines, see Production Deployment Guidelines.
Step 8 - Start the WSO2 API-M server
If you want to deploy WSO2 API-M using a hybrid single node deployment, where WSO2 Identity Server is used as the Key Manager while the rest of the WSO2 API-M components are all in one node, configure and start the Key Manager (e.g., configure and start WSO2 Identity Server as the Key Manager) before starting the WSO2 API-M server.
Start the WSO2 API-M servers using the standard start-up script. For more information, see Starting the server.
cd <API-M_HOME>/bin/
sh api-manager.shcd <API-M_HOME>\bin\
api-manager.bat --run