Configuring Workflows for Tenants
Using the API Manager, you can configure custom workflows that get invoked at user signup, application creation, registration, subscription etc. You do these configurations in the workflow-extensions.xml as described in the previous sections.
However, in a multi-tenant API Manager setup, not all tenants have access to the file system and not all tenants want to use the same workflow that the super admin has configured in the api-manager.xml file. For example, different departments in an enterprise can act as different tenants using the same API Manager instance and they can have different workflows. In addition, an enterprise can combine WSO2 API Manager and WSO2 EI (Enterprise Integrator) to provide API Management As a Service to the clients. In this case, each client is a separate enterprise represented by a separate tenant. In both cases, the authority to approve business operations (workflows) resides within a tenant's space.
To allow different tenants to define their own custom workflows without editing configuration files, the API Manager provides configurations in tenant-specific locations in the registry, which you can access through the UI.
The topics below explain how to deploy a BPEL/HumanTask using WSO2 EI and how to point them to services deployed in the tenant spaces in the API Manager.
Deploying a BPEL and a HumanTask for a tenant
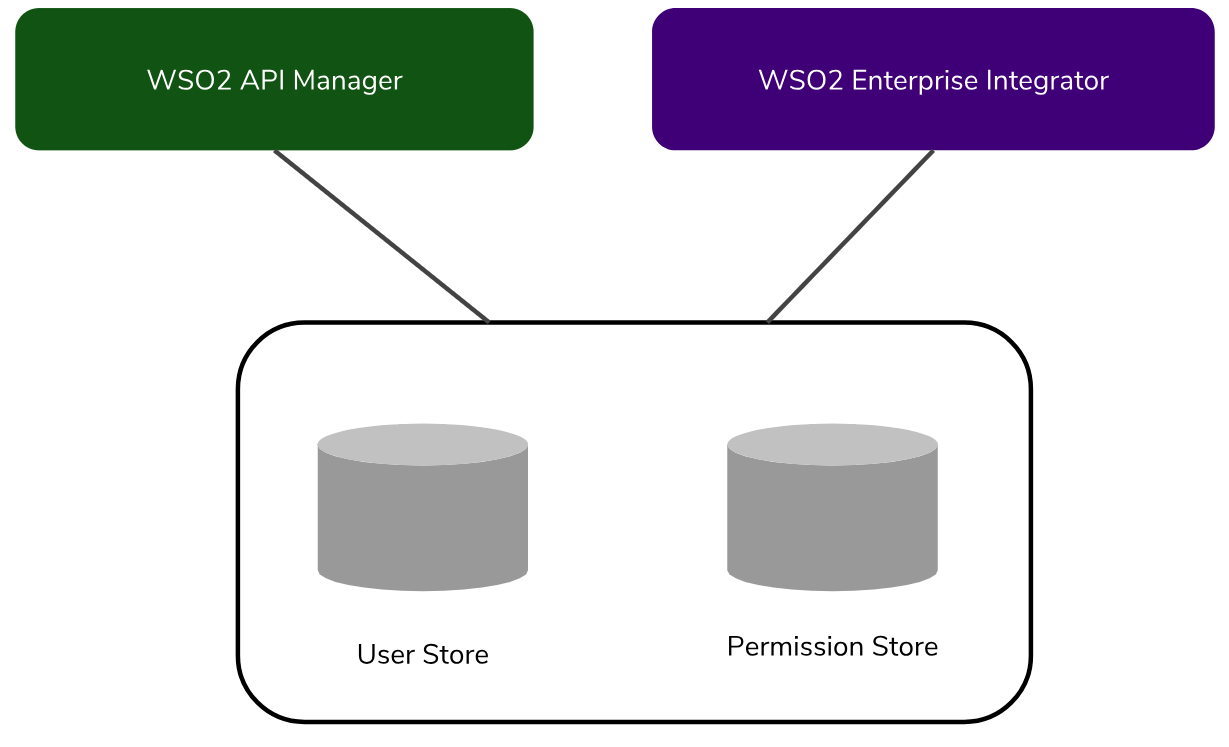
In this guide, the API Manager and EI use the same user store by sharing the same user and permission store, and all the users present are visible to both EI and API Manager. This is depicted by the diagram below.
Warning
If you are using WSO2 BPS3.2.0, please copy the <APIM_HOME>/repository/components/patches/patch0009 folder to the <BPS_HOME>/repository/components/patches folder and restart the BPS server for the patch to be applied. This patch has a fix for a bug that causes the workflow configurations to fail in multi-tenant environments.
This patch is built into the BPS version 3.5.0 onwards.
Follow the steps below to deploy a BPEL and a HumanTask for a tenant in the API Manager:
- Step 1 - Share the user/permission stores with the EI and API Manager
- Step 2 - Share the data in the registry with the EI and API Manager
- Step 3 - Create a BPEL
- Step 4 - Create a tenant for authentication
- Step 5 - Create a HumanTask
- Step 6 - Test the workflow
Step 1 - Share the user/permission stores with the EI and API Manager
-
Identify the permission store used by API Manager by referring to the
<Configuration>tag in the<APIM_HOME>/repository/conf/user-mgt.xmlfile.The following is an example of this configuration.
<Configuration>
   <AddAdmin>true</AddAdmin>
   <AdminRole>admin</AdminRole>
       <AdminUser>
           <UserName>admin</UserName>
           <Password>admin</Password>
       </AdminUser>
   <EveryOneRoleName>everyone</EveryOneRoleName> <!-- By default users in this role sees the registry root -->
   <Property name="dataSource">jdbc/SHARED_DB</Property>
</Configuration>
Do the same configuration in the
<EI_HOME>/wso2/business-process/conf/user-mgt.xmlfile file so that both API Manager and EI are pointing to the same datasource. -
Identify the user store used by API Manager by referring to the
<UserStoreManager>tag in the<APIM_HOME>/repository/conf/user-mgt.xmlfile.By default both API Manager and EI use a JDBC based Userstore manager, so no changes are required. But if API Manager uses a different user store such as LDAP or Active Directory, the same
<UserStoreManager>configuration needs to be done in the<EI_HOME>/wso2/business-process/conf/user-mgt.xmlfile. -
Do the same permission store JDBC configuration (mentioned in step 1) found in the
<APIM_HOME>/repository/conf/datasources/master-datasources.xmlfile, in the<EI_HOME>/wso2/business-process/conf/datasources/master-datasources.xmlfile.The following is an example of this configuration.
<datasource>
    <name>WSO2_SHARED_DB</name>
    <description>Shared Database for user and registry data</description>
    <jndiConfig>
        <name>jdbc/SHARED_DB</name>
    </jndiConfig>
    <definition type="RDBMS">
        <configuration>
            <url>jdbc:mysql://localhost:3306/WSO2SHARED_DB</url>
            <username>root</username>
            <password>root</password>
            <driverClassName>com.mysql.jdbc.Driver</driverClassName>
            <validationQuery>SELECT 1</validationQuery>
            <testOnBorrow>true</testOnBorrow>
            <maxWait>60000</maxWait>
            <defaultAutoCommit>true</defaultAutoCommit>
            <validationInterval>30000</validationInterval>
            <maxActive>50</maxActive>
        </configuration>
    </definition>
</datasource>
Tip
Make sure you copy the database driver (in this case, MySQL driver) to the
/repository/components/libfolder in<APIM_HOME>and<EI_HOME>before starting each server.Info
In the case the default JDBC Userstore is being used, the above-mentioned datasource will act as both the permission and user store.
Step 2 - Share the data in the registry with the EI and API Manager
To deploy BPELs in an API Manager tenant space, the tenant space should be accessible by both the EI and API Manager, and certain tenant-specific data such as key stores need to be shared with both products.
The registry data of API Manager is stored in the above-mentioned jdbc/SHARED_DB which has already been added to the EI master-datasources.xml file in the previous steps.
-
Add the following entries to the
<EI_HOME>/wso2/business-process/conf/registry.xmlfile to share the same registry with EI in order to create a registry mount to share the data stored in the registry.<dbConfig name="sharedregistry"> <dataSource>jdbc/SHARED_DB</dataSource> </dbConfig> <remoteInstance url="https://localhost:9443/registry"> <id>mount</id> <dbConfig>sharedregistry</dbConfig> <readOnly>false</readOnly> <enableCache>true</enableCache> <registryRoot>/</registryRoot> </remoteInstance> <!-- This defines the mount configuration to be used with the remote instance and the target path for the mount --> <mount path="/_system/config" overwrite="true"> <instanceId>mount</instanceId> <targetPath>/_system/nodes</targetPath> </mount> <mount path="/_system/governance" overwrite="true"> <instanceId>mount</instanceId> <targetPath>/_system/governance</targetPath> </mount>
Step 3 - Create a BPEL
In this section, you create a BPEL that has service endpoints pointing to services hosted in the tenant's space. This example uses the Application Creation workflow.
-
Sign in to the API Manager's management console (
https://localhost:9443/carbon) and create a tenant using the Configure -> Multitenancy menu.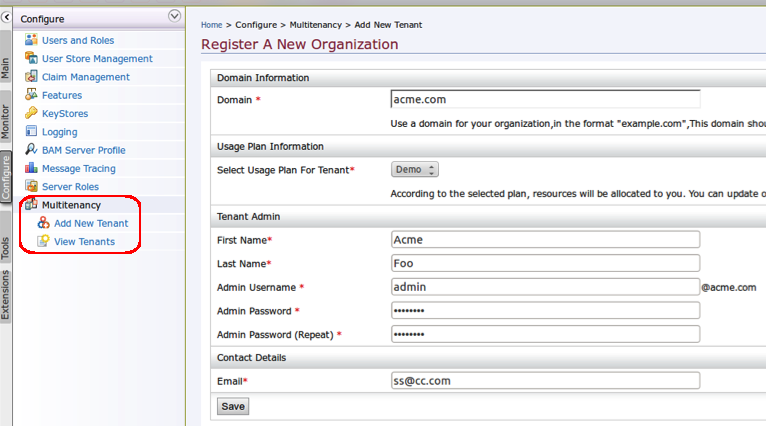
-
Create a copy of the BPEL located in the
<APIM_HOME>/business-processes/application-creation/BPELdirectory. -
Extract the contents of the new BPEL archive.
-
Copy
ApplicationService.eprandApplicationCallbackService.eprfrom the<APIM_HOME>/business-processes/eprfolder to the folder extracted before. Then, rename the two files asApplicationService-Tenant.eprandApplicationCallbackService-Tenant.eprrespectively. -
Open
ApplicationService-Tenant.eprin a text editor and change thewsa:Addresstohttp://localhost:9765/services/t/<domain>/ApplicationServiceand add the tenant admin credentials.Info
In a distributed setup -
- The ApplicationService-Tenant.epr's wsa:Address should point to the proxy/load balancer of Enterprise Integrator(EI cluster)
(http:///services/t/<domain>/ApplicationService). - The ApplicationCallbackService-Tenant.epr's wsa:Address should point to APIM cluster's Workflow Callback service endpoint. This is normally deployed at the gateway nodes.
- The wsa:Address should point to the gateway nodes. (https:///services/WorkflowCallbackService) and the user credentials which grant access to that service should be used.
- The ApplicationService-Tenant.epr's wsa:Address should point to the proxy/load balancer of Enterprise Integrator(EI cluster)
-
Open
ApplicationCallbackService-Tenant.eprin a text editor and add the tenant admin credentials. -
Point the
deploy.xmlfile of the extracted folder to the new.epr files provided in the BPEL archive.Example:
<invoke partnerLink="AAPL"> <service name="applications:ApplicationService" port="ApplicationPort"> <endpoint xmlns="http://wso2.org/bps/bpel/endpoint/config" endpointReference="ApplicationService-Tenant.epr"></endpoint> </service> </invoke> <invoke partnerLink="CBPL"> <service name="callback.workflow.apimgt.carbon.wso2.org:WorkflowCallbackService" port="WorkflowCallbackServiceHttpsSoap11Endpoint"> <endpoint xmlns="http://wso2.org/bps/bpel/endpoint/config" endpointReference="ApplicationCallbackService-Tenant.epr"></endpoint> </service> </invoke> -
Zip the content and create a BPEL archive in the following format.
ApplicationApprovalWorkFlowProcess_1.0.0-Tenant.zip |_ApplicationApprovalWorkFlowProcess.bpel |_ApplicationApprovalWorkFlowProcessArtifacts.wsdl |_ApplicationCallbackService-Tenant.epr |_ApplicationService-Tenant.epr |_ApplicationsApprovalTaskService.wsdl |_SecuredService-service.xml |_WorkflowCallbackService.wsdl |_deploy.xml -
Sign in to the EI as the tenant admin and upload the BPEL.
Warning
If you are using Mac OS with High Sierra, you may encounter the following warning when login into the Management console due to a compression issue that exists in High Sierra SDK.
WARN {org.owasp.csrfguard.log.JavaLogger} - potential cross-site request forgery (CSRF) attack thwarted (user:<anonymous>, ip:xxx.xxx.xx.xx, method:POST, uri:/carbon/admin/login_action.jsp, error:required token is missing from the request)To avoid this issue open the
<EI\_HOME>/ repository/conf/tomcat/catalina-server.xmlfile and changecompression="on"tocompression="off"in the Connector configuration and restart the EI.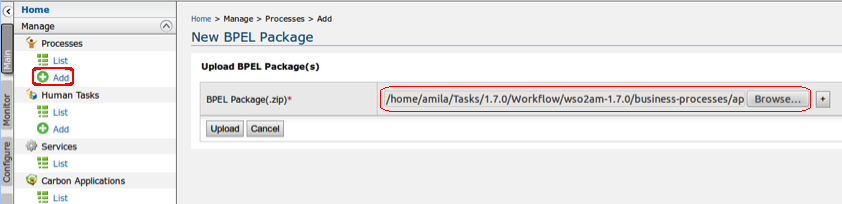
Step 4 - Create a tenant for authentication
Step 1 - Create a registry resource in the tenant's configuration registry
- Start the EI server if it is not started already.
- Navigate to Registry>Browse in the Main menu of the management console and click on
/_system/config. -
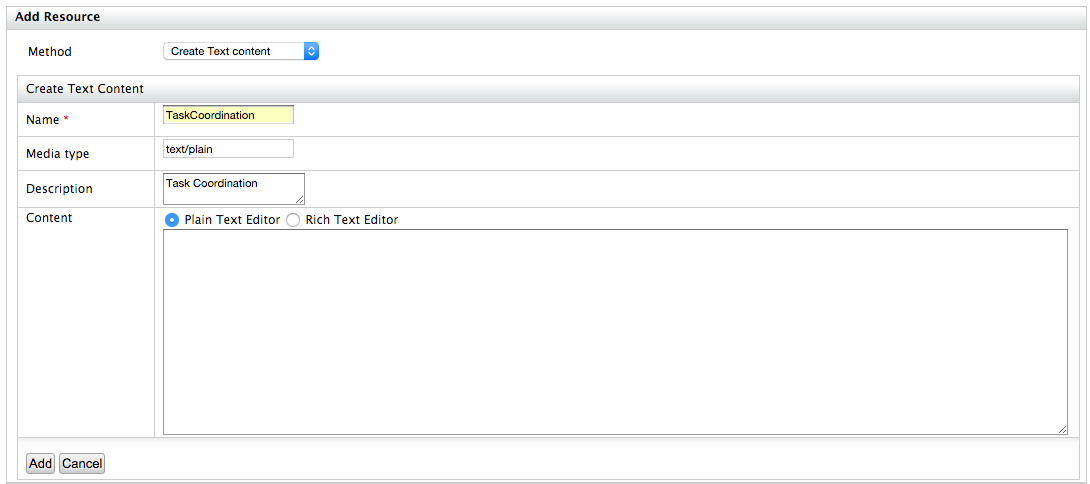
Click on Entries > Add Resource and fill the form using the values listed below for guidance.
Method Name Media Type Create Text Content TaskCoordination text/plain -
Click Add to finish adding the resource.
Step 2 - Create username and password registry properties and define credentials
-
Click on the registry resource you created (Task Coordination) found under the Entries section.
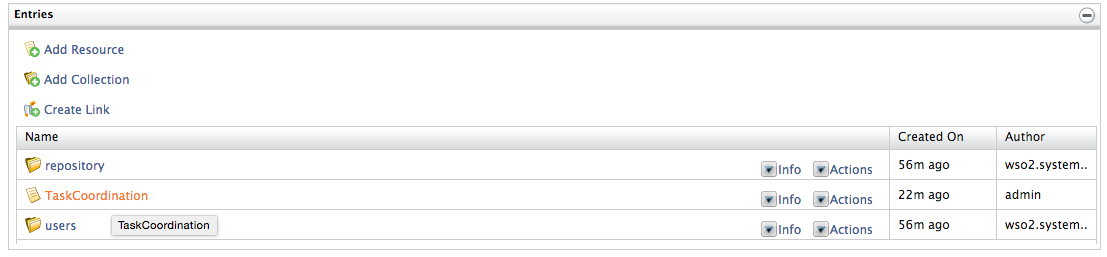
-
Add two new registry properties for the resource named "Username" and "Password", and define the tenant coordination user credentials.
To do this, click Properties > Add New Property and enter the following values.
Username Property Password Property Name: username Name: password Value: (username value) Value: (password value) 
-
Click Add to finish adding the property.

Step 5 - Create a HumanTask
Similar to creating a BPEL, create a HumanTask that has service endpoints pointing to services hosted in the tenant's space.
- Create a copy of the
HumanTaskarchive in the<APIM_HOME>/business-processes/application-creation/HumanTaskdirectory and extract its content. -
Edit the SOAP service port-bindings in the
ApplicationApprovalTaskService.wsdlfile.Example:
<wsdl:service name="ApplicationService">
        <wsdl:port name="ApplicationPort" binding="tns:ApplicationSoapBinding">
            <soap:address location="http://localhost:9765/services/t/<tenant domain>/ApplicationService" />
        </wsdl:port>
    </wsdl:service>
    <wsdl:service name="ApplicationReminderService">
        <wsdl:port name="ApplicationReminderPort" binding="tns:ApplicationSoapBindingReminder">
            <soap:address location="http://localhost:9765/services/t/<tenant domain>/ApplicationReminderService" />
        </wsdl:port>
    </wsdl:service>
    <wsdl:service name="ApplicationServiceCB">
        <wsdl:port name="ApplicationPortCB" binding="tns:ApplicationSoapBindingCB">
            <soap:address location="http://localhost:9765/services/t/<tenant domain>/ApplicationServiceCB" />
        </wsdl:port>
    </wsdl:service>
Info
In a distributed setup, the above addresses should be changed to point to the EI proxy/loadbalancer.
A sample is shown below.
<soap:address location="http:///services/t//ApplicationServiceCB"/> -
Create the
HumanTaskarchive by zipping all the extracted files.When creating the HumanTask, make sure all the files are at the top level of the zip.
-
Sign in to the EI as the tenant admin and upload the HumanTask.
-
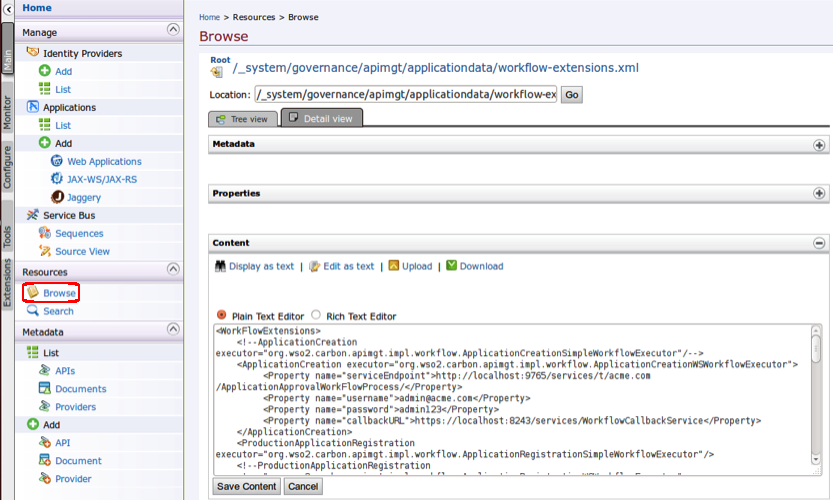
Sign in to the API Manager's management console as the tenant admin and select Resources > Browse menu.
-
Go to the
/_system/governance/apimgt/applicationdata/workflow-extensions.xmlfile in the registry and change the service endpoint as a tenant-aware service URL (e.g.,http://localhost:9765/services/t//ApplicationApprovalWorkFlowProcess).In addition, set the credentials as the tenant admin's credentials of the
ApplicationCreationWSWorkflowExecutorfile.Example:
Note
Be sure to disable the
SimpleWorkflowExecutorand enable theApplicationCreationWSWorkflowExecutor.
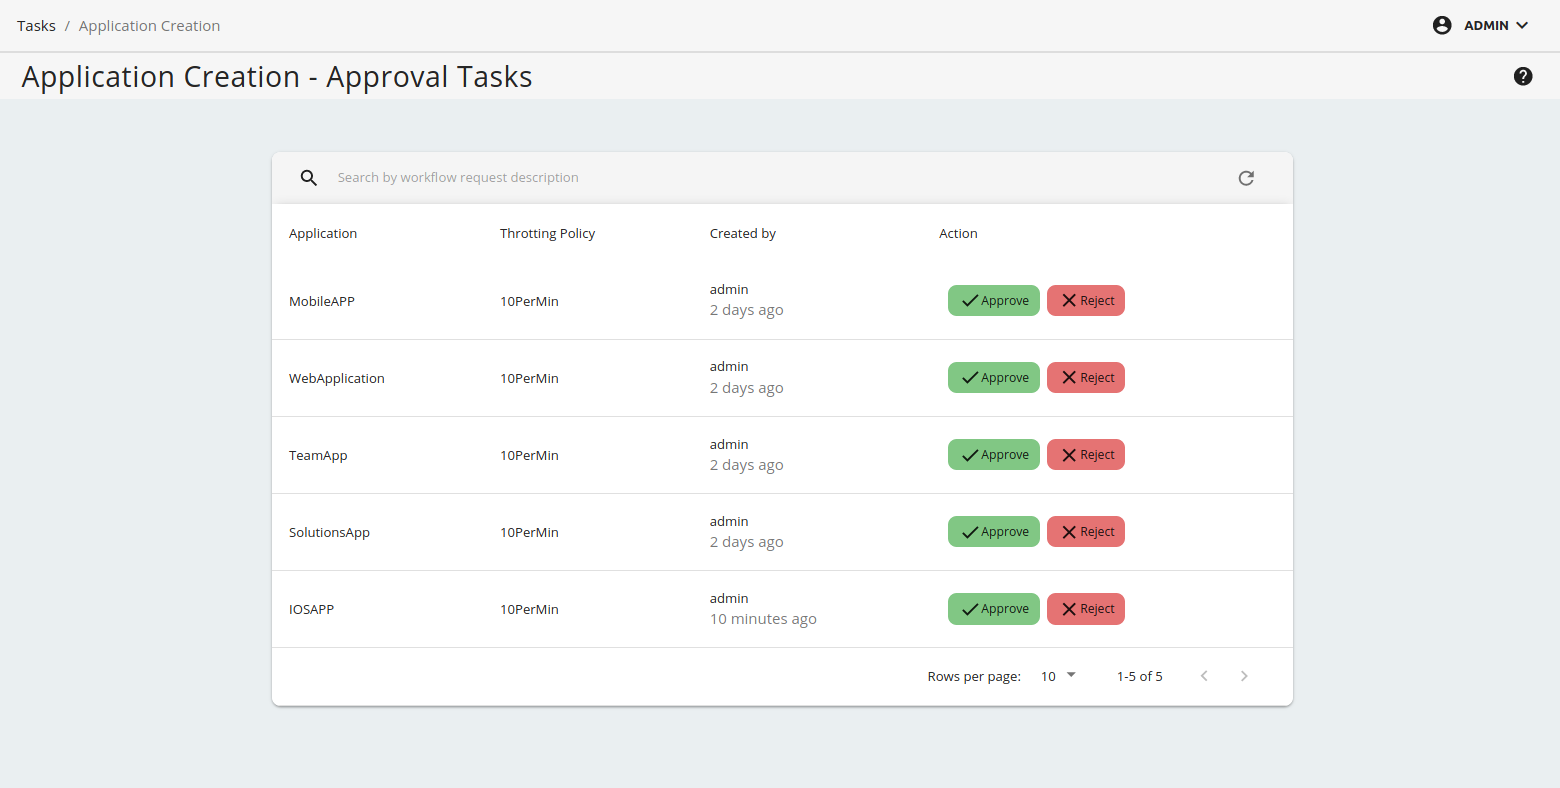
Step 6 - Test the work flow
You have now completed configuring the Application Creation workflow for a tenant. Whenever a tenant user signs in to the tenant Developer Portal and creates an application, the workflow will be invoked.
-
Sign in to the Admin Portal (
https://<hostname>:9443/admin) as the tenant admin. -
Click Application Creation.
You will see all approval tasks have been created for newly created applications.