Running the Streaming Integrator in Containerized Environments
Running the Streaming Integrator with Docker
This section shows you how to run Streaming Integrator in Docker. This involves installing Docker, running the Streaming Integrator in Docker and then deploying and running a Siddhi application in the Docker environment.
Before you begin:
- The system requirements are as follows:
- 3 GHz Dual-core Xeon/Opteron (or latest)
- 8 GB RAM
- 10 GB free disk space
- 3 GHz Dual-core Xeon/Opteron (or latest)
- Install Docker by following the instructions provided in here.
- Save the following Siddhi application as a
.siddhifile in a preferred location in your machine.
@App:name('MySimpleApp')
@App:description('Receive events via HTTP transport and view the output on the console')
@Source(type = 'http', receiver.url='http://0.0.0.0:8006/productionStream', basic.auth.enabled='false',
   @map(type='json'))
define stream SweetProductionStream (name string, amount double);
@sink(type='log')
define stream TransformedProductionStream (nameInUpperCase string, amount double);
-- Simple Siddhi query to transform the name to upper case.
from SweetProductionStream
select str:upper(name) as nameInUpperCase, amount
insert into TransformedProductionStream;
Note the following about this Siddhi application.- The Siddhi application operates in Docker. Therefore, the HTTP source configured in it uses a receiver URL where the host number is
0.0.0.0. - The
8006port of the receiver URL is the same HTTP port that you previously exposed via Docker.
- The Siddhi application operates in Docker. Therefore, the HTTP source configured in it uses a receiver URL where the host number is
Starting the Streaming Integrator in Docker
In this scenario, you are downloading and installing the Streaming Integrator via Docker.
WSO2 provides open source Docker images to run WSO2 Streaming Integrator in Docker Hub. You can view these images In Docker Hub - WSO2.
To run the Streaming Integrator in the open source image that is available for it
-
To pull the required WSO2 Streaming Integrator distribution with updates from the Docker image, issue the following command.
docker pull -it wso2/streaming-integrator:1.0.0 -
Expose the required ports via docker when running the docker container. In this scenario, you need to expose the following ports:
-
The 9443 port where the Streaming Integrator server is run.
-
The 8006 HTTP port from which Siddhi application you are deploying in this scenario receives messages.
To expose these ports, issue the following command.
docker run -p 9443:9443 -p 8006:8006 wso2/streaming-integrator/1.0.0 -v <local-absolute-siddhi-file-path>/MySimpleApp.siddhi:/apps/MySimpleApp.siddhi siddhiio/siddhi-runner-alpine -Dapps=/apps/MySimpleApp.siddhiInfo
In the above command, you are mounting the location where you have saved the
MySimpleApp.siddhifile so that the Streaming Integrator can locate it and run it when it starts in Docker. Therefore, replace<local-absolute-siddhi-file-path>with the path in which you saved the Siddhi application in your machine. -
-
If you did not mount the location to the
MySimpleApp.siddhifile when issuing the command to start the Streaming Integrator, you can deploy the Siddhi application via the Streaming Integrator tool.Click here for detailed instructions.
- Start and access the Streaming Integrator Tooling. Open a new file and copy-paste the
MySimpleApp.siddhiSiddhi application in the Source View.
Then save the Siddhi application. - To deploy the Siddhi application, click the Deploy menu option and then click Deploy to Server. The Deploy Siddhi Apps to Server dialog box opens as shown in the example below.
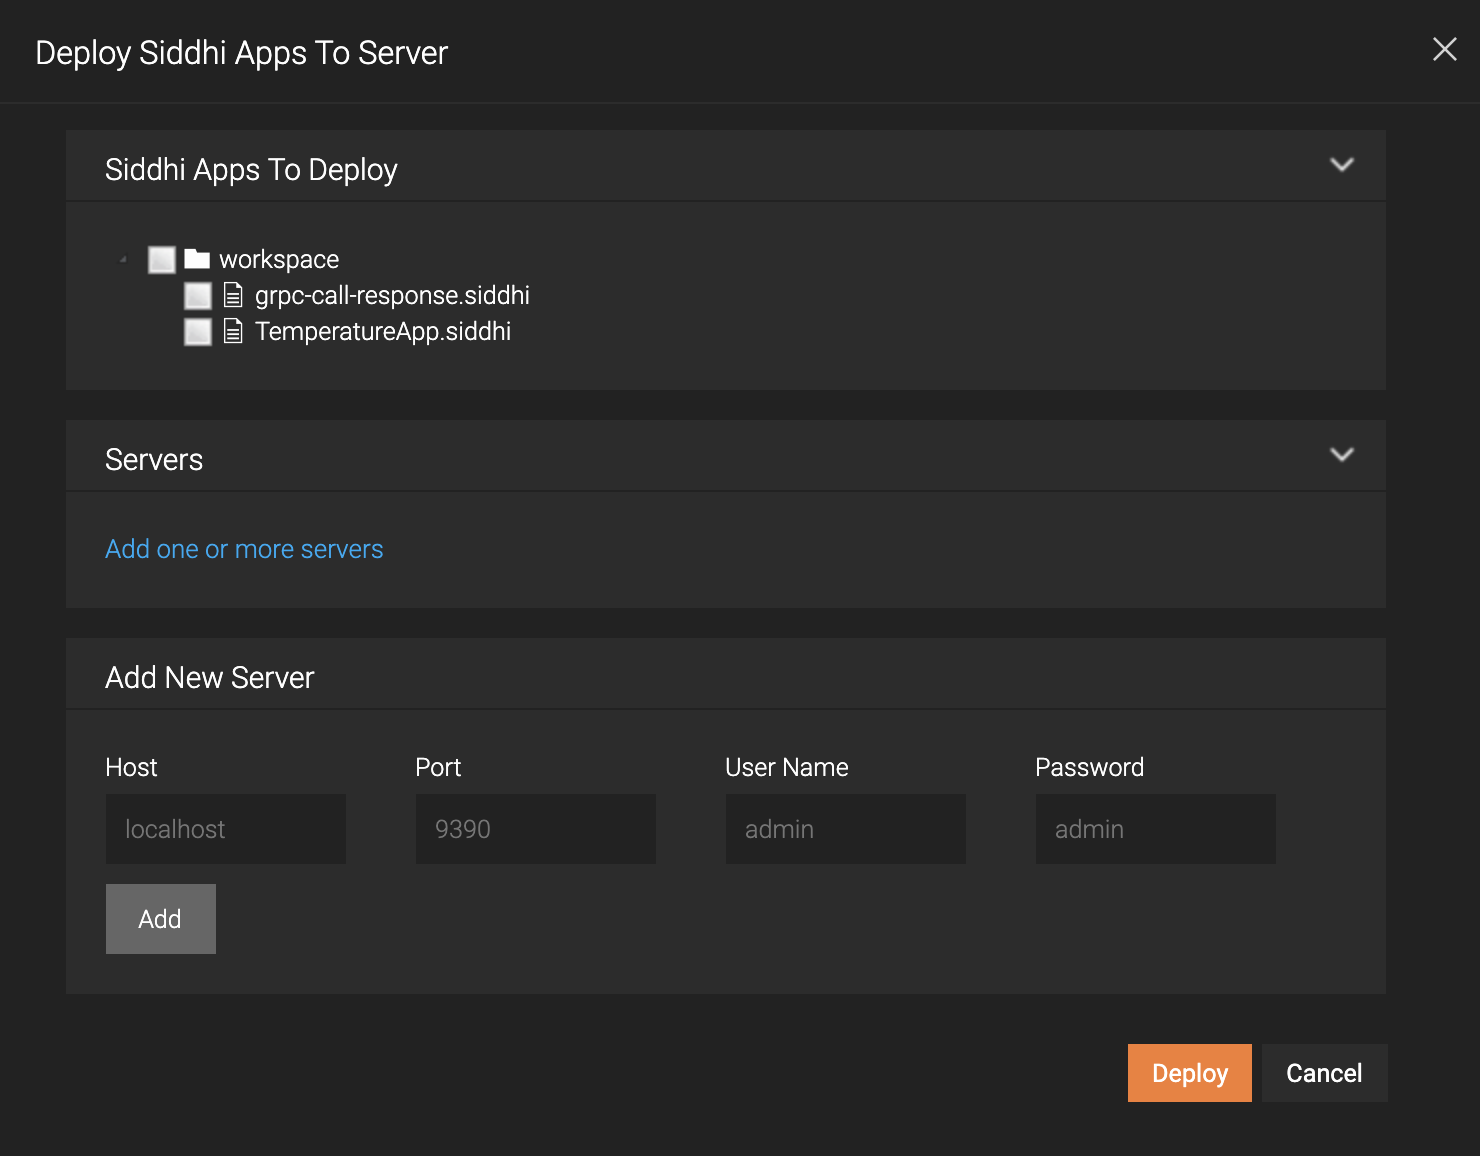
- In the Add New Server section, enter information as follows:
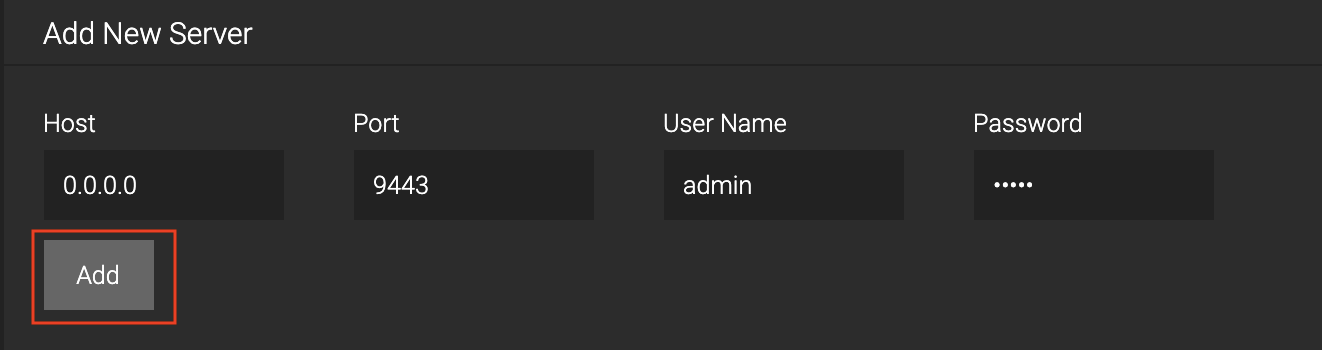
Then click Add. - Select the check boxes for the MySimpleApp Siddhi application and the server you added as shown below.
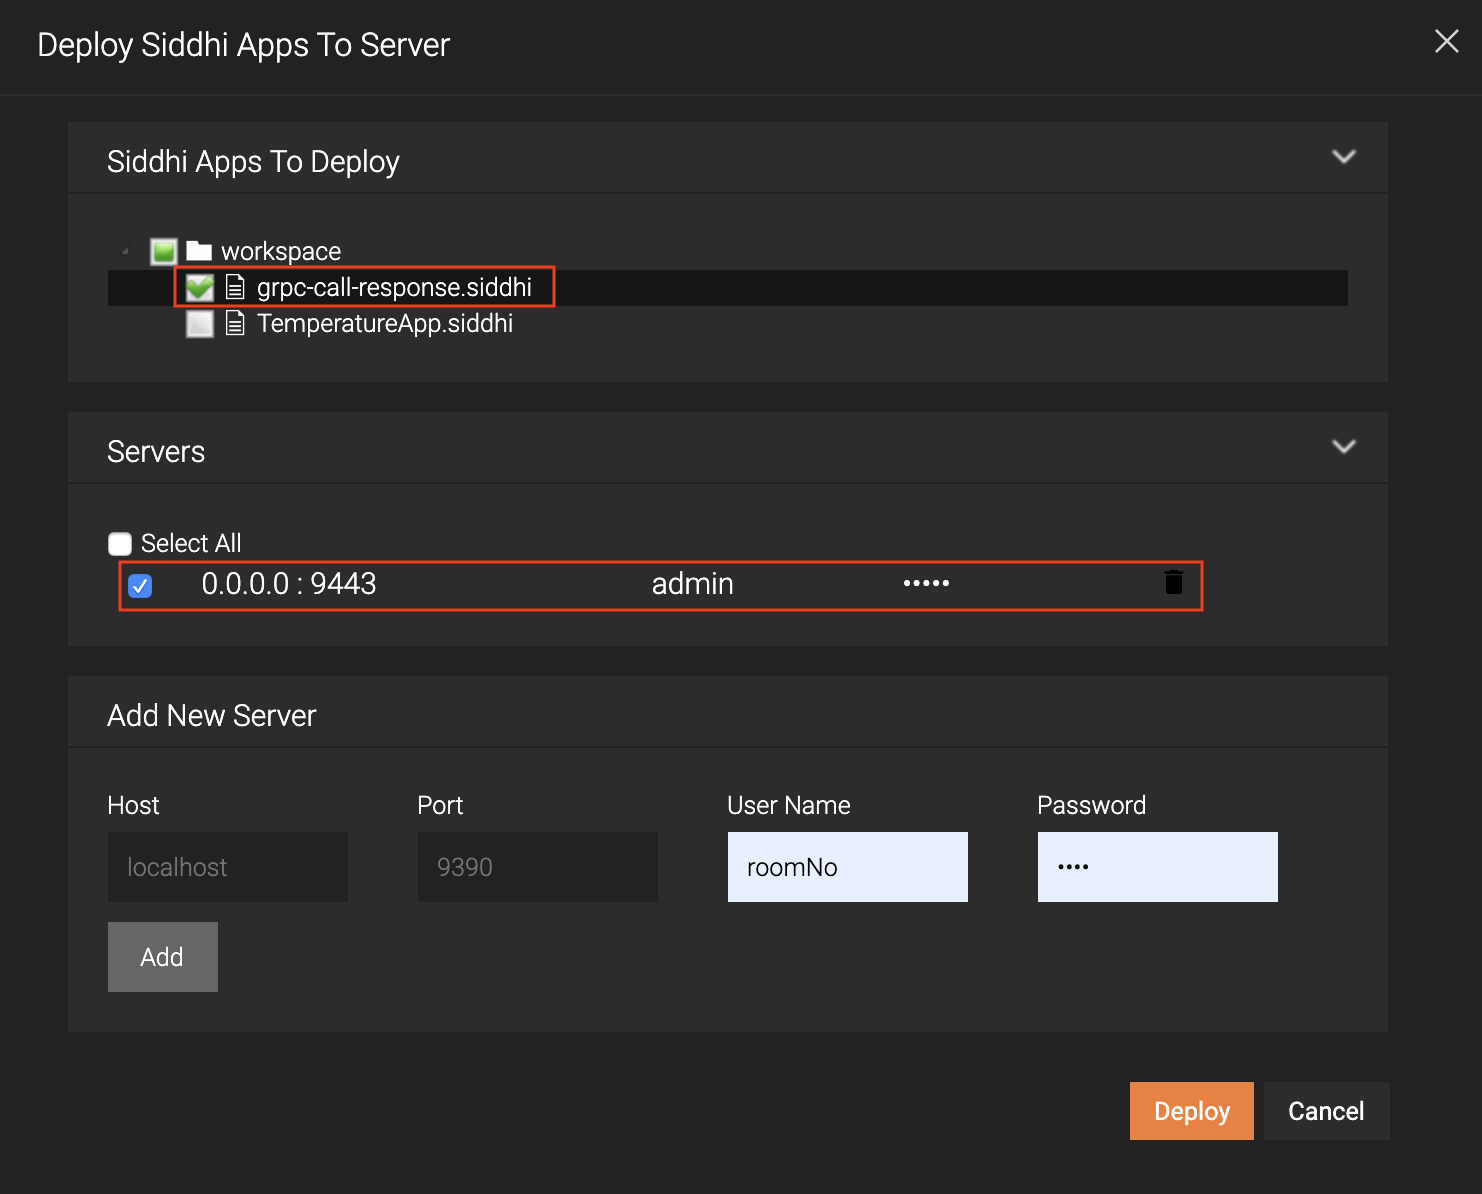
- Click Deploy.
When the Siddhi application is successfully deployed, the following message appears in the Deploy Siddhi Apps to Server dialog box.

The following is logged in the console in which you started the Streaming Integrator in Docker.

- In the Add New Server section, enter information as follows:
- Start and access the Streaming Integrator Tooling. Open a new file and copy-paste the
Now the Streaming Integrator has started in the Docker environment.
Creating and deploying the Siddhi application
Let's create a simple Siddhi application that receives an HTTP message, does a simple transformation to the message, and then logs it in the SI console.
Trying-out the Siddhi application
To try out the MySimpleApp Siddhi application you deployed in Docker, issue the following CURL command.
curl -X POST -d "{\"event\": {\"name\":\"sugar\",\"amount\": 20.5}}" http://0.0.0.0:8006/productionStream --header "Content-Type:application/json"The following output appears in the console in which you started the Streaming Integrator in Docker.

Running the Streaming Integrator with Kubernetes
In this section, you get to start and run the Streaming Integrator in a Kubernetes cluster in 5 minutes.
Before you begin:
- Create a Kubernetes cluster. In this quick start guide, you can do this via Minikube as follows.
- Install Minikube and start a cluster by following the Minikube Documentation.
- Enable ingress on Minikube by issuing the following command.
minikube addons enable ingress
- Install Minikube and start a cluster by following the Minikube Documentation.
- Make sure that you have admin privileges to install the Siddhi operator.
Installing the Siddhi Operator for the Streaming Integrator
To install the Siddhi Operator, follow the procedure below:
-
To install the Siddhi Kubernetes operator for streaming integrator issue the following commands:
kubectl apply -f https://github.com/wso2/streaming-integrator/releases/download/v1.0.0-m1/00-prereqs.yamlkubectl apply -f https://github.com/wso2/streaming-integrator/releases/download/v1.0.0-m1/01-siddhi-operator.yaml -
To verify whether the Siddhi operator is successfully installed, issue the following command.
kubectl get deploymentIf the installation is successful, the following deployments should be running in the Kubernetes cluster.

Deploying Siddhi applications in Kubernetes
You can deploy multiple Siddhi applications in one or more selected containers via Kubernetes. In this example, let's deploy just one Siddhi application in one container for the ease of understanding how to run the Streaming Integrator in a Kubernetes cluster.
-
First, let's design a simple Siddhi application that consumes events via HTTP to detect power surges. It filters events for a specific device type (i.e., dryers) and that also report a value greater than 600 for
power.@App:name("PowerSurgeDetection") @App:description("App consumes events from HTTP as a JSON message of { 'deviceType': 'dryer', 'power': 6000 } format and inserts the events into DevicePowerStream, and alerts the user if the power level is greater than or equal to 600W by printing a message in the log.") /* Input: deviceType string and powerConsuption int(Watt) Output: Alert user from printing a log, if there is a power surge in the dryer. In other words, notify when power is greater than or equal to 600W. */ @source( type='http', receiver.url='${RECEIVER_URL}', basic.auth.enabled='false', @map(type='json') ) define stream DevicePowerStream(deviceType string, power int); @sink(type='log', prefix='LOGGER') define stream PowerSurgeAlertStream(deviceType string, power int); @info(name='surge-detector') from DevicePowerStream[deviceType == 'dryer' and power >= 600] select deviceType, power insert into PowerSurgeAlertStream; -
The above Siddhi application needs to be deployed via a YAML file. Therefore, enter basic information for the YAML file and include the Siddhi application in a section named
specas shown below.apiVersion: siddhi.io/v1alpha2 kind: SiddhiProcess metadata: name: streaming-integrator spec: apps: - script: | @App:name("PowerSurgeDetection") @App:description("App consumes events from HTTP as a JSON message of { 'deviceType': 'dryer', 'power': 6000 } format and inserts the events into DevicePowerStream, and alerts the user if the power level is greater than or equal to 600W by printing a message in the log.") /* Input: deviceType string and powerConsuption int(Watt) Output: Alert user from printing a log, if there is a power surge in the dryer. In other words, notify when power is greater than or equal to 600W. */ @source( type='http', receiver.url='${RECEIVER_URL}', basic.auth.enabled='false', @map(type='json') ) define stream DevicePowerStream(deviceType string, power int); @sink(type='log', prefix='LOGGER') define stream PowerSurgeAlertStream(deviceType string, power int); @info(name='surge-detector') from DevicePowerStream[deviceType == 'dryer' and power >= 600] select deviceType, power insert into PowerSurgeAlertStream; -
Add a section named `container' and parameters with values to configure the container in which the Siddhi application is to be deployed.
container:
env:
  -
    name: RECEIVER_URL
    value: "http://0.0.0.0:8080/checkPower"
  -
    name: BASIC_AUTH_ENABLED
    value: "false"
Here, you are specifying that Siddhi applications running within the container should receive events to the
http://0.0.0.0:8080/checkPowerURL and basic authentication is not enabled for them. -
Add a
runnersection and add configurations related to authorization such as users and roles. For this example, you can configure this section as follows.runner: | auth.configs: type: 'local' # Type of the IdP client used userManager: adminRole: admin # Admin role which is granted all permissions userStore: # User store users: - user: username: root password: YWRtaW4= roles: 1 roles: - role: id: 1 displayName: root restAPIAuthConfigs: exclude: - /simulation/* - /stores/*To view the complete file, click here.
apiVersion: siddhi.io/v1alpha2 kind: SiddhiProcess metadata: name: streaming-integrator-app spec: apps: - script: | @App:name("PowerSurgeDetection") @App:description("App consumes events from HTTP as a JSON message of { 'deviceType': 'dryer', 'power': 6000 } format and inserts the events into DevicePowerStream, and alerts the user if the power level is greater than or equal to 600W by printing a message in the log.") /* Input: deviceType string and powerConsuption int(Watt) Output: Alert user from printing a log, if there is a power surge in the dryer. In other words, notify when power is greater than or equal to 600W. */ @source( type='http', receiver.url='${RECEIVER_URL}', basic.auth.enabled='false', @map(type='json') ) define stream DevicePowerStream(deviceType string, power int); @sink(type='log', prefix='LOGGER') define stream PowerSurgeAlertStream(deviceType string, power int); @info(name='surge-detector') from DevicePowerStream[deviceType == 'dryer' and power >= 600] select deviceType, power insert into PowerSurgeAlertStream; container: env: - name: RECEIVER_URL value: "http://0.0.0.0:8080/checkPower" - name: BASIC_AUTH_ENABLED value: "false" runner: | auth.configs: type: 'local' # Type of the IdP client used userManager: adminRole: admin # Admin role which is granted all permissions userStore: # User store users: - user: username: root password: YWRtaW4= roles: 1 roles: - role: id: 1 displayName: root restAPIAuthConfigs: exclude: - /simulation/* - /stores/* -
Save the file as
siddhi-process.yamlin a preferred location -
To apply the configurations in this YAML file to the Kubernetes cluster, issue the following command.
kubectl apply -f <PATH_to_siddhi-process.yaml>Info
This file overrules the configurations in the
<SI_HOME>|<SI_TOOLING_HOME>/conf/server/deployment.yamlfile.
Invoking the Siddhi application
To invoke the PowerSurgeDetection Siddhi application that you deployed in the Kubernetes cluster, follow the steps below.
-
First, get the external IP of minikube by issuing the following command.
minikube ipAdd the IP it returns to the
/etc/hostsfile in your machine. -
Issue the following CURL command to invoke the
PowerSurgeDetectionSiddhi application.curl -X POST \ http://siddhi/streaming-integrator-0/8080/checkPower \ -H 'Accept: */*' \ -H 'Content-Type: application/json' \ -H 'Host: siddhi' \ -d '{ "deviceType": "dryer", "power": 600 }' -
To monitor the associated logs for the above siddhi application, get a list of the available pods by issuing the following command.
`kubectl get pods'
This returns the list of pods as shown in the example below.
NAME READY STATUS RESTARTS AGE streaming-integrator-app-0-b4dcf85-npgj7 1/1 Running 0 165m streaming-integrator-5f9fcb7679-n4zpj 1/1 Running 0 173m -
To monitor the logs for the required pod, issue a command similar to the following. In this example, the pod to be monitored is
streaming-integrator-app-0-b4dcf85-npgj7.streaming-integrator-app-0-b4dcf85-npgj7