Git Integration for Choreo Connect
The following section provides information on how to integrate Choreo Connect with Git for version controlling of API artifacts.
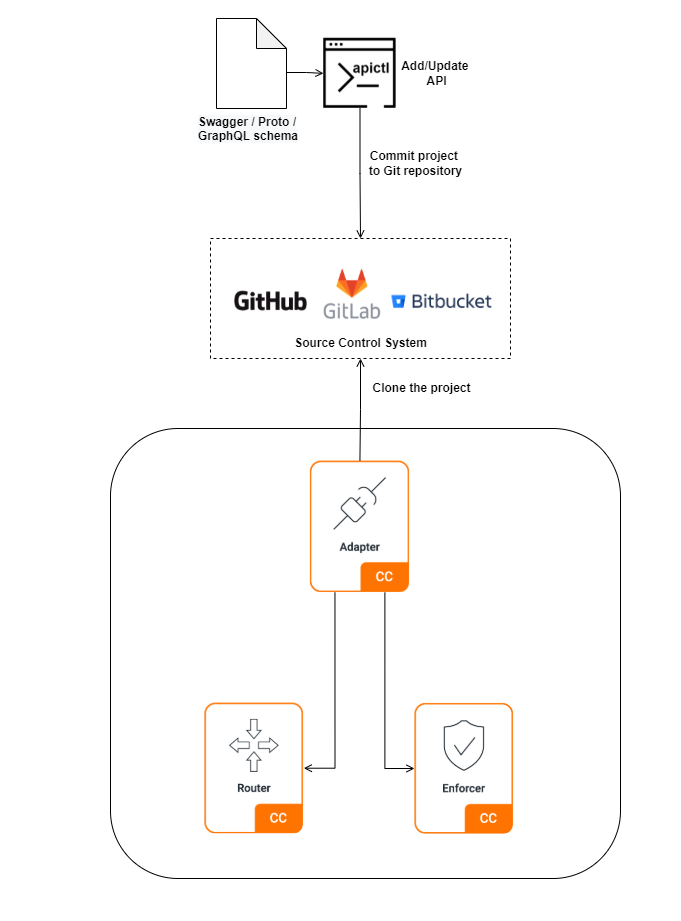
When Choreo Connect is used as a standalone gateway, APIs can be deployed through the APICTL command-line tool. Once an API project is added/updated, it must be deployed/redeployed using APICTL. If the Adapter container restarts for any reason, the APIs deployed with APICTL will be lost. To address this requirement, Choreo Connect supports the use of Git for version controlling of API artifacts.
How it works
The source watcher in the Adapter, is responsible for deploying the API artifacts, with the help of Git based to the following steps.
-
You need to have a repository with the API projects, hosted on a source control system (e.g., GitHub, Bitbucket).
-
When the Adapter starts, the source watcher will clone the API project(s) from the given repository and will deploy the API artifacts.
-
The source watcher will then start polling the repository for changes.
-
If there are any updates in the repository, the source watcher will fetch the changes and will deploy the updated API artifacts.
Configuring Git Integration for Choreo Connect
Follow the instructions below to configure Git Integration for Choreo Connect:
Step 1 - Initialize Git repository
-
Initialize the API project(s).
For more information, see Choreo Connect Deployed on Docker Compose with WSO2 API Controller Guide.
-
Create a new repository on any of the following Git hosting services.
Note
Maintain the following folder structure when pushing the API project(s) to the repository.
 <api-project-1>
 ├── Client-certificates
 ├── Definitions
 │   └── swagger.yaml
 ├── Docs
 ├── Endpoint-certificates
 ├── Image
 ├── Interceptors
 ├── README.md
 ├── Sequences
 │   ├── fault-sequence
 │   ├── in-sequence
 │   └── out-sequence
 ├── api.yaml
 ├── api_meta.yaml
 └── libs
 <api-project-2>
 ├── Client-certificates
 ├── Definitions
 │   └── swagger.yaml
 ├── Docs
 ├── Endpoint-certificates
 ├── Image
 ├── Interceptors
 ├── README.md
 ├── Sequences
 │   ├── fault-sequence
 │   ├── in-sequence
 │   └── out-sequence
 ├── api.yaml
 ├── api_meta.yaml
 └── libs
 <api-project-3>.zip
Step 2 - Configure Choreo Connect with Git
Git Integration in Choreo Connect works in the standalone mode.
Step 2.1 - Enable Git for version controlling of API artifacts
Add the following configuration under the Adapter section of the main configuration file of Choreo Connect (config.toml file) to enable Git for version controlling of API artifacts.
[adapter]

artifactsDirectory = "<path_to_the_artifacts_directory>"

[adapter.sourceControl]
  enabled = true
  pollInterval = 30
  retryInterval = 5
  maxRetryCount = 20
  artifactsDirectory = "<path_to_the_artifacts_directory>"
  [adapter.sourceControl.repository]
    URL = "https://<hostname>/<username_or_organization>/<repository-name>.git"
    branch = "<branch_name>"
    username = $env{git_username}
    accessToken = $env{git_access_token}
SSHKeyFile = "/home/wso2/ssh-keys/<private_key_file>"[adapter]
artifactsDirectory = "/home/wso2/git-artifacts"
[adapter.sourceControl]
enabled = true
pollInterval = 30
retryInterval = 5
maxRetryCount = 20
artifactsDirectory = "/home/wso2/git-artifacts"
[adapter.sourceControl.repository]
URL = "https://github.com/wso2/product-microgateway.git"
branch = "main"
username = $env{git_username}
accessToken = $env{git_access_token}
SSHKeyFile = "/home/wso2/ssh-keys/id_ed25519"The following table describes the above configuration.
| Property | Description |
|---|---|
enabled |
Set this to true to enable Git integration for API Artifacts. |
pollInterval |
The time interval (in seconds) in which the Adapter should fetch updates from the repository. |
retryInterval |
The time interval (in seconds) in which the Adapter should retry fetching artifacts from the repository at startup (in case of failure). |
maxRetryCount |
Maximum number of times the Adapter should retry fetching artifacts from the repository at startup (in case of failure). |
artifactsDirectory |
The directory path where the Git artifacts are stored. |
URL |
The URL of the Git repository. |
branch |
The branch of the Git repository. If not specified, the default branch will be used. |
username |
The username of the Git repository. If this is set, then you need to also set the accessToken. |
accessToken |
The password or personal access token of the Git repository. |
SSHKeyFile |
SSHKeyFile is the optional path to the private key used for authenticating the Git repository. If this is set, then you do not need to set the username and accessToken. |
Note
- Both
artifactsDirectoryconfigurations should be set to the same directory path. - If the
branchis not specified, the default branch will be used. - If the repository is a public repository (in GitHub), then you do not need to set
username,accessTokenandSSHKeyFile. - If the repository is a private repository, then you need to set either the
usernameandaccessTokenorSSHKeyFile.
Step 2.2 - Authenticate the source watcher with the repository
The source watcher needs to be authenticated with the Git repository to fetch the artifacts. Authenticating the Git repository can be done in the following ways:
Using the Username and Access Token
To authenticate the repository with basic HTTP authentication, the username and access token should be set in the username and accessToken fields. The password can also be set in the accessToken field. It is recommended to use the personal access token for authentication. For public repositories (in GitHub), the username and accessToken fields can be kept empty.
-
Generate a personal access token.
-
Configure Choreo Connect.
Add the following configuration in the main configuration file of Choreo Connect (
config.tomlfile).[adapter] artifactsDirectory = "<path_to_the_artifacts_directory>" [adapter.sourceControl] enabled = true pollInterval = 30 retryInterval = 5 maxRetryCount = 20 artifactsDirectory = "<path_to_the_artifacts_directory>" [adapter.sourceControl.repository] URL = "https://<hostname>/<username_or_organization>/<repository-name>.git" branch = "" username = $env{git_username} accessToken = $env{git_access_token} SSHKeyFile = ""[adapter] artifactsDirectory = "/home/wso2/git-artifacts" [adapter.sourceControl] enabled = true pollInterval = 30 retryInterval = 5 maxRetryCount = 20 artifactsDirectory = "/home/wso2/git-artifacts" [adapter.sourceControl.repository] URL = "https://github.com/wso2/product-microgateway.git" branch = "" username = $env{git_username} accessToken = $env{git_access_token} SSHKeyFile = ""
Using the SSH Key file
To authenticate the repository with SSH key, the SSH private key file path should be set in the SSHKeyFile field.
-
Generate the SSH Keys that need to be used for authentication.
Important
Make sure to keep the passphrase of the SSH key empty.
-
Configure Choreo Connect.
Add the following configuration in the main configuration file of Choreo Connect (
config.tomlfile).[adapter] artifactsDirectory = "<path_to_the_artifacts_directory>" [adapter.sourceControl] enabled = true pollInterval = 30 retryInterval = 5 maxRetryCount = 20 artifactsDirectory = "<path_to_the_artifacts_directory>" [adapter.sourceControl.repository] URL = "git@<hostname>:<username>/<repository-name>.git" branch = "" username = "" accessToken = "" SSHKeyFile = "/home/wso2/ssh-keys/<private_key_file>"[adapter] artifactsDirectory = "/home/wso2/git-artifacts" [adapter.sourceControl] enabled = true pollInterval = 30 retryInterval = 5 maxRetryCount = 20 artifactsDirectory = "/home/wso2/git-artifacts" [adapter.sourceControl.repository] URL = "[email protected]:wso2/product-microgateway.git" branch = "" username = "" accessToken = "" SSHKeyFile = "/home/wso2/ssh-keys/id_ed25519" -
Copy the generated private key file to the
docker-compose/resources/adapter/ssh-keysdirectory. -
Add volume mapping.
- Open the
docker-compose.yamlfile located in the<CHOREO-CONNECT-HOME>/docker-compose/choreo-connectdirectory. -
Find the
volumessection under theadapterand add the following volume mapping:volumes: ... - ../resources/adapter/ssh-keys:/home/wso2/ssh-keys
- Open the
-
Create a Dockerfile.
When using authentication with a SSH key file, you need to create a custom Docker image of the Adapter as mentioned below:
FROM wso2/choreo-connect-adapter:<tag> USER root RUN apk add openssh-client RUN mkdir /home/wso2/.ssh && chown -R wso2:wso2 /home/wso2/.ssh \ && ssh-keyscan -H <hostname> >> /home/wso2/.ssh/known_hosts USER wso2 CMD eval "$(ssh-agent -s)" ; ssh-add /home/wso2/ssh-keys/* ; ./adapterFROM wso2/choreo-connect-adapter:1.1.0 USER root RUN apk add openssh-client RUN mkdir /home/wso2/.ssh && chown -R wso2:wso2 /home/wso2/.ssh \ && ssh-keyscan -H github.com >> /home/wso2/.ssh/known_hosts USER wso2 CMD eval "$(ssh-agent -s)" ; ssh-add /home/wso2/ssh-keys/* ; ./adapter -
Build the new image.
docker build -t <IMAGE_NAME> -f <DOCKER_FILE_PATH> <CONTEXT>docker build -t myimages/choreo-connect-adapter-ssh:1.0.0 -f Dockerfile . -
Update the
docker-compose.yamlfile with the new Adapter image.
Step 3 - Start Choreo Connect
Start Choreo Connect on Docker Compose by executing the Docker Compose script inside the <CHOREO-CONNECT_HOME> directory.
Click here if you are using an ARM64 based machine (e.g., Apple M1)
If you are trying this out in an ARM64 based machine (e.g., Apple M1), update the Docker image names with the following.
docker-compose.yamlfiles,<CHOREO-CONNECT_HOME>/docker-compose/choreo-connect/docker-compose.yaml<CHOREO-CONNECT_HOME>/docker-compose/choreo-connect-with-apim/docker-compose.yaml
| Existing (Default) image name | Image name for tryout in ARM64 (e.g., Apple M1) |
|---|---|
wso2/choreo-connect-adapter:1.1.0 |
wso2/choreo-connect-adapter:1.1.0-ubuntu |
wso2/choreo-connect-enforcer:1.1.0 |
wso2/choreo-connect-enforcer:1.1.0-ubuntu |
wso2/choreo-connect-router:1.1.0 |
wso2/choreo-connect-router:1.1.0-ubuntu |
wso2/wso2am:4.1.0-alpine |
wso2/wso2am:4.1.0-multiarch |
Note:
Note that the above Ubuntu based (*-ubuntu) images are for tryout purpose only and are not recommended for a production deployment.
-
Navigate to
<CHOREO-CONNECT_HOME>/docker-compose/choreo-connect/directory. -
Execute the following command.
docker-compose up -d
After the containers are up and running, you can monitor the status of the containers by using the following command.
docker ps | grep choreo-connect-Step 4 - Invoke the sample API
Step 4.1 - Obtain a token
After the APIs are exposed via WSO2 Choreo Connect, you can invoke an API with a valid token (JWT) or by using a test key.
Let's use WSO2 Choreo Connect's test key endpoint to obtain a test key in order to access the API. For more information, see Generate a Test JWT.
TOKEN=$(curl -X POST "https://localhost:9095/testkey" -d "scope=read:pets" -H "Authorization: Basic YWRtaW46YWRtaW4=" -k -v)More information
You can obtain a JWT token from any third-party secure token service or via the WSO2 API Manager.
Step 4.2 - Invoke the API
Execute the following command to invoke the API using the test key. You can now invoke the API running on the WSO2 Choreo Connect using the following cURL command.
curl -X GET "https://<CHOREO-CONNECT_ROUTER_HOST>:<CHOREO-CONNECT_ROUTER_PORT>/<API-context>/<API-resource>" -H "accept:application/xml" -H "Authorization:Bearer $TOKEN" -kcurl -X GET "https://localhost:9095/v2/pet/findByStatus?status=available" -H "accept: application/xml" -H "Authorization:Bearer $TOKEN" -k