API Key Authentication
API Key Authentication in Choreo Connect is a simple authentication scheme that accepts a valid self-contained JWT token issued for accessing APIs. Since self-contained tokens can have all authorization information, the token processing time is fast and more efficient. The common practice is to have a short expiration time for self-contained access tokens.
Select one of the methods given below to enable API Key Authentication for an API depending on the Choreo Connect mode you are using.
| Mode | Method |
|---|---|
| Choreo Connect with WSO2 API Manager as a Control Plane | Secure APIs with API Keys via API-M |
| Choreo Connect as a Standalone Gateway | Update the OpenAPI definition of the API |
Update the OpenAPI definition of the API
When deploying via WSO2 API Manager, the already existing API Key security schemes defined in the OpenAPI definition will be overridden as you configure API security from the Publisher Portal. Therefore, making changes via the API Manager Publisher UI is sufficient. Use the following steps to enable API Key authentication when deploying an API using apictl, in other words, during standalone mode.
Step 1 - Define the API Key security scheme
Security schemes must be defined in the OpenAPI definition under securitySchemes. One or more API Key security schemes can be used simultaneously, similar to a logical OR operator. Define the API Key security scheme as follows:
| Field Name | Description |
|---|---|
name |
Header name or query key for the APIKey. |
in |
This can be either header or query. |
type |
Specify apiKey as the type. |
The following example defines an API Key security scheme named apiKeyAuth, which expects X-API-Key as a request header. Here, apiKeyAuth is the name provided for the security scheme and X-API-Key is the name for the header.
Note
The following example shows how to define API Key security schemes in OAS3. If you are using an OAS2 API definition, go to this Swagger document to get more information on defining API Key security in OAS2.
components:
 securitySchemes:
   ApiKeyAuth:        # arbitrary name for the security scheme
     type: apiKey
     in: header       # can be "header" or "query"
     name: X-API-KEY  # name of the header or query parameter
   appId:             # you can define several API Key security schemas
     type: apiKey
     in: header
     name: X-APP-ID
Step 2 - Apply the API Key Authentication security scheme
A security scheme can be applied at a resource level or to the whole API by using the security keyword as applicable. A resource-level security scheme will override an API-level security scheme. In the example given below, the ApiKeyAuth security scheme that has already been defined is referred from the resource /pet/{petId}. For more information, refer to the Swagger documentation on API Keys.
Operation-specific security
The following code snippet is an example of how the API key can be applied to a specific resource.
"/pet/{petId}":
 get:
   tags:
     - pet
   summary: Find pet by ID
   description: Returns a single pet
   operationId: getPetById
   parameters:
     - name: petId
       in: path
       description: ID of pet to return
       required: true
       schema:
         type: integer
         format: int64
   security:
     - ApiKeyAuth: []
API Level security
The following code snippet is an example of how the API key can be applied globally to all operations.
security:
- ApiKeyAuth: []
Step 3 - Generate an API Key
Currently, only API Keys issued by WSO2 API Manager are allowed. Hence, you need a valid API Key issued for the particular API Name and the version from WSO2 API Manager. Follow the steps mentioned on generating the API Key documentation to generate an API Key from API Manager.
Step 4 - Invoke the API using the API Key
Use the following cURL command to invoke the API with API Key. When using API Manager, you can directly use the cURL command that appears in the Developer Portal test console.
curl -k -X GET "<API_URL>" -H "accept: application/json" -H "<Header name>: <API Key>"curl -k -X GET "https://localhost:9095/petstore/v1/pet/1" -H "accept: application/json" -H "X-API-KEY: eyJhbGciOiJSUzI1NiIsICJ0eXAiOiJqd3QiLCAia2lkIjoiYmFsbGVyaW5hIn0=.eyJzdWIiOiJhZG1pbiIsICJpc3MiOiJodHRwczovL2xvY2FsaG9zdDo5MDk1L2FwaWtleSIsICJpYXQiOjE1ODAxMDUzOTAsICJqdGkiOiI3OTFiNzAyMC1kN2U2LTRmYmEtYmMyMy1lMzk5YTVlNmYzYjciLCAiYXVkIjoiaHR0cDovL29yZy53c28yLmFwaW1ndC9nYXRld2F5IiwgImtleXR5cGUiOiJQUk9EVUNUSU9OIiwgImFsbG93ZWRBUElzIjpbXX0=.f-86LfD7lLq-0oM1V1u1dLW7fWcydH4MElWVxUfRTGGRiXHhh8VrS5q18LdCtH1E1jav5pPZpdDQgQUvhVYNXVqiipydfJFOMbDysA0Jdakmh_TVmeZRHhIYgzcVHQNnXMcYXg7Ns4QPBvJVONfbmDluuiU_uFnOPBiXj2N4HL2OTLgVXkEoVTEpL0mmaO2Ab4ZHqKW5xj32aeK8sEAtU5Nd3rQOGvfEwL7xvx4JAmza8ka0eYt7c4QCPVcDSVOkdas9njlsvEdtka5GRL9PAx3xg370phSD1cji6WSRlZhEGzuq6hjLbCqsf17KvZgK1zbrEbSypjgegEe-any3EQ=="{"id":1,"category":{"id":0},"name":"tested","photoUrls":[],"tags":[],"status":"tested"}Additional Information
Choreo Connect API Key Authentication supports restrictions for IP address and HTTP referrer.
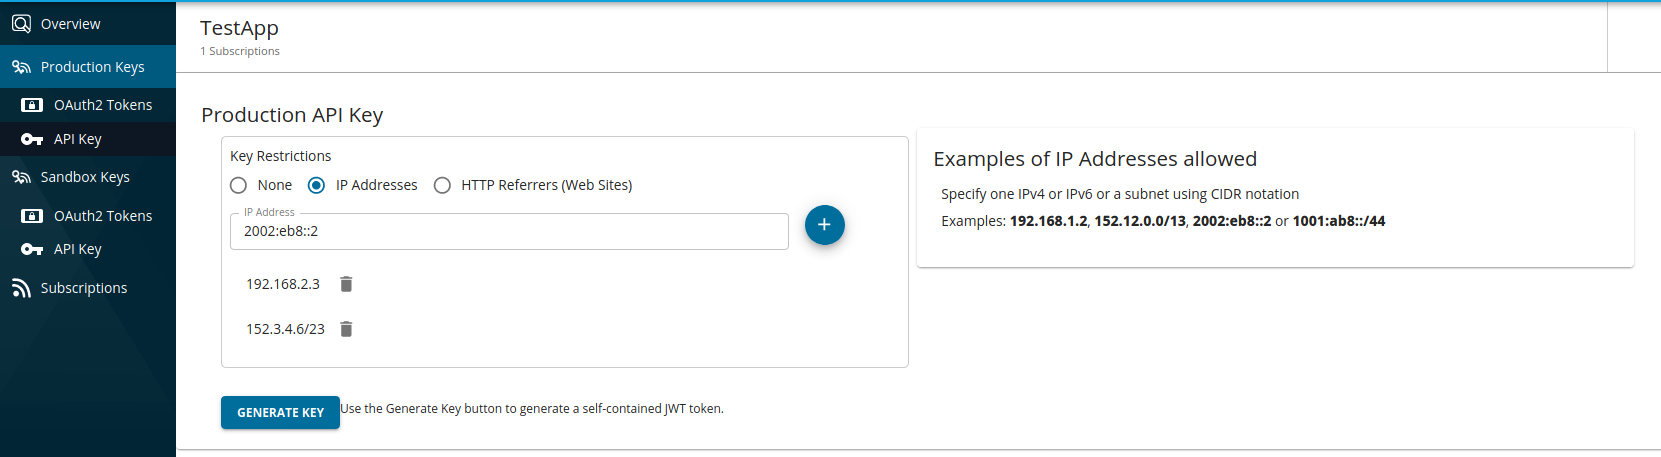
1) IP address restriction
The IP address restriction allows only the clients with specific IP addresses to use the token. The IP addresses can be specified in the following formats.
- IPv4 (e.g.,
192.168.1.2) - IPv6 (e.g.,
2002:eb8::2) - IP range in CIDR notation (e.g.
152.12.0.0/13,1001:ab8::/14)
Generating an API key with an IP restriction
-
Navigate to API key generation window of the specific application in the Developer Portal.
-
Select
IP Addresses, add the IP addresses in the text input as shown below, and generate the key.
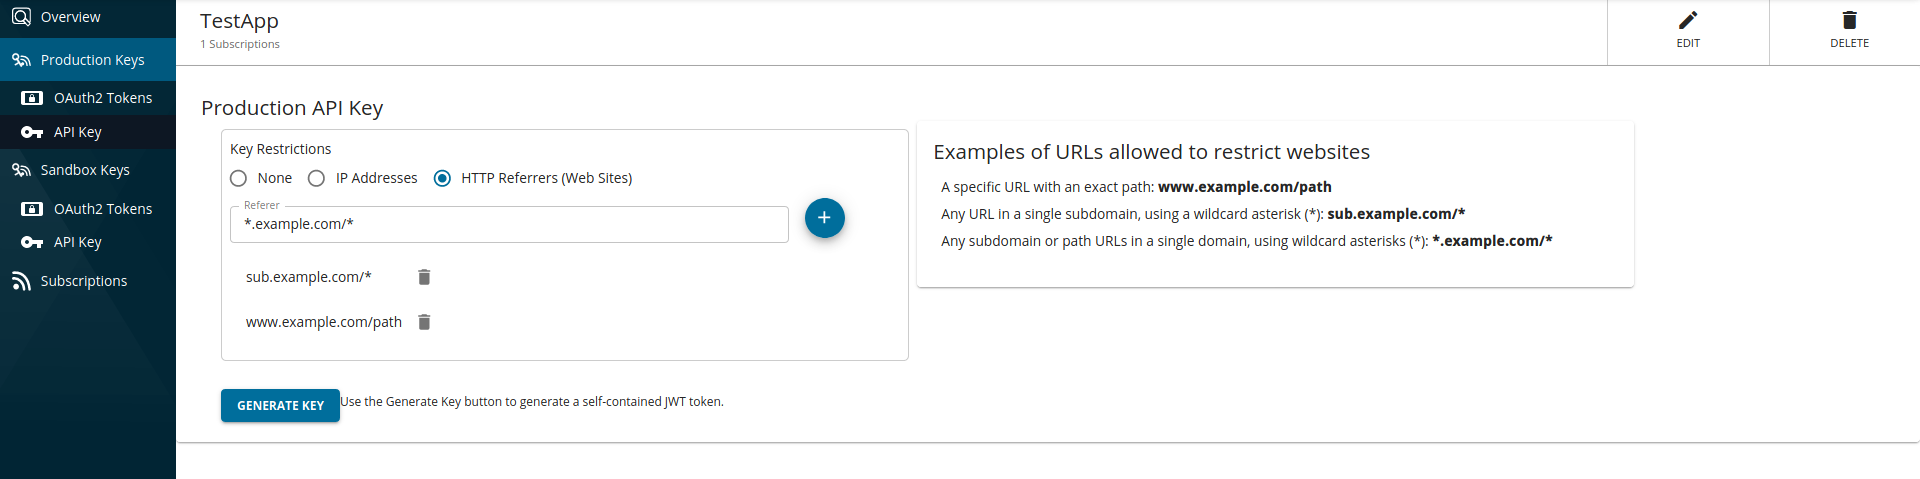
2) HTTP referrer restriction
When the HTTP referrer restriction has been enabled, only the specific HTTP referrers can use the token. Therefore, by using this restriction, when API clients run on web browsers, you can limit the access to an API through only specific web pages. The referrer can be specified in the following formats.
- A specific URL with an exact path:
www.example.com/path - Any URL in a single subdomain, using a wildcard asterisk (*):
sub.example.com/* - Any subdomain or path URLs in a single domain, using wildcard asterisks (*):
*.example.com/*
Generating an API key with the HTTP referrer restriction
-
Navigate to API key generation window of that specific application in the Developer Portal.
-
Select
HTTP Referrers (Web Sites)and add the referrers in the text input as shown below and generate the key.
Configurations related to API Key
Following is the default config referred for API Key authentication. The token service name "APIM Publisher" refers to the Control Plane and holds the configurations for API key, and not to be confused with the access token issuer which is the "Resident Key Manager" as defined in the config. Therefore, even if both of the token types (API keys and access tokens) are produced by the same token issuer which is the Resident Key Manager, subscription validation can be enabled independently.
[[enforcer.security.tokenService]]
name = "APIM Publisher"
issuer = "https://localhost:9443/publisher"
validateSubscription = true
certificateAlias = ""
certificateFilePath = "/home/wso2/security/truststore/wso2carbon.pem"
Info
Choreo Connect Update 1.1.0.8 onwards, you may use the following to reconfigure API Authentication related configs.
[[enforcer.security.tokenService]]
name = "APIM APIkey"
validateSubscription = true
certificateAlias = "apikey_certificate_alias"
certificateFilePath = "/home/wso2/security/truststore/wso2carbon.pem"- name - Name of the token service and must not be changed
- certificateAlias - Alias name to be used by the internal Enforcer truststore for the public certificate of the JWT issuer
- certificateFilePath - Certificate file path within the Enforcer container
-
validateSubscription
Whether to validate subscriptions. If disabled, a single API key may be used against any API in the same Choreo Connect instance since only the JWT signature would be validated procedure. When set to true, sunscription validation is done as given below depending on the Choreo Connect mode.
-
For Choreo Connect with WSO2 API Manager as a Control Plane - Check against the subscriptions received from the Control Plane in order to validate the mapping between the invoked API and application info in the API key JWT claims.
-
For Choreo Connect as a Standalone Gateway - Check the metadata of the invoked API against the API details included in the API key claims.
-