Message store and message processor for guaranteed delivery
This sample demonstrates how a store and forward messaging scenario can be implemented using the RabbitMQ message broker and WSO2 Micro Integrator. Store and forward messaging is used for serving traffic to back-end services that can accept request messages only at a given rate.
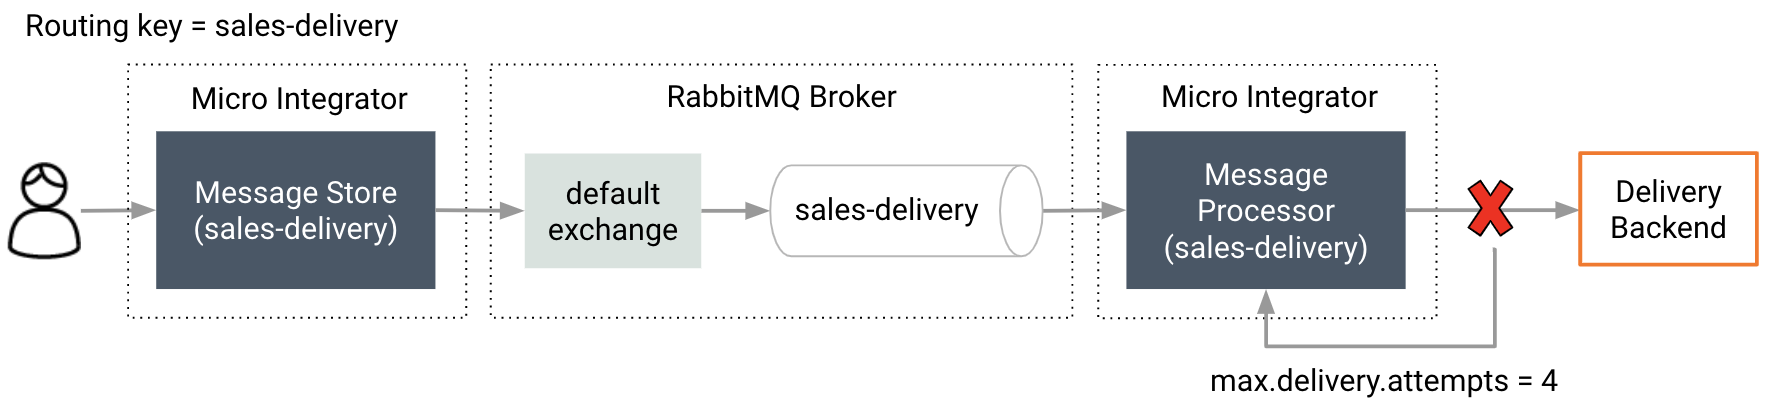
This messaging pattern ensures guaranteed message delivery. That is, because request messages are stored in a message store, messages never get lost.
As shown below, when a client sends a message, the message store artifact in the Micro Integrator will route the messages to the RabbitMQ broker. The message processor artifact in the Micro Integrator will then process the message from the broker and send it to the back-end service.
Synapse configurations
See the instructions on how to build and run this example.
<?xml version="1.0" encoding="UTF-8"?>
<messageStore xmlns="http://ws.apache.org/ns/synapse"
            class="org.apache.synapse.message.store.impl.rabbitmq.RabbitMQStore"
            name="sales-delivery-store">
   <parameter name="store.rabbitmq.host.name">localhost</parameter>
   <parameter name="store.producer.guaranteed.delivery.enable">false</parameter>
   <parameter name="store.rabbitmq.host.port">5672</parameter>
   <parameter name="store.rabbitmq.username">guest</parameter>
   <parameter name="store.rabbitmq.queue.name">sales-delivery</parameter>
   <parameter name="store.rabbitmq.password">guest</parameter>
</messageStore><?xml version="1.0" encoding="UTF-8"?>
<messageProcessor xmlns="http://ws.apache.org/ns/synapse"
class="org.apache.synapse.message.processor.impl.forwarder.ScheduledMessageForwardingProcessor"
name="sales-delivery-processor"
targetEndpoint="DeliveryEndpoint"
messageStore="sales-delivery-store">
<parameter name="client.retry.interval">1000</parameter>
<parameter name="throttle">false</parameter>
<parameter name="max.delivery.attempts">4</parameter>
<parameter name="member.count">1</parameter>
<parameter name="store.connection.retry.interval">1000</parameter>
<parameter name="max.store.connection.attempts">-1</parameter>
<parameter name="max.delivery.drop">Disabled</parameter>
<parameter name="interval">1000</parameter>
<parameter name="message.processor.failMessagesStore">sales-store</parameter>
<parameter name="is.active">true</parameter>
<parameter name="target.endpoint">DeliveryEndpoint</parameter>
</messageProcessor><?xml version="1.0" encoding="UTF-8"?>
<proxy name="sales-delivery-proxy" startOnLoad="true" transports="http https" xmlns="http://ws.apache.org/ns/synapse">
<target>
<inSequence>
<property name="OUT_ONLY" scope="default" type="STRING" value="true"/>
<property name="FORCE_SC_ACCEPTED" scope="axis2" type="STRING" value="true"/>
<log level="custom">
<property expression="//Message" name="Message Received"/>
</log>
<store messageStore="sales-delivery-store"/>
</inSequence>
<outSequence/>
<faultSequence/>
</target>
</proxy><?xml version="1.0" encoding="UTF-8"?>
<endpoint name="DeliveryEndpoint" xmlns="http://ws.apache.org/ns/synapse">
<address uri="http://localhost:8280/deliveries">
<timeout>
<duration>30000</duration>
<responseAction>fault</responseAction>
</timeout>
<suspendOnFailure>
<errorCodes>-1</errorCodes>
<initialDuration>0</initialDuration>
<progressionFactor>1.0</progressionFactor>
<maximumDuration>0</maximumDuration>
</suspendOnFailure>
<markForSuspension>
<errorCodes>-1</errorCodes>
<retriesBeforeSuspension>0</retriesBeforeSuspension>
</markForSuspension>
</address>
</endpoint>Build and run
- Set up WSO2 Integration Studio.
- Create an integration project with an ESB Configs module and an Composite Exporter.
- Create the artifacts (proxy service, message-processor, message-store, endpoint) with the configurations given above.
- Deploy the artifacts in your Micro Integrator.
- Make sure you have a RabbitMQ broker instance running.
- Send a message to the
sales-delivery-proxywith the following payload.<Message> <SalesId>342</SalesId> <SaleName>HealthCorp</SaleName> <DeliveryDate>20/12/2020</DeliveryDate> <Destination>Colombo</Destination> </Message>