Amazon S3 Connector Example
The AmazonS3 Connector allows you to access the Amazon Simple Storage Service (Amazon S3) via the AWS SDK.
What you'll build
This example depicts how to use AmazonS3 connector to:
- Create a S3 bucket (a location for storing your data) in Amazon cloud.
- Upload a message into the created bucket as a text file.
- Retrieve created text file back and convert into a message in the integration runtime.
All three operations are exposed via an API. The API with the context /s3connector has three resources:
/createbucket- Once invoked, it will create a bucket in Amazon with the specified name/addobject- The incoming message will be stored into the specified bucket with the specified name/info- Once invoked, it will read the specified file from the specified bucket and respond with the content of the file
Following diagram shows the overall solution. The user creates a bucket, stores some message into the bucket, and then receives it back.
To invoke each operation, the user uses the same API.

If you do not want to configure this yourself, you can simply get the project and run it.
Setting up the environment
Please follow the steps mentioned at Setting up Amazon S3 document in order to create a Amazon S3 account and obtain credentials you need to access the Amazon APIs. Keep them saved to be used in the next steps.
Configure the connector in WSO2 Integration Studio
Follow these steps to set up the Integration Project and import AmazonS3 connector into it.
-
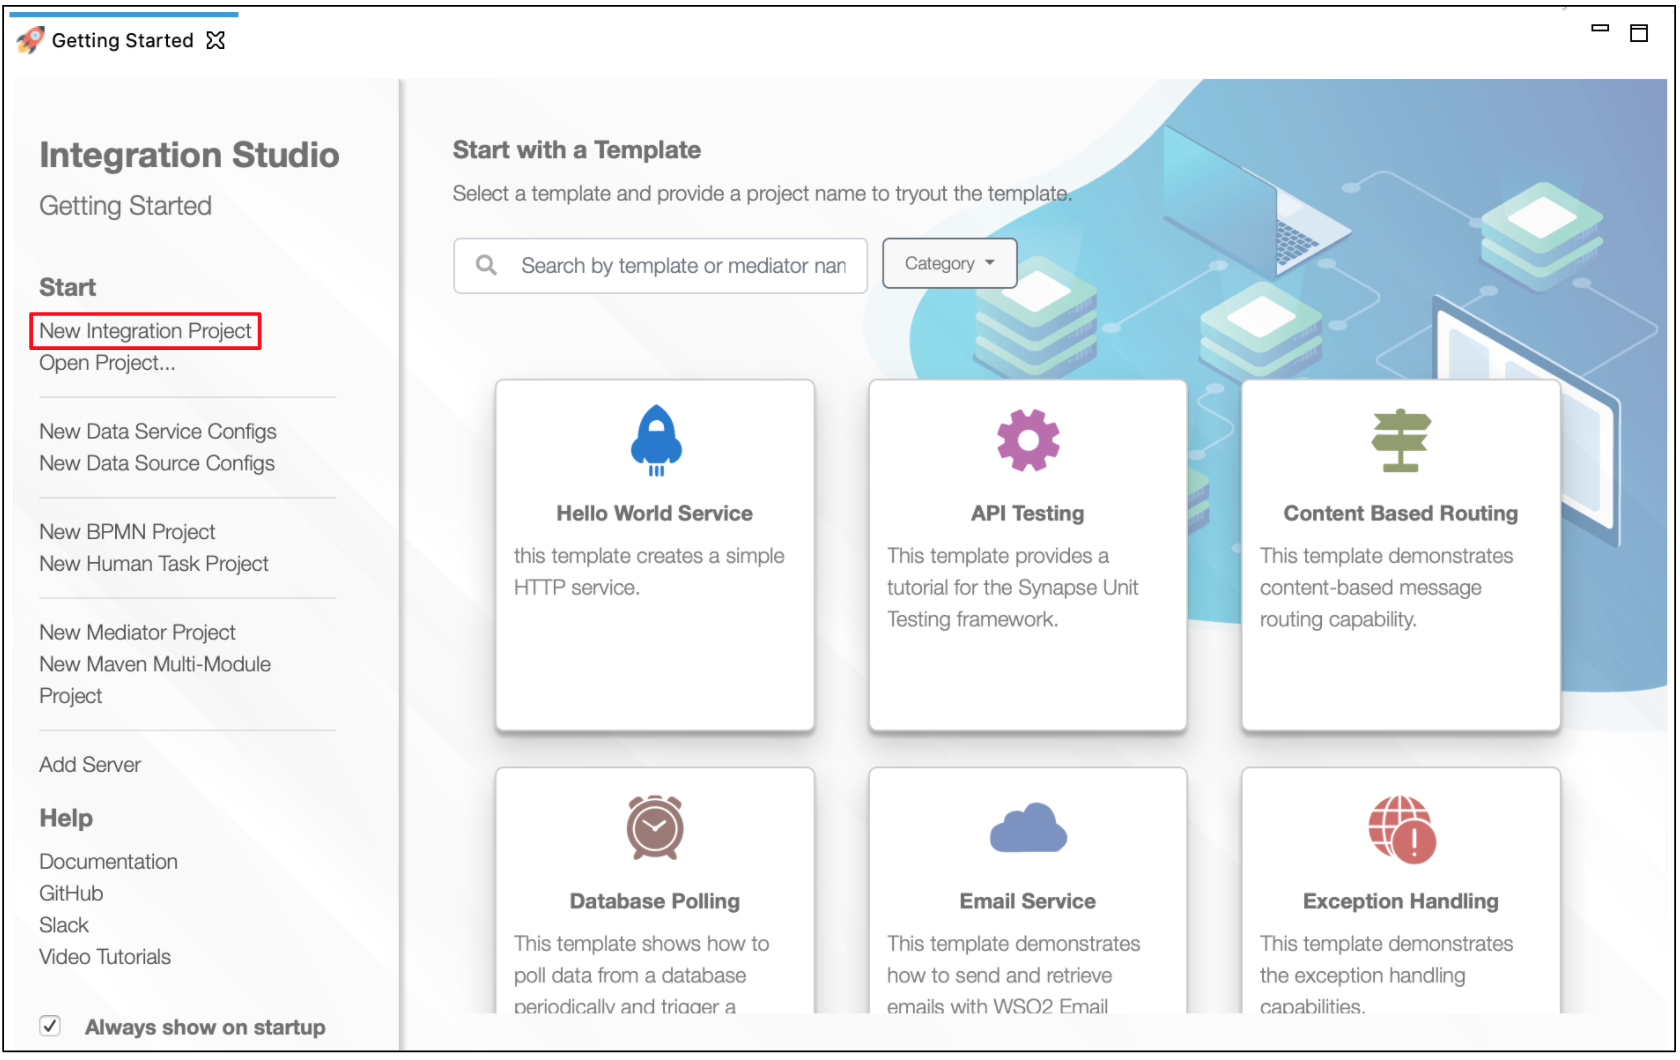
Open WSO2 Integration Studio and create an Integration Project.
-
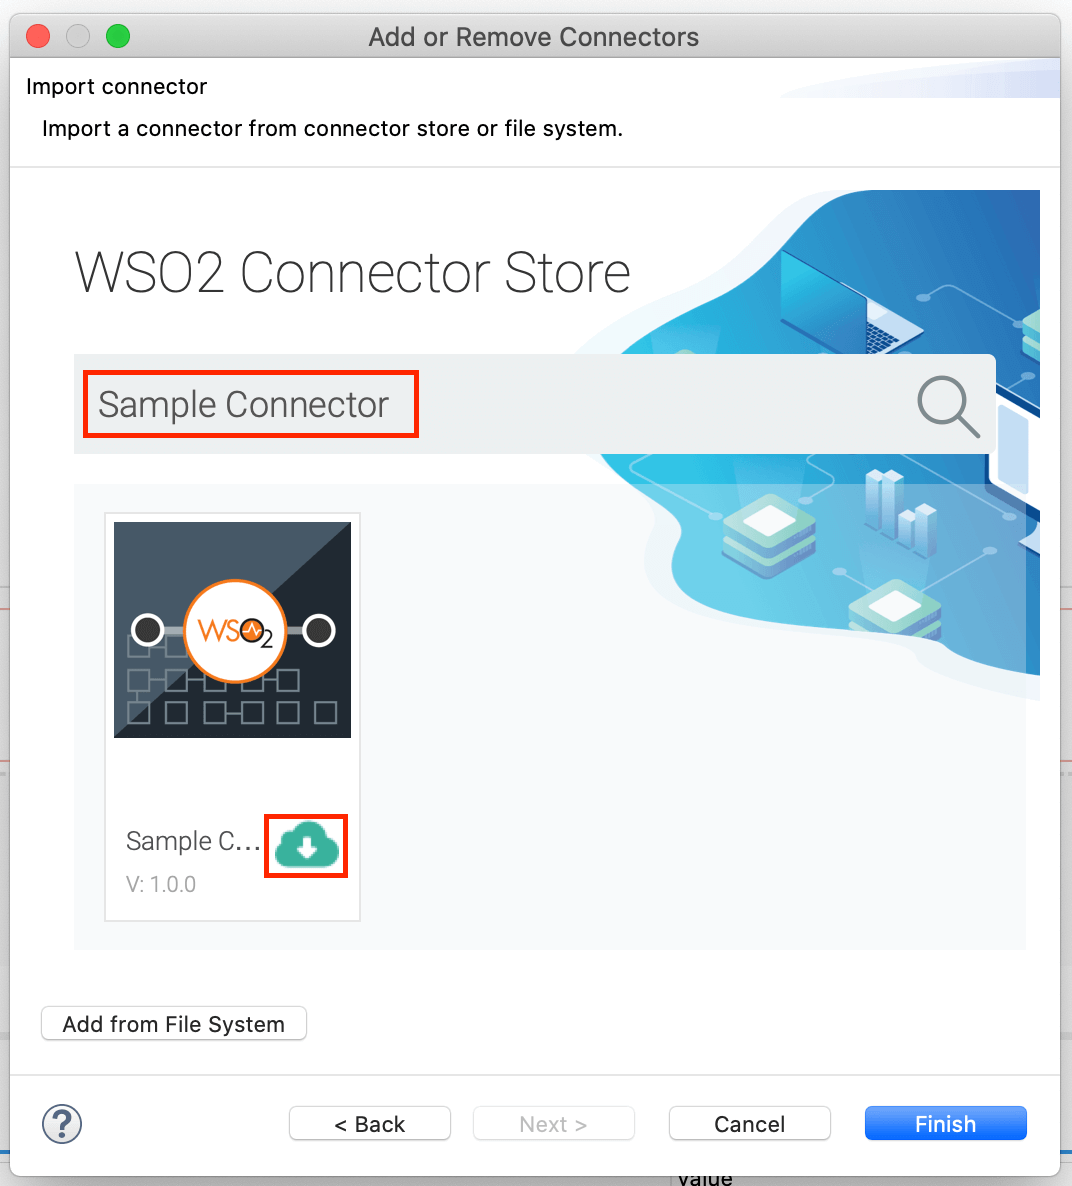
Right-click the project that you created and click on Add or Remove Connector -> Add Connector. You will get directed to the WSO2 Connector Store.
-
Search for the specific connector required for your integration scenario and download it to the workspace.
-
Click Finish, and your Integration Project is ready. The downloaded connector is displayed on the side palette with its operations.
-
You can drag and drop the operations to the design canvas and build your integration logic.

-
Right click on the created Integration Project and select New -> Rest API to create the REST API.
Creating the Integration Logic
-
Specify the API name as
S3ConnectorTestAPIand API context as/s3connector. -
First we will create the
/createbucketresource. This API resource will retrieve the bucket name from the incoming HTTP PUT request and create a bucket in Amazon S3. Right click on the API Resource and go to Properties view. We use a URL template called/createbucketas we have three API resources inside a single API. The method will be PUT.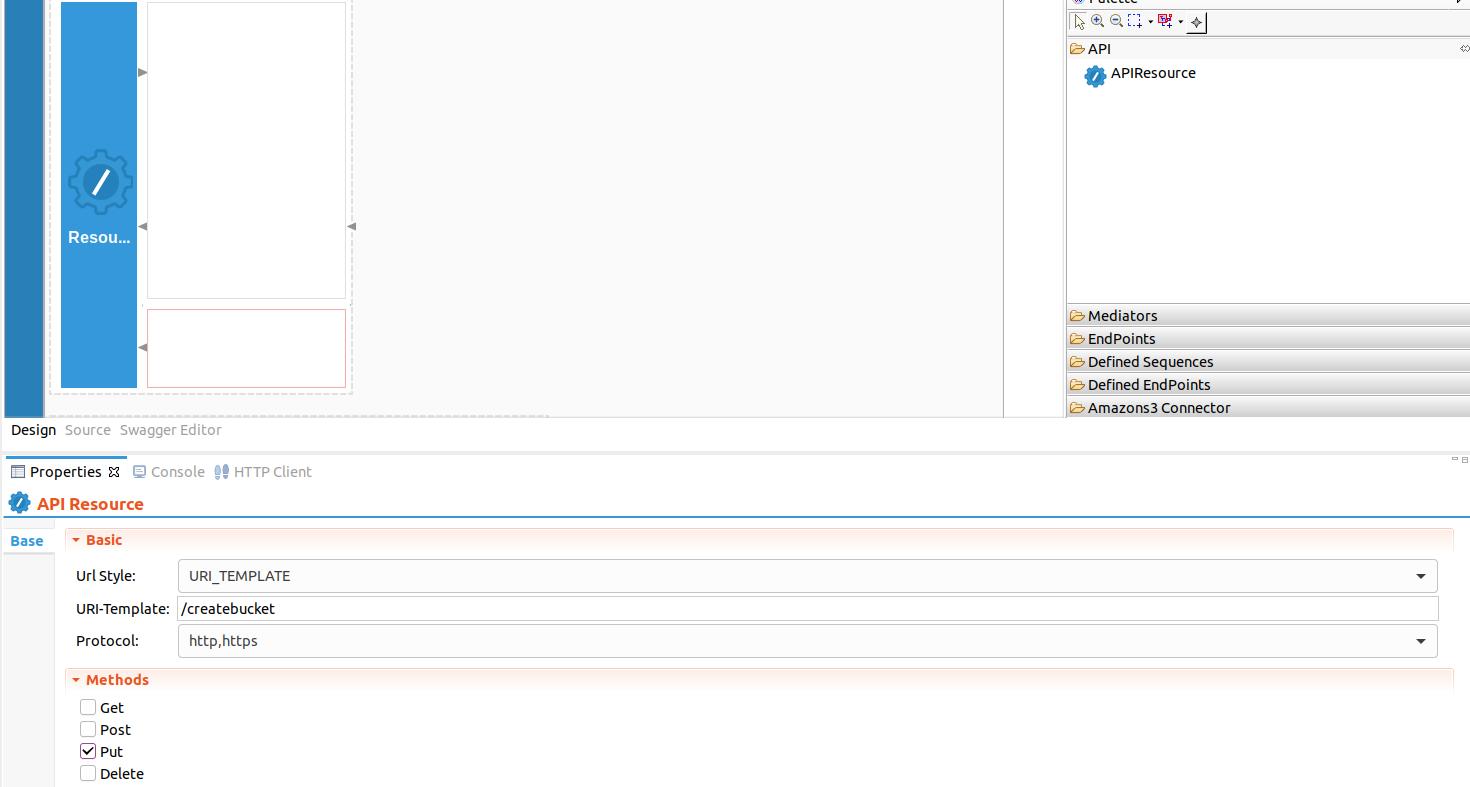
-
Next drag and drop the 'createBucket' operation of the S3 Connector to the Design View as shown below. Here, you will receive the following inputs from the user.
- bucketName - Name of the bucket

-
Create a connection from the properties window by clicking on the '+' icon as shown below.

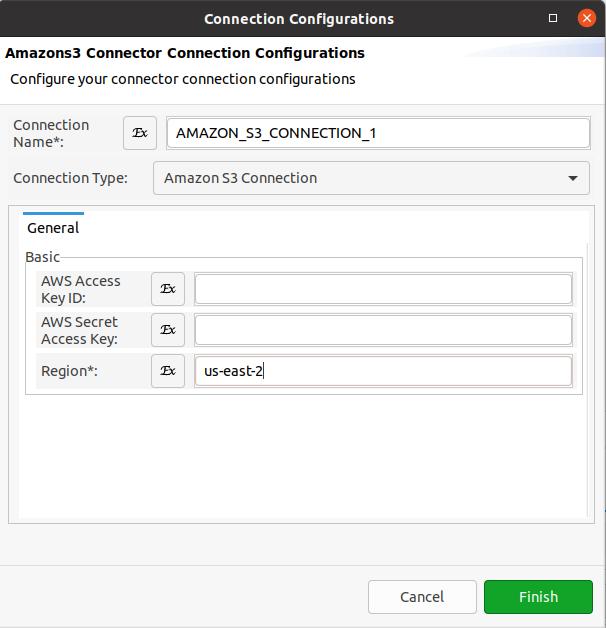
In the popup window, the following parameters must be provided.
- Connection Name - Unique name to identify the connection by.
- Connection Type - Type of the connection that specifies the protocol to be used.
- AWS Access Key ID - Access key associated with your Amazon user account.
- AWS Secret Access Key - Secret Access key associated with your Amazon user account.
- Region - Region that is used to select a regional endpoint to make requests.
Note
- You can either define the credentials or allow the AWS SDK to manage the credentials. The SDK will look for AWS credentials in system/user environment variables or use the IAM role for authentication if the application is running in an EC2 instance.
- The IAM role for authentication is available only with Amazon S3 connector v2.0.2 and above.
-
After the connection is successfully created, select the created connection as 'Connection' from the drop down menu in the properties window.
-
Next, configure the following parameters in the properties window,
- Bucket Name - json-eval($.bucketName)
- Bucket Region - Select a region from the drop-down menu. Here we are using us-east-2.

-
Drag and drop the Respond Mediator to send back the response from creating the bucket as shown below.

-
Create the next API resource, which is
/addobjectby dragging and dropping another API resource to the design view. This API resource will retrieve information about the object from the incoming HTTP POST request such as the bucketName, objectKey and the file content and upload it to Amazon S3.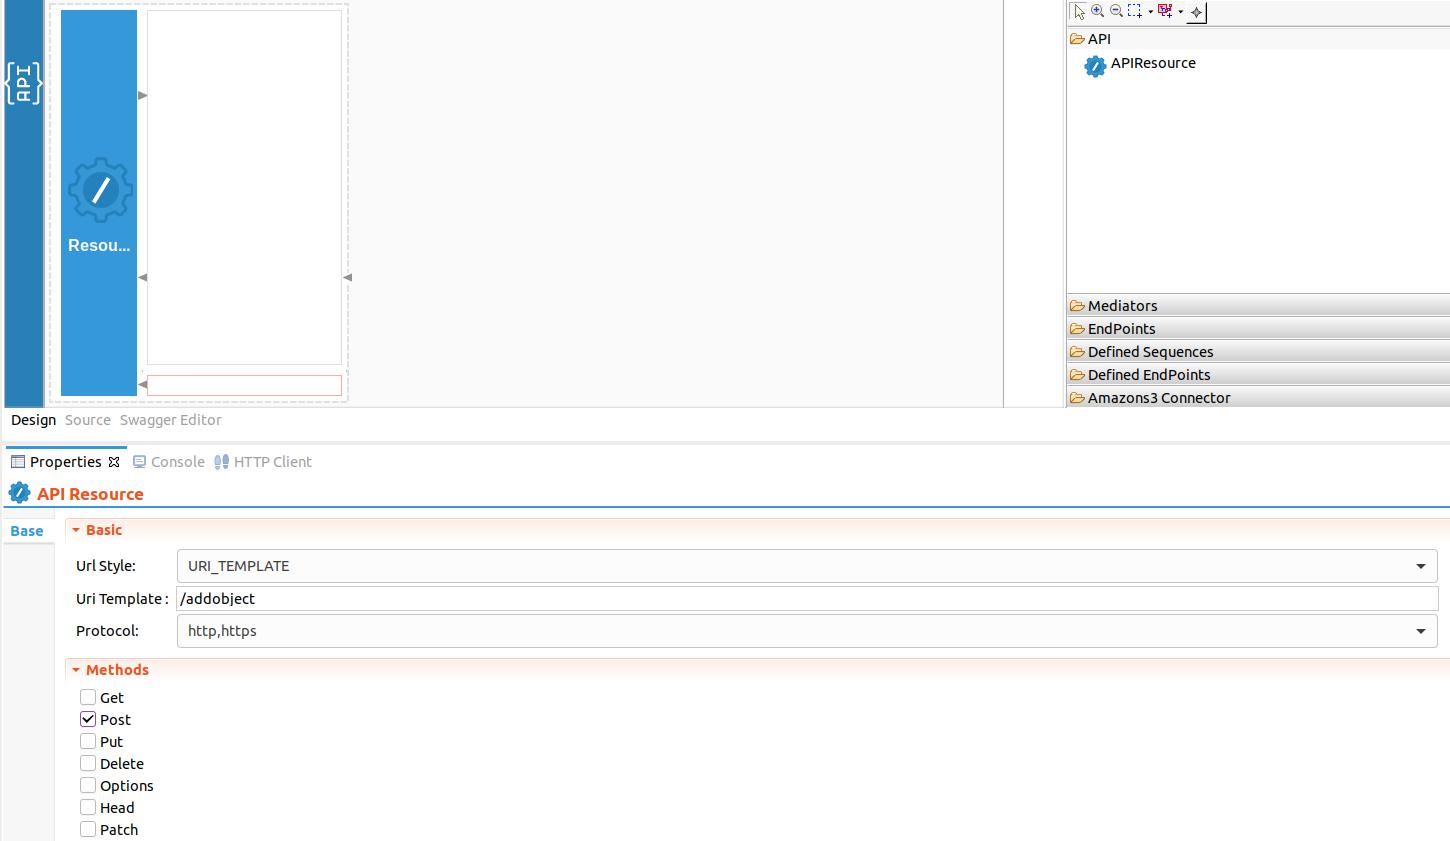
-
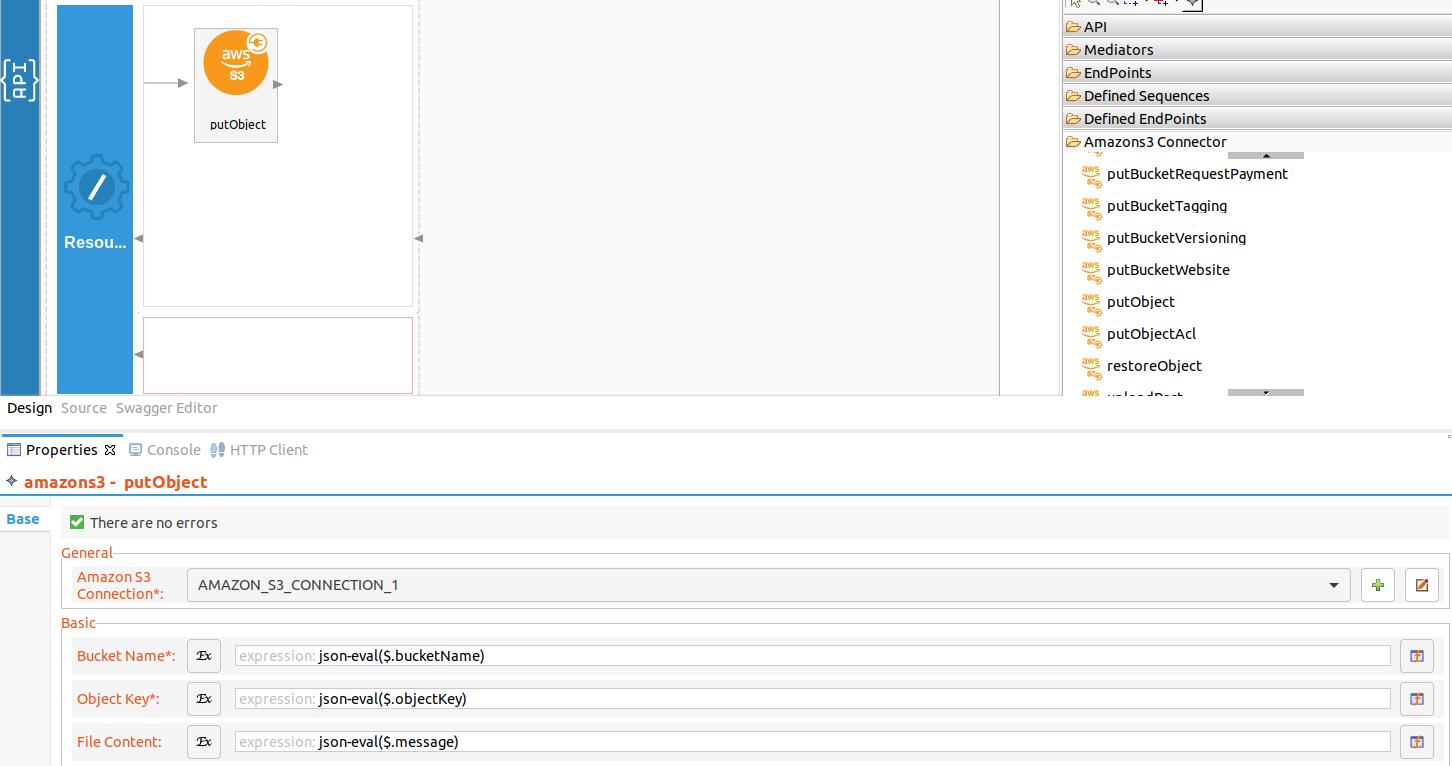
Drag and drop the ‘putObject’ operation of the S3 Connector to the Design View. In the properties view, select the already created connection as 'Connection' from the drop down menu and provide the following expressions to the below properties,
- Bucket Name - json-eval($.bucketName)
- Object Key - json-eval($.objectKey)
- File Content - json-eval($.message)
-
Drag and drop the Respond Mediator to send back the response from uploading the object.
-
Create the next API resource, which is
/infoby dragging and dropping another API resource to the design view. This API resource will retrieve information from the incoming HTTP POST request such as the bucketName, objectKey and get the object from Amazon S3.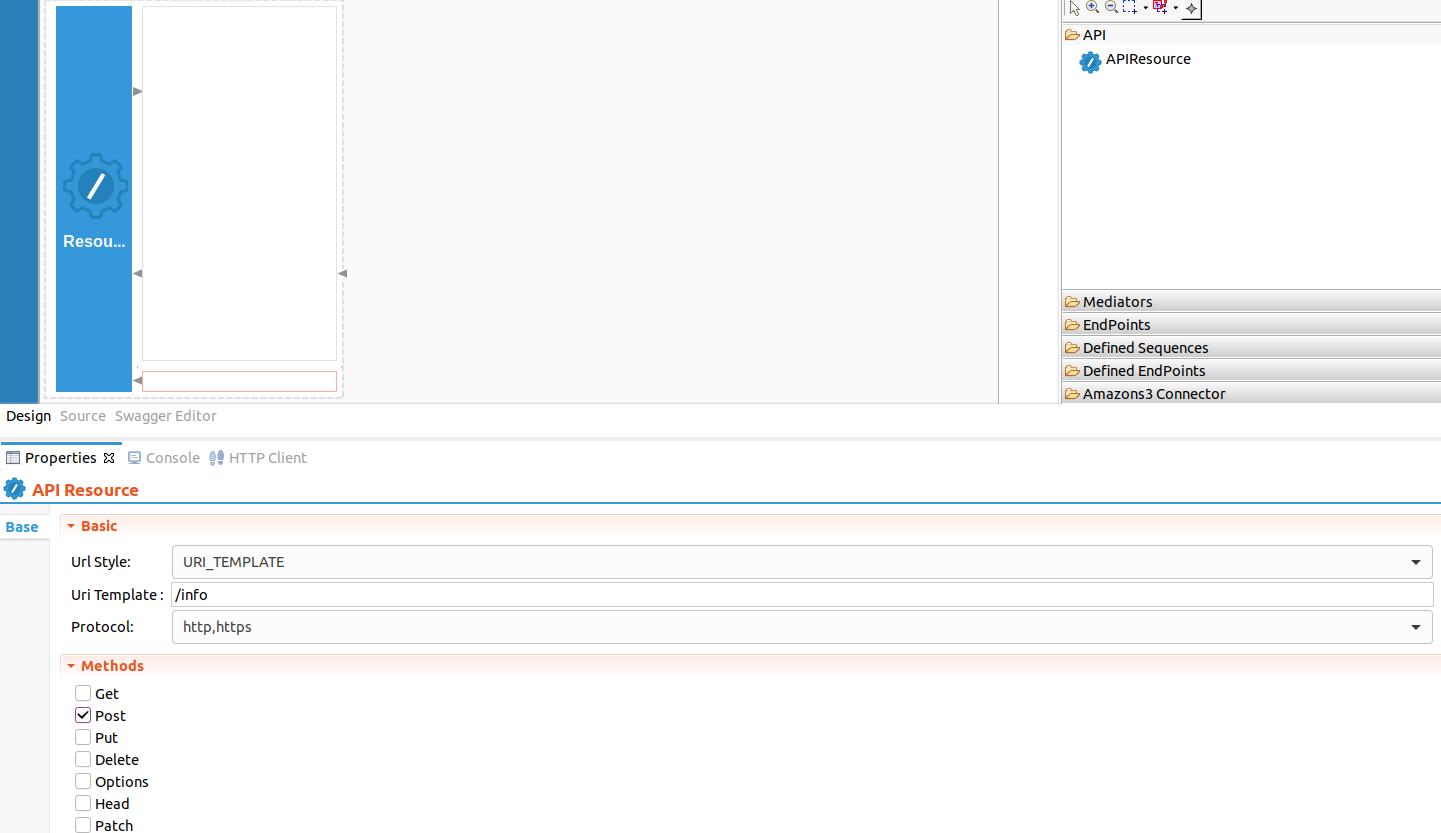
-
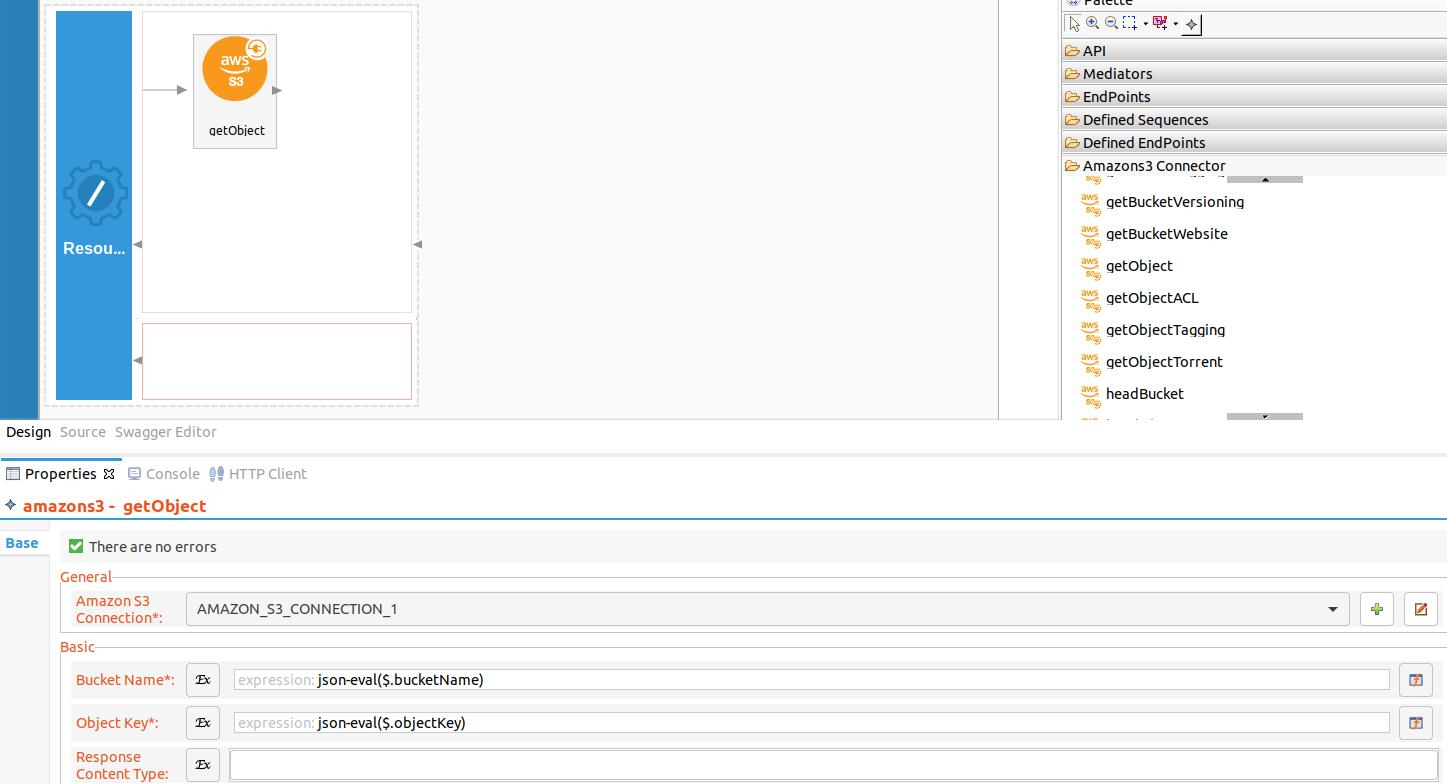
Next drag and drop the ‘getObject’ operation of the S3 Connector to the Design View. In the properties view, select the already created connection as 'Connection' from the drop down menu and provide the following expressions to the below properties,
- Bucket Name - json-eval($.bucketName)
- Object Key - json-eval($.objectKey)
-
Finally, drag and drop the Respond Mediator to send back the response from the getObject operation.
-
You can find the complete API XML configuration below. You can go to the source view and copy paste the following config.
<?xml version="1.0" encoding="UTF-8"?>
<api context="/s3connector" name="S3ConnectorTestAPI" xmlns="http://ws.apache.org/ns/synapse">
    <resource methods="PUT" uri-template="/createbucket">
        <inSequence>
            <amazons3.createBucket configKey="AMAZON_S3_CONNECTION_1">
                <bucketName>{json-eval($.bucketName)}</bucketName>
                <bucketRegion>us-east-2</bucketRegion>
            </amazons3.createBucket>
            <respond/>
        </inSequence>
        <outSequence/>
        <faultSequence/>
    </resource>
    <resource methods="POST" uri-template="/addobject">
        <inSequence>
            <amazons3.putObject configKey="AMAZON_S3_CONNECTION_1">
                <bucketName>{json-eval($.bucketName)}</bucketName>
                <objectKey>{json-eval($.objectKey)}</objectKey>
                <fileContent>{json-eval($.message)}</fileContent>
            </amazons3.putObject>
            <respond/>
        </inSequence>
        <outSequence/>
        <faultSequence/>
    </resource>
    <resource methods="POST" uri-template="/info">
        <inSequence>
            <amazons3.getObject configKey="AMAZON_S3_CONNECTION_1">
                <bucketName>{json-eval($.bucketName)}</bucketName>
                <objectKey>{json-eval($.objectKey)}</objectKey>
            </amazons3.getObject>
            <respond/>
        </inSequence>
        <outSequence/>
        <faultSequence/>
    </resource>
</api>Note:
- As
awsAccessKeyIduse the access key obtained from Amazon S3 setup and update the above API configuration. - As
awsSecretAccessKeyuse the secret key obtained from Amazon S3 setup and update the above API configuration. - Note that
region,connectionNameand credentials are hard coded. Please change them as per the requirement. - For more information please refer the reference guide for Amazon S3 connector.
Now we can export the imported connector and the API into a single CAR application. CAR application is the one we are going to deploy to server runtime.
Exporting Integration Logic as a CApp
CApp (Carbon Application) is the deployable artifact on the integration runtime. Let us see how we can export integration logic we developed into a CApp along with the connector.
Creating Connector Exporter Project
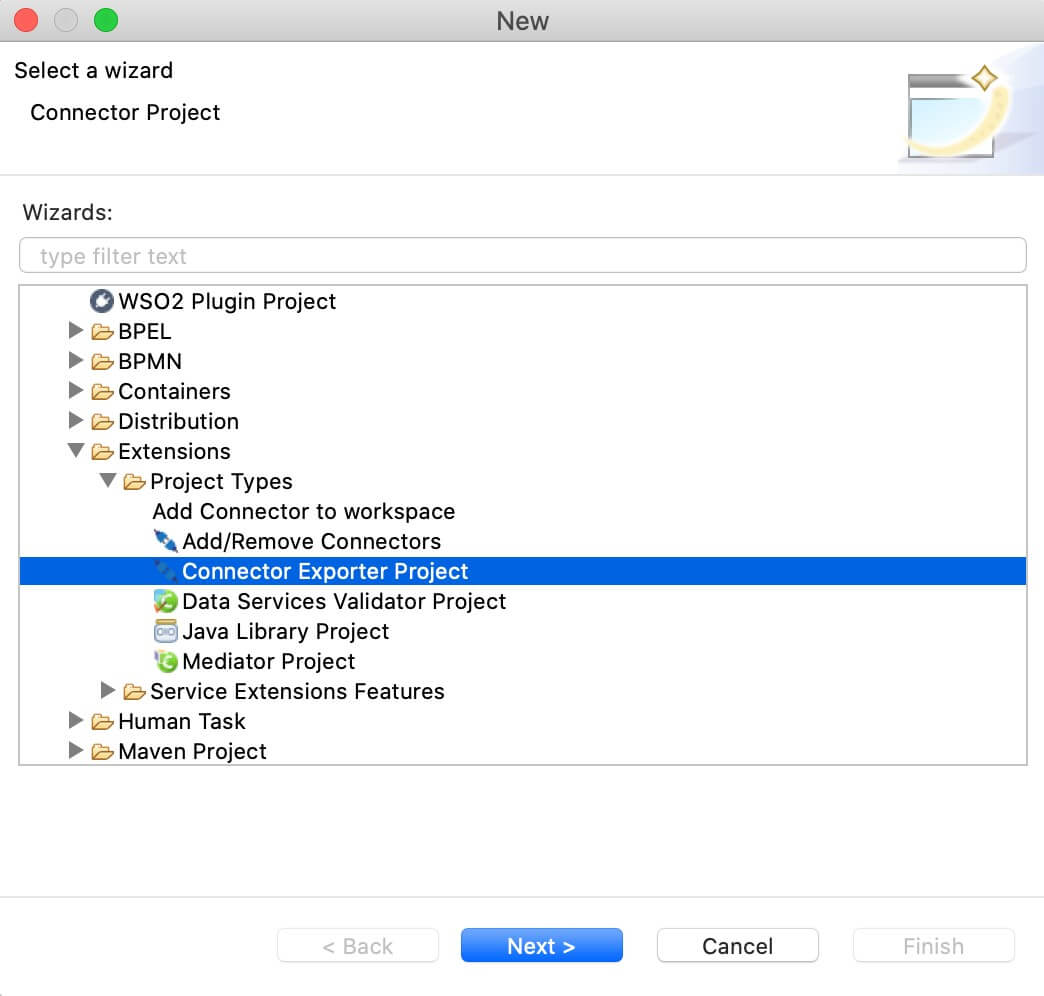
To bundle a Connector into a CApp, a Connector Exporter Project is required.
-
Navigate to File -> New -> Other -> WSO2 -> Extensions -> Project Types -> Connector Exporter Project.
-
Enter a name for the Connector Exporter Project.
-
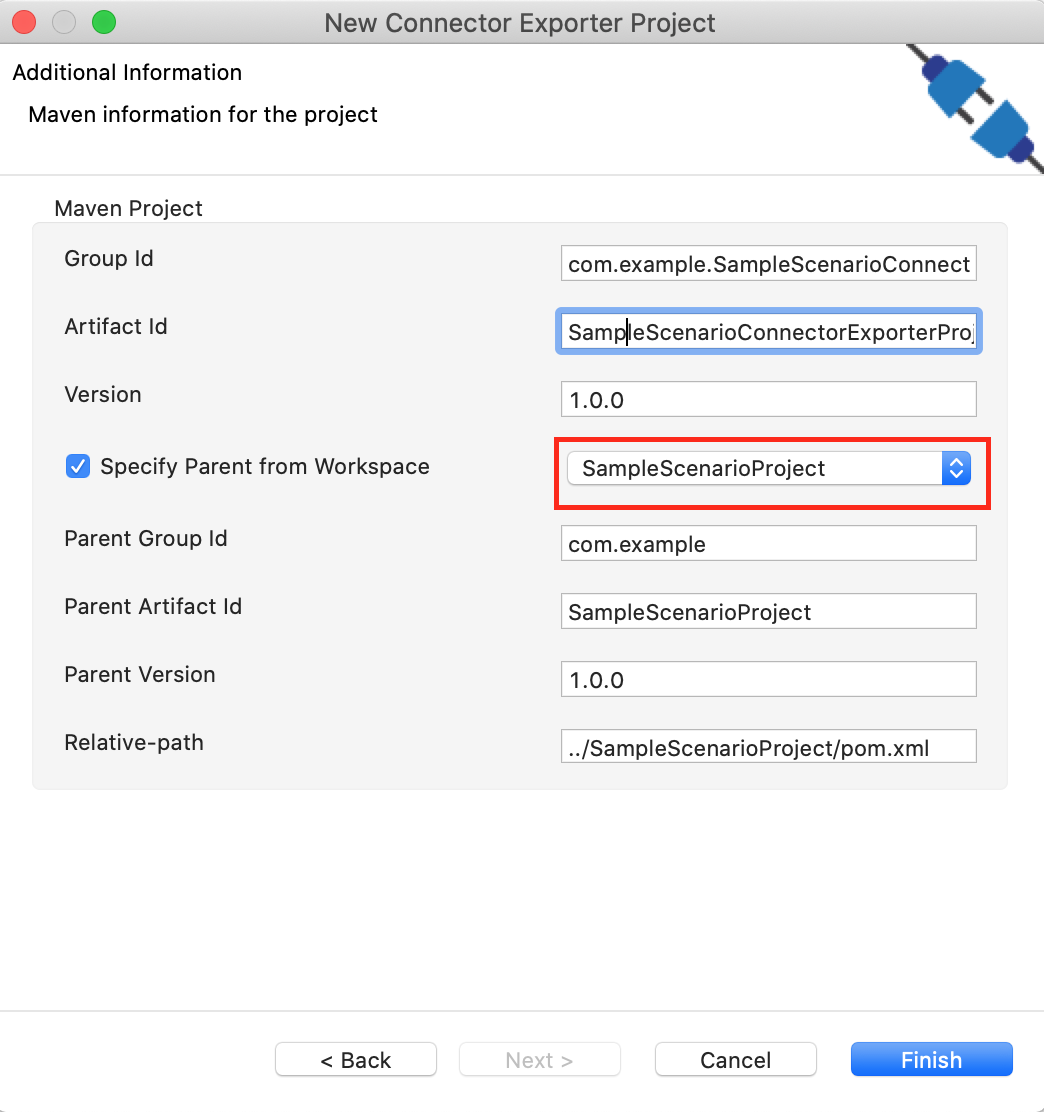
In the next screen select, Specify the parent from workspace and select the specific Integration Project you created from the dropdown.
-
Now you need to add the Connector to Connector Exporter Project that you just created. Right-click the Connector Exporter Project and select, New -> Add Remove Connectors -> Add Connector -> Add from Workspace -> Connector
-
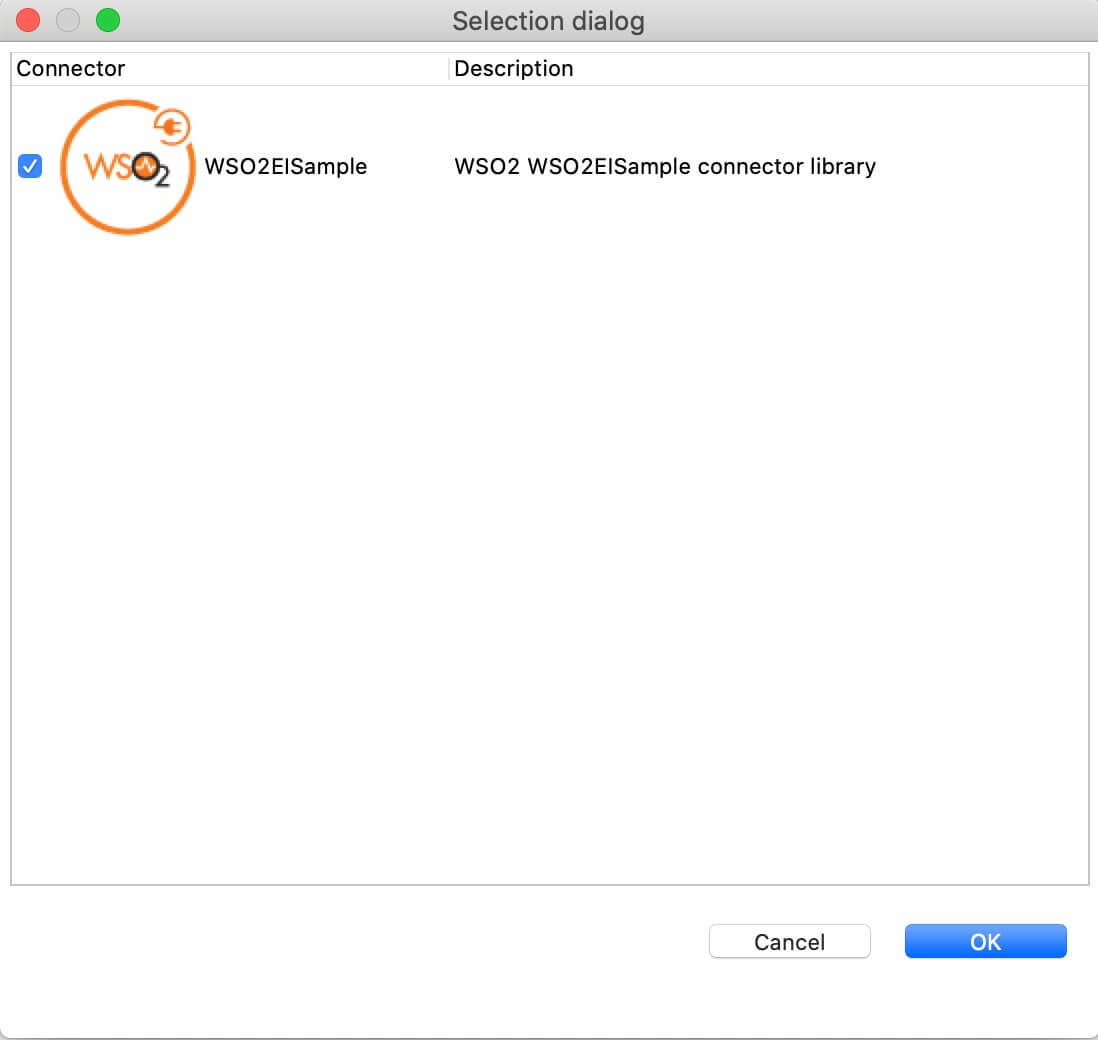
Once you are directed to the workspace, it displays all the connectors that exist in the workspace. You can select the relevant connector and click Ok.
Creating a Composite Application Project
To export the Integration Project as a CApp, a Composite Application Project needs to be created. Usually, when an Integration project is created, this project can be created as part of that project by Integration Studio. If not, you can specifically create it by navigating to File -> New -> Other -> WSO2 -> Distribution -> Composite Application Project.
Exporting the Composite Application Project
-
Right-click the Composite Application Project and click Export Composite Application Project.

-
Select an Export Destination where you want to save the .car file.
-
In the next Create a deployable CAR file screen, select both the created Integration Project and the Connector Exporter Project to save and click Finish. The CApp is created at the specified location provided at the previous step.
Now the exported CApp can be deployed in the integration runtime so that we can run it and test.
Get the project
You can download the ZIP file and extract the contents to get the project code.
Tip
You may need to update the value of the access key and make other such changes before deploying and running this project.
Deployment
Follow these steps to deploy the exported CApp in the integration runtime.
Deploying on Micro Integrator
You can copy the composite application to the <PRODUCT-HOME>/repository/deployment/server/carbonapps folder and start the server. Micro Integrator will be started and the composite application will be deployed.
You can further refer the application deployed through the CLI tool. See the instructions on managing integrations from the CLI.
Click here for instructions on deploying on WSO2 Enterprise Integrator 6
-
You can copy the composite application to the
<PRODUCT-HOME>/repository/deployment/server/carbonappsfolder and start the server. -
WSO2 EI server starts and you can login to the Management Console https://localhost:9443/carbon/ URL. Provide login credentials. The default credentials will be admin/admin.
-
You can see that the API is deployed under the API section.
Testing
We can use Curl or Postman to try the API. The testing steps are provided for curl. Steps for Postman should be straightforward and can be derived from the curl requests.
Creating a bucket in Amazon S3
- Create a file called
data.jsonwith the following content. Note that the bucket region isus-east-2. If you need to create the bucket in a different region, modify the hard coded region of the API configuration accordingly.{ "bucketName":"wso2engineers" } -
Invoke the API as shown below using the curl command. Curl Application can be downloaded from here.
Expected Response:curl -H "Content-Type: application/json" --request PUT --data @data.json http://127.0.0.1:8290/s3connector/createbucketYou will receive a response like below containing the details of the bucket created.
{
    "createBucketResult": {
        "success": true,
        "Response": {
            "Status": "200:Optional[OK]",
            "Location": "http://wso2engineers.s3.amazonaws.com/"
        }
    }
}
Please navigate to Amazon AWS S3 console and see if a bucket called
wso2engineersis created. If you tried to create a bucket with a name that already exists, it will reply back with a message indicating the conflict.
Post a message into Amazon S3 bucket
- Create a file called
data.jsonwith the following content.{ "bucketName":"wso2engineers", "objectKey":"Julian.txt", "message":"Julian Garfield, Software Engineer, Integration Group" } -
Invoke the API as shown below using the curl command. Curl Application can be downloaded from here.
Expected Response: You will receive a response like below containing the details of the object created.curl -H "Content-Type: application/json" --request POST --data @data.json http://127.0.0.1:8290/s3connector/addobject
Navigate to AWS S3 console and click on the bucket{ "putObjectResult": { "success": true, "PutObjectResponse": { "ETag": "\"359a77e8b4a63a637df3e63d16fd0e34\"" } } }wso2engineers. You will note that a file has been created with the nameJulian.txt.
Read objects from Amazon S3 bucket
Now let us read the information on wso2engineers that we stored in the Amazon S3 bucket.
-
Create a file called data.json with the following content. It specifies which bucket to read from and what the filename is. This example assumes that the object is stored at root level inside the bucket. You can also read a object stored in a folder inside the bucket.
2. Invoke the API as shown below using the curl command.{ "bucketName":"wso2engineers", "objectKey":"Julian.txt" }
Expected Response: You receive a response similar to the following. Thecurl -H "Content-Type: application/json" --request POST --data @data.json http://127.0.0.1:8290/s3connector/infoContentelement contains the contents of the file requested.Note
The
Contentelement is available only with Amazon S3 connector v2.0.1 and above.{ "getObjectResult": { "success": true, "GetObjectResponse": { "AcceptRanges": "bytes", "Content": "Julian Garfield, Software Engineer, Integration Group", "ContentLength": 45, "ContentType": "text/plain; charset=UTF-8", "DeleteMarker": false, "ETag": "\"359a77e8b4a63a637df3e63d16fd0e34\"", "LastModified": null, "metadata": null, "MissingMeta": 0, "PartsCount": 0, "TagCount": 0 } } }
In this example Amazon S3 connector is used to perform operations with Amazon S3 storage. You can receive details of the errors that occur when invoking S3 operations using the S3 responses itself. Please read the Amazon S3 connector reference guide to learn more about the operations you can perform with the Amazon S3 connector.
Top