Deploying a GraphQL API in Choreo Connect
GraphQL is a querying language for APIs that was initially developed by Facebook. When compared to the REST APIs, GraphQL APIs allow you to query only the required data. Response will have only the data you requested (over-fetching and under-fetching will not happen). Using a single request you can fetch data related to multiple resources. This is not possible with REST APIs. If REST API is used, you will have to consider multiple requests to gather the same amount of data. GraphQL APIs are based on a strong type system. Schema Definition Language (SDL) file defines the contract between client and the server. It explains how client can access the data provided by the server. This page explains how to deploy a GraphQL API in Choero Connect and also explains the supported features of Choreo Connect for GraphQL APIs.
Update Level 5
This feature is available only as an update, after Update level 1.1.0.5 (released on 15 Aug 2022) and further. For more information regarding Choreo Connect updates, see here.
Choreo Connect supports the below features in addition to the basic GraphQL API invocations.
- Runtime configurations
- Transport level security
- GraphQL query analysis (query complexity and query depth limitation)
- Cross-Origin Resource Sharing (CORS)
- Rate limiting policies (API level and operation level) with the support of WSO2 API-M
- Security scopes
- Enable/ disable security for GraphQL operations
Note
Currently Choreo Connect supports query and mutation GraphQL operations only.
You can deploy GraphQL APIs using Choreo Connect by following one of the two deployment modes described below.
| Mode | Method |
|---|---|
| Choreo Connect with WSO2 API Manager as a Control Plane | Via WSO2 API Manager Publisher Portal |
| Choreo Connect as a Standalone Gateway | Via apictl for Standalone Mode |
Via WSO2 API Manager Publisher Portal
Below instructions explain how to deploy a GraphQL API to Choreo Connect via the Publisher Portal in WSO2 API Manager.
Before you begin
- This guide assumes that you already have an up and running Choreo Connect instance configured with WSO2 API Manager. If not, you can refer to the Quick Start Guide on how to run Choreo Connect with WSO2 API Manager. To learn more about Choreo Connect related components, refer to the Overview of Choreo Connect.
- GraphQL schema file (SDL) and a GraphQL server implementaion relevant to the SDL.
- You need to have a GraphQL schema file (SDL) and a GraphQL server implementaion relevant to the SDL. You can obtain the SDL file relevant to this example from here and the server implementation relevant to that SDL available in here.
Step 1 - Create a GraphQL API in WSO2 API Manager Publisher Portal
You can create a GraphQL API in WSO2 API-M Publisher Portal by following the steps described below.
-
Sign in to the API Publisher Portal.
https://<hostname>:9443/publisherExample:
https://localhost:9443/publisherLet's use
adminas the username and password to sign in. -
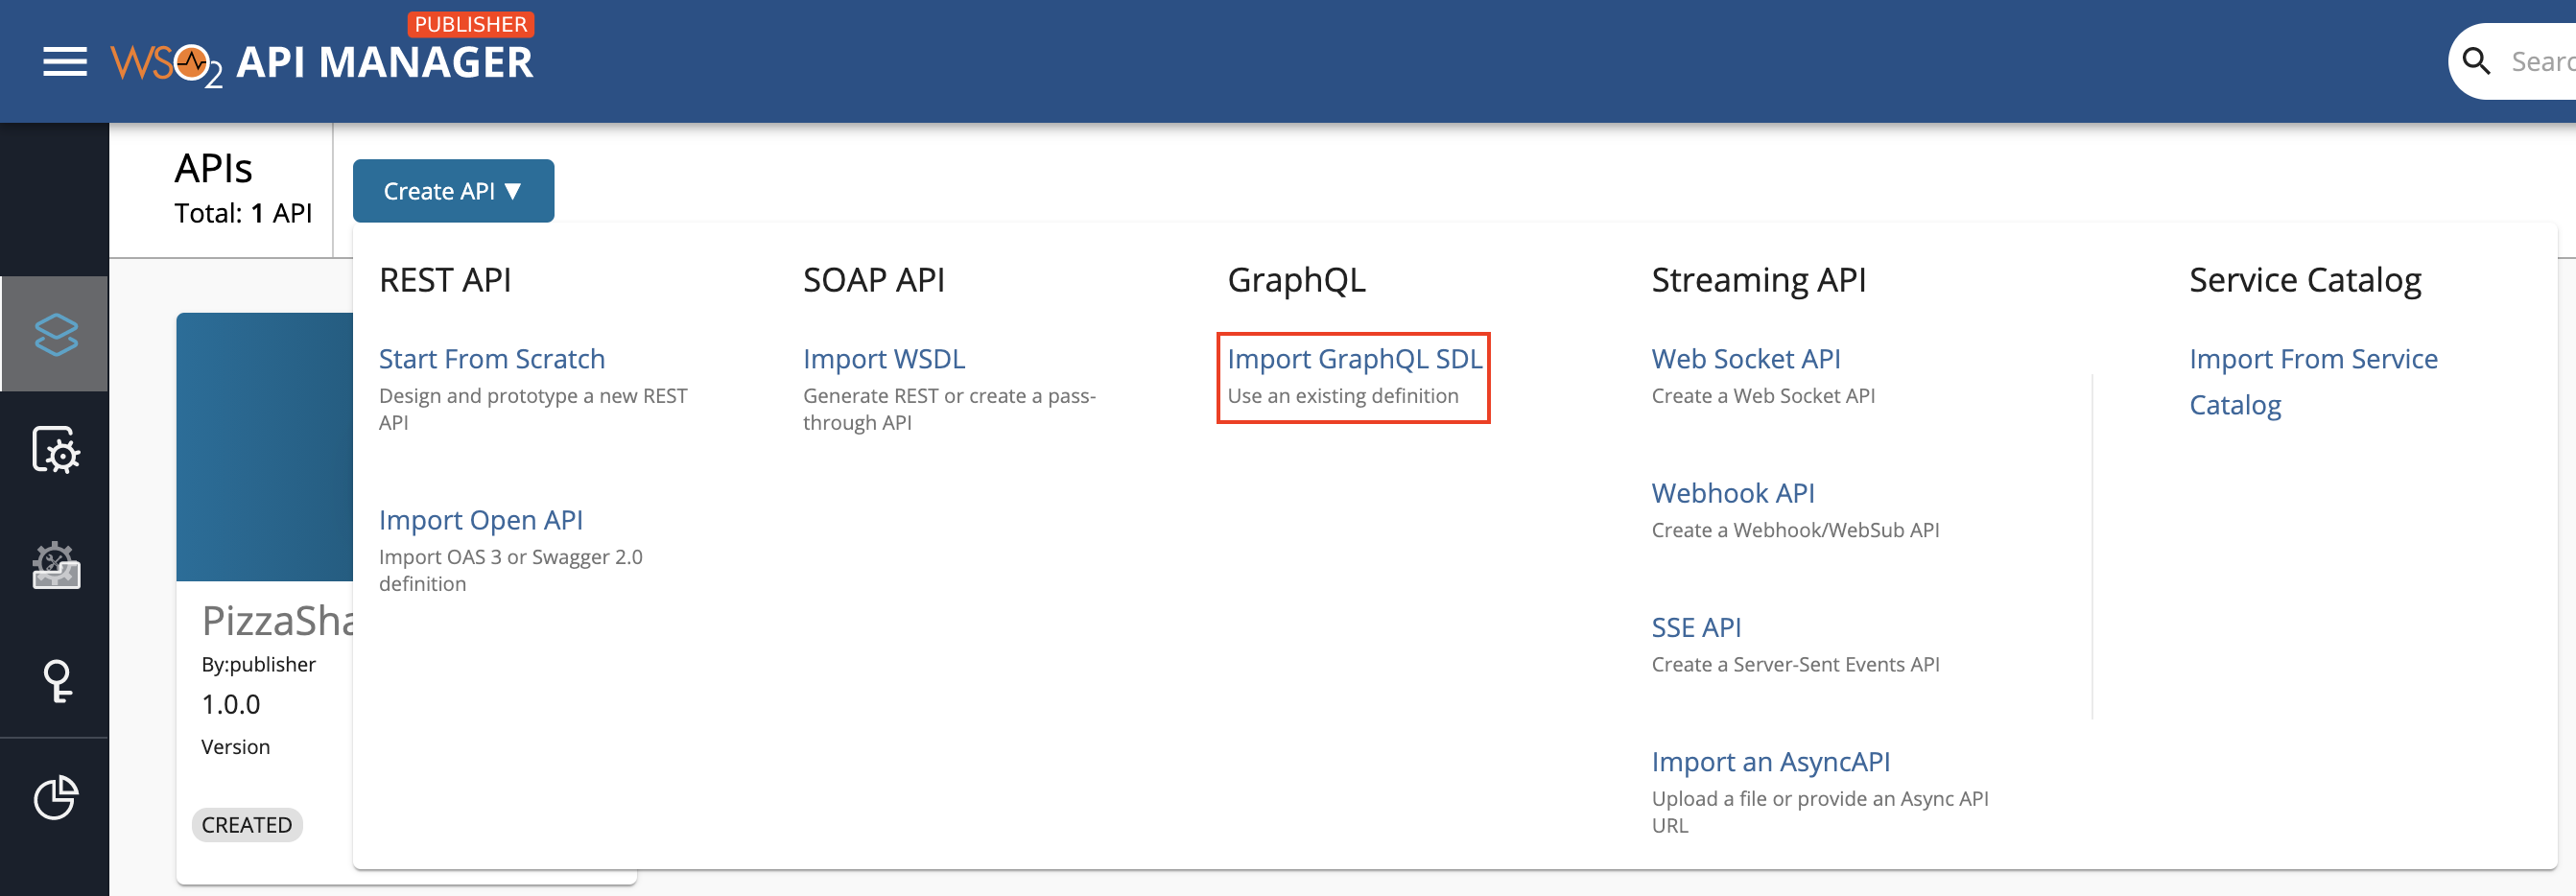
Click Create API and then click Import GraphQL SDL.
-
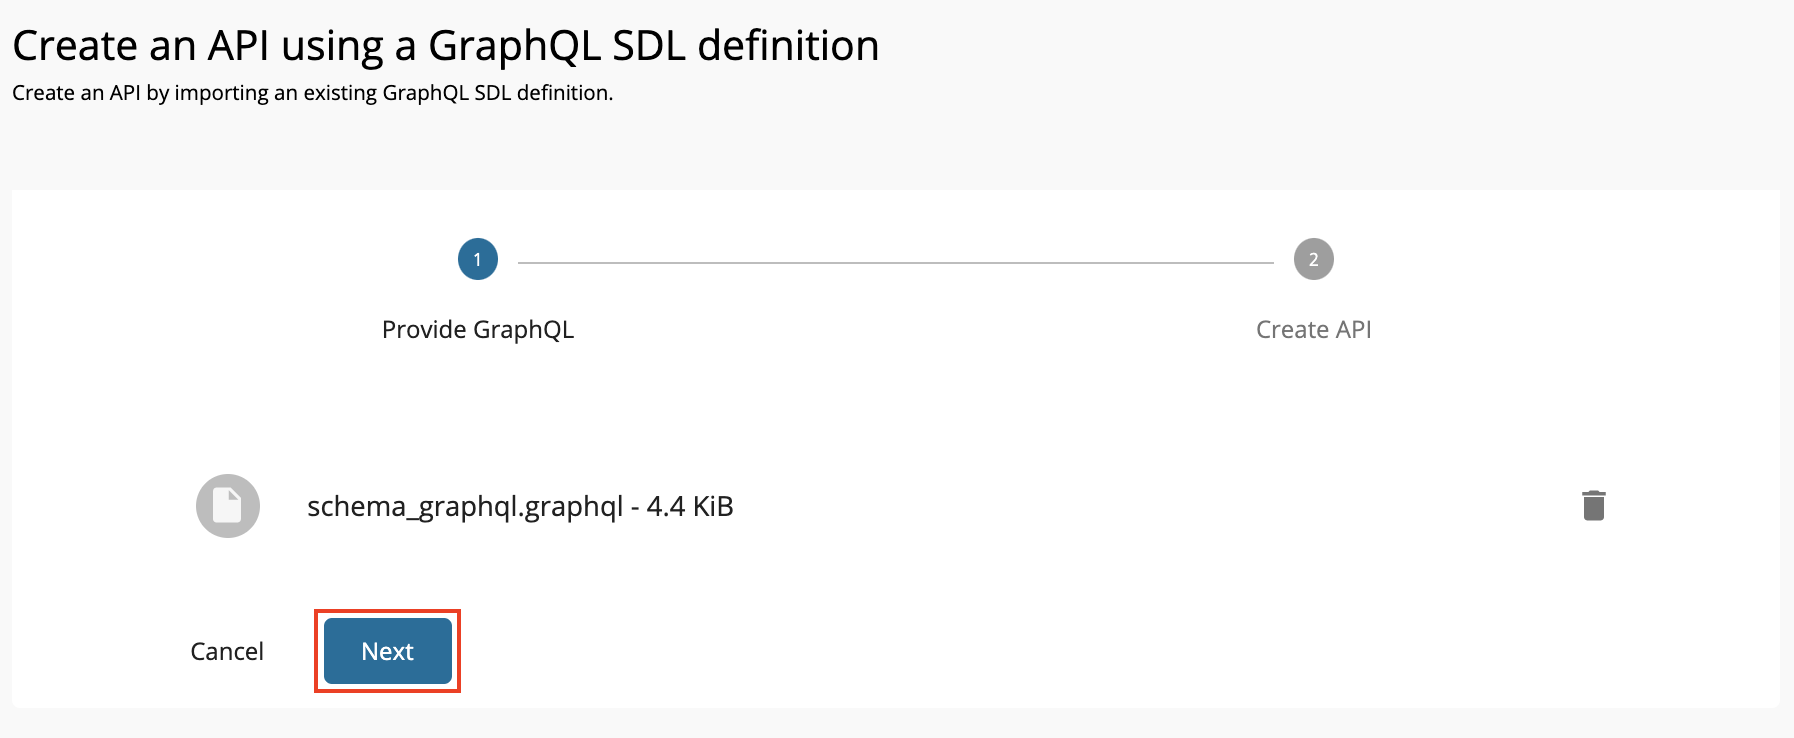
Import the schema by dragging and dropping the file or by uploading the file, and click Next.
Let's use the StarWarsAPI schema definition to create the schema file.
Note
-
You need to define the SDL Schema based on the GraphQL schema design best practices.
- The file extension can be either
.graphql,.txt, or.json. - The file name can be any name, which is based on your preference.
-
-
Enter the GraphQL API related details and click Create.
Let's create an API named "StarWarsAPI" using the following sample data.
FieldDescriptionName
StarWarsAPI
Context
/swapiVersion
1.0.0
Endpoint
http://hostName:8080/graphql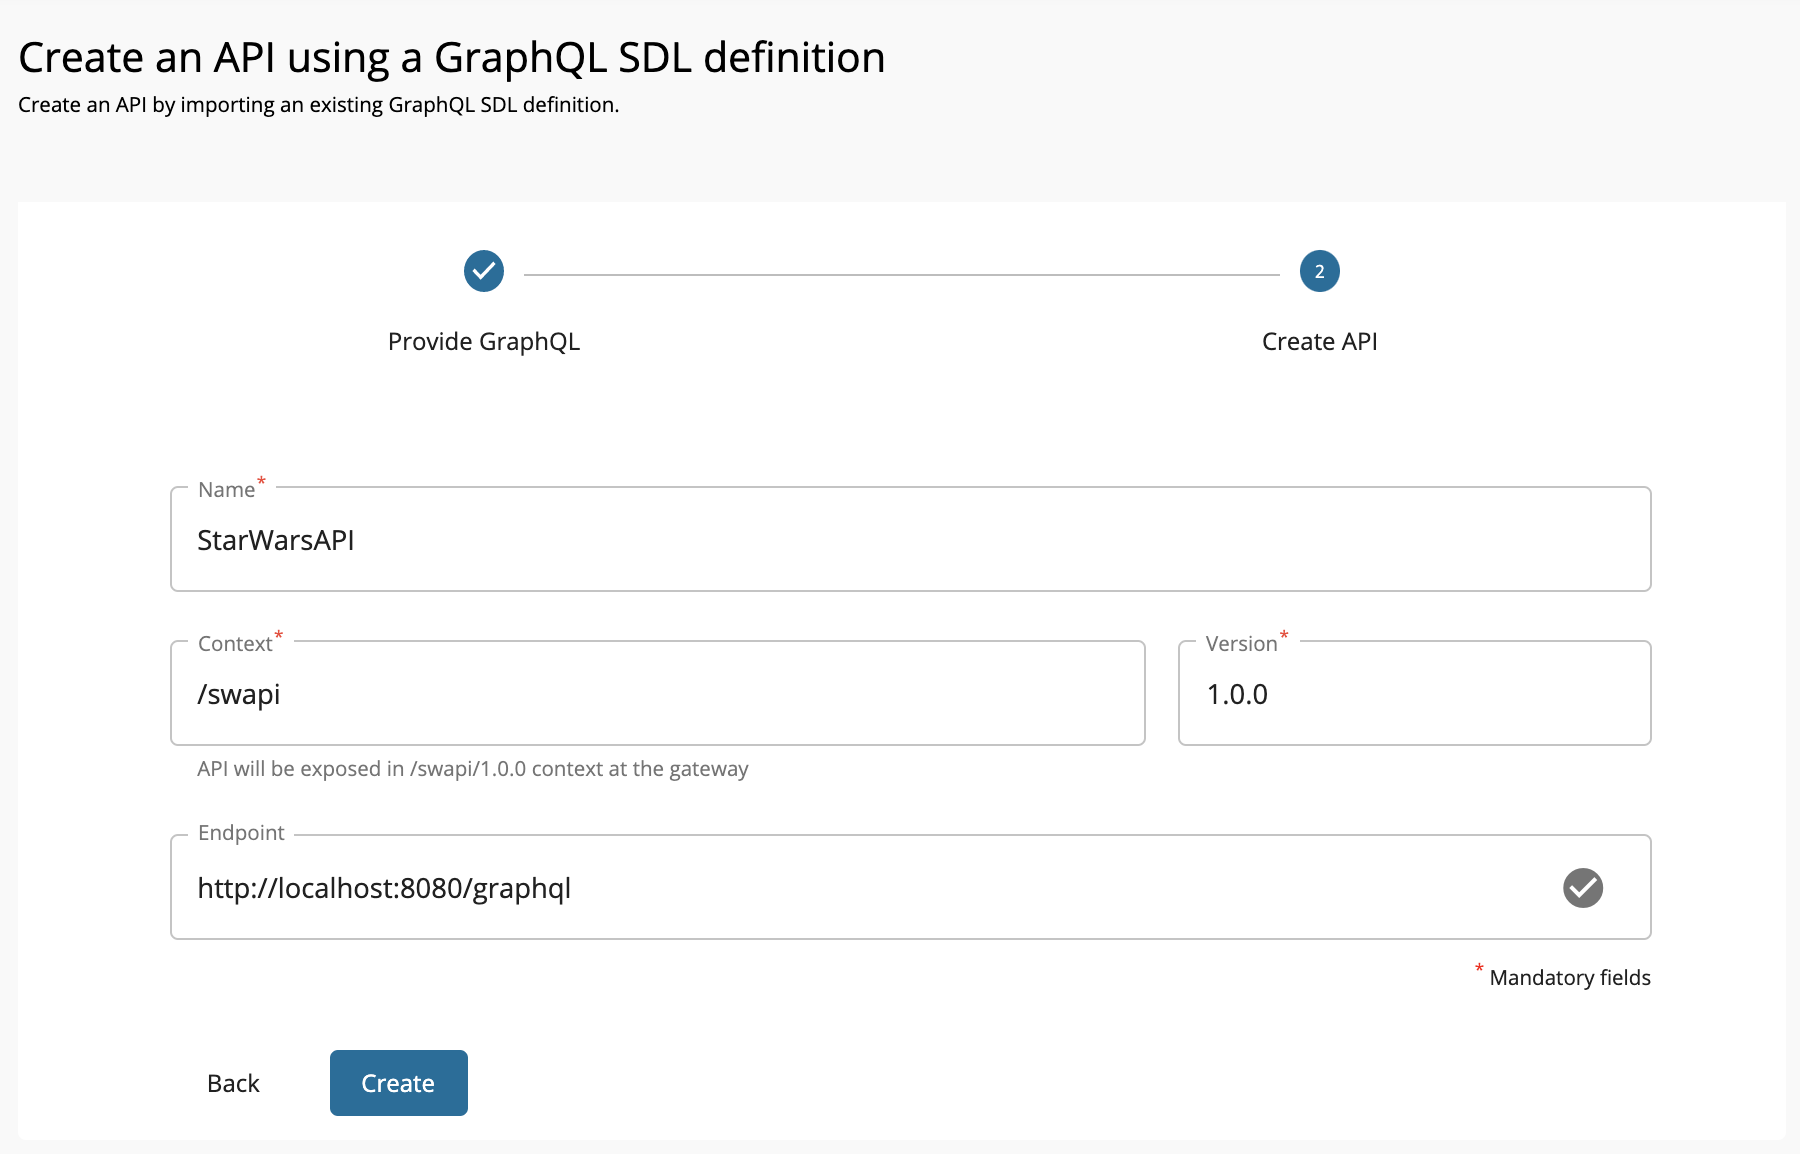
-
Click
Createbutton.
Step 2 - Deploy and publish the API
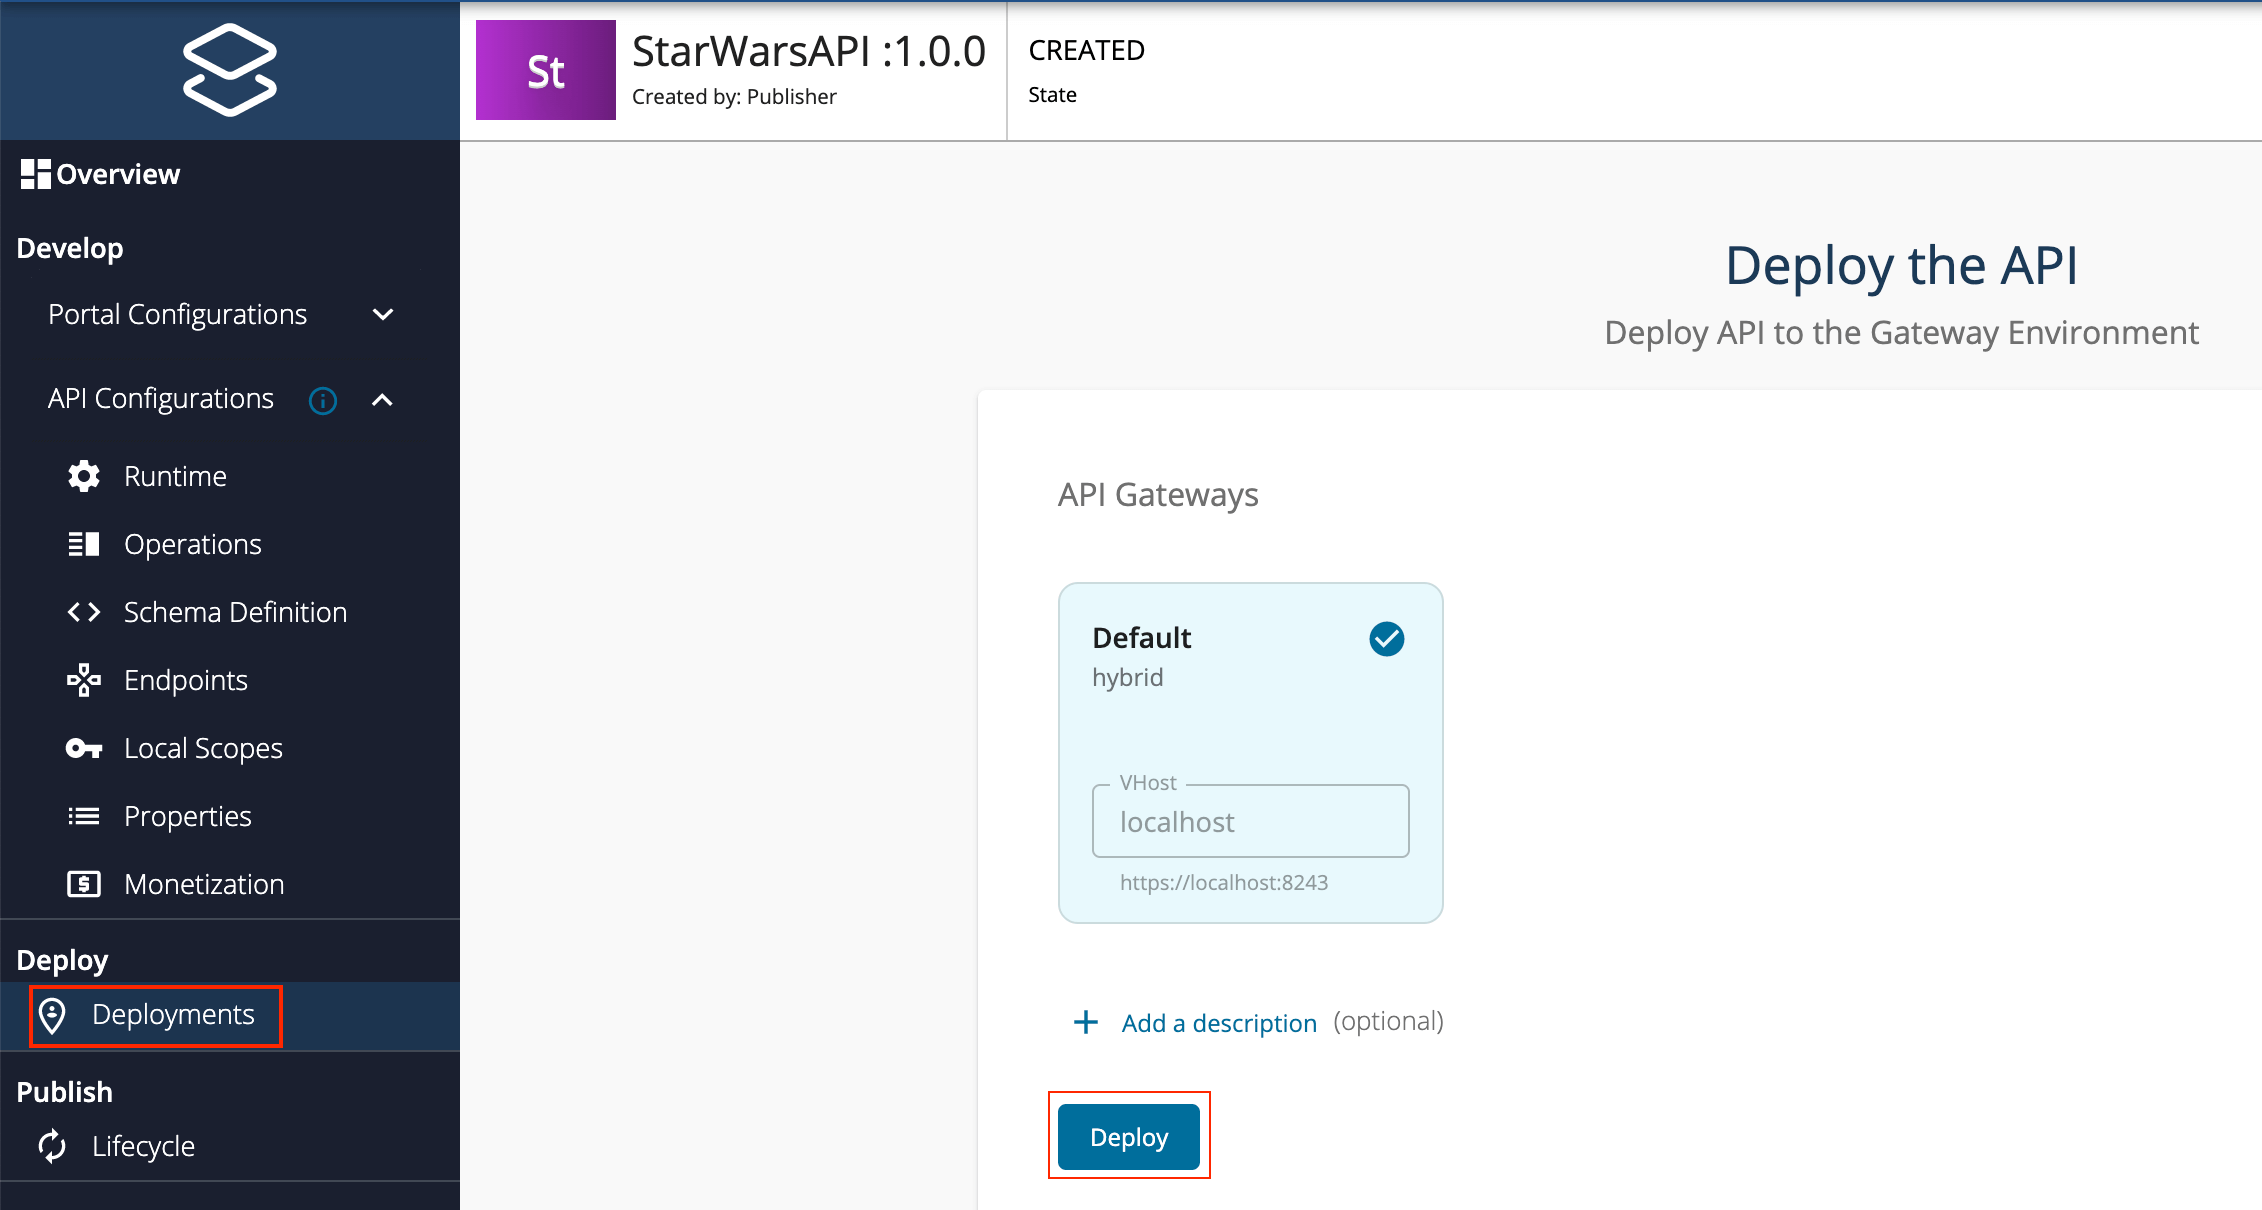
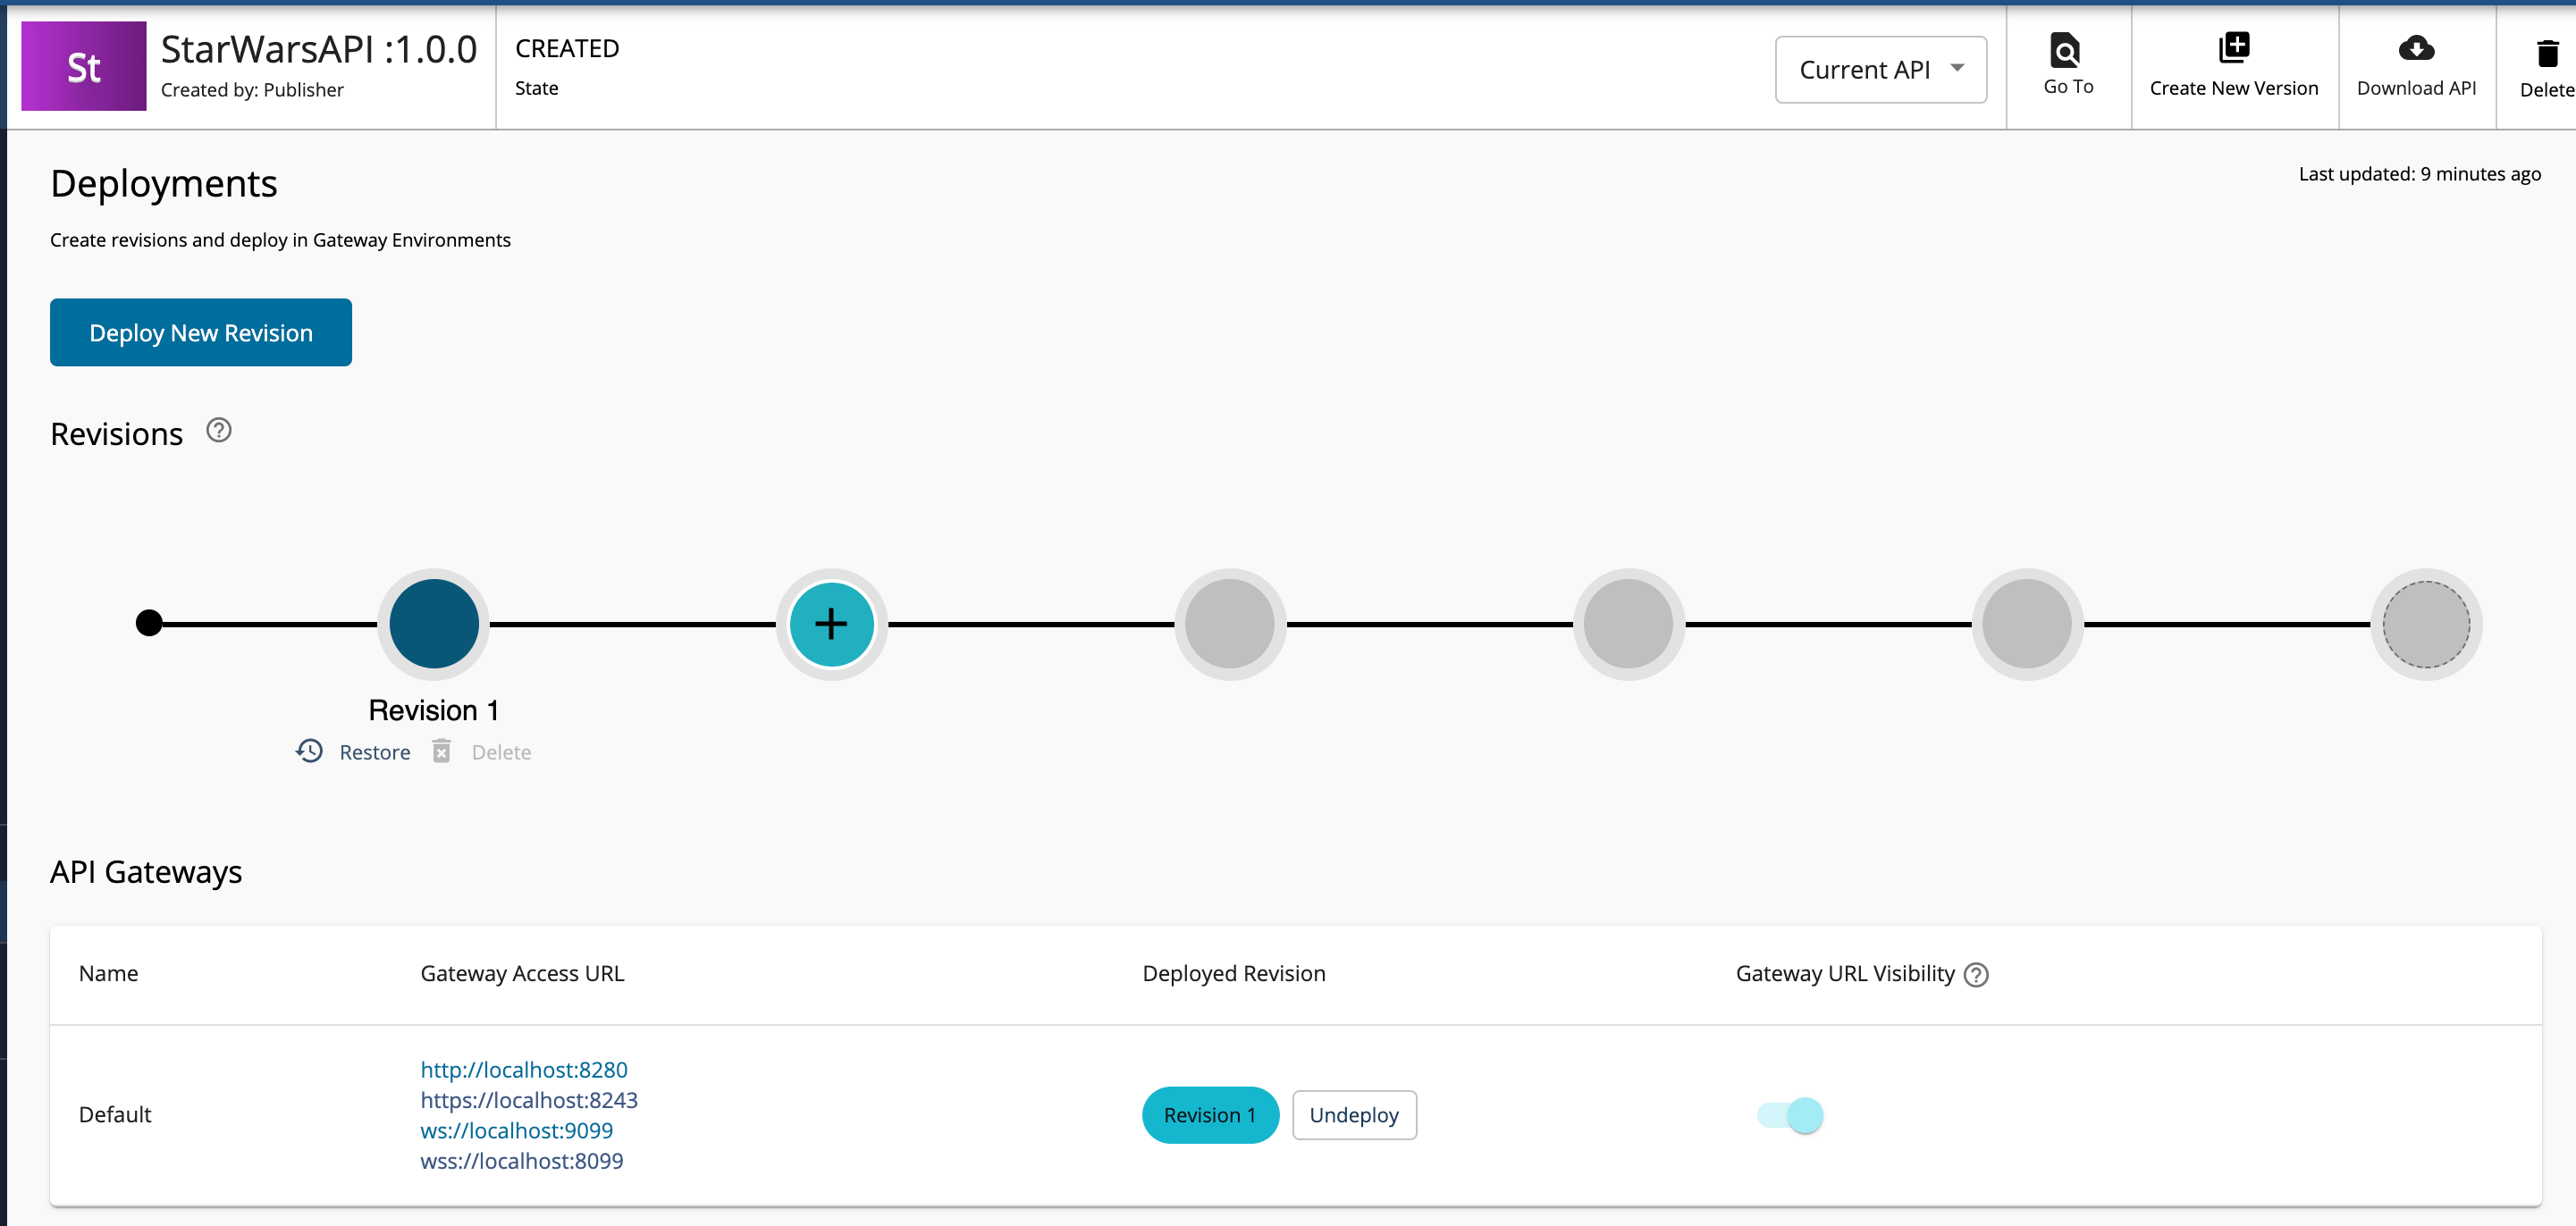
- Navigate to Deploy and click Deployments to retrieve the API deployment page.
-
Click Deploy to deploy the API in Choreo Connect.
The Deployment page appears.
-
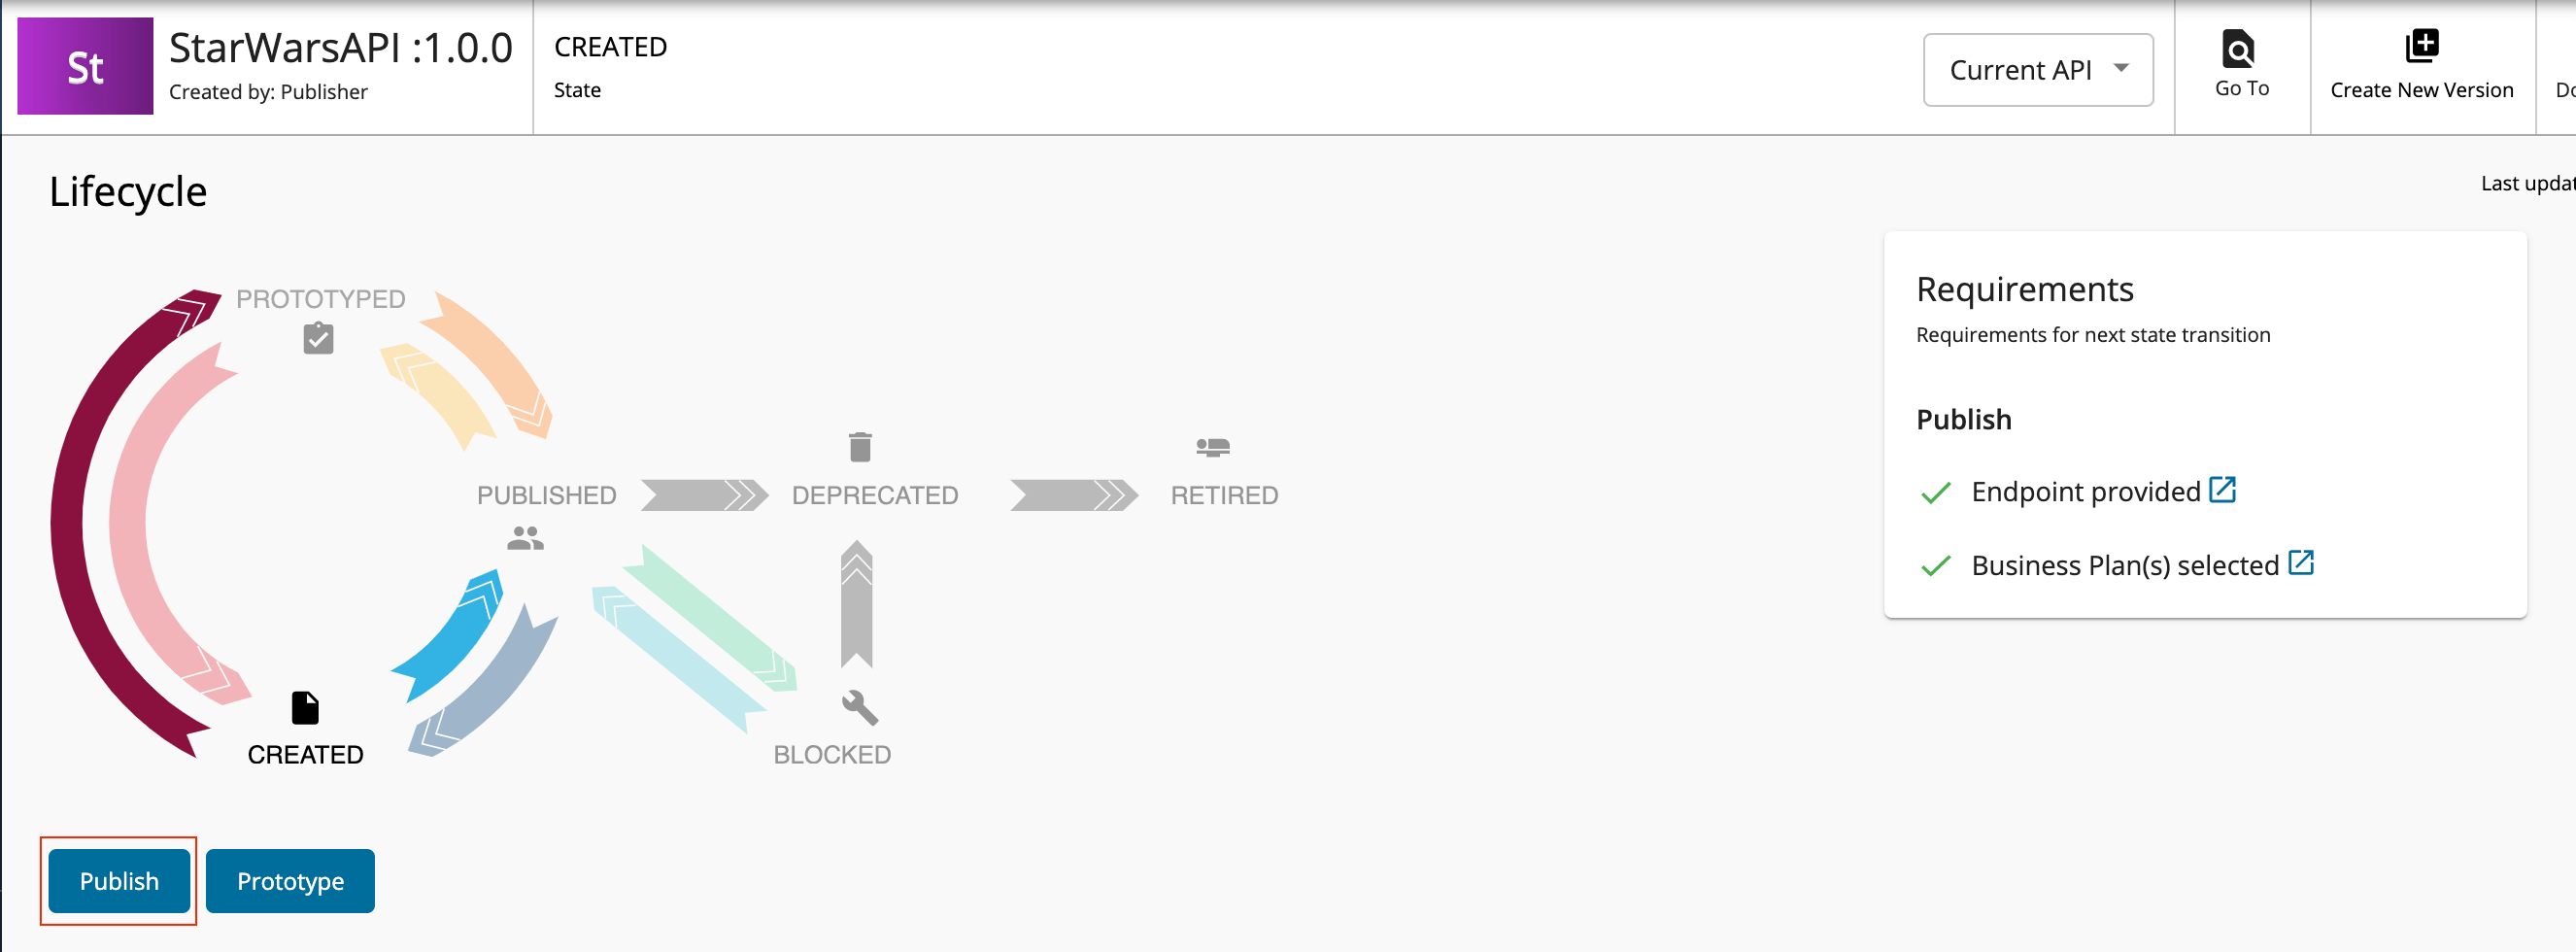
Navigate to Publish and click Lifecycle.
The API lifecycle page appears.
-
Click Publish to publish the API to the API Developer Portal.
Step 3 - Generate an Access Token to invoke the API
-
Click View in Dev Portal at the top right corner to open Developer Portal in another browser tab.
-
Open Applications from the top menu and select DefaultApplication from the list.
-
Open the Subscriptions tab and subscribe your API to the DefaultApplication.
-
Open APIs from the top menu and select your API.
-
Open the Try Out tab and click GET TEST KEY. This will include the access token in the cURL command you generate in the section below.
Step 4 - Invoke the API by providing a valid GraphQL query
-
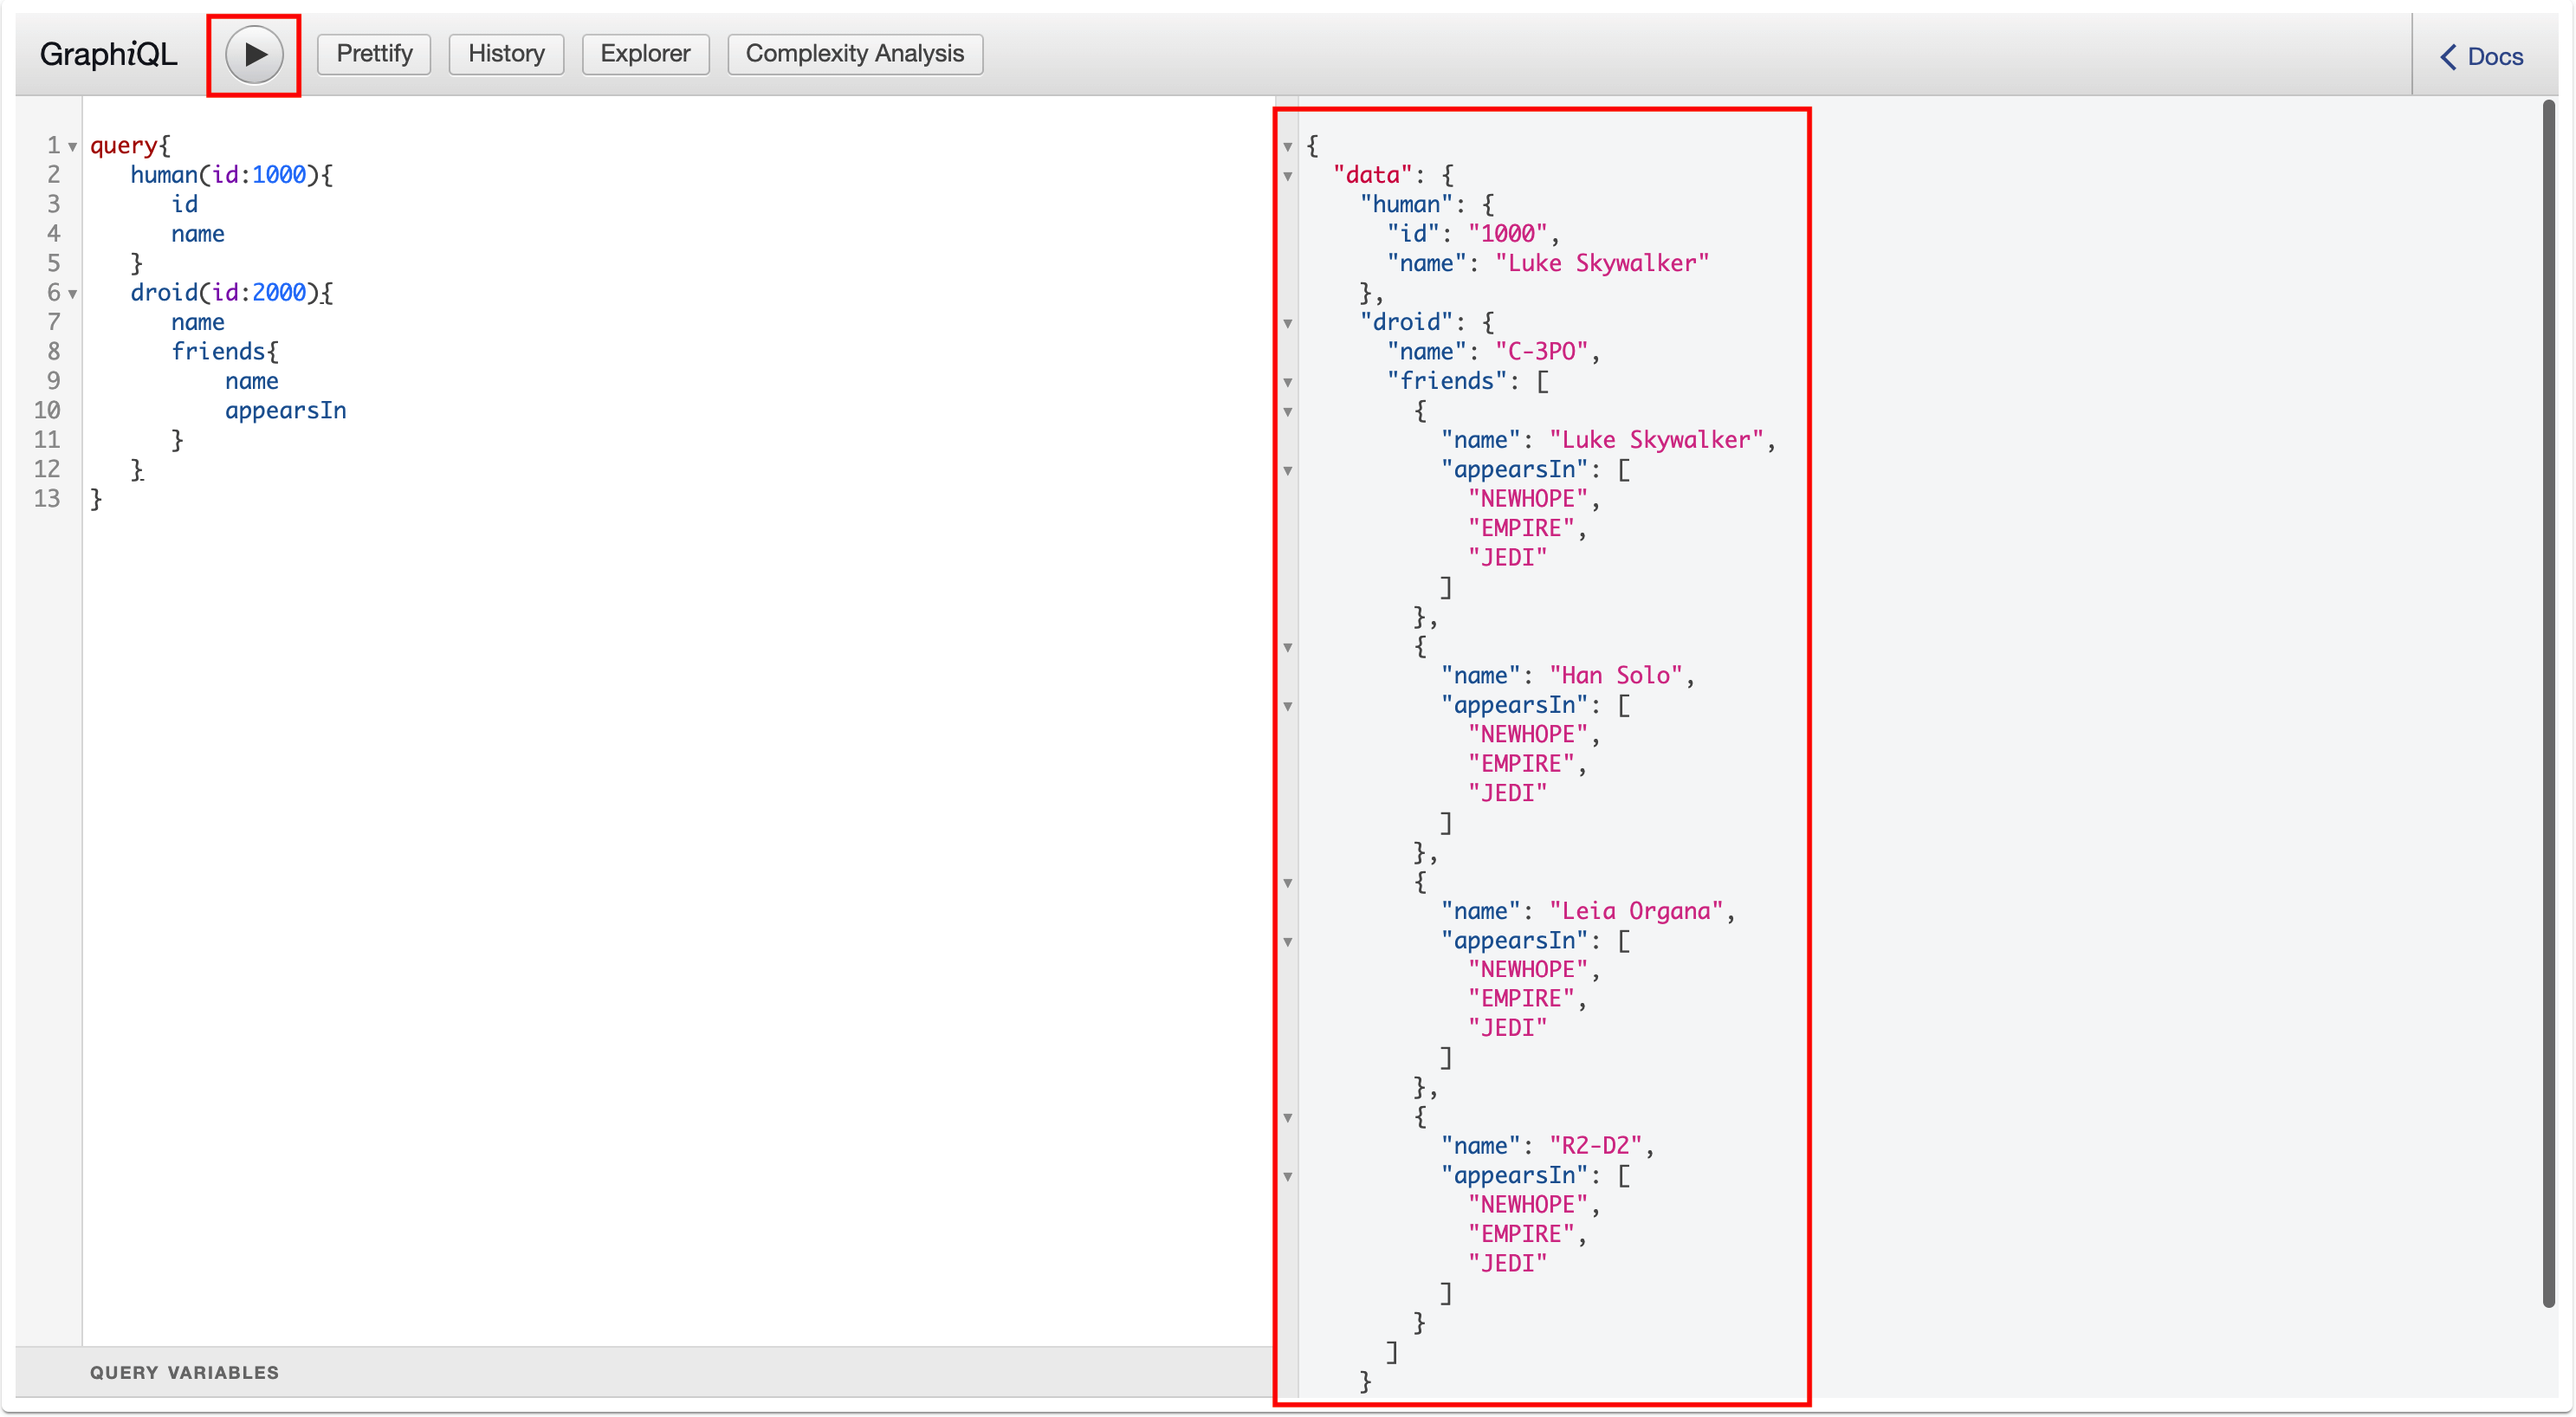
Since GraphQL APIs require a GraphQL query to provide results, you need to have a valid query. A sample query is provided in the below section. In API Manager Publisher Portal, GraphQL is used for build queries. You can use the explorer option available there to build queries. For more information regarding valid GraphQL query generation, see here.
query{ human(id:1000){ id name } droid(id:2000){ name friends{ name appearsIn } } } -
Click Execute.
You will get a response for the GraphQL API invocation, as shown below.
Via apictl for Standalone Mode
The CLI tool (apictl)
does not support initializing projects for GraphQL APIs yet. However, you can download the sample GraphQL API project from
here and try it out by deploying
it into Choreo Connect. When you are using your own GraphQL API with Choreo Connect, you can change the relevant attribute values
in api.yaml, graphql-complexity.yaml and definitions/schema.graphql files. There is an explanation regarding those attribute values in
here.
The following steps describe how to deploy a GraphQL API in Choreo Connect standalone mode.
Step 1 - Create an API Project
When using GraphQL APIs in Choreo Connect standalone mode, you need to have an API project. The structure of a sample GraphQL API project is included below.
.
├── Definitions
│   ├── graphql-complexity.yaml
│   └── schema.graphql
└── api.yaml
Note
- Similar to the sample project, you can deploy your own GraphQL API in Choreo Connect by changing the relevant attribute values that are defined in the
api.yamlfile. graphql-complexity.yamlis an optional file where you can define complexities relevant to the GraphQL queries.
Step 2 - Add a Choreo Connect Environment to apictl
To use apictl with Choreo Connect, a Choreo Connect environment needs to be added to the apictl. This environment will hold the Adapter URL for further commands.
apictl mg add env dev --adapter https://localhost:9843Info
The apictl commands that starts as apictl mg are Choreo Connect specific. If a command does not have mg after apictl then the command could probably be common to both Choreo Connect and API Manager, but it could also be API Manager specific.
Tip
The apictl commands here onwards are executed with the -k flag to avoid SSL verification with the Choreo Connect.
To communicate via HTTPS without skipping SSL verification (without -k flag), add the cert in the Choreo Connect truststore into the <USER_HOME>/.wso2apictl/certs folder.
Step 3 - Log in to the Choreo Connect Environment in apictl
You can use the following command to log in to the above Choreo Connect cluster (log in to the Choreo Connect Adapter). When you log in, an access token will be retrieved from Choreo Connect and it will be saved in apictl.
apictl mg login dev -u <username> -p <password> -kapictl mg login dev -u admin -p admin -kStep 4 - Deploy the API
Now let's deploy the API to Choreo Connect by executing the following command.
apictl mg deploy api -f <path_to_the_API_project_just_created>/<gqlProjectName> -e dev -kStep 5 - Generate an access token
After exposing the GraphQL API via Choreo Connect, you can invoke an API with a valid access token.
Let's use the following command to generate a JWT to access the API, and set it to the variable TOKEN.
TOKEN=$(curl -X POST "https://<hostname>:<port>/testkey" -d "scope=<scope values>" -H "Authorization: Basic base64(username:password)" -k -v)
TOKEN=$(curl -X POST "https://localhost:9095/testkey" -d "" -H "Authorization: Basic YWRtaW46YWRtaW4=" -k -v)
Step 6 - Invoke the API
Note
- Choreo Connect handles GraphQL API requests considering the
POSTHTTP method type only. Therefore, the query given in the request should follow the JSON structure explained here. - The request should include one of the HTTP request
Content-Typeheaders listed below.-H "Content-Type: application/json"-H "Content-Type: application/graphql"
-
Invoke the API using the following cURL command structure.
curl -X POST "<Docker-hostname>:<Docker-port>/<API-context>/<API-version>" -H "Authorization: Bearer $TOKEN" -d "<query>" -H "Content-Type: application/json" -kcurl -X POST "https://localhost:9095/starwars/1.0.0" -H "Authorization: Bearer $TOKEN" -d '{"query":"query MyQuery { allDroids { appearsIn } }","variables":null}' -H "Content-Type: application/json" -k{"data":{"allDroids":[{"appearsIn":["NEWHOPE","EMPIRE","JEDI"]},{"appearsIn":["NEWHOPE","EMPIRE","JEDI"]}]}}