Overriding Developer Portal Theme
There are mainly two ways to customize and override the developer portal theme.
- Theming using
userTheme.js - Overriding React components
In this section, we will cover the first method which is the simplest way to change the appearance of Developer portal.
For the second method, please refer Advanced Customization section.
Global Theming
You can find the default theme in the following location <API-M_HOME>/repository/deployment/server/jaggeryapps/devportal/source/src/app/data/defaultTheme.js.
The defaultTheme.js file has all the parameters defining the look and feel of the Developer Portal.
Using the above file as reference, you can add new properties to userTheme.js configurations and override the default parameters defined in the above default theme.
The userTheme.js file is located in following path in the API Manager server directory.
<API-M_HOME>/repository/deployment/server/jaggeryapps/devportal/site/public/theme/userTheme.js. Changes done in this file are reflected directly in the Developer Portal ( It's not required to restart the server or rebuild the source code).
Note
API Manager Devportal is themed using React Material Design. The theme configuration is an external JSON file that resides outside the React codebase. While an administrator who has access to the file system can override the default theme configuration, a tenant admin can override both of them via the defaultTheme.json file.
You can refer to <API-M_HOME>/repository/deployment/server/jaggeryapps/devportal/source/src/defaultTheme.js for available parameters. Note that you need to only put the parameters that you override to the userTheme.js file.
The parameters you can override via the theme are listed at the bottom. Additionally, the default theme parameters available with React Material Design library can be overridden via this file.
Example:
Enable landing page. defaultTheme.js.
const Configurations = {
    custom: {
        landingPage: {
            active: true,
        },
    },
};
Example:
Enable landing page. defaultTheme.json (Tenant theming).
{
  "custom": {
    "landingPage": {
      "active": true
    }
  }
}
The following documents describe some of the most commonly used customizations, that you can do by changing the defaultTheme.js
- Enabling or Disabling API Detail Tabs
- Override API Overview Page per API
- Enable or Disable Rating
- Enable or Disable Home Page
- Enable or Disable Tag Cloud
- Enable or Disable Footer
- Enable or Disable Banner
- Styling API Details Left Menu
- Styling API Details Info Section
- Styling the Logo and Header
- Customize API Listing Default View
Tenant Theming
Uploading Devportal theme via the Admin Portal (Tenants Only)
If you do not have access to the file system , you can upload/download the Devportal theme via the Admin Portal as shown below:
-
Download the sample theme here sample-theme.zip.
-
The
sample-theme.zipfile contains the following folder structure.You can make the changes required to
userTheme.jsonfile and archive it back. The name of the archive does not matter. But make sure that theuserTheme.jsonfile name remains the same. Uses of resources inloginfolder will be discussed in Applying themes for tenant login pages.└──apim │ └──css │ │ └── custom.css │ ├── defaultTheme.json │ └── images │ └── custom-logo.png └──analytics │ └── images │ └── custom-logo.png │ └── favicon.ico └──login └──css │ └── custom.css ├── loginTheme.json └── images └── custom-logo.png └── favicon.ico -
Sign in to the WSO2 Admin Portal (
https://<server-host>:<server-port>/admin) with your tenant username (format:<username>@<domain>.com) and password. -
Click Tenant Theme under Settings category and click Browse File to Upload to upload your ZIP file. Alternatively, you can drag and drop your ZIP file to upload.
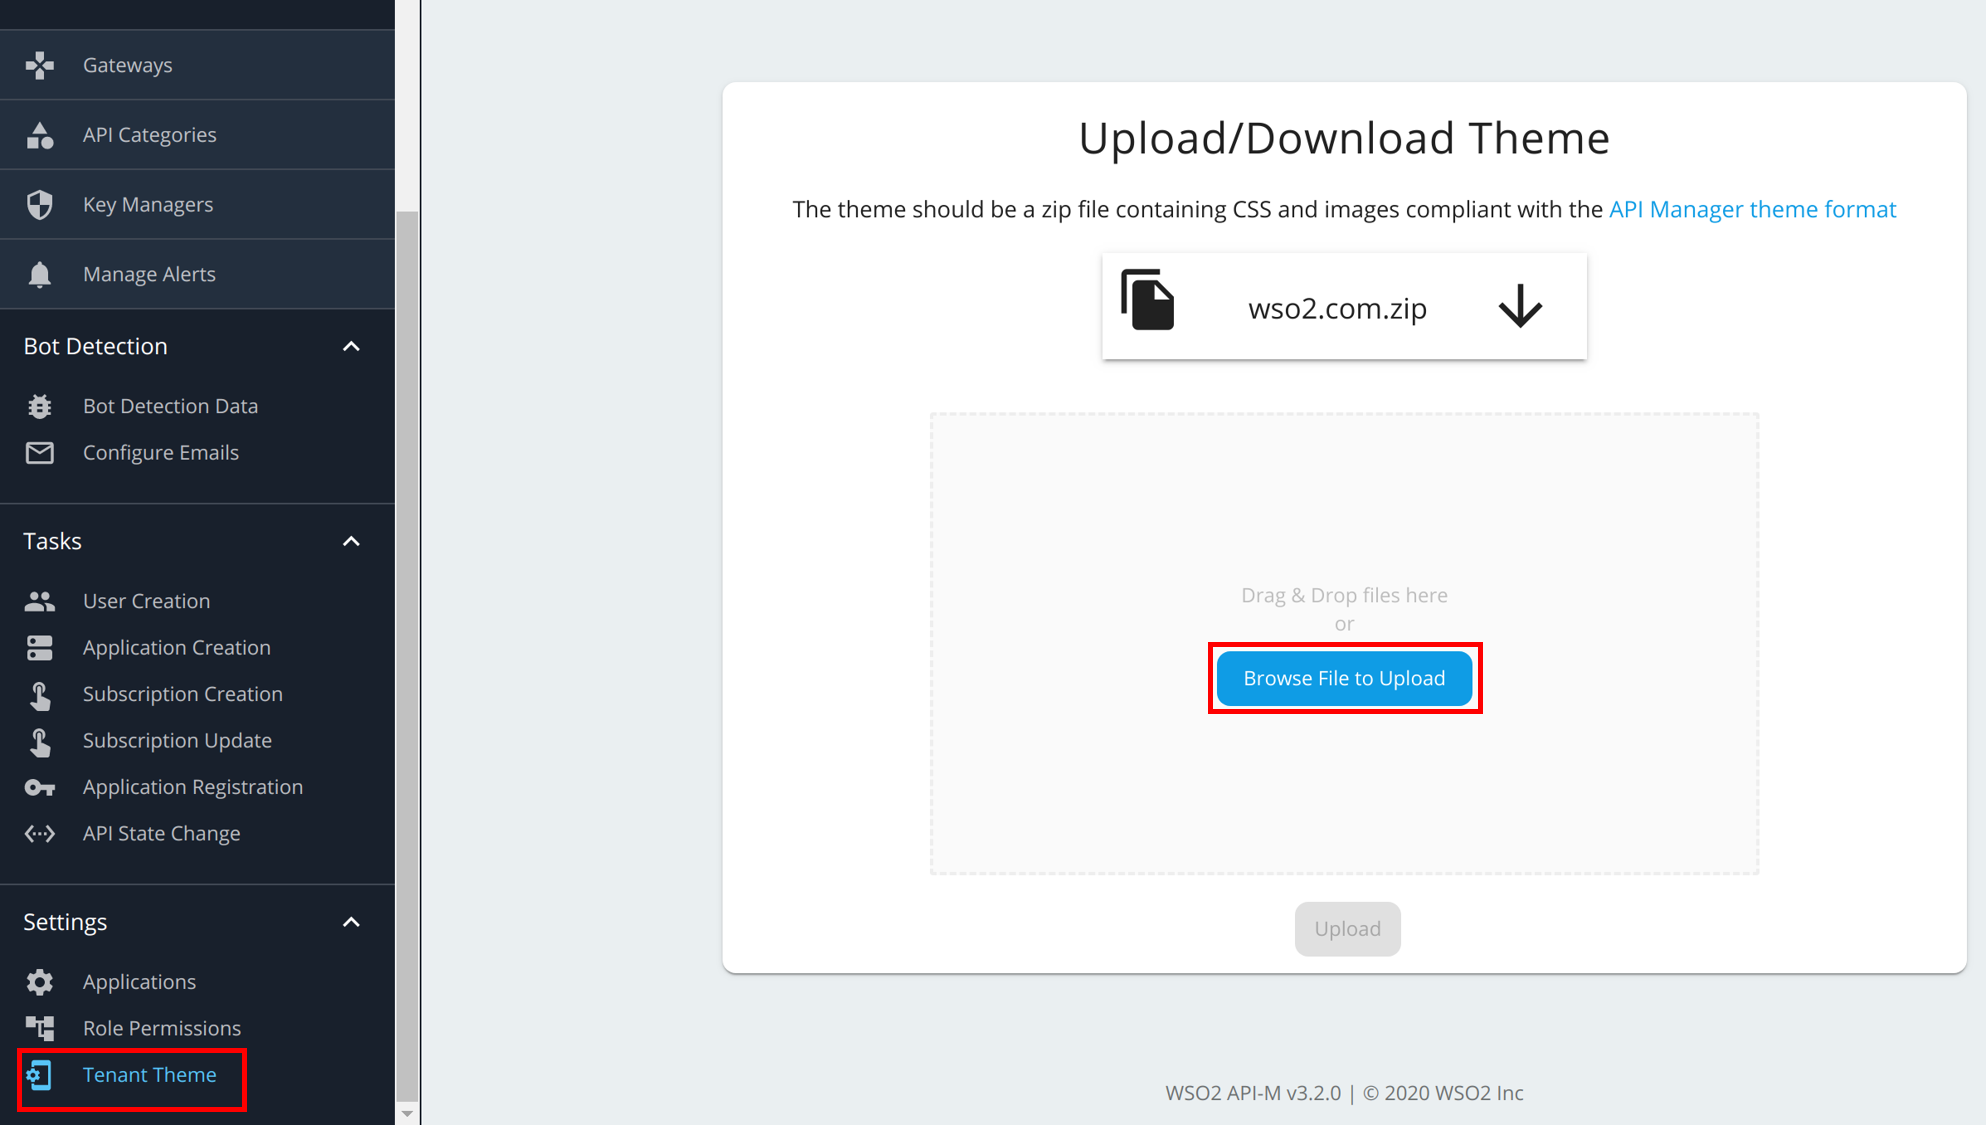
-
Access the API Developer Portal (
https://<server-host>:<server-port>/devportal) using your tenant username and password.Note the new theme is applied.
Note
From API-M 3.1.0 onwards, defaultTheme.json can contain only the custom modifications done to the default theme.
Therefore the following are valid defaultTheme.json files.
    Ex1:
    {
      direction: 'rtl'
    }

    Ex2:
    {
        custom: {
                defaultApiView: 'list',
        }
    }
The default theme configuration can be found at <APIM_HOME>/repository/deployment/server/jaggeryapps/devportal/source/src/defaultTheme.js.
In the shared defaultTheme.json we have overriden the custom.appBar configurations only.
{
    "custom": {
        "appBar": {
            "logo": "/site/public/tenant_themes/<tenant-domain>/apim/images/custom-logo.svg",
            "logoHeight": 31,
            "logoWidth": 144,
            "background": "#1d344f",
                "activeBackground": "#254061"
        }
    }
}
Adding custom logo for the tenant
In your tenant theme, you can refer to an image from the defaultTheme.json file as follows. The examples below uses the custom-logo.png image from the sample-theme.zip. The image can be referred using one of the following URL patterns.
The path format to the custom-logo.png image within the tenant domain theme is as follows:
"logo": "/site/public/tenant_themes/<tenant-domain>/apim/images/custom-logo.png",The path to the custom-logo.png image within the testorg.com tenant domain theme is as follows:
"logo": "/site/public/tenant_themes/testorg.com/apim/images/custom-logo.png",The following defines the logo image from an external URL.
"logo": "https://dummyimage.com/208x19/66aad1/ffffff&text=testlogo",Applying CSS rules to change the look and feel
If you prefer to change the styling using CSS rules, you can use the custom.css file. The above sample theme also has a custom CSS file. In the CSS file, let's change the top header background color to black.
Note that we have injected IDs into the dom elements. You can use them to apply CSS rules. However, be aware of the dynamically generated CSS class names. These class names have a number suffix that changes from version to version. Therefore, it is recommended not to use them for styling purposes.
The CSS file is referenced in the defaultTheme.json in the following manner. It is not a must to replace the <tenant-domain> in the following line, as at runtime the Developer Portal will automatically replace it with the current tenant domain.
"tenantCustomCss": "/site/public/tenant_themes/<tenant-domain>/apim/css/custom.css",Content of defaultTheme.js
The following is the Devportal app theme object merging with the React Material Design default theme object described here.
Applying themes for tenant login pages
- Configure a custom URL for the tenant.
- Sign in to tenant's Admin Console.
- Go to Settings > Advanced and add the following property.
"EnablePerTenantServiceProviderCreation" : "true" login folder in the tenant theme contains the config files and resources to define login theme customizations.
└──login
└──css
│    └── custom.css
├── loginTheme.json
└── images
     └── custom-logo.png
└── favicon.ico- Apply changes to
login/loginTheme.jsonfile. A sample file would look like below.
{
  "title" : "WSO2 API Manager",
  "header" : {
    "title" : "API Manager"
  },
  "footer" : {
    "name" : "WSO2 API Manager"
  },
  "favicon" : {
    "src" : "favicon.ico"
  },
  //"logo" : {
    //"src" : "custom-logo.png",
    //"alt" : "logo",
    //"height" : "60",
    //"width" : "60"
  //},
  "cookie-policy" : {
    "visible" : true,
    "text" : "<custom cookie policy text>"
  },
  "privacy-policy" : {
    "visible" : true,
    "text" : "<custom privacy policy text>"
  }
}
!!! note Note that it is not allowed to define both a header, title, and a logo for the login customizations. You can only define either a header, title, or a logo.
-
Copy the image files into
login/imagesfolder and mention the file names against favicon and logo src fields. In case you need to change the look and feel of login pages you can add a custom css file tologin/cssfolder. Make sure to name the file ascustom.css. -
Zip this file along with other resources in the tenant theme and upload it via the Admin Portal. Or you can make changes manually if you have access to the server's file system.