Scenario 2 - Engage Access Control to the API
This is a tutorial that is part of a series and can be used as a standalone tutorial on how to control access to the API. For more details on the scenario and general prerequisites, please see the scenario overview page.
Time to Complete : 7 minutes
User Story
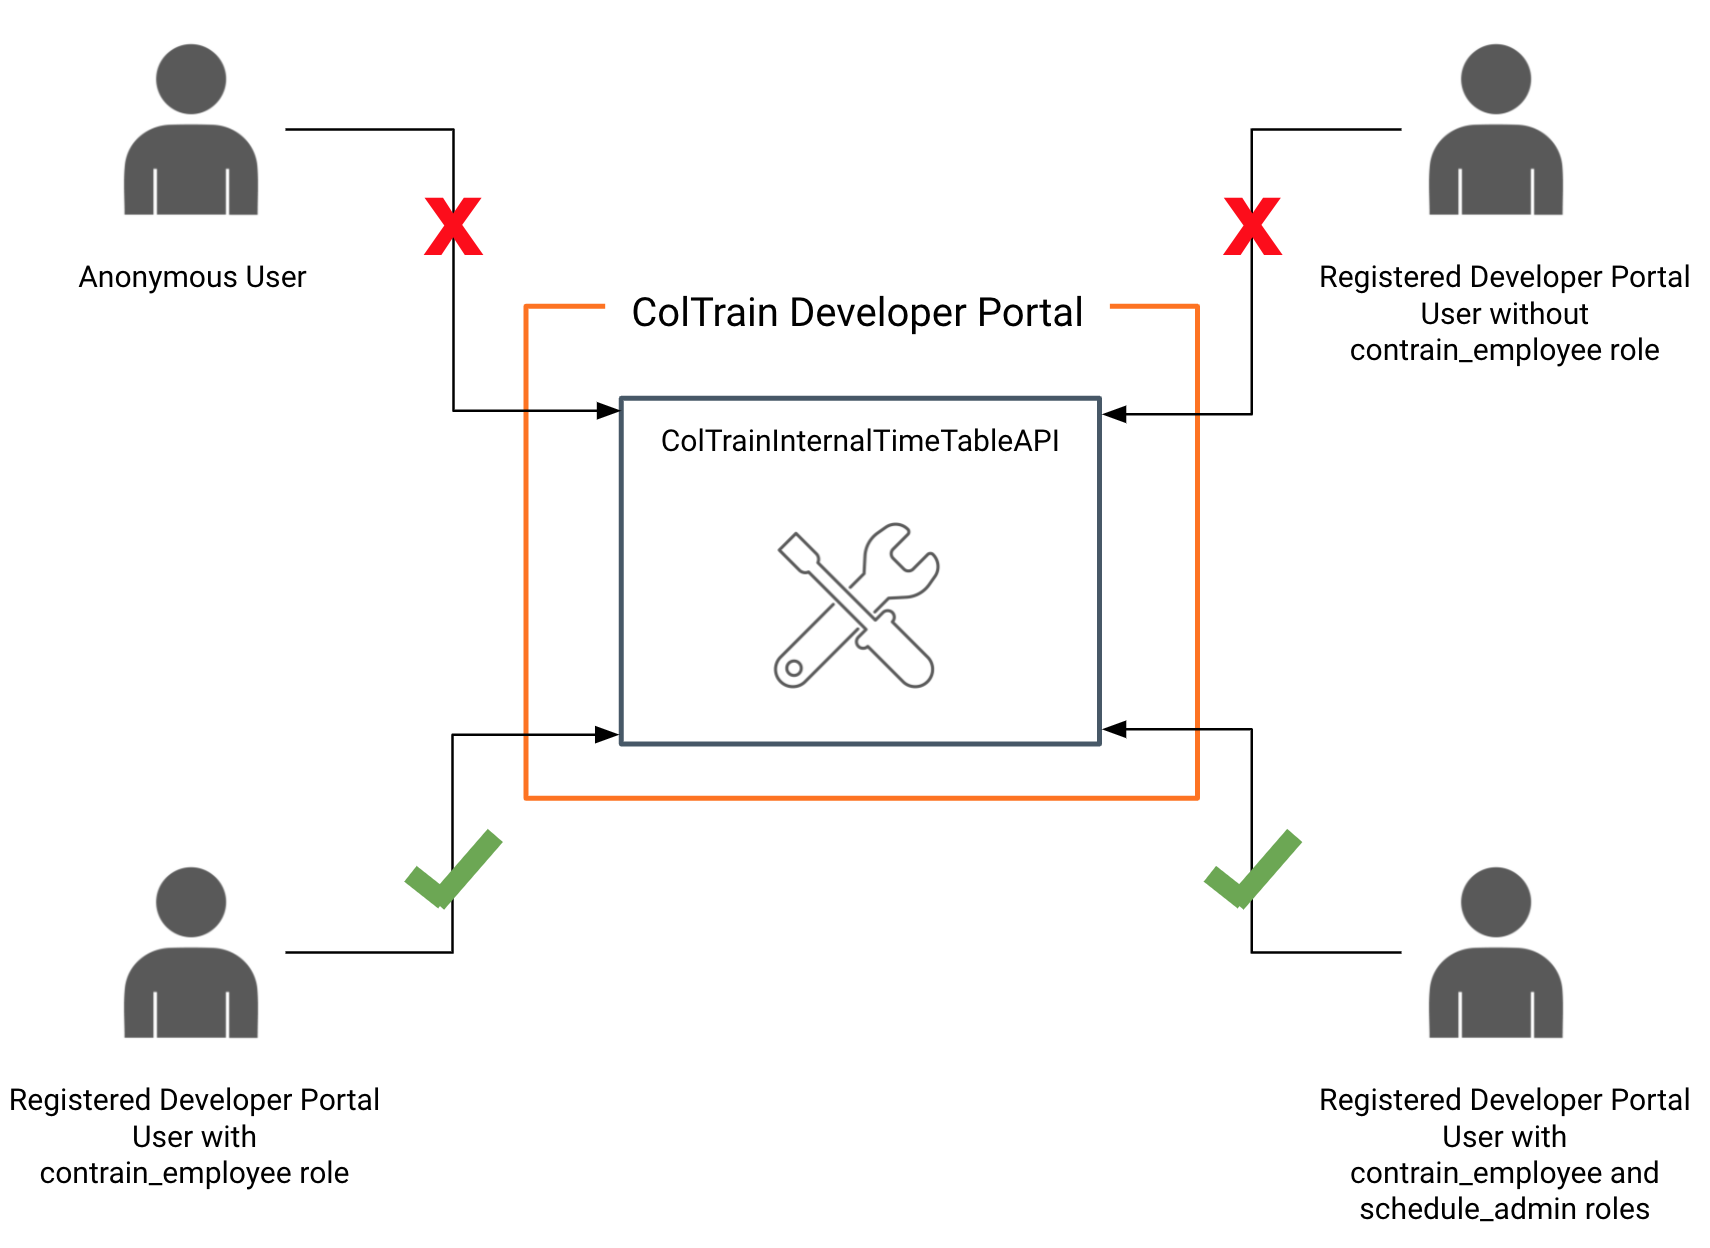
ColTrain has a separate API to manage schedules for their internal staff. This API needs to have more elevated permission levels to access than their public API. All the employees in the ColTrain company have access to the end-user application where they can view the train schedule details using this API. All the staff in the ColTrain should be able to check the available schedules whereas only the staff with admin privileges can add, edit or remove the existing schedule. Any other registered or public user should not be able to view this API since it is there for internal tasks. Coltrain wants to have a clear separation on who can view and access their APIs. They have identified that it would be a cumbersome task If they are to implement this from scratch to their backend APIs directly. Since now they are using an API Management platform, they wanted to move all these authentication and authorization tasks out of their internal APIs. This would be beneficial for their internal teams because they only have to pay attention to their APIs business logic only.
We could configure the API to be visible for a set of users. For example, this API should be visible for only Developer Portal users with coltrain_employee role only.
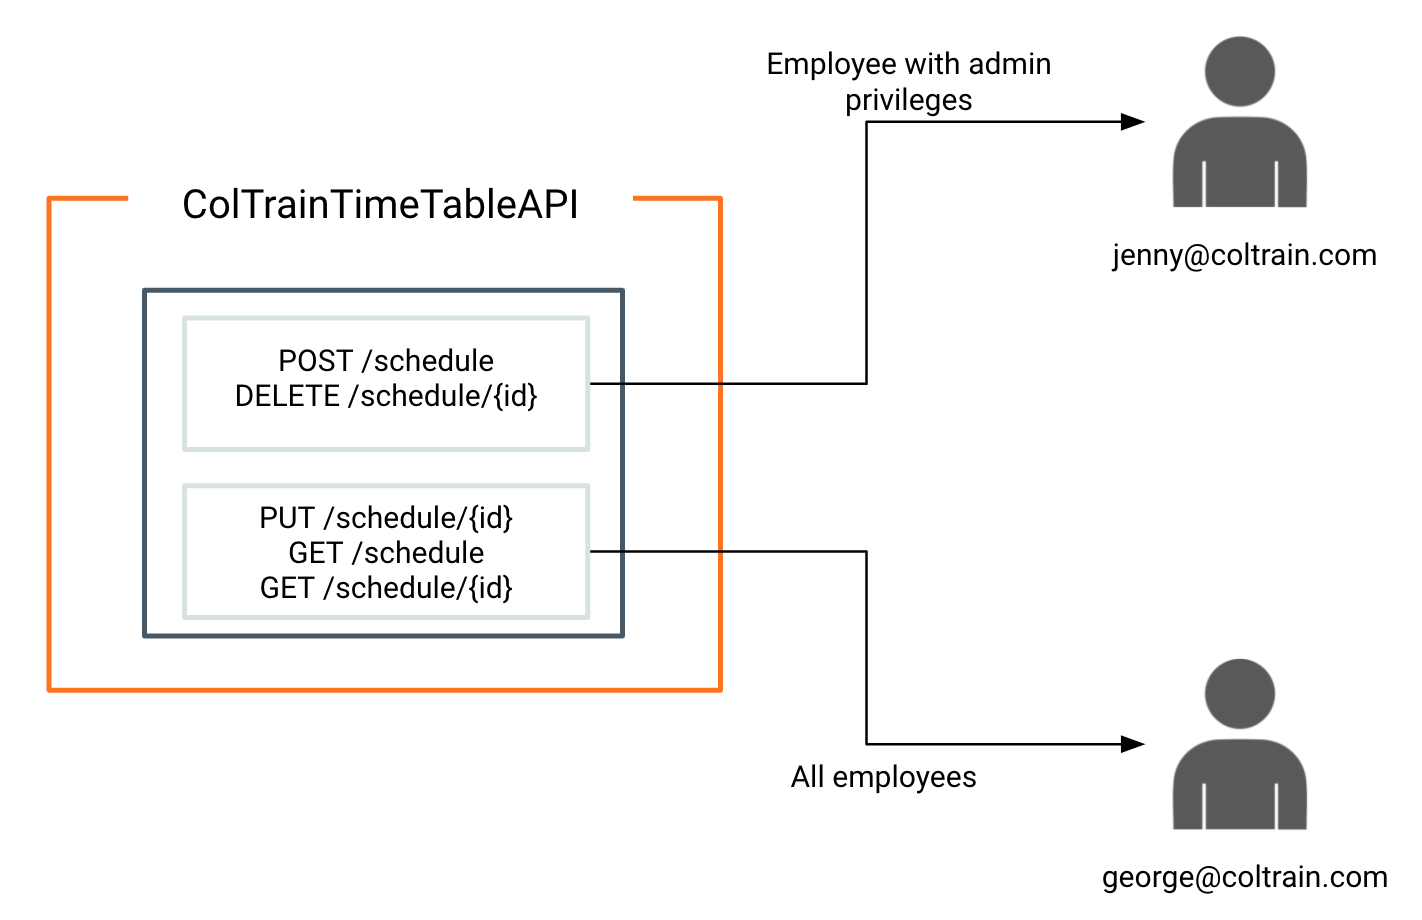
Also WSO2 API Manager provides capability to provide access control to the resources of the API by using OAuth2 scopes. Requests containing access tokens with the correct scope will be able to access these resources.
Note
This setup contains roles schedule_admin and coltrain_employee already created in the ColTrain tenant domain. schedule_admin and coltrain_employee roles are assigned to the user [email protected] and only coltrain_employee role is assigned to [email protected] .
Step 1: Create an API with role restrictions
Lets create a separate API named ColTrainInternalTimeTableAPI for this and set the visibility of that API based on roles.
- Log on to the Publisher Portal again
https://localhost:9443/publisher/. Use user credentials as[email protected]and password asuser123. -
Create a new API using the OpenAPI definition coltrain-openapi.yaml provided in the
/resourceslocation. Lets use /coltrain-schedule as the context. Use the endpoint provided in the file as it is.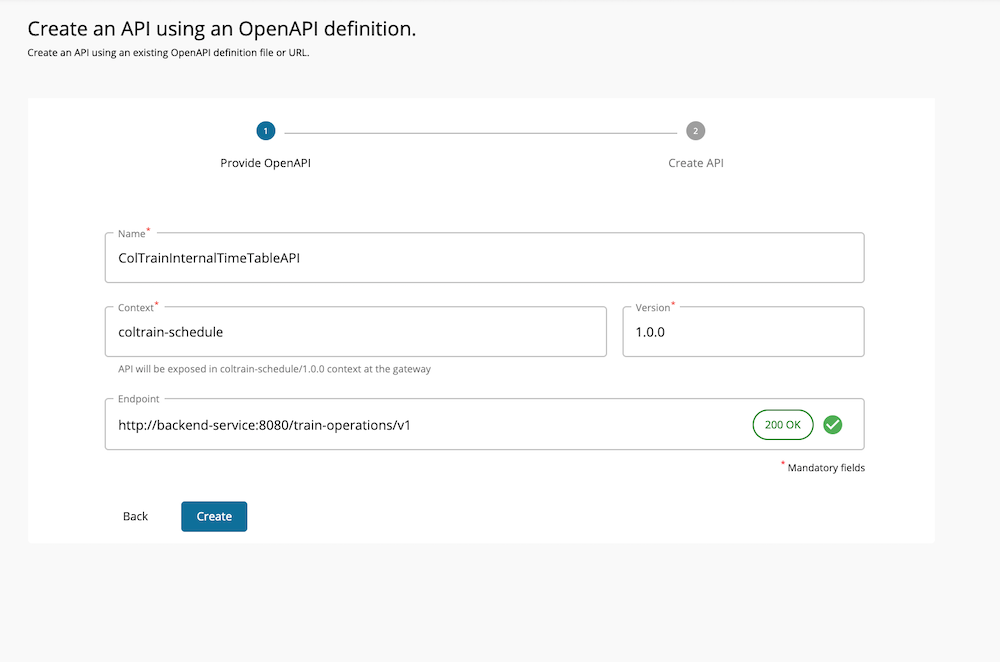
-
Go to Develop → Portal Configurations → Basic Info and under the Developer portal visibility, select Restrict by role(s) . This would enable another field to set the role. Use coltrain_employee and press enter and save.
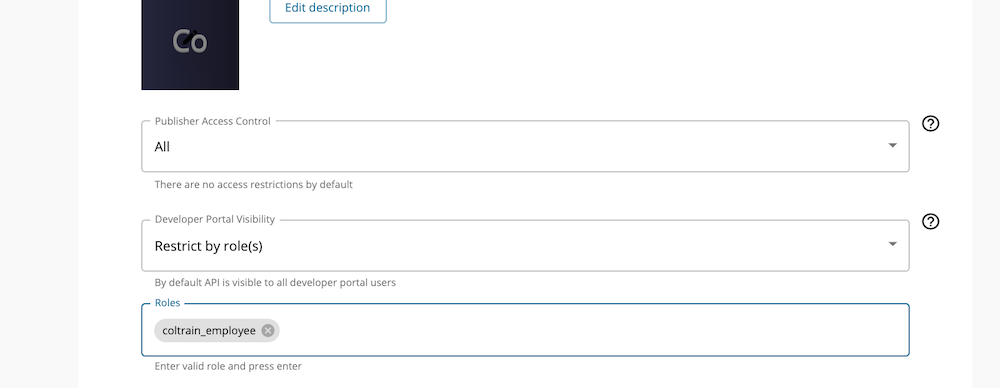
Developer Portal visibility is set to the API. Users with the coltrain_employee role can now view the API in the Developer Portal.
Step 2: Set access control for resources
Next task is to set the access control for the resources. To do that, follow these steps.
-
Create a scope by selecting the Develop → API Configurations → Local Scopes and create a scope using the below details. Use schedule_admin as the role.
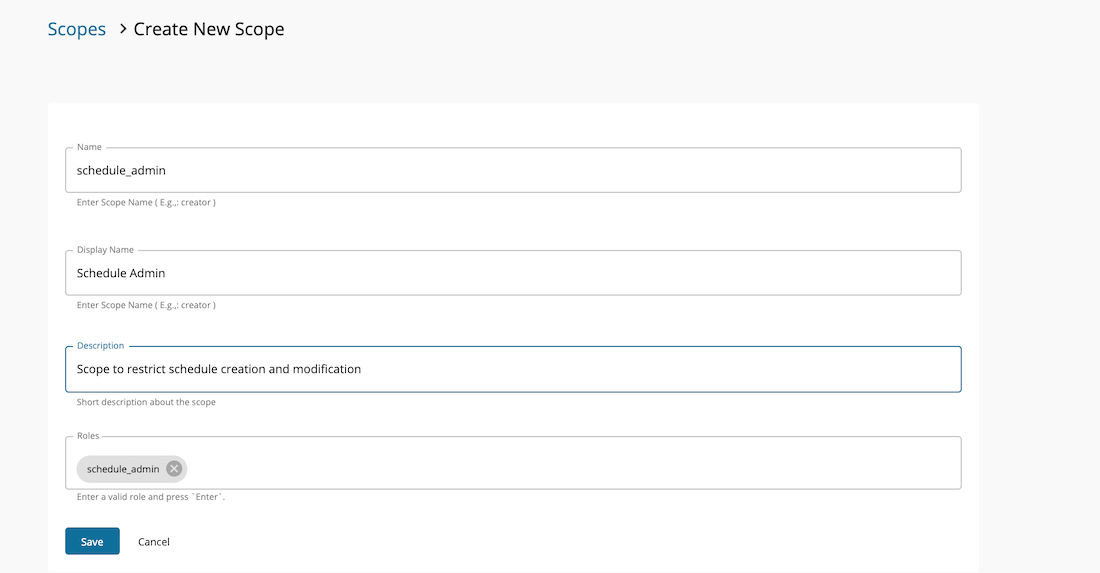
-
Go to Develop → API Configurations → Resources section and assign the role to the relevant resource. For example, to set the schedule_admin scope to
POST /scheduleresource, select this resource to expand and select the scope from Operation scope drop down menu.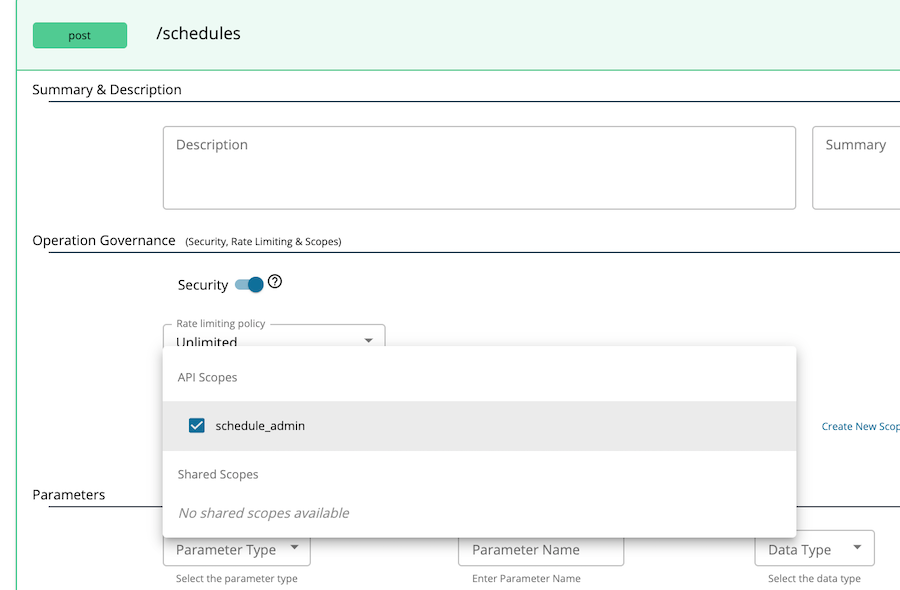
-
Deploy the API. For that, go to the Deploy → Deployments section and click deploy.
- Define a business plan for the API. For that, go to Develop → Portal Configurations → Subscriptions and select a business plan. (ex: Unlimited).
- Publish the API using Publish → Lifecycle option.
Now go to the Developer Portal and go to the ColTrain’s domain. You would not be able to not see the ColTrainInternalTimeTableAPI API.

Lets login using [email protected]. Use user123 as the password. Now you should be able to see the API.

Jenny has coltrain_employee role and as a result she can view the API.
Step 3: Try out the API
Now lets try out the API.
- Log on to the Developer Portal using user
[email protected]and passworduser123. - Go to Applications → Add new Application and create an application and generate keys.
-
Copy the key and the secret. Secret can be viewed by clicking the icon next the Consumer Secret section.

-
Subscribe to the API using this application.
Now we will try to access this API using two different access tokens generated by two different users. User [email protected] has schedule_admin role assigned to her. [email protected] does not have this role assigned to him.
Since the POST /schedule resource is protected using scope schedule_admin scope, lets create access tokens with this scope using the previously generated clientid and secret. Use the following commands.
For Jenny:
curl -k -X POST https://localhost:9443/oauth2/token -d "grant_type=password&[email protected]&password=user123&scope=schedule_admin" -H "Authorization: Basic Base64(consumer-key:consumer-secret)"For George:
curl -k -X POST https://localhost:9443/oauth2/token -d "grant_type=password&[email protected]&password=user123&scope=schedule_admin" -H "Authorization: Basic Base64(consumer-key:consumer-secret)"If you check the responses of the above two requests, you would see that for the first response, there will be a scope schedule_admin in the response payload.
Invoke the POST resource using each token.
curl -X POST "https://localhost:8243/t/coltrain.com/coltrain-schedule/1.0.0/schedules" -H "Content-Type: application/json" -H "Authorization: Bearer <token>" -d "{\"entryId\":\"10\",\"startTime\":\"18:30\",\"endTime\":\"20.30\",\"from\":\"London\",\"to\":\"Oxford\",\"trainType\":\"Standard\"}" -vYou would see that you could access the resource using [email protected] user’s token and you would get an error message for George's token.
{"code":"900910","message":"The access token does not allow you to access the requested resource","description":"User is NOT authorized to access the Resource: /schedules. Scope validation failed."}You could tryout the same commands using the Postman collection provided in the resources/Access_Control_Demo.postman_collection.json location as well. You need to add the client_id and client_secret under the variable section to use this.

What's next
Try out the next scenario in the series, Implementing an API.
Top