Enabling Role-Based Access Control Using XACML
Many organizations expose their business capabilities through APIs. One of the key challenges is controlling access to these exposed APIs in such a way that all authorized users are able to access its APIs without any interruption, while at the same time making sure that any unauthorized users are kept out. In order to achieve this, parameters such as the user role can be used in determining whether to grant or deny access to an API for a given user. There are two ways to control access to users, namely OAuth 2.0 scope and XACML. This section explains how an external extensible Access Control Markup Language (XACML) entitlement server can be integrated with WSO2 API Manager to provide role-based access control to APIs exposed via WSO2 API Manager. XACML is a declarative access control policy language based on XML that can provide a standardized way of validating authorization requests.
WSO2 API Manager provides the capability to authorize users based on OAuth 2.0 tokens and this mechanism can be extended to provide role-based access control using OAuth 2.0 scopes. However, as opposed to using OAuth 2.0 scope to provide authorization, XACML provides a standardized way of validating authorization requests. Authorization policies can be written in a standardized way using XACML and can be stored and managed through a policy administration point (PAP). Since the policies are standardized, policies written to one XACML engine can be ported to another engine from a different vendor without any issue. Similarly, XACML provides more control on how access should be enforced as different parameters and possibilities can be evaluated. XACML also provides ‘Obligations’ and ‘Advice’ as part of the XACML response that can be used by the API Manager when enforcing the policy decision to implement fine-grained access control for APIs.
How XACML is used with WSO2 API Manager
The diagram shown below depicts the scenario where WSO2 API Manager uses the XACML entitlement server to validate API requests that come into the API Manager. In this case, WSO2 Identity Server has been used as the XACML entitlement server.
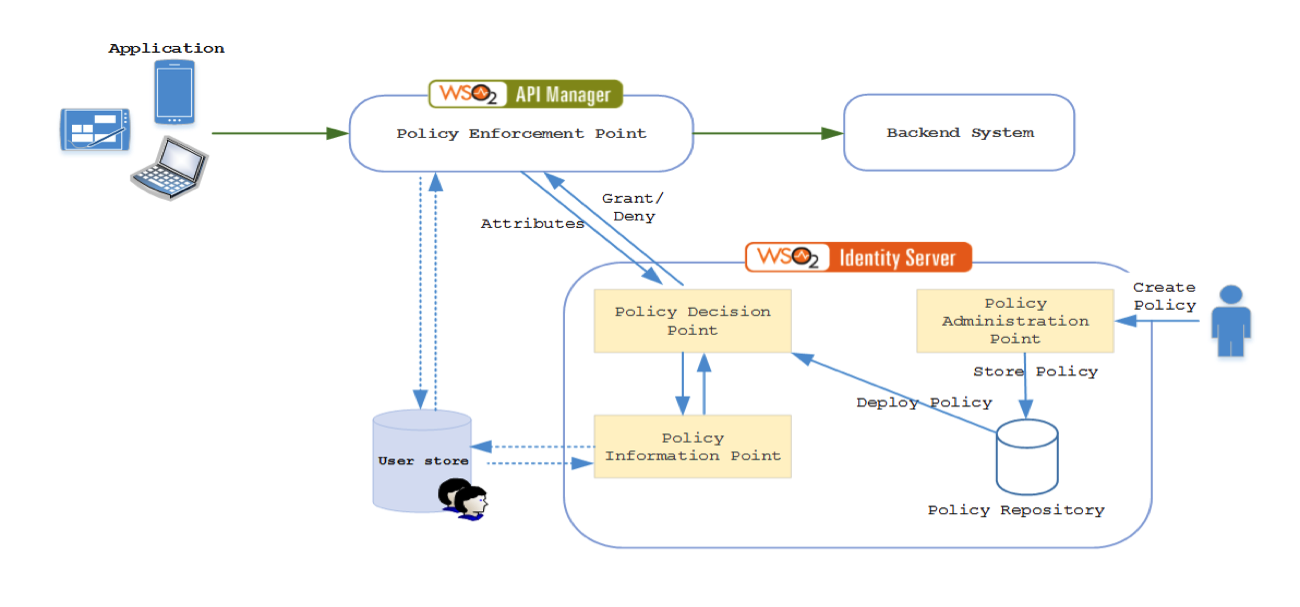
The process is initiated by an administrator who creates the XACML policies and adds them to the PAP. The created policies are stored in a policy repository and promoted to the policy decision point (PDP) by an authorized user. Once the policy is deployed, authorization requests are evaluated against this policy. There can be more than one policy deployed in the PDP.
The API Manager acts as the policy enforcement point (PEP). Whenever an API invocation comes to the API Manager, an authorization request is sent to the PDP with the required attributes. In this case, it can be the name of the user, resource path and the HTTP verb. The PDP receives the request along with these attributes and evaluates the request against the existing policies deployed in the PDP. If the request requires more information, the PDP tries to obtain that information from a policy information point (PIP). In this case, the request from the API Manager can contain the username and the policy that is deployed requires the role of the user. In such a scenario, the PDP gets this information from the user store that is defined as a PIP. Once the PDP has the required information to evaluate the request, a response is sent back to the API Manager with its policy decision.
Enabling role-based access control
The steps below demonstrate how WSO2 Identity Server, acting as a XACML entitlement server, can validate authentication requests from the API Manager based on a set of predefined XACML entitlement policies. This allows a standardized way of defining entitlement policies that can be enforced from WSO2 API Manager. For detailed information on XACML, see XACML Architecture in the WSO2 Identity Server documentation.
Let’s take the following requirement in exposing an API via the API manager.
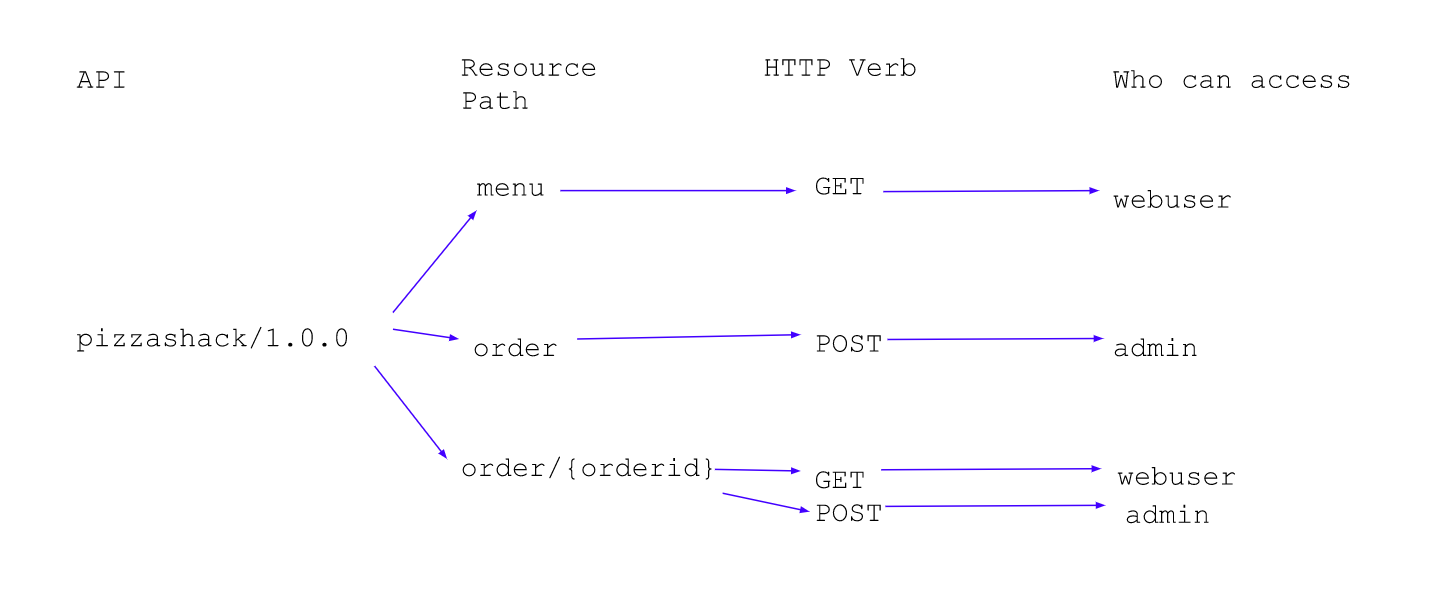
Based on the requirement, a single API is exposed to add or retrieve order information. Each member type (webuser or admin) is identified from the resource path. The operation (GET or POST) that needs to be performed is distinguished by the HTTP verb. Follow the steps below to implement this kind of role-based access control.
-
Let’s start by creating the required users. First, you need to link both the API Manager and the Identity Server to the same user store in order to share users, roles and other related information. This can be done by linking the API manager with the LDAP user store within WSO2 Identity Server. For more information, see Configuring an external LDAP or Active Directory Userstore . For this you can create a read write LDAP user store.
Note
By default, in API Manager JDBCUserStore is enabled. When you are moving to the ReadWriteLDAPUserStore, make sure you have commented the configuration of JDBCUserStore and keep only one user store configuration
<API-M_HOME>/repository/conf/user-mgt.xmlin both nodes.Tip
In an actual deployment, both these servers can share the user store of your organization.
-
Start the WSO2 API Manager server and log in to the Management Console. Create user information with the following permission structure.
User Role api_user webuser api_admin admin -
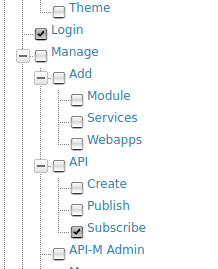
When adding the webuser role, set the Login and Subscribe permissions from permission tree.
-
Start the WSO2 Identity Server and log in to its Admin Console.
Tip
Since API Manager and Identity Server run on the same server, offset the Identity Server by 1.
-
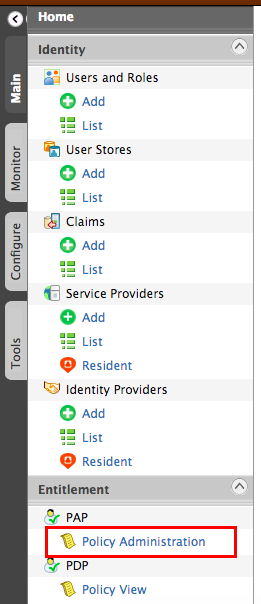
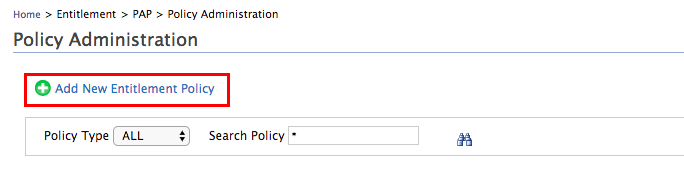
Under the Entitlement section, click Policy Administration > Add New Entitlement Policy .
-
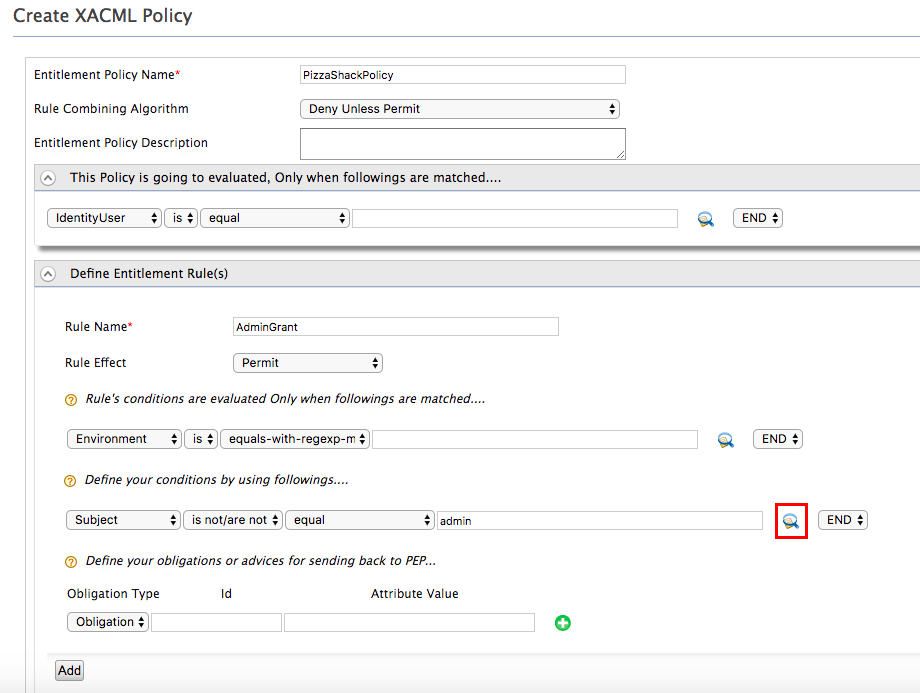
You are redirected to a page listing all available policy editors. Select Standard Policy Editor from the list and add the values shown below in the policy editor. Refer Creating a XACML Policy in WSO2 Identity Server for more information.
- Entitlement Policy Name: PizzaShackPolicy
- Rule Combining Algorithm: Deny unless Permit
When the rule combination algorithm is set to Deny Unless Permit , you need to set the permit criteria as a rule.
-
In the Define Entitlement Rule(s) area, set the following 2 rules to define the kind of requests and from which user they should be permitted.
-
AdminGrant - grants full access to the admin user. Give the information below,
Conditions: Under Define your conditions by using followings.... , select drop down options as Subject , is/are , at-least-one-member-of in order and enter admin in the last field. Click the icon next to END shown below to configure the attribute value and attribute source to retrieve the user roles from the user store.
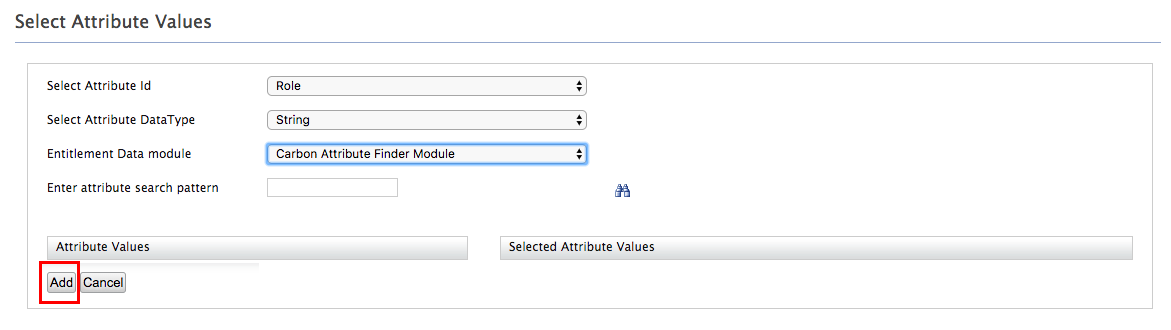
Select the attributes as given below. Note that this needs to be done for all the rules.
Select Attribute ID: Role
Select Attribute Data Type: String
Entitlement Data Module: Carbon Attribute Finder Module
Click on Add button after providing above values as shown below.
-
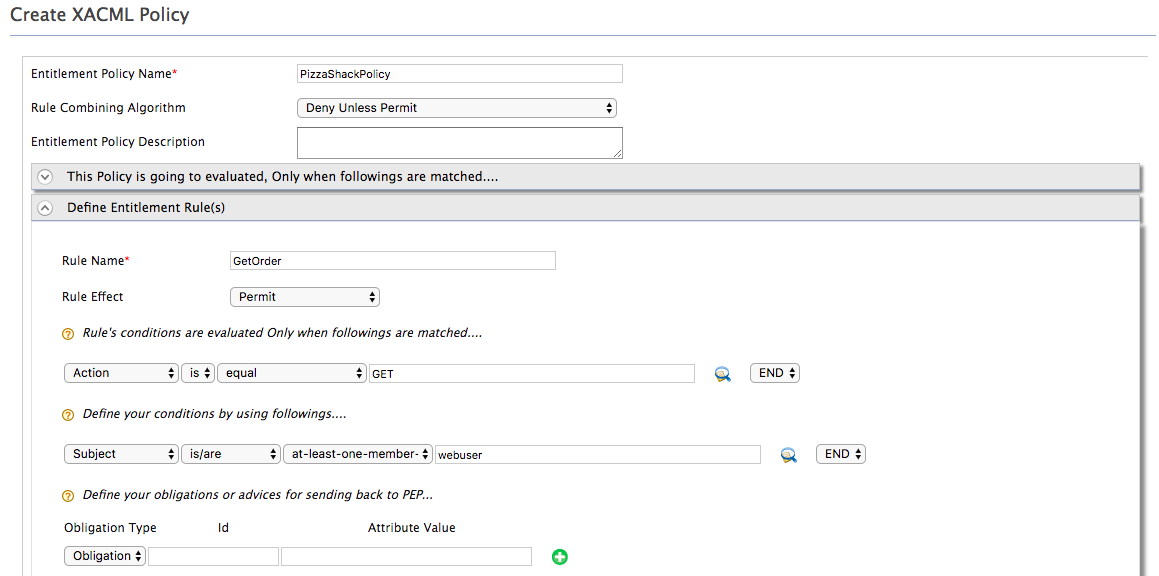
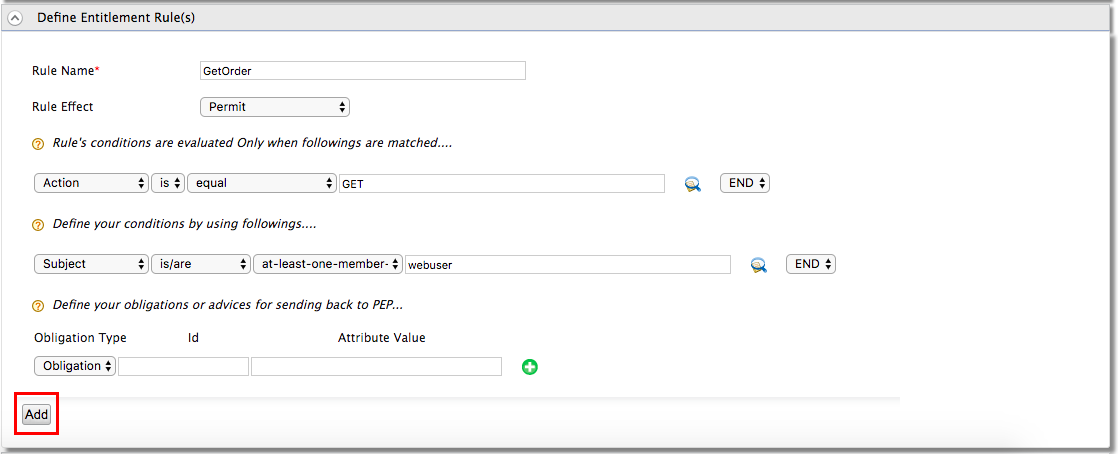
GetOrder- allows web users to get order information from the API. Give the information below,
Rule Name: GetOrder
Conditions: Under Rule's conditions are evaluated...... , select drop down options as Action , is , equal in order and enter GET in the last field. Under Define your conditions by using followings.... , select drop down options as Subject , is/are , at-least-one-member-of in order and enter webuser in the last field. Click the icon next to END shown below to configure the attribute value and attribute source to retrieve the user roles from the user store.
Select the attributes as given below. Note that this needs to be done for all the rules.
Select Attribute ID: Role
Select Attribute Data Type: String
Entitlement Data Module: Carbon Attribute Finder Module
Click on Add button after providing above values as shown below.

-
-
Click Add once done.
- The rules are added to the policy. Click Finish to save the policy.

-
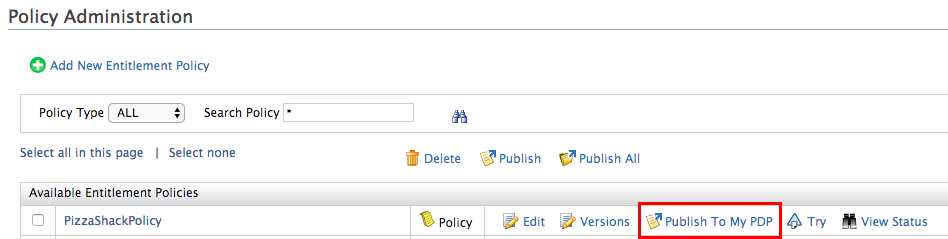
In the Policy Administration page, click Publish to My PDP to publish the policy to the PDP.
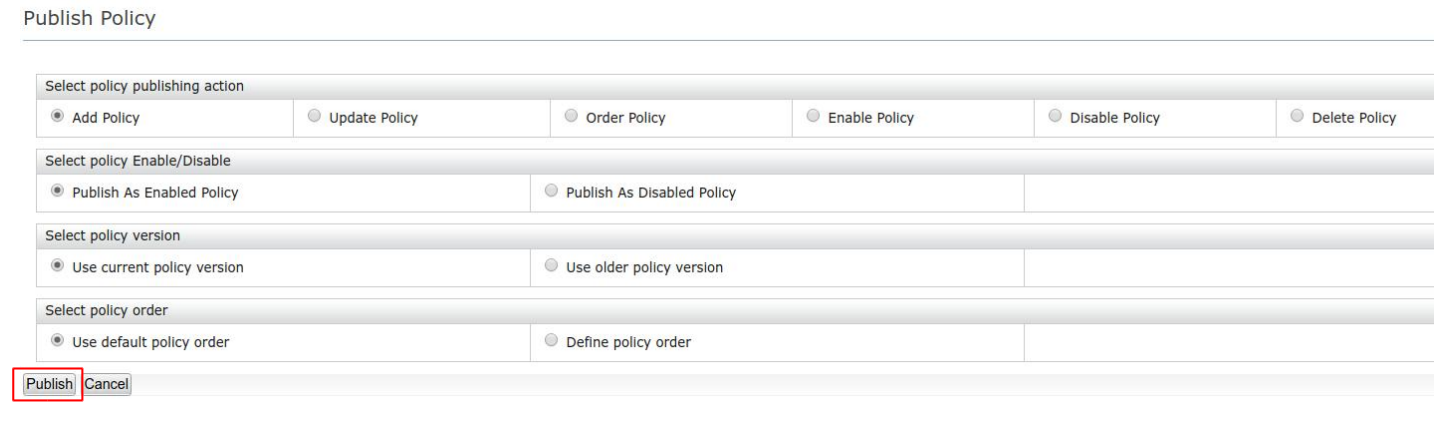
Keep the default selected values in the Publish Policy window and select publish.
Tip
You can test the service by clicking Try option in front of the entitlement policy. It is the tryIt tool developed for XACML in WSO2 Identity Server and you can access the same tryIt tool by navigating to Tools > XACML > TryIt .

You need to enter your username as the Subject Name . Refer Evaluating a XACML Policy for more information on how to use the TryIt tool for XACML Policy evaluation.
-
Download the entitlement-1.0-SNAPSHOT.jar and add it to the
<API-M_HOME>/repository/components/libdirectory. This JAR file contains theAPIEntitlementCallbackHandlerclass which passes the username, HTTP verb and the resource path to the XACML entitlement server. If you want to view the source code of the JAR, go here . -
Restart the server once the JAR file is added.
-
Now, you need to create a sequence containing the entitlement policy mediator that can be attached to each API required to authorize users with the entitlement server. Create an XML file with the following configuration and name it
EntitlementMediator.xml.<sequence xmlns="http://ws.apache.org/ns/synapse" name="EntitlementMediator"> <entitlementService xmlns="http://ws.apache.org/ns/synapse" remoteServiceUrl="https://localhost:9444/services" remoteServiceUserName="admin" remoteServicePassword="admin" callbackClass="org.wso2.sample.handlers.entitlement.APIEntitlementCallbackHandler"/> </sequence>Note
The Entitlement Mediator intercepts requests and evaluates the actions performed by a user against an eXtensible Access Control Markup Language (XACML) policy. Here, WSO2 Identity Server is used as the XACML Policy Decision Point (PDP) where the policy is set, and WSO2 API Manager serves as the XACML Policy Enforcement Point (PEP) where the policy is enforced. Refer Entitlement Mediator for more information on parameters and usage of this mediator.
Info
The attributes in the <entitlementService> element above should be modified according to the services' endpoint configuration as follows.
remoteServiceUrl - Service URL of WSO2 Identity Server, acting as the XACML entitlement server in this scenario.
remoteServiceUserName - Username
remoteServicePassword - Password used to connect to the service
-
Log in to the API Publisher and create an API.
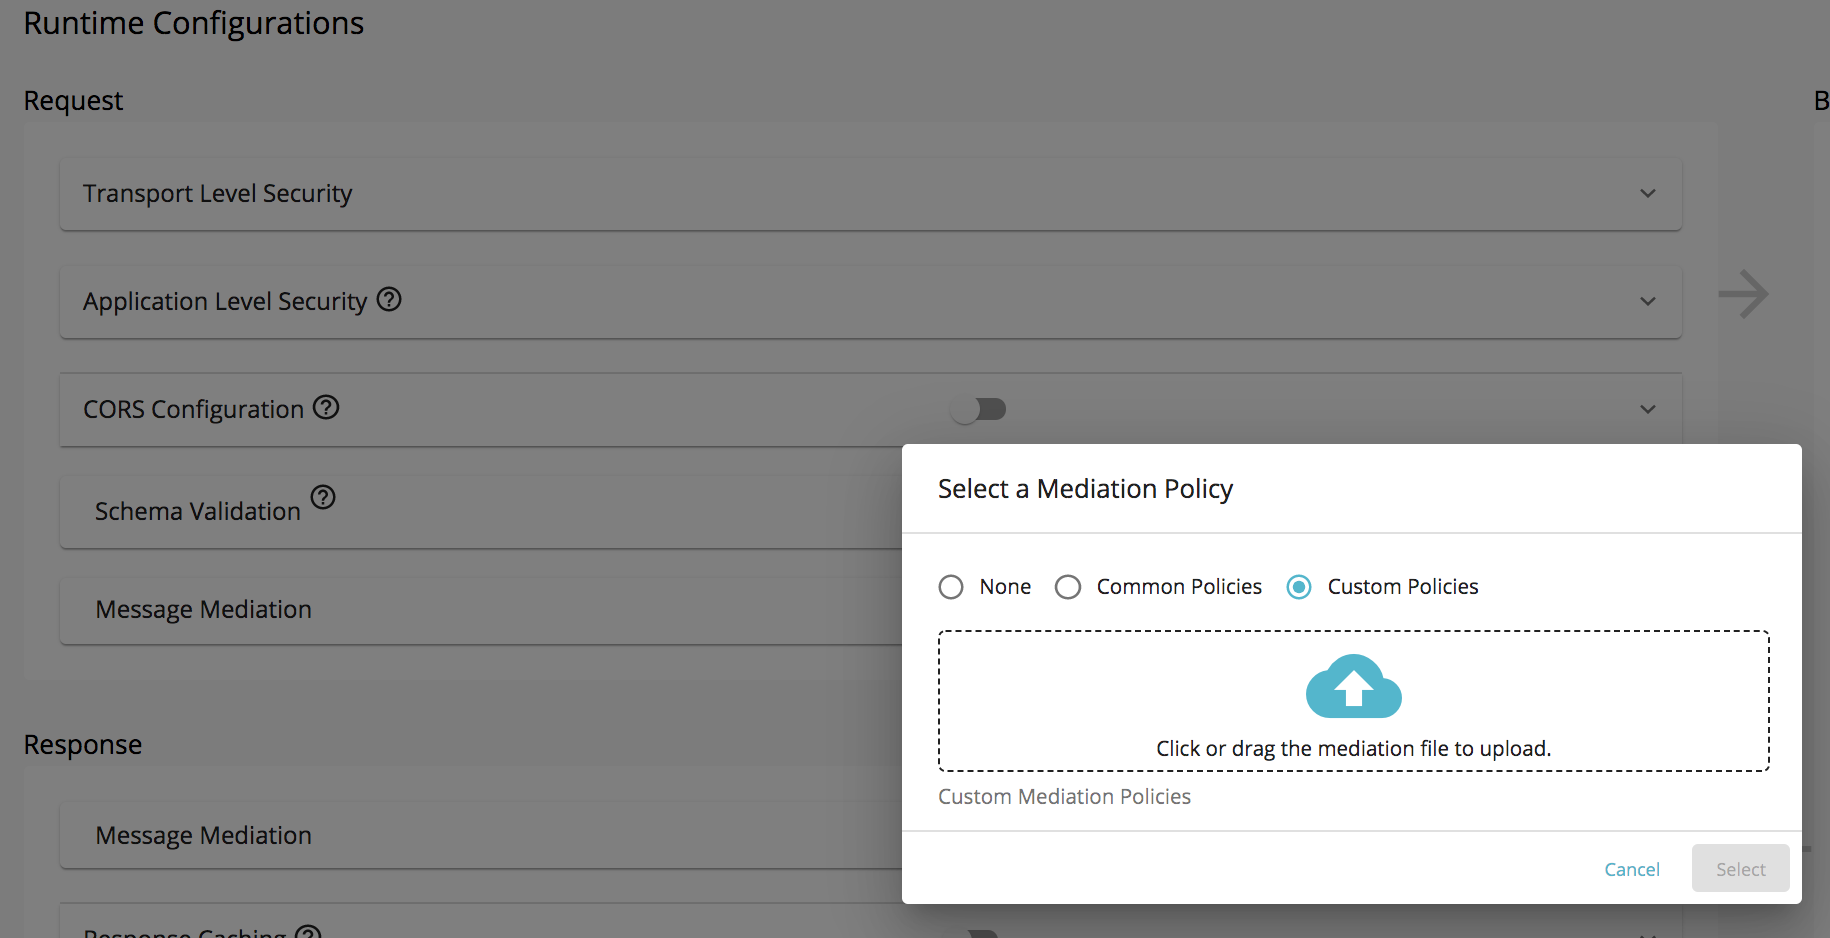
- Attach the custom sequence to the inflow of the message as shown below.
-
Save, publish and test the API to make sure that the requests specified in the 2 rules defined in step 8 are accessible according to the user role specified. For example, the POST operation is only available to users with the role admin. If an anonymous user tries to access the POST operation, it should fail.
Note
If you encounter an error stating "org.apache.axis2.transport.jms.JMSSender cannot be found by axis2_1.6.1.wso2v16" when publishing the API, comment out the following JMSSender configuration in the
<APIM_HOME>/repository/conf/axis2/axis2_blocking_client.xmlfile and restart the server.<!--transportSender name="jms" class="org.apache.axis2.transport.jms.JMSSender"/--> -
If you want to debug the entitlement mediator, enable debug logs in the Management Console for the
org.wso2.sample.handlers.entitlement.APIEntitlementCallbackHandlerclass.