Google Pub Sub Connector Example
The Google Pub/Sub connector allows you to access the Google Cloud Pub/Sub API Version v1 from an integration sequence.
What you'll build
Given below is a sample scenario that demonstrates how to work with the WSO2 Google Pub Sub Connector to:
- Create a Topic to store company update notifications.
- Insert company update notifications to the created topic.
- Retrieve company updates from the created topic.
To work with the Google Pub/Sub connector, you need to have a Google Cloud Platform account. Please refer the Setting up the Google Pub Sub Environment documentation to setup an account.
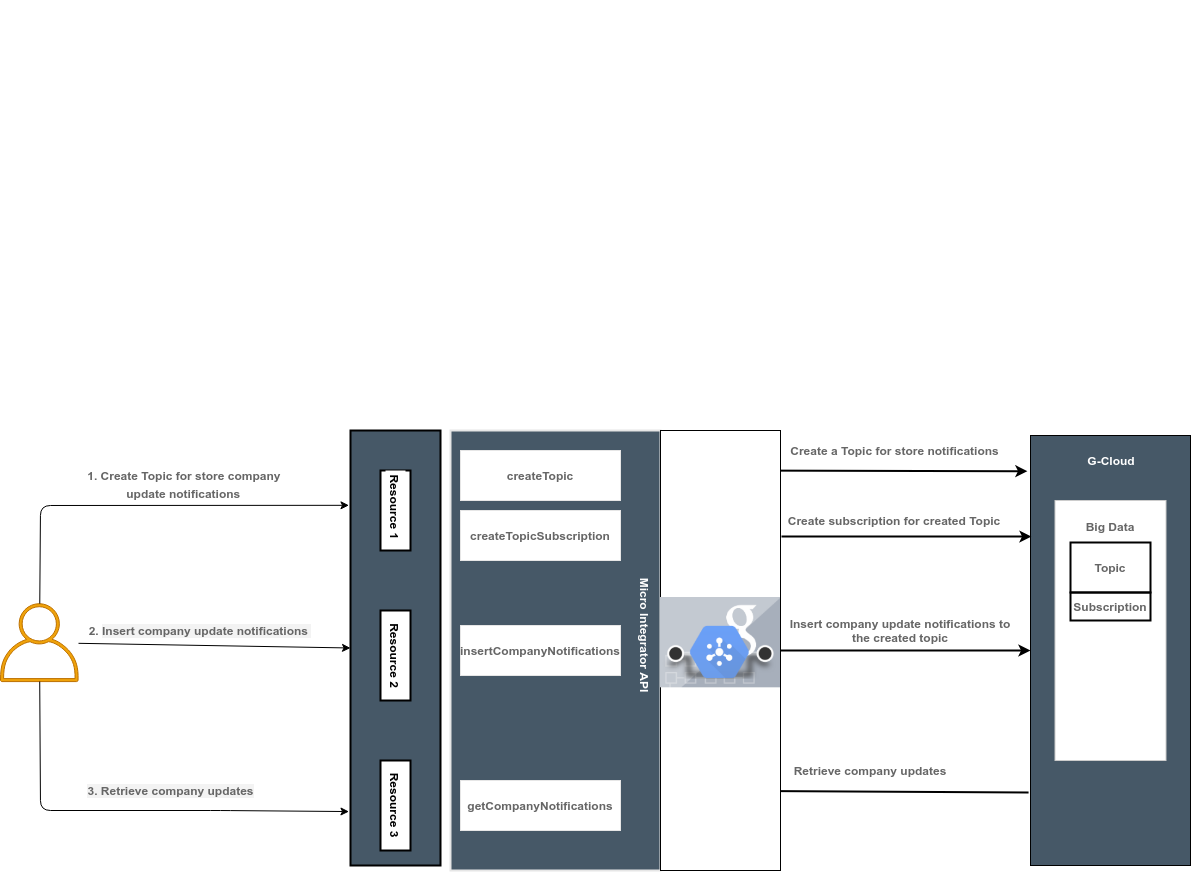
In this scenario the user needs to create a Topic in Google Cloud Platform account under Big Data. This topic is used to store notifications related to the company updates. Once the user invokes the createTopic resource, the subscribing operation also gets triggered simultaneously. Then the user can insert company update notifications to the created topic. Finally the user can retrieve the company updates from the subscribed topic while invoking the API.
All three operations are exposed via an API. The API with the context /resources has six resources.
/createTopic: Used to create a Topic for store company notifications and subscribe to the topic./insertCompanyNotifications: Used to insert company update notifications to the subscribed topic./getcompanynotifictions: Used to retrieve information about the company updates.
Note: In this example we will be using XPath 2.0 which needs to be enabled in the product as shown below before starting the integration service. If you are using EI 7 or APIM 4.0.0, you need to enable this property by adding the following to the PRODUCT-HOME/conf/deployment.toml file. You can further refer to the Product Configurations. If you are using EI 6, you can enable this property by uncommenting synapse.xpath.dom.failover.enabled=true property in PRODUCT-HOME/conf/synapse.properties file.
[mediation]
synapse.enable_xpath_dom_failover=true
The following diagram shows the overall solution. The user creates a topic, stores some company update notifications, and then receives it back. To invoke each operation, the user uses the same API.
If you do not want to configure this yourself, you can simply get the project and run it.
Configure the connector in WSO2 Integration Studio
Connectors can be added to integration flows in WSO2 Integration Studio. Once added, the operations of the connector can be dragged onto your canvas and added to your resources.
Import the connector
Follow these steps to set up the Integration Project and the Connector Exporter Project.
-
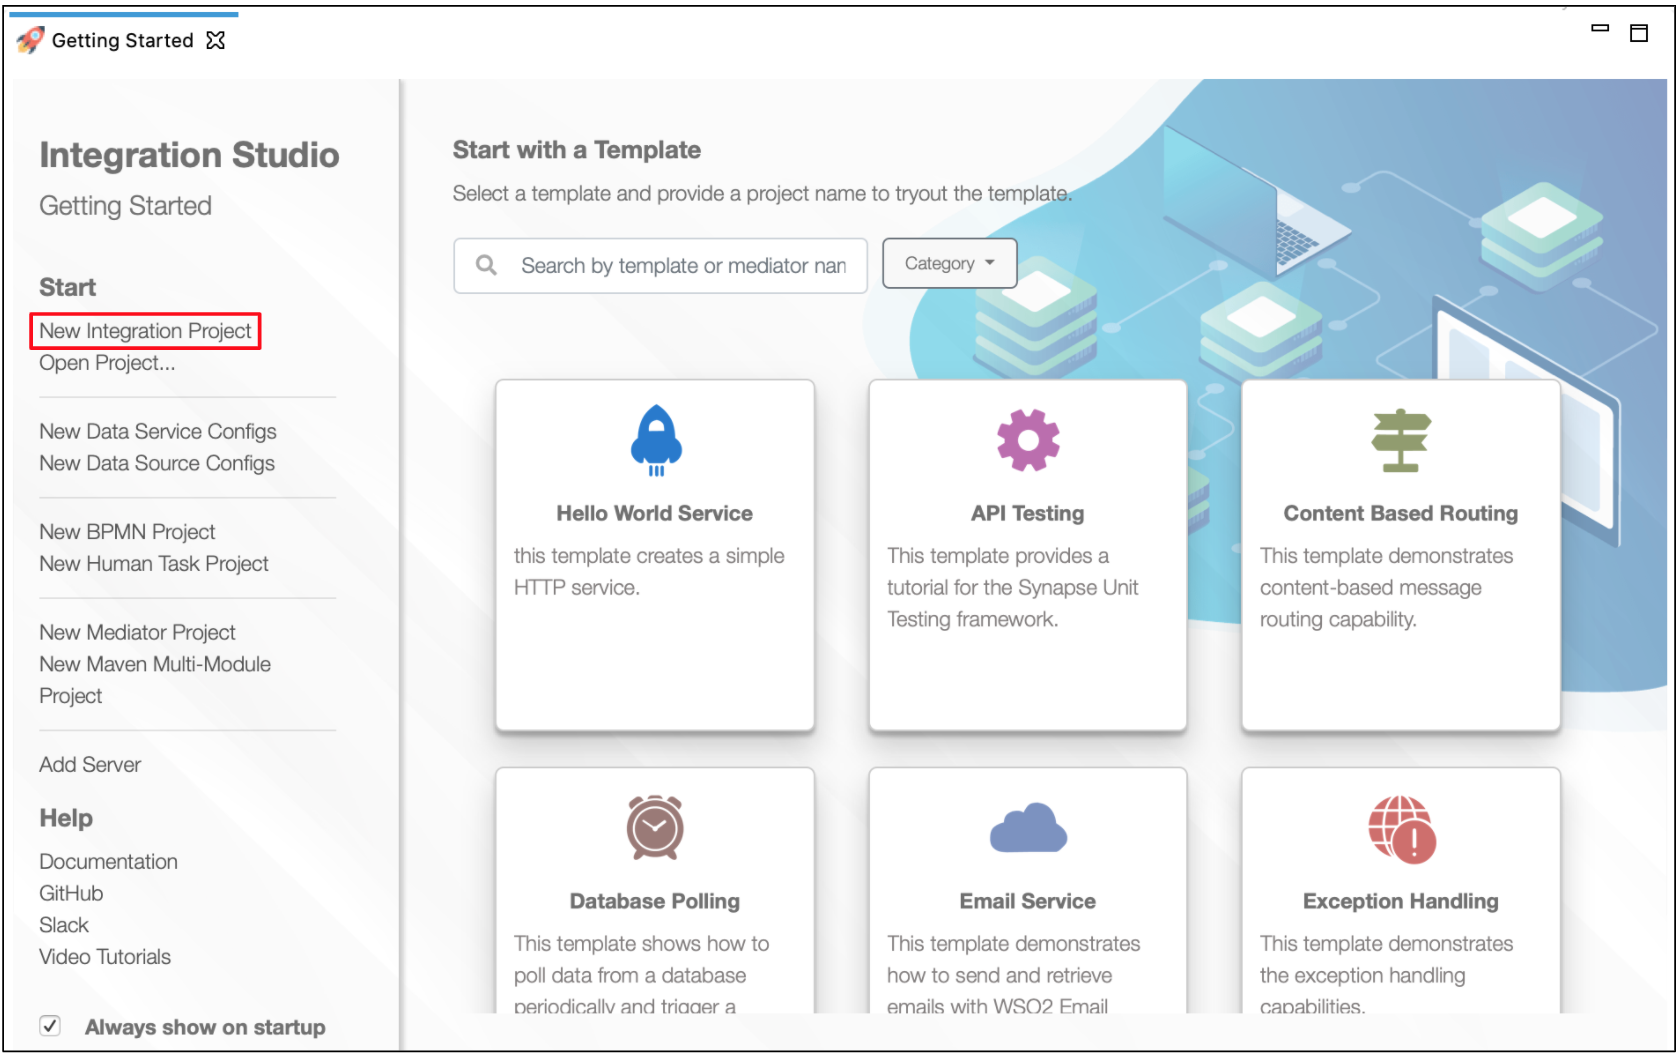
Open WSO2 Integration Studio and create an Integration Project.
-
Right-click the project that you created and click on Add or Remove Connector -> Add Connector. You will get directed to the WSO2 Connector Store.
-
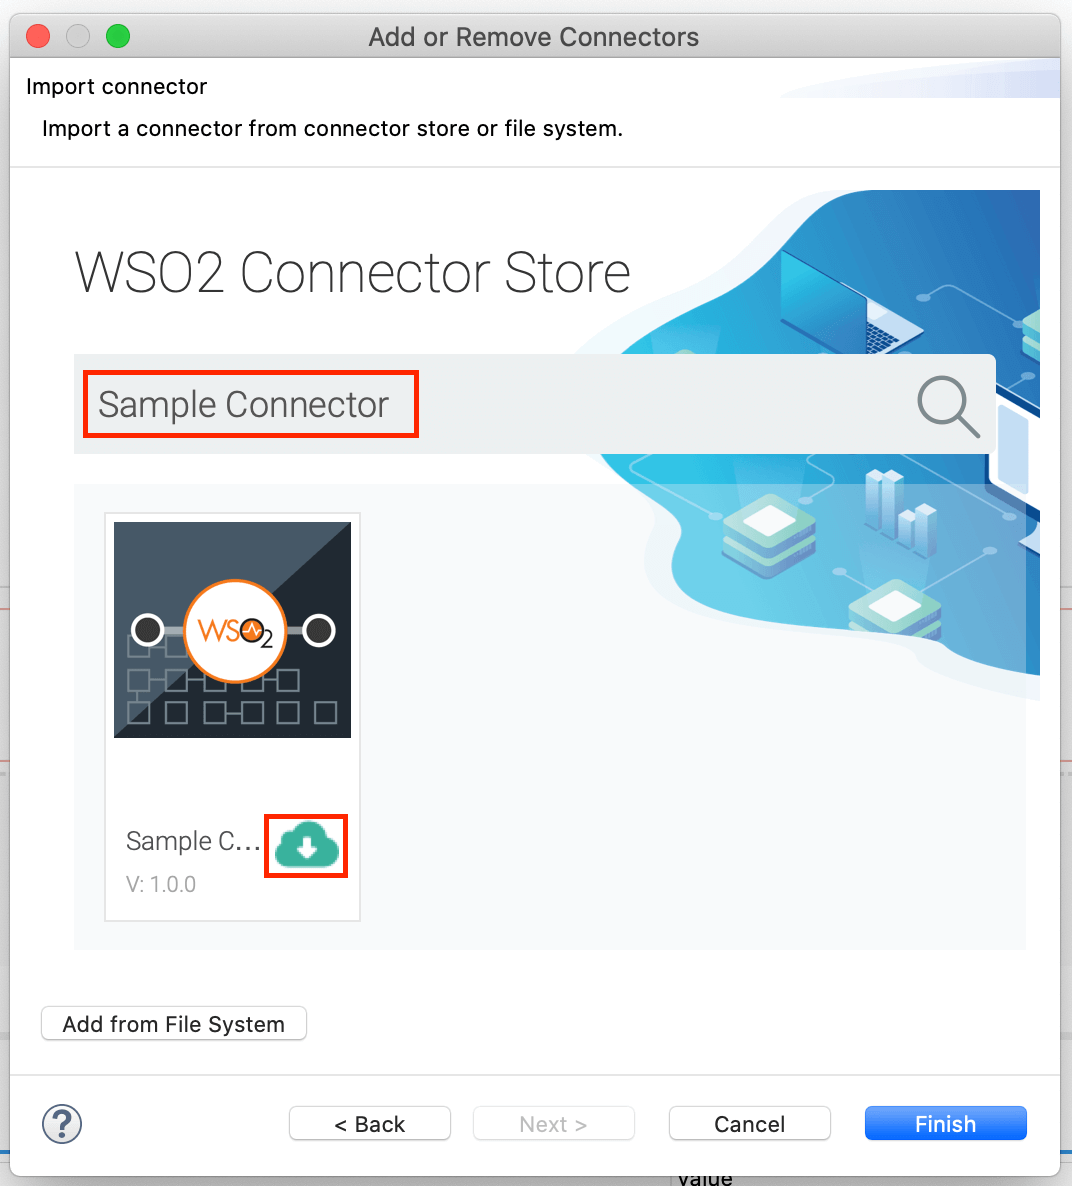
Search for the specific connector required for your integration scenario and download it to the workspace.
-
Click Finish, and your Integration Project is ready. The downloaded connector is displayed on the side palette with its operations.
-
You can drag and drop the operations to the design canvas and build your integration logic.

-
Right click on the created Integration Project and select New -> Rest API to create the REST API.
Add integration logic
First create an API, which will be where we configure the integration logic. Right click on the created Integration Project and select, New -> Rest API to create the REST API. Specify the API name as pubsubApi and API context as /resources.

Configuring the API
Configure a resource for the createTopic operation
-
Initialize the connector.
-
Navigate into the Palette pane and select the graphical operations icons listed under Googlepubsub Connector section. Then drag and drop the
initoperation into the Design pane.
-
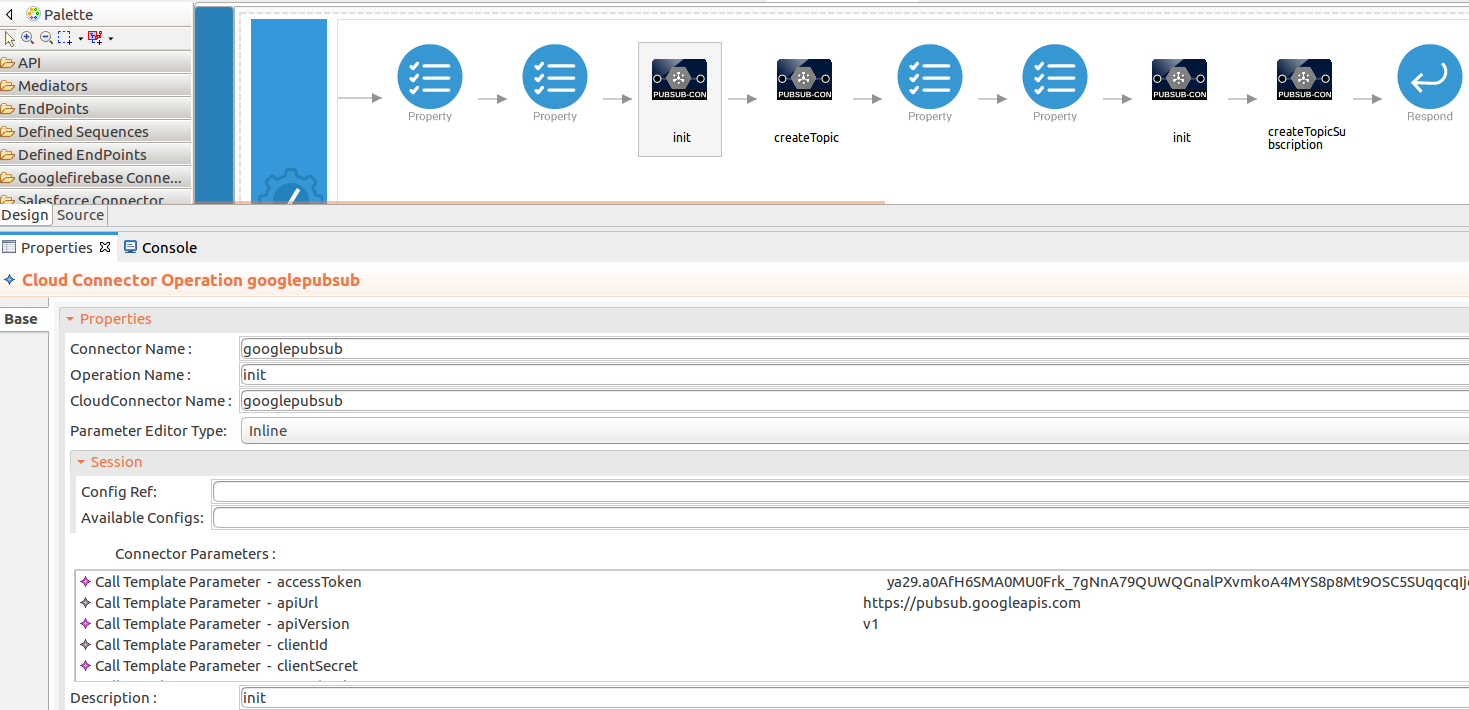
Add the property values into the
initoperation as shown below. Replace theaccessToken,apiUrl,apiVersionwith your values.- accessToken : The access token that grants access to the Google Pub/Sub API on behalf of a user.
- apiUrl : The application URL of Google Pub/Sub.
- apiVersion : The version of the Google Pub/Sub API.
-
-
Set up the createTopic operation.
-
Navigate into the Palette pane and select the graphical operations icons listed under Googlepubsub Connector section. Then drag and drop the
createTopicoperation into the Design pane. -
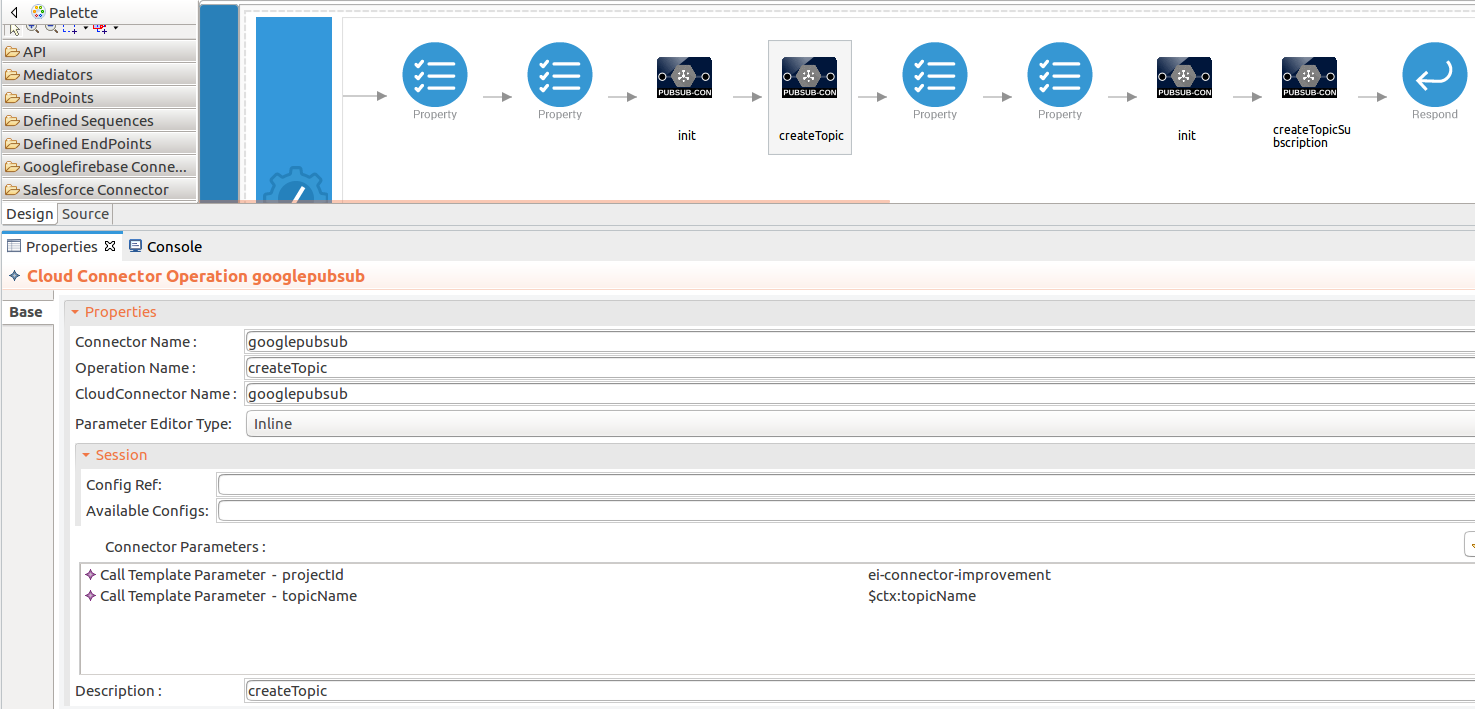
The createTopic operation creates a new topic with the name that you specify.
- projectId : The unique ID of the project within which you want to create a topic.
- topicName : The name that you want to give the topic that you are creating.
While invoking the API, topicName values is populated as an input value for the operation.
-
To get the input values in to the API we can use the property mediator. Navigate into the Palette pane and select the graphical mediators icons listed under Mediators section. Then drag and drop the
Propertymediators into the Design pane as shown below.
The parameters available for configuring the Property mediator are as follows:
Note: The properties should be added to the pallet before creating the operation.
-
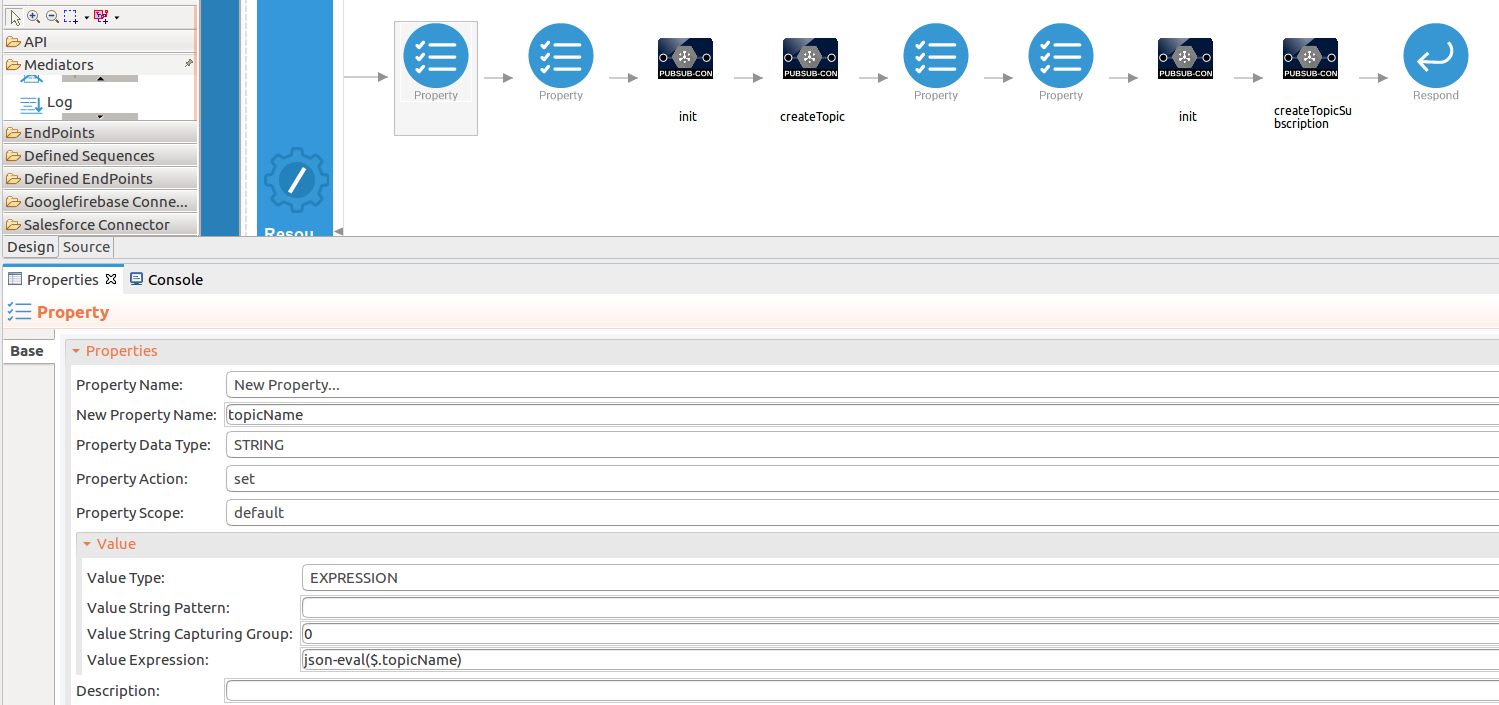
Add the property mediator to capture the
topicNamevalue. The topicName contains the name that you want to give the topic that you are creating.- name : topicName
- expression : json-eval($.topicName)
-
-
Set up the createTopicSubscription operation.
-
Initialize the connector. You can use the same configuration to initialize the connector. Please follow the steps given in section 1 for setting up the init operation to the createTopic operation.
-
Set up the
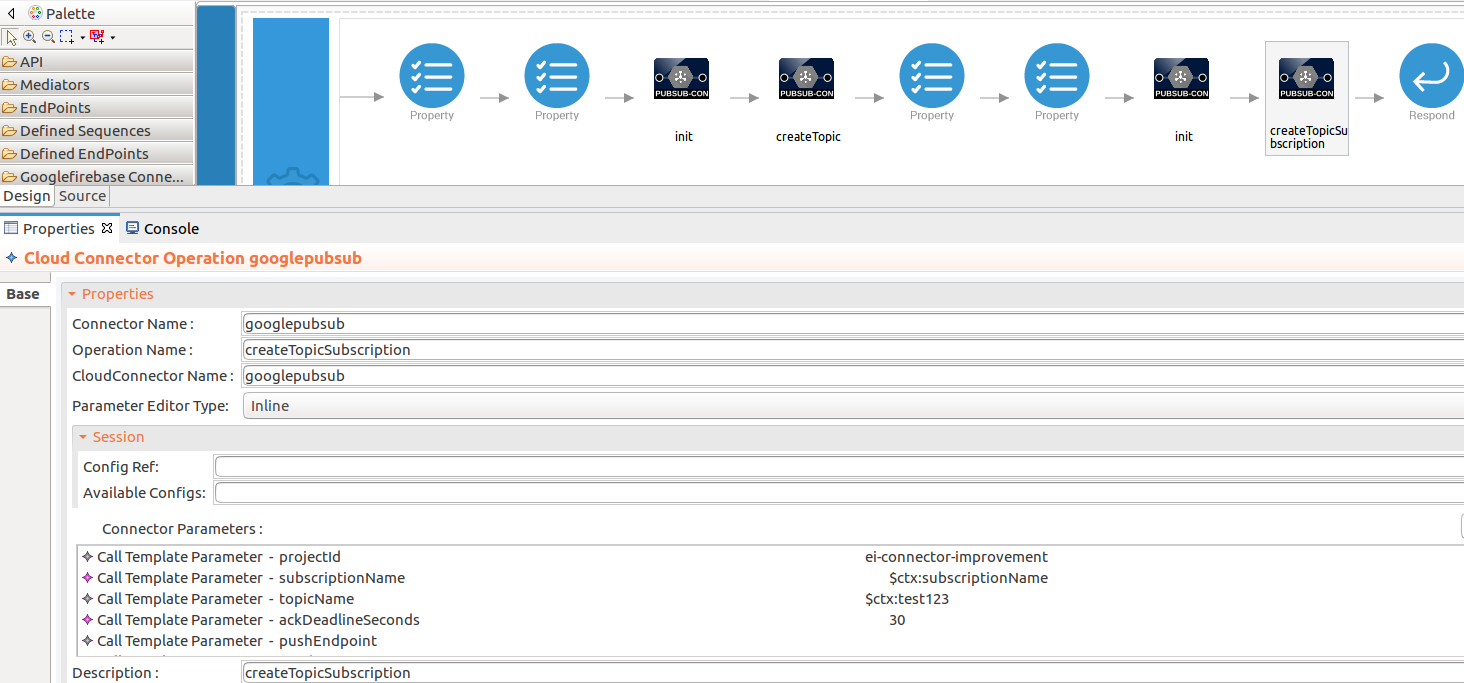
createTopicSubscriptionoperation. Navigate into the Palette pane and select the graphical operations icons listed under Googlepubsub Connector section. Then drag and drop thecreateTopicSubscriptionoperation into the Design pane.- projectId : The unique ID of the project within which the topic is created.
- subscriptionName : The name of the subscription.
- topicName : The name of the topic for which you want to create a subscription.
- ackDeadlineSeconds : The maximum time a subscriber can take to acknowledge a message that is received.
-
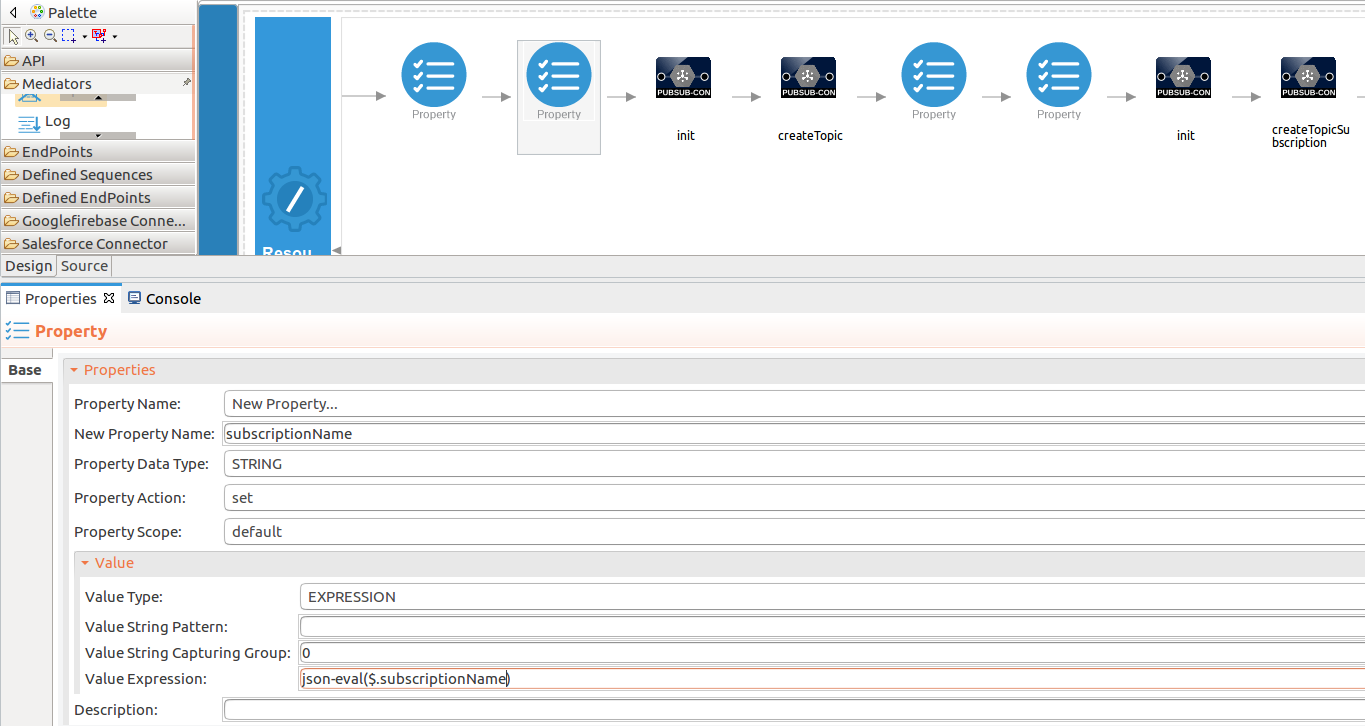
Add the property mediator to capture the
subscriptionNamevalues. This contains the name of the subscription.- name : subscriptionName
- expression : json-eval($.subscriptionName)
-
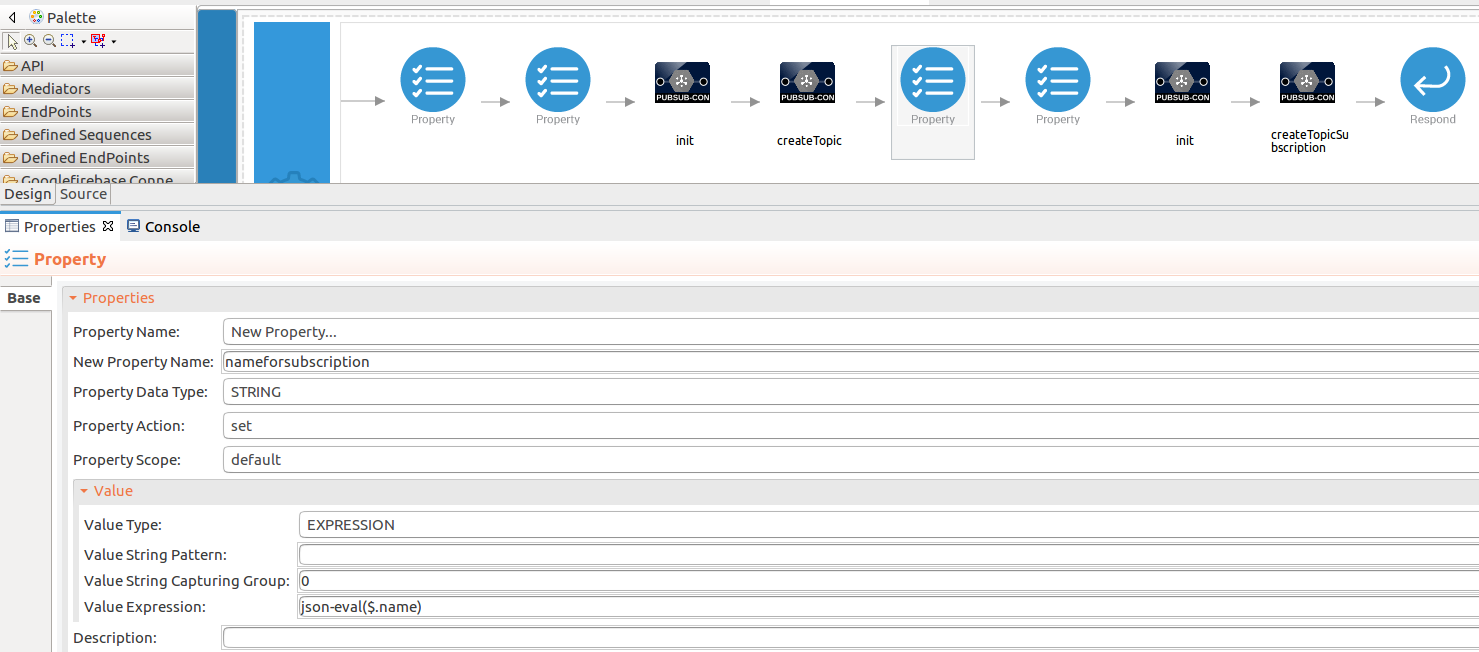
Add the property mediator to store the name of the created Topic value from the response of the createTopic operation.
- name : nameforsubscription
- expression : json-eval($.name)
-
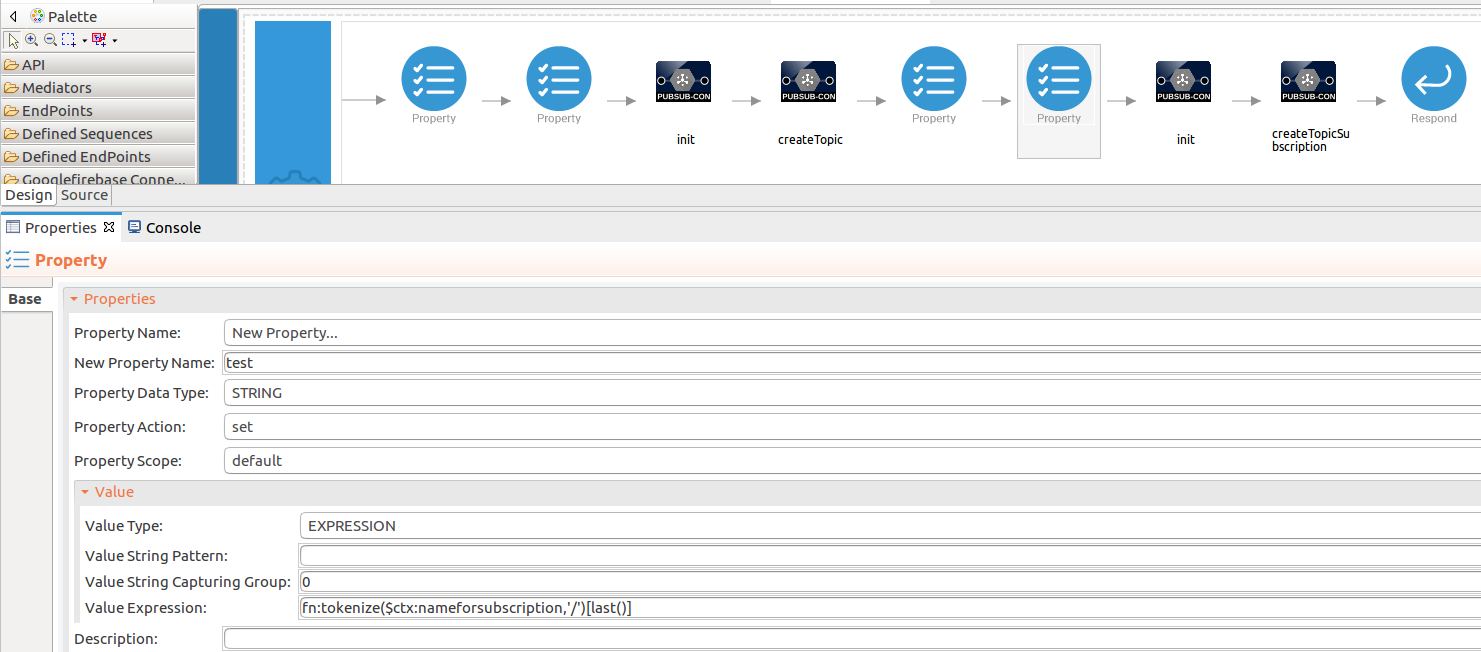
Add the property mediator to capture the Topic name from the response using the splitting separators in the results.
- name : nameforsubscription
- expression : json-eval($.name)
-
-
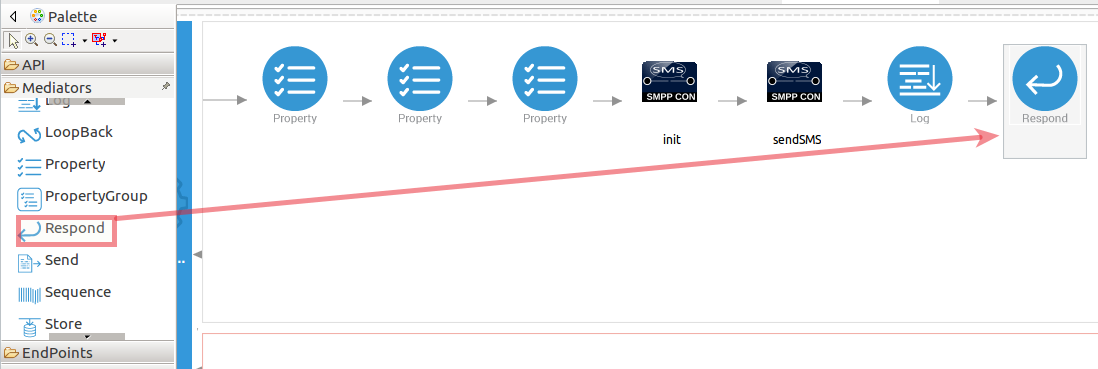
Forward the backend response to the API caller.
When you are invoking the created resource, the request of the message is going through the
/createTopicresource. Finally, it is passed to the Respond mediator. The Respond Mediator stops the processing on the current message and sends the message back to the client as a response.-
Drag and drop the respond mediator to the Design view.
-
Once you have setup the sequences and API, you can see the
/createTopicresource as shown below.
-
Configure a resource for the publishMessage operation
-
Initialize the connector.
-
Initialize the connector. You can use the same configuration to initialize the connector. Please follow the steps given in section 1 for setting up the init operation to the createTopic operation.
-
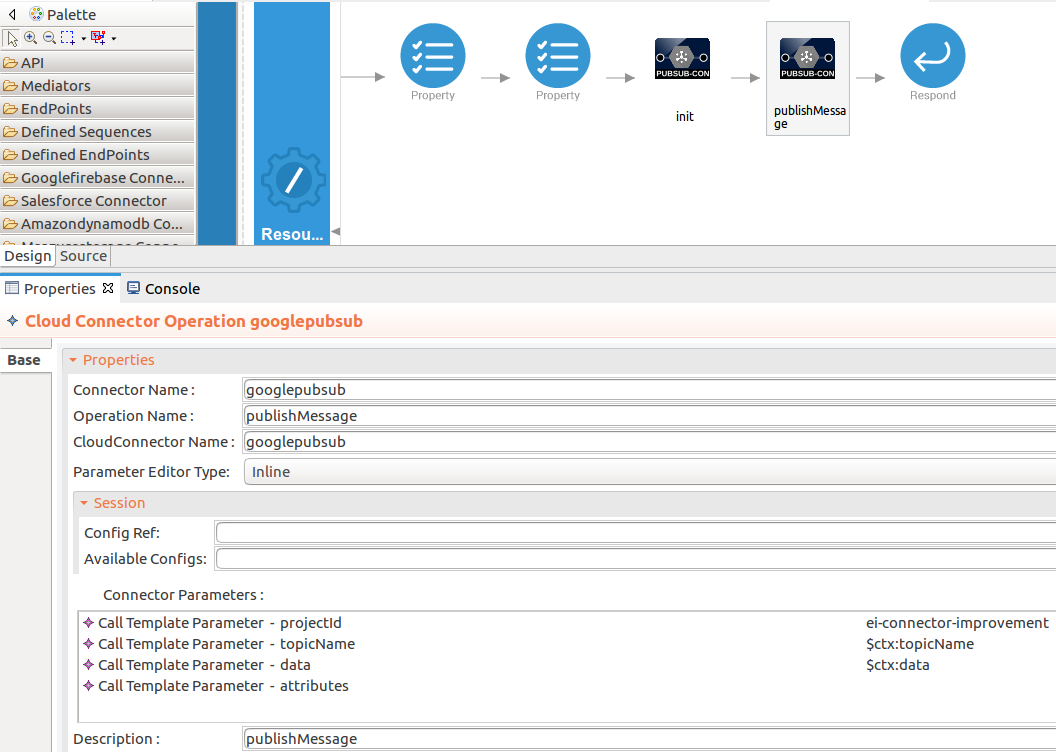
Set up the
publishMessageoperation. Navigate into the Palette pane and select the graphical operations icons listed under Googlepubsub Connector section. Then drag and drop thepublishMessageoperation into the Design pane.- projectId : The unique ID of the project within which the topic is created.
- topicName : The name of the topic for which you want to create a subscription.
- data : The message payload.
-
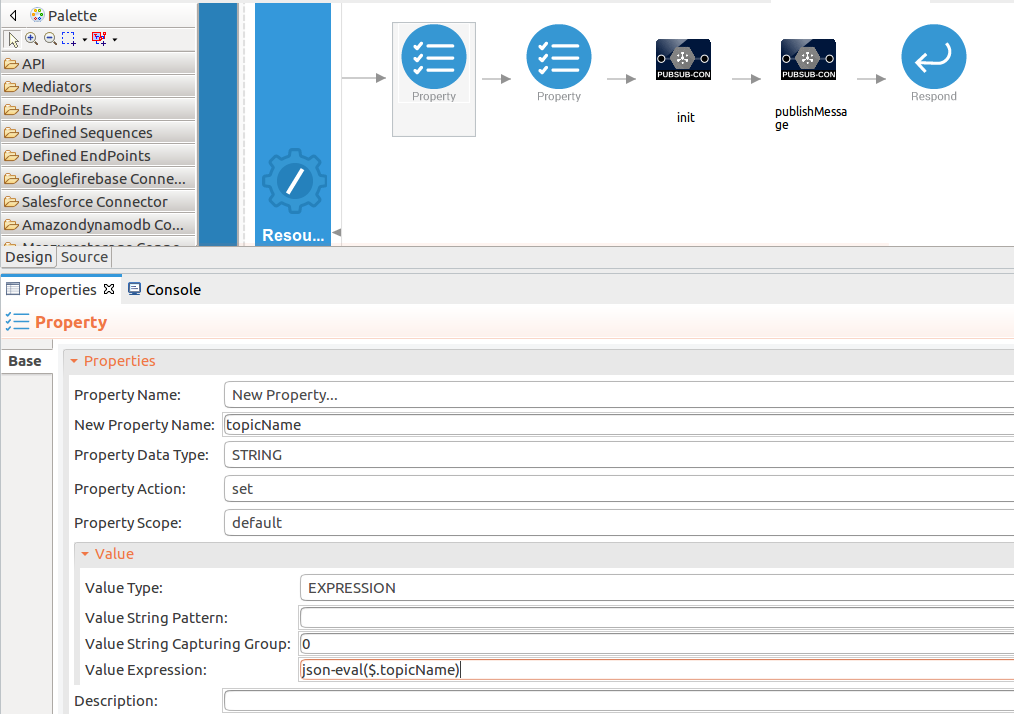
Add the property mediator to capture the
topicNamevalues.- name : topicName
- expression : json-eval($.topicName)
-
Add the property mediator to capture the
datavalues.- name : data
- expression : json-eval($.data)

Configure a resource for the pullMessage operation
-
Initialize the connector.
-
Initialize the connector. You can use the same configuration to initialize the connector. Please follow the steps given in section 1 for setting up the init operation to the createTopic operation
-
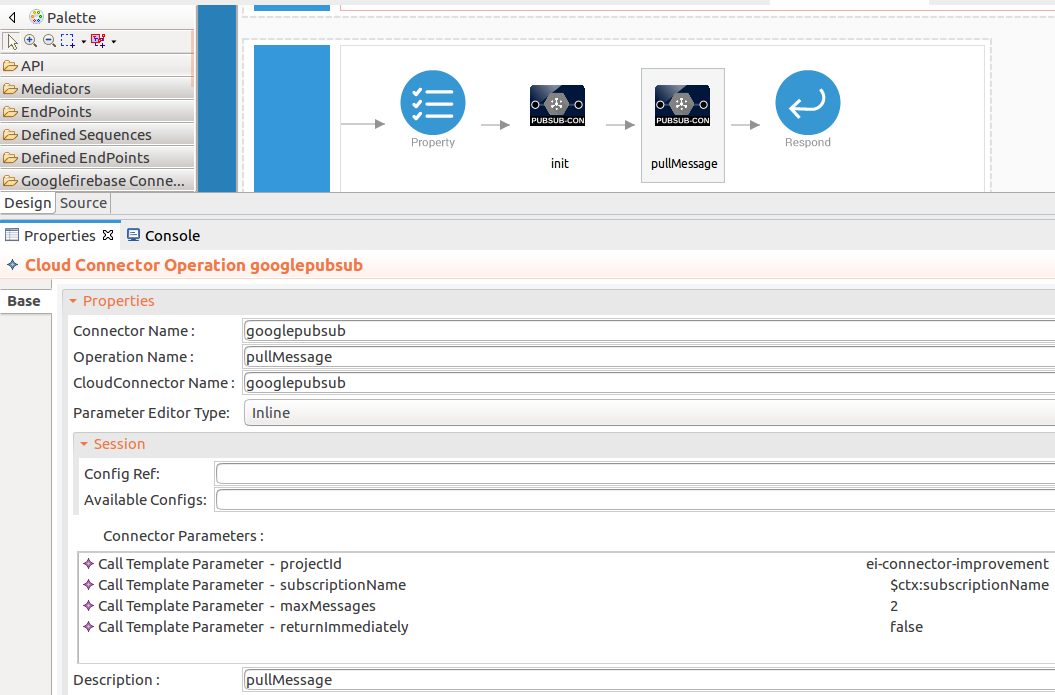
Set up the
publishMessageoperation. Navigate into the Palette pane and select the graphical operations icons listed under Googlepubsub Connector section. Then drag and drop thepublishMessageoperation into the Design pane.- projectId : The unique ID of the project within which the topic is created.
- subscriptionName : The name of the topic for which you want to create a subscription.
- maxMessages : The maximum number of messages to retrieve.
- returnImmediately : Set this to true if you want the server to respond immediately.
-
Add the property mediator to capture the
subscriptionNamevalues. Follow the steps given in createTopicSubscription operation.
Now you can switch into the Source view and check the XML configuration files of the created API and sequences.
!!! note "pubsubApi.xml"
<?xml version="1.0" encoding="UTF-8"?>
<api context="/resources" name="pubsubApi" xmlns="http://ws.apache.org/ns/synapse">
    <resource methods="POST" url-mapping="/createTopic">
        <inSequence>
            <property expression="json-eval($.topicName)" name="topicName" scope="default" type="STRING"/>
            <property expression="json-eval($.subscriptionName)" name="subscriptionName" scope="default" type="STRING"/>
            <googlepubsub.init>
                <accessToken>ya29.a0AfH6SMA0MU0Frk_7gNnA79QUWQGnalPXvmkoA4MYS8p8Mt9OSC5SUqqcqIjcrP-_ollVB9gpeg3SufbCpASMCWyHcVCN6ZMCbqz4IdQqRVi8Kt22tI6gR5zvgtWn1qFWnYnGQ6Ehqi_mS9k0PL_R-kQcl-AkqveA8ZY</accessToken>
                <apiUrl>https://pubsub.googleapis.com</apiUrl>
                <apiVersion>v1</apiVersion>
            </googlepubsub.init>
            <googlepubsub.createTopic>
                <projectId>ei-connector-improvement</projectId>
                <topicName>{$ctx:topicName}</topicName>
            </googlepubsub.createTopic>
            <property expression="json-eval($.name)" name="nameforsubscription" scope="default" type="STRING"/>
            <property expression="fn:tokenize($ctx:nameforsubscription,'/')[last()]" name="test" scope="default" type="STRING" xmlns:fn="http://www.w3.org/2005/xpath-functions"/>
            <googlepubsub.init>
                <accessToken>ya29.a0AfH6SMA0MU0Frk_7gNnA79QUWQGnalPXvmkoA4MYS8p8Mt9OSC5SUqqcqIjcrP-_ollVB9gpeg3SufbCpASMCWyHcVCN6ZMCbqz4IdQqRVi8Kt22tI6gR5zvgtWn1qFWnYnGQ6Ehqi_mS9k0PL_R-kQcl-AkqveA8ZY</accessToken>
                <apiUrl>https://pubsub.googleapis.com</apiUrl>
                <apiVersion>v1</apiVersion>
            </googlepubsub.init>
            <googlepubsub.createTopicSubscription>
                <projectId>ei-connector-improvement</projectId>
                <subscriptionName>{$ctx:subscriptionName}</subscriptionName>
                <topicName>{$ctx:test}</topicName>
                <ackDeadlineSeconds>30</ackDeadlineSeconds>
            </googlepubsub.createTopicSubscription>
            <respond/>
        </inSequence>
        <outSequence/>
        <faultSequence/>
    </resource>
    <resource methods="POST" url-mapping="/insertcompanynotifications">
        <inSequence>
            <property expression="json-eval($.topicName)" name="topicName" scope="default" type="STRING"/>
            <property expression="json-eval($.data)" name="data" scope="default" type="STRING"/>
            <googlepubsub.init>
                <accessToken>ya29.a0AfH6SMA0MU0Frk_7gNnA79QUWQGnalPXvmkoA4MYS8p8Mt9OSC5SUqqcqIjcrP-_ollVB9gpeg3SufbCpASMCWyHcVCN6ZMCbqz4IdQqRVi8Kt22tI6gR5zvgtWn1qFWnYnGQ6Ehqi_mS9k0PL_R-kQcl-AkqveA8ZY</accessToken>
                <apiUrl>https://pubsub.googleapis.com</apiUrl>
                <apiVersion>v1</apiVersion>
            </googlepubsub.init>
            <googlepubsub.publishMessage>
                <projectId>ei-connector-improvement</projectId>
                <topicName>{$ctx:topicName}</topicName>
                <data>{$ctx:data}</data>
            </googlepubsub.publishMessage>
            <respond/>
        </inSequence>
        <outSequence/>
        <faultSequence/>
    </resource>
    <resource methods="POST" url-mapping="/getcompanynotifictions">
        <inSequence>
            <property expression="json-eval($.subscriptionName)" name="subscriptionName" scope="default" type="STRING"/>
            <googlepubsub.init>
                <accessToken>ya29.a0AfH6SMDDFZCdoo37Tb48MrJU-ZnNoyrYqNY8r5cgWX0kD7n3GBhZr_TbicfvywjKwGYaZEBV50_yGINVOhZr_4jFMu2O03c87NiDCBpKW5zdsnl3x9iWdsosjDoE7uAGEKKLikPgnKfcgilGB2d-MBzu_c2e53kXG6A</accessToken>
                <apiUrl>https://pubsub.googleapis.com</apiUrl>
                <apiVersion>v1</apiVersion>
            </googlepubsub.init>
            <googlepubsub.pullMessage>
                <projectId>ei-connector-improvement</projectId>
                <subscriptionName>{$ctx:subscriptionName}</subscriptionName>
                <maxMessages>2</maxMessages>
                <returnImmediately>false</returnImmediately>
            </googlepubsub.pullMessage>
            <respond/>
        </inSequence>
        <outSequence/>
        <faultSequence/>
    </resource>
</api>
Get the project
You can download the ZIP file and extract the contents to get the project code.
Tip
You may need to update the simulator details and make other such changes before deploying and running this project.
Deployment
Follow these steps to deploy the exported CApp in the integration runtime.
Deploying on Micro Integrator
You can copy the composite application to the <PRODUCT-HOME>/repository/deployment/server/carbonapps folder and start the server. Micro Integrator will be started and the composite application will be deployed.
You can further refer the application deployed through the CLI tool. See the instructions on managing integrations from the CLI.
Click here for instructions on deploying on WSO2 Enterprise Integrator 6
-
You can copy the composite application to the
<PRODUCT-HOME>/repository/deployment/server/carbonappsfolder and start the server. -
WSO2 EI server starts and you can login to the Management Console https://localhost:9443/carbon/ URL. Provide login credentials. The default credentials will be admin/admin.
-
You can see that the API is deployed under the API section.
Testing
Invoke the API as shown below using the curl command. Curl Application can be downloaded from here.
- Create a Topic for store company update notifications.
Sample request
curl -v POST -d '{"topicName":"CompanyUpdates","subscriptionName": "SubscriptionForCompanyUpdates"}' "http://localhost:8290/resources/createTopic" -H "Content-Type:application/json"{
"name": "projects/ei-connector-improvement/subscriptions/SubscriptionForCompanyUpdates",
"topic": "projects/ei-connector-improvement/topics/CompanyUpdates",
"pushConfig": {},
"ackDeadlineSeconds": 30,
"messageRetentionDuration": "604800s",
"expirationPolicy": {
"ttl": "2678400s"
}
}-
Created Topic.

-
Created subscription for the Topic that you specify in the G-Cloud.

-
Insert company update notifications to the created topic.
Sample request
curl -v POST -d '{"topicName":"CompanyUpdates", "data":"This is first notification"}' "http://localhost:8290/resources/insertcompanynotifications" -H "Content-Type:application/json"{
"messageIds": [
"1268617220412368"
]
}Sample request
curl -v POST -d '{"subscriptionName":"SubscriptionForCompanyUpdates"}' "http://localhost:8290/resources/getcompanynotifictions" -H "Content-Type:application/json"{
"receivedMessages": [
{
"ackId": "ISE-MD5FU0RQBhYsXUZIUTcZCGhRDk9eIz81IChFEgIIFAV8fXFYW3VfVBoHUQ0Zcnxmd2NTQQhXRFB_VVsRDXptXFcnUA8fentgcmhYEwUDR1B4V3Pr67-C9PCXYxclSpuLu6xvM8byp5xMZho9XxJLLD5-NjNFQV5AEkw9BkRJUytDCypYEU4E",
"message": {
"data": "VGhpcyBpcyBmaXJzdCBub3RpZmljYXRpb24=",
"messageId": "1268617220412368",
"publishTime": "2020-06-09T15:36:35.632Z"
}
}
]
}-
View published company update notification.

What's next
- You can deploy and run your project on Docker or Kubernetes. See the instructions in Running the Micro Integrator on Containers.
