Connector Developer Guidelines
Integration Connectors are extensions to the integration runtime of WSO2 (compatible with EI 6.x, EI 7.x, as well as APIM 4.0.0). This enables developers to interact with SaaS applications on the cloud, databases, and popular B2B protocols.
Connectors are hosted in a connector store and can be added to integration flows in WSO2 Integration Studio, which is the tooling component for developing integrations. Once added, the operations of the connector can be dragged onto your canvas and added to your sequences and proxy services.
Each connector provides a set of operations, which you can call from your proxy services, sequences, and APIs to interact with the specific third-party service.
This document is an in-depth guide for developers to follow when developing a new connector from scratch. It aims to cover the initial steps to be followed, best practices, and details the means of implementing the UI schema for Integration Studio support.
Connector Architecture
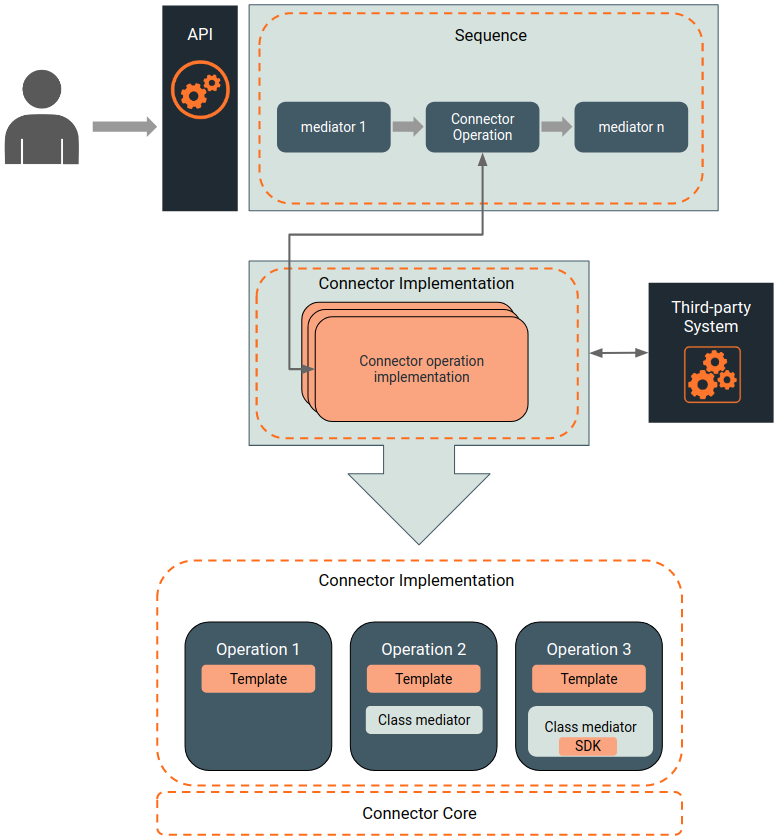
A connector is a collection or a set of operations that can be used in the integration flow to access a specific service or functionality. These operations are invoked from proxy services, sequences, and APIs to interact.
- A connector operation is made using sequence templates.
- The integration logic inside a connector operation is constructed using mediators.
- The integration logic inside a connector operation needs some custom functionality not provided by mediators, a java implementation can be attached to the associated sequence template. This is using the Custom Class Mediator approach.
- If the third-party service provider provides a Java SDK to interact with the service, connector operation can use them extending the java implementation.
Connector Types
There are two types of connectors.
- Application/SaaS connectors - Connects to cloud applications. These are implemented purely using WSO2 mediators and constructs. E.g., Amazon S3, Salesforce
- Technology connectors - Implements different B2B protocols. Logic for these are implemented using mainly Java. E.g., JMS, NATS, Email.
Connector Structure
The typical folder structure of a connector is as follows.
├── pom.xml
├── repository
├── src
│   ├── main
│   │   ├── assembly
│   │   │   ├── assemble-connector.xml
│   │   │   └── filter.properties
│   │   ├── java
│   │   │   └── org
│   │   │       └── wso2
│   │   │           └── carbon
│   │   │               └── connector
│   │   │                   └── sampleConnector.java
│   │   └── resources
│   │       ├── config
│   │       │   ├── component.xml
│   │       │   └── init.xml
│   │       ├── connector.xml
│   │       └── sample
│   │           ├── component.xml
│   │           └── operation1.xml
│ └── test- pom.xml - Defines the build information for maven.
- repository - When running Integration tests, the integration runtime distribution should be placed here.
- src/main/assembly - Instructions on packaging the connector.
- src/main/java/org/wso2/carbon/connector - Java code which is being used to implement connector logic.
- src/main/resources - Contains sequence templates for each connector operation.
- src/main/resources/config - Contains the connector initialization logic.
- src/main/resources/connector.xml - Contains the connector information.
- src/test - Contains the test cases.
About the connector.xml file
All the operations exposed by the connector should be registered in this file. The syntax is as follows.
<?xml version="1.0" encoding="UTF-8"?>
<connector>
   <component name="sample" package="org.wso2.carbon.connector">
      <dependency component="config" />
      <dependency component="sample" />
      <description>WSO2 sample connector library</description>
   </component>
   <icon>icon/icon-small.gif</icon>
</connector>| Attribute | Description |
|---|---|
| name | The ‘name’ attribute of the ‘component’ element in the connector.xml file defines the name of the connector. When operations are being invoked, this is the name appended to the operation. |
| Dependancy | Defines the sub directories which contain the operations. |
| icon | Path to the icon file of the connector. |
For example, according to the sample above, it contains two subdirectories named ‘config’ and ‘sample’ inside /resources.
     └── resources
           ├── config
           │   ├── component.xml
           │   └── init.xml
           ├── connector.xml
           └── sample
                  ├── component.xml
                  └── operation1.xml
Subdirectory containing operations
Resources folder is used to group the operations in the connector in a more organized manner.
It may contain subdirectories which contain operations. Each of those subdirectories should contain a component.xml file as below defining each template which represents an operation. Ultimately, all component.xml files in sub-directories should be referred to by the main component.xml file of the connector.
Below is the component.xml in ‘sample’ subdirectory.
<?xml version="1.0" encoding="UTF-8"?>
<component name="sample" type="synapse/template">
   <subComponents>
      <component name="operation1">
         <file>operation1.xml</file>
         <description>sample wso2 connector method</description>
      </component>
   </subComponents>
</component>| Attribute | Description |
|---|---|
| name | The name of the subdirectory. This is the name to be used as the ‘component’ attribute of the ‘dependency’ element in the connector.xml file. |
| subComponents | Defines the template files. |
| component (under subComponent) | Defines an operation. The ‘name’ attribute defines the name of the operation. The following is an example of what you can find in the component.xml file.
|
| file | Name of the file containing the operation. |
| description | Description of the operation |
For example:
      └── resources
            ├── config
            │   ├── component.xml
            │   └── init.xml
            ├── connector.xml
            └── sample
                   ├── component.xml
                   └── operation1.xml
The following is a sample available in the component.xml file.
<component name="sample" type="synapse/template">Operation
An operation of an integration connector is implemented using a synapse template as mentioned before. A typical template configuration for an operation would look like below.
<?xml version="1.0" encoding="UTF-8"?>
<template xmlns="http://ws.apache.org/ns/synapse" name="operation1">
   <parameter name="hostName" />
   <sequence>
      <log level="full">
            <property name="*******host name********" expression="$func:hostName" />
      </log>
   </sequence>
</template>| Attribute | Description |
|---|---|
| name | The name of the operation. This should correspond to the name defined in the subcomponent in the component.xml. |
| parameter | The parameters required for the operation are defined as parameters. |
| sequence | The mediation logic is implemented here. |
The following is a sample of the code in component.xml.
    <subComponents>
        <component name="operation1">
            <file>operation1.xml</file>
            <description>sample wso2 connector method</description>
        </component>
    </subComponents>
The following is a sample code extracted from operation1.xml
<template xmlns="http://ws.apache.org/ns/synapse" name="operation1">Invoking an operation
When invoking an operation from the main integration flow, the connector name defined in the connector.xml would be appended to the respective operation. Invoking the operation would look similar to the following.
<sample.operation1>
    <hostName>localhost</hostName>
</sample.operation1>
Writing Your First Connector
Prerequisites
- Download and install Apache Maven.
Step 1: Create Maven project template
We will use the Maven archetype to generate the Maven project template and sample connector code.
-
Open a terminal and navigate to the directory where you want the connector code to be created and run the following command.
mvn org.apache.maven.plugins:maven-archetype-plugin:2.4:generate -DarchetypeGroupId=org.wso2.carbon.extension.archetype -DarchetypeArtifactId=org.wso2.carbon.extension.esb.connector-archetype -DarchetypeVersion=2.0.4 -DgroupId=org.wso2.carbon.esb.connector -DartifactId=org.wso2.carbon.esb.connector.googlebooks -Dversion=1.0.0 -DarchetypeRepository=http://maven.wso2.org/nexus/content/repositories/wso2-public/ -
Enter the name of the connector and press enter.
-
Next, press ‘Y’ and enter to confirm configuration properties.
You will observe the following in the logs, if the connector was successfully created.
[INFO] ----------------------------------------------------------------------------
[INFO] Using following parameters for creating project from Archetype: org.wso2.carbon.extension.esb.connector-archetype:2.0.4
[INFO] ----------------------------------------------------------------------------
[INFO] Parameter: groupId, Value: org.wso2.carbon.esb.connector
[INFO] Parameter: artifactId, Value: org.wso2.carbon.esb.connector.googlebooks
[INFO] Parameter: version, Value: 1.0.0
[INFO] Parameter: package, Value: org.wso2.carbon.esb.connector
[INFO] Parameter: packageInPathFormat, Value: org/wso2/carbon/esb/connector
[INFO] Parameter: package, Value: org.wso2.carbon.esb.connector
[INFO] Parameter: groupId, Value: org.wso2.carbon.esb.connector
[INFO] Parameter: artifactId, Value: org.wso2.carbon.esb.connector.googlebooks
[INFO] Parameter: connector_name, Value: Synergy
[INFO] Parameter: version, Value: 1.0.0
[WARNING] CP Don't override file /home/user/org.wso2.carbon.esb.connector.googlebooks/src/test/resources/testng.xml
[WARNING] CP Don't override file /home/user/org.wso2.carbon.esb.connector.googlebooks/src/test/resources/artifacts/ESB/connector/config/Synergy.properties
[INFO] project created from Archetype in dir: /home/user/org.wso2.carbon.esb.connector.googlebooks
[INFO] ------------------------------------------------------------------------
[INFO] BUILD SUCCESS
[INFO] ------------------------------------------------------------------------
[INFO] Total time:  01:15 h
[INFO] Finished at: 2020-08-10T11:59:34+05:30
[INFO] ------------------------------------------------------------------------
You may observe that the following directory structure is created.
Step 2: Adding the new connector resources
Now, let's configure files in the org.wso2.carbon.esb.connector.sample/src/main/resources directory:
-
Create a directory named googlebooks_volume in the
/src/main/resourcesdirectory. -
Create a file named
listVolume.xmlwith the following content in the googlebooks_volume directory:<?xml version="1.0" encoding="UTF-8"?> <template xmlns="http://ws.apache.org/ns/synapse" name="listVolume"> <parameter name="searchQuery" description="Full-text search query string." /> <sequence> <property name="uri.var.searchQuery" expression="$func:searchQuery" /> <call> <endpoint> <http method="get" uri-template="https://www.googleapis.com/books/v1/volumes?q={uri.var.searchQuery}" /> </endpoint> </call> </sequence> </template> -
Create a file named
component.xmlin the googlebooks_volume directory and add the following content.<?xml version="1.0" encoding="UTF-8"?> <component name="googlebooks_volume" type="synapse/template"> <subComponents> <component name="listVolume"> <file>listVolume.xml</file> <description>Lists volumes that satisfy the given query.</description> </component> </subComponents> </component> -
Edit the
connector.xmlfile in thesrc/main/resourcesdirectory and replace the contents with the following dependency:<?xml version="1.0" encoding="UTF-8"?> <connector> <component name="sample" package="org.wso2.carbon.connector"> <dependency component="googlebooks_volume" /> <description>wso2 sample connector library</description> </component> </connector> -
Create a folder named icon in the /src/main/resources directory and add two icons. You can download icons from the following location: http://svn.wso2.org/repos/wso2/scratch/connectors/icons/.
Step 3: Building the connector
Open a terminal, navigate to the org.wso2.carbon.esb.connector.sample directory and execute the following maven command:
mvn clean installThis builds the connector and generates a ZIP file named sample-connector-1.0.0.zip in the target directory.
Step 4: Testing the connector
-
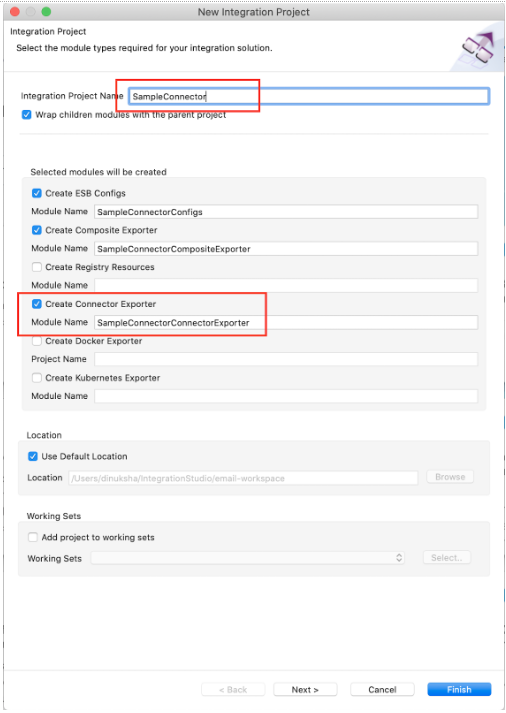
Open WSO2 Integration Studio and create an integration project by clicking New Integration Project.
-
In the window that appears, make sure you select Connector Exporter Project" as a module of the project.
-
In the newly created project, navigate to
SampleConnector/SampleConnectorConfigs/src/main/synapse-config/apiin WSO2 Integration Studio. Right-click and select New -> Rest API. -
Select Create A New API Artifact and provide below details.
- Name - sampleAPI
- Context - /sample
-
Right-click the
SampleConnectorConfigsproject and select Add or Remove Connector. In the window that appears, select Add from File System and select the file path to the<sample_connector_folder>/target/sample-connector-1.0.0.zipfile. You may observe the sample-connector added in the pallette as shown below.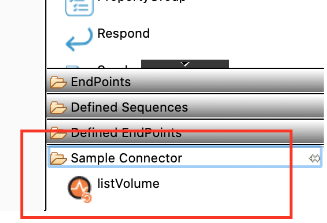
-
Switch to the source view and update the configuration as below.
<?xml version="1.0" encoding="UTF-8"?>
<api context="/sample" name="sampleAPI" xmlns="http://ws.apache.org/ns/synapse">
    <resource methods="POST" uri-template="/listVolume">
        <inSequence>
            <sample.listVolume>
                <searchQuery>{json-eval($.searchQuery)}</searchQuery>
            </sample.listVolume>
            <respond/>
        </inSequence>
        <outSequence/>
        <faultSequence/>
    </resource>
</api>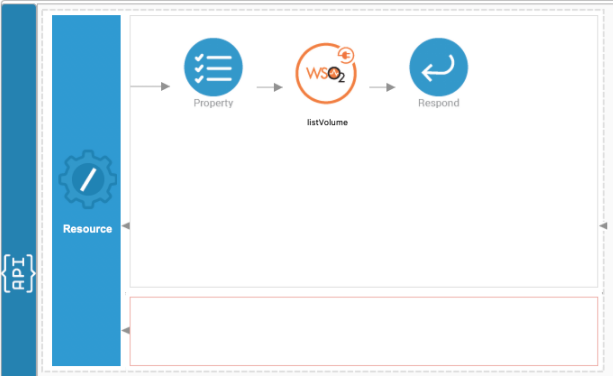
-
Right-click the
SampleConnectorConnectorExporterproject and go to -> New -> Add or Remove Connectors -> Select ‘workspace’. Select the connector from the below window and click OK and then click Finish.
-
To run the project, right-click on the project and select Run As -> Run on Micro Integrator.
-
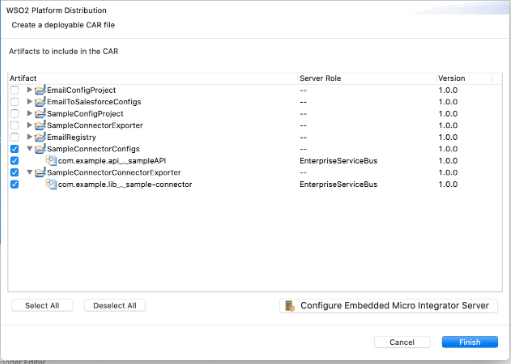
Select the artifacts to be exported and click Finish.
-
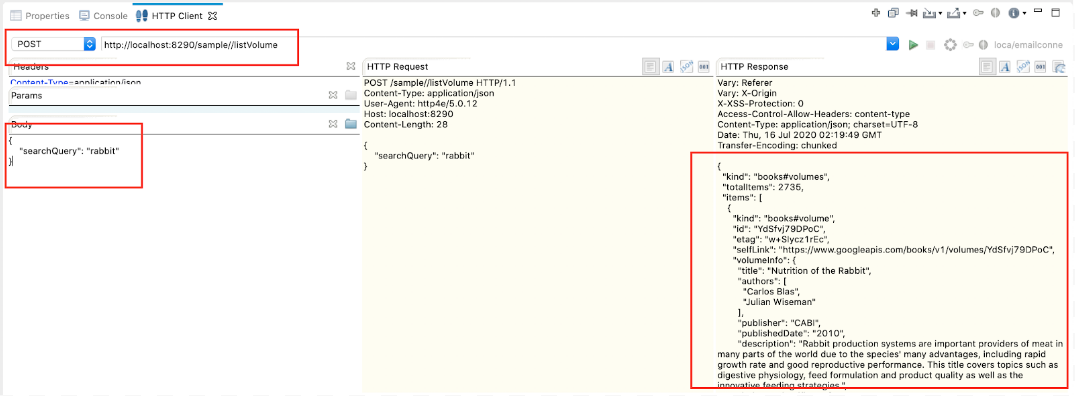
Send a POST call to http://localhost:8290/sample/listVolume with the below request payload.
{ "searchQuery": "rabbit" } -
A JSON response containing book information will be returned.
Extending Connector Capabilities with Java
In cases where you need to provide custom capabilities that cannot be fulfilled using mediators, we are able to implement this logic in Java within the connector itself and invoking them using the Class Mediator. This capability is useful when creating Technology connectors.
These Java classes should reside inside /src/main/java/org.wso2.carbon.connector/ directory.
Sample
This sample is an extension to the ‘Writing your first connector’ section. Let us improve the connector with a Java implementation.
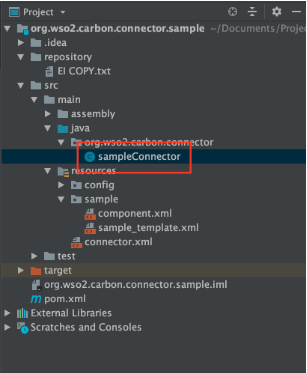
In the same project, you may observe the sampleConnector class created in the /src/main/java/org.wso2.carbon.connector/ directory.
The class would look similar to the following.
public class sampleConnector extends AbstractConnector {

   @Override
   public void connect(MessageContext messageContext) throws ConnectException {
       Object templateParam = getParameter(messageContext, "generated_param");
       try {
           log.info("sample sample connector received message :" + templateParam);
           /**Add your connector code here
           **/
       } catch (Exception e) {
        throw new ConnectException(e);
       }
   }
}
This class is being invoked by /src/main/resources/sample/sample_template.xml with the below code segment.
<class name="org.wso2.carbon.connector.sampleConnector" />Now, let’s add the component containing the sample_template.xml to the connector by adding the below line to connector.xml.
<dependency component="sample" />After adding this line, the connector.xml should be similar to the following:
<?xml version="1.0" encoding="UTF-8"?>
<connector>
   <component name="sample" package="org.wso2.carbon.connector">
      <dependency component="googlebooks_volume" />
      <dependency component="sample" />
      <description>wso2 sample connector library</description>
   </component>
</connector>
In the sample, when the connect method is invoked, it should log message “sample sample connector received message :
Invoking the sample
-
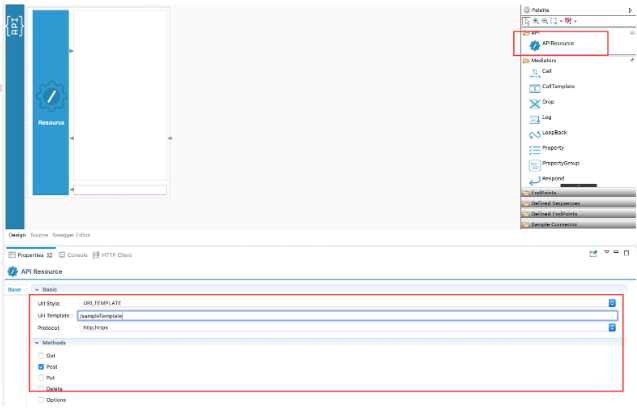
Add a new REST API resource with the following configuration.
- URI Style: URI_TEMPLATE
- URI Template: /sampleTemplate
- Methods: POST
-
Drag and drop the sample_template operation as indicated below, and configure the generated_param expression as
json-eval($.generatedParam).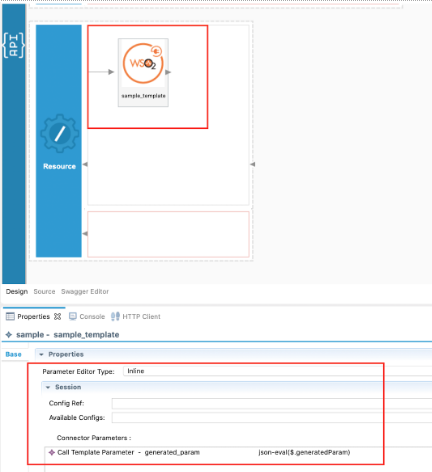
The API resource would now look similar to the following:
<resource methods="POST" uri-template="/sampleTemplate"> <inSequence> <sample.sample_template> <generated_param>{json-eval($.generatedParam)}</generated_param> </sample.sample_template> </inSequence> <outSequence/> <faultSequence/> </resource> -
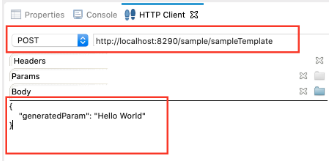
Run the project in Micro Integrator as done previously and invoke http://localhost:8290/sample/sampleTemplate with the below payload.
{
    "generatedParam": "Hello World"
}
AbstractConnector class - Any Java class being invoked from a template sequence must extend the AbstractConnector class and override the connect() method. The logic to be invoked must be inside the connect() method.
Invoking the java class - The Java class must be invoked from the template sequence using the following syntax.
<class name="org.wso2.carbon.connector.sampleConnector" />Note: The class should not contain class level variables as it will introduce concurrency issues during message mediation.
Connection Handling
In connectors, we often need to establish connections with the third-party applications or sometimes need to maintain connection configuration. This is done using the ‘init’ operation which is typically invoked before any operation is performed.
This is a hidden operation which is not mandatory for all connectors to implement.
In the latest versions of the connectors, connections are abstracted into local entries by configuring the ‘init’ operation in the local entries. It is then linked to the connector operations, which allows the user to maintain multiple connection entries and configure which connection to be used for each operation.
E.g., The following is a connection created for the email operations.
Local Entry containing the init operation
<?xml version="1.0" encoding="UTF-8"?>
<localEntry key="imapsconnection" xmlns="http://ws.apache.org/ns/synapse">
    <email.init>
        <host>imap.gmail.com</host>
        <port>993</port>
        <name>imapsconnection</name>
        <username></username>
        <password></password>
        <connectionType>IMAPS</connectionType>
        <maxActiveConnections>4</maxActiveConnections>
    </email.init>
</localEntry>
Operation invoked in the mediation flow
<email.list configKey="imapsconnection">
            <subjectRegex>{json-eval($.subjectRegex)}</subjectRegex>
</email.list>
Here, the init operation is configured using the configKey attribute. When the configKey attribute is configured, the operations in the local entry with the relevant key name is invoked before invoking the operation.
SaaS Connectors
In SaaS connectors, where the logic is implemented using pure integration constructs, it often uses OAuth 2.0 for authentication. Connector core provides the capability to handle access tokens and refresh expired tokens.
Authentication Mechanism using Refresh Token
In previous versions of connectors, expiry based access token refreshing was preferred for connections. However, in the latest versions, the process of refreshing access tokens will be retry-based, which means that when an endpoint is called with the current access token and a 4XX HTTP response code is returned, the token is refreshed using the refresh token and the call is reattempted. If the second call also fails, the failure message is passed to the client.
In order to implement this, the below template can be used.
<template name="callWithRetry" xmlns="http://ws.apache.org/ns/synapse">
    <sequence>
        <filter source="boolean($ctx:uri.var.refreshToken)" regex="true">
            <then>
                <filter source="$ctx:httpMethod" regex="(post|patch)">
                    <enrich>
                        <source clone="true" type="body"/>
                        <target property="ORIGINAL_MSG_PAYLOAD" type="property"/>
                    </enrich>
                </filter>
                <property name="uri.var.accessToken.reg"
                          expression="get-property('registry', $ctx:uri.var.accessTokenRegistryPath)"/>
                <header name="Authorization"
                        expression="fn:concat('Bearer  ', $ctx:uri.var.accessToken.reg )"
                        scope="transport"/>
                <salesforcerest.callOptions/>
                <property name="httpCode" expression="$axis2:HTTP_SC" scope="default" type="STRING"/>
                <filter source="$ctx:httpCode" regex="4[0-9][0-9]">
                    <then>
                        <class name="org.wso2.carbon.connector.core.RefreshAccessToken"/>
                        <header name="Authorization"
                                expression="fn:concat('Bearer  ', $ctx:uri.var.accessToken )"
                                scope="transport"/>
                        <filter source="$ctx:httpMethod" regex="(post|patch)">
                            <enrich>
                                <source clone="true" property="ORIGINAL_MSG_PAYLOAD" type="property"/>
                                <target type="body"/>
                            </enrich>
                        </filter>
                        <salesforcerest.callOptions/>
                    </then>
                </filter>
            </then>
            <else>
                <header name="Authorization"
                        expression="fn:concat('Bearer  ', $ctx:uri.var.accessToken )"
                        scope="transport"/>
                <salesforcerest.callOptions/>
            </else>
        </filter>
    </sequence>
</template>
For example, see the sample code
Here, salesforcerest.calloptions will contain call mediators defined for HTTP methods GET, POST, DELETE, etc. (For example, see the code)
There are two class mediators made available in carbon-mediation for refreshing the access token. See the related pull request for more information.
-
RefreshAccessToken.java - In the above template, you may observe this class is being invoked using the below line.
<class name="org.wso2.carbon.connector.salesforcerest.RefreshAccessToken"/> -
RefreshAccessTokenWithExpiry.java - This class can be used if you need a periodic refresh of access tokens. It can be invoked as follows,
<class name="org.wso2.carbon.connector.salesforcerest.RefreshAccessTokenWithExpiry"/>
Technology Connectors
In Technology connectors, when the logic is implemented using Java we often need to maintain the connections made. For example, email connections, Kafka connections etc. The connection can be created/configured when the init operation is invoked and maintained to be used across operations.
In order to handle this, the connector core consists of a connection handler. Furthermore, it also consists of a generic connection pool to maintain a connection pool for each connector.
When implementing a connection for a connector, it must implement the Connection class. For more information, see the code.
For example, see the Java code.
Connection Handler
Connection Handler contains a map that maintains connections/connection pools. Following are the methods it provides.
| Method | Description |
|---|---|
| createConnection(String connector, String connectionName, Connection connection) | Puts the connection to the connection map. No pooling. |
| createConnection(String connector, String connectionName, ConnectionFactory factory, Configuration configuration) | This method is used to create a connection pool. In order to create a connection pool ConnectionFactory class (https://github.com/wso2/carbon-mediation/blob/master/components/mediation-connector/org.wso2.carbon.connector.core/src/main/java/org/wso2/carbon/connector/core/pool/ConnectionFactory.java) must be implemented as done in https://github.com/wso2-extensions/esb-connector-email/blob/master/src/main/java/org/wso2/carbon/connector/connection/EmailConnectionFactory.java. This specifies how the connections are created. Configurations of the connection pool must be set in the Configurations object to be passed (https://github.com/wso2/carbon-mediation/blob/master/components/mediation-connector/org.wso2.carbon.connector.core/src/main/java/org/wso2/carbon/connector/core/pool/Configuration.java). |
| getConnection(String connector, String connectionName) | Retrieve connection for the relevant connector. |
| returnConnection(String connector, String connectionName, Connection connection) | Return connection back to the pool. |
| shutdownConnections() | Shuts down all connections in the connection handler. |
| shutdownConnections(String connector) | Shuts down all connections of the relevant connector. |
| checkIfConnectionExists(String connector, String connectionName) | Check if the connection exists by the given connection name for the relevant connector. |
Utilities
Connector core acts as a SDK for connector development. It is added as a dependency to the connector project automatically via the connector architype. It is advised to use utilities in the connector core whenever possible when you need to extend connector operation functionalities.
Below are some of the utilities provided by the connector core.
Handling expired Access Tokens
RefreshAccessToken - This is a class mediator that you can use to refresh your access token. When invoked, this class mediator calls the token refresh url with a GET request and reads access_token and sets it to a property and saves it to governance registry for reuse. See code.
RefreshAccessTokenWithExpiry - This is a class mediator used for refreshing access tokens, similar to the above. However, this does not invoke the end point right away to refresh. Whenever this class mediator is called it will check whether a pre-agreed time limit has passed. If the time has passed it will call the refresh endpoint to get a new access token. See code.
You can also extend these two classes to change the behavior if the refresh endpoint of the particular SaaS has different behaviors. You can add the child class into the connector project under java/<appropriate_package> and refer to those local class mediators.
Connection Handling
See the above section on Connection Handling.
Read template parameters
Template parameters can be read using the lookupTemplateParamater(MessageContext ctxt, String paramName) method in ConnectorUtils as indicated below.
ConnectorUtils.lookupTemplateParamater(messageContext, ”param”)Read connection pool parameters
Connection pool parameters can be parsed from the template parameters and set to the Configuration object using the getPoolConfiguration(MessageContext messageContext) method in ConnectorUtils as indicated below.
ConnectorUtils.getPoolConfiguration(messageContext)Handling payloads
Following methods in PayloadUtils class can be used for payload building and transformations.
| Methods | Description |
|---|---|
| setContent(MessageContext messageContext, InputStream inputStream, String contentType) | Builds content according to the given content type and set in the message body |
| handleSpecialProperties(String contentType, MessageContext axis2MessageCtx) | Changes the content type and handles other headers |
| preparePayload(MessageContext messageContext, String xmlString) | Converts the XML String to XML Element and sets in message context |
| setPayloadInEnvelope(MessageContext axis2MsgCtx, OMElement payload) | Sets the OMElement in the message context |
Best practices
Use functionalities available in Connector Core Every connector depends on the WSO2 Connector Core, which acts as the interface between the mediation engine and the connector implementation. It is the SDK provided to develop connectors. Connection pooling, OAuth-based authentication, JSON and XML utilities are there.
Never use class level variables when you extend “AbstractConnector” class
The connect method of this class must be stateless as multiple threads will access it at the same time (e.g., Email Send). Due to the same reason, avoid using class level variables to assign and keep values as that makes this method stateful.
Add DEBUG and TRACE logs when required This is extremely useful in production. It is always advised to add required DEBUG and TRACE logs when extended Java logic is written. Developers can also add debug and trace logs for sequence templates using log mediator. In both cases make sure to use the connector name as a prefix. Otherwise it will be hard to identify the logs related to the connector when runtime has multiple connectors deployed.
<log category="DEBUG" level="custom">
        <property name="message" value="This is a debug log"/>
</log>
Add meaningful comments to the code This helps for other developers to read through the implementation and understand. In sequence templates also developers can use XML-based comments.
    <!-- Calling test EP to obtain key required for further mediation-->
    <call>
        <endpoint key="testEP"/>
    </call>
Group operations for readability If the connector has many operations, instead of adding templates for all the operations in the same level, developers can group them to folders for easy navigation and readability (i.e., DayforceConnector).
Define private templates and reuse. Do not duplicate logic across templates
Developers may define a template with the <hidden>true</hidden> property in component.xml related to the template (example component.xml). Then that template will not be presented as a connector operation to the users when rendered in WSO2 Integration Studio. It is a private template which you can refer to construct logic in other templates. This provides a way to keep a reusable logic inside the connector for easy maintenance. See the example for more information.
Use property Group if there are a lot of properties to define Within some operations we need to define a number of properties together. When you use WSO2 Integration Studio to develop the logic, this fact makes sequence template logic to render in a lengthy manner in the UI. It makes it harder to navigate. To prevent this and to make XML definition also more readable you can group properties together using Property Group mediator.
Use $ctx: syntax instead of get-property() when reading properties
When you use the property mediator to read properties, always use $ctx: syntax. It delivers better performance. Make sure to use properties in the correct scope.
Avoid old mediators
Please do not use mediators like <send/>, <loopback/> in sequence templates. They are there for the sake of backward compatibility. Always stick to mediators like <call/> and <respond/>.
Timeout configs for connections
Connection timeout is an environment dependent configuration. Developers may define a default value, however it should be available for users to configure. If it is a technology connector, timeout is a configuration of the “connection”. If it is a SaaS connector developer needs to template it so that it can be passed to <call> mediator. For more information, see here.
Handle errors meaningfully. Use ERROR CODES Sometimes it is required to handle errors within the connector. Sometimes it is required to let the calling template handle the error. Sometimes it is required to forward the error message back to the connector operation invoker as it is. It is good to analyze use cases, and then design which errors need to be handled at which instance. However, it is a good practice to define and use error codes.
Please read the WSO2 Error Code guide.
Write test cases
Input and Output schema
Input and output schema can be defined for connectors so that a datamapper mediator can be used to easily transform the payloads required for each operation.
These schemas are placed inside /resources under input_schema and output_schema folders.
Input schema
Maps the input format required for the operation. For example:
Operation
<template xmlns="http://ws.apache.org/ns/synapse" name="sample">
   <parameter name="param" description="Sample parameter."/>
   <sequence>
       <property name="param" expression="$func:param"/>
   </sequence>
</template>
Input Schema
{
 "$schema":"http:\/\/wso2.org\/json-schema\/wso2-data-mapper-v5.0.0\/schema#",
 "id":"http:\/\/wso2jsonschema.org",
 "title":"root",
 "type":"object",
 "properties":{
   "source":{
     "id":"http:\/\/wso2jsonschema.org\/param",
     "type":"string"
   }
}
Output schema
Maps the out format of the operation.
Output Schema
{
 "$schema":"http:\/\/wso2.org\/json-schema\/wso2-data-mapper-v5.0.0\/schema#",
 "id":"http:\/\/wso2jsonschema.org",
 "title":"result",
 "type":"object",
 "properties":{
   "success":{
     "id":"http:\/\/wso2jsonschema.org\/success",
     "type":"boolean"
   }
 }
}
The UI schema
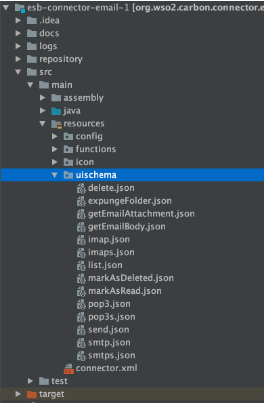
In order to support the WSO2 Integration Studio (version 7.1.0 +) properties window shown below, the UI schema should be derived for each operation. If this schema is present in the connector, when imported to the Integration Studio, the properties panel will automatically get generated as per the information there.

When adding the UI Model to the connector, the JSON files containing the schema should be included in a directory called ‘uischema’ under the resources directory.
Let us go through the constructs available in the UI schema.
Connection
In previous versions, the connector is being initialized using the init operation.
In the latest connector versions, the init operation, which is used to initiate the connector, is being created as a local entry and then referred from Integration Studio itself.
This operation is referred to as ‘Connection’ in UI schema terminology. Here we will define the fields that are required to initialize the connection of a connector.
Connection schema should be created in a separate file. As a practice, the name of the file should be the name of the connection.
The schema of a connection is as follows.
{
  "connectorName": "email",
  "connectionName": "IMAP",
  "title": "IMAP Connection",
  "help": "<h1>Email Connector</h1> <b>The email connector supports IMAP, POP3 and SMTP protocols for handling emails</b>",
  "elements": []
}| Property Name | Description |
|---|---|
| connectorName | Name of the connector |
| connectionName | Unique name for the connection |
| title | Title of the connection to be shown |
| help | Help tip to be shown |
| elements | Field elements of the connection |
Operation
Connection operation will be portrayed in the new Integration Studio connector view as shown below.
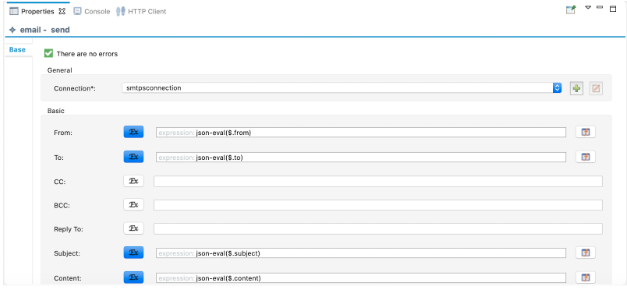
Operation schema for each operation should be created in a separate file. As a practice, the name of the file should be the name of the operation.
The schema of an operation is as follows.
{
  "connectorName": "email",
  "operationName": "send",
  "title": "Send Email",
  "help": "<h1>Send Email</h1> <b>The send operation sends an email.</b><br><br><ul><li><a href=\"https://ei.docs.wso2.com/en/latest/micro-integrator/reference/connectors/file-connector/file-connector-config/\"> More Help </a></li></ul>",
  "elements": []
}| Property Name | Description |
|---|---|
| connectorName | Name of the connector |
| operationName | Unique name for the operation |
| title | Title of the connection to be shown |
| help | Help tip to be shown |
| elements | Field elements of the connection |
Elements
The following is an element definition.
{
 "type": "attribute",
 "value": {
   "name": "from",
   "displayName": "From",
   "inputType": "stringOrExpression",
   "defaultValue": "",
   "required": "false",
   "helpTip": "The 'From' address of the message sender"
 }
}
Types of Elements
Attribute
{
 "type": "attribute",
 "value": {
   "name": "from",
   "displayName": "From",
   "inputType": "stringOrExpression",
   "defaultValue": "",
   "required": "false",
   "helpTip": "The 'From' address of the message sender"
 }
}| Property Name | Description |
|---|---|
| type | Type of the element |
| value | Value of the element |
| name | Name of the element |
| displayName | Display name to be shown |
| inputType | Field type for the attribute (stringOrExpression, booleanOrExpression, textOrExpression). |
| required | Whether the field is a mandatory field or not |
| helpTip | Help tip to be shown |
Attribute Group
Grouping multiple attributes together
{
    "type": "attributeGroup",
    "value": {
        "groupName": "Basic",
        "elements": []
    }
}| Property Name | Description |
|---|---|
| type | Type of the element |
| value | Value of the element |
| groupName | Name of the group |
| elements | Elements in the group |
When defining an attribute for the connection to be used in an operation, the following format should be used.
{
 "type": "attribute",
 "value": {
   "name": "configRef",
   "displayName": "Connection",
   "inputType": "connection",
   "allowedConnectionTypes": [
     "SMTP",
     "SMTPS"
   ],
   "defaultType": "connection.smtp",
   "defaultValue": "",
   "required": "true",
   "helpTip": "Connection to be used"
 }
}
Additional parameters to be added.
| Property Name | Description |
|---|---|
| allowedConnectionTypes | Names of the connection types to be used for the operation. The name should correspond to the “connectionName” attribute in the connection schema. |
| defaultType | Default connection type to be used. |
Samples
Connection - imap.json
{
  "connectorName": "email",
  "connectionName": "IMAP",
  "title": "IMAP Connection",
  "help": "<h1>Email Connector</h1> <b>The email connector supports IMAP, POP3 and SMTP protocols for handling emails</b>",
  "elements": [
    {
      "type": "attribute",
      "value": {
        "name": "connectionName",
        "displayName": "Connection Name",
        "inputType": "string",
        "defaultValue": "EMAIL_CONNECTION_1",
        "required": "true",
        "helpTip": "The name for the email connection",
        "validation": "nameWithoutSpecialCharactors"
      }
    },
    {
      "type": "attributeGroup",
      "value": {
        "groupName": "General",
        "elements": [
          {
            "type": "attributeGroup",
            "value": {
              "groupName": "Basic",
              "elements": [
                {
                  "type": "attribute",
                  "value": {
                    "name": "host",
                    "displayName": "Host",
                    "inputType": "stringOrExpression",
                    "defaultValue": "",
                    "required": "true",
                    "helpTip": "Host name of the mail server"
                  }
                }
              ]
            }
          }
        ]
      }
    },
    {
      "type": "attributeGroup",
      "value": {
        "groupName": "Advanced",
        "elements": [
          {
            "type": "attribute",
            "value": {
              "name": "readTimeout",
              "displayName": "Read Timeout",
              "inputType": "stringOrExpression",
              "defaultValue": "",
              "required": "false",
              "helpTip":"The socket read timeout value"
            }
          }
        ]
      }
    }
  ]
}
Operation - send.json
{
  "connectorName": "email",
  "operationName": "send",
  "title": "Send Email",
  "help": "<h1>Send Email</h1> <b>The send operation sends an email.</b><br><br><ul><li><a href=\"https://apim.docs.wso2.com/en/latest/reference/connectors/file-connector/file-connector-config/\"> More Help </a></li></ul>",
  "elements": [
    {
      "type": "attributeGroup",
      "value": {
        "groupName": "General",
        "elements": [
          {
            "type": "attribute",
            "value": {
              "name": "configRef",
              "displayName": "Connection",
              "inputType": "connection",
              "allowedConnectionTypes": [
                "SMTP",
                "SMTPS"
              ],
              "defaultType": "connection.smtp",
              "defaultValue": "",
              "required": "true",
              "helpTip": "Connection to be used"
            }
          },
          {
            "type": "attributeGroup",
            "value": {
              "groupName": "Basic",
              "elements": [
                {
                  "type": "attribute",
                  "value": {
                    "name": "from",
                    "displayName": "From",
                    "inputType": "stringOrExpression",
                    "defaultValue": "",
                    "required": "false",
                    "helpTip": "The 'From' address of the message sender"
                  }
                }
              ]
            }
          },
          {
            "type": "attributeGroup",
            "value": {
              "groupName": "Advanced",
              "elements": [
                {
                  "type": "attribute",
                  "value": {
                    "name": "contentType",
                    "displayName": "Content Type",
                    "inputType": "stringOrExpression",
                    "defaultValue": "text/html",
                    "required": "false",
                    "helpTip": "Content Type of the body"
                  }
                }
              ]
            }
          }
        ]
      }
    }
  ]
}
Icons
Icons for the connector must be added to the icon folder under the root folder of the connector.
![]()
The icon names are icon-large(72x80) and icon-small(25x25) and they should be in .png format.
Top