Mutual SSL Authentication
Certificate-based authentication on the Choreo Connect is authenticating a request based on a digital certificate, before granting access to the backend. By way of certificate-based authentication, the Choreo Connect supports mutual SSL. In mutual SSL, both parties the client and the server identifies themselves in order to create a successful SSL connection. Mutual SSL allows a client to make a request without a username and password, provided that the server is aware of the client's certificate.
Update Level 20
This feature is available only as an update, after Update level 1.0.0.20 (released on 10 June 2023) and further. For more information regarding Choreo Connect updates, see here.
Note
Mutual SSL/TLS is a security protocol that ensures both the client and the server authenticate with each other. It builds on the standard SSL/TLS protocol used in HTTPS to add an additional layer of security. Hence from APIM 4.0.0 onwards, when using Mutual SSL to invoke APIs, it is a must to use HTTPS as the transport.
Prerequisites
- Navigate to the
<CHOREO-CONNECT_HOME>/docker-compose/choreo-connect(-with-apim)/conf/config.tomlfile. -
Configure the
mTLSAPIsEnabledtotrueunder the[router.downstream.tls]configuration to enable the mTLS APIs in the Choreo Connect.[router.downstream.tls] trustedCertPath = "/etc/ssl/certs/ca-certificates.crt" # Default path for client ca-certificates mTLSAPIsEnabled = trueImportant
Make sure to close the HTTP port when using this feature, and leave only the HTTPS port open. This would prevent any attempts to bypass the mTLS authentication. You may close the port by following one of the steps given below.
Deployment Configuration Docker Compose Set router.listenerPortto0in theconfig.tomlfile.Kubernetes Set router.listenerPortto0in theconfig-toml-configmapfile.Kubernetes with Helm Charts Remove the following section from the templates/router-service.yamlfile.
Or else, set- name: "http-router" port: 9090 targetPort: 9090 protocol: TCProuter.listenerPortto0in a newconfig-toml-configmap.yamlfile and use this file during deployment with the flag--set-file wso2.deployment.adapter.configToml=<FILE_PATH_FOR_TEMPLATED_CONFIG_TOML>. Make sure that the other values are also set correctly in the new Configuration file.
Create an API secured with Mutual SSL
- Create an API.
- Click Develop -> API Configurations -> Runtime.
-
Select Mutual SSL.

Note
HTTP transport will be disabled for an API if it has Mutual SSL enabled.
-
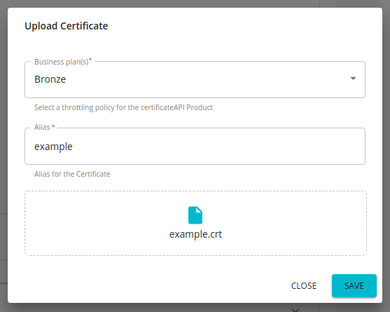
Click Add Certificate to upload a new client certificate.
Note
This feature currently supports
.crtand.cerformats for certificates.If you need to use a certificate in any other format, you can convert it using a standard tool before uploading it.
-
Provide an alias and public certificate. Select the tier that should be used to throttle out the calls using this particular client certificate and click Upload.
-
Save and Deploy the API.
Important
To invoke mTLS enabled APIs that deployed in Choreo Connect, the CA certificates of the client's public certificates should be added as trusted certificates to the router.
If you need to change the location of the volume mount, the trustedCertPath value under the [router.downstream.tls] in config.toml should also be changed.
Invoke an API secured with Mutual SSL using Postman
Import the certificate and private key to Postman.
- Navigate to the certificates tab in Postman settings.
- Add the certificate and private key.
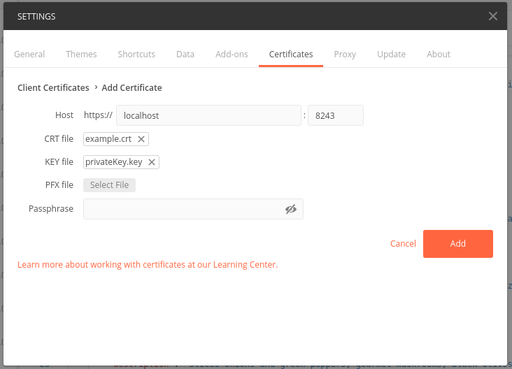
- Invoke the API from Postman.
Invoke an API secured with Mutual SSL using cURL
-
curl -k --location -X GET "<API_URL>" -H "accept: application/json" -H "Authorization: Bearer <access-token>" --key <client_private_key> --cert <client_public_certificate>curl -k --location -X GET 'https://localhost:9095/test/1.0/foo' -H 'accept: applicaition/json' -H 'Authorization: Bearer 0ee9aa70-d631-3401-b152-521b431036ca' --key privateKey.key --cert example.pem
Note
enableClientValidation configuration should be true for sending the client certificates directly to the Choroe Connect. No need to add this configuration to the config.toml file since this is the default configuration. If you have added this and changed this to false, then the client certificates should be sent within a header.
 [enforcer.security.mutualSSL]
     enableClientValidation = true
Limitations
Listed below are the known limitations for this feature.
-
Application subscription is not permitted for APIs that are only protected with Mutual SSL. Therefore, subscription or application-level throttling is not applicable to these types of APIs.
-
Resource-level throttling is not applicable to the APIs that are only protected with Mutual SSL.
-
Resource-level security will not be applicable to the APIs that are only protected with Mutual SSL.
-
Scope-level security will not be applicable to the APIs that are only protected with Mutual SSL.
Using mTLS Header to invoke APIs secured with Mutual SSL
By default, the Choreo Connect retrieves the client certificate from the X-WSO2-CLIENT-CERTIFICATE HTTP header.
Follow the instructions below to enable the mTLS Header and some properties:
- Navigate to the
<CHOREO-CONNECT_HOME>/docker-compose/choreo-connect(-with-apim)/conf/config.tomlfile. -
Configure the
enableClientValidationtofalseunder the[enforcer.security.mutualSSL]configuration to enable the mTLS Header.[enforcer.security.mutualSSL] certificateHeader = "<Header Name>" # This will give a custom header name for the mTLS header enableClientValidation = false # This should be false to check the header value for the client certificate clientCertificateEncode = false # This should be true if the client certificate in the header is encoded enableOutboundCertificateHeader = false # This should be true if the client certificate is needed to be sent to the backend[enforcer.security.mutualSSL] certificateHeader = "SSL-CLIENT-CERT" enableClientValidation = false clientCertificateEncode = false enableOutboundCertificateHeader = false -
Start the Server.
-
Invoke the API with the custom header.
curl -k --location -X GET "<API_URL>" -H "accept: application/json" -H "Authorization: Bearer <access-token>" -H "<MTSL_Header_name>:<Certificate_Key>"curl -k --location -X GET 'https://localhost:9095/test/1.0/foo' -H 'accept: applicaition/json' -H 'Authorization: Bearer 0ee9aa70-d631-3401-b152-521b431036ca' -H 'SSL-CLIENT-CERT: -----BEGIN CERTIFICATE-----LS0tLS1CRUdJTiBDRVJUSUZJQ0FURS0tLS0tCk1JSURsakNDQW40Q0NRRDc2MUpWekluMGNUQU5CZ2txaGtpRzl3MEJBUXNGQURDQmpERUxNQWtHQTFVRUJoTUMKVTB3eEVEQU9CZ05WQkFnTUIxZGxjM1JsY200eEVEQU9CZ05WQkFjTUIwTnZiRzl0WW04eERUQUxCZ05WQkFvTQpCRmRUVHpJeEN6QUpCZ05WQkFzTUFrTlRNUkl3RUFZRFZRUUREQWxzYjJOaGJHaHZjM1F4S1RBbkJna3Foa2lHCjl3MEJDUUVXR25kaGRHaHpZV3hoYTI5eVlXeGxaMlZBWjIxaGFXd3VZMjl0TUI0WERUSXhNREV4TkRBME16VXoKTlZvWERUSXlNREV4TkRBME16VXpOVm93Z1l3eEN6QUpCZ05WQkFZVEFsTk1NUkF3RGdZRFZRUUlEQWRYWlhOMApaWEp1TVJBd0RnWURWUVFIREFkRGIyeHZiV0p2TVEwd0N3WURWUVFLREFSWFUwOHlNUXN3Q1FZRFZRUUxEQUpEClV6RVNNQkFHQTFVRUF3d0piRzlqWVd4b2IzTjBNU2t3SndZSktvWklodmNOQVFrQkZocDNZWFJvYzJGc1lXdHYKY21Gc1pXZGxRR2R0WVdsc0xtTnZiVENDQVNJd0RRWUpLb1pJaHZjTkFRRUJCUUFEZ2dFUEFEQ0NBUW9DZ2dFQgpBTWMrRjhJblZmMzAwZ2FraTh2QUZ6cUFTSGNQV0xZalQ4dmMwOUs1TzZHRjgzaXpUa2F0UDFtYW1ydWlKL2VRCk1KL2VLVGhJdzR3MWEzS3Y4cjJwc3d2bWRjdjAzZnhRNis2aFh3Ykh5VUtHWFFwbVhtL3d5VE01NzRlR1cybXAKM2toTjlIdFV0SU5uS3BzSENLcFI3MFhGKzNrTTZleHJJNnRJUUpxdTdKM2t1OEdqRVI3R1Vma2trYXI1OGs3eApibEpIWG5URkdjWXJNSXAvcS9YUENqR0pGajhub2tNbjhnL0dWTExCVGFXSWJVa3E2ejRJYjk1dHNOd2thU1dhCnh6U2t3K3JIVkZLWnpPTlV1WTdKTk16Zkp6RkllZG5lY0U3c2Y0WnFIRlF6aUpVbW9qWklDMXp5bFdZdzQ4OEUKNUZvaU9xTWpHYTlUMXhXMUpOWTBab01DQXdFQUFUQU5CZ2txaGtpRzl3MEJBUXNGQUFPQ0FRRUFSZTdrcWZlbwpjd1htazRLWlBKMmlnaGY2VU9jc2dYSEZqMnVpQTNhSWMrd2xwREJpdkdCbDJHM2gxQXl6UFNtcVpYaUcvTGttCkg1dm43VUpGQXlQRVBlQ25HdWduTk5kZGpnSFp0SEdJLzdXcm1LTHdIOEU3TWdmSWJ6dk5Hd3ZXWmRrZi9DblcKNjNDYzhhTzJQMDhYd0dHU25JSDg2cWF6NEtvZUF1aFlCdHZyekNObERraTFjZ1E1bHczU0djU3dxMlB0eEd4cApvS0xWOUJYUzlVdUNJRDRrYjFqRUo3YlplTis0Z0pDbTVGTldUbWdhWXFDcjdERWIwRkhpWitLVnBsZzJZZ3ZYCkM2Z2ZrRm9NYTVJREwvWGVja0J0dFlITzFKcWUyMElRKy9kVHB4ZWE4RjE5aDVmeDRZWVlsRFhLWS8wRmxiRXoKZ1l2UGFIUnVKWnFlV1E9PQotLS0tLUVORCBDRVJUSUZJQ0FURS0tLS0tCg==-----END CERTIFICATE-----'