Salesforce Bulk v2.0 Connector Example
The Salesforce Bulk v2.0 Connector provides seamless integration with the Salesforce Bulk v2.0 REST API, enabling easy and efficient handling of large volumes of data. The SalesforceBulk API operates on a RESTful architecture, offering a fast and reliable method to load or delete vast amounts of data from your organization's Salesforce account. With SalesforceBulk, you can perform asynchronous operations like querying, inserting, updating, upserting, or deleting a considerable number of records by submitting them in batches. These batches can be processed by Salesforce in the background, ensuring minimal disruption to your workflow.
What you'll build
The following example demonstrates how to use the Salesforce Bulk v2.0 Connector for performing various operations on your Salesforce data:
- Insert account records to the salesforce.
- Insert account records from a file to the salesforce.
- Get the created bulk job information.
- Get the successfully processed records.
- Get the unprocessed records to a file.
- Delete the bulk job.
- Create a query job to get account details.
- Get the created query job information.
- Get the successful results of the created query job to a file.
You can use the following resources to achieve your requirements.
/createJobAndUploadData:- Create a new bulk ingest job for insert operation.
- Upload the CSV content passed through the request body.
- Close the job to denote that the upload is completed.
/createJobAndUploadFile:- Create a new bulk ingest job for insert operation.
- Read a CSV file using File Connector.
- Upload the CSV content read from the file.
- Close the job to denote that the upload is completed.
/getJobInfo:- Get the bulkJob info identified by the jobId passed through the request body.
/getSuccessfulResults:- Retrive the successful results of the bulk job identified by the
jobId.
- Retrive the successful results of the bulk job identified by the
/getUnprocessedResults:- Retrive the unprocessed records of the bulk job identified by the
jobId. - Store the results to a CSV file.
- Retrive the unprocessed records of the bulk job identified by the
/deleteJob:- Delete the bulkJob identified by the jobId passed through the request body.
/createQuery:- Create a query job in salesforce.
/getQueryJobInfo:- Get the queryJob info identified by the jobId passed through the request body.
/getSuccessfulQueryResults:- Retrive the successful results of the bulk query job identified by the
queryJobId. - Store it in a CSV file.
- Retrive the successful results of the bulk query job identified by the
Setting up the environment
By default, the text/csv message formatter and message builder are not configured in the Micro Integrator settings. To enable this connector to function correctly with text/csv data, you will need to follow these steps to add the necessary message formatter and message builder configurations.
- Open
[MI_Root]/conf/axis2/axis2.xmlusing a text editor. - Navigate to the
Message Formatterssection. - Add a new message formatter for the type
text/csv.<messageFormatter contentType="text/csv" class="org.apache.axis2.format.PlainTextFormatter"/>
- Navigate to the
Message Builderssection. - Add a new message builder for the type
text/csv.<messageBuilder contentType="text/csv" class="org.apache.axis2.format.PlainTextBuilder"/>
- Save the file and restart the Micro Integrator.
Configure the connector in WSO2 Integration Studio
Connectors can be added to integration flows in WSO2 Integration Studio. Once added, the operations of the connector can be dragged onto your canvas and added to your sequences.
Import the connector
Follow these steps to set up the Integration Project and the Connector Exporter Project.
-
Open WSO2 Integration Studio and create an Integration Project.

-
Right-click the project that you created and click on Add or Remove Connector -> Add Connector. You will get directed to the WSO2 Connector Store.
-
Search for the "Salesforce Bulk API V2.0" connector and download it to the workspace.

-
Click Finish, and your Integration Project is ready. The downloaded connector is displayed on the side palette with its operations.
-
You can drag and drop the operations to the design canvas and build your integration logic.

-
Right click on the created Integration Project and select New -> Rest API to create the REST API.
Add integration logic
First create a REST API called Salesforce in your project
| Name | Context |
|---|---|
| Salesforce | /salesforce |
Create the following resources in 'Salesforce' REST API
| uri-template | method |
|---|---|
| /createJobAndUploadData | POST |
| /createJobAndUploadFile | GET, POST |
| /getJobInfo | POST |
| /getSuccessfulResults | POST |
| /getUnprocessedResults | POST |
| /deleteJob | POST |
| /createQuery | GET, POST |
| /getQueryJobInfo | POST |
| /getSuccessfulQueryResults | POST |
Lets add the operations to the resources in Salesforce API
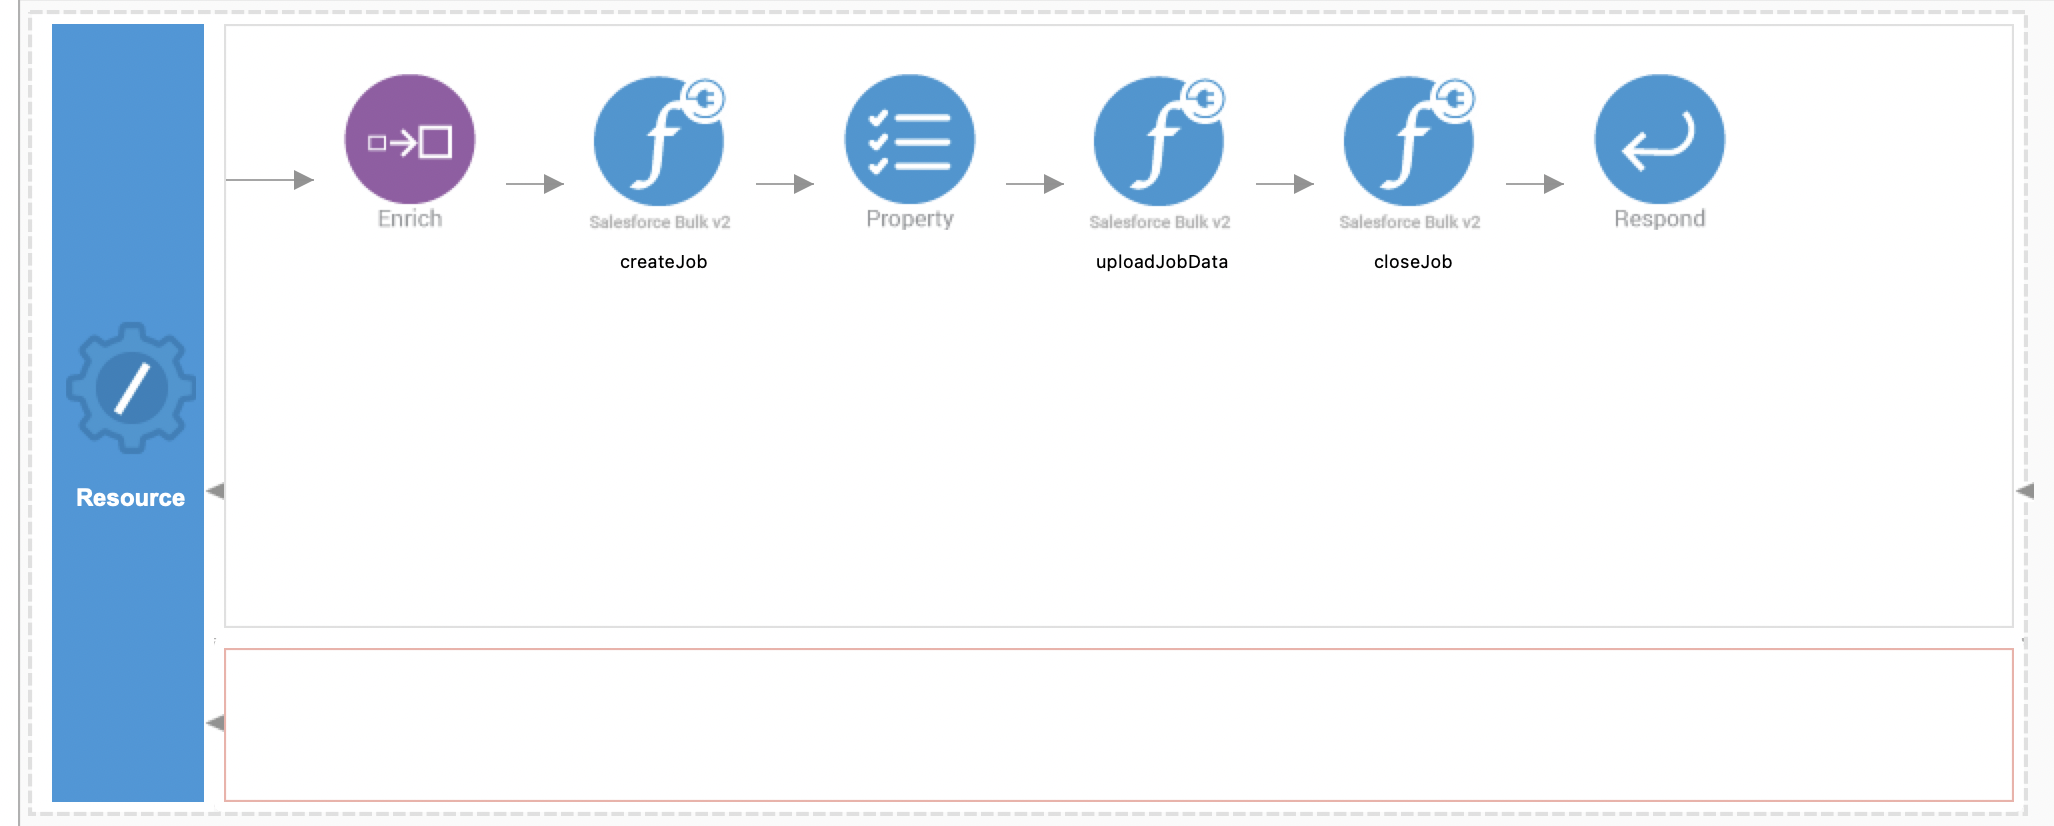
- /createJobAndUploadData
Users can utilize this resource to send CSV content for upload via the request body. The API will utilize an enrich mediator to store the CSV content in a csvContent property. The 'UploadJobData' operation will then upload the csvContent. After uploading the content, the CloseJob operation will be used to change the job status to UploadComplete.
-
In the API insequence drag and drop the Enrich mediator. Using the Enrich mediator clone the body content to a property called
csvContent. Enrich source:<enrich> <source clone="true" type="body"/> <target property="csvContent" type="property"/> </enrich> -
Drag and drop
createJoboperation from Salesforce_bulkapi_v2_Connector section.- Double click the operation. It will show you the properties section.
- In the properties section, In the General Section, click on the
+button next toSalesforce Configuration- In the
Connection configurtionsection give a name forSalesforce Connection Name - Provide your Salesforce instance URL in the
Instance URLtext box. - Provide your Salesforce connected app's client id in the
Client IDtext box. - Provide your Salesforce connected app's client secret in the
Client Secrettext box. - Provide your Salesforce connected app's refresh token in the
Refresh Tokentext box. - Provide your Salesforceconnected app's Access Token in the
Access Tokentext box.- We recommend not to use
Access Token. - If you are using an
Access Token, please update it promptly upon expiration. - If you are providing an
Access Tokenalong withClient ID, Client Secret, and Refresh Token, and if theAccess Tokenhas expired, kindly remove the expiredAccess Token. An invalidAccess Tokencould lead to poor connector performance.
- We recommend not to use
- Click finish.
- In the
- In the properties section, under
Basic, selectINSERTin the Operation dropdown. - Input
Accountin theObjecttext box - Select
COMMAin theColumn Delimeterdropbox - Select
LForCRLFin theLine Endingdropbox based on your operating system. IF Windows :CRLF, for Unix-based systems :LF
-
Drag and drop a property mediator. Using this mediator we will extract the jobId from the response and will use it in other operations in this sequence.
<property expression="json-eval($.id)" name="jobId" scope="default" type="STRING"/> -
Drag and drop
uploadJobDataoperation from Salesforce_bulkapi_v2_Connector section.- Double click the operation. It will show you the properties section.
- In the 'General' section of the properties, select the Salesforce connection configuration you created.
- For
Job IDtext box enter$ctx:jobIdas expression. - For
Input Dataenter$ctx:csvContentas the expression
<salesforce_bulkapi_v2.uploadJobData configKey="SF_CONNECTION_CONFIG_NAME_1"> <jobId>{$ctx:jobId}</jobId> <inputData>{$ctx:csvContent}</inputData> </salesforce_bulkapi_v2.uploadJobData> -
Drag and drop
closeJoboperation from Salesforce_bulkapi_v2_Connector section.- Double-click the operation to view its properties section.
- In the 'General' section of the properties, select the Salesforce connection configuration you created.
- In the 'Job ID' text box, enter the expression
$ctx:jobId.
-
Drag and drop 'Respond' mediator.
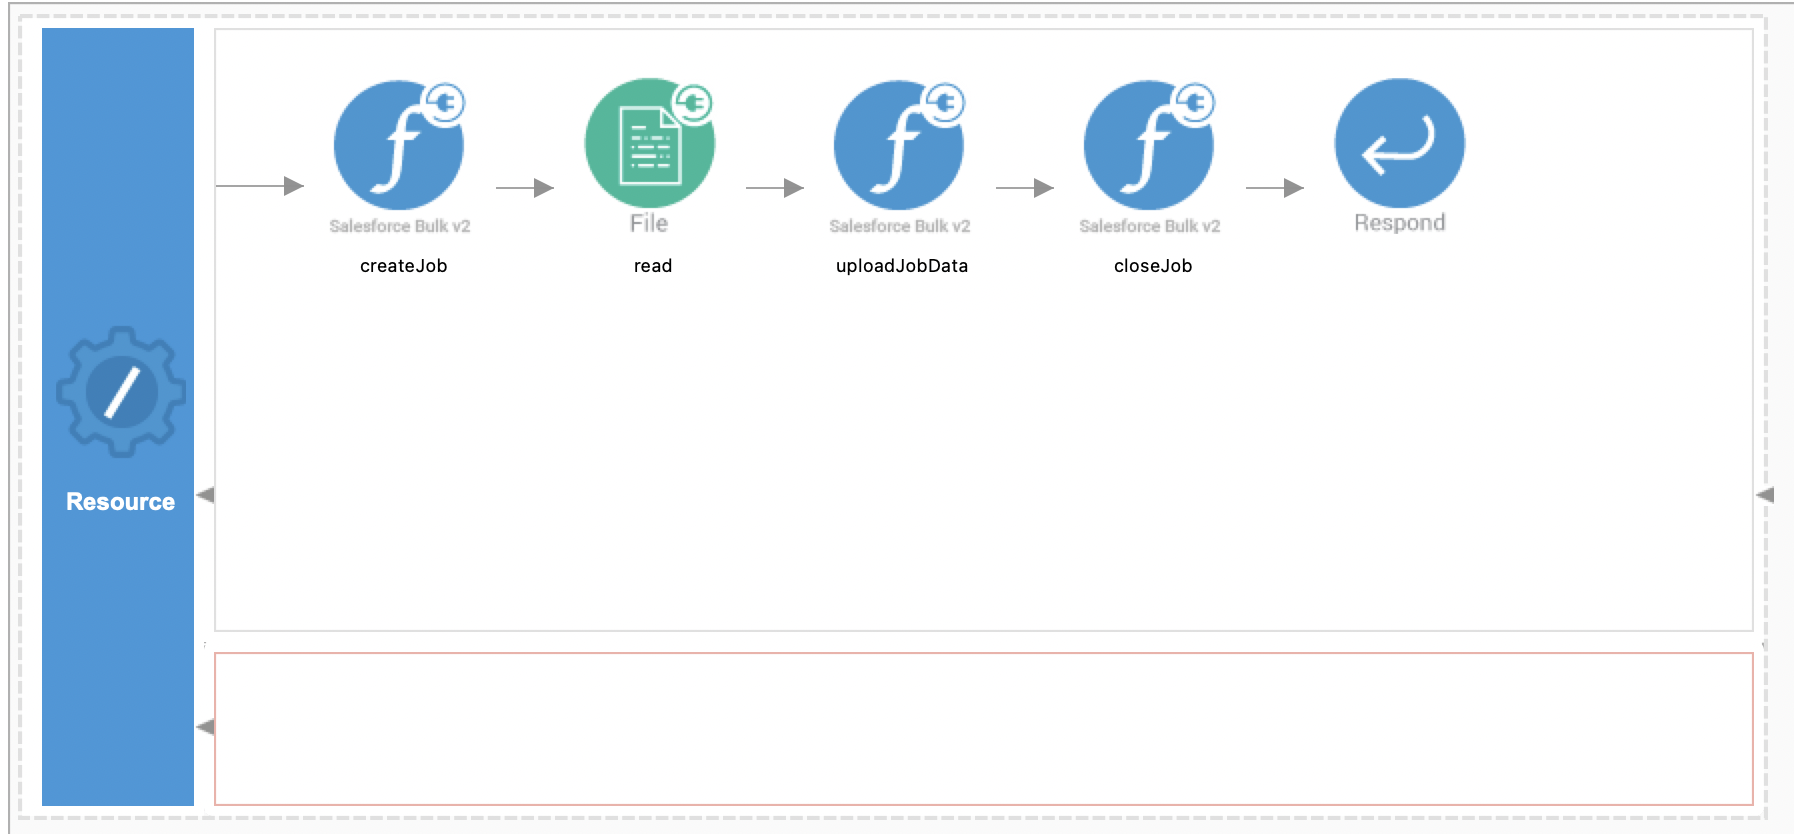
- /createJobAndUploadFile
Users can utilize this resource to send CSV content for upload via a CSV file. The API will utilize an File Connector to store the CSV content in a csvContent property. The 'UploadJobData' operation will then upload the csvContent. After uploading the content, the CloseJob operation will be used to change the job status to UploadComplete.
-
Drag and drop
createJoboperation from Salesforce_bulkapi_v2_Connector section.- Double-click the operation to view its properties section.
- In the 'General' section of the properties, select the Salesforce connection configuration you created.
- In the properties section, under
Basic, selectINSERTin the Operation dropdown. - Input
Accountin theObjecttext box - Select
COMMAin theColumn Delimeterdropbox - Select
LForCRLFin theLine Endingdropbox based on your operating system. IF Windows :CRLF, for Unix-based systems :LF
-
Drag and drop a property mediator. Using this mediator we will extract the jobId from the response and will use it in other operations in this sequence.
<property expression="json-eval($.id)" name="jobId" scope="default" type="STRING"/> -
Drag and drop
readoperation from File_Connector section.- Prior to this step, you must configure the File Connector. For setup instructions, please refer to the File Connector Documentation.
- Create a File Connection and select it.
- In the
Basicsection, enter the file path. - In the
Operation Resultsection, selectAdd Result Toas "Message Property", - Set the
Property Nameas "csvContent".
-
Drag and drop
uploadJobDataoperation from Salesforce_bulkapi_v2_Connector section.- Double click the operation. It will show you the properties section.
- In the 'General' section of the properties, select the Salesforce connection configuration you created.
- For
Job IDtext box enter$ctx:jobIdas expression. - For
Input Dataenter$ctx:csvContentas the expression
<salesforce_bulkapi_v2.uploadJobData configKey="SF_CONNECTION_CONFIG_NAME_1"> <jobId>{$ctx:jobId}</jobId> <inputData>{$ctx:csvContent}</inputData> </salesforce_bulkapi_v2.uploadJobData> -
Drag and drop
closeJoboperation from Salesforce_bulkapi_v2_Connector section.- Double-click the operation to view its properties section.
- In the 'General' section of the properties, select the Salesforce connection configuration you created.
- In the 'Job ID' text box, enter the expression
$ctx:jobId.
-
Drag and drop 'Respond' mediator.
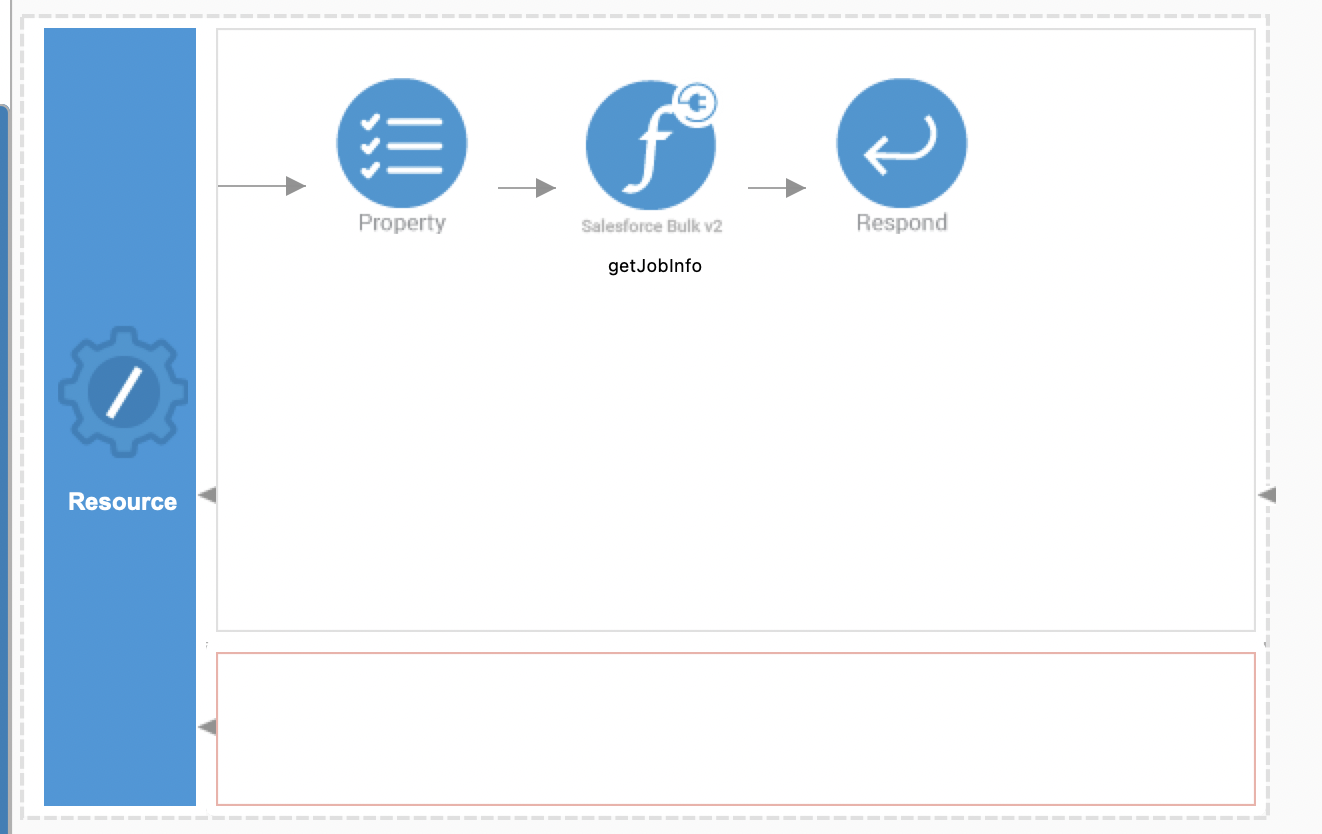
- /getJobInfo
Using this resource, users can get the job information.
- Drag and drop a 'Property' mediator. This mediator will extract the jobId from the request payload and enable its use in other operations within this sequence.
<property expression="json-eval($.id)" name="jobId" scope="default" type="STRING"/> -
Drag and drop
getJobInfooperation from Salesforce_bulkapi_v2_Connector section.- Double-click the operation to view its properties section.
- In the 'General' section of the properties, select the Salesforce connection configuration you created.
-
In the 'Job ID' text box, enter the expression
$ctx:jobId.<salesforce_bulkapi_v2.getJobInfo configKey="SF_CONNECTION_CONFIG_NAME_1"> <jobId>{$ctx:jobId}</jobId> </salesforce_bulkapi_v2.getJobInfo>
-
Drag and drop 'Respond' mediator.
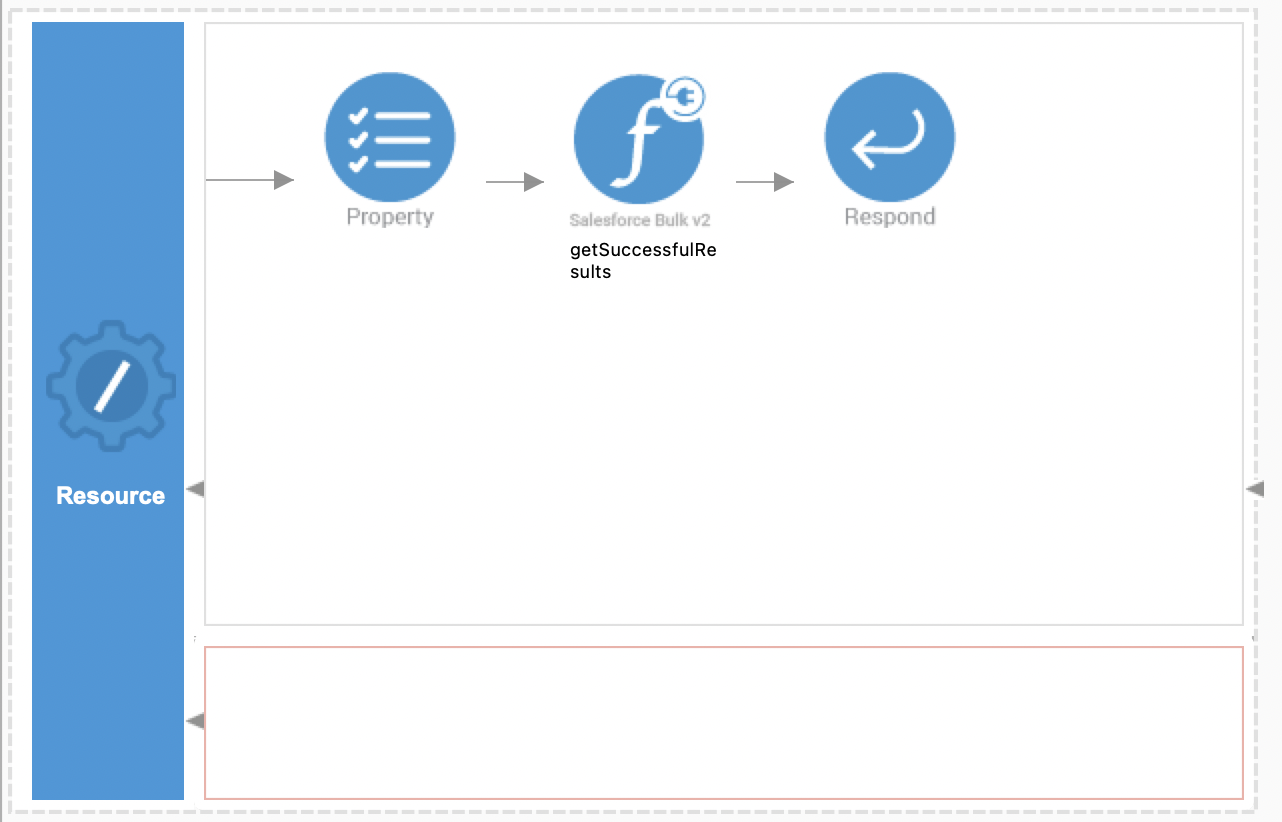
- /getSuccessfulResults
Using this resource, users can retrieve the successfully processed records of a particular bulk job.
- Drag and drop a 'Property' mediator. This mediator will extract the jobId from the request payload and enable its use in other operations within this sequence.
<property expression="json-eval($.id)" name="jobId" scope="default" type="STRING"/> -
Drag and drop
getSuccessfulResultsoperation from Salesforce_bulkapi_v2_Connector section.- Double-click the operation to view its properties section.
- In the 'General' section of the properties, select the Salesforce connection configuration you created.
- In the 'Job ID' text box, enter the expression
$ctx:jobId. -
In the 'Output type' drop down, select
JSONorCSV.<salesforce_bulkapi_v2.getSuccessfulResults configKey="SF_CONNECTION_CONFIG_NAME_1"> <jobId>{$ctx:jobId}</jobId> <outputType>JSON</outputType> <includeResultTo>BODY</includeResultTo> </salesforce_bulkapi_v2.getSuccessfulResults>
-
Drag and drop 'Respond' mediator.
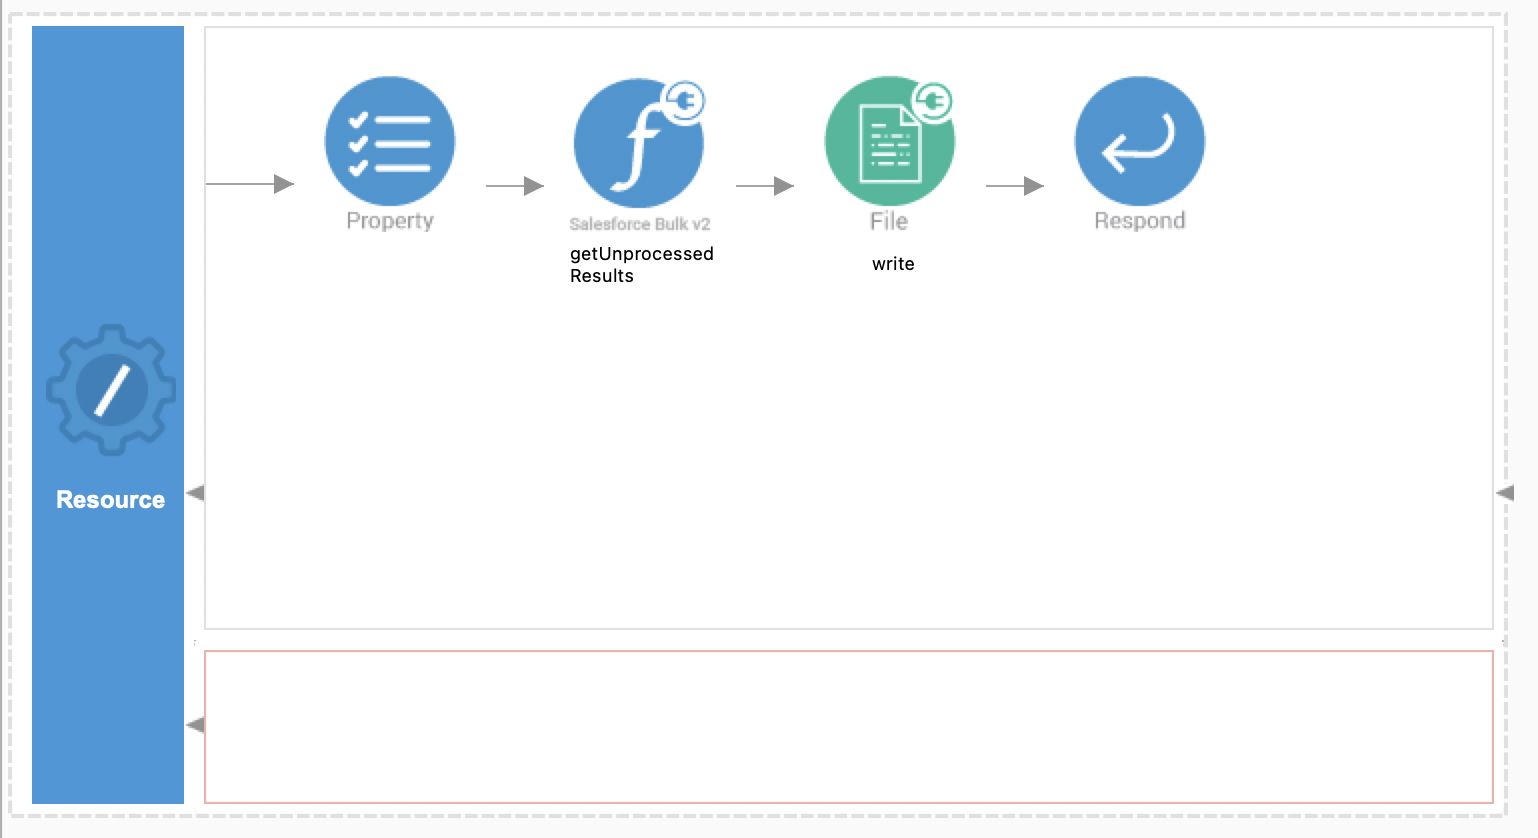
- /getUnprocessedResults
Using this resource, users can retrieve the unprocessed records of a particular bulk job.
- Drag and drop a 'Property' mediator. This mediator will extract the jobId from the request payload and enable its use in other operations within this sequence.
<property expression="json-eval($.id)" name="jobId" scope="default" type="STRING"/> -
Drag ann drop
getUnprocessedResultsoperation from Salesforce_bulkapi_v2_Connector section.- Double-click the operation to view its properties section.
- In the 'General' section of the properties, select the Salesforce connection configuration you created.
- In the 'Job ID' text box, enter the expression
$ctx:jobId. -
In the 'Output type' drop, select
CSV.<salesforce_bulkapi_v2.getUnprocessedResults configKey="SF_CONNECTION_CONFIG_NAME_1"> <jobId>{$ctx:jobId}</jobId> <outputType>CSV</outputType> <includeResultTo>BODY</includeResultTo> </salesforce_bulkapi_v2.getUnprocessedResults>
-
Drag and drop
writeoperation from File_Connector section.- In the
Generalsection of the properties, select the File Connection configuration you created. - In the
Basicsection, enter the file path.
- In the
-
Drag and drop 'Respond' mediator.
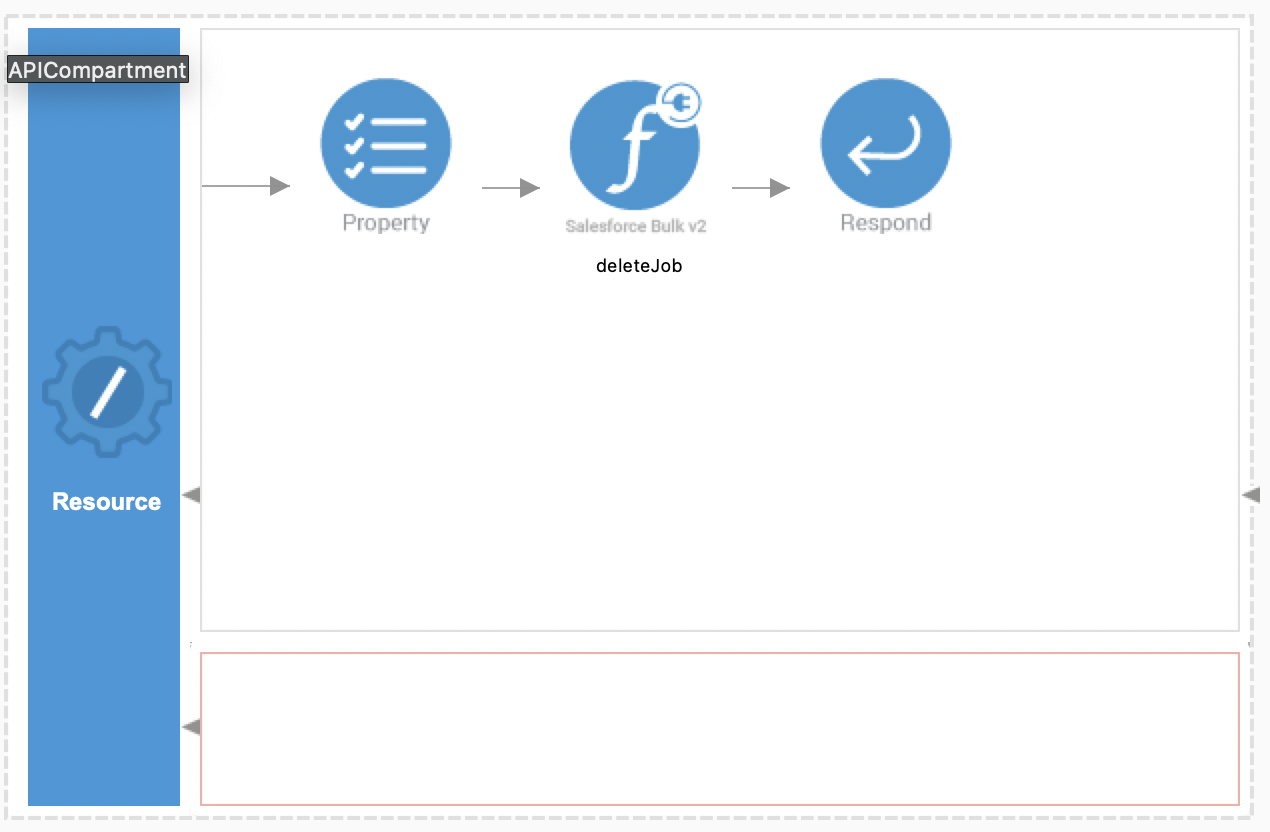
- /deleteJob
Using this resource, users can delete a perticular bulk job
- Drag and drop a 'Property' mediator. This mediator will extract the jobId from the request payload and enable its use in other operations within this sequence.
<property expression="json-eval($.id)" name="jobId" scope="default" type="STRING"/> -
Drag and drop
deleteJoboperation from Salesforce_bulkapi_v2_Connector section.- Double-click the operation to view its properties section.
- In the 'General' section of the properties, select the Salesforce connection configuration you created.
-
In the 'Job ID' text box, enter the expression
$ctx:jobId.<salesforce_bulkapi_v2.deleteJob configKey="SF_CONNECTION_CONFIG_NAME_1"> <jobId>{$ctx:jobId}</jobId> </salesforce_bulkapi_v2.deleteJob>
-
Drag and drop 'Respond' mediator.
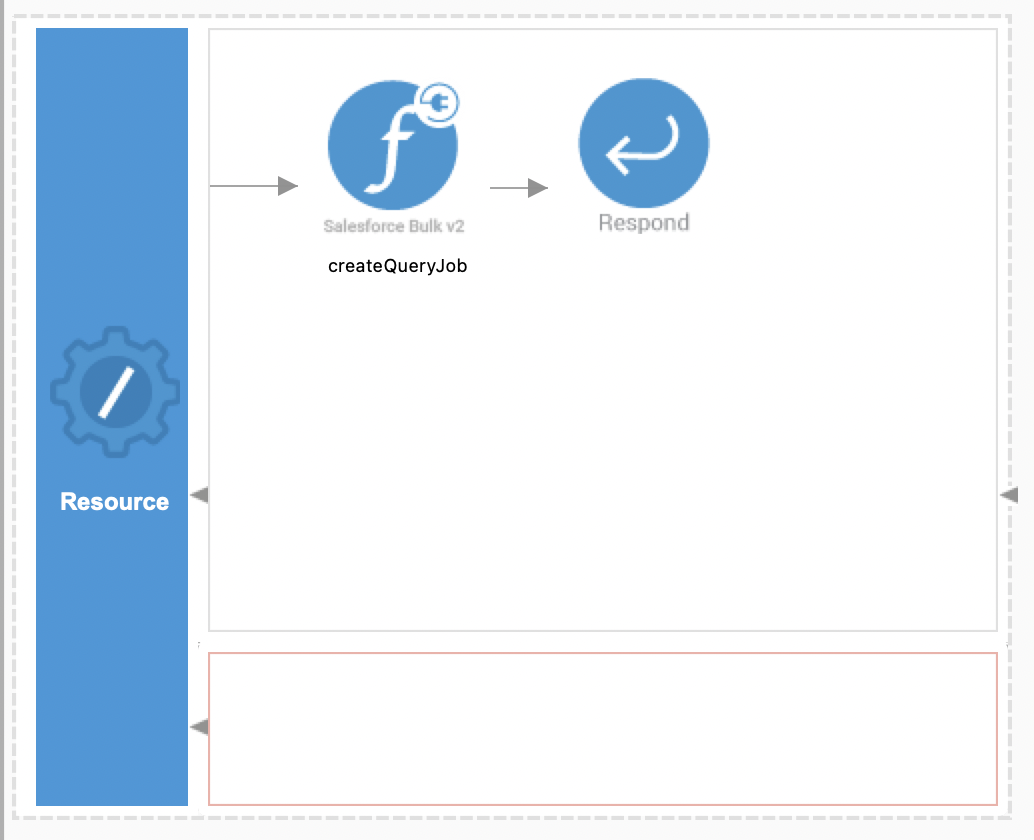
- /createQuery
Using this resource, users can create a bulk query job in salesforce
-
Drag and drop
createQueryJoboperation from Salesforce_bulkapi_v2_Connector section.- Double-click the operation to view its properties section.
- In the 'General' section of the properties, select the Salesforce connection configuration you created.
- In the properties section, under
Basic, selectQUERYin the Operation dropdown. - Input
SELECT Id, name FROM Accountin theObjecttext box - Select
COMMAin theColumn Delimeterdropbox -
Select
LForCRLFin theLine Endingdropbox based on your operating system. IF Windows :CRLF, for Unix-based systems :LF<salesforce_bulkapi_v2.createQueryJob configKey="SF_CONFIG_1"> <query>SELECT Name FROM Account</query> <operation>QUERY</operation> <columnDelimiter>COMMA</columnDelimiter> <lineEnding>LF</lineEnding> </salesforce_bulkapi_v2.createQueryJob>
-
Drag and drop 'Respond' mediator.
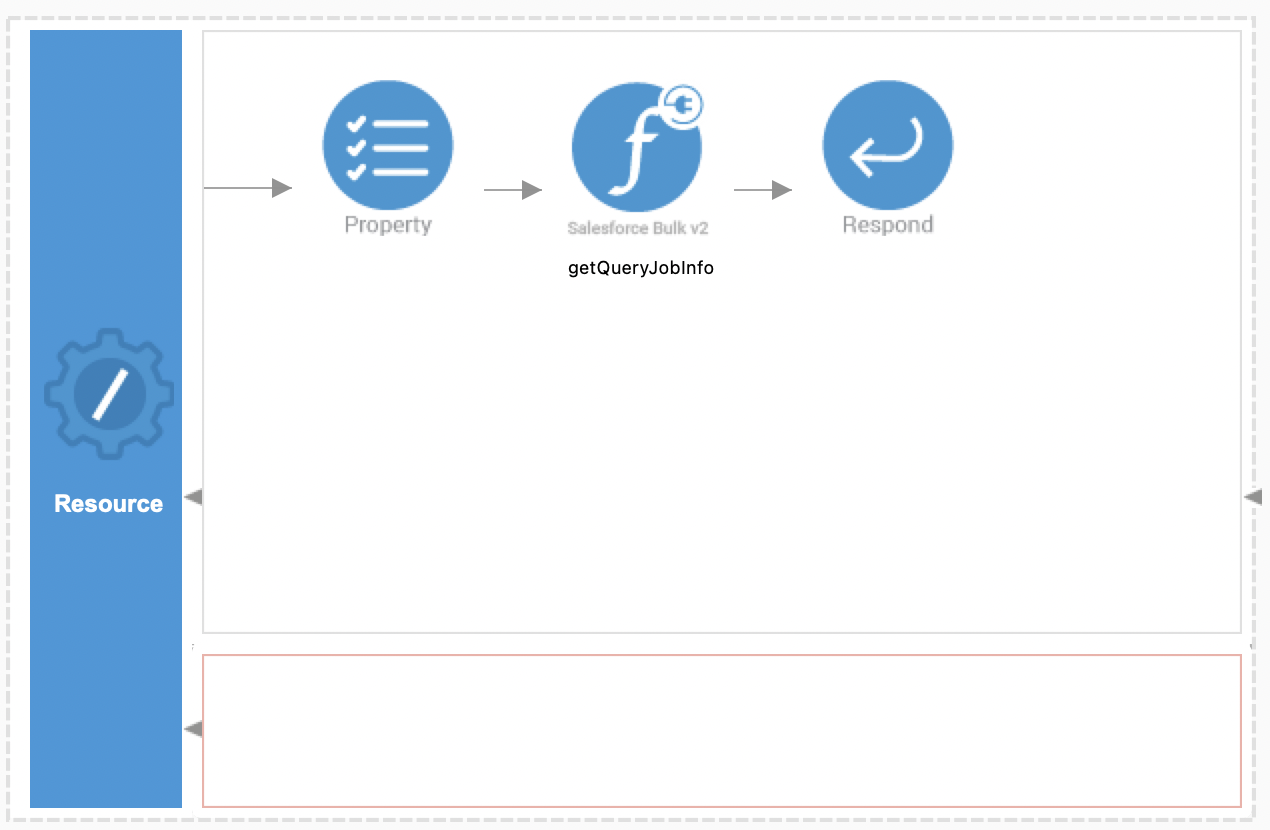
- /getQueryJobInfo
Using this resource, users can get the query job information.
- Drag and drop a 'Property' mediator. This mediator will extract the jobId from the request payload and enable its use in other operations within this sequence.
<property expression="json-eval($.id)" name="jobId" scope="default" type="STRING"/> -
Drag and drop
getQueryJobInfooperation from Salesforce_bulkapi_v2_Connector section.- Double-click the operation to view its properties section.
- In the 'General' section of the properties, select the Salesforce connection configuration you created.
-
In the 'Job ID' text box, enter the expression
$ctx:jobId.<salesforce_bulkapi_v2.getQueryJobInfo configKey="SF_CONNECTION_CONFIG_NAME_1"> <jobId>{$ctx:jobId}</jobId> </salesforce_bulkapi_v2.getQueryJobInfo>
-
Drag and drop 'Respond' mediator.
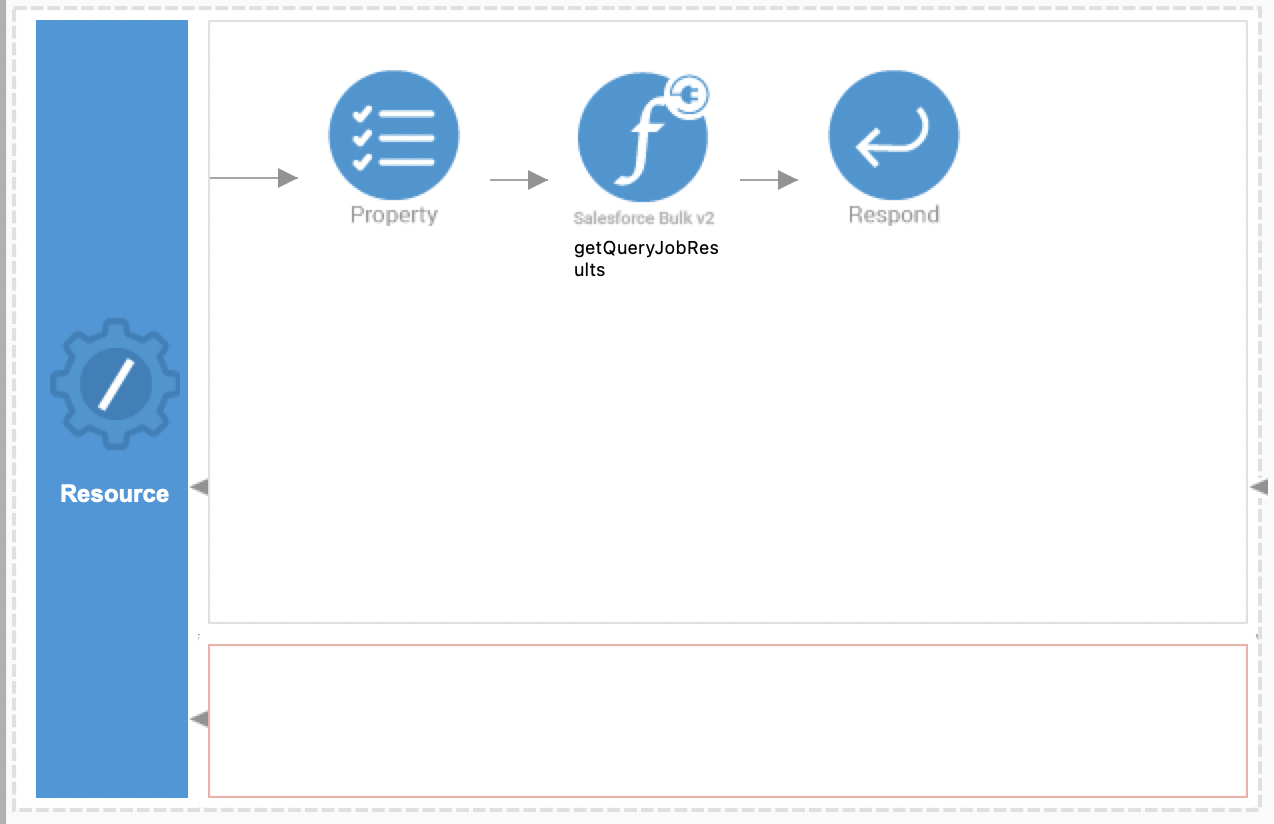
- /getSuccessfulQueryResults
Using this resource, users can get the successful query results from salesforce
- Drag and drop a 'Property' mediator. This mediator will extract the queryJobId from the request payload and enable its use in other operations within this sequence.
<property expression="json-eval($.id)" name="queryJobId" scope="default" type="STRING"/> -
Drag and drop
getQueryJobResultsoperation from Salesforce_bulkapi_v2_Connector section.- Double-click the operation to view its properties section.
- In the 'General' section of the properties, select the Salesforce connection configuration you created.
-
In the 'Job ID' text box, enter the expression
$ctx:jobId.<salesforce_bulkapi_v2.getQueryJobResults configKey="SF_CONNECTION_CONFIG_NAME_1"> <queryJobId>{$ctx:queryJobId}</queryJobId> <outputType>JSON</outputType> <includeResultTo>FILE</includeResultTo> <filePath>/path/to/file/out.json</filePath> </salesforce_bulkapi_v2.getQueryJobResults>Note: The includeResultTo 'FILE' feature is
deprecated.
-
Drag and drop 'Respond' mediator.
The resources are now ready to be tested. The API source should resemble the following. Expand to see.
<?xml version="1.0" encoding="UTF-8"?>
<api context="/salesforce" name="createjob" xmlns="http://ws.apache.org/ns/synapse">
<resource methods="POST" uri-template="/createJobAndUploadData">
<inSequence>
  <enrich>
    <source clone="true" type="body"/>
    <target property="csvContent" type="property"/>
  </enrich>
<salesforce_bulkapi_v2.createJob configKey="SF_CONNECTION_CONFIG_NAME_1">
<operation>INSERT</operation>
<object>Account</object>
<columnDelimiter>COMMA</columnDelimiter>
<lineEnding>LF</lineEnding>
</salesforce_bulkapi_v2.createJob>
<property expression="json-eval($.id)" name="jobId" scope="default" type="STRING"/>
<salesforce_bulkapi_v2.uploadJobData configKey="SF_CONNECTION_CONFIG_NAME_1">
  <jobId>{$ctx:jobId}</jobId>
  <inputData>{$ctx:csvContent}</inputData>
</salesforce_bulkapi_v2.uploadJobData>
<salesforce_bulkapi_v2.closeJob configKey="SF_CONNECTION_CONFIG_NAME_1">
<jobId>{$ctx:jobId}</jobId>
</salesforce_bulkapi_v2.closeJob>
<respond/>
</inSequence>
<outSequence/>
<faultSequence/>
</resource>
<resource methods="POST GET" uri-template="/createJobAndUploadFile">
<inSequence>
<salesforce_bulkapi_v2.createJob configKey="SF_CONNECTION_CONFIG_NAME_1">
<operation>INSERT</operation>
<object>Account</object>
<columnDelimiter>COMMA</columnDelimiter>
<lineEnding>LF</lineEnding>
</salesforce_bulkapi_v2.createJob>
<property expression="json-eval($.id)" name="jobId" scope="default" type="STRING"/>
<file.read configKey="MY_CONN">
<path>data.csv</path>
<readMode>Complete File</readMode>
<startLineNum>0</startLineNum>
<lineNum>0</lineNum>
<includeResultTo>Message Property</includeResultTo>
<resultPropertyName>csvContent</resultPropertyName>
<enableStreaming>false</enableStreaming>
<enableLock>false</enableLock>
</file.read>
<salesforce_bulkapi_v2.uploadJobData configKey="SF_CONNECTION_CONFIG_NAME_1">
  <jobId>{$ctx:jobId}</jobId>
  <inputData>{$ctx:csvContent}</inputData>
</salesforce_bulkapi_v2.uploadJobData>
<salesforce_bulkapi_v2.closeJob configKey="SF_CONNECTION_CONFIG_NAME_1">
<jobId>{$ctx:jobId}</jobId>
</salesforce_bulkapi_v2.closeJob>
<respond/>
</inSequence>
<outSequence/>
<faultSequence/>
</resource>
<resource methods="POST" uri-template="/getJobInfo">
<inSequence>
<property expression="json-eval($.id)" name="jobId" scope="default" type="STRING"/>
<salesforce_bulkapi_v2.getJobInfo configKey="SF_CONNECTION_CONFIG_NAME_1">
  <jobId>{$ctx:jobId}</jobId>
</salesforce_bulkapi_v2.getJobInfo>
<respond/>
</inSequence>
<outSequence/>
<faultSequence/>
</resource>
<resource methods="POST" uri-template="/getSuccessfulResults">
<inSequence>
<property expression="json-eval($.id)" name="jobId" scope="default" type="STRING"/>
<salesforce_bulkapi_v2.getSuccessfulResults configKey="SF_CONNECTION_CONFIG_NAME_1">
  <jobId>{$ctx:jobId}</jobId>
  <outputType>JSON</outputType>
  <includeResultTo>BODY</includeResultTo>
</salesforce_bulkapi_v2.getSuccessfulResults>
<respond/>
</inSequence>
<outSequence/>
<faultSequence/>
</resource>
<resource methods="POST" uri-template="/getUnprocessedResults">
<inSequence>
<property expression="json-eval($.id)" name="jobId" scope="default" type="STRING"/>
<salesforce_bulkapi_v2.getUnprocessedResults configKey="SF_CONNECTION_CONFIG_NAME_1">
  <jobId>{$ctx:jobId}</jobId>
  <outputType>CSV</outputType>
  <includeResultTo>BODY</includeResultTo>
</salesforce_bulkapi_v2.getUnprocessedResults>
<file.write configKey="MY_CONN">
<filePath>path/to/folder/out.csv</filePath>
<mimeType>Automatic</mimeType>
<writeMode>Append</writeMode>
<enableStreaming>false</enableStreaming>
<appendNewLine>false</appendNewLine>
<enableLock>false</enableLock>
<includeResultTo>Message Body</includeResultTo>
<updateLastModified>true</updateLastModified>
</file.write>
<respond/>
</inSequence>
<outSequence/>
<faultSequence/>
</resource>
<resource methods="POST" uri-template="/deleteJob">
<inSequence>
<property expression="json-eval($.id)" name="jobId" scope="default" type="STRING"/>
<salesforce_bulkapi_v2.deleteJob configKey="SF_CONNECTION_CONFIG_NAME_1">
  <jobId>{$ctx:jobId}</jobId>
</salesforce_bulkapi_v2.deleteJob>
<respond/>
</inSequence>
<outSequence/>
<faultSequence/>
</resource>
<resource methods="POST GET" uri-template="/createQuery">
<inSequence>
<salesforce_bulkapi_v2.createQueryJob configKey="SF_CONNECTION_CONFIG_NAME_1">
<query>SELECT Id, name FROM Account</query>
<operation>QUERY</operation>
<columnDelimiter>COMMA</columnDelimiter>
<lineEnding>LF</lineEnding>
</salesforce_bulkapi_v2.createQueryJob>
<respond/>
</inSequence>
<outSequence/>
<faultSequence/>
</resource>
<resource methods="POST" uri-template="/getQueryJobInfo">
<inSequence>
<property expression="json-eval($.id)" name="jobId" scope="default" type="STRING"/>
<salesforce_bulkapi_v2.getQueryJobInfo configKey="SF_CONFIG_1">
<queryJobId>{$ctx:jobId}</queryJobId>
</salesforce_bulkapi_v2.getQueryJobInfo>
<log level="full"/>
<respond/>
</inSequence>
<outSequence/>
<faultSequence/>
</resource>
<resource methods="POST" uri-template="/getSuccessfulQueryResults">
<inSequence>
<property expression="json-eval($.id)" name="queryJobId" scope="default" type="STRING"/>
<log level="custom">
<property expression="$ctx:queryJobId" name="testprop1"/>
</log>
<salesforce_bulkapi_v2.getQueryJobResults configKey="SF_CONNECTION_CONFIG_NAME_1">
<queryJobId>{$ctx:queryJobId}</queryJobId>
<outputType>JSON</outputType>
<includeResultTo>FILE</includeResultTo>
<filePath>path/to/file/out.json</filePath>
</salesforce_bulkapi_v2.getQueryJobResults>
<respond/>
</inSequence>
<outSequence/>
<faultSequence/>
</resource>
</api>
Testing the resources
Let's test the API. Start the MI and deploy the API.
-
Let's create a bulk ingest job using our
/createJobAndUploadDataresource. To invoke the resource, use the following curl command:You will receive a response similar to the following:curl --location 'http://localhost:8290/salesforce/createJobAndUploadData' \ --header 'Content-Type: text/plain' \ --header 'Cookie: CookieConsentPolicy=0:1; LSKey-c$CookieConsentPolicy=0:1' \ --data 'Name,ShippingCity,NumberOfEmployees,AnnualRevenue,Website,Description Lorem Ipsum,Milano,2676,912260031,https://ft.com/lacus/at.jsp,"Lorem ipsum dolor sit amet"'Note down the{ "id": "7508d00000Ihhl5AAB", "operation": "insert", "object": "Account", "createdById": "0058d000006mtd1AAA", "createdDate": "2023-03-16T06:43:09.000+0000", "systemModstamp": "2023-03-16T06:43:09.000+0000", "state": "UploadComplete", "concurrencyMode": "Parallel", "contentType": "CSV", "apiVersion": 57.0 }idfrom the response. -
Let's create a bulk ingest job using our
/createJobAndUploadFileresource. To invoke the resource, use the following curl command:You will receive a response similar to the following:curl --location 'http://localhost:8290/salesforce/createJobAndUploadFile' \ --header 'Content-Type: text/plain' \ --header 'Cookie: CookieConsentPolicy=0:1; LSKey-c$CookieConsentPolicy=0:1'Note down the{ "id": "7508d00000Ahhl5AAB", "operation": "insert", "object": "Account", "createdById": "0058d000006mtd1AAA", "createdDate": "2023-03-16T06:43:09.000+0000", "systemModstamp": "2023-03-16T06:43:09.000+0000", "state": "UploadComplete", "concurrencyMode": "Parallel", "contentType": "CSV", "apiVersion": 57.0 }idfrom the response. -
Let's get the job information of the bulk job using our
/getJobInforesource. To invoke the resource, please use the following curl command:Make sure you replace thecurl --location 'http://localhost:8290/salesforce/getJobInfo' \ --header 'Content-Type: application/json' \ --header 'Cookie: CookieConsentPolicy=0:1; LSKey-c$CookieConsentPolicy=0:1' \ --data '{ "id" : "7508d00000Ihhl5AAB" }'idvalue. You will receive a response similar to the following:{ "id": "7508d00000Ihhl5AAB", "operation": "insert", "object": "Account", "createdById": "0058d000006mtd1AAA", "createdDate": "2023-03-16T06:43:09.000+0000", "systemModstamp": "2023-03-16T06:43:13.000+0000", "state": "JobComplete", "concurrencyMode": "Parallel", "contentType": "CSV", "apiVersion": 57.0, "jobType": "V2Ingest", "lineEnding": "LF", "columnDelimiter": "COMMA", "numberRecordsProcessed": 1, "numberRecordsFailed": 0, "retries": 0, "totalProcessingTime": 139, "apiActiveProcessingTime": 81, "apexProcessingTime": 0 } -
Let's get the successfully processed records using our
/getSuccessfulResultsresource. To invoke the resource, please use the following curl command:Make sure you replace thecurl --location 'http://localhost:8290/salesforce/getSuccessfulResults' \ --header 'Content-Type: application/json' \ --header 'Cookie: CookieConsentPolicy=0:1; LSKey-c$CookieConsentPolicy=0:1' \ --data '{ "id" : "7508d00000Ihhl5AAB" }'idvalue. You will receive a response similar to the following:[ { "sf__Id": "0018d00000UVCjuAAH", "sf__Created": "true", "Name": "Lorem Ipsum", "ShippingCity": "Milano", "NumberOfEmployees": "2676", "AnnualRevenue": "9.12260031E8", "Website": "https://ft.com/lacus/at.jsp", "Description": "Lorem ipsum dolor sit amet" } ] -
Let's get the successfully processed records using our
/getUnprocessedResultsresource. To invoke the resource, please use the following curl command:Make sure you replace thecurl --location 'http://localhost:8290/salesforce/getUnprocessedResults' \ --header 'Content-Type: application/json' \ --header 'Cookie: CookieConsentPolicy=0:1; LSKey-c$CookieConsentPolicy=0:1' \ --data '{ "id" : "7508d00000Ihhl5AAB" }'idvalue. Upon successful execution, you will receive a200 OKresponse, and the output will be written to the designated file.{ "result": "success", } -
Let's delete the bulk job using our
/deleteJobresource. To invoke the resource, please use the following curl command:Make sure you replace thecurl --location 'http://localhost:8290/salesforce/deleteJob' \ --header 'Content-Type: application/json' \ --header 'Cookie: CookieConsentPolicy=0:1; LSKey-c$CookieConsentPolicy=0:1' \ --data '{ "id" : "7508d00000Ihhl5AAB" }'idvalue.
Upon successful execution, you will receive a response similar to the following,In the event that the provided job ID does not exist, the API will respond with a{ "result": "success", }404 Not Foundresponse. -
Let's create a bulk query job using our
/createQueryresource. To invoke the resource, please use the following curl command:You will receive a response similar to the following:curl --location --request POST 'http://localhost:8290/salesforce/createQuery' \ --header 'Cookie: CookieConsentPolicy=0:1; LSKey-c$CookieConsentPolicy=0:1'Make sure you replace the{ "id": "7508d00000IhhkKAAR", "operation": "query", "object": "Account", "createdById": "0058d000006mtd1AAA", "createdDate": "2023-03-16T06:37:50.000+0000", "systemModstamp": "2023-03-16T06:37:50.000+0000", "state": "UploadComplete", "concurrencyMode": "Parallel", "contentType": "CSV", "apiVersion": 57.0, "lineEnding": "LF", "columnDelimiter": "COMMA" }idvalue. -
Let's get the job information of the query job using our
/getQueryJobInforesource. To invoke the resource, please use the following curl command:Make sure you replace thecurl --location 'http://localhost:8290/salesforce/getQueryJobInfo' \ --header 'Content-Type: application/json' \ --header 'Cookie: CookieConsentPolicy=0:1; LSKey-c$CookieConsentPolicy=0:1' \ --data '{ "id" : "7508d00000Ihhl5AAB" }'idvalue. You will receive a response similar to the following:{ "id":"7508d00000Ihhl5AAB", "operation":"query", "object":"Account", "createdById":"0055j000008dizPAAQ", "createdDate":"2023-08-23T16:12:50.000+0000", "systemModstamp":"2023-08-23T16:12:50.000+0000", "state":"JobComplete", "concurrencyMode":"Parallel", "contentType":"CSV", "apiVersion":57.0, "jobType":"V2Query", "lineEnding":"LF", "columnDelimiter":"COMMA", "numberRecordsProcessed":28, "retries":0, "totalProcessingTime":255 } -
Let's get the query results using our
/getSuccessfulQueryResultsresource. To invoke the resource, please use the following curl command:Make sure you replace thecurl --location 'http://localhost:8290/salesforce/getSuccessfulQueryResults' \ --header 'Content-Type: application/json' \ --header 'Cookie: CookieConsentPolicy=0:1; LSKey-c$CookieConsentPolicy=0:1' \ --data '{ "id" : "7508d00000IhhkKAAR" }'idvalue. You will receive a response similar to the following:[ { "Id": "0018d00000SIDcyAAH", "Name": "Sample Account for Entitlements" } ]
What's Next
- To customize this example for your own scenario, see Salesforce bulk V2 Connector Configuration documentation for all operation details of the connector.