Role-based Permissions
The User Management module in WSO2 products enables role-based access. As a result, the permissions enabled for a particular role determines what that user can do using the management console of a WSO2 product. Permissions can be granted to a role at two levels:
- Super tenant level: A role with super tenant permissions is used for managing all the tenants in the system and also for managing the key features in the system, which are applicable to all the tenants.
- Tenant level: A role with tenant level permissions is only applicable to individual tenant spaces.
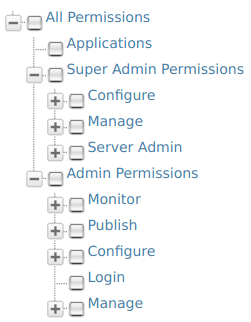
The permissions navigator that you use to enable permissions for a role is divided into these two categories (Super Admin permissions and Admin permissions) as shown below.
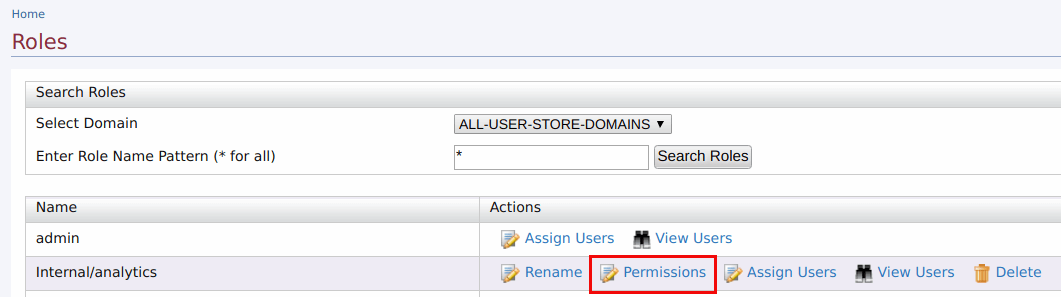
You can access the permissions navigator for a particular role by clicking Permissions as shown below.
By default, every WSO2 product comes with the following Users, Roles and Permissions configured:
Users:
- Admin - Has all the permissions in the system enabled by default. Therefore, this is a super tenant, with all permissions enabled. By default, the admin user is assigned to both the admin and the everyone roles.
Info
-
The admin user and admin role are defined and linked to each other in the
user-mgt.xmlfile, stored in the<PRODUCT_HOME>/repository/conf/directory as shown below.These properties can be customized by configuring the<AddAdmin>true</AddAdmin> <AdminRole>admin</AdminRole> <AdminUser> <UserName>admin</UserName> <Password>admin</Password> </AdminUser><PRODUCT_HOME>/repository/conf/deployment.tomlfile. For more information, see Change the super admin credentials. -
The admin role has all the permissions in the system enabled by default. Therefore, this is a super tenant, with all permissions enabled.
Roles:
By default, all WSO2 products have the following roles configured:
- admin - Provides full access to all features and controls. By default, the admin user is assigned to both the admin and the
Internal/everyoneroles. - Internal/everyone - This is a predefined role that is used to group all the users (across the user stores) together. When you create a new user, automatically the user belongs to the
Internal/everyonerole. It does not include any permissions. This role can be used to identify all logged-in users. - Internal/system - This is another predefined role that does not include any permissions. Unlike the
Internal/everyonerole, this role is not assigned to a user by default. - Internal/analytics - This role can be assigned to users who do not have the publisher or subscriber roles assigned but need permission to view the analytics dashboards.
In addition to the above, the following roles exist by default.
- Internal/creator
- Internal/publisher
- Internal/subscriber
For more information about managing roles, see Managing User Roles
You will be able to log in to the management console of the product with the admin user defined in the user-mgt.xml file. You can then create new users and roles and configure permissions for the roles using the management console. However, note that you cannot modify the permissions of the admin role. The possibility of managing users, roles, and permissions is granted by the User Management permission. For more information, see Configuring the User Realm.
Description of role-based permissions
Note
Note that the descriptions given in this document only explain how permissions control access to operations available on the Management Console (https://<hostname>:9443/carbon). In addition, not that all the permissions available in the permission tree are listed here. You can get the information related to them throughout the documentation wherever applicable.
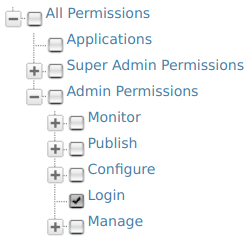
Log-in permissions
The Login permission defined under Admin permissions allows users to log in to the management console of the product. Therefore, this is the primary permission required for using the management console.
Super tenant permissions
The following table describes the permissions at Super Tenant level. These are also referred to as Super Admin permissions.
| Permission | Description of UI menus enabled |
|---|---|
Management permissions:
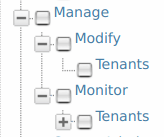 |
The Super Admin/Manage permissions are used for adding new tenants and monitoring them. - Modify/Tenants permission enables the Add New Tenant option in the Configure/Multitenancy menu of the management console, which allows users to add new tenants. |
Server Admin permissions: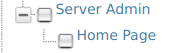 |
Selecting the Server Admin permission enables the Manage/Shutdown/Restart option in the Main menu of the management console. |
Tenant-level permissions
The following table describes the permissions at Tenant level. These are also referred to as Admin permissions.
Info
Note that when you select a node in the Permissions navigator, all the subordinate permissions that are listed under the selected node are also automatically enabled.
| Permission level | Description of UI menus enabled |
|---|---|
| Admin | When the Admin permission node is selected, features including the following menus are enabled in the management console:
|
| Admin/Manage/Identity/User Store Management | This permission enables the Identity/User Stores option in the Main menu. This option allows users to add new user stores. For more details on User Store Management, see Configuring Secondary User Stores |
| Admin/Manage/Identity/Claim | This permission enables the Identity/Claims option in the Main menu. This option allows users to perform Claim Management. For more details, see Claim Management. |
| Admin/Manage/Identity/Key Store Management | This permission enables the Manage/KeyStores option in the Main menu. This option allows users to add and modify new key stores. For more details on Key Store Management, see Creating New Key Stores |
| Admin/Manage/Resources/Browse | This permission enables the Browse option under the Registry menu in the main navigator. This option allows users to browse the resources stored in the registry by using the Registry tree navigator. |
| Admin/Manage/Search | This permission enables the Search option under the Registry sub-menu in the Main menu. This option allows users to search for specific resources stored in the registry by filling in the search criteria. |
| Admin/Monitor | When the Admin/Monitor permission node is selected, system monitoring related features including the following menus are enabled in the management console:
|
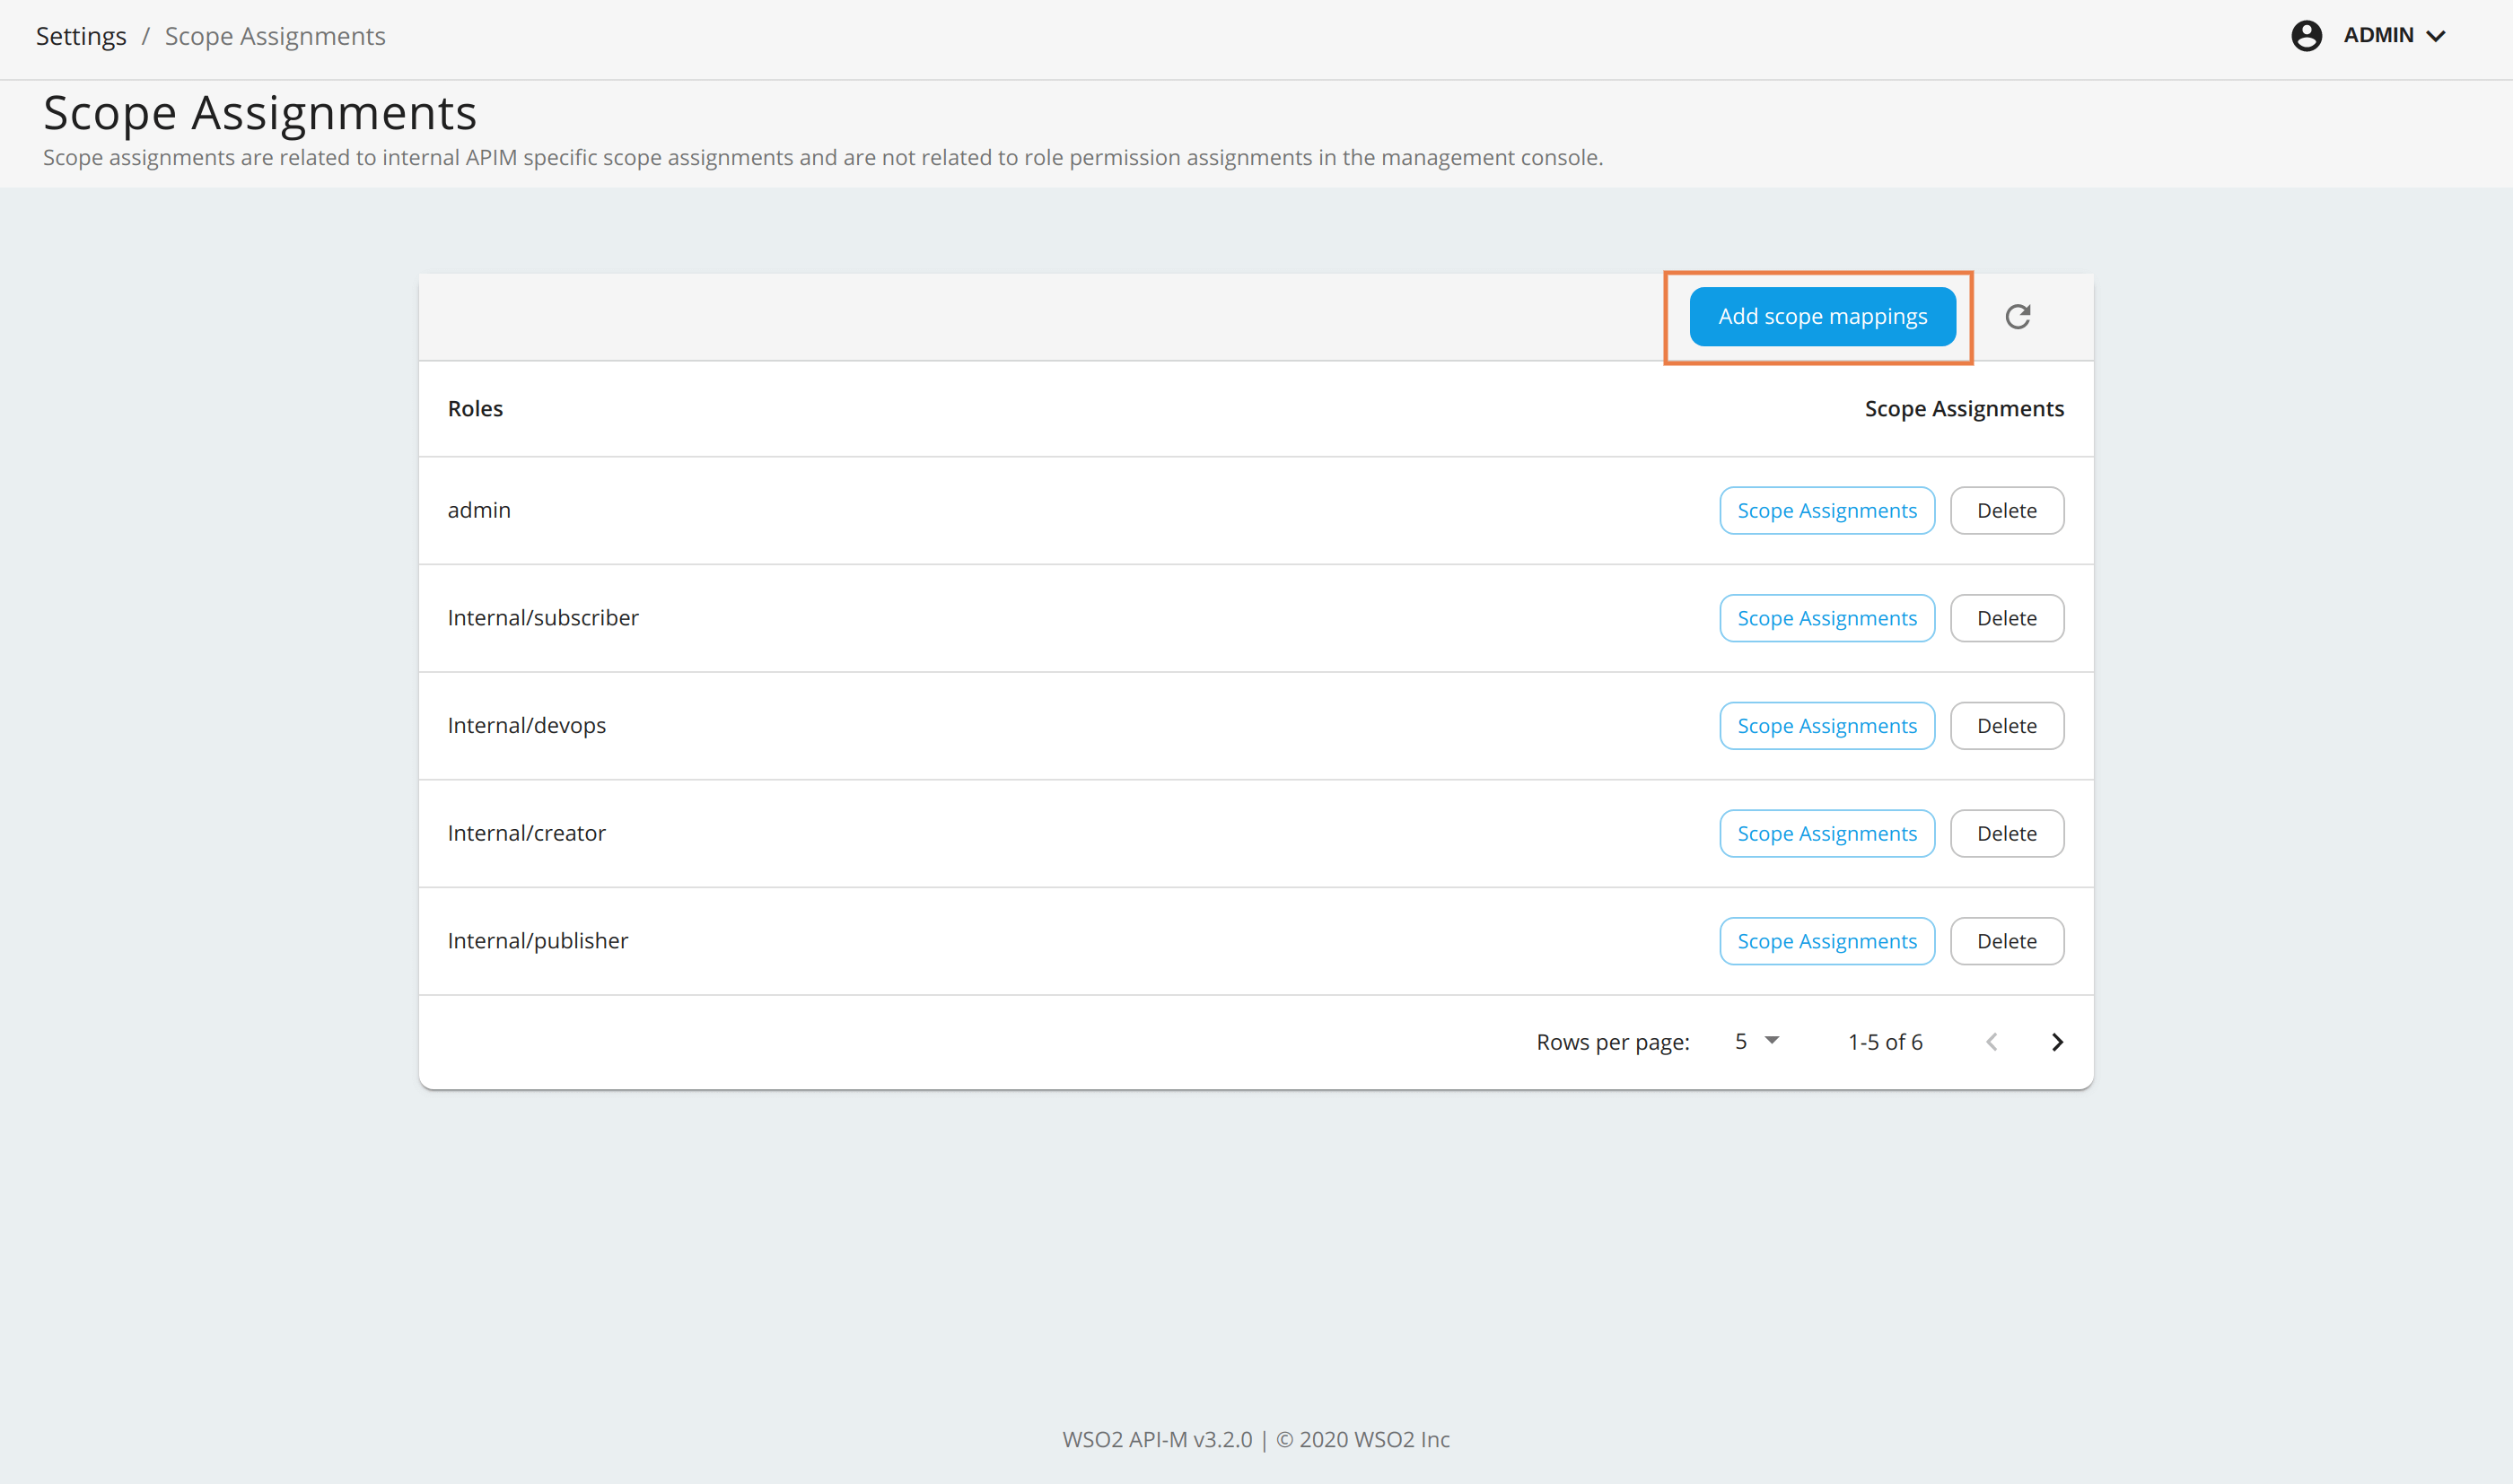
Adding API-M specific Scope Assignments
Note
Note that the role-scope assignments mentioned here are related to the internal API-M specific scope assignments which is different from the role-permission assignments done in the management console.
-
Sign in to Admin Portal (
https://<APIM_Host>:<APIM_Port>/admin) and navigate to Settings > Scope Assignments in the Admin Portal. -
Click Add scope mappings.
-
Provide a role name created in a Carbon console. Then click Next to proceed.
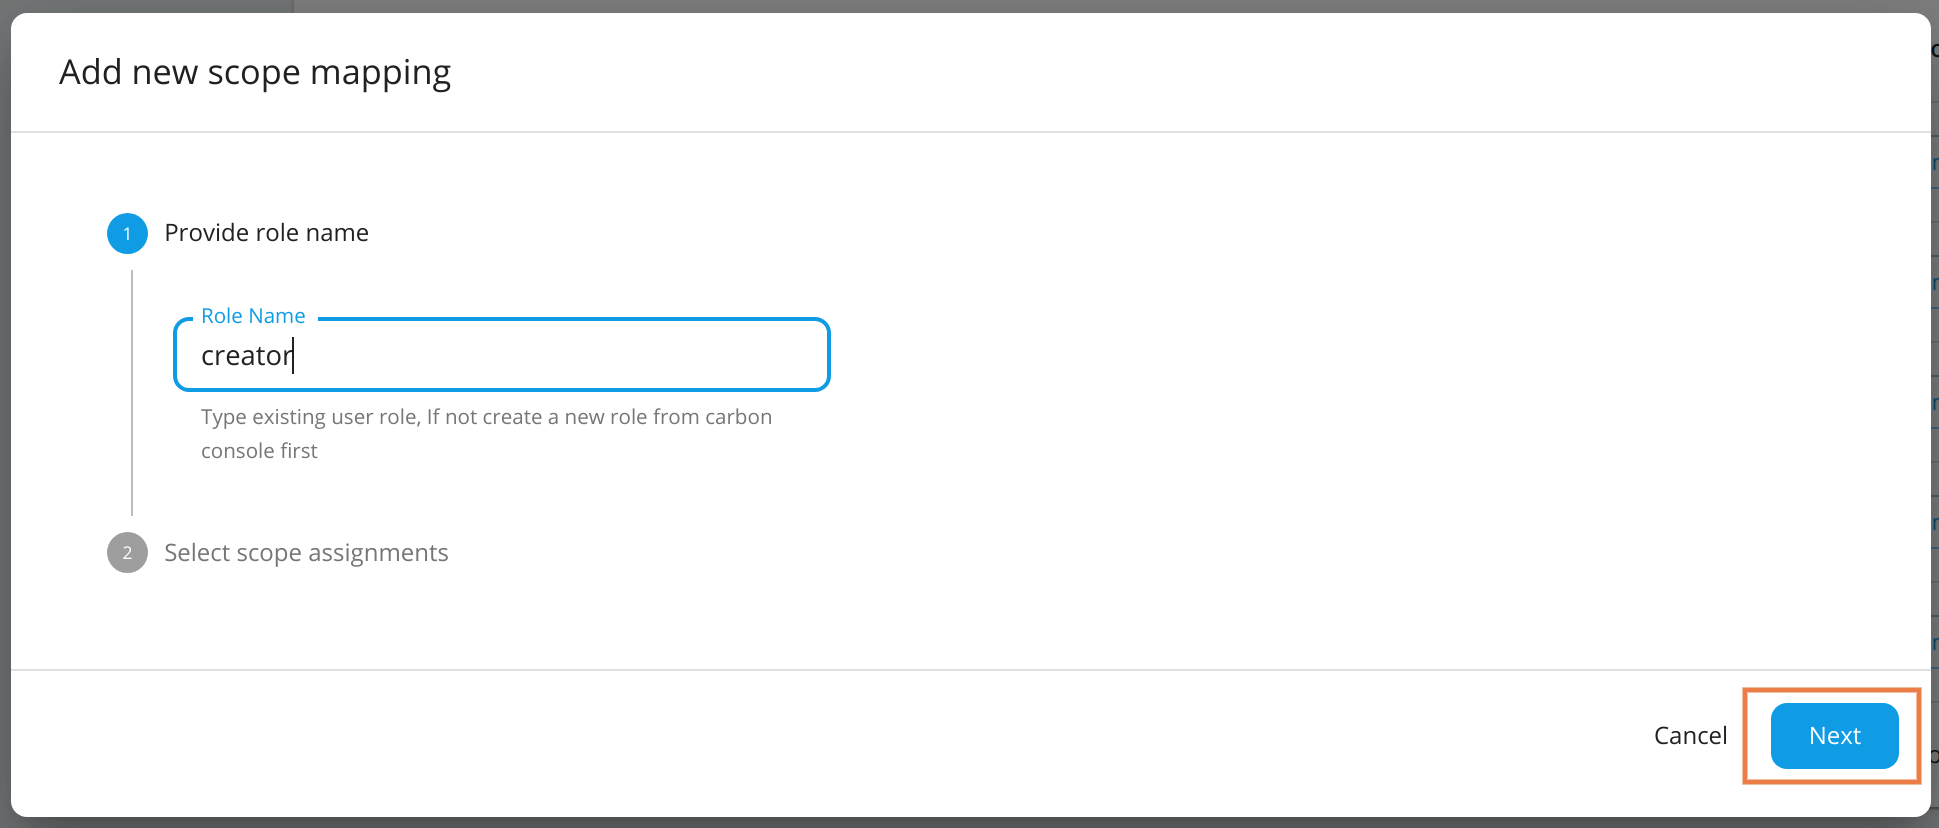
-
In Select scope assignments, you can either select Role alias or Custom scope assignment.
Role Alias
- New roles can be mapped to existing
Internal/*roles, created roles, and admin. All the scopes associated with the selected existing role will be mapped to the new role automatically. - If you want to map the scopes of
Internal/creatorto the newcreatorrole, selectInternal/creatorfrom the drop-down menu and save. -
This will update all scope mappings in the
tenant-conf.jsonfile withInternal/creatoras an allowed role resulting in the newcreatorrole to be allowed for all scopes allowed for theInternal/creatorrole.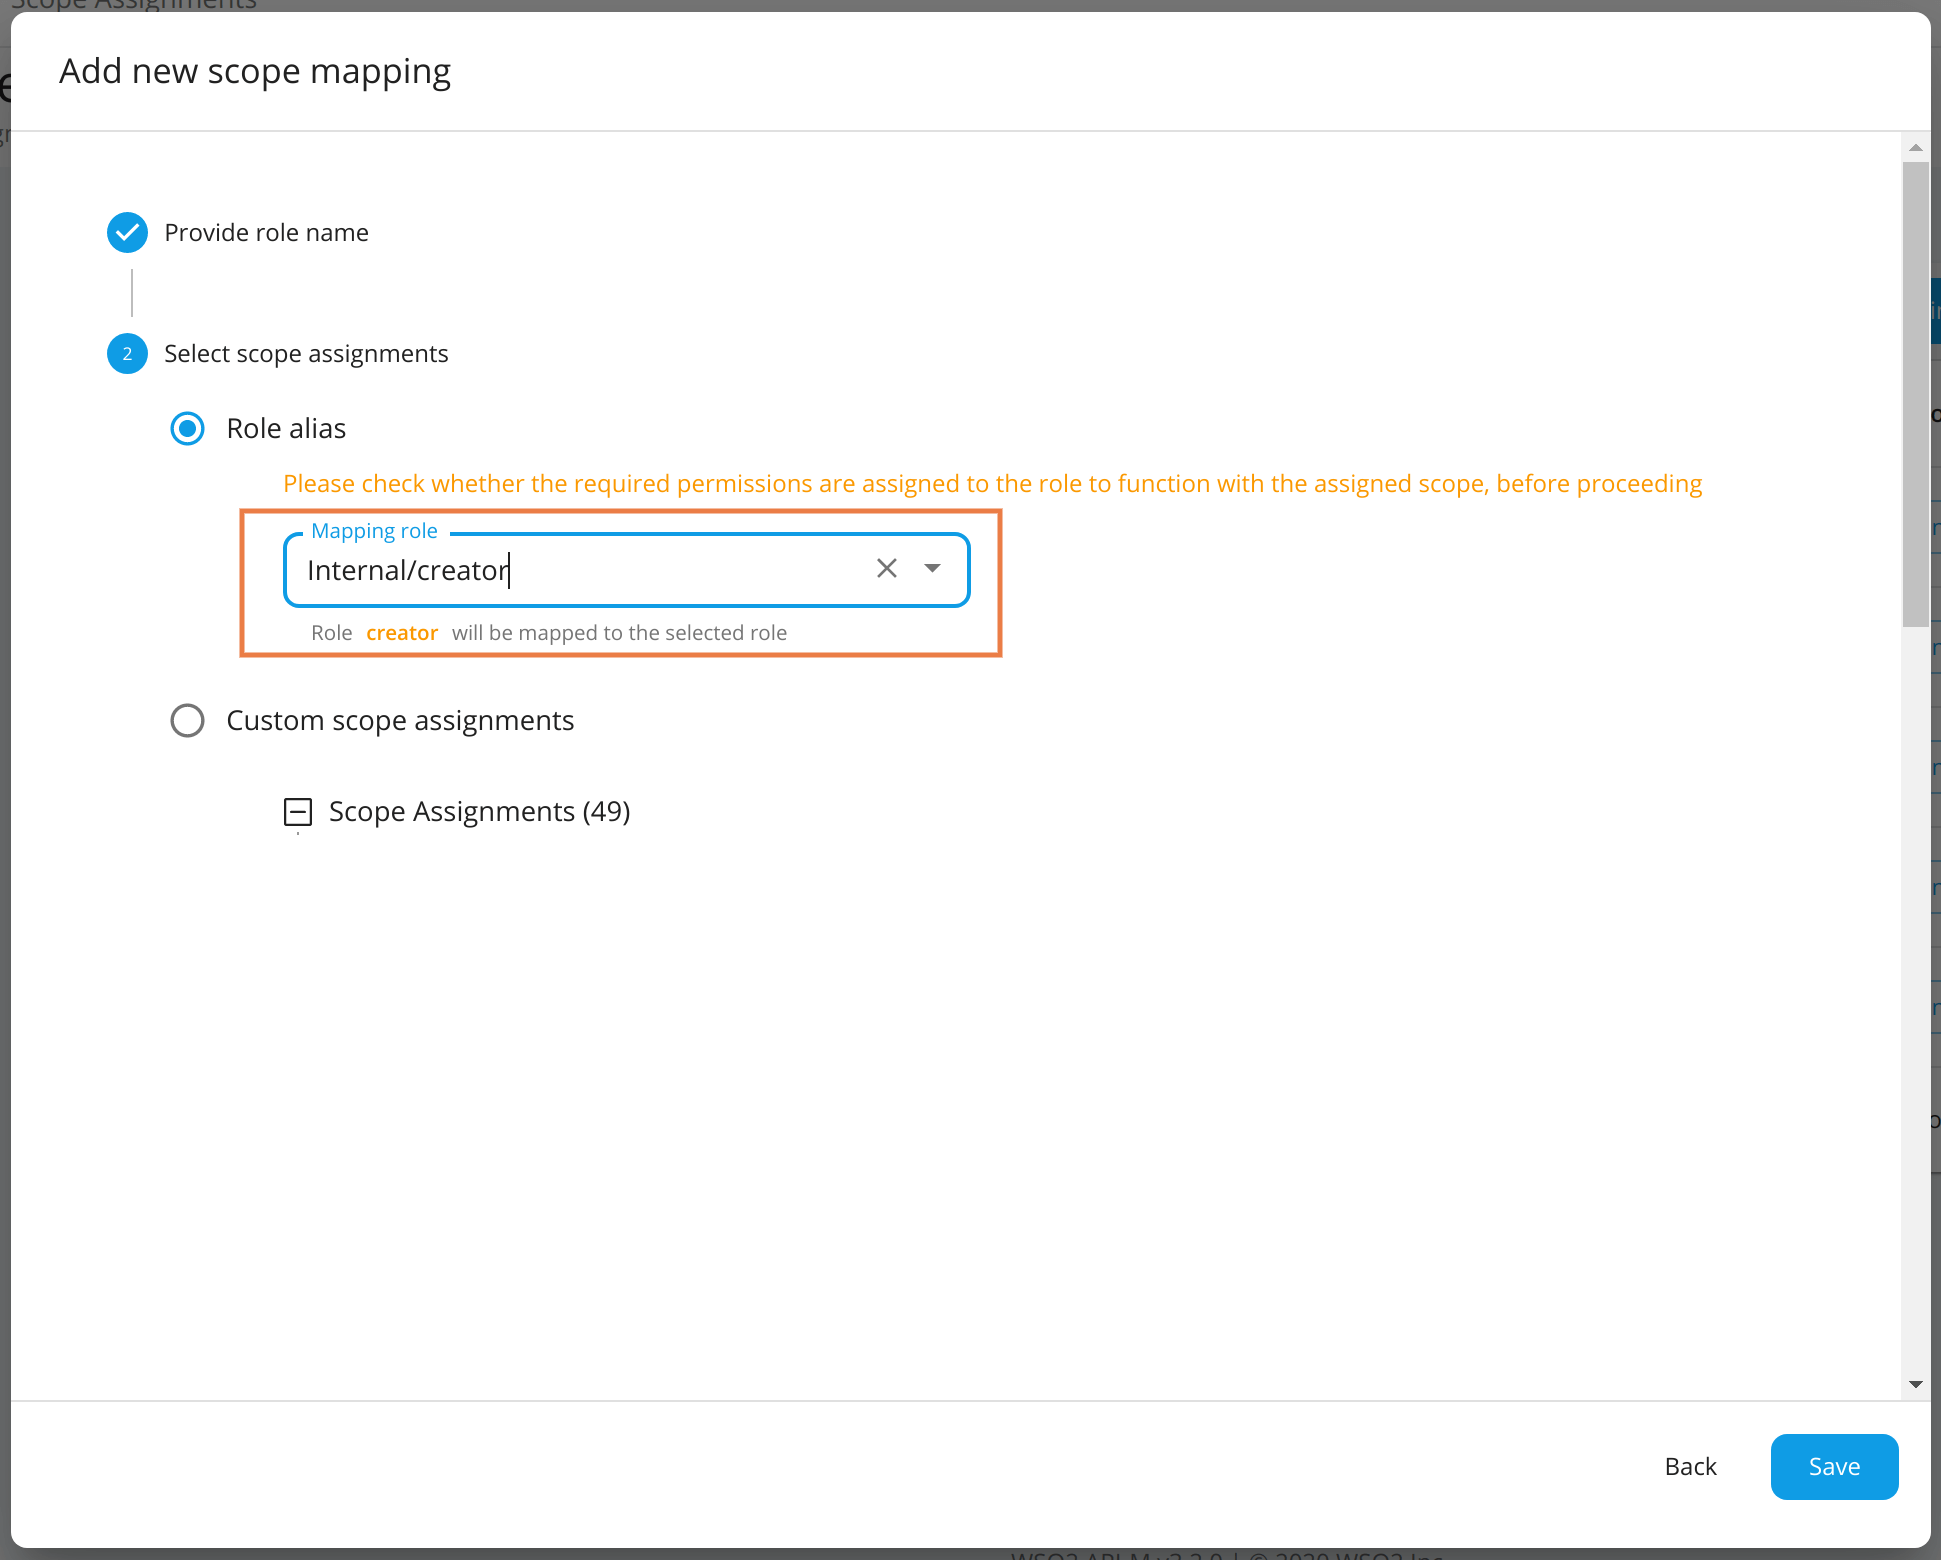
Custom Scope Assignments
- New roles can be associated with scopes individually. If you create a custom role that has different permissions, add the required scopes for the role based on the functionality or permissions you need to give to a user carrying this role.
-
For example, if you need to allow the user to create APIs, select the new scope
apim:api_createunder custom scope assignments.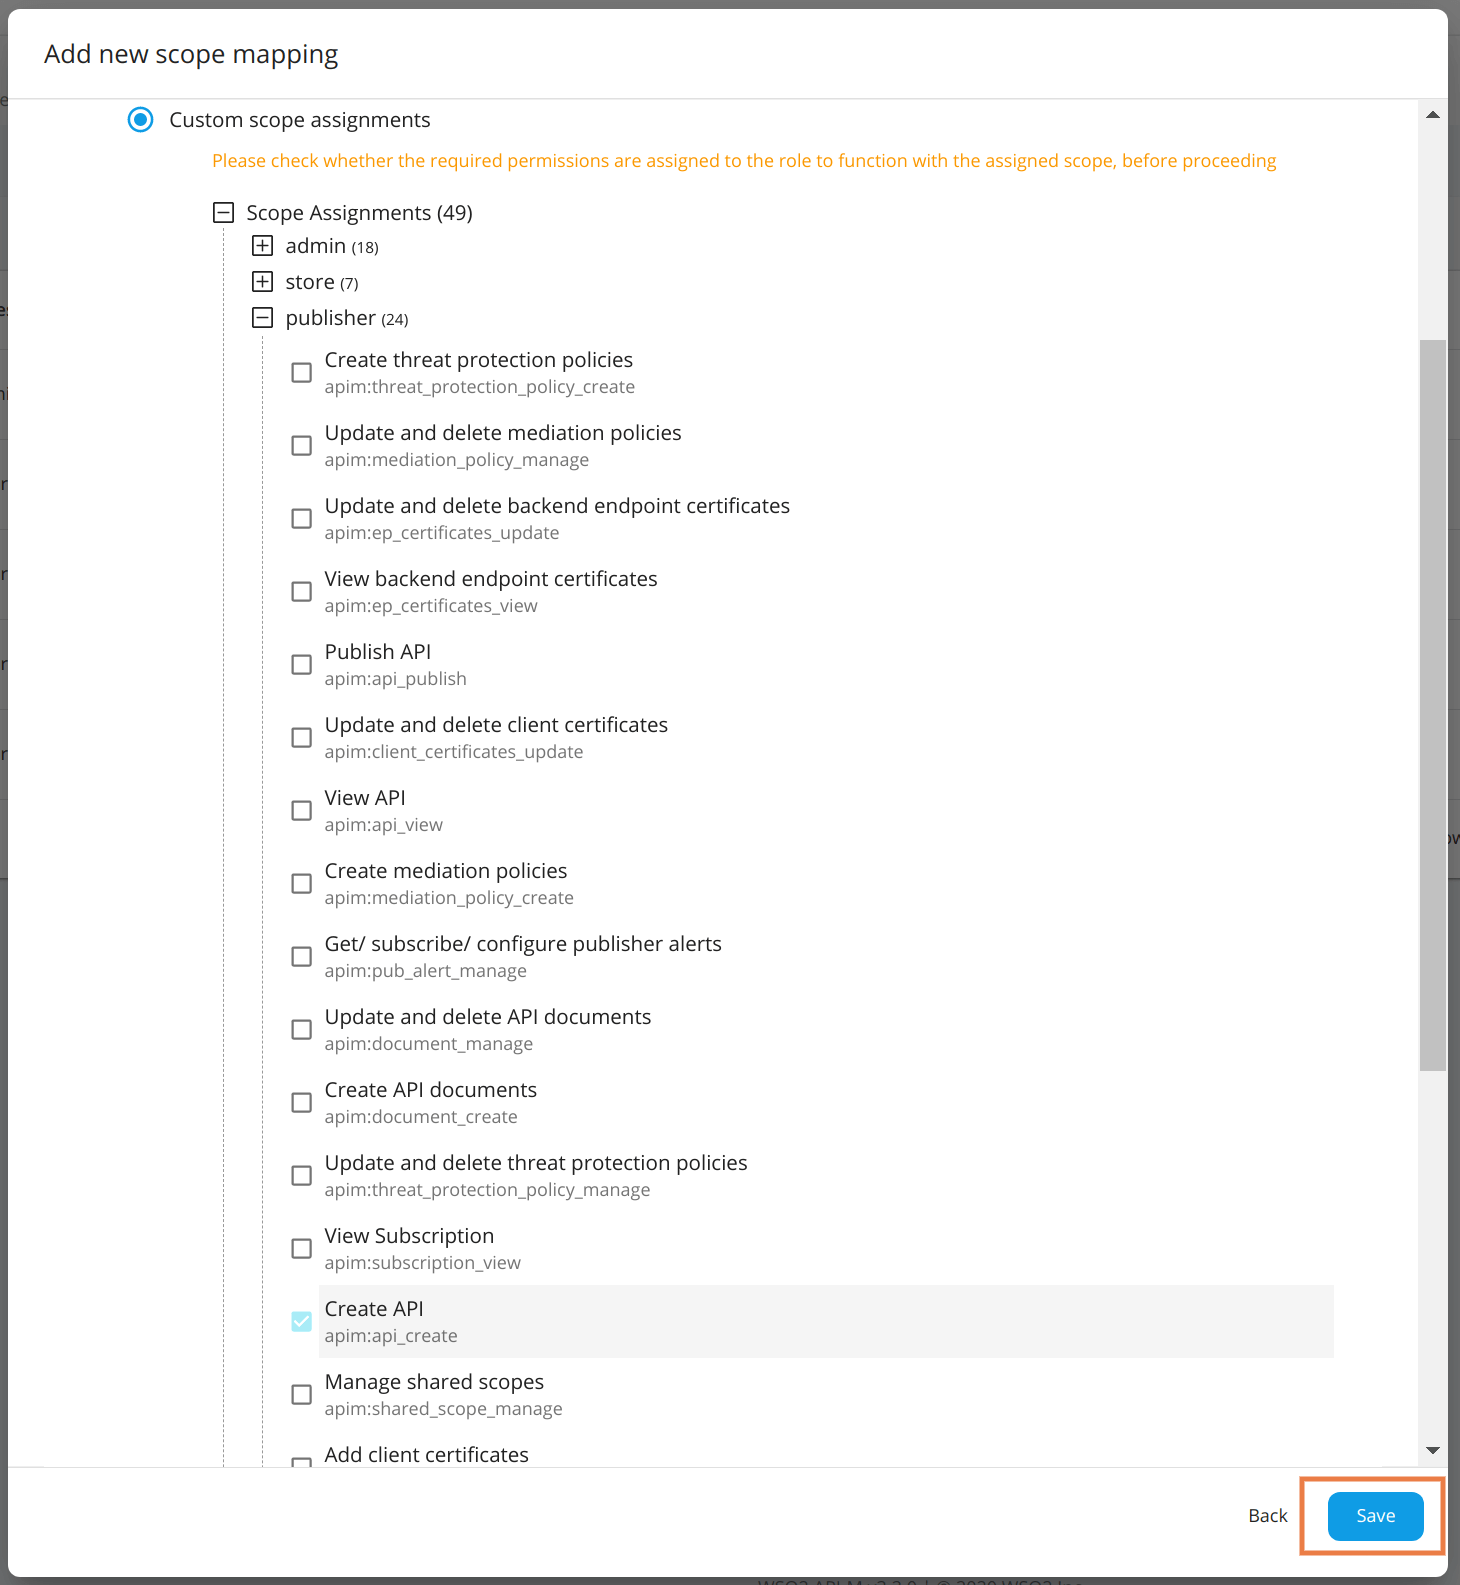
- New roles can be mapped to existing
Info
The following are the scopes allowed for each default Internal role under the default configurations.
| Role | admin | Internal/publisher | Internal/creator | Internal/subscriber | Internal/analytics | Internal/everyone | Internal/devops | Internal/integration_dev |
|---|---|---|---|---|---|---|---|---|
| apim:api_publish | ✓ | ✓ | ||||||
| apim:api_create | ✓ | ✓ | ||||||
| apim:api_generate_key | ✓ | ✓ | ✓ | |||||
| apim:api_view | ✓ | ✓ | ✓ | ✓ | ||||
| apim:api_delete | ✓ | ✓ | ||||||
| apim:api_manage | ✓ | |||||||
| apim:subscribe | ✓ | ✓ | ✓ | |||||
| apim:tier_view | ✓ | ✓ | ✓ | |||||
| apim:tier_manage | ✓ | |||||||
| apim:bl_view | ✓ | |||||||
| apim:subscription_view | ✓ | ✓ | ✓ | |||||
| apim:subscription_block | ✓ | ✓ | ||||||
| apim:subscription_manage | ✓ | ✓ | ||||||
| apim:mediation_policy_view | ✓ | ✓ | ||||||
| apim:mediation_policy_create | ✓ | ✓ | ||||||
| apim:api_mediation_policy_manage | ✓ | ✓ | ||||||
| apim:api_workflow | ✓ | |||||||
| apim:api_workflow_view | ✓ | |||||||
| apim:api_workflow_approve | ✓ | |||||||
| apim:admin | ✓ | |||||||
| apim:app_owner_change | ✓ | |||||||
| apim:app_import_export | ✓ | ✓ | ||||||
| apim:api_import_export | ✓ | ✓ | ||||||
| apim:api_product_import_export | ✓ | ✓ | ||||||
| apim:label_manage | ✓ | |||||||
| apim:label_read | ✓ | |||||||
| apim:app_update | ✓ | ✓ | ||||||
| apim:app_manage | ✓ | ✓ | ✓ | |||||
| apim:sub_manage | ✓ | ✓ | ✓ | |||||
| apim:monetization_usage_publish | ✓ | ✓ | ||||||
| apim:document_create | ✓ | ✓ | ✓ | |||||
| apim:ep_certificates_update | ✓ | ✓ | ||||||
| apim:client_certificates_update | ✓ | ✓ | ||||||
| apim:client_certificates_manage | ✓ | ✓ | ||||||
| apim:threat_protection_policy_manage | ✓ | ✓ | ||||||
| apim:document_manage | ✓ | ✓ | ✓ | |||||
| apim:client_certificates_add | ✓ | ✓ | ||||||
| apim:publisher_settings | ✓ | ✓ | ✓ | |||||
| apim:store_settings | ✓ | ✓ | ||||||
| apim:admin_settings | ✓ | |||||||
| apim:client_certificates_view | ✓ | ✓ | ||||||
| apim:mediation_policy_manage | ✓ | ✓ | ||||||
| apim:threat_protection_policy_create | ✓ | ✓ | ||||||
| apim:ep_certificates_add | ✓ | ✓ | ||||||
| apim:ep_certificates_view | ✓ | ✓ | ||||||
| apim:ep_certificates_manage | ✓ | ✓ | ||||||
| apim:api_key | ✓ | ✓ | ||||||
| apim_analytics:admin | ✓ | |||||||
| apim_analytics:monitoring_dashboard:own | ✓ | |||||||
| apim_analytics:monitoring_dashboard:edit | ✓ | |||||||
| apim_analytics:monitoring_dashboard:view | ✓ | ✓ | ||||||
| apim_analytics:business_analytics:own | ✓ | |||||||
| apim_analytics:business_analytics:edit | ✓ | |||||||
| apim_analytics:business_analytics:view | ✓ | ✓ | ||||||
| apim_analytics:api_analytics:own | ✓ | |||||||
| apim_analytics:api_analytics:edit | ✓ | |||||||
| apim_analytics:api_analytics:view | ✓ | ✓ | ✓ | |||||
| apim_analytics:application_analytics:own | ✓ | |||||||
| apim_analytics:application_analytics:edit | ✓ | |||||||
| apim_analytics:application_analytics:view | ✓ | ✓ | ||||||
| apim:pub_alert_manage | ✓ | ✓ | ||||||
| apim:sub_alert_manage | ✓ | ✓ | ||||||
| apim:tenantInfo | ✓ | |||||||
| apim:tenant_theme_manage | ✓ | |||||||
| apim:admin_operations | ✓ | |||||||
| apim:shared_scope_manage | ✓ | |||||||
| apim:admin_alert_manage | ✓ | |||||||
| apim:bot_data | ✓ | |||||||
| apim:scope_manage | ✓ | |||||||
| apim:role_manage | ✓ | |||||||
| apim:environment_manage | ✓ | |||||||
| apim:environment_read | ✓ | |||||||
| service_catalog:service_view | ✓ | ✓ | ✓ | |||||
| service_catalog:service_write | ✓ | ✓ | ||||||
| apim:comment_view | ✓ | ✓ | ✓ | |||||
| apim:comment_write | ✓ | ✓ | ✓ | |||||
| apim:comment_manage | ✓ | ✓ | ✓ | |||||
| apim:throttling_policy_manage | ✓ | ✓ | ✓ | ✓ | ||||
| apim:admin_application_view | ✓ | |||||||
| apim:api_list_view | ✓ | |||||||
| apim:api_definition_view | ✓ | |||||||
| apim:common_operation_policy_view | ✓ | ✓ | ✓ | |||||
| apim:common_operation_policy_manage | ✓ | ✓ | ||||||
| apim:policies_import_export | ✓ | ✓ |