Quick Start Guide - Streaming Integration
Let's get started with WSO2 Streaming Integrator(SI) by running a simple streaming use case in your local environment.
Before you begin...
-
Install Oracle Java SE Development Kit (JDK) version 11 and set the
JAVA_HOMEenvironment variable.For more information on setting the
JAVA_HOMEenvironment variable for different operating systems, see Setup and Install. -
Download the Streaming Integrator and Streaming Integrator Tooling distributions and extract them to a location of your choice.
Tip
You can download Streaming Integrator Tooling from the Tooling link in the OTHER RESOURCES section of the above download page.
Hereafter, the extracted location is referred to as
<SI_HOME>and<SIT_HOME>respectively. -
Optionally, download the API Manager distribution as a ZIP file by navigating to the WSO2 API Manager product page, clicking TRY IT NOW, and then clicking Zip Archive.
What you'll build
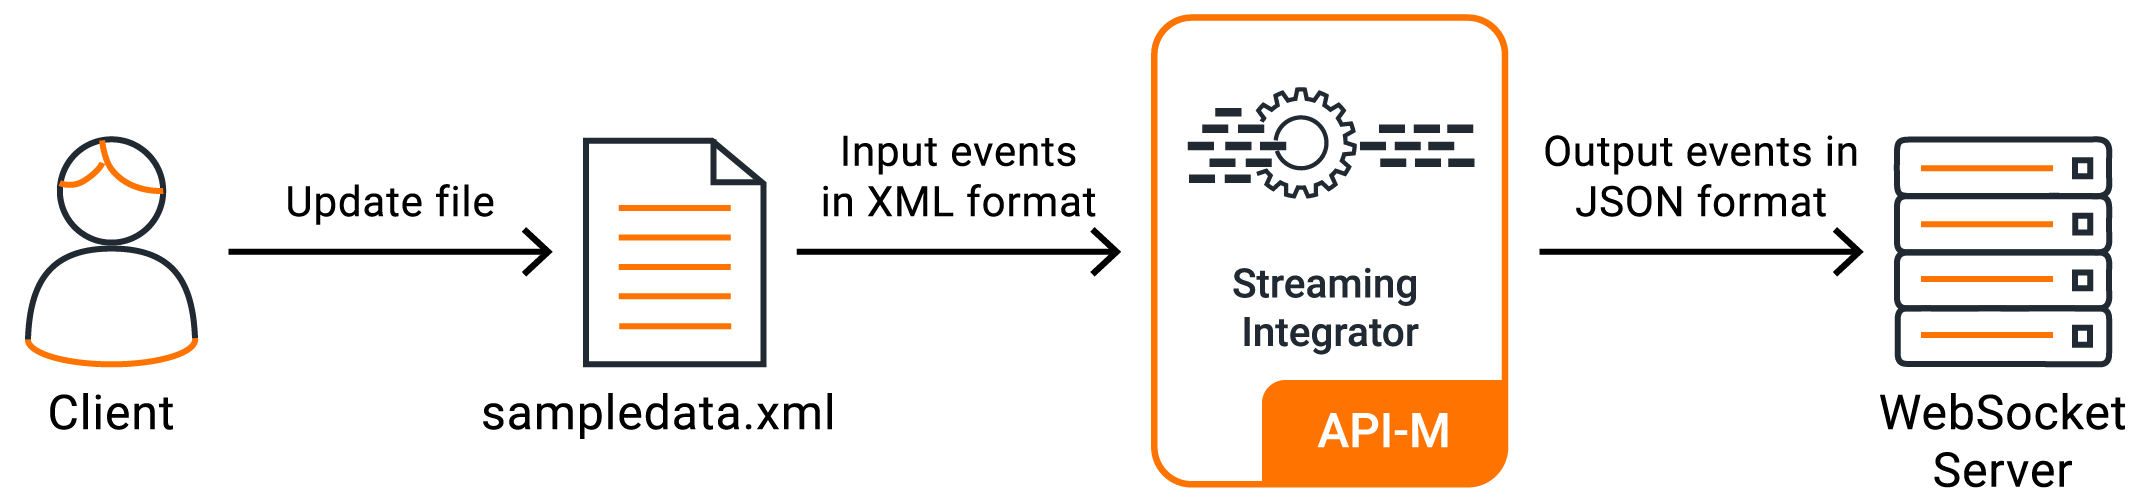
In this sample scenario, you aggregate the data relating to the raw material purchases of a sweet production factory and publish the data to a WebSocket server.
Step 1 - Start the Streaming Integrator
To start WSO2 Streaming Integrator, navigate to the <SI_HOME>/bin directory from the CLI, and issue the appropriate command based on your operating system:
- For Linux:
./server.sh - For Windows:
server.bat --run
Step 2 - Start the Streaming Integrator Tooling
Let's use the sample WebSocket Receiver that is shipped with the Streaming Integrator Tooling.
To start the sample, navigate to the <SIT_HOME>/bin directory from the CLI, and issue the appropriate command based on your operating system:
- For Linux:
./tooling.sh - For Windows:
tooling.bat --run
Step 3 - Create and deploy a sample Siddhi application
Let's create a simple Siddhi application that reads data from an XML file, does a simple transformation to the data, and then writes the results to the WebSocket receiver running.
-
Download
sampledata.xmlfile from here and save it in a location of your choice. -
Navigate to
http://localhost:9390/editor. -
Click on New, and copy and paste the content given below.
Note
The Siddhi application given below listens to the
/Users/foo/filesdirectory. You will be copying files to this directory in the upcoming steps. Create this directory if you haven't done it, or use another directory by specifying it in thedir.uri = 'file:/Users/foo/files'parameter in the Siddhi application.Tip
Here, a sample Siddhi application is provided to minimize the time spent following this guide. However, WSO2 recommends that you use the Streaming Integration Tooling that offers features such as syntax checking, event simulation for testing purposes, reformatting code, the option to design applications in a graphical interface or by writing code, and many more. For more information on designing Siddhi applications, see Streaming Integrator Tooling Overview.
@App:name('ManageProductionStats') @App:description('Receive events via an xml file located in a given directory and write sum of the amount to websocket server as a json event') @source(type = 'file', mode = "TEXT.FULL", dir.uri = 'file:/Users/foo/files', enclosing.element = "/events/event", enable.streaming.xml.content = "true", @attributes(name = "name", amount = "amount"), @map(type = 'xml')) @sink(type = 'log') define stream SweetsProductionStream (name string, amount double); @sink(type = 'websocket-server', host = "localhost", port = "8025", @map(type = 'json')) define stream ProductionAlertStream (name string, amount double); @sink(type = 'log') define stream LowProductionAlertStream (name string, amount double); -- Simple Siddhi query to calculate production totals. @info(name = 'query1') from SweetsProductionStream select name, sum(amount) as amount group by name insert into ProductionAlertStream; -
Save this file as
ManageProductionStats.siddhi. -
To deploy the Siddhi application in the Streaming Integrator, click Deploy and then click Deploy to Server.
-
Add the Streaming Integrator server details under
Add New Serversection and then click Add.For this example, specify the Streaming Integrator host as
localhostand port as9443. -
Select the
ManageProductionStatsand theServerand then click Deploy.The following message appears to indicate that the Siddhi application was deployed successfully in the Streaming Integrator console.
INFO {org.wso2.carbon.streaming.integrator.core.internal.StreamProcessorService} - Siddhi App ManageProductionStats deployed successfully
You can now test the SweetProductionApplication service that you just generated.
Step 4 - Test your Siddhi application
Follow the instructions below to test the ManageProductionStats Siddhi application that you created above.
-
Copy the
sampledata.xmlfile downloaded in step 3.1 to the/Users/foo/filesdirectory (or the directory that was specified in step 3.3). -
Observe the SI console output.
You can see the following message in the SI console log.
INFO {io.siddhi.core.stream.output.sink.LogSink} - ManageProductionStats : ProductionAlertStream : [Event{timestamp=1630491334294, data=[Almond cookie, 170.0], isExpired=false}, Event{timestamp=1630491334294, data=[Baked alaska, 100.0], isExpired=false}, Event{timestamp=1630491334294, data=[Toffee, 100.0], isExpired=false}]
Congratulations!
Now, you have created your first Streaming service. Optionally, you can follow the steps given below to expose the service as a Managed API in API Manager.
Exposing a Streaming Service as a Managed API
The ManageProductionStats Siddhi Application you deployed in the Streaming Integrator is a streaming service for the API Manager. Now, let's look at how you can expose the streaming service to the API Management layer and generate a managed API by using the service.
Step 1 - Expose as a service
Step 1.1 - Start WSO2 API Manager
Start the API Manager runtime:
-
Extract the API Manager ZIP file.
-
Start WSO2 API Manager.
Note
If you are running both APIM and SI in the same JVM, start APIM with a port offset.
Open a terminal, navigate to the
<API-M_HOME>/bindirectory and execute the relevant command../api-manager.sh -DportOffset=1api-manager.bat -DportOffset=1
Step 1.2 - Start WSO2 Streaming Integrator
Update and start the Streaming Integrator runtime:
-
Stop the Streaming Integrator.
-
Add the following configuration to the
<SI_HOME>/conf/server/deployment.yamlfile of the Streaming Integrator.Tip
- The default username and password for connecting to the API Gateway is
admin:admin. - The
9444port shown above is the port of API Manager, to which, the service catalog listens.
service.catalog.configs: enabled: true hostname: localhost port: 9444 username: admin password: admin - The default username and password for connecting to the API Gateway is
-
Start the Streaming Integrator again.
Step 1.3 - Generate an AsyncAPI Definition
Follow the instructions below to generate an AsyncAPI Definition via the Streaming Integrator Tooling Component:
-
Click Async API View.
The AsyncAPI Generation form appears.

-
Enter the WebSocket Streaming API related details.
The AsyncAPI generation form appears because you did not provide any Streaming API related content for the
@App:asyncAPIannotation when defining the Siddhi application.Let's add the following Streaming API information to create a WebSocket API based AsyncAPI definition.
Field Value Title SweetProductionApplicationVersion 1.0.0Description Consumes events of sweets productionSelect Source or Sink type to Generate Async API Select websocket-server Sources Select ProductionAlertStream 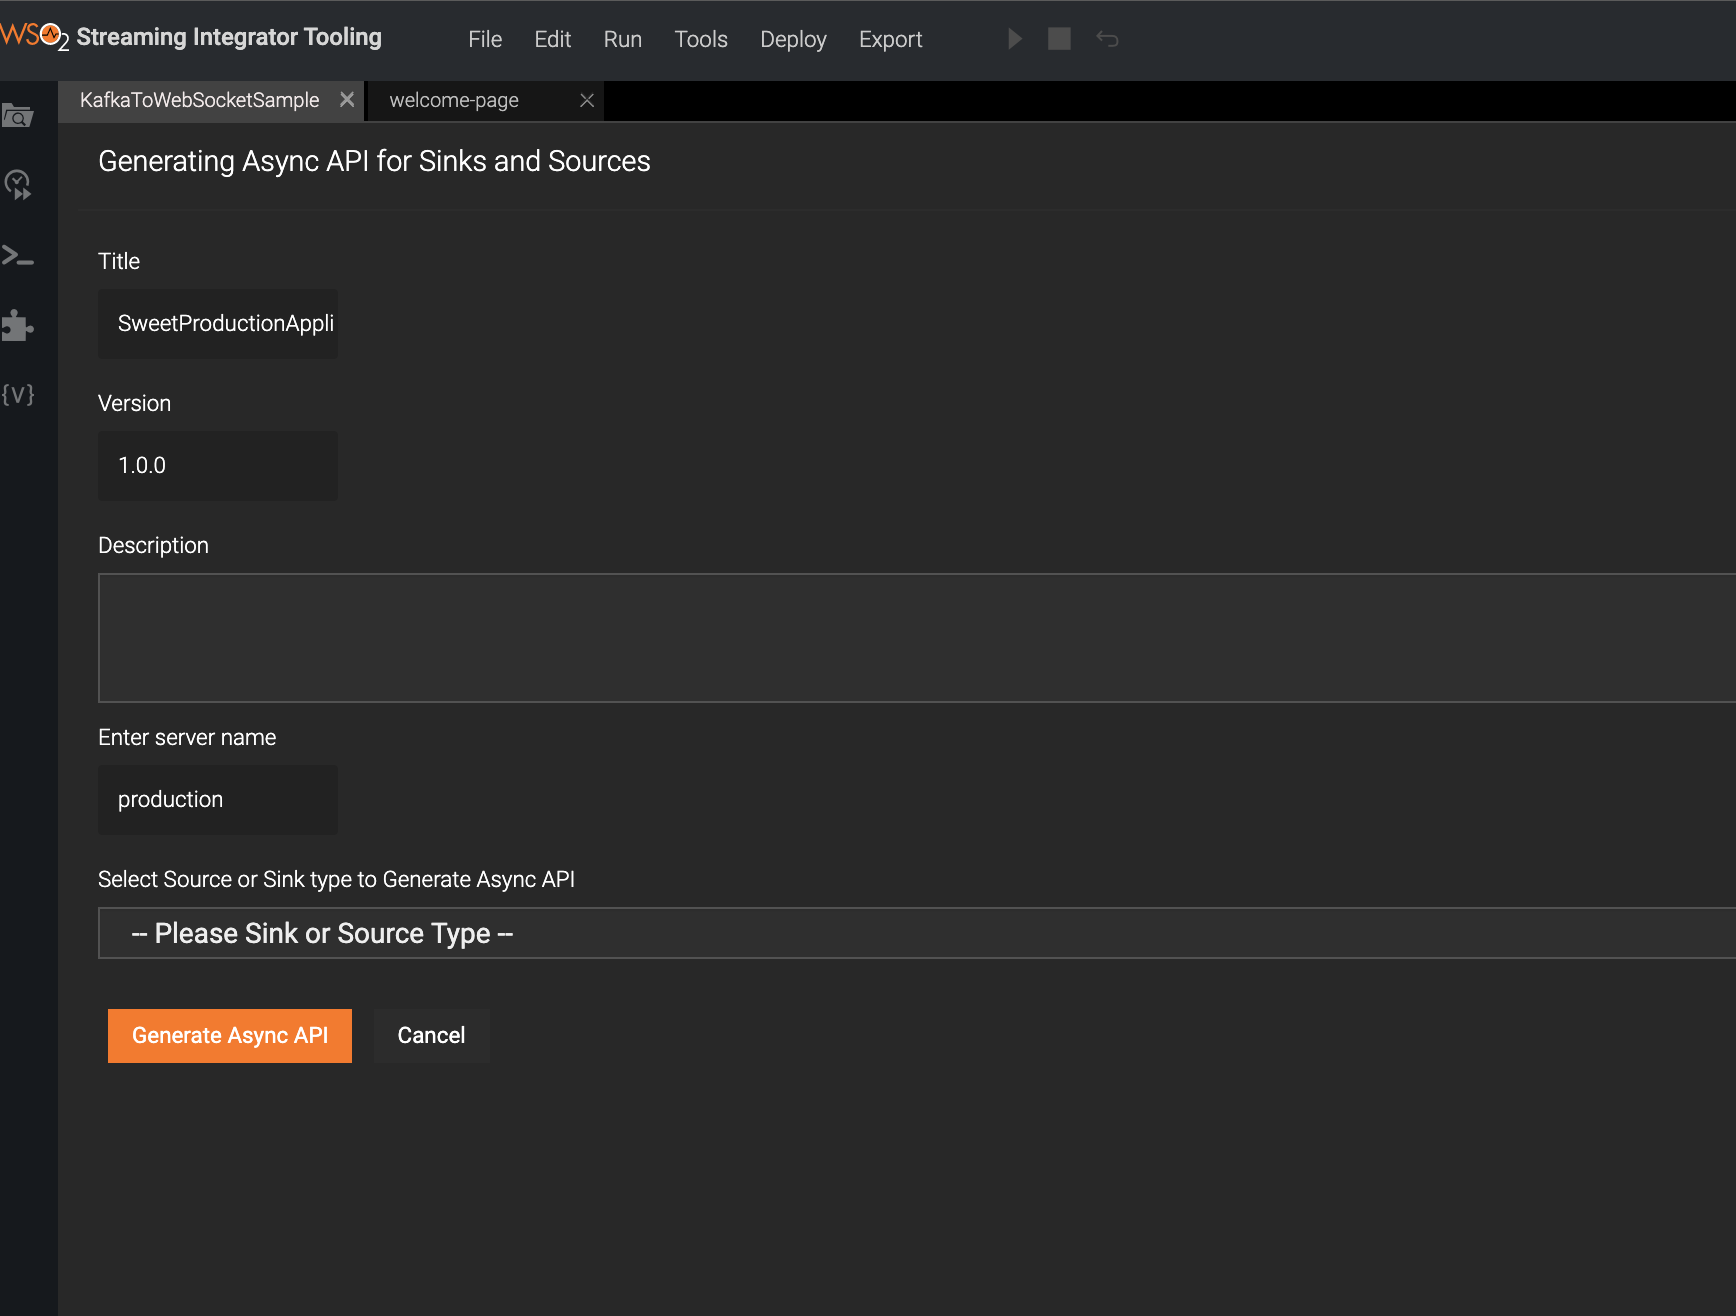
-
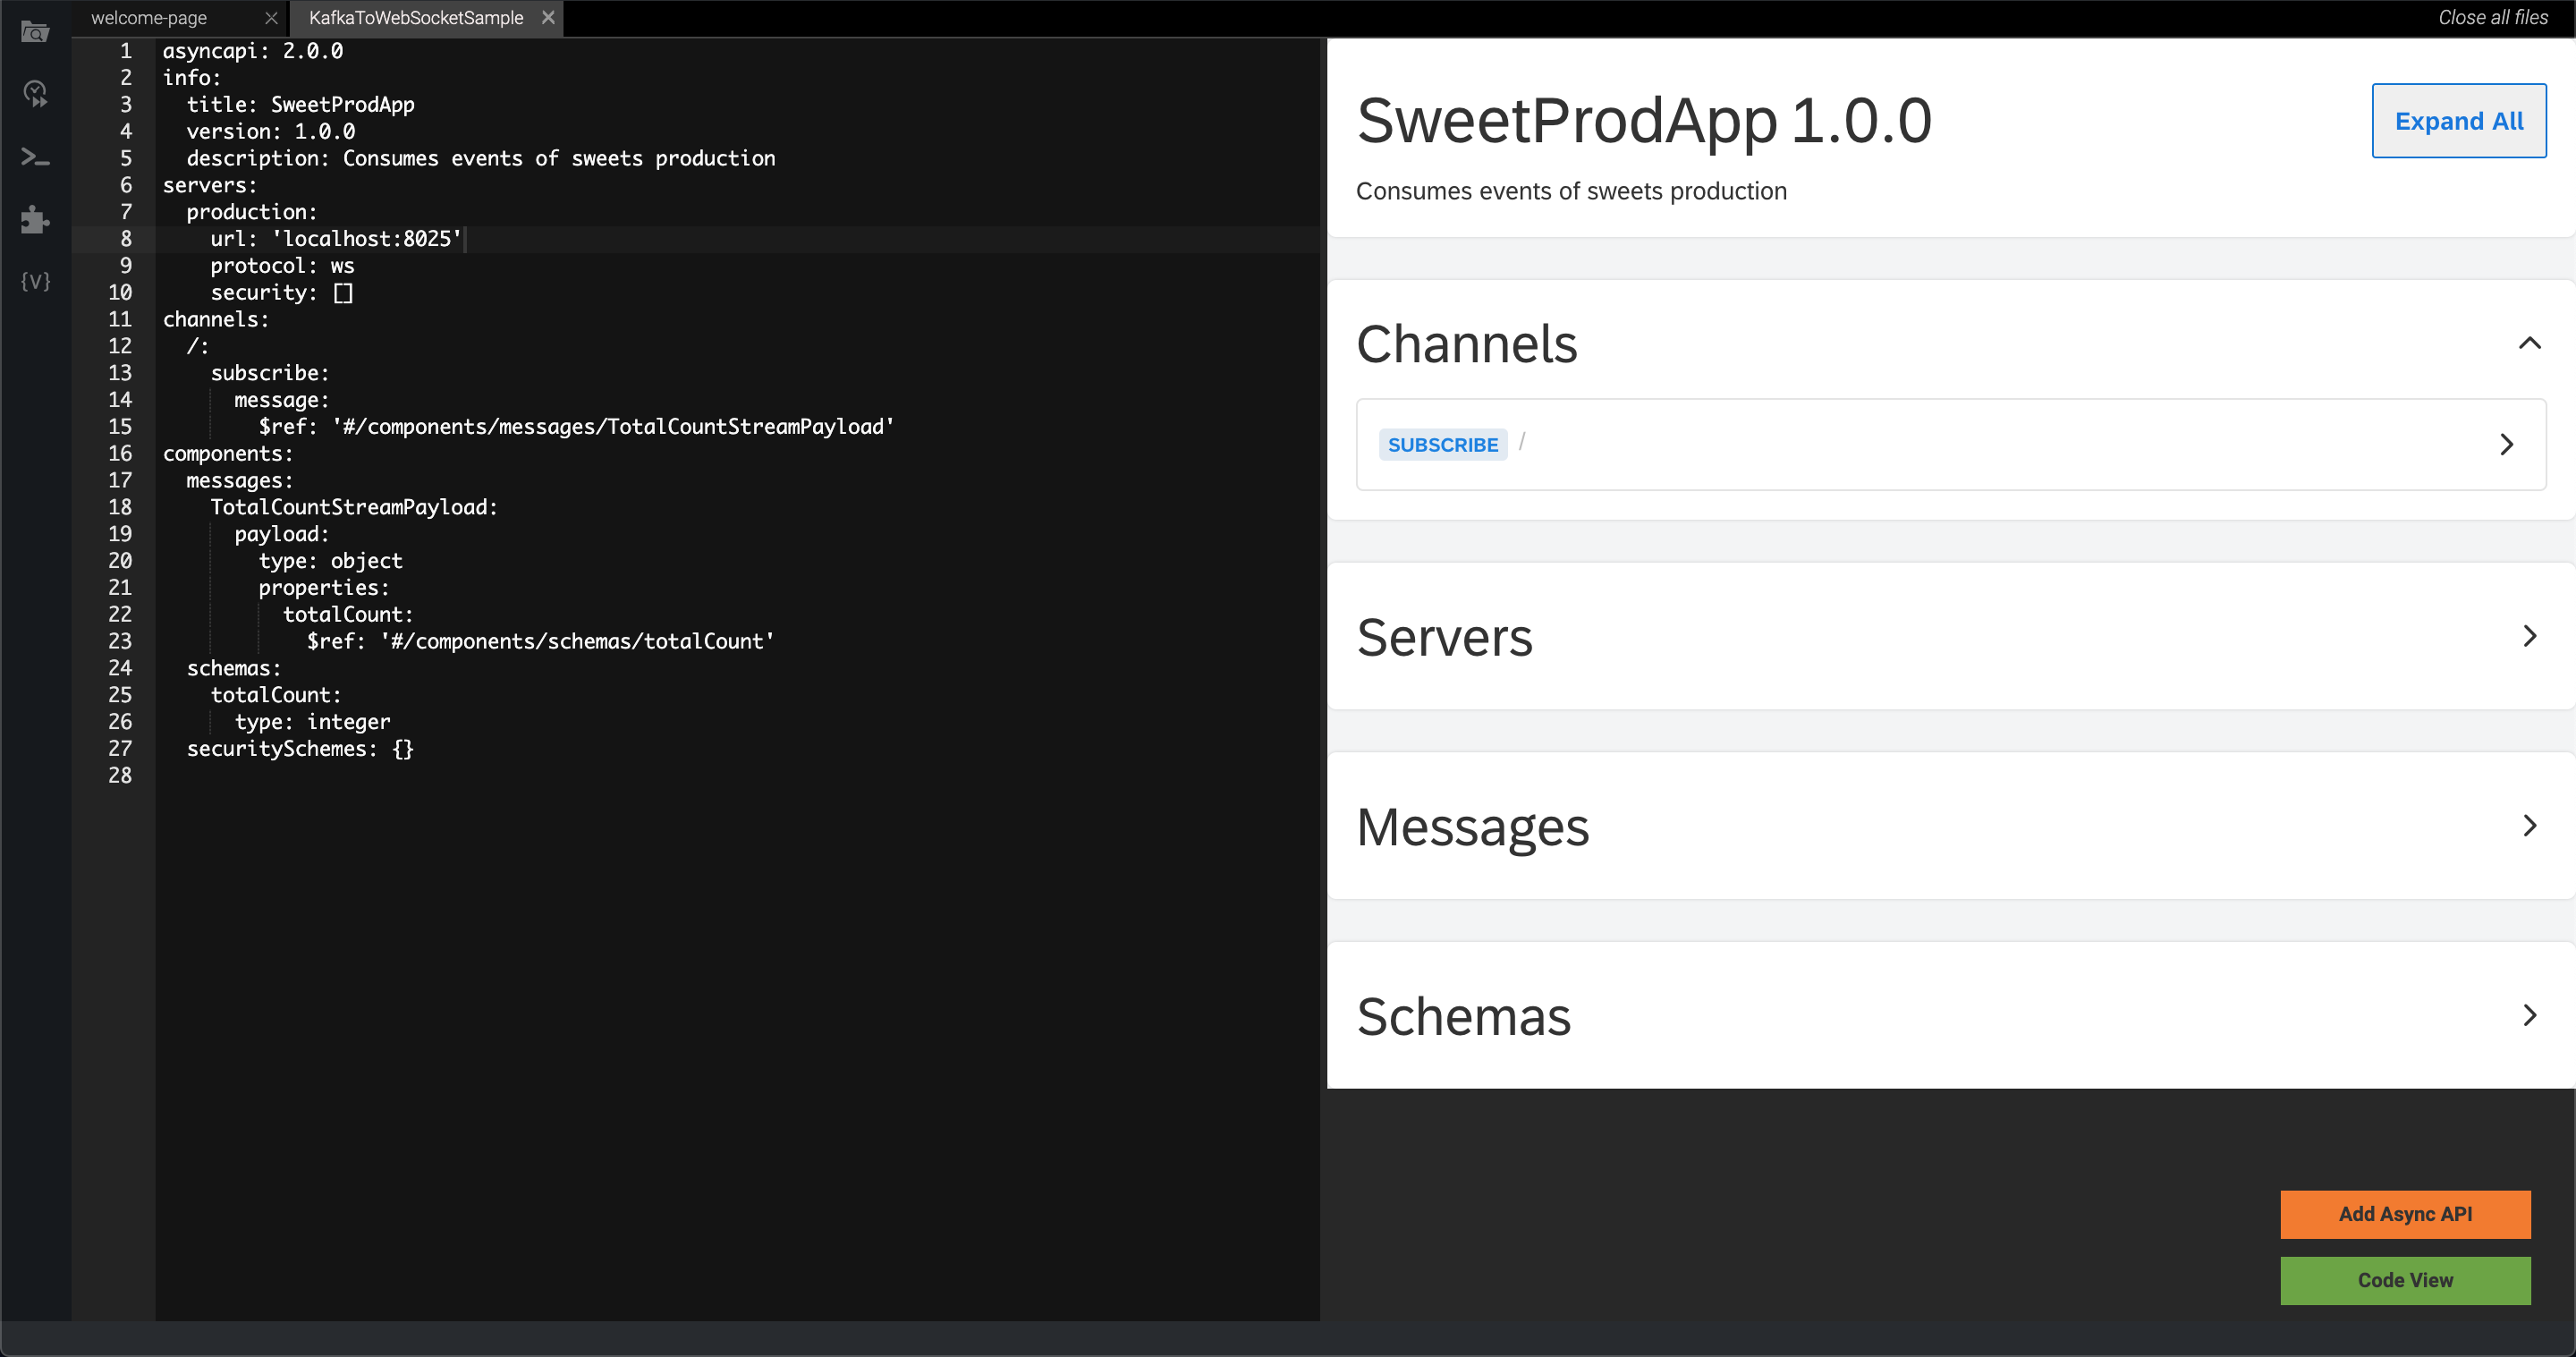
Click Generate Async API to generate the AsyncAPI definition.

After the AsyncAPI is generated as described above, the Async API specifications will be visible in the Async API View.
-
Add the generated AsyncAPI definition to the Streaming backend.
Click Add Async API to add the generated AsyncAPI definition to the Siddhi application.

-
Click Code View to view the Siddhi application with the AsyncAPI definition that was generated and save it so that it can be deployed on SI server.
Step 1.4 - Publish the AsyncAPI definition
Note
Before you begin:
-
You need to import the public certificate of the API Manager to the truststore of the Streaming Integrator. For information on importing the certificates, see the Importing certificates to the truststore guide.
-
For testing purposes, you can skip the above and simply copy the keystore and the truststore of WSO2 APIM (
wso2carbon.jksandclient-truststore.jksfiles located in the<WSO2_APIM_HOME>/repository/resources/security/directory) to theresources/securitydirectory of both SI and SI Tooling. - Restart SI and SI Tooling.
You need to deploy your Streaming backend, which contains the AsyncAPI definition, to the Streaming Integrator server in order to export the AsyncAPI definition that you generated to the services in WSO2 API Manager.
Follow the instructions below to publish the AsyncAPI definition to the service catalog:
-
Click Deploy, and then click Deploy to Server in Streaming Integrator Tooling.
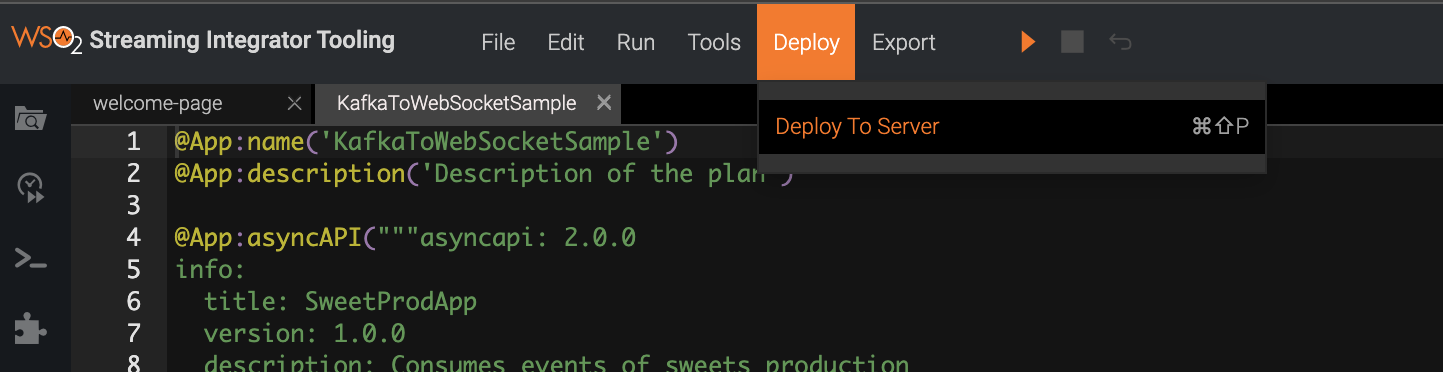
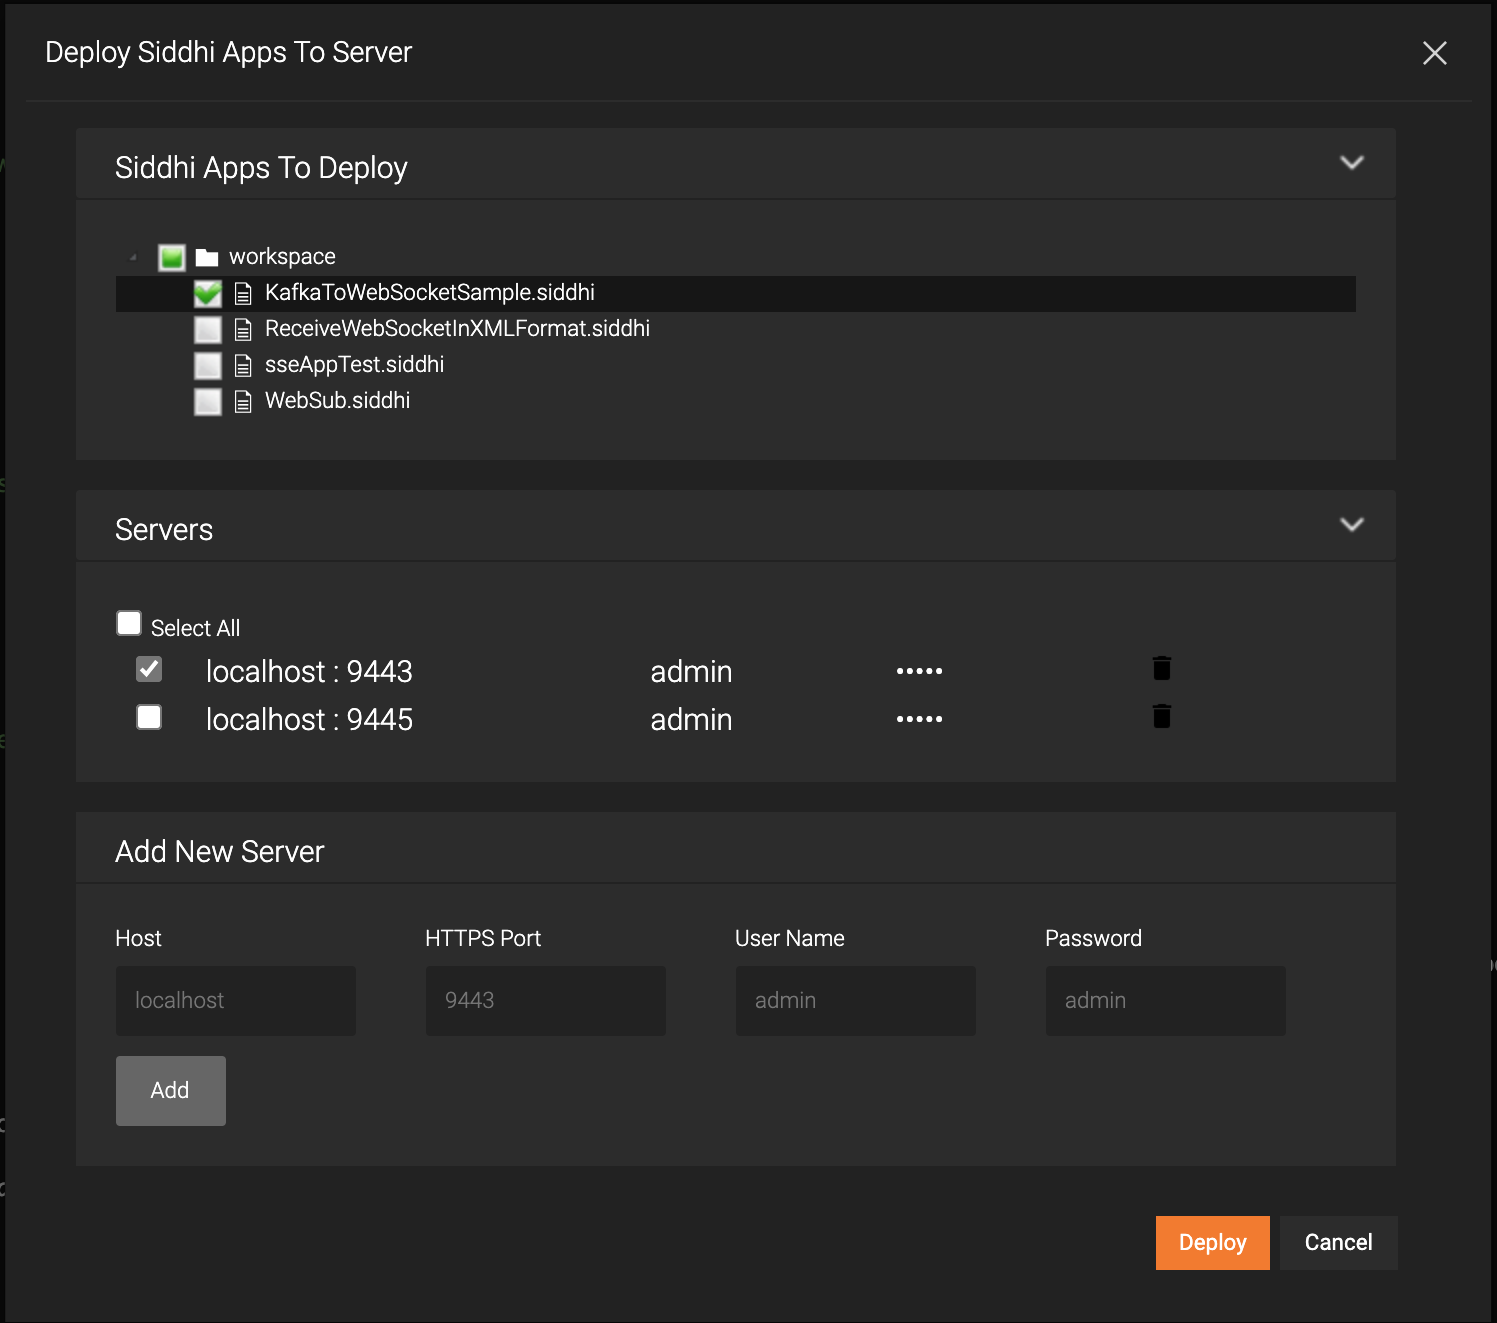
This opens the Deploy Siddhi Apps to Server dialog box.
-
Add the SI server host and port (default 9443) and select the relevant check box for your Siddhi application, which contains the AsyncAPI definition, and for the server in which you want to deploy it.
-
Click Deploy.
After the Siddhi application is successfully deployed, the following log messages appear in the Streaming Integrator and API Manager server logs to indicate that the AsyncAPI definition is successfully published in the Service Catalog.
Siddhi App ManageProductionStats deployed successfullyCommonUtil Creation of folder is successful. Directory Name : SweetProdApp-1.0.0
Step 1.5 - Access the streaming service
Access the streaming service via the API Publisher as follows:
-
Sign in to the API Publisher portal:
https://localhost:9443/publisher.Tip
Use
adminas the username and password. -
You can also click the hamburger icon on the upper-left and click Services to see the available services.
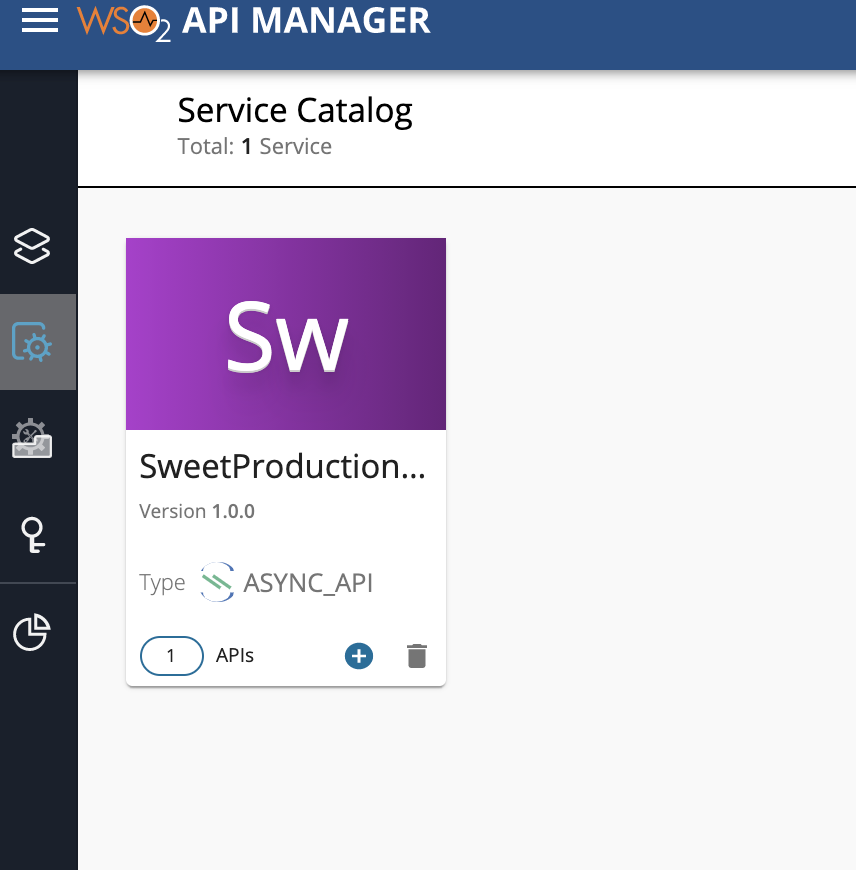
-
See that the
SweetProductionApplicationis listed as a service.
Step 2 - Create a managed API using the Streaming Service
-
Click on the SweetProductionApplication service.
-
Click Create API.
This opens the Create API dialog box with the API details that are generated based on the service.

-
Update the API name, context, and version if required, and click Create API.
The overview page of the API that you just created appears.
-
Optionally, update the portal configurations and API configurations as required.
Now, you have successfully created a WebSocket API using the service.
Step 3 - Publish the managed API
-
Navigate to Deployments and click Deploy to create a revision to deploy in the default Gateway environment.
-
Navigate to Lifecycle and click Publish to publish the API in the Gateway environment.
If the API is published successfully, the lifecycle state will shift to PUBLISHED.
Step 4 - Invoke the managed API via Developer Portal
-
Navigate to the Developer Portal by clicking on View In Dev Portal at the top menu.
-
Sign in using the default username/password
admin/admin. You will be redirected to the APIs. -
Under APIs, you will see the published
SweetProductionApplication. Click on it to navigate to the Overview of the API. -
Click Subscriptions on the left menu and click SUBSCRIBE.
This creates a subscription to the API using the
DefaultApplication.
-
Click PROD KEYS to generate keys for the application and click GENERATE KEYS.
-
Copy the generated access token for future use. Alternatively, you can generate a new access token by using
GENERATE ACCESS TOKEN. -
Click Try Out on the left menu and click on the SUB topic.
You can see the sample command to access the API.
Tip
- If
wscatis not already installed, use the following command to install it:npm install -g wscat - Change the below mentioned default port
9099according to the port offset of APIM.
wscat -c 'ws://localhost:9099/sweets/1.0.0/' -H 'Authorization: Bearer <access token>'Execute the command in Command Line.
- If
-
Remove the existing
sampledata.xmlfile in the/Users/foo/filesdirectory and rename the downloaded file assampledata1.xmland copy to the directory.The following message appears in the Command Line.
< [{"event":{"name":"Butter cookie","amount":50.0}},{"event":{"name":"Almond cookie","amount":271.0}},{"event":{"name":"Baked alaska","amount":150.0}}]
   > %
What's Next?
Once you try out this quick start guide, you can proceed to one of the following sections.
-
Learn more about the Streaming Integrator by trying out Streaming Integrator Tutorials.
-
Start using the Streaming Integrator. For more information and instructions about Streaming Integration functionality, see Streaming Integrator Use Cases.
-
Manage and expose streaming backends via Streaming APIs.