REST API from a SOAP Endpoint
When it comes to web services, they are designed to provide rich functionlity to end users by supporting interoperable interactions over a network. Web services are mainly categorized into two types called SOAP and RESTful services. However, due to various reasons like flexibility, scalability, complexity, performance, etc. RESTful services became better for modern clients. Due to this reason exposing a SOAP endpoint as a RESTfull service is helpful as it provides more flexibilities when integrating web services with various end user applications.
This guide will explain you on how to perform the SOAP to REST transformation using WSO2 Micro Integrator and how to deploy the converted API in Choreo Connect gateway to provision the key features that the Choreo Connect is supporting by using an example.
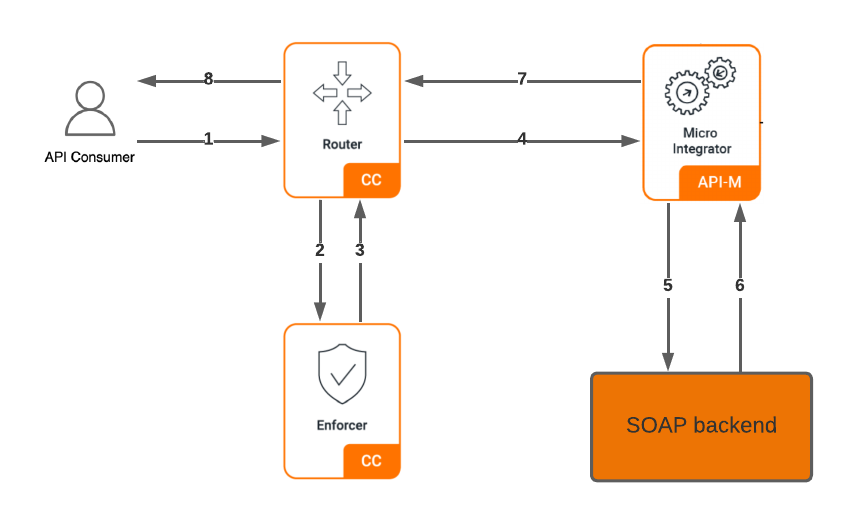
The following diagram illustrates the request flow from client to the backend through WSO2 Micro Integrator and the response flow from backend to client through WSO2 Micro Integrator for this example. The WSO2 Micro Integrator acting as the backend for the Choreo Connect Gateway whereas its handling the JSON to SOAP message transformation as well as GET to POST method transformation.
| Numbers | Description |
|---|---|
| 1 | Client request |
| 2,3 | Request validation flow via the Enforcer |
| 4 | If the request is valid (i.e. authenticated, not rate-limited etc.), the Router forwards the request to the MI |
| 5 | After perform the transformation, MI forwards the transformed request to the backend |
| 6 | Response from the backend |
| 7 | MI sends transformed response back to the router |
| 8 | Response to the client |
Note
This guide uses Phone Verify from CDYNE as the backend (WSDL: http://ws.cdyne.com/phoneverify/phoneverify.asmx?wsdl). You may use your own backend and continue with the same steps.
Create SOAP to REST transformation using WSO2 Micro Integrator
Following steps will guide you through creation of SOAP to REST transformation using WSO2 Micro Integrator.
Before you begin
This guide assumes that you already have installed WSO2 Integration Studio, if not you can follow up instructions on Installing WSO2 Integration Studio.
Tip
The project that will be creating in below Step 1 & Step 2 is available in /samples/rest-to-soap-conversion directory of the Choreo Connect's github repository.
If you wish to use that, you can go through the following steps to import it directly to the Integration Studio and use.
- Clone the Choreo Connect repository.
- Import the
PhoneVerifysample project to the Integration studio. Refer Importing Projects for more information. - Configure Micro Integrator to Update APIM Service Catalog if required.
- Deploy the Artifacts.
Step 1 - Create an Integration project with ESB Configs module and Composit Exporter module
Select File->New->Integration Project from Integration studio and enter the project name as PhoneVerification.
Make sure to tick the Create ESB Configs and Create Composite Exporter when creating the Integration project.
For more information refer to Creating an Integration Project.
Step 2 - Create the REST API
- In the left hand side project explorer panel, expand the created project
PhoneVerification. - Right click on
PhoneVerfificationConfigsand select New->REST API. - Select the Import API Artifact option and provide file having this synapse configuration.
Note
If you want to design your API from scratch, select Create New API Artifact option in the above step and create it using Integration Studio. For more information on this refer documentation on Creating a REST API.
Tip
This example is using PayloadFactory Mediator to transform JSON content to SOAP. Also a similar example can be find in Converting JSON to SOAP.
Step 3 - Configure Micro Integrator to Update APIM Service Catalog
Note
This step is required only if you are trying Choreo Connect with WSO2 APIM mode and create the API through Service Catalog.
You can use the following steps to configure the Micro Integrator to update the APIM service catalog for the developped integrations.
-
Update the metadata of the Integration Service.
- Open the
PhoneVerify_metadata.yamlfile located inPhoneVerification/PhoneVerificationConfigs/src/main/resources/metadata/PhoneVerify_metadata.yamlusing the project explorer. -
Change the
serviceUrlas follows.http://172.17.0.1:8290/phoneverifyhttp://host.docker.internal:8290/phoneverifyNote
serviceUrlis used to access service you created on Micro Integrator. When you create the API on API Manager, thisserviceUrlwill be used as the endpoint for your service.Also note that this guide assumes, you are using
docker-composeto run API Manager and Choreo Connect Gateway and Micro Integrator is running on the host machine(localhost). Therefore, If you are using another setup, please make sure to set the host & port of theserviceUrlaccordingly.
- Open the
-
Configure Micro integrator to automatically publish artifacts to Service Catalog in API Manager publisher portal.
- Open the server configurations for Embedded Micro Integrator in Integration Studio by clicking on the Server Configuration(Micro Integrator) (
 ) icon on the upper menu.
 - Uncomment the
[[service_catalog]]section and change the APIM server configurations accordingly.[[service_catalog]] apim_host = "https://localhost:9444" enable = true username = "admin" password = "admin"
- Open the server configurations for Embedded Micro Integrator in Integration Studio by clicking on the Server Configuration(Micro Integrator) (
Step 4 - Update Swagger Definition
This step will show you how to Update the swagger definition to change some important parameters which is required when deploy this API in Choreo Connect Gateway using the Swagger definition.
Change Server URL
Note
Follow this step only if you are using Choreo Connect in Standalone Mode on docker-compose and Micro Integrator is running on localhost.
- Open the file in
PhoneVerification/PhoneVerificationConfigs/src/main/resources/metadata/PhoneVerify_swagger.yaml. -
Change the URL under
serverssection as follows.http://172.17.0.1:8290/phoneverifyhttp://host.docker.internal:8290/phoneverify
Step 5 - Deploy the Artifacts in Micro Integrator
You have multiple options to deploy your REST API. See the Deploying Artifacts for more information.
In this example we are using the Embedded Micro Integrator in your WSO2 Integration Studio.
Below steps will show you, how to deploy your REST API.
- Select the Composite Application in the project explorer.
- Click the
 icon in the menu palette to open the Run As dialog box.
 - Select Run on Micro Integrator and click OK.
- Then select the created API artifact under
PhoneVerificationConfigsand click Finish.
Refer to Deploy Artifacts using Embedded Micro Integrator for more information.
Tip
Once the REST API is deployed you may use following cURL command to test it directly.
curl -X GET "http://localhost:8290/phoneverify/checkphonenumber?PhoneNumber=18006785432&LicenseKey=18006785432" -v
Deploy the REST API in Choreo Connect Gateway
You can deploy the created REST API in the following ways depending on the Choreo Connect mode you have chosen.
| Mode | Method |
|---|---|
| Choreo Connect with WSO2 API Manager as a Control Plane | Via WSO2 API Manager Publisher Portal |
| Choreo Connect as a Standalone Gateway | Via apictl for Standalone Mode |
Via WSO2 API Manager Publisher Portal
Follow the instructions below to deploy the created Integration Service as an API in a Choreo Connect instance run with WSO2 API Manager as the Control Plane.
Before you begin
This guide assumes that you already have a Choreo Connect instance configured to run with API Manager. If not,
-
To start Choreo Connect with an existing API Manager instance, follow the steps mentioned in the Using Choreo Connect Deployed on Docker with WSO2 API Manager Guide.
-
To start a complete deployment setup that includes a WSO2 API Manager instance and a Choreo Connect instance already configured to work with API Manager, follow the steps in the Quick Start Guide.
You have two options to deploy the Created API in WSO2 API Manager.
- Through the API Manager Service Catalog Integrated with Micro Integrator.
- Using the Swagger definition of the Created REST API.
This guide will continue with the first option. Therefore you must have Configured Micro Integrator to Update APIM Service Catalog in the Step-3 of the Integration creation guide.
Following steps will show you how to create the API using WSO2 APIM Publisher and invoke it.
Step 1 - Create the API using API Manager Publisher Portal
You can create the API using the Service Catalog as follows.
-
Sign in to Publisher portal
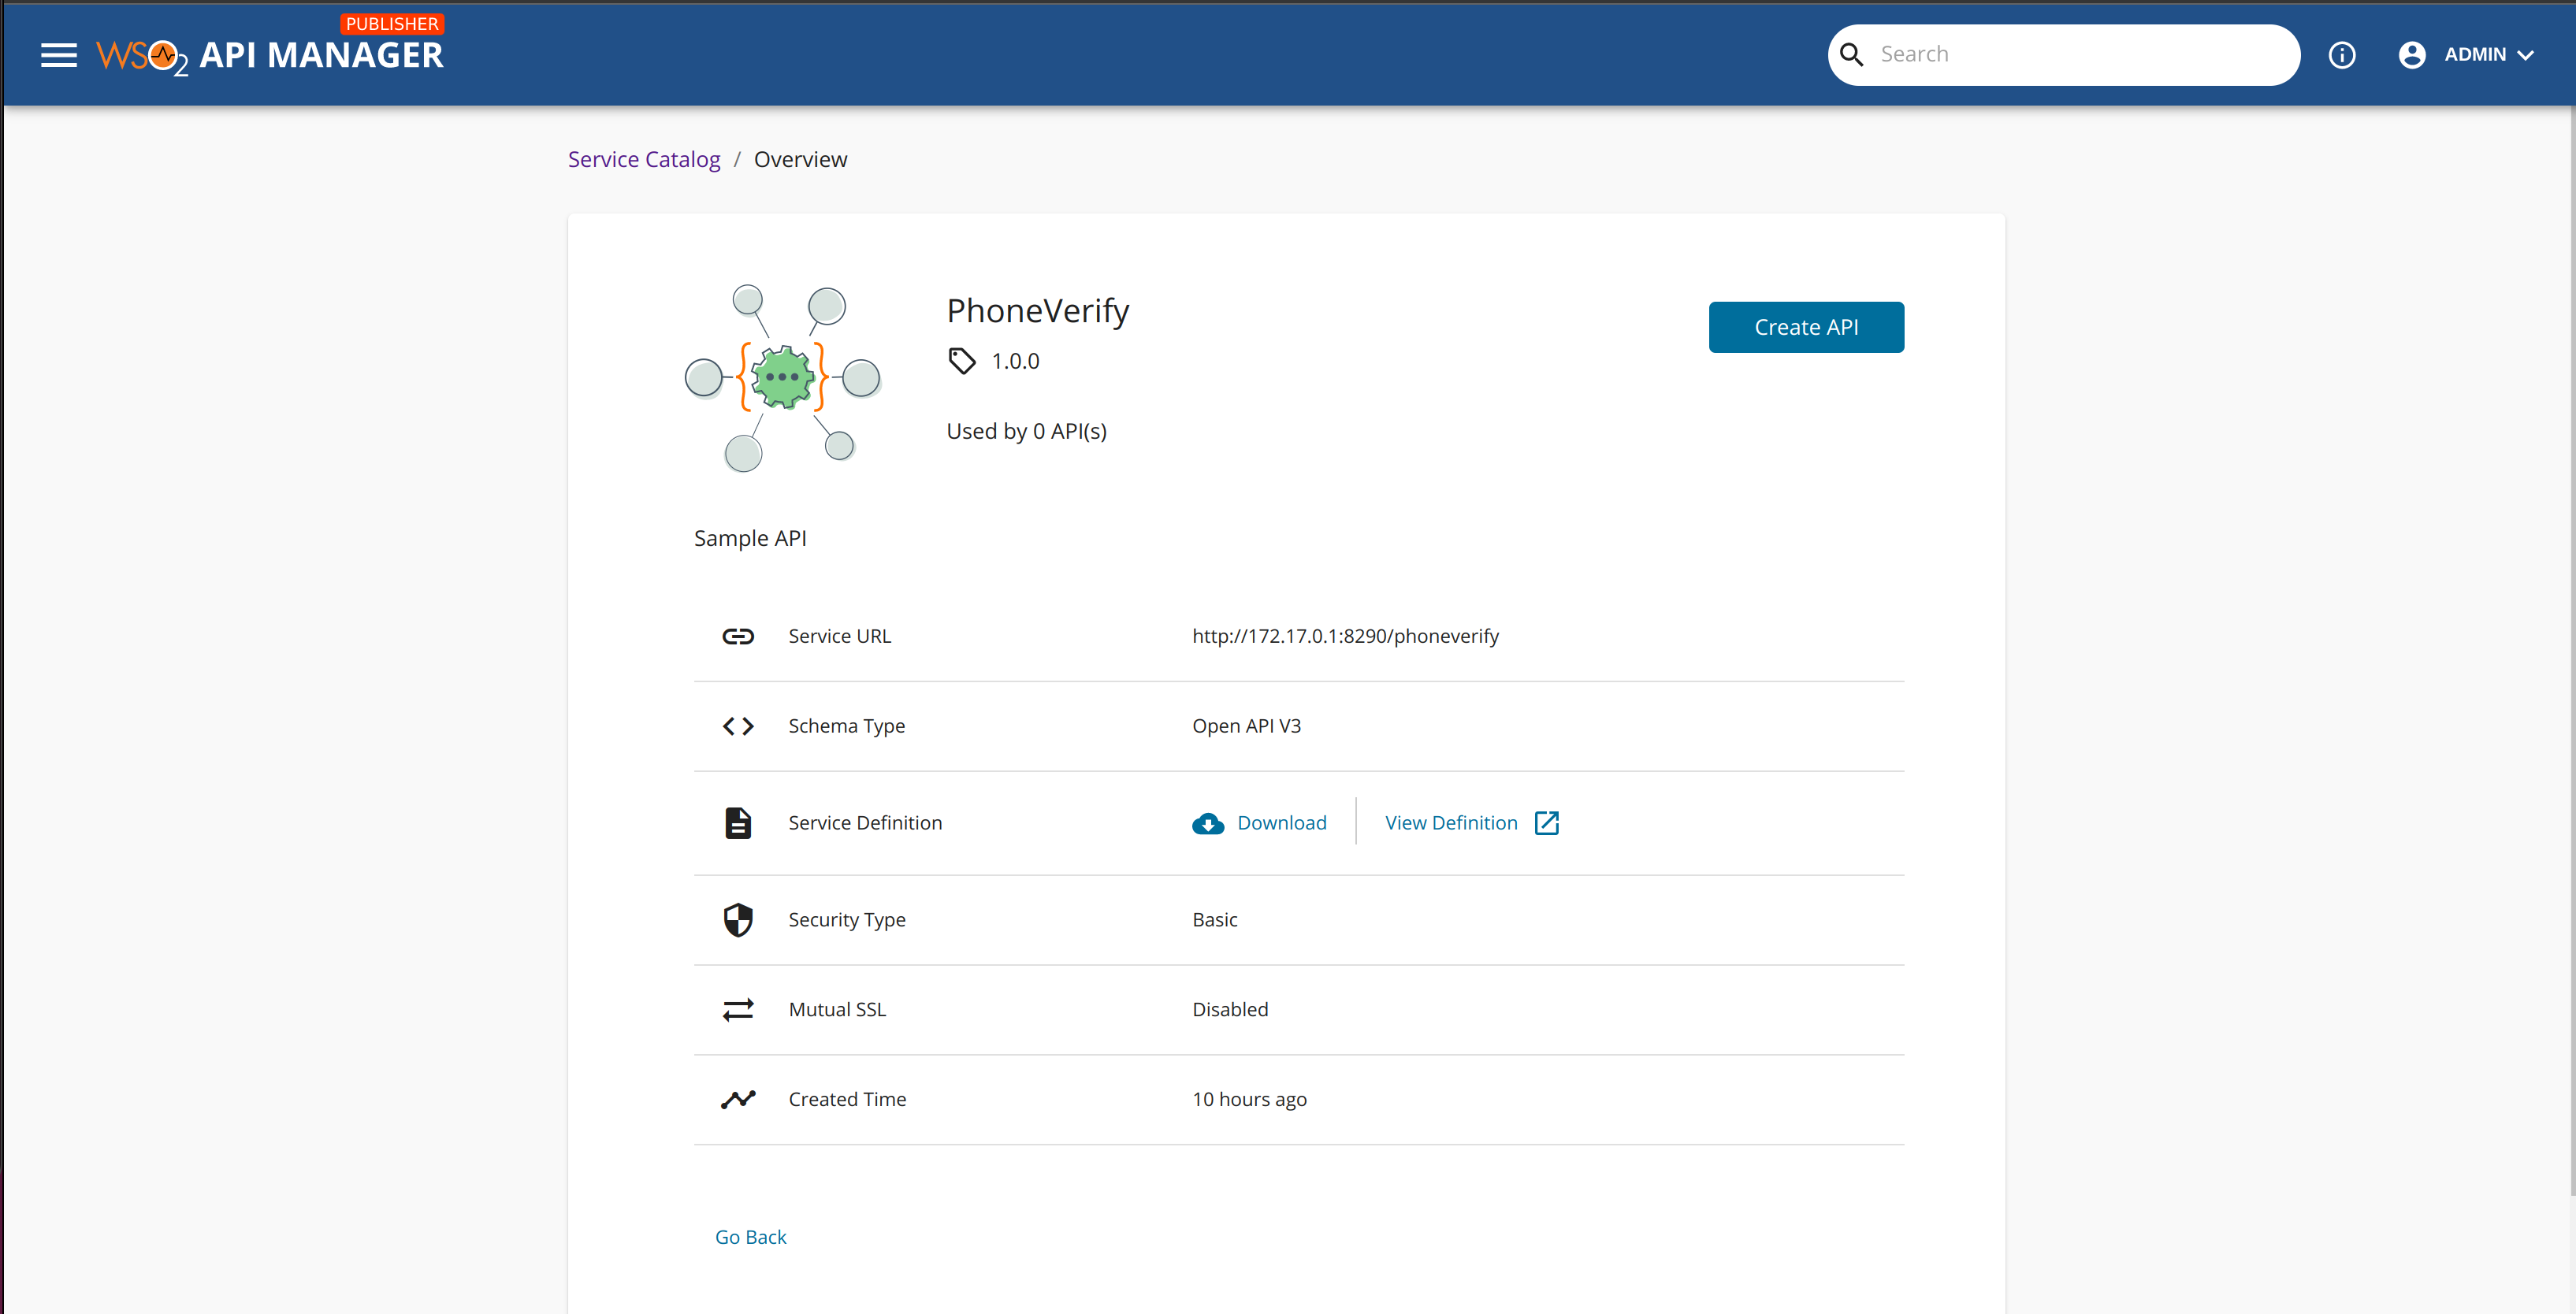
https://localhost:9444/publisher/and go to the Service Catalog by clicking on the Services icon on the left panel.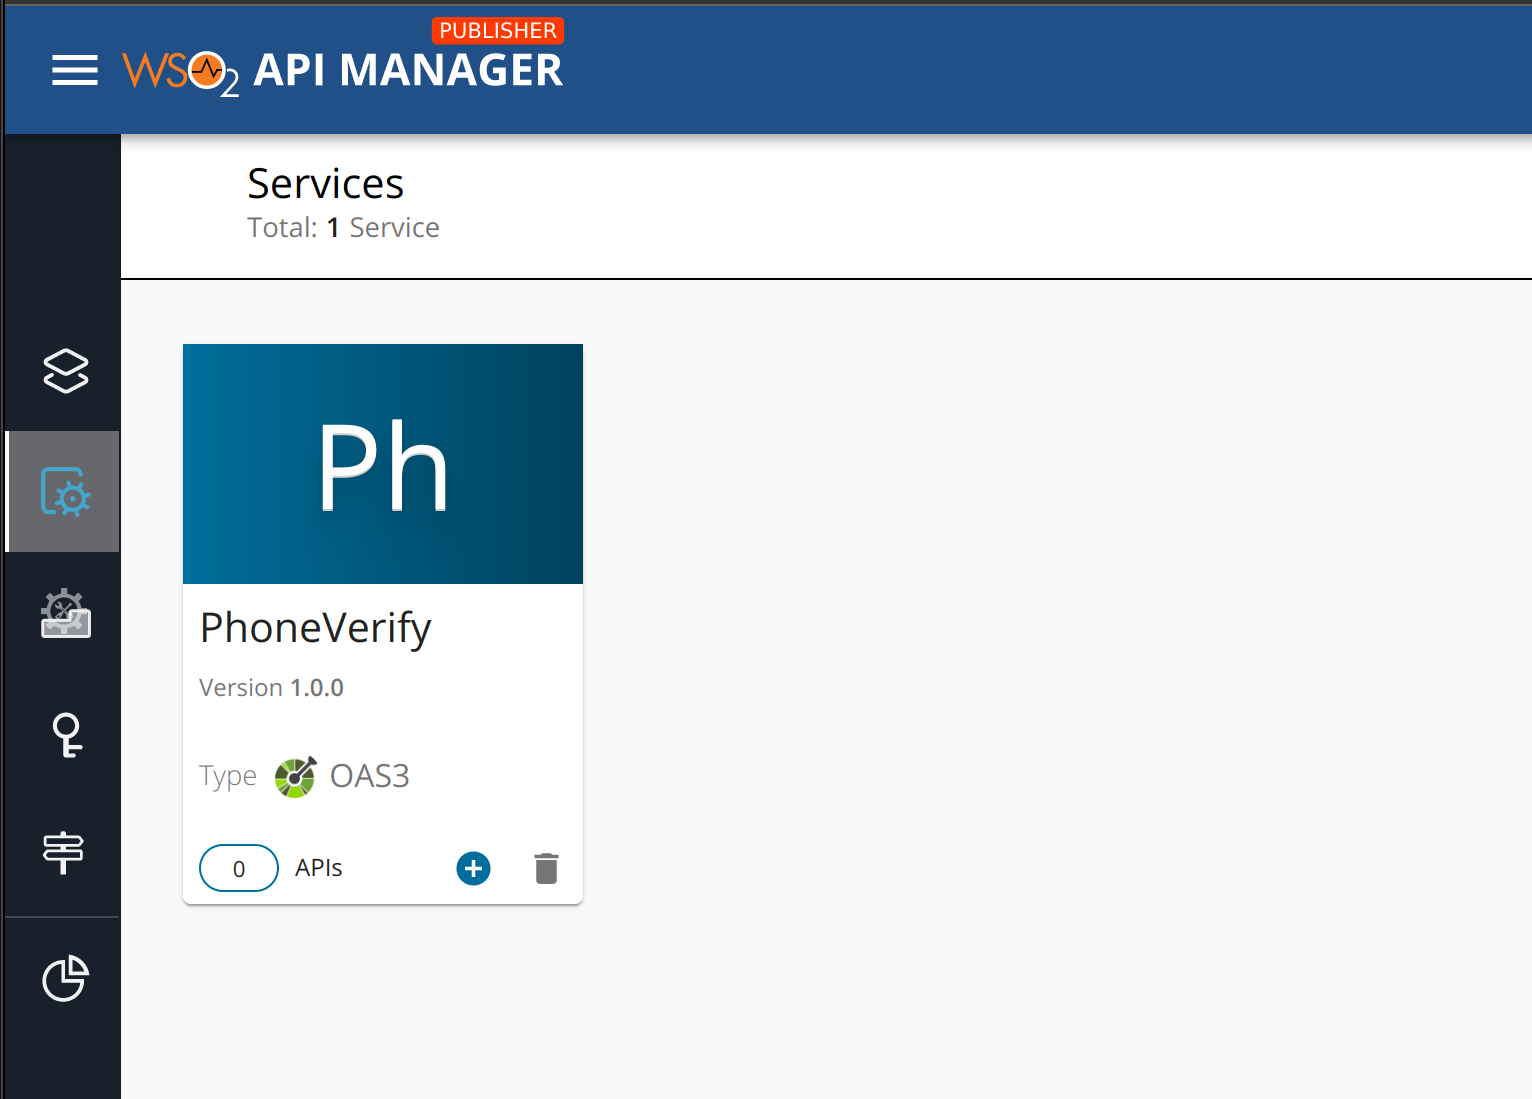
-
Click on the PhoneVerify service and then click on Create API in the next window and create the API.
Step 2 - Deploy the API using API Manager Publisher Portal
Go to the Deployments from the left side panel of the Publisher Portal and Deploy the API.
Step 4 - Publish the API using API Manager Publisher Portal
Go to the Lifecycle page from the left side panel and click on Publish button to publish the API.
Step 5 - Invoke the API Through Developer Portal
- Log in to Developer Portal via
https://localhost:9444/devportaland select the newly created API. - Navigate to the Subscriptions page and subscribe the API to the default application visible as DefaultApplication with an available Rate Limiting Policy.
- Now go to the Applications and select DefaultApplication.
- Click on Production Keys and then click Generate Keys with the default settings, to generate production keys.
- Now go back to APIs and select your API and go to Try Out section from there. In the Try Out section you can get a Test Key with the DefaultApplication for production endpoint by clicking on GET TEST KEY .
- Then you can invoke the API using the Swagger console UI that appears in the same page or you may use
cURLto invoke it. A samplecURLlooks like below.curl -X 'GET' 'https://localhost:9095/phoneverify/1.0.0/checkphonenumber?PhoneNumber=8006785432&LicenseKey=8006785432' -H 'accept: */*' -H 'Authorization: Bearer <generated_key>' -k
Via apictl for Standalone Mode
You can use WSO2 API Controller (apictl) to deploy the created REST API in Choreo Connect Gateway. The following steps will show you how to create the apictl project, deploy it on the Choreo Connect Gateway, and invoke it using a test token.
Before you begin
Download and initialize apictl and Choreo Connect is up and running in standalone mode.
The following steps will show you how to create the apictl project, deploy it on the Choreo Connect Gateway, and invoke it using a test token.
Step 1 - Initialize the apictl project
Use the follwing command to initialize the apictl project.
apictl init PhoneVerify --oas http://localhost:8290/PhoneVerify?swagger.json
Note
The Swagger URL http://localhost:8290/PhoneVerify?swagger.json is used to get the Swagger definition of the deployed integration service in previous steps. You may read more details on this from Using Swagger Documents.
Step 2 - Deploy the API
Execute the following commands to get your API project deployed in Choreo Connect.
-
Add a Choreo Connect Environment to
apictl.apictl mg add env dev --adapter https://localhost:9843 -
Log in to the Choreo Connect Environment in
apictl.apictl mg login dev -u admin -p admin -k -
Deploy the API.
apictl mg deploy api -f PhoneVerify -e dev -k
Note
More details on the above commands can be found in the Managing Choreo Connect page under CI/CD documentation.
Step 3 - Invoke the API
After the APIs are deployed in Choreo Connect, you can invoke an API with a valid access token.
Let's use the following command to generate a JWT to access the API and set it to the variable TOKEN.
TOKEN=$(curl -X POST "https://localhost:9095/testkey" -H "Authorization: Basic YWRtaW46YWRtaW4=" -k -v)
Info
Refer Enforcer Test Key Authentication to learn more on test key generation.
Execute the following cURL command to invoke the API using the access token.
curl -X 'GET' 'https://localhost:9095/phoneverify/checkphonenumber?PhoneNumber=8006785432&LicenseKey=8006785432' -H "Authorization: Bearer $TOKEN" -k -v