WSO2's Centralized API Management: The Single Control Plane for Multiple Gateways
Introduction
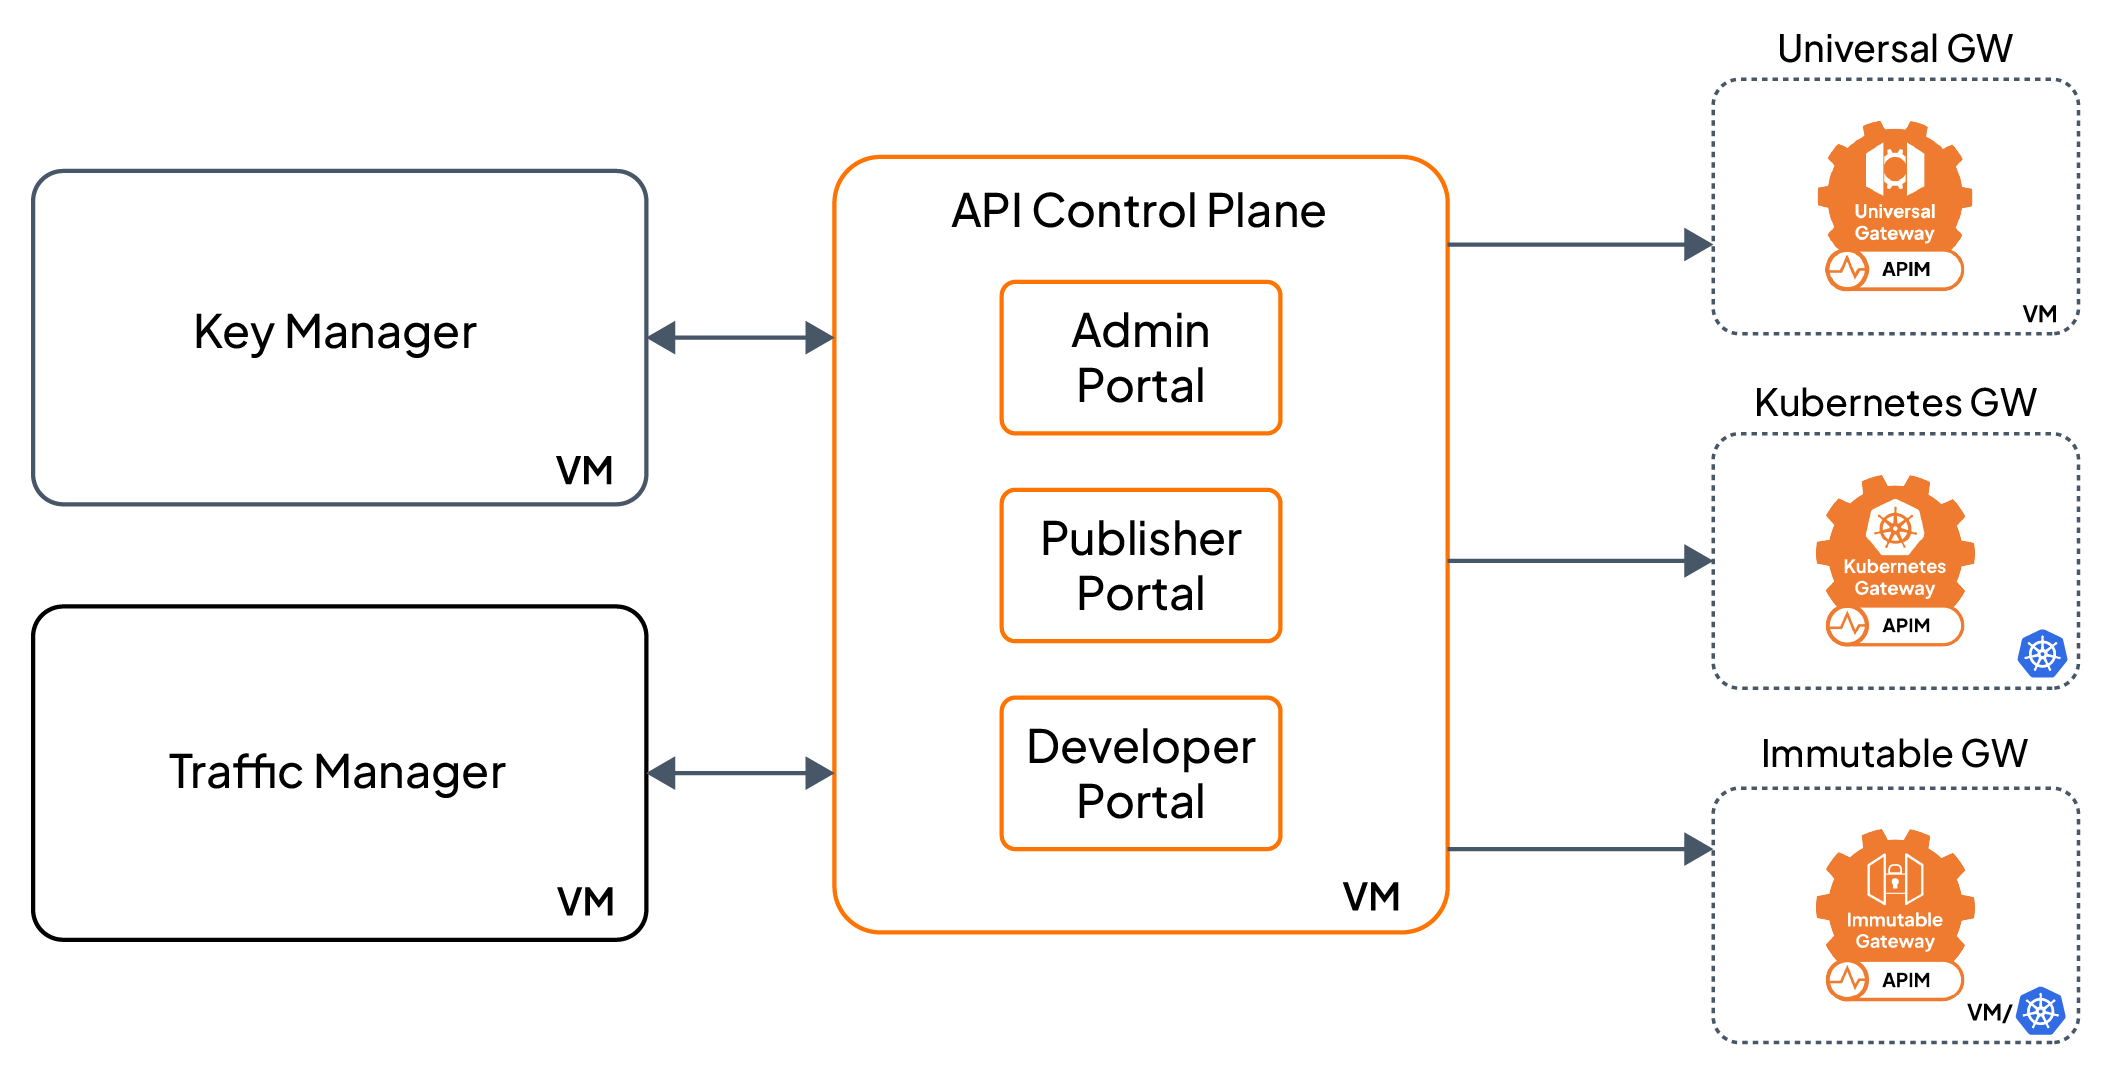
WSO2 API Manager’s architecture comprises the control plane (CP), gateway (GW), and traffic manager (TM). This post outlines how a single control plane can be used to manage multiple gateways.
An API control plane (ACP) serves as the central administrative layer in an API management system. It empowers administrators and operators to configure, monitor, and govern APIs throughout the ecosystem. Functioning as the system's core intelligence, the control plane defines and enforces policies, oversees lifecycle management, and handles comprehensive API monitoring, security, and analytics. Unlike the data plane (API gateways), the control plane does not process API requests or execute API logic. Instead, its focus lies in configuration, deployment, monitoring, and governance, while the gateways manage API traffic and enforce configurations at runtime.
In WSO2 API Manager, the control plane consists of the following:
- API Publisher: Used for API creation, configuration, and publishing.
- Developer Portal: A portal for developers to find and subscribe to APIs.
- Key Manager: Enforces security policies by managing OAuth, JWT tokens, and API key validation.
- API Analytics: Gathers data on API usage, traffic, and user interactions.
- Admin Console: Offers administrative control for API configurations, monitoring, and governance.
These components work together in a single control plane to enable centralized API management and policy enforcement. The control plane communicates with the API gateways (the execution plane) to deploy API definitions, propagate policies, and monitor performance.
In WSO2 API Manager, the API gateway is a critical component responsible for handling the actual API traffic. It serves as the execution layer where API requests are routed to backend services, and various policies such as authentication, rate limiting, caching, transformation, and logging are applied. WSO2 API Manager provides different types of gateways to accommodate various deployment scenarios and use cases.
Here are the three main API gateways in WSO2 API Manager:
- Classic Gateway (Universal): This is the default, core API gateway that handles all incoming API traffic, processes requests according to policies defined in the control plane (like API security, throttling), and routes requests to backend services. The Classic Gateway is typically deployed as a standalone gateway in a single environment or as part of a larger distributed system in multiple regions or data centers.
- Kubernetes Gateway: The cloud native gateway deployment option is designed for Kubernetes environments. It integrates with cloud native platforms, such as Kubernetes clusters, and leverages containers to manage API gateway deployments.
- Immutable Gateway: The WSO2 Microgateway is a lightweight, low-latency API gateway designed specifically for microservices-based architectures. It is designed to be used in environments where APIs are deployed in containerized or serverless setups. It is typically deployed as part of a microservices architecture where each service has its own gateway, running in isolated environments or as sidecars to microservices.
For details on selecting the appropriate self-managed WSO2 API Gateway, refer to the Choosing the Right Self-Managed WSO2 API Gateway for Your Needs. This tutorial will offer a comprehensive guide for each gateway, explaining how to utilize the API control plane (ACP) to manage APIs deployed within them.
WSO2’s Single Control Plane for Multiple Gateways
A platform engineer must be able to manage APIs from a single WSO2 API Manager control plane. These APIs should be exposed through various gateway types (Classic, Kubernetes, and Immutable). This capability will enable support for diverse deployment targets, such as VMs, containers, and cloud native environments.
This setup enables:
- Centralized API publishing and governance.
- Deployment to multiple execution environments (on-prem, cloud native, and containerized).
- Fine-grained control over exposure of APIs based on organizational or infrastructure needs.
- Agility and scalability through appropriate use of each gateway type.
| Requirement | Description |
|---|---|
| Single Control Plane | All APIs are managed via one publisher, developer portal, and key manager. |
| Multiple Gateway Types | APIs can be deployed to Classic, Kubernetes-based, and Immutable gateways. |
| Environment-Specific API Deployment | Publishers can target APIs to specific environments. The gateway environments can be there per region, cloud, etc. |
| Seamless Integration | Gateways sync API runtime data from the control plane. |
| Security | OAuth2/JWT validation works consistently across all gateways. |
| Extensibility | Each gateway can be scaled or updated independently. |
Consider a deployment scenario within a complex enterprise architecture where multiple API gateways are strategically positioned to manage diverse traffic flows and enforce specific security policies.
In this scenario, we have identified three distinct APIs: the HR System API, responsible for accessing and managing human resources data; the Product Catalog API, providing access to the organization's product information; and the Compliance Report API, which generates and disseminates necessary compliance documentation. Based on varying business needs, traffic patterns, and regional requirements, each of these APIs is deployed independently and redundantly across several geographically distributed API gateways.
For instance, the HR System API, handling sensitive employee data, might be deployed on gateways located within specific secure network zones. The Product Catalog API, serving a high volume of customer requests, could be replicated across multiple edge gateways for optimal performance and availability. Similarly, the Compliance Report API might reside on gateways closest to the regulatory bodies or internal departments that require access to these reports.
This distributed deployment model ensures localized traffic management, enhanced security by perimeter isolation, improved fault tolerance, and scalability to handle varying loads for each API independently.
| Gateway Type | Consuming Systems | Example API | API Name |
|---|---|---|---|
| Classic | Legacy internal apps | HR System API | HRSystemAPI |
| Kubernetes | Cloud-native services | Product Catalog API | ProductCatalogAPI |
| Immutable | Offline or secure zones | Compliance Report API | ComplianceReportAPI |
Let's explore deploying the aforementioned APIs to each gateway now.
Setting Up Backends for the APIs
These are sample backend implementations for Product Catalog API, HR System API, and Compliance Report API using Node.js with Express and an in-memory array for storage. The backend services for the HR System API and the Compliance Report API will be exposed as local services, while the backend service for the Product Catalog API will be exposed via Rancher Desktop, which makes it accessible via an external IP.
Click the link to install Node.js and the npm command line interface.
First, deploy the backend service for the Product Catalog API following the steps given below.
- Download and save the files in the product-catalog-backend folder to the product-catalog-backend folder locally.
- Navigate to the product-catalog-backend folder via a terminal.
-
Execute the following command to build the Docker image locally.
docker build -t product-api:latest . -
Load the image into Kubernetes (Rancher Desktop). Since Rancher Desktop shares the Docker runtime, your image is already available to Kubernetes. Just apply the YAML.
kubectl apply -f deployment.yaml -n apk -
Verify everything is running correctly.
kubectl get pods
kubectl get svc
The product-api-service will be running at http://product-api-service:80.
Next, deploy the backend services for HR System API and Compliance Report API following the steps given below.
-
Download and save hr-api.js and compliance-api.js files.
-
Then run the following commands in a terminal to start the hr-api and compliance-api backend services.
npm init -y
npm install express
nvm install 18
nvm use 18
node hr-api.js
node compliance-api.js
The backend servers will be running at http://localhost:3500/reports, and http://localhost:4000/employees.
Setting Up the API Control Plane and Classic Gateway
Download the WSO2 API Manager Enterprise Package from the WSO2 API Manager downloads page for API control plane, traffic manager, and Classic Gateway components.
Set up API control plane (ACP), traffic manager (TM), and Classic Gateway servers locally by performing the relevant configuration changes in the PRODUCT_HOME/repository/conf/deployment.toml files.
In this setup, a mysql server will be used when creating databases. Follow Changing to MySQL to setup and configure shared_db and apim_db databases (shared_db is the database that stores registry and user management data and apim_db is the database that keeps API-M related data).
Since Rancher Desktop will be used to run the Kubernetes cluster for the Kubernetes Gateway, and it occupies port 9443, we need to avoid port conflicts when running other components locally. To do this, we use port offsets in the deployment.toml file of each component.
The port offset is added to the base port (9443) to calculate the final port used by each component:
- Offset 0 - uses port 9443 (default)
- Offset 1 - uses port 9444
- Offset 2 - uses port 9445
- Offset 3 - uses port 9446
These offsets will be applied when configuring the ACP, traffic manager, and Classic gateway to ensure each runs on a unique, non-conflicting port. So, ACP will be offset by 1, traffic manager will be offset by 2, and Classic gateway will be offset by 3.
You can find the deployment.toml files at ACP, TM, and Classic Gateway links.
Once the configuration changes are done, start the servers as given below.
Navigate to <Home>/bin in the API Control Plane component and start the server as below.
On MacOS/Linux:
sh api-cp.sh
On Windows:
api-cp.bat --run
Similarly, navigate to <Home>/bin in the traffic manager component and start the server as below.
On MacOS/Linux:
sh traffic-manager.sh
On Windows:
traffic-manager.bat --run
Finally, navigate to <Home>/bin in the Classic Gateway component and start the server as below.
On MacOS/Linux:
sh gateway.sh
On Windows:
gateway.bat --run
Create API Proxies for the Backend APIs
Create and deploy the HR System API as shown below (follow the steps in Create a REST API from an OpenAPI Definition - WSO2 API Manager Documentation for more information if needed) .
- Login to the publisher portal via
https://localhost:9444/publisher - Click Create API and then click Import OpenAPI.
- Select OpenAPI Archive/File option and drag and drop or click Browse File to Upload to upload the HRSystemAPI.json definition file (save the file locally and upload).
-
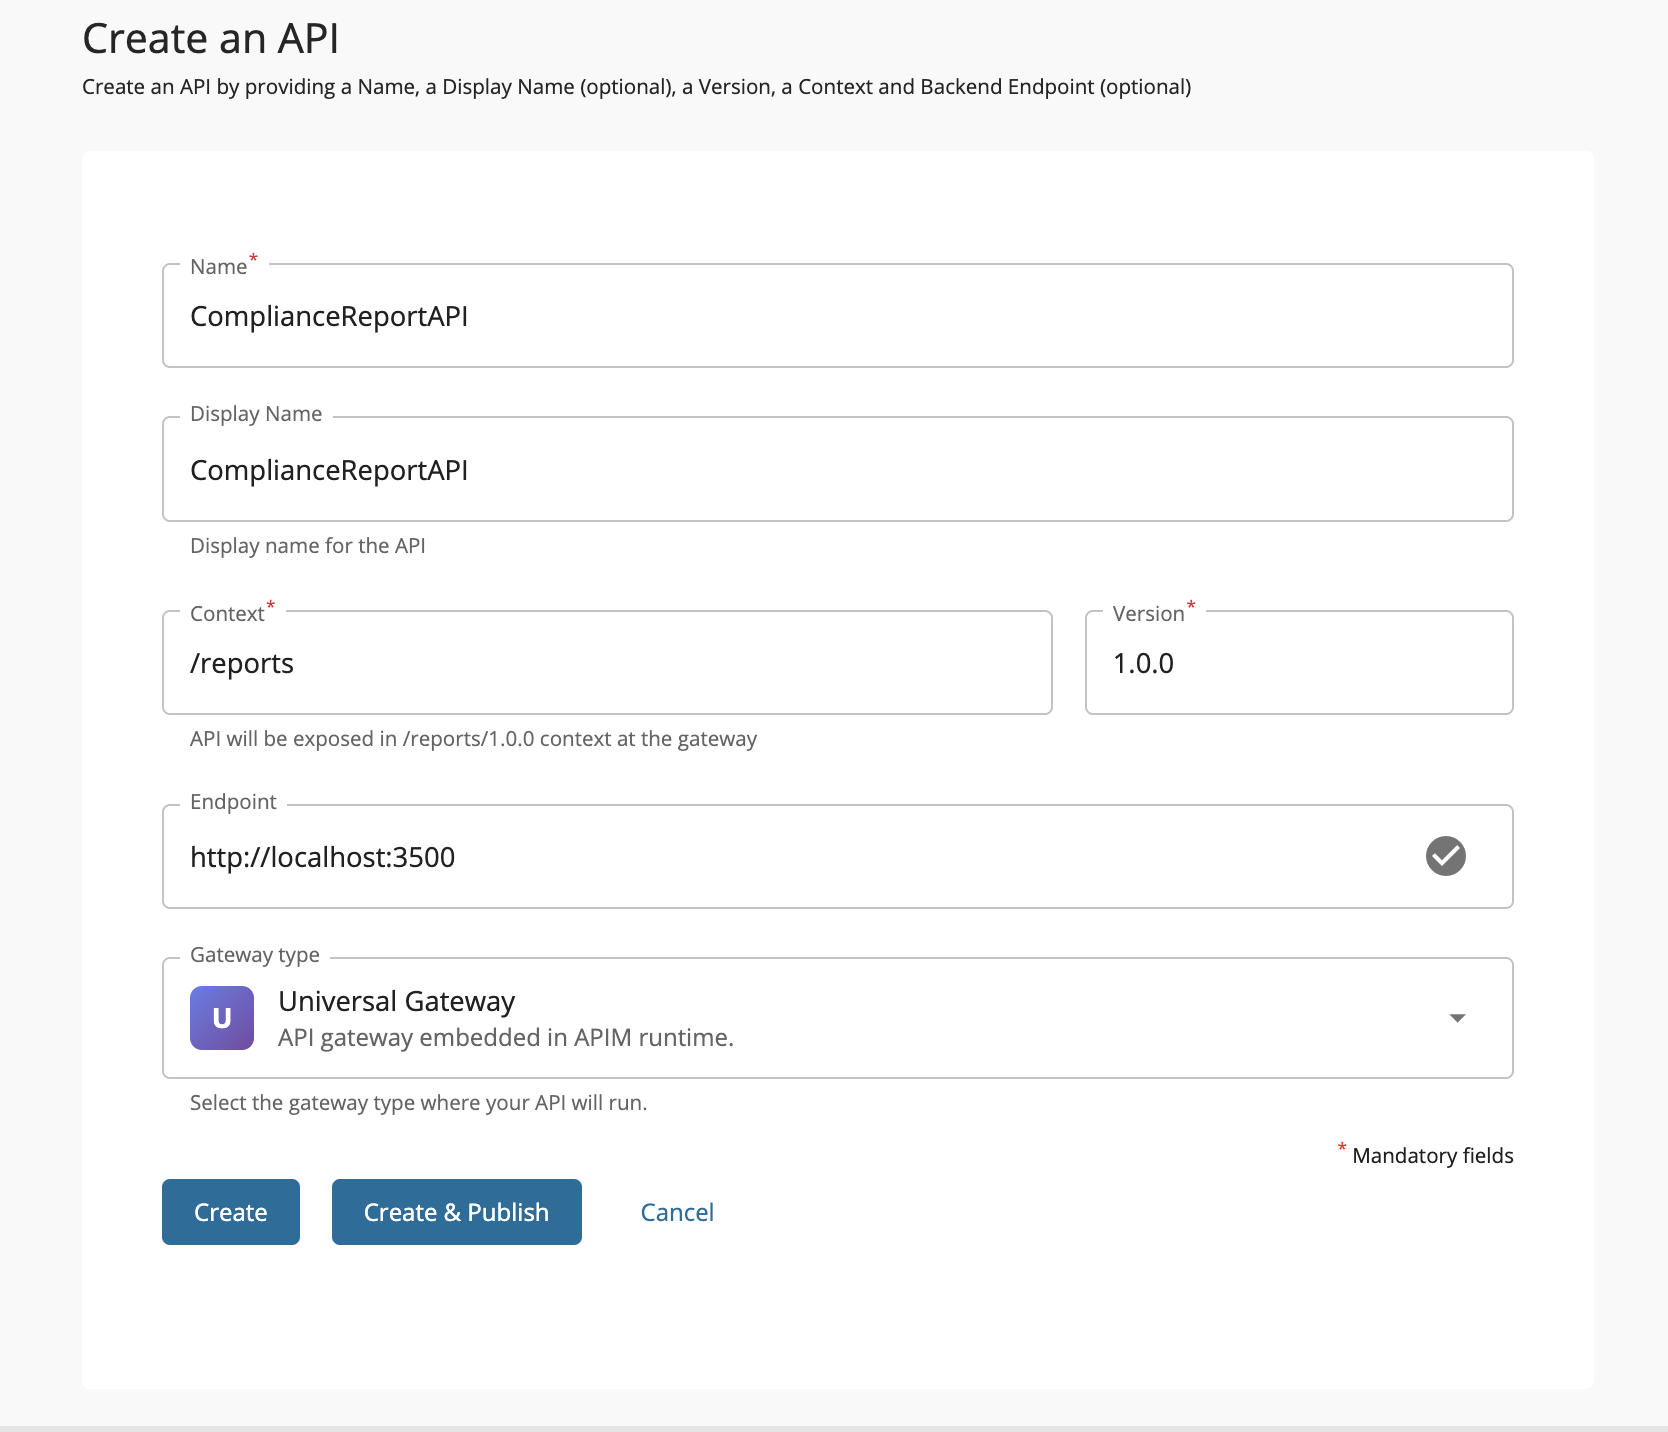
Edit the information as given below and click Create.

-
Note that the Gateway type is selected as Universal Gateway here.
-
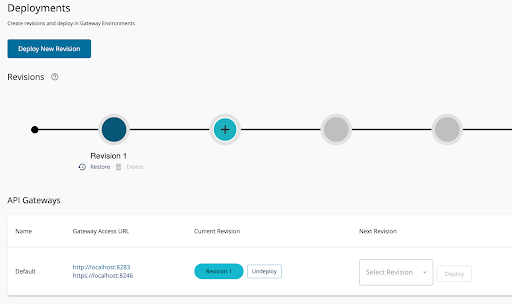
Once created, go to Deploy -> Deployments and deploy the API.
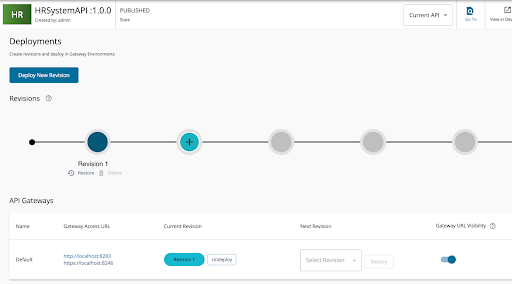
-
Finally navigate to Lifecycle and click the Publish button to publish the API.
- Navigate to the developer portal via
https://localhost:9444/devportal/and click APIs from the top menu. -
You will see the published HRSystemAPI as below in the developer portal.
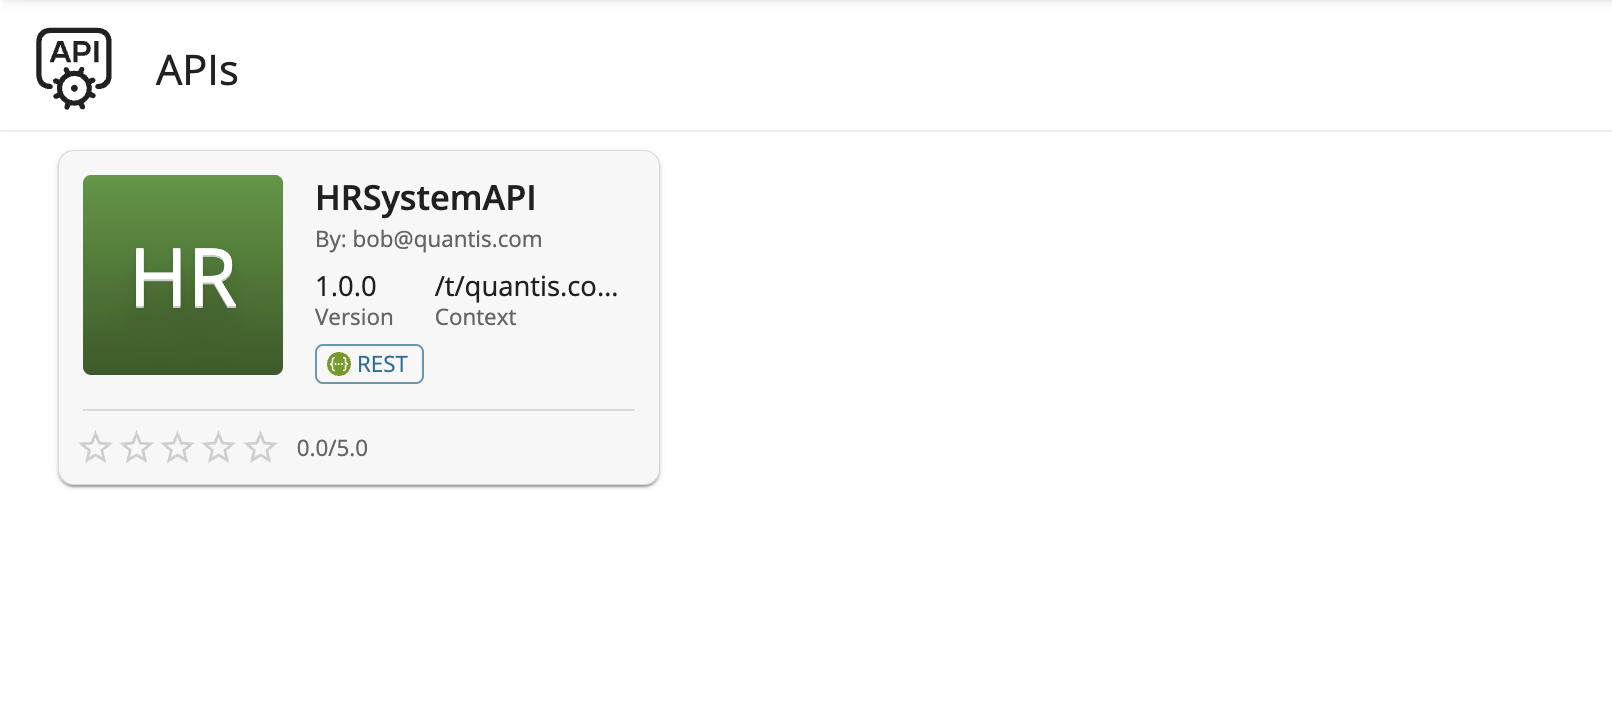
You have successfully published the HRSystemAPI to the Classic Gateway now.
Next let’s see how to publish an API to the Kubernetes Gateway.
Setting Up API Control Plane and Kubernetes Gateway
Make sure to complete the Kubernetes Gateway prerequisites first.
Configure APK in Kubernetes Cluster as explained in APK as Gateway in APIM Deployment Patterns as below.
-
Create Kubernetes namespace.
kubectl create ns apk -
Add a hostname mapping to the /etc/hosts file as follows.
127.0.0.1 default.gw.wso2.com -
Create a new helm repository with the latest Kubernetes Gateway release using the following command. Let’s consider the
as wso2apk. helm repo add wso2apk https://github.com/wso2/apk/releases/download/1.3.0 -
Execute the following command to update the helm repositories.
helm repo update -
Install the Kubernetes Gateway components and start WSO2 API Platform For Kubernetes. Consider apk as the
for this guide. As the --version of this command, use the version of the release you used in point 3 above. It will take a few minutes for the deployment to complete. helm install apk wso2apk/apk-helm --version 1.3.0 -f https://raw.githubusercontent.com/wso2/apk/main/helm-charts/samples/apk/1.3.0-cp-enabled-values.yaml -n apk -
Create a new helm repository with the latest kubernetes gateway agent release using the following command. Let’s consider the
as wso2apkagent for this guide. helm repo add wso2apkagent https://github.com/wso2/product-apim-tooling/releases/download/1.3.0 -
Execute the following command to update the helm repositories.
helm repo update -
Create a file named
values.yamllocally and add the following configurations. This will be used as the values.yaml for the Kubernetes Gateway Agent Helm Chart.wso2: subscription: imagePullSecrets: "" replicaCount: 1 image: repository: wso2/apim-apk-agent tag: 1.3.0 pullPolicy: Always service: name: apim-apk-agent-service resources: requests: memory: "128Mi" cpu: "100m" limits: memory: "256Mi" cpu: "200m" controlPlane: enabled: true serviceURL: https://host.docker.internal:9444/ username: admin password: admin environmentLabels: Kubernetes skipSSLVerification: true eventListeningEndpoints: amqp://admin:[email protected]:5673?retries='10'&connectdelay='30' internalKeyIssuer: https://localhost:9444/oauth2/token dataPlane: enabled: true k8ResourceEndpoint: https://apk-wso2-apk-config-ds-service.apk.svc.cluster.local:9443/api/configurator/apis/generate-k8s-resources namespace: apk metrics: enabled: false agent: mode: CPtoDP certmanager: enabled: false serviceAccount: enableServiceAccountCreation: true enableClusterRoleCreation: true serviceAccountName: wso2agent-platform roleName: wso2agent-role -
Install the Kubernetes Gateway Agent components to start WSO2 API Platform For Kubernetes (APK). Consider apk as the
for this guide. As the --version of this command, use the version of the release you used in point 3 above and use the changed values.yaml you used above. It will take a few minutes for the deployment to complete. helm install apim-apk-agent wso2apkagent/apim-apk-agent --version 1.3.0 -f <path-to-values.yaml> -n apk -
Verify the deployment.
kubectl get pods -n apk
Next, configure API Control Plane (ACP) for APK following API Manager Control Plane - Kubernetes Gateway 1.3.0 as shown below to additionally add the Kubernetes gateway configurations to the same ACP configured in the previous section (Note that you do not have to download or setup an ACP again, as the same ACP will be used for this and adding only the following configurations to the deployment.toml would be sufficient).
[[apim.gateway.environment]]
name = "Kubernetes"
type = "hybrid"
gateway_type = "APK"
provider = "wso2"
display_in_api_console = true
description = "This is a hybrid gateway that handles both production and sandbox token traffic."
show_as_token_endpoint_url = true
service_url = "https://localhost:${mgt.transport.https.port}/services/"
username= "${admin.username}"
password= "${admin.password}"
http_endpoint = "http://default.gw.wso2.com:9090"
https_endpoint = "https://default.gw.wso2.com:9095"
Find the latest deployment.toml of the ACP with the above configurations in final-acp-ceployment.toml.
Alternatively, you have the option to add the Kubernetes gateway related configurations via the Admin portal as explained below instead of modifying the deployment.toml file of the ACP.
- Navigate to
https://localhost:9444/adminand click Gateways. - Click Add Gateway Environment button.
-
Fill the Kubernetes gateway related details as below.
Note that the name assigned to the Kubernetes Gateway is determined by the value specified for environmentLabels in the
values.yamlfile used with the Kubernetes Gateway Agent Helm Chart. This label acts as an identifier for the gateway instance and is used by the system to map and manage the gateway. Ensure that the environmentLabels value accurately reflects the intended name of your Kubernetes Gateway to avoid any misconfigurations or mismatches during deployment.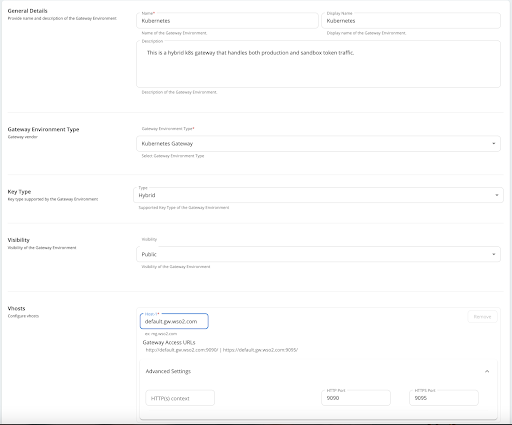
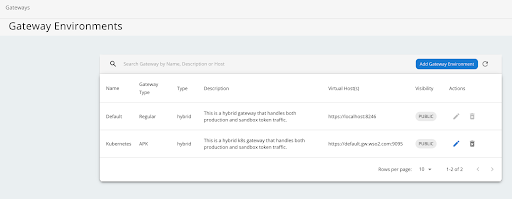
-
Click Add.
-
You will see the newly added Kubernetes gateway details in the list as below.
Create the Product Catalog API as below.
- Navigate to the Publisher portal via
https://localhost:9444/publisher. - Click Create API and then click Import OpenAPI.
- Select OpenAPI Archive/File option and drag and drop or click Browse File to Upload to upload the ProductCatalogAPI.json definition file (save the file locally and upload).
-
Edit the information as given below and click Create.
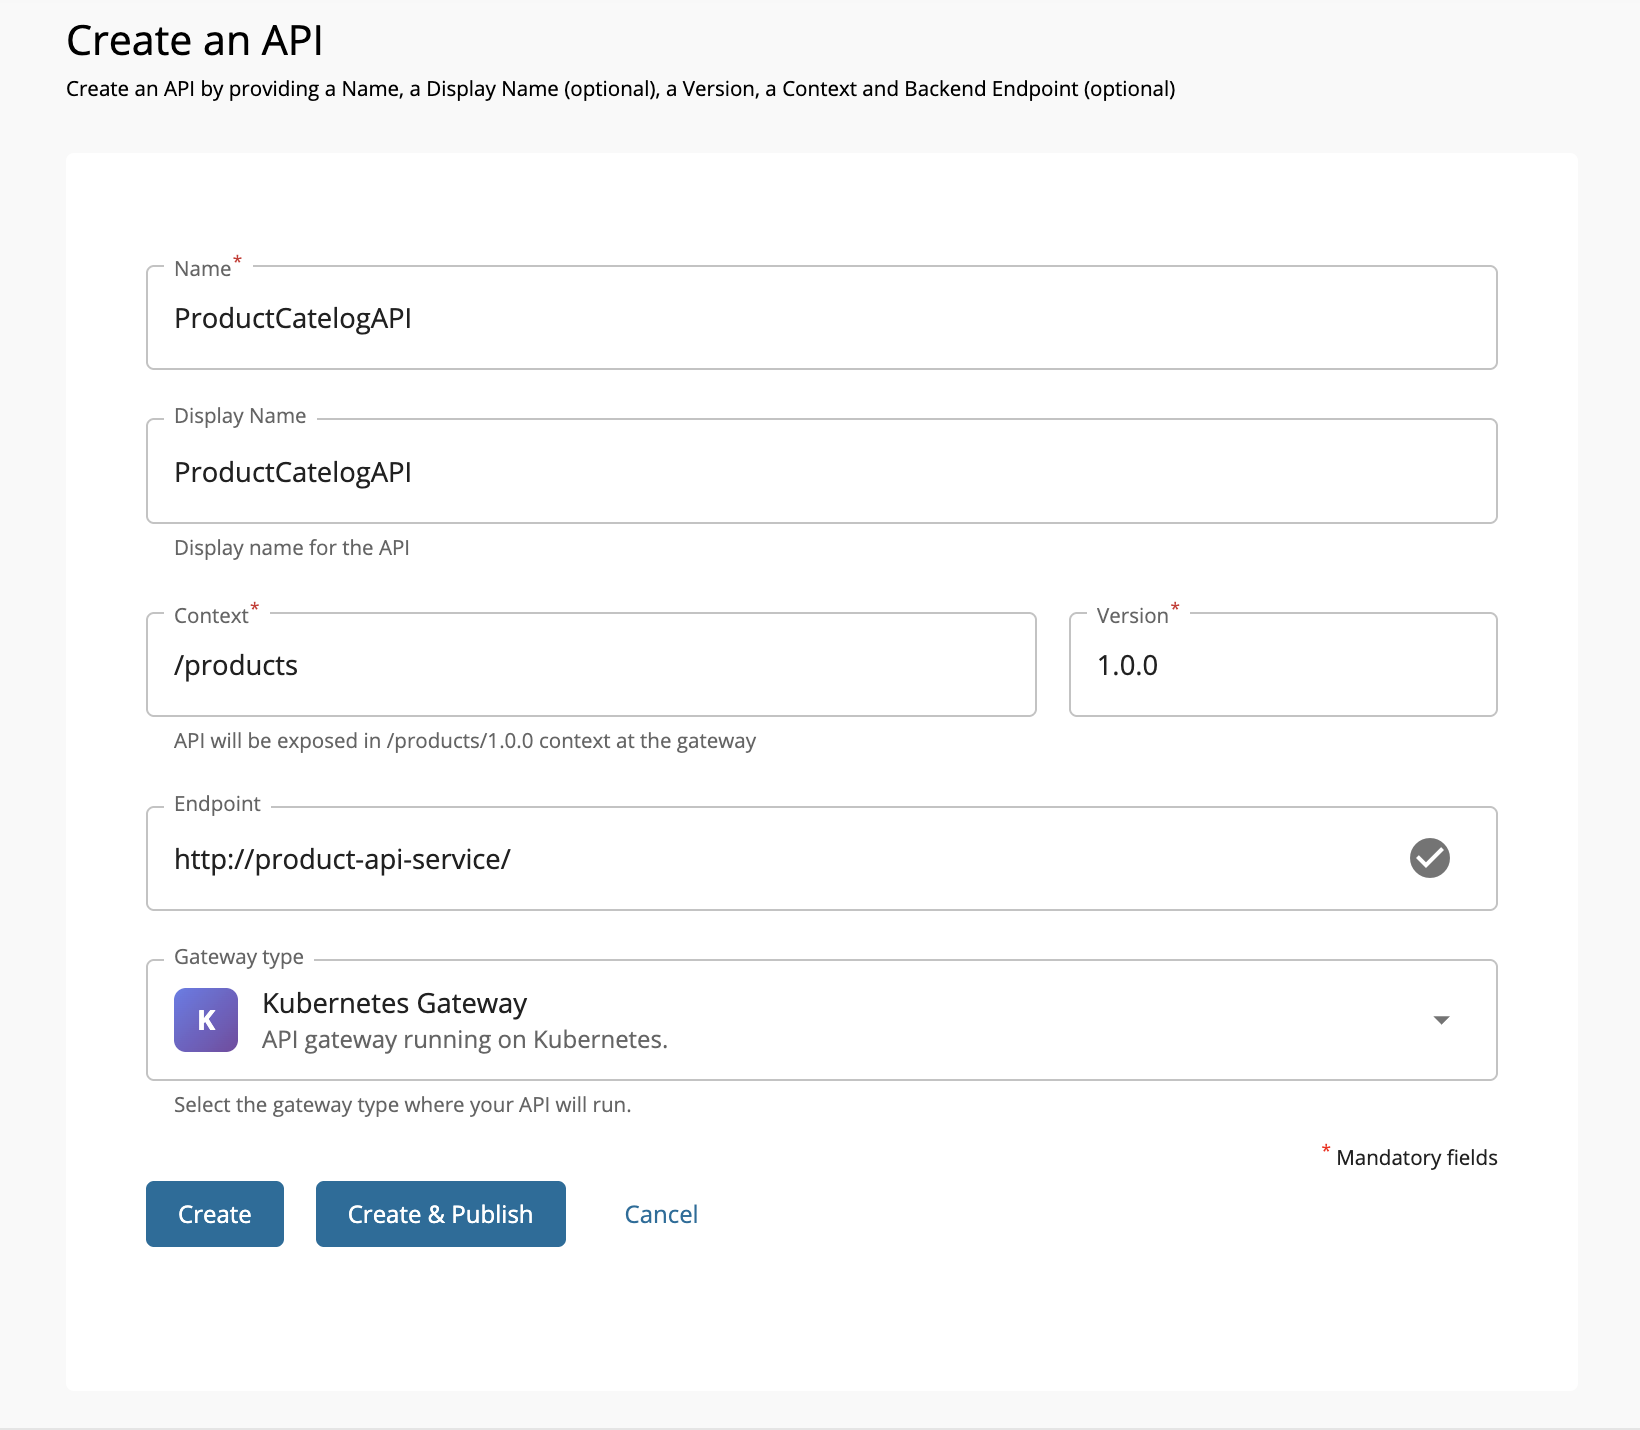
-
Note that the Gateway type is selected as Kubernetes Gateway here. Once created, go to Deploy -> Deployments and deploy the API.

-
Finally navigate to Lifecycle and click the Publish button to publish the API.
- Navigate to the Developer Portal via
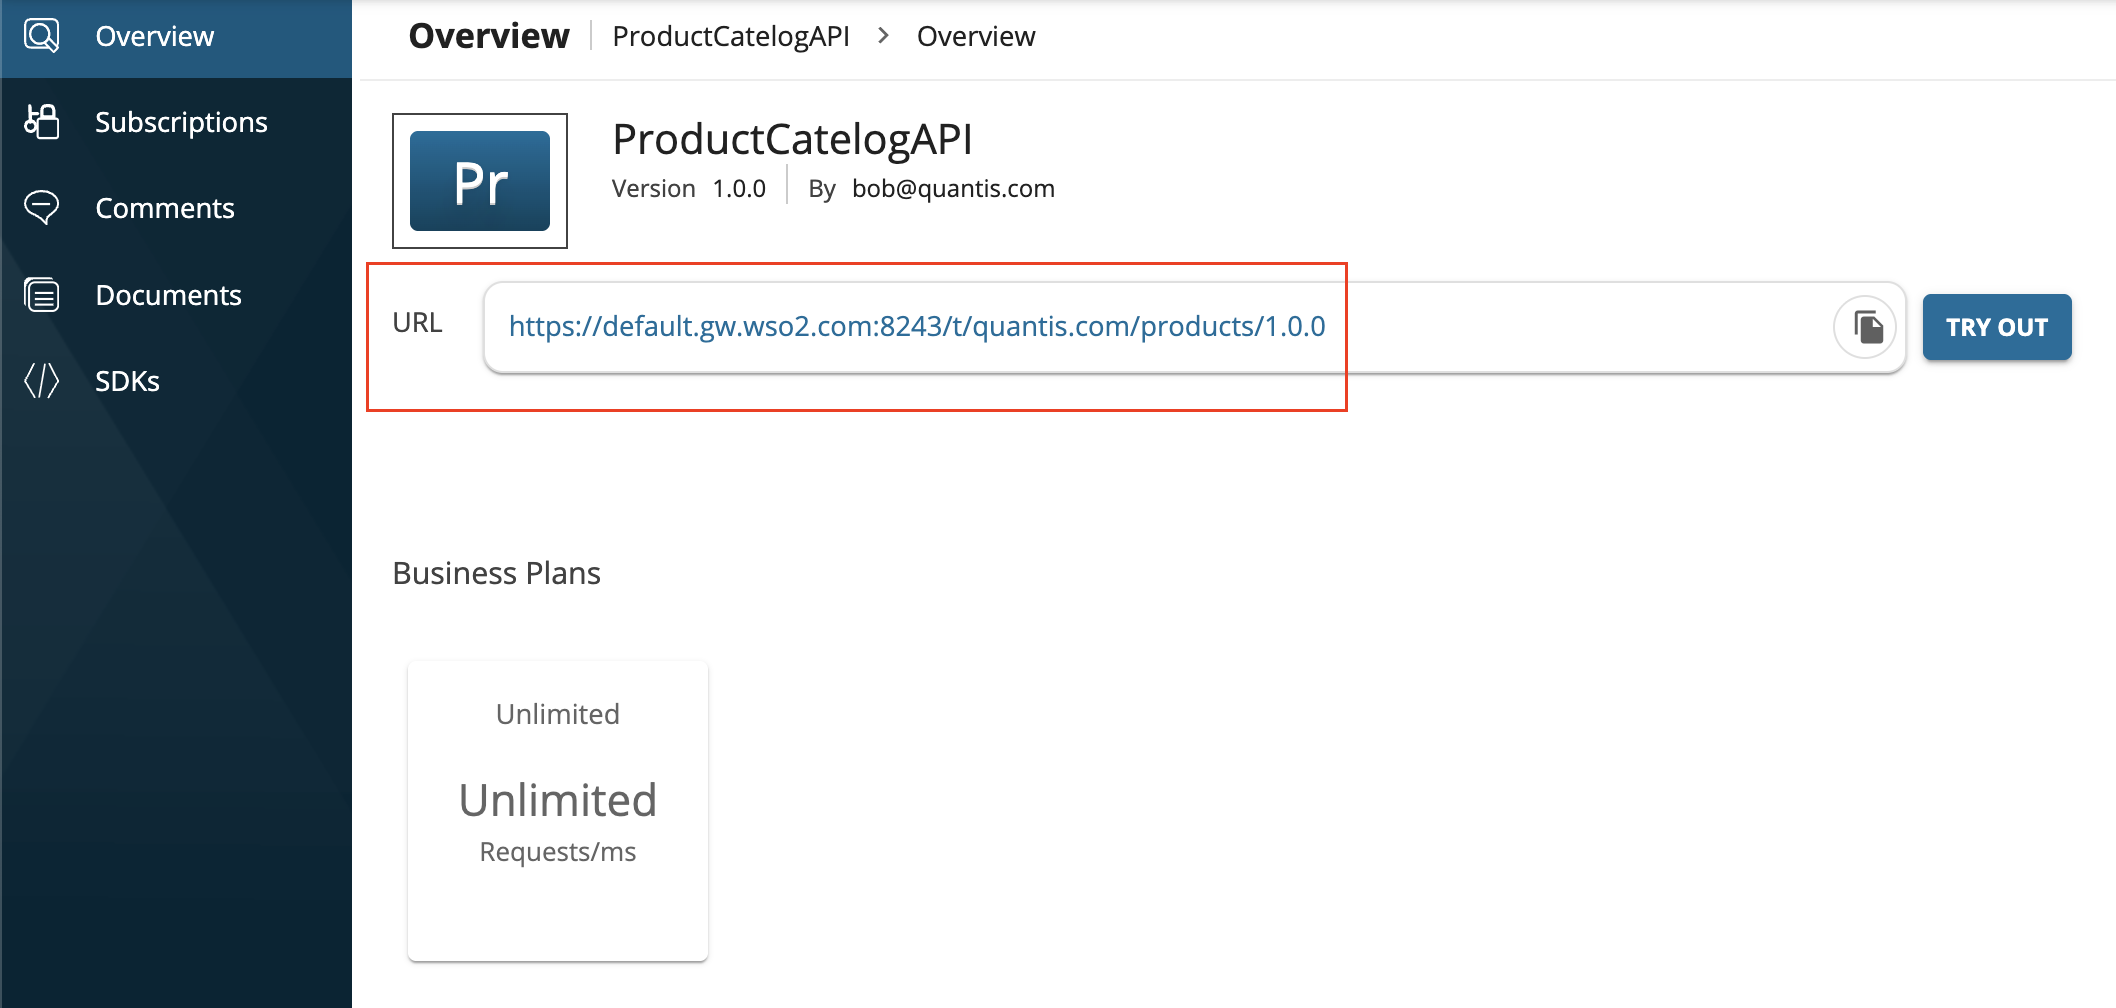
https://localhost:9444/devportal/and click APIs from the top menu. -
You will see the published ProductCatalogAPI as below in the developer portal.
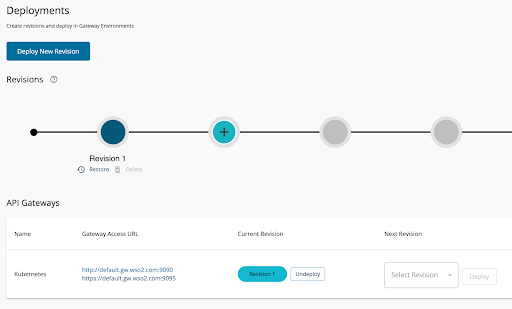
-
Verify that the ProductCatalogAPI is successfully deployed to Kubernetes Gateway by executing the following command.
kubectl get apis -n apkThe deployed API can be seen as below.

Let’s see how to publish an API to the Immutable gateway now.
Setting Up the Immutable Gateway
Follow these prerequisites to setup Microgateway Toolkit and Runtime locally.
Navigate to MGW_TOOLKIT/bin. Execute the following command to generate the project file using ComplianceReportAPI.json (save the file locally and use).
./micro-gw init compliance-report -a ComplianceReportAPI.json
This will initialize the project directory as below.
JAVA_HOME: /usr/local/Cellar/openjdk@11/11.0.27/libexec/openjdk.jdk/Contents/Home
Warning!!! Microgateway is supported only on Java 1.8. Hence JAVA_HOME is set to internal JRE
Project 'compliance-report' is initialized successfully.
(Use "micro-gw build compliance-report" after copying the api definitions)
(Use "micro-gw import compliance-report [-l]|[-a -v]" to import APIs from WSO2 API Manager)
Build the project.
./micro-gw build compliance-report
Expose the Compliance Report API via Microgateway Runtime by navigating to MGW_HOME/bin and executing the following command.
./gateway <path-to-compliance-report-jar-file>
Once executed, the API will be exposed via 9095 or 9090 ports as shown below.
JAVA_HOME: /usr/local/Cellar/openjdk@11/11.0.27/libexec/openjdk.jdk/Contents/Home
WARNING: Incompatible JRE version '11.0.27' found. This ballerina program supports running on JRE version '1.8.*'
WARNING: sun.reflect.Reflection.getCallerClass is not supported. This will impact performance.
[ballerina/http] started HTTPS/WSS listener 0.0.0.0:9096
[ballerina/http] started HTTP/WS listener 0.0.0.0:9090
2025-05-26 15:22:26,175 INFO  [wso2/gateway/src/gateway/utils] - [APIGatewayListener] [-] HTTP listener is active on port 9090
[ballerina/http] started HTTPS/WSS listener 0.0.0.0:9095
2025-05-26 15:22:26,181 INFO  [wso2/gateway/src/gateway/utils] - [APIGatewayListener] [-] HTTPS listener is active on port 9095
The same ComplianceReportAPI can be deployed in the Publisher portal as below, so that the tokens generated via the Developer portal can be used to invoke the API deployed in the Microgateway as well.
- Navigate to the Publisher portal via
https://localhost:9444/publisher. - Click Create API and then click Import OpenAPI.
- Select OpenAPI Archive/File option and drag and drop or click Browse File to Upload to upload the ComplianceReportAPI.json definition file (save the file locally and upload).
-
Edit the information as given below and click Create.
-
Note that the Gateway type is selected as Universal Gateway here as we need to get a valid token to be used while invoking the API in the Microgateway. Once created, go to Deploy -> Deployments and deploy the API.
-
Finally go to Lifecycle and click Publish to publish the API.
Manage APIs from the Control Plane
The APIs deployed in different gateways can be managed through the central API control plane as below.
The developer portal can be used for API discovery purposes for application developers. The portal is the market place where application developers can search and use APIs exposed in the Classic Gateway, Kubernetes Gateway, or microgateway. WSO2 API Manager's publisher portal centrally manages API details and tracks the lifecycle of APIs deployed on each gateway.
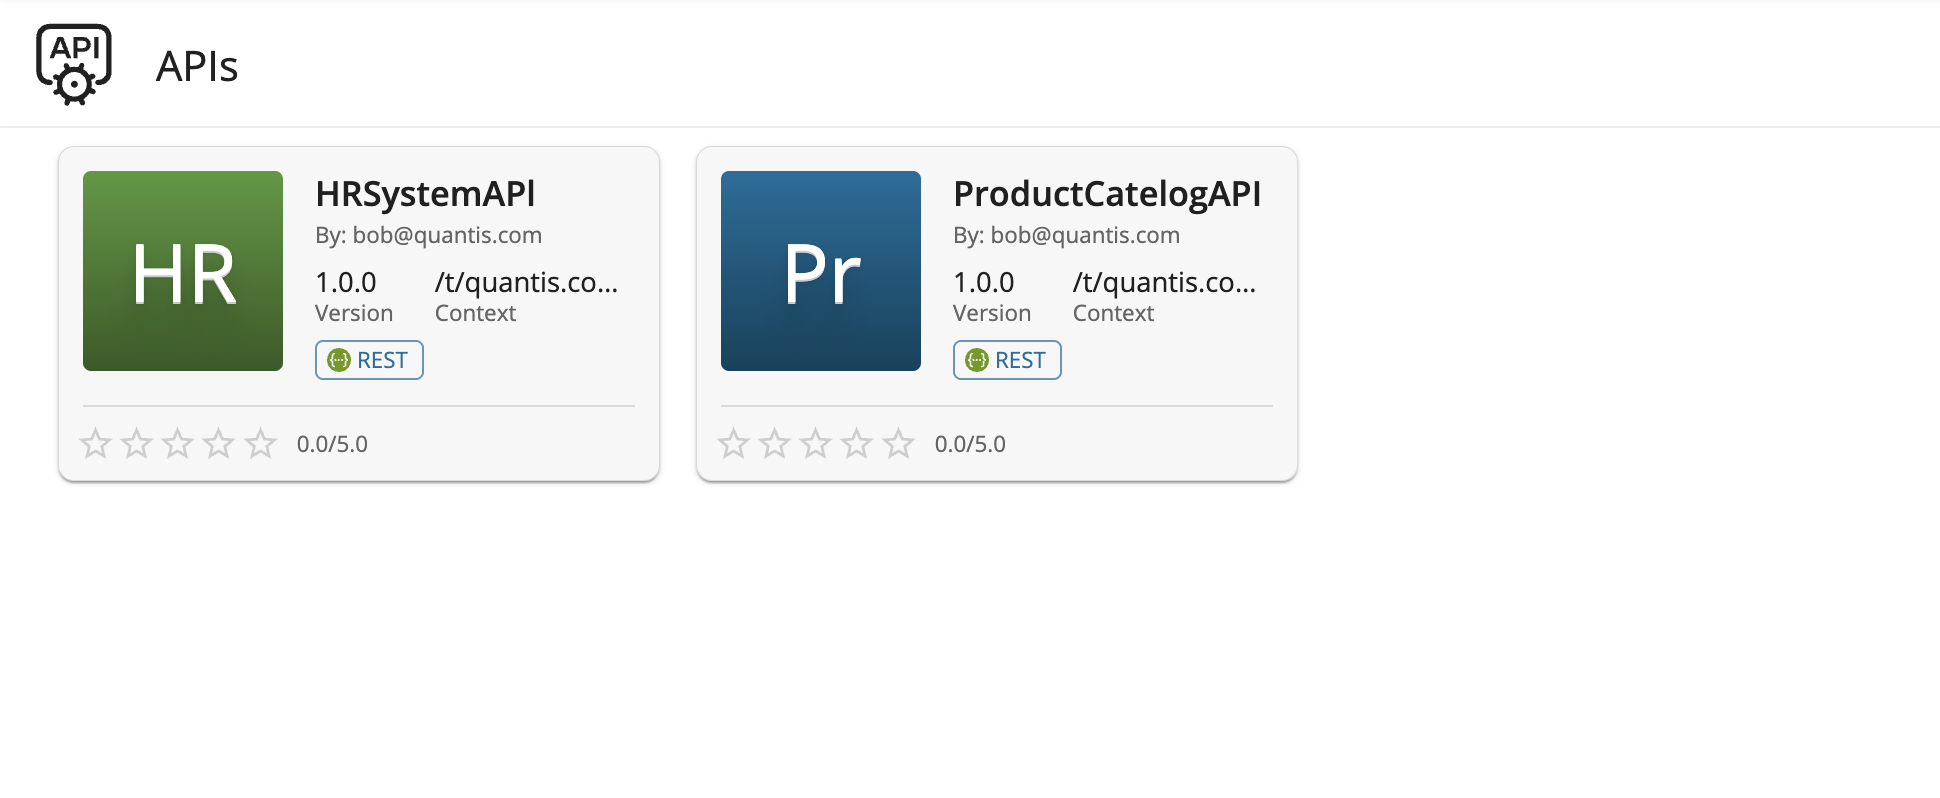
All the deployed APIs can be seen in the developer portal as below.

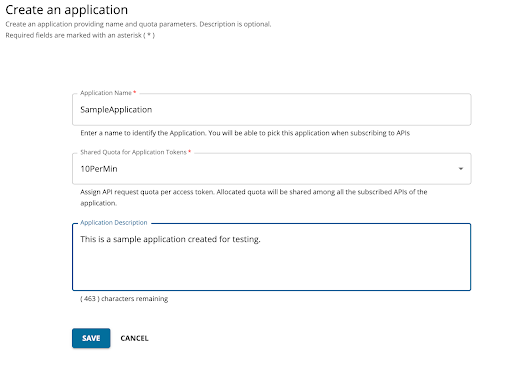
Subscribe to the 3 APIs by creating an application as below.
- Login to the Developer Portal (
https://localhost:9444/devportal). - Click on the Applications tab and then use the ADD NEW APPLICATION option.
-
Provide the information as given below and click Save.
-
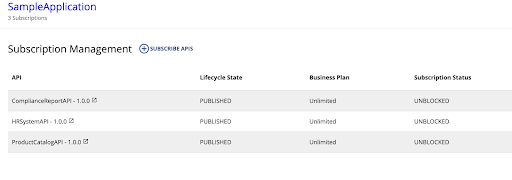
Click Subscriptions to subscribe to the created HRSystemAPI, ProductCatalogAPI, and ComplianceReportAPI.
-
Click Production Keys or Sandbox Keys based on the environment for which you need to generate keys. Let's assume that you are working in a production environment. Therefore, click Production Keys.
- Click Generate Keys to create an application Access Token with relevant scopes.
-
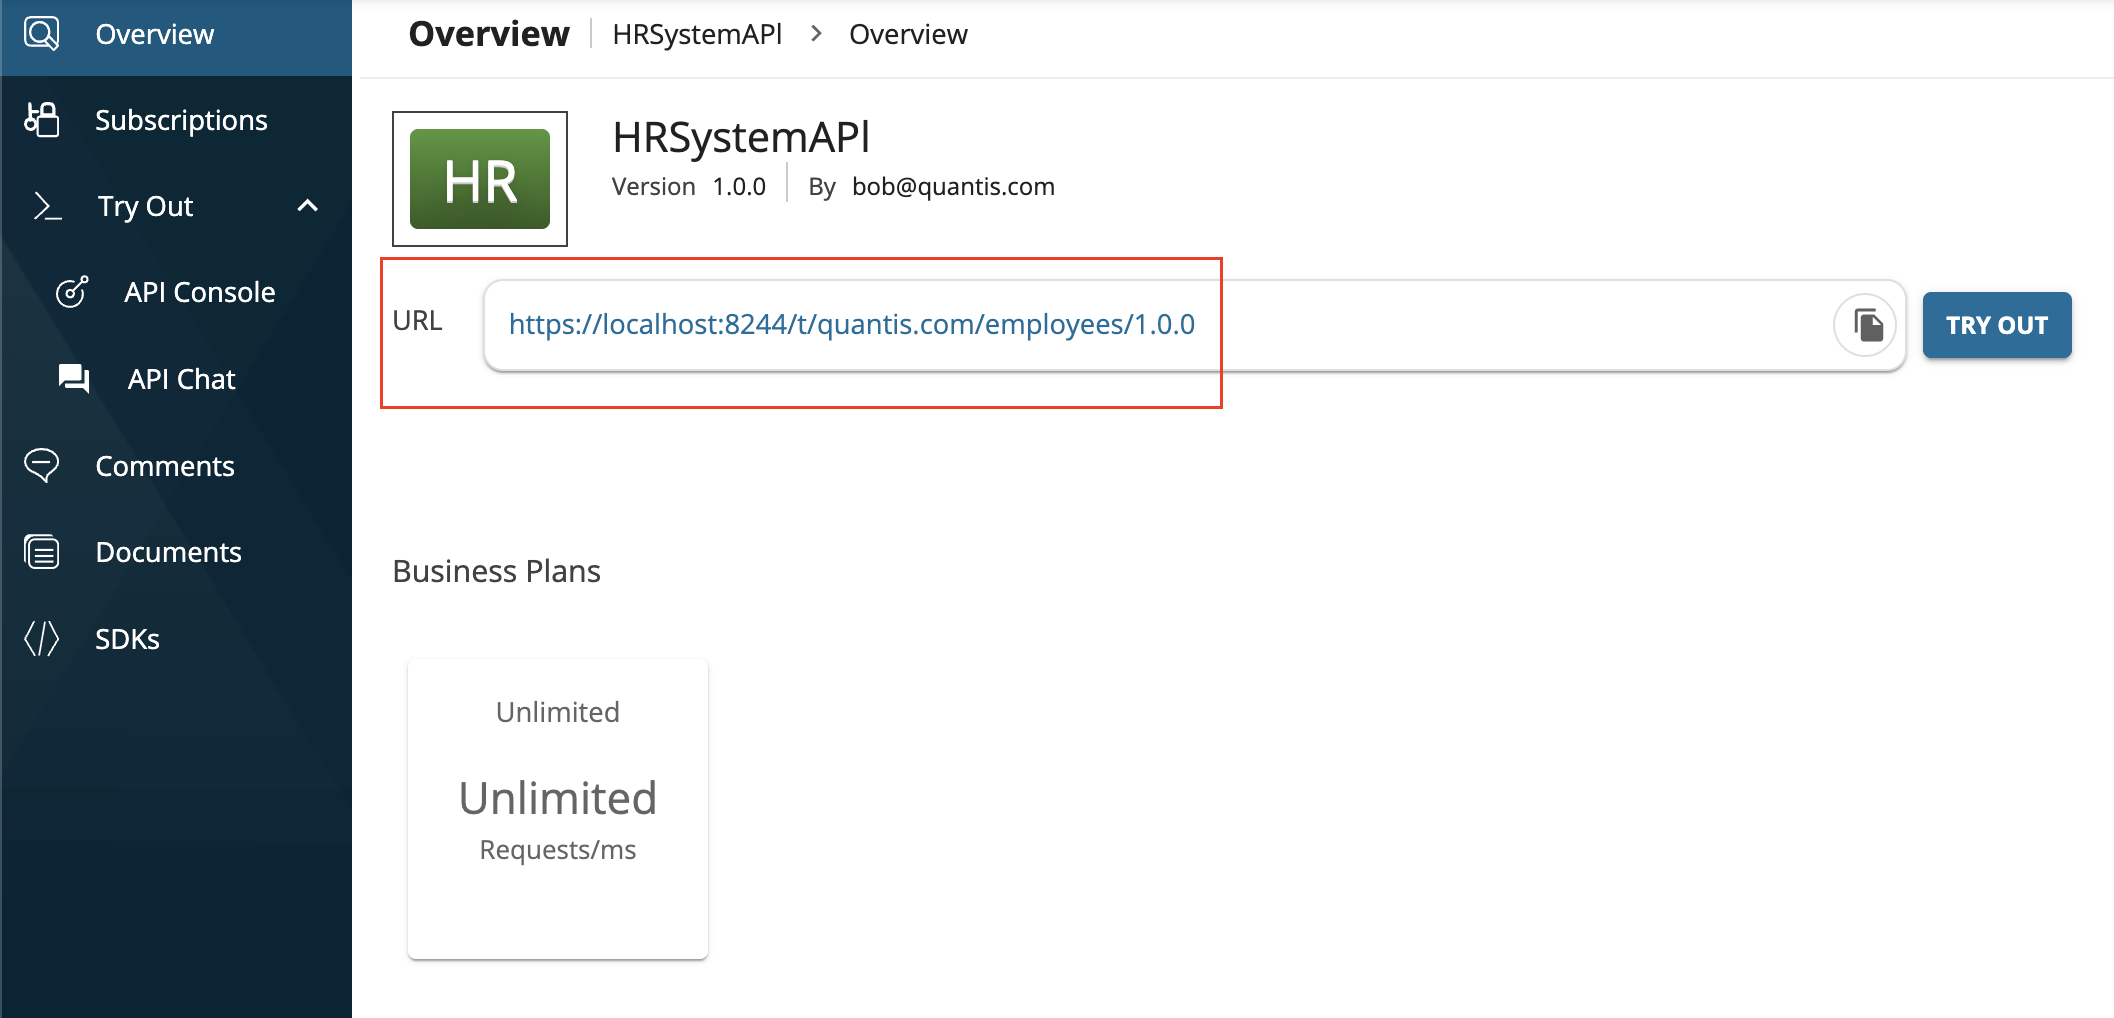
Copy the generated token and use that for invoking the APIs in the API Console tab in each API. The following image shows an example of API invocation response for the HRSystemAPI’s employees GET resource.
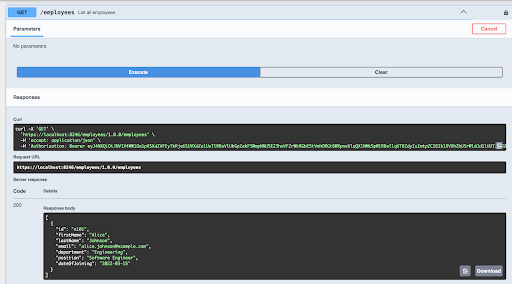
-
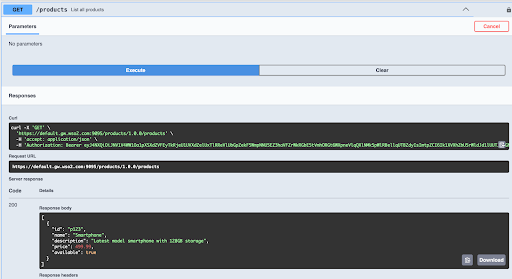
Similarly, the ProductCatalogAPI can be invoked.
-
The generated token can be used to invoke the ComplianceReportAPI deployed in the Microgateway as below.
curl -X GET "https://localhost:9095/reports/" -H "accept: application/json" -H "api_key:$TOKEN" -k
Conclusion
Using a single control plane and multiple gateways in WSO2 API Manager is a powerful strategy for managing APIs to maintain centralized control over API configurations, security policies, and monitoring. This architecture is ideal for organizations that need to manage APIs across multiple regions or environments and require a high level of flexibility, resilience, and consistency in their API management approach.