Pattern 3: Distributed Setup
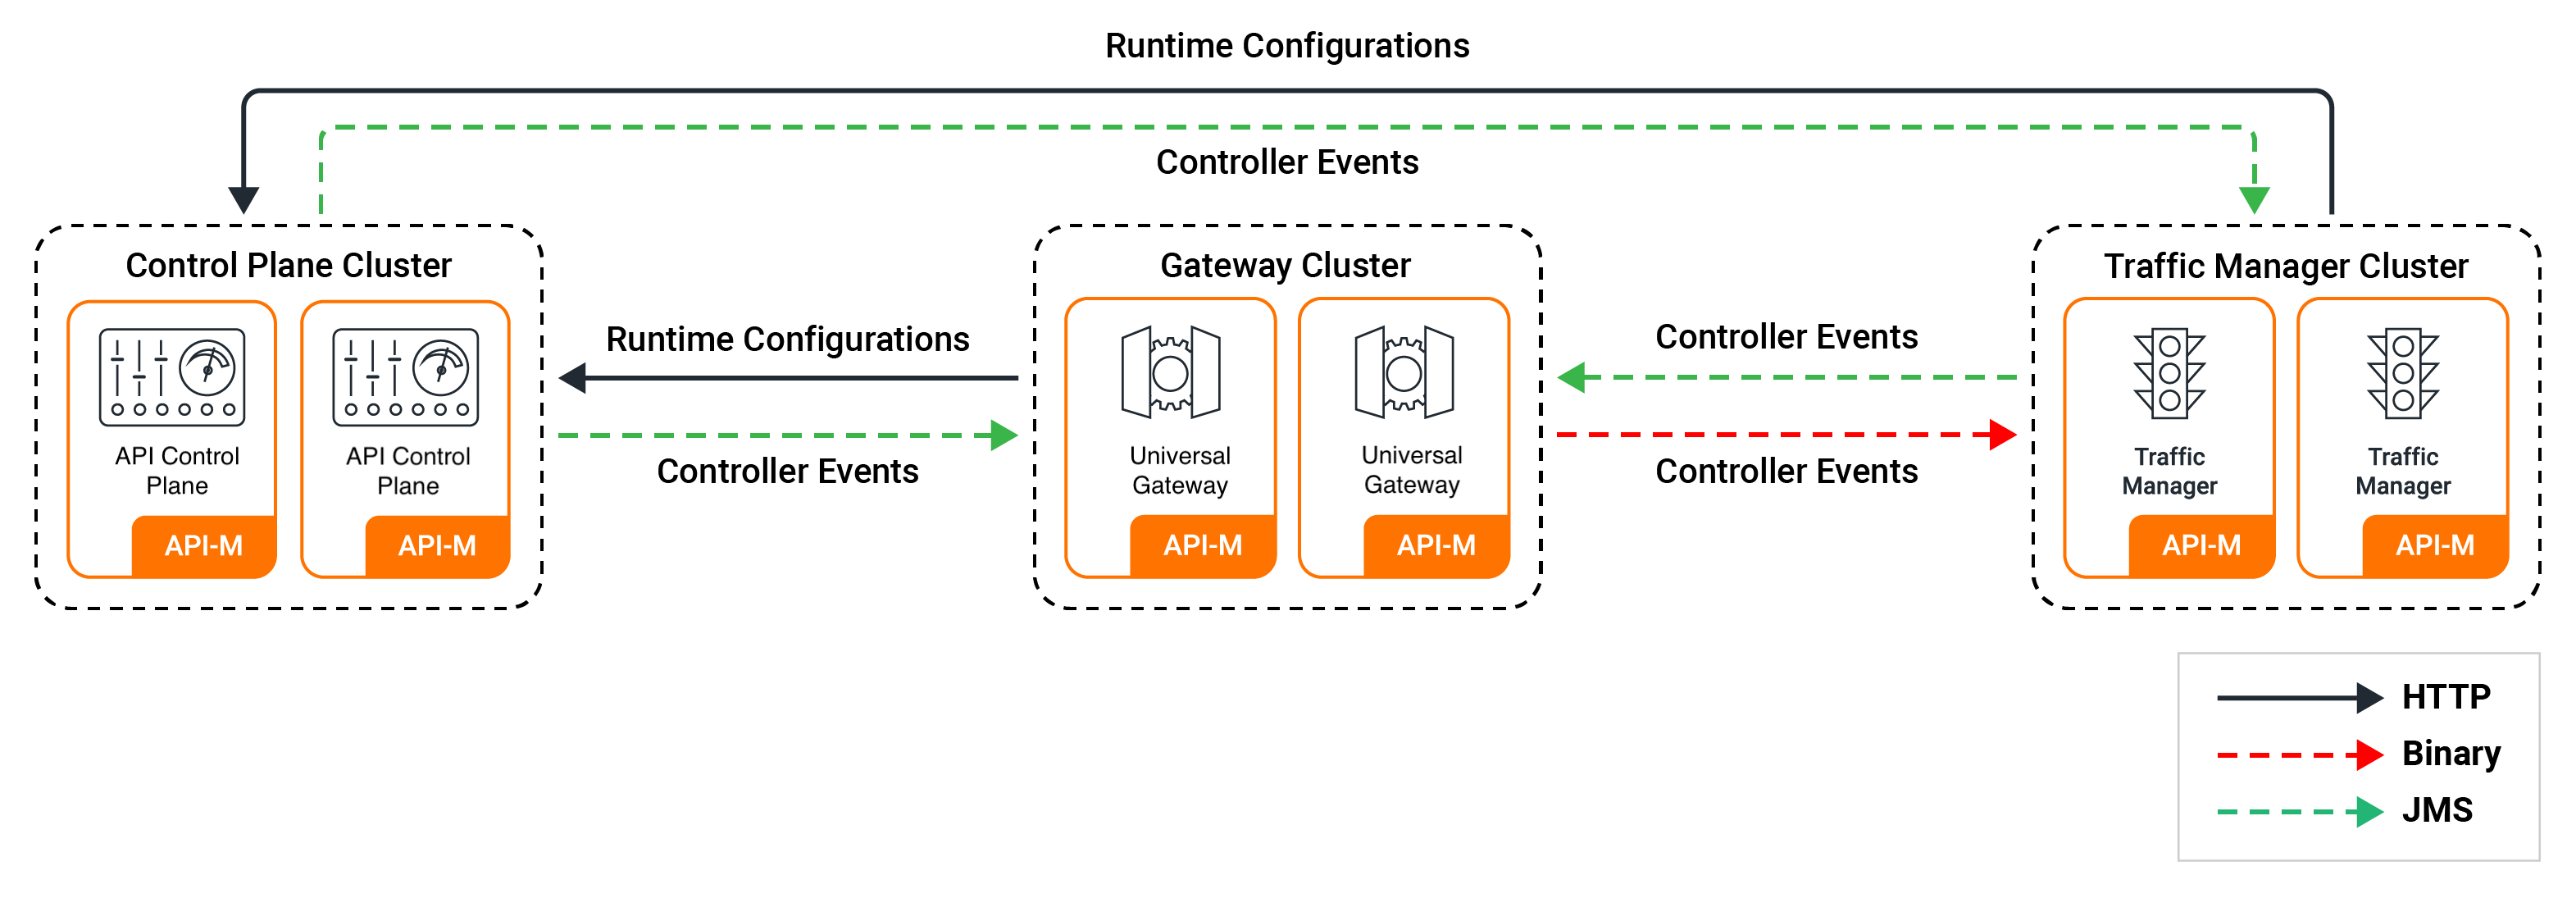
WSO2 API-M can be deployed as an all-in-one deployment or as a distributed deployment. In the distributed setup, the respective component distributions, namely WSO2 API Control Plane, WSO2 Classic Gateway (Universal) and WSO2 Traffic Manager are deployed as separate nodes.
Given below are the API-M nodes you can have in a distributed deployment by default.
Tip
To enable high availability, you need a minimum of two nodes running each component distribution.
| API-M Component Distribution | Description |
|---|---|
| WSO2 API Control Plane | API-M nodes running the Control Plane component. The WSO2 API Control Plane includes the Key Manager, Publisher Portal, Developer Portal components. |
| WSO2 Classic Gateway | API-M nodes running the Gateway component. |
| WSO2 Traffic Manager | API-M nodes running the Traffic Manager component. |
Step 1 - Install WSO2 API-M
To install and set up the API-M servers:
- Download the WSO2 API Control Plane, WSO2 Classic Gateway (Universal) and WSO2 Traffic Manager component distributions from the WSO2 API Manager website.
Step 2 - Install and configure the databases
You can create the required databases for the API-M deployment in a separate server and point to the databases from the respective nodes.
For information, see Installing and Configuring the Databases.
Step 3 - Configure your deployment with production hardening
Ensure that you have taken into account the respective security hardening factors (e.g., changing and encrypting the default passwords, configuring JVM security, etc.) before deploying WSO2 API-M.
For more information, see Production Deployment Guidelines.
Note
Configure the same encryption key on all API Manager instances before starting any node for the first time so they can decrypt shared registry resources consistently. For more information, see Configuring Encryption Key.
Step 4 - Create and import SSL certificates
Create an SSL certificate for each of the WSO2 API-M nodes and import them to the keystore and the truststore. This ensures that hostname mismatch issues in the certificates will not occur.
For more information, see Creating SSL Certificates.
Step 5 - Configure API-M Analytics
API Manager Analytics is delivered via the API Manager Analytics cloud solution. You need to configure the WSO2 Classic Gateway distribution to publish analytics data to the cloud.
See the instructions on configuring the Gateway with the cloud-based analytics solution.
Step 6 - Configure and start the component nodes
Let's configure the API-M nodes in the deployment.
Configure the Gateway nodes
Configure the Gateway to communicate with the API Control Plane and the Traffic Manager nodes.
Follow the instructions given below to configure the Gateway node so that it can communicate with the API Control Plane node:
-
Open the
<CLASSIC-GW_HOME>/repository/conf/deployment.tomlfile of the Gateway node. -
Add the following configurations to the deployment.toml file.
- Connect the Gateway to the API Control Plane node:
# Key Manager configuration
[apim.key_manager]
service_url = "https://[control-plane-LB-host]/services/"
username = "$ref{super_admin.username}"
password = "$ref{super_admin.password}"

# Event Hub configurations
[apim.event_hub]
enable = true
username = "$ref{super_admin.username}"
password = "$ref{super_admin.password}"
service_url = "https://[control-plane-LB-host]/services/"
event_listening_endpoints = ["tcp://control-plane-1-host:5672", "tcp://control-plane-2-host:5672"]
# Key Manager configuration [apim.key_manager] service_url = "https://[control-plane-host]:${mgt.transport.https.port}/services/" username = "$ref{super_admin.username}" password = "$ref{super_admin.password}" # Event Hub configurations [apim.event_hub] enable = true username = "$ref{super_admin.username}" password = "$ref{super_admin.password}" service_url = "https://[control-plane-host]:${mgt.transport.https.port}/services/" event_listening_endpoints = ["tcp://control-plane-host:5672"]Info
Event hub configuration is used to retrieve Gateway artifacts. Using
event_listening_endpoints, the Gateway will create a JMS connection with the event hub that is then used to subscribe for API/Application/Subscription and Key Manager operations-related events. Theservice_urlpoints to the internal API that resides in the event hub that is used to pull artifacts and information from the database.- Connecting the Gateway to the Traffic Manager node:
[apim.throttling]
throttle_decision_endpoints = ["tcp://traffic-manager-1-host:5672", "tcp://Traffic-Manager-2-host:5672"]

[[apim.throttling.url_group]]
traffic_manager_urls = ["tcp://traffic-manager-1-host:9611"]
traffic_manager_auth_urls = ["ssl://traffic-manager-1-host:9711"]

[[apim.throttling.url_group]]
traffic_manager_urls = ["tcp://traffic-manager-2-host:9611"]
traffic_manager_auth_urls = ["ssl://traffic-manager-2-host:9711"]
[apim.throttling] throttle_decision_endpoints = ["tcp://traffic-manager-host:5672"] [[apim.throttling.url_group]] traffic_manager_urls = ["tcp://traffic-manager-host:9611"] traffic_manager_auth_urls = ["ssl://traffic-manager-host:9711"]Info
Rate limiting configurations are used by the Gateway to connect with the Traffic Manager. The Gateway will publish Gateway invocation-related events to the TM using the
apim.throttling.url_group. Traffic Managers will receive these events and rate limiting decisions will be published to the Gateway. To receive these rate limiting decisions, the Gateway has to create a JMS connection usingthrottle_decision_endpointsand listen.Enabling TLS/SSL for Gateway to Traffic Manager JMS communications
If required, you can enable TLS/SSL for the JMS communications happening between the Gateway and Traffic Manager nodes.
Add the following configuration to the Gateway node for this purpose.
[apim.throttling.jms]
topic_connection_factory = "amqp://<![CDATA[<username>]]>:<![CDATA[<password>]]>@clientid/carbon?brokerlist='tcp://tm.wso2.com:8672?ssl='true'%26ssl_cert_alias='<certificate_alias_in_truststore>'%26trust_store='<path_to_trust_store>'%26trust_store_password='<truststore_password>'%26key_store='<path_to_key_store>'%26key_store_password='<keystore_password>''"
Also update your Traffic Manager node to include the following configuration to enable secure broker connections.
[broker.transport.amqp.ssl_connection] enabled = true port = 8672 ssl_enabled_protocols = "TLSv1,TLSv1.2" ciphers = "TLS_ECDHE_ECDSA_WITH_AES_256_GCM_SHA384,TLS_ECDHE_ECDSA_WITH_AES_128_GCM_SHA256,TLS_ECDHE_RSA_WITH_AES_256_GCM_SHA384,TLS_ECDH_ECDSA_WITH_AES_256_GCM_SHA384,TLS_ECDH_RSA_WITH_AES_256_GCM_SHA384,TLS_ECDHE_RSA_WITH_AES_128_GCM_SHA256" [broker.transport.amqp.ssl_connection.keystore] location = "repository/resources/security/wso2carbon.jks" password = "wso2carbon" cert_type = "SunX509" [broker.transport.amqp.ssl_connection.truststore] location = "repository/resources/security/client-truststore.jks" password = "wso2carbon" cert_type = "SunX509" -
Add the following configurations to the deployment.toml file to configure the Gateway environment. Change the
gateway_labelsproperty based on your Gateway environment.[apim.sync_runtime_artifacts.gateway] gateway_labels =["Default"]Info
Once an API is deployed/undeployed, the API Control Plane will send a deploy/undeploy event to the Gateways. Using this configuration, the Gateway will filter out its relevant deploy/undeploy events and retrieve the artifacts.
-
Add the following configuration to set a unique identifier for each Gateway node when setting up a distributed deployment on VMs.
[apim.gateway_notification] gateway_id = "<unique-gateway-id>"[apim.gateway_notification] gateway_id = "gateway_00"Info
To further optimize the gateway notification feature, you can use additional
gateway_notificationconfigurations. For more information, see API-M Revision Deployment Monitoring. -
Enable JSON Web Token (JWT) if required. For instructions, see Generating JSON Web Token.
-
Add the public certificate of the private key (that is used for signing the tokens) to the truststore under the "gateway_certificate_alias" alias. For instructions, see Create and import SSL certificates.
Note
This is not applicable if you use the default certificates, which are the certificates that are shipped with the product itself.
-
Follow the steps given below to configure High Availability (HA) for the Classic Gateway:
-
Create a copy of the WSO2 Classic Gateway node that you just configured. This is the second node of the Gateway cluster.
-
Configure a load balancer fronting the two Gateway nodes in your deployment. For instructions, see Configuring the Proxy Server and the Load Balancer.
Note
To keep custom runtime artifacts deployed in the Gateway, add the following configuration in the
<CLASSIC-GW_HOME>/repository/conf/deployment.tomlfile of the Gateway nodes.[apim.sync_runtime_artifacts.gateway.skip_list] apis = ["api1.xml","api2.xml"] endpoints = ["endpoint1.xml"] sequences = ["post_with_nobody.xml"] local_entries = ["file.xml"] -
Open the
deployment.tomlfiles of each Gateway node and add the cluster hostname. For example, if the hostname isgw.am.wso2.comthe configuration will be:[server] hostname = "gw.wso2.com" -
Specify the following incoming connection configurations in the
deployment.tomlfiles of both nodes.[transport.http] properties.port = 9763 properties.proxyPort = 80 [transport.https] properties.port = 9443 properties.proxyPort = 443 -
Open the server's
/etc/hostsfile and map the hostnames to IPs.Format:
<GATEWAY-IP> gw.wso2.comExample:
xxx.xxx.xxx.xx4 gw.wso2.com
-
Sample configuration for the Gateway
[server]
hostname = "gw.wso2.com"
node_ip = "127.0.0.1"
server_role = "default"
[user_store]
type = "database_unique_id"
[super_admin]
username = "admin"
password = "admin"
create_admin_account = true
[database.shared_db]
type = "mysql"
hostname = "db.wso2.com"
name = "shared_db"
port = "3306"
username = "sharedadmin"
password = "sharedadmin"
[keystore.tls]
file_name = "wso2carbon.jks"
type = "JKS"
password = "wso2carbon"
alias = "wso2carbon"
key_password = "wso2carbon"
[truststore]
file_name = "client-truststore.jks"
type = "JKS"
password = "wso2carbon"
[transport.http]
properties.port = 9763
properties.proxyPort = 80
[transport.https]
properties.port = 9443
properties.proxyPort = 443
# key manager implementation
[apim.key_manager]
service_url = "https://api.am.wso2.com/services/"
[apim.sync_runtime_artifacts.gateway]
gateway_labels =["Default"]
# Event Hub configurations
[apim.event_hub]
enable = true
username = "$ref{super_admin.username}"
password = "$ref{super_admin.password}"
service_url = "https://api.am.wso2.com/services/"
event_listening_endpoints = ["tcp://apim-cp-1:5672", "tcp://apim-cp-2:5672"]
# Traffic Manager configurations
[apim.throttling]
throttle_decision_endpoints = ["tcp://traffic-manager-1:5672", "tcp://traffic-manager-2:5672"]
[[apim.throttling.url_group]]
traffic_manager_urls=["tcp://traffic-manager-1:9611"]
traffic_manager_auth_urls=["ssl://traffic-manager-1:9711"]
[[apim.throttling.url_group]]
traffic_manager_urls=["tcp://traffic-manager-2:9611"]
traffic_manager_auth_urls=["ssl://traffic-manager-2:9711"]
[server]
hostname = "gw.wso2.com"
node_ip = "127.0.0.1"
server_role = "default"
offset=0
[user_store]
type = "database_unique_id"
[super_admin]
username = "admin"
password = "admin"
create_admin_account = true
[database.shared_db]
type = "h2"
url = "jdbc:h2:./repository/database/WSO2SHARED_DB;DB_CLOSE_ON_EXIT=FALSE"
username = "wso2carbon"
password = "wso2carbon"
[keystore.tls]
file_name = "wso2carbon.jks"
type = "JKS"
password = "wso2carbon"
alias = "wso2carbon"
key_password = "wso2carbon"
[truststore]
file_name = "client-truststore.jks"
type = "JKS"
password = "wso2carbon"
# Key Manager configuration
[apim.key_manager]
service_url = "https://cp.wso2.com:9443/services/"
username = "$ref{super_admin.username}"
password = "$ref{super_admin.password}"
# Traffic Manager configurations
[apim.throttling]
throttle_decision_endpoints = ["tcp://tm.wso2.com:5672"]
[[apim.throttling.url_group]]
traffic_manager_urls=["tcp://tm.wso2.com:9611"]
traffic_manager_auth_urls=["ssl://tm.wso2.com:9711"]
# Event Hub configurations
[apim.event_hub]
enable = true
username = "$ref{super_admin.username}"
password = "$ref{super_admin.password}"
service_url = "https://cp.wso2.com:9443/services/"
event_listening_endpoints = ["tcp://cp.wso2.com:5672"]
[apim.sync_runtime_artifacts.gateway]
gateway_labels =["Default"]
Configure the API Control Plane nodes
Follow the steps given below to configure the API Control Plane nodes to communicate with the Classic Gateway.
-
Open the
<ACP_HOME>/repository/conf/deployment.tomlfile of the API Control Plane node. -
Add the following configurations to the deployment.toml file.
Connecting the API Control Plane to the Gateway node:
[[apim.gateway.environment]]
name = "Default"
type = "hybrid"
display_in_api_console = true
description = "This is a hybrid gateway that handles both production and sandbox token traffic."
show_as_token_endpoint_url = true
service_url = "https://[api-gateway-LB-host]/services/"
ws_endpoint = "ws://[api-gateway-LB-host-or-ip]:9099"
wss_endpoint = "wss://[api-gateway-LB-host-or-ip]:8099"
http_endpoint = "http://[api-gateway-LB-host]"
https_endpoint = "https://[api-gateway-LB-host]"
[[apim.gateway.environment]] name = "Default" type = "hybrid" display_in_api_console = true description = "This is a hybrid gateway that handles both production and sandbox token traffic." show_as_token_endpoint_url = true service_url = "https://[api-gateway-host]:9443/services/" ws_endpoint = "ws://[api-gateway-host]:9099" wss_endpoint = "wss://[api-gateway-host]:8099" http_endpoint = "http://[api-gateway-host]:${http.nio.port}" https_endpoint = "https://[api-gateway-host]:${https.nio.port}"Info
This configuration is used for deploying APIs to the Gateway and for connecting the Developer Portal component to the Gateway if the Gateway is shared across tenants. If the Gateway is not used in multiple tenants, you can create a Gateway Environment using the Admin Portal.
Note that in the above configurations, the
service_urlpoints to the9443port of the Gateway node, whilehttp_endpointandhttps_endpointpoints to thehttpandhttps nio ports(8280 and 8243).Add Event Hub Configurations:
Info
Enabling TLS/SSL for event hub JMS communications
If required, you can enable TLS/SSL for the JMS communications of event hub. Update your event hub configurations to include the following for this purpose.
To enable secure broker connections add the following configuration to the Control Plane node.[apim.event_hub] enable = true jms.username = "<username>" jms.password = "<password>" jms.ssl = "true'&ssl_cert_alias='<certificate_alias_in_truststore>'&trust_store='<path_to_trust_store>'&trust_store_password='<truststore_password>'&key_store='<path_to_key_store>'&key_store_password='<keystore_password>" ssl = "true'&ssl_cert_alias='<certificate_alias_in_truststore>'&trust_store='<path_to_trust_store>'&trust_store_password='<truststore_password>'&key_store='<path_to_key_store>'&key_store_password='<keystore_password>" event_listening_endpoints = ["tcp://control-plane-host:8672"][broker.transport.amqp.ssl_connection] enabled = true port = 8672 ssl_enabled_protocols = "TLSv1,TLSv1.2" ciphers = "TLS_ECDHE_ECDSA_WITH_AES_256_GCM_SHA384,TLS_ECDHE_ECDSA_WITH_AES_128_GCM_SHA256,TLS_ECDHE_RSA_WITH_AES_256_GCM_SHA384,TLS_ECDH_ECDSA_WITH_AES_256_GCM_SHA384,TLS_ECDH_RSA_WITH_AES_256_GCM_SHA384,TLS_ECDHE_RSA_WITH_AES_128_GCM_SHA256" [broker.transport.amqp.ssl_connection.keystore] location = "repository/resources/security/wso2carbon.jks" password = "wso2carbon" cert_type = "SunX509" [broker.transport.amqp.ssl_connection.truststore] location = "repository/resources/security/client-truststore.jks" password = "wso2carbon" cert_type = "SunX509"# Event Hub configurations [apim.event_hub] enable = true username= "$ref{super_admin.username}" password= "$ref{super_admin.password}" service_url = "https://localhost:${mgt.transport.https.port}/services/" event_listening_endpoints = ["tcp://localhost:5672"] event_duplicate_url = ["tcp://apim-cp-2:5672"] [[apim.event_hub.publish.url_group]] urls = ["tcp://control-plane-1-host:9611"] auth_urls = ["ssl://control-plane-1-host:9711"] [[apim.event_hub.publish.url_group]] urls = ["tcp://control-plane-2-host:9611"] auth_urls = ["ssl://control-plane-2-host:9711"]# Event Hub configurations [apim.event_hub] enable = true username= "$ref{super_admin.username}" password= "$ref{super_admin.password}" service_url = "https://localhost:${mgt.transport.https.port}/services/" event_listening_endpoints = ["tcp://localhost:5672"] [[apim.event_hub.publish.url_group]] urls = ["tcp://control-plane-host:9611"] auth_urls = ["ssl://control-plane-host:9711"]Info
As there are two event hubs in a HA setup, each event hub has to publish events to both event streams. This will be done through the event streams created with
apim.event_hub.publish.url_group. The token revocation events that are received to an event hub will be duplicated to the other event hub usingevent_duplicate_url.Add Event Listener Configurations:
The below configurations are only added to the API Control Plane if you are using the Resident Key Manager (resides in the API Control Plane). If you are using WSO2 IS as Key Manager, you need to add these in the IS node. Once you add the below configurations, the Control Plane or Identity Server will listen to token revocation events and invoke the
notification_endpointregarding the revoked token.# Event Listener configurations [[event_listener]] id = "token_revocation" type = "org.wso2.carbon.identity.core.handler.AbstractIdentityHandler" name = "org.wso2.is.notification.ApimOauthEventInterceptor" order = 1 [event_listener.properties] notification_endpoint = "https://[control-plane-LB-host]/internal/data/v1/notify" username = "${admin.username}" password = "${admin.password}" 'header.X-WSO2-KEY-MANAGER' = "default"# Event Listener configurations [[event_listener]] id = "token_revocation" type = "org.wso2.carbon.identity.core.handler.AbstractIdentityHandler" name = "org.wso2.is.notification.ApimOauthEventInterceptor" order = 1 [event_listener.properties] notification_endpoint = "https://[control-plane-host]:${mgt.transport.https.port}/internal/data/v1/notify" username = "${admin.username}" password = "${admin.password}" 'header.X-WSO2-KEY-MANAGER' = "default" -
If required, encrypt the Auth Keys (access tokens, client secrets, and authorization codes), see Encrypting OAuth Keys.
-
Optionally, add the following configuration to enable distributed cache invalidation within the API Control Plane nodes.
[apim.cache_invalidation] enabled = true domain = "control-plane-domain" -
Follow the steps given below to configure High Availability (HA) for the API Control Plane:
-
Create a copy of the API Control Plane node that you just configured. This is the second node of the API Control Plane cluster.
-
Configure a load balancer fronting the two API Control Plane nodes in your deployment. For instructions, see Configuring the Proxy Server and the Load Balancer.
-
Sample configuration for the API Control Plane
[server]
hostname = "api.am.wso2.com"
node_ip = "127.0.0.1"
server_role="default"
base_path = "${carbon.protocol}://${carbon.host}:${carbon.management.port}"

[user_store]
type = "database_unique_id"

[super_admin]
username = "admin"
password = "admin"
create_admin_account = true

[database.apim_db]
type = "mysql"
hostname = "db.wso2.com"
name = "apim_db"
port = "3306"
username = "apimadmin"
password = "apimadmin"

[database.shared_db]
type = "mysql"
hostname = "db.wso2.com"
name = "shared_db"
port = "3306"
username = "sharedadmin"
password = "sharedadmin"

[keystore.tls]
file_name =  "wso2carbon.jks"
type =  "JKS"
password =  "wso2carbon"
alias =  "wso2carbon"
key_password =  "wso2carbon"

[truststore]
file_name = "client-truststore.jks"
type = "JKS"
password = "wso2carbon"

[[apim.gateway.environment]]
name = "Default"
type = "hybrid"
display_in_api_console = true
description = "This is a hybrid gateway that handles both production and sandbox token traffic."
show_as_token_endpoint_url = true
service_url = "https://[api-gateway-LB-host]/services/"
ws_endpoint = "ws://[api-gateway-LB-host]:9099"
wss_endpoint = "wss://[api-gateway-LB-host]:8099"
http_endpoint = "http://[api-gateway-LB-host]"
https_endpoint = "https://[api-gateway-LB-host]"

[apim.devportal]
url = "https://api.am.wso2.com/devportal"

[transport.https.properties]
proxyPort = 443

# Event Hub configurations
[apim.event_hub]
enable = true
username = "$ref{super_admin.username}"
password = "$ref{super_admin.password}"
service_url = "https://api.am.wso2.com/services/"
event_listening_endpoints = ["tcp://localhost:5672"]
event_duplicate_url = ["tcp://apim-cp-2:5672"]

[[apim.event_hub.publish.url_group]]
urls = ["tcp://apim-cp-1:9611"]
auth_urls = ["ssl://apim-cp-1:9711"]

[[apim.event_hub.publish.url_group]]
urls = ["tcp://apim-cp-2:9611"]
auth_urls = ["ssl://apim-cp-2:9711"]

# key manager implementation
[apim.key_manager]
service_url = "https://api.am.wso2.com/services/"
username= "$ref{super_admin.username}"
password= "$ref{super_admin.password}"
type = "default"

[[event_listener]]
id = "token_revocation"
type = "org.wso2.carbon.identity.core.handler.AbstractIdentityHandler"
name = "org.wso2.is.notification.ApimOauthEventInterceptor"
order = 1

[event_listener.properties]
notification_endpoint = "https://api.am.wso2.com/internal/data/v1/notify"
username = "${admin.username}"
password = "${admin.password}"
'header.X-WSO2-KEY-MANAGER' = "default"
[server]
hostname = "cp.wso2.com"
node_ip = "127.0.0.1"
server_role = "default"
offset=0

[user_store]
type = "database_unique_id"

[super_admin]
username = "admin"
password = "admin"
create_admin_account = true

[database.apim_db]
type = "mysql"
hostname = "db.wso2.com"
name = "apim_db"
port = "3306"
username = "apimadmin"
password = "apimadmin"

[database.shared_db]
type = "mysql"
hostname = "db.wso2.com"
name = "shared_db"
port = "3306"
username = "sharedadmin"
password = "sharedadmin"

[keystore.tls]
file_name =  "wso2carbon.jks"
type =  "JKS"
password =  "wso2carbon"
alias =  "wso2carbon"
key_password =  "wso2carbon"

# Gateway configuration
[[apim.gateway.environment]]
name = "Default"
type = "hybrid"
display_in_api_console = true
description = "This is a hybrid gateway that handles both production and sandbox token traffic."
show_as_token_endpoint_url = true
service_url = "https://gw.wso2.com:9443/services/"
username= "${admin.username}"
password= "${admin.password}"
ws_endpoint = "ws://gw.wso2.com:9099"
wss_endpoint = "wss://gw.wso2.com:8099"
http_endpoint = "http://gw.wso2.com:8280"
https_endpoint = "https://gw.wso2.com:8243"

# Event Listener configurations
[[event_listener]]
id = "token_revocation"
type = "org.wso2.carbon.identity.core.handler.AbstractIdentityHandler"
name = "org.wso2.is.notification.ApimOauthEventInterceptor"
order = 1

[event_listener.properties]
notification_endpoint = "https://cp.wso2.com:9443/internal/data/v1/notify"
username = "${admin.username}"
password = "${admin.password}"
'header.X-WSO2-KEY-MANAGER' = "default"

# Event Hub configurations
[apim.event_hub]
enable = true
username = "$ref{super_admin.username}"
password = "$ref{super_admin.password}"
service_url = "https://cp.wso2.com:9443/services/"
event_listening_endpoints = ["tcp://cp.wso2.com:5672"]

[[apim.event_hub.publish.url_group]]
urls = ["tcp://cp.wso2.com:9611"]
auth_urls = ["ssl://cp.wso2.com:9711"]
Configure the Traffic Manager Nodes
Configure the Traffic Manager to communicate with the API Control Plane.
-
Open the
<TM_HOME>/repository/conf/deployment.tomlfile of the Traffic Manager node. -
Add the following configurations to the deployment.toml file.
Connecting the Traffic Manager to the API Control Plane node:
# Event Hub configurations
[apim.event_hub]
enable = true
username = "$ref{super_admin.username}"
password = "$ref{super_admin.password}"
service_url = "https://[control-plane-LB-host]/services/"
event_listening_endpoints = ["tcp://control-plane-1-host:5672", "tcp://control-plane-2-host:5672"]
# Event Hub configurations [apim.event_hub] enable = true username = "$ref{super_admin.username}" password = "$ref{super_admin.password}" service_url = "https://[control-plane-host]/services/" event_listening_endpoints = ["tcp://control-plane-host:5672"]Info
With
event_listening_endpoints, the Traffic Manager is subscribed to the JMS stream of both event hubs. Once a policy-related event is received, it will pull the execution plans from theservice_url.If the Traffic Manager node is configured with High Availability (HA), configure rate limiting as follows.
[apim.throttling]
event_duplicate_url = ["tcp://traffic-manager-2-host:5672"]
throttle_decision_endpoints = ["tcp://localhost:5672"]
Info
The
event_duplicate_urlwill publish rate limiting decisions to the other Traffic Manager node to maintain consistency. -
Follow the steps given below to configure High Availability (HA) for the Traffic Manager.
-
Create a copy of the Traffic Manager node that you just configured. This is the second node of the Traffic Manager cluster.
-
Configure a load balancer fronting the two Traffic Manager nodes in your deployment.
Note
In each startup of a Traffic Manager node, the rate-limiting policies are redeployed by retrieving the latest policy details from the database. This maintains the consistency between the Traffic Manager nodes. If you need to avoid redeploying certain rate-limiting policies, add the following configuration to the
<TM_HOME>/repository/conf/deployment.tomlfile in the Traffic Manager node.[apim.throttling] skip_redeploying_policies = ["throttle_policy_1","throttle_policy_2"]
-
Sample configuration for the Traffic Manager
[server]
hostname = "tm.am.wso2.com"
node_ip = "127.0.0.1"
server_role = "default"

[transport.https.properties]
proxyPort = 443

[user_store]
type = "database_unique_id"

[super_admin]
username = "admin"
password = "admin"
create_admin_account = true

[database.shared_db]
type = "mysql"
hostname = "db.wso2.com"
name = "shared_db"
port = "3306"
username = "sharedadmin"
password = "sharedadmin"

[keystore.tls]
file_name =  "wso2carbon.jks"
type =  "JKS"
password =  "wso2carbon"
alias =  "wso2carbon"
key_password =  "wso2carbon"

[truststore]
file_name = "client-truststore.jks"
type = "JKS"
password = "wso2carbon"

# Event Hub configurations
[apim.event_hub]
enable = true
username = "$ref{super_admin.username}"
password = "$ref{super_admin.password}"
service_url = "https://api.am.wso2.com/services/"
event_listening_endpoints = ["tcp://apim-cp-1:5672", "tcp://apim-cp-2:5672"]

# Traffic Manager configurations
[apim.throttling]
event_duplicate_url = ["tcp://traffic-manager-2:5672"]
throttle_decision_endpoints = ["tcp://localhost:5672"]
[server]
hostname = "tm.wso2.com"
node_ip = "127.0.0.1"
server_role = "default"
offset=0

[user_store]
type = "database_unique_id"

[super_admin]
username = "admin"
password = "admin"
create_admin_account = true

[database.shared_db]
type = "h2"
url = "jdbc:h2:./repository/database/WSO2SHARED_DB;DB_CLOSE_ON_EXIT=FALSE"
username = "wso2carbon"
password = "wso2carbon"

[keystore.tls]
file_name =  "wso2carbon.jks"
type =  "JKS"
password =  "wso2carbon"
alias =  "wso2carbon"
key_password =  "wso2carbon"

[truststore]
file_name = "client-truststore.jks"
type = "JKS"
password = "wso2carbon"

# Event Hub configurations
[apim.event_hub]
enable = true
username = "$ref{super_admin.username}"
password = "$ref{super_admin.password}"
service_url = "https://cp.wso2.com:9443/services/"
event_listening_endpoints = ["tcp://cp.wso2.com:5672"]
Step 7 - Start the API-M nodes
Once you have successfully configured all the API-M nodes in the deployment, you can start the servers.
-
Starting the Gateway nodes
Open a terminal, navigate to the
<CLASSIC-GW_HOME>/binfolder, and execute the following command:cd <CLASSIC-GW_HOME>/bin/ sh gateway.shcd <CLASSIC-GW_HOME>\bin\ gateway.bat --run -
Start the API Control Plane nodes
Open a terminal, navigate to the
<ACP_HOME>/binfolder, and execute the following command:cd <ACP_HOME>/bin/ sh api-cp.shcd <ACP_HOME>\bin\ api-cp.bat --run -
Start the Traffic Manager nodes
Open a terminal, navigate to the
<TM_HOME>/binfolder, and execute the following command:cd <TM_HOME>/bin/ sh traffic-manager.shcd <TM_HOME>\bin\ traffic-manager.bat --run