Pattern 0: All-in-One Setup
This pattern deploys all WSO2 API Manager components — Control Plane, Gateway, Traffic Manager, and Key Manager — in a single node. It is suitable for development, testing, and evaluation environments where high availability is not required.
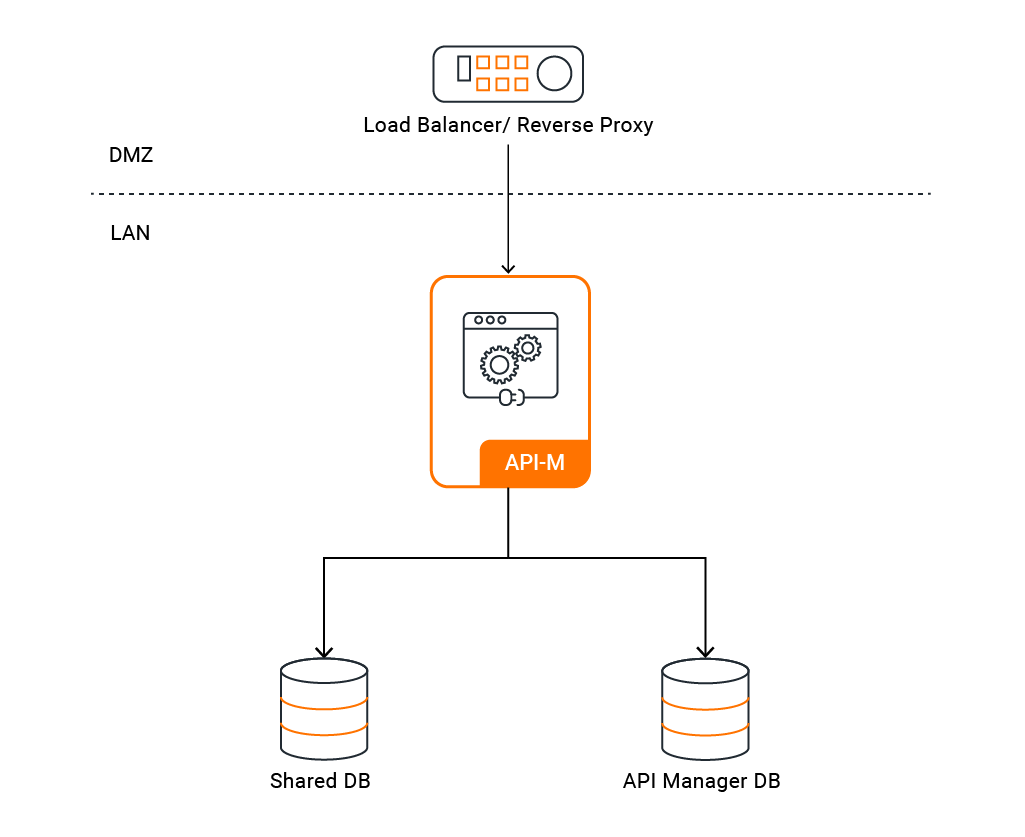
Quick Start
This section gets WSO2 API Manager running on Kubernetes with default settings. No custom database or image configuration is needed — ideal for local evaluation.
Step 1 — Install Required Tools
-
Ensure the following tools are installed on your machine:
Tool Purpose Install Guide kubectlKubernetes CLI for managing cluster resources Install helm(v3)Package manager for deploying WSO2 Helm charts Install -
Verify all tools are installed and check their versions:
kubectl version --client
helm version
Version Compatibility
Ensure your tool versions are within the supported ranges listed in the Prerequisites page before proceeding.
Step 2 — Verify Your Cluster is Running
-
Ensure your Kubernetes cluster is up and running:
kubectl cluster-info
kubectl get nodes
All nodes should show a
Readystatus.
Step 3 — Add the WSO2 Helm Repository
-
Add the WSO2 Helm repository and update it:
helm repo add wso2 https://helm.wso2.com && helm repo update
Step 4 — Install a Routing Controller
WSO2 API Manager 4.7.0 uses Envoy Gateway by default for routing and it is the recommended option. NGINX Ingress Controller is also available for users who require it.
-
Install Envoy Gateway:
helm install envoy-gateway oci://docker.io/envoyproxy/gateway-helm \ --version v1.7.0 -n envoy-gateway-system \ --set config.envoyGateway.extensionApis.enableBackend=true \ --set envoyGateway.gateway.experimentalFeatures.enabled=true \ --create-namespace -
Create the
apimnamespace:kubectl create namespace apim -
Apply the sample Gateway manifest:
kubectl apply \ -f https://raw.githubusercontent.com/wso2/helm-apim/4.7.x/resources/assets/sample-gateway.yaml \ -n apim -
Verify the gateway is ready:
kubectl get gateway -n apim
See Section 4 — Routing Controller for full Envoy Gateway values configuration.
-
Install the NGINX ingress controller into your cluster:
helm upgrade --install ingress-nginx ingress-nginx \
  --repo https://kubernetes.github.io/ingress-nginx \
  --namespace ingress-nginx --create-namespace
helm upgrade --install ingress-nginx ingress-nginx \ --repo https://kubernetes.github.io/ingress-nginx \ --namespace ingress-nginx --create-namespace \ --set controller.service.externalTrafficPolicy=LocalNote
externalTrafficPolicy=Localis required on managed Kubernetes services. Without it, the cloud load balancer health probes fail and traffic never reaches the ingress controller. -
Verify the controller is running:
kubectl get pods -n ingress-nginxThe NGINX pod should show
1/1 Runningbefore proceeding.
Step 5 — Deploy WSO2 API Manager
-
Deploy using the default values, which include an embedded H2 database and default keystores. A unique encryption key is required and must be set at deploy time:
helm install apim wso2/wso2am-all-in-one \
  --version 4.7.0-1 \
  --namespace apim --create-namespace \
  -f https://raw.githubusercontent.com/wso2/helm-apim/4.7.x/resources/am-pattern-0-all-in-one/default_values.yaml \
  --set wso2.apim.configurations.encryption.key=$(openssl rand -hex 32)
Encryption key is mandatory
WSO2 API Manager 4.7.0 requires a 256-bit encryption key to be set before the first startup. The command above generates one automatically using
openssl. If you are deploying to a shared or production environment, generate the key separately and store it securely — you will need the same key if you redeploy or scale the deployment.opensslis not available on Windows by default. Windows users can generate the key using PowerShell'sSystem.Security.Cryptography.RandomNumberGeneratorclass. -
Wait for the pod to be ready:
kubectl get pods -n apim -wThe API Manager pod should show
1/1 Runningbefore proceeding. This may take several minutes on the first run.Default Configuration
The default deployment uses:
- Embedded H2 database (not suitable for production)
- Default WSO2 keystores and truststores
- Hostname:
am.wso2.com
Step 6 — Configure Local DNS
Envoy Gateway users
If you installed Envoy Gateway (the default), get the external address from the Gateway resource:
kubectl get gateway -n apim
Then map the kubernetes.gatewayAPI.* hostnames from your values.yaml to the external address.
Windows users
On Windows, the hosts file is at C:\Windows\System32\drivers\etc\hosts. Open Notepad (or another text editor) as Administrator to edit it.
-
Run the following command in a separate terminal and keep it running:
minikube tunnelNote
minikube tunnelrequires sudo privileges to expose ports 80 and 443. You will be prompted for your system password. Once entered, the tunnel will stay running silently — this is expected. Do not close this terminal. Open a new terminal for the next steps. -
Get the external IP:
kubectl get gateway -n apimkubectl get ing -n apimThe ADDRESS column should now show
127.0.0.1. -
Add the following entry to your
/etc/hostsfile:127.0.0.1 am.wso2.com gw.wso2.com websocket.wso2.com websub.wso2.com
-
Get the external IP:
kubectl get gateway -n apimkubectl get ing -n apim -
Add the following entry to your
/etc/hostsfile, replacing<EXTERNAL-IP>with the value from the output above:<EXTERNAL-IP> am.wso2.com gw.wso2.com websocket.wso2.com websub.wso2.com
-
Get the external IP:
kubectl get gateway -n apimkubectl get ing -n apim -
For quick testing, add the
ADDRESSvalue to your/etc/hosts:<EXTERNAL-IP> am.wso2.com gw.wso2.com websocket.wso2.com websub.wso2.comFor a production setup, create a DNS record in your DNS provider (e.g. Route 53, Azure DNS, Cloud DNS) mapping the hostnames to the external IP instead of using
/etc/hosts.
Note
These are the default hostnames. If you customised the hostnames in your values.yaml, use those values here instead:
- Envoy Gateway:
kubernetes.gatewayAPI.management.hostname,kubernetes.gatewayAPI.gateway.hostname, etc. - NGINX:
ingress.controlPlane.hostname,ingress.gateway.hostname, etc.
Step 7 — Access the Portals
-
Once DNS is configured, open the following URLs in your browser:
Portal URL Publisher https://<kubernetes.gatewayAPI.management.hostname>/publisherDeveloper Portal https://<kubernetes.gatewayAPI.management.hostname>/devportalCarbon Console https://<kubernetes.gatewayAPI.management.hostname>/carbonGateway https://<kubernetes.gatewayAPI.gateway.hostname>Portal URL Publisher https://<kubernetes.ingress.management.hostname>/publisherDeveloper Portal https://<kubernetes.ingress.management.hostname>/devportalCarbon Console https://<kubernetes.ingress.management.hostname>/carbonGateway https://<kubernetes.ingress.gateway.hostname>Replace the hostname placeholders with the actual values from your
values.yaml. With default values, all hostnames resolve toam.wso2.com(management) andgw.wso2.com(gateway).Default credentials: admin / admin
Customized Configurations
The settings below are for production deployments or scenarios where you need to go beyond the defaults. All configurations in this section are made by editing your values.yaml file — the Helm chart's configuration file.
Note
Once all changes are in place, deploy using Deploy with Custom Values.
The Helm charts for WSO2 API Manager are available in the WSO2 Helm Chart Repository. You can use the charts directly from the repository or clone it and use a local copy.
Resource Naming Convention
Kubernetes resources created by the Helm charts follow this naming pattern:
<RELEASE_NAME>-<CHART_NAME>-<RESOURCE_NAME>
1. Image and Registry
1.1 Configure Docker Image and Registry
By default, the Helm chart pulls the official WSO2 Docker image. Configure this section if you need to use a custom image — for example, if you have built an image with additional JARs, configurations, or security patches — or if your image is hosted in a private registry that requires authentication.
wso2:
  deployment:
    image:
      registry: ""        # e.g. docker.io/myorg
      repository: ""      # e.g. wso2am
      digest: ""
      imagePullSecrets:
        enabled: false
        username: ""
        password: ""
Enable
imagePullSecretsif your registry is private.
2. Database and Credentials
2.1 Configure Databases
The quick start uses an embedded H2 database which is not persistent and will lose data when the pod restarts. For any environment beyond local testing, configure an external database (MySQL, PostgreSQL, Oracle, or MSSQL) to ensure data persistence and reliability.
JDBC Driver Required
The default WSO2 Docker image does not include third-party JDBC drivers. Before configuring an external database, you must rebuild the Docker image with the appropriate JDBC driver for your database (e.g. mysql-connector-java.jar for MySQL, postgresql.jar for PostgreSQL). See section 1.1 for how to configure a custom image.
wso2:
  apim:
    configurations:
      databases:
        apim_db:
          url: ""         # JDBC URL for the APIM database
          username: ""
          password: ""
        shared_db:
          url: ""         # JDBC URL for the shared database
          username: ""
          password: ""
2.2 Configure Admin Credentials
The default admin credentials are admin/admin. Change these before deploying to any shared or production environment to prevent unauthorised access.
wso2:
  apim:
    configurations:
      adminUsername: ""
      adminPassword: ""
2.3 Update Keystore Passwords
If you are mounting custom keystores (see section 3.1), update the passwords here to match. If left as defaults while using custom keystores, WSO2 API-M will fail to start due to password mismatch.
wso2:
  apim:
    configurations:
      security:
        keystores:
          primary:
            password: ""
            keyPassword: ""
          internal:
            password: ""
            keyPassword: ""
          tls:
            password: ""
            keyPassword: ""
        truststore:
          password: ""
2.4 Component Configuration References
All available configuration options for each Helm chart are documented in their respective component guides:
3. Security
3.1 Mount Keystore and Truststore
The default WSO2 keystores use a self-signed certificate which is fine for evaluation but not for production. Use this section to mount your own organisation-issued or CA-signed certificates so that clients can establish trusted SSL connections to your API Manager deployment. The secret must include the primary keystore, internal keystore, and truststore. You can also include keystores for HTTPS transport.
kubectl create secret generic apim-keystore-secret \
  --from-file=wso2carbon.jks \
  --from-file=client-truststore.jks \
  -n apim
Keep the following in mind:
- The secret must be created in the same namespace as the deployment (e.g.
apim). - Use the same secret name in both the
kubectlcommand above and in yourvalues.yaml. - If you are using different keystore filenames or aliases, update the helm chart configurations accordingly.
Then reference the secret name in your values.yaml. For more details on configuring keystores, see Configuring Keystores in WSO2 API Manager.
3.2 Configure the Internal Encryption Key
Mandatory in 4.7.0
The internal encryption key is required in WSO2 API Manager 4.7.0. You must set this before the first startup — changing it afterwards will cause decryption failures for any data already encrypted.
-
Generate a unique 256-bit key:
openssl rand -hex 32
!!! note
openssl is not available on Windows by default. Windows users can generate the key using PowerShell's System.Security.Cryptography.RandomNumberGenerator class.
-
Add the key to your
values.yaml:wso2: apim: configurations: encryption: key: "<generated-64-char-hex-key>"
3.3 Encrypt Secrets
By default, database passwords and other sensitive values are stored as plain text in values.yaml. This is acceptable for local testing but a security risk in production.
Option 1: Cipher Tool
Use the cipher tool from the product pack to encrypt secrets:
sh ciphertool.sh -Dconfigure -Dsymmetric -Dkey.based.encryption
Option 2: apictl
You can also use apictl to encrypt secrets. For further guidance, refer to Encrypting Secrets with apictl.
-
Initialize
apictlusing the trust store:apictl secret initExample:
apictl secret init Enter Key Store location: /home/wso2carbon/wso2am-4.7.0/repository/resources/security/wso2carbon.jks Enter Key Store password: Enter Key alias: wso2carbon Enter Key password: Key Store initialization completed -
Encrypt each of the following values using
apictl secret create:admin_passwordkeystore_passwordkeystore_key_passwordssl_keystore_passwordssl_key_passwordinternal_keystore_passwordinternal_keystore_key_passwordtruststore_passwordapim_db_passwordshared_db_password
Example:
apictl secret create Enter plain alias for secret: db_password Enter plain text secret: Repeat plain text secret: db_password : eKALmLVA+HFVl7vxxxxxxxxxxxxxxxxxxxxxxxxxxxjakhHN -
Replace the plain text values in your
values.yamlwith the encrypted values. -
Enable secure vault:
# -- Secure vault enabled secureVaultEnabled: true -
If you are using a cloud provider secret manager, store the secret encryption key there and reference it so the runtime can fetch and use it to decrypt secrets:
aws:
  enabled: true
  secretsManager:
    secretIdentifiers:
      secretEncryptionKey:
        # -- Secret name in the cloud provider's secret manager
        secretName: ""
        # -- Secret key in the cloud provider's secret manager
        secretKey: ""
Note
Currently, AWS, Azure, and GCP Secrets Managers are supported.
3.4 Configure SSL
WSO2 API Manager exposes multiple services (Publisher, DevPortal, Gateway) over HTTPS. Proper SSL configuration ensures that traffic between clients and the cluster is encrypted and that certificates are trusted. For WSO2 recommended best practices, refer to the WSO2 container guide.
3.5 Configure JWKS URL
Important for local deployments
By default, the JWKS URL is set to https://am.wso2.com:9443/oauth2/jwks. If am.wso2.com is not globally routable (e.g., local /etc/hosts setup), token verification will fail. Override the URL to use localhost or the actual routable hostname:
wso2:
  apim:
    configurations:
      oauth_config:
        oauth2JWKSUrl: "https://localhost:9443/oauth2/jwks"
4. Routing Controller
4.1 Configure Envoy Gateway (Default in 4.7.x)
Envoy Gateway is the default routing controller in WSO2 API Manager 4.7.0. It uses the Kubernetes Gateway API, which provides more flexibility than traditional Ingress resources.
Step 1: Create a TLS secret
kubectl create secret tls apim-tls-secret \
  --key <private-key-file> \
  --cert <certificate-file> \
  -n apim
Step 2: Install Envoy Gateway (if not already done in Step 4 of the Quick Start)
helm install envoy-gateway oci://docker.io/envoyproxy/gateway-helm \
  --version v1.7.0 -n envoy-gateway-system \
  --set config.envoyGateway.extensionApis.enableBackend=true \
  --set envoyGateway.gateway.experimentalFeatures.enabled=true \
  --create-namespace
Step 3: Apply the Gateway manifest
kubectl apply \
  -f https://raw.githubusercontent.com/wso2/helm-apim/4.7.x/resources/assets/sample-gateway.yaml \
  -n apim
Step 4: (Optional) Create a CA ConfigMap for backend TLS
If you want Envoy Gateway to verify backend TLS certificates, create a ConfigMap with your CA certificate:
kubectl create configmap wso2-ca-cert \
  --from-file=ca.crt=<path-to-ca-cert> \
  -n apim
Step 5: Configure Envoy Gateway in values.yaml
kubernetes:
  gatewayAPI:
    enabled: true
    gatewayName: "wso2-apim-gateway"
    defaultConfigMapCreation: false
    management:
      enabled: true
      hostname: "am.wso2.com"
    gateway:
      enabled: true
      hostname: "gw.wso2.com"
    websocket:
      enabled: true
      hostname: "websocket.wso2.com"
    websub:
      enabled: true
      hostname: "websub.wso2.com"
    backendTLSPolicy:
      enabled: true
      caCertificateConfigMap: "wso2-ca-cert"
      hostname: "<hostname used in the TLS certificate>"
4.2 Configure NGINX Ingress Controller
Use this section if you are using NGINX Ingress Controller instead of Envoy Gateway.
Configure ingress annotations
You may need to customise these if you want to enable sticky sessions, change the backend protocol, or apply rate limiting.
ingressClass: "nginx"
ingress:
  tlsSecret: ""
  ratelimit:
    enabled: false
    zoneName: ""
    burstLimit: ""
  controlPlane:
    hostname: "am.wso2.com"
    annotations:
      nginx.ingress.kubernetes.io/backend-protocol: "HTTPS"
      nginx.ingress.kubernetes.io/affinity: "cookie"
      nginx.ingress.kubernetes.io/session-cookie-name: "route"
      nginx.ingress.kubernetes.io/session-cookie-hash: "sha1"
Refer to the NGINX ingress annotations documentation for the full list of supported options.
Configure TLS for Ingress
kubectl create secret tls my-tls-secret \
  --key <private-key-file> \
  --cert <certificate-file> \
  -n apim
Then set the secret name in your values.yaml under ingress.tlsSecret. Refer to the Kubernetes ingress TLS documentation for more details.
5. Gateway and User Management
5.1 Configure Multiple Gateways
By default, a single gateway environment is configured. Use this section if you need to register multiple gateway environments — for example, to route traffic to different gateways based on the API type (Regular vs APK), or to publish APIs to a single Developer Portal while serving traffic through geographically distributed gateways.
gateway:
  environments:
    - name: "Default"
      type: "hybrid"
      gatewayType: "Regular"
      provider: "wso2"
      displayInApiConsole: true
      description: "Handles both production and sandbox token traffic."
      showAsTokenEndpointUrl: true
      serviceName: "apim-gw-wso2am-gateway-service"
      servicePort: 9443
      wsHostname: "websocket.wso2.com"
      httpHostname: "gw.wso2.com"
      websubHostname: "websub.wso2.com"
    - name: "Default_apk"
      type: "hybrid"
      gatewayType: "APK"
      provider: "wso2"
      displayInApiConsole: true
      description: "Handles both production and sandbox token traffic."
      showAsTokenEndpointUrl: true
      serviceName: "apim-gw-wso2am-gateway-service"
      servicePort: 9443
      wsHostname: "websocket.wso2.com"
      httpHostname: "default.gw.wso2.com:9095"
      websubHostname: "websub.wso2.com"
See Deploy through multiple API Gateways for more details.
5.2 Configure User Store Properties
By default, WSO2 API-M uses a JDBC-based user store. Configure this section if you need to connect to an external user store such as LDAP or Active Directory, or if you need to customise how users and groups are read and managed.
userStore:
  type: "database_unique_id"
  properties:
    ReadGroups: true
Warning
If you do not need to set any custom properties, remove the properties block entirely. An empty properties block will cause the deployment to fail.
See Working with user store properties for the full list of options.
6. Deploy with Custom Values
Once your values.yaml is configured, deploy with:
helm install <release-name> <helm-chart-path> \
  --version 4.7.0-1 \
  --namespace <namespace> --create-namespace \
  --dependency-update \
  -f values.yaml
Deployment Parameters
<release-name>— Name for your Helm release (e.g.apim)<namespace>— Kubernetes namespace to deploy into (e.g.apim)<helm-chart-path>— Path to the Helm chart, either the repository chart (wso2/wso2am-all-in-one) or a local clone (e.g../all-in-one)