Enabling PrivateJet Mode to Deploy APIs
In an age where more and more applications are adopting the microservice architecture, it is obvious that container-orchestration systems such as Kubernetes have gained popularity due to the attractive functionalities they offer to simplify a number of complex management tasks. Automating computer application deployment, scaling, and management are a few of such functionalities to name. WSO2 API Manager provides cloud-native API management, where a user is able to expose microservices as managed APIs in cloud environment such as Kubernetes. This could be done with the support of WSO2-Kubernetes API Operator.
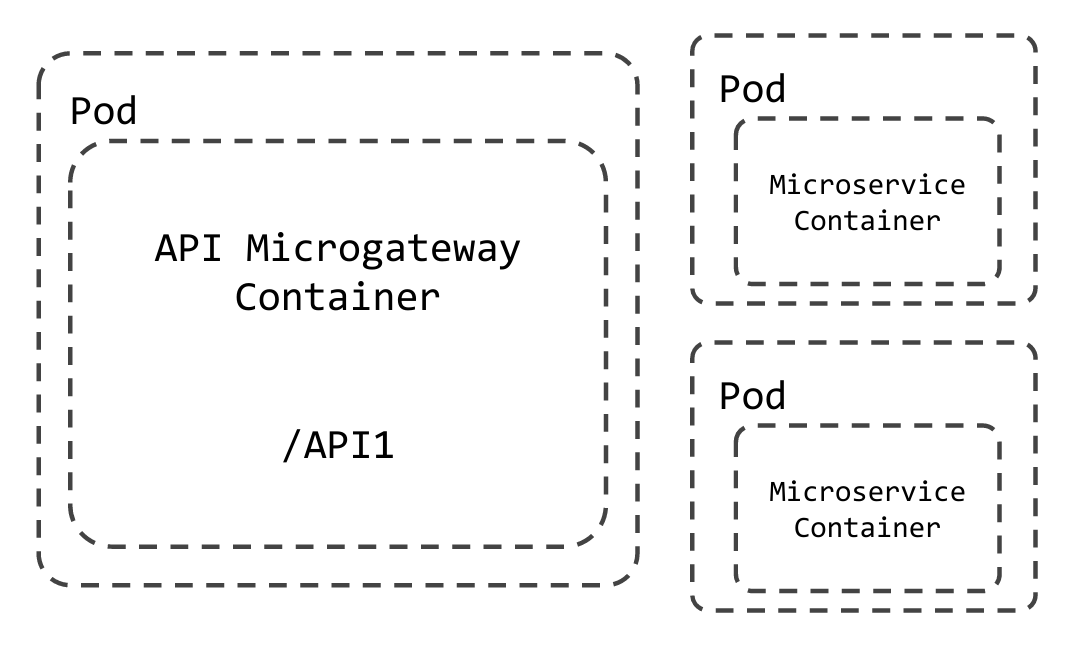
Microservices will be exposed as managed APIs in cloud clusters in the PrivetJet mode. Here, each microservice will have a dedicated WSO2 API Microgateway. This will provide maximum security and guaranteed resource allocation for API execution. As depicted in the above diagram, when the APIs published via API-Manager in cloud environments, deployment, scaling, and management tasks will handle by the WSO2 -Kubernetes API Operator itself.
Enabling PrivateJet mode
Installation Prerequisites
Kubernetes v1.12 or v1.14
Follow the steps below to enable PrivateJet mode to deploy APIs as managed APIs in cloud clusters. (Ex: Kubernetes)
-
Install and setup Kubernetes API Operator.
-
Follow the prerequisites given below in order to expose APIs using ingress controller. Go to the README guide of Expose an API using Ingress for scenarios.
Prerequisites:
i. First install the Nginx-ingress controller
ii. Change operator mode to
ingressand set ingress hostname to"internal.wso2.com".kubectl patch configmap controller-config -n wso2-system \ -p '{"data":{"operatorMode":"ingress"}}' kubectl patch configmap ingress-configs -n wso2-system \ -p '{"data":{"ingressHostName":"internal.wso2.com"}}'More Info
You can find all configs related to ingress mode in the file controler_conf.yaml. Navigate to the directory
api-operator/controller-artifactsto find the configuration file. You can set theoperatorMode,ingressHostNameand other configurations in the file.
Finally apply the changes using apictl.operatorMode: "ingress" ingressHostName: "internal.wso2.com"apictl apply -f api-operator/controller-artifacts/controler_conf.yaml -
Deploying cluster configurations
Processes in containers inside pods are authenticated when contacting the apiserver and accessing resources. In order to regulate access to the resources need to establish the RBAC Authorization with at least permissions to, Create, Delete, Update, Get , List, Post the customresourcedefinitions, apis and configmaps.
For that we need to create an service account containing an authentication token. ClusterRole which define permissions on cluster-scoped resources can then be bound to this ServiceAccount with a ClusterRoleBinding, so the ServiceAccount is authorized to perform those actions.
Follow the steps below to regulate access to the resources in the cluster.
i. Create a service account
kubectl create serviceaccount <service-account name> -n <namespace>kubectl create serviceaccount wso2am-privatejetii. Create a clusterRole
cat <<EOF | kubectl apply -f -
apiVersion: rbac.authorization.k8s.io/v1
kind: ClusterRole
metadata:
  name: clusterrole-privatejet
rules:
- apiGroups: ["","apiextensions.k8s.io","wso2.com"]
  resources: ["configmaps","customresourcedefinitions","apis"]
  verbs: ["get", "post", "create", "delete", "put", "list","update"]
EOF
iii. Create a clusterRoleBinding
cat <<EOF | kubectl apply -f -
apiVersion: rbac.authorization.k8s.io/v1
kind: ClusterRoleBinding
metadata:
 name: clusterrolebinding-privatejet
subjects:
- kind: ServiceAccount
  name: wso2am-privatejet # Name is case sensitive
  apiGroup: ""
  namespace: default
roleRef:
  kind: ClusterRole
  name: clusterrole-privatejet
  apiGroup: rbac.authorization.k8s.io
EOF
iv. Obtaining service account token
First you need to get the secret name for your service account. This can be done by executing,
kubectl get secrets -n <serviceaccount-namespace>kubectl get secretsThen, get the service account token by executing the following command,
kubectl describe secret <secret-name> -n <serviceaccount-namespace>kubectl describe secret wso2am-privatejet-token-rsf7qv. Obtaining the master URL
Execute the following command to obtain the Master URL for the purpose of establishing a connection with the cluster.
kubectl cluster-info

Result:
Kubernetes master is running at https://35.223.28.131
GLBCDefaultBackend is running at https://35.223.28.131/api/v1/namespaces/kube-system/services/default-http-backend:http/proxy
Heapster is running at https://35.223.28.131/api/v1/namespaces/kube-system/services/heapster/proxy
KubeDNS is running at https://35.223.28.131/api/v1/namespaces/kube-system/services/kube-dns:dns/proxy
Metrics-server is running at https://35.223.28.131/api/v1/namespaces/kube-system/services/https:metrics-server:/proxy
Note
If the API-Manager deployed in a kubernetes cluster Master URL and ServiceAccount token are not required to configure.
-
Configuring the cluster details.
The cluster configurations carried out in the above step, should be added in the
<API-M_HOME>/repository/conf/deployment.tomlfile or in thetenant-conf.jsonfile respect to the user.For the super tenant users the cluster configurations should be added in the
<API-M_HOME>/repository/conf/deployment.tomlfile as follows.[[ContainerMgtClusterConfig]] type = "<cloud-environment-type>" clusterName = "<cluster-name>" displayName = "<cluster-name-to_display>" properties.Replicas = <number-of-replicas> properties.AccessURL = "<access-URL>" properties.MasterURL = "<Master-URL-of-clsuter>" properties.SAToken = "<serviceacccount-token>" properties.Namespace = "<namespcae>"[[ContainerMgtClusterConfig]] type = "Kubernetes" clusterName = "docker-desktop" displayName = "cluster-1" properties.Replicas = 1 properties.AccessURL = "https://internal.wso2.com" properties.MasterURL = "https://kubernetes.docker.internal:6443" properties.SAToken = "eyJhbGciOiJSUzI1NiIsImtpZCI6Ijg2UlYySEFkaVBOVG4zZ3FhWERXQUxQVUQ0bjlzOXE3dFhpbUZNZlFiRjQifQ.eyJpc3MiOiJrdWJlcm5ldGVzL3NlcnZpY2VhY2NvdW50Iiwia3ViZXJuZXRlcy5pby9zZXJ2aWNlYWNjb3VudC9uYW1lc3BhY2UiOiJ3c28yIiwia3ViZXJuZXRlcy5pby9zZXJ2aWNlYWNjb3VudC9zZWNyZXQubmFtZSI6IndzbzJhbS1wYXR0ZXJuLTEtc3ZjLWFjY291bnQtdG9rZW4tZGR0OTkiLCJrdWJlcm5ldGVzLmlvL3NlcnZpY2VhY2NvdW50L3NlcnZpY2UtYWNjb3VudC5uYW1lIjoid3NvMmFtLXBhdHRlcm4tMS1zdmMtYWNjb3VudCIsImt1YmVybmV0ZXMuaW8vc2VydmljZWFjY291bnQvc2VydmljZS1hY2NvdW50LnVpZCI6Ijc3NmRmMjFkLTA3NjItNDM2Zi05ZDIwLTZlYzFkODMxYzc1NSIsInN1YiI6InN5c3RlbTpzZXJ2aWNlYWNjb3VudDp3c28yOndzbzJhbS1wYXR0ZXJuLTEtc3ZjLWFjY291bnQifQ.YwlSgnSnwS7BNP0q0iDHsjlq_r3RhobG-SrduuEi35VXNfipPsK3UVJcCBmDKQOzKAxRG9415h2pr3cS-QsM6PR_UU2UWlXiUO-3UtSMqVY48Ek_1wdfmfCkiE7IOeua_58CV15tXtMLom0Oh27nkmWGfTHVvImQnqho4nv26BKZH4vKWgkw0HpMt73KHdN6SlVMK0cynktO5H-2A4V2rh-uL-OUXCLON_sBypVoPc9PAMxHo-bUe0SqBPiM0SiALu-0-J6dBcwbzPb5g-yUZmHmtuw3O32C304Hgfr-4Dui3X5DSKBSeqlrjjjfrvMVNug0J4JKk3bJ56h0OgujFw" properties.Namespace = "default"Tenant users, can edit the cluster configurations in
tenant-conf.jsonfile. Log in to the Management Console (https://<hostname>:9443/carbon) and edit the tenant-conf.json file in/_system/config/apimgt/applicationdata/path."ContainerMgt": [ { "Type": "Kubernetes", "ContainerMgtInfo": [ { "ClusterName": "", "DisplayName": "", "Properties": { "MasterURL": "", "AccessURL": "", "SAToken": "", "Namespace": "default", "Replicas": 1 } } ] } ]"ContainerMgt": [ { "Type": "Kubernetes", "ContainerMgtInfo": [ { "ClusterName": "docker-desktop", "DisplayName": "cluster-1", "Properties": { "MasterURL": "https://kubernetes.docker.internal:6443", "AccessURL": "https://internal.wso2.com", "SAToken": "eyJhbGciOiJSUzI1NiIsImtpZCI6Ijg2UlYySEFkaVBOVG4zZ3FhWERXQUxQVUQ0bjlzOXE3dFhpbUZNZlFiRjQifQ.eyJpc3MiOiJrdWJlcm5ldGVzL3NlcnZpY2VhY2NvdW50Iiwia3ViZXJuZXRlcy5pby9zZXJ2aWNlYWNjb3VudC9uYW1lc3BhY2UiOiJ3c28yIiwia3ViZXJuZXRlcy5pby9zZXJ2aWNlYWNjb3VudC9zZWNyZXQubmFtZSI6IndzbzJhbS1wYXR0ZXJuLTEtc3ZjLWFjY291bnQtdG9rZW4tZGR0OTkiLCJrdWJlcm5ldGVzLmlvL3NlcnZpY2VhY2NvdW50L3NlcnZpY2UtYWNjb3VudC5uYW1lIjoid3NvMmFtLXBhdHRlcm4tMS1zdmMtYWNjb3VudCIsImt1YmVybmV0ZXMuaW8vc2VydmljZWFjY291bnQvc2VydmljZS1hY2NvdW50LnVpZCI6Ijc3NmRmMjFkLTA3NjItNDM2Zi05ZDIwLTZlYzFkODMxYzc1NSIsInN1YiI6InN5c3RlbTpzZXJ2aWNlYWNjb3VudDp3c28yOndzbzJhbS1wYXR0ZXJuLTEtc3ZjLWFjY291bnQifQ.YwlSgnSnwS7BNP0q0iDHsjlq_r3RhobG-SrduuEi35VXNfipPsK3UVJcCBmDKQOzKAxRG9415h2pr3cS-QsM6PR_UU2UWlXiUO-3UtSMqVY48Ek_1wdfmfCkiE7IOeua_58CV15tXtMLom0Oh27nkmWGfTHVvImQnqho4nv26BKZH4vKWgkw0HpMt73KHdN6SlVMK0cynktO5H-2A4V2rh-uL-OUXCLON_sBypVoPc9PAMxHo-bUe0SqBPiM0SiALu-0-J6dBcwbzPb5g-yUZmHmtuw3O32C304Hgfr-4Dui3X5DSKBSeqlrjjjfrvMVNug0J4JKk3bJ56h0OgujFw", "Namespace": "default", "Replicas": 1 } } ] } ]Note
Super tenant users can customize the container management implementations if required. Then customize classes should be added to the
<API-M_HOME>/repository/conf/deployment.tomlfile as follows.[ContainerMgtConfig] <Environment-type> = "<class-name>"[ContainerMgtConfig] Kubernetes = "org.wso2.carbon.apimgt.impl.containermgt.K8sManager_CustomClass"