Deploying WSO2 API-M in a Distributed Setup
Follow the instructions below to deploy WSO2 API Manager's five main components (Key Manager, Gateway, Publisher, Developer Portal, and Traffic Manager) in a distributed environment.
Step 1 - Install and configure WSO2 API-M
- Download the WSO2 API Manager into the designated servers for the distributed deployment.
- Unzip the WSO2 API Manager zipped archive, and rename the directory to reflect the component. For example, Key Manager, Gateway, Publisher, Developer Portal, and Traffic Manager. This unzipped directory is referred to as
<API-M_HOME>in this document. -
Follow the instructions below to optimize the distribution for the relevant server profile.
When a node starts, it starts all the components and features bundled with it. If resource utilization is a concern, the product can be run on a specific profile, so that apart from the common features, only the components and features that are required for that particular profile startup.
Note
You can either run the profile optimizer before starting the server or while starting the server. If you are running the optimizer while starting the server make sure that the optimizer is run with the
--skipConfigOptimizationoption to preserve the manually applied configurations in thedeployment.tomlfile.For more information on using profile optimizer support, see Product Profiles.
-
Replace the default certificates (where
CN=localhost) in each of the five servers, with the new certificates generated with proper common name (CN) values. This will ensure that hostname mismatch issues in the certificates will not occur.The same primary keystore should be used for all API Manager instances in order to decrypt the registry resources. For more information, see Configuring the Primary Keystore.
Tip
When creating the keystore, always use a longer validity period so that it will avoid the need for migration on the registry data when shifting to a new keystore.
Step 2 - Install and configure the databases
You can create the required databases for the API-M deployment in a separate server and point to the databases from the respective nodes. For information on configuring the databases, see Installing and Configuring the Databases.
Step 3 - Configure your deployment with production hardening
Ensure that you have taken into account the respective security hardening factors (e.g., changing and encrypting the default passwords, configuring JVM security, etc.) before deploying WSO2 API-M. For more information, see Production Deployment Guidelines.
Step 4 - Create and import SSL certificates
Create an SSL certificate for each of the WSO2 API-M nodes (i.e., Publisher, Developer Portal, Key Manager, Gateway, and Traffic Manager) and import them to the keyStore and the trustStore. For more information, see Creating SSL Certificates.
When maintaining high availability (HA) in the WSO2 API-M distributed set up, you need to create and import an SSL certificate for each of the WSO2 API-M HA nodes.
Step 5 - Configure API-M Analytics
If you wish to view reports, statistics, and graphs related to the APIs deployed in the Developer Portal, you need to configure WSO2 API-M Analytics. Follow the standard setup to configure API-M Analytics in a production setup, and follow the quick setup to configure API-M Analytics in a development setup.
Step 6 - Configure the connections among the components and start the servers
Let's configure the inter-component relationships of the distributed setup by modifying the <API-M_HOME>/repository/conf/deployment.toml file of the respective servers. After the required configuration is done in each component, it is recommended to start the servers in the following order - Key Manager, Traffic Manager, Publisher, Developer Portal, and Gateway.
Note
In a clustered environment, you use Session Affinity (Sticky Sessions) to ensure that requests from the same client always get routed to the same server. For more information, see the note on Session affinity in WSO2 API Manager below.
More information on Session Affinity in WSO2 API Manager
When a request is made to deploy an API in the API Publisher, Sticky Sessions make sure that the authentication call to obtain the session and the request to deploy the API is made to the same server. The servlet transport ports (i.e., 9443 if no port offset is configured) need to be enabled for Sticky Sessions in the load balancer that is fronting the Gateway nodes.
Similarly, when a throttling policy is created from the Admin dashboard (Publisher Node), a Siddhi execution plan is created and deployed in the Traffic Manager. Therefore, Sticky Sessions need to be enabled for the servlet transport ports (i.e., 9443 if no port offset is configured) in the load balancer that is fronting the Traffic Manager nodes.
Key validation requests sent from the Gateway node to the Key Manager nodes also require Sticky Sessions to be enabled for the servlet transport ports (i.e., 9443 if no port offset is configured) in the load balancer that is fronting the Key Manager nodes.
Info
In a multi-tenanted deployment, the <API-M_HOME>/repository/tenants directory should be mounted in all the API-M nodes
- Step 6.1 - Configure and start the Key Manager
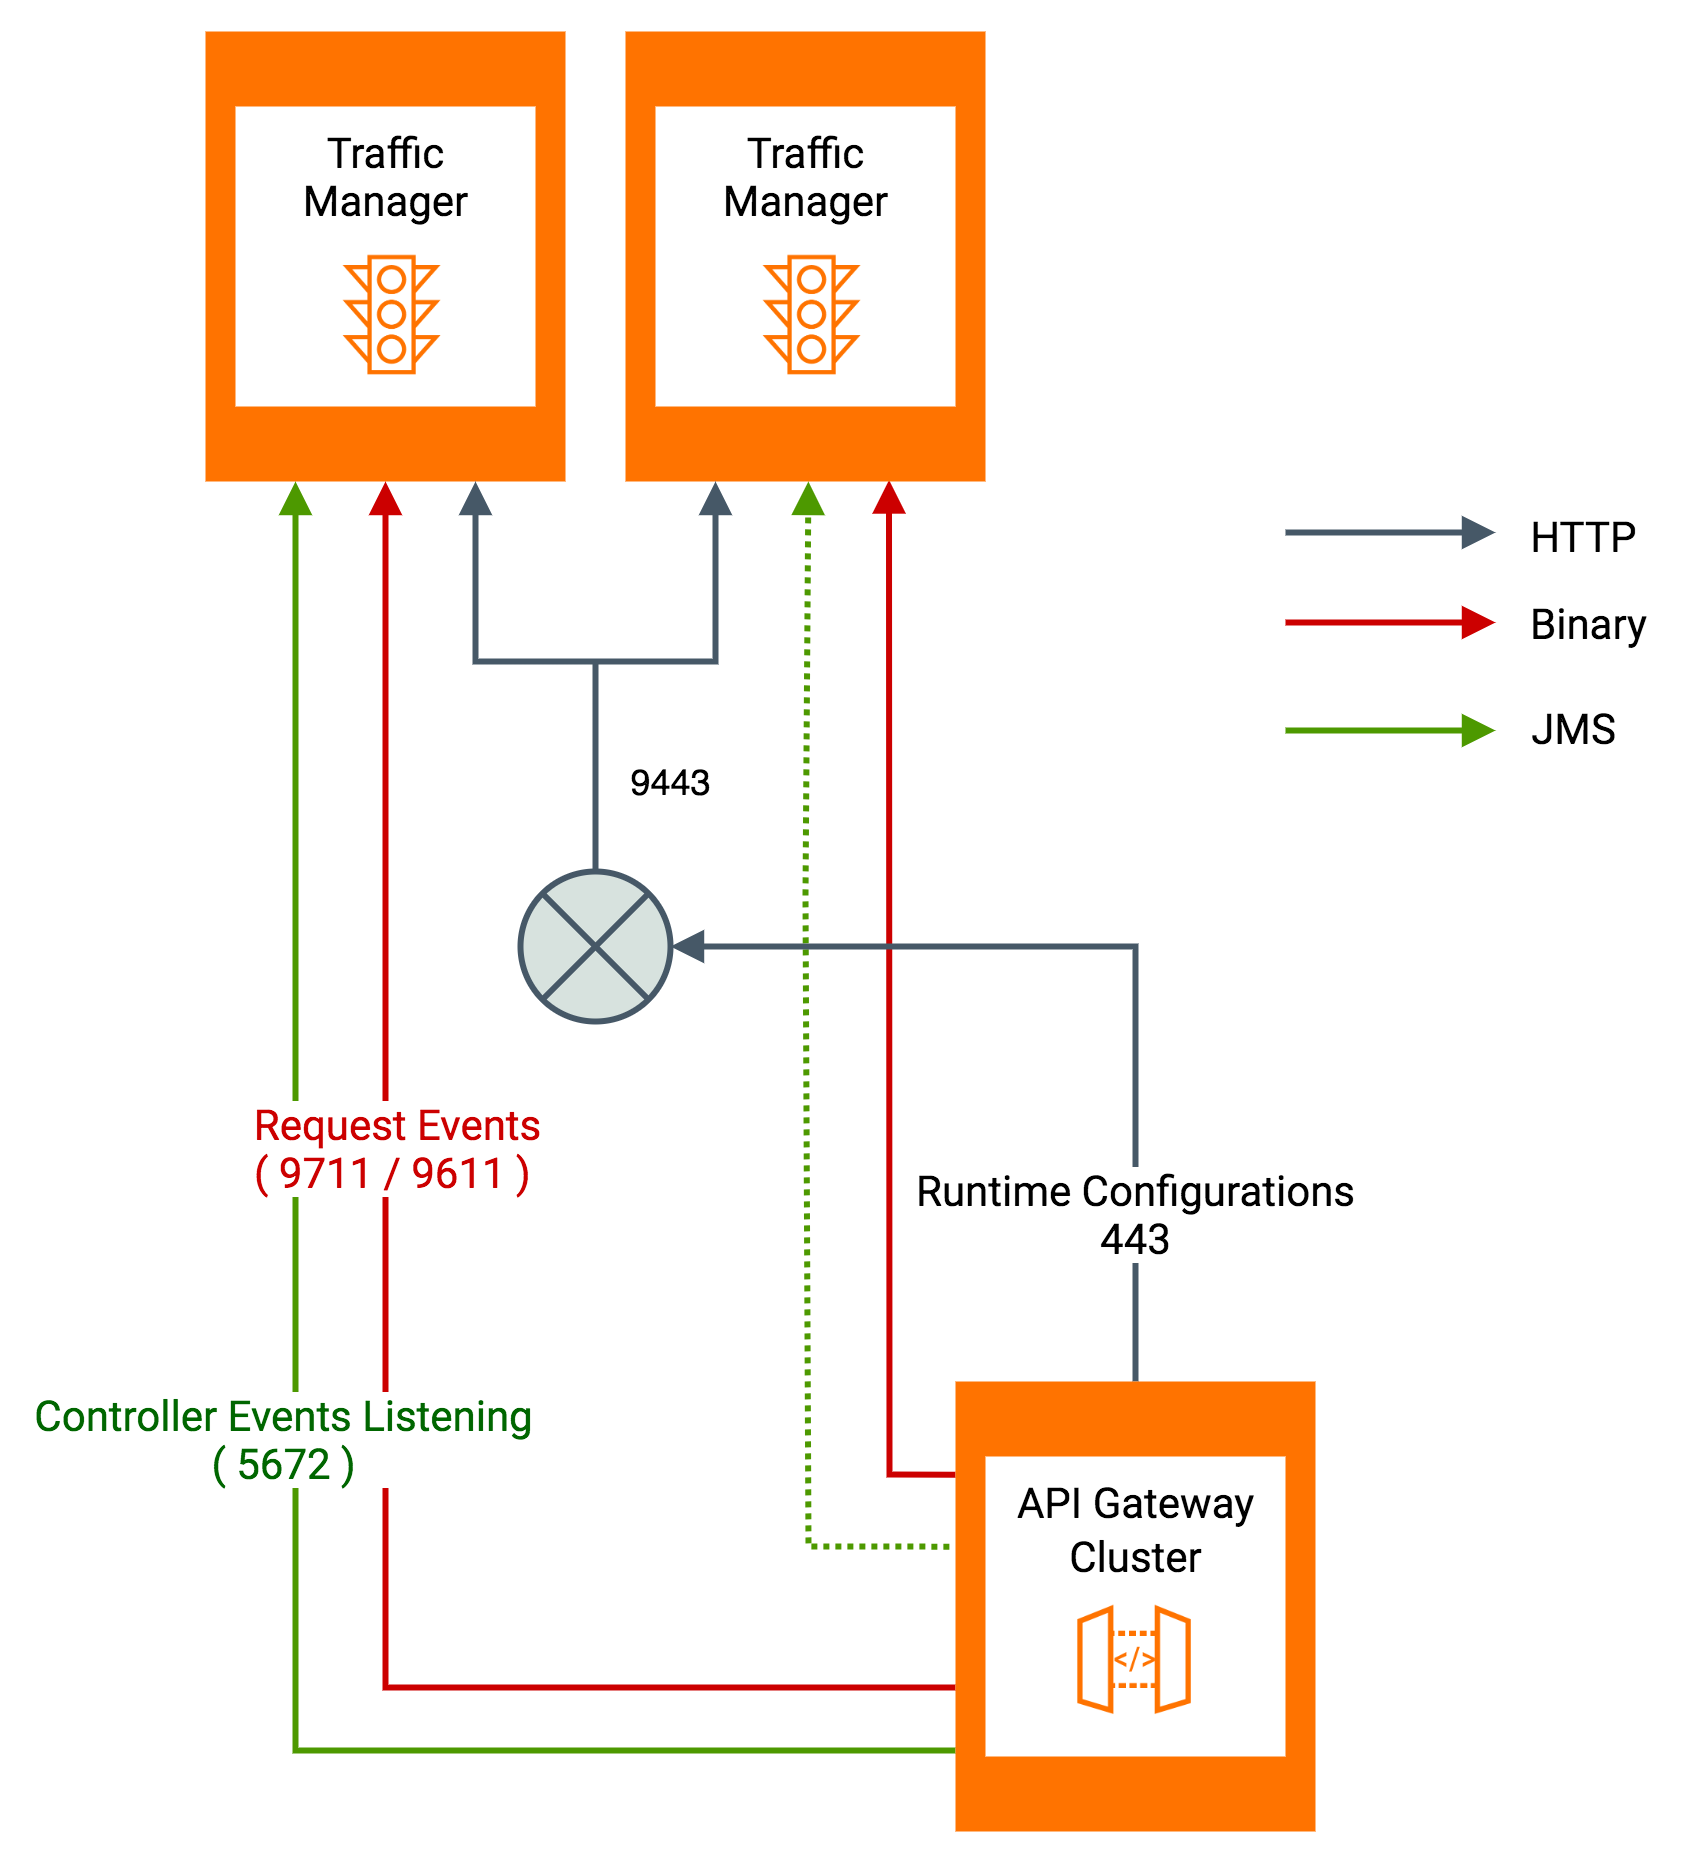
- Step 6.2 - Configure and start the Traffic Manager
- Step 6.3 - Configure and start the API Publisher
- Step 6.4 - Configure and start the Developer Portal
- Step 6.5 - Configure and start the Gateway
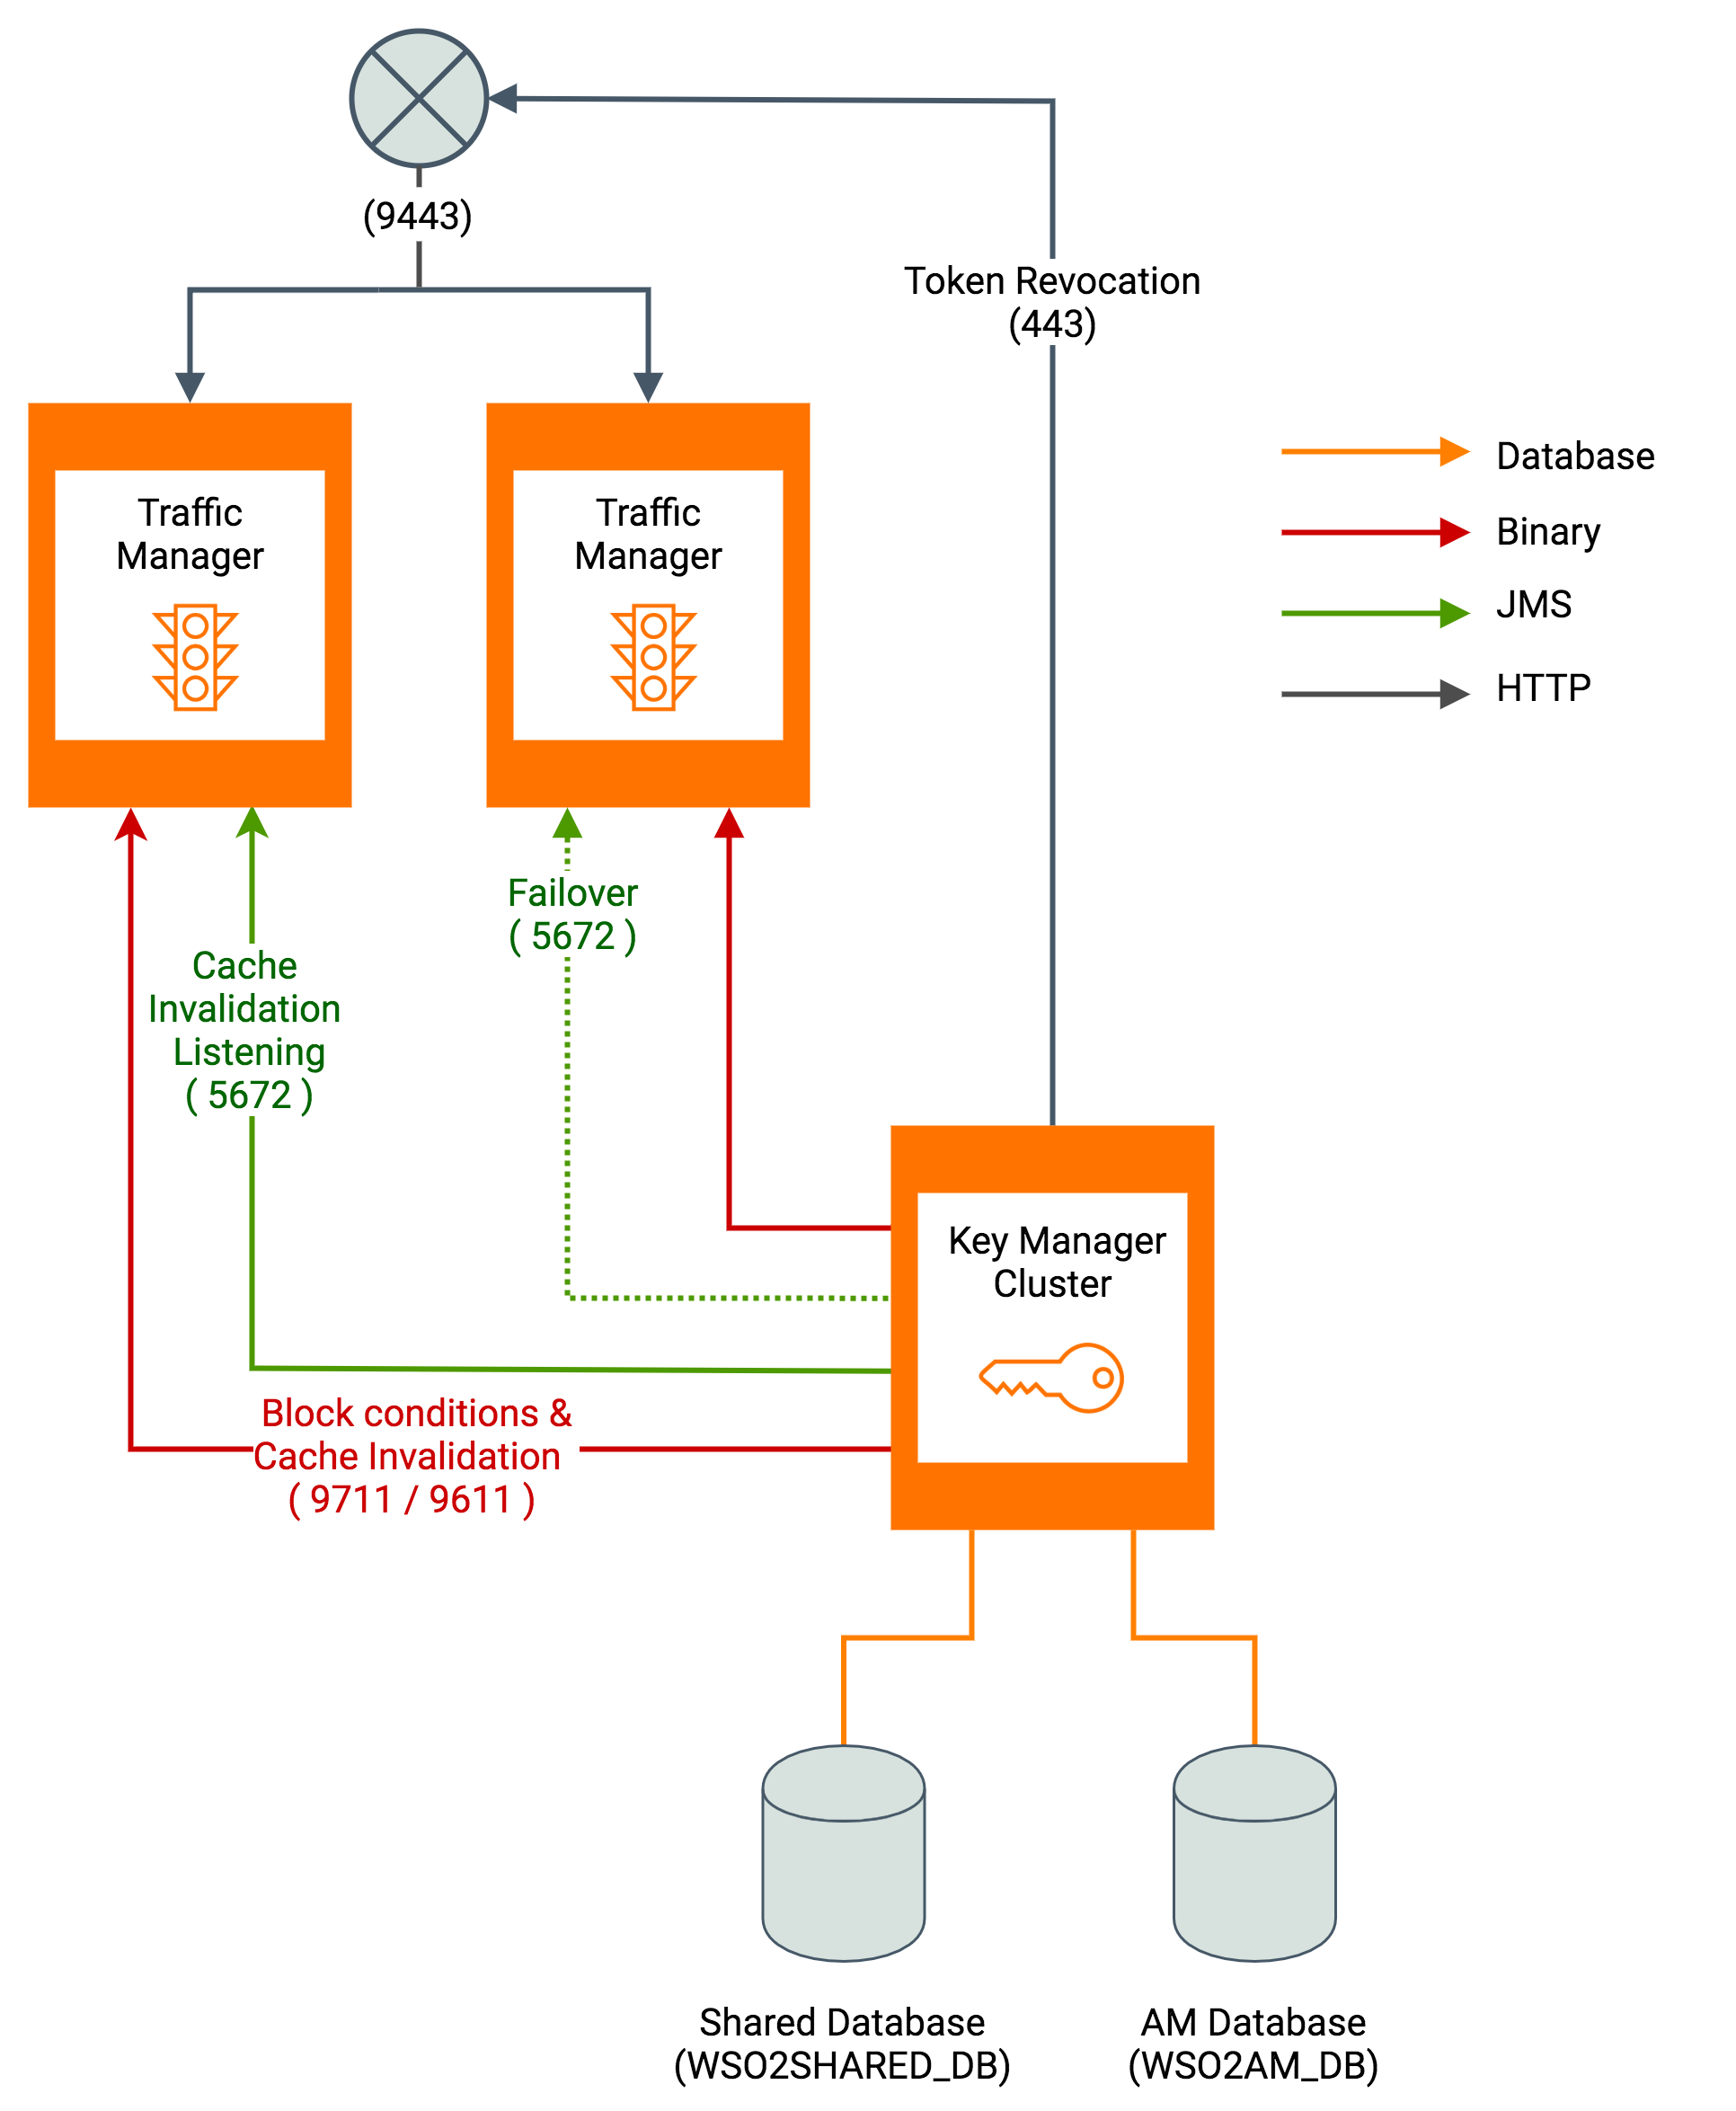
Step 6.1 - Configure and start the Key Manager
This section involves setting up the Key Manager node and enabling it to work with the other components in a distributed deployment.
Warning
Skip this step if you are using WSO2 Identity Server as the Key Manager and follow the instructions mentioned in Configuring WSO2 Identity Server as a Key Manager to configure and start the Key Manager.
-
Open the
<API-M_HOME>/repository/conf/deployment.tomlfile in the Key Manager node and make the following changes to point to the Traffic Manager nodes.[apim.throttling] throttle_decision_endpoints = ["tcp://Traffic-Manager-1-host:5672","tcp://Traffic-Manager-2-host:5672"] [[apim.throttling.url_group]] traffic_manager_urls = ["tcp://Traffic-Manager-1-host:9611"] traffic_manager_auth_urls = ["ssl://Traffic-Manager-1-host:9711"] [[apim.throttling.url_group]] traffic_manager_urls = ["tcp://Traffic-Manager-2-host:9611"] traffic_manager_auth_urls = ["ssl://Traffic-Manager-2-host:9711"] [[event_listener]] id = "token_revocation" type = "org.wso2.carbon.identity.core.handler.AbstractIdentityHandler" name = "org.wso2.is.notification.ApimOauthEventInterceptor" order = 1 [event_listener.properties] notification_endpoint = "https://[Traffic-Manager-LB-Host]/internal/data/v1/notify" username = "${admin.username}" password = "${admin.password}" 'header.X-WSO2-KEY-MANAGER' = "default"[apim.throttling] throttle_decision_endpoints = ["tcp://Traffic-Manager-host:5672"] [[apim.throttling.url_group]] traffic_manager_urls = ["tcp://Traffic-Manager-host:9611"] traffic_manager_auth_urls = ["ssl://Traffic-Manager-host:9711"] [[event_listener]] id = "token_revocation" type = "org.wso2.carbon.identity.core.handler.AbstractIdentityHandler" name = "org.wso2.is.notification.ApimOauthEventInterceptor" order = 1 [event_listener.properties] notification_endpoint = "https://Traffic-Manager-host:${mgt.transport.https.port}/internal/data/v1/notify" username = "${admin.username}" password = "${admin.password}" 'header.X-WSO2-KEY-MANAGER' = "default" -
If you wish to encrypt the Auth Keys (access tokens, client secrets, and authorization codes), see Encrypting OAuth Keys.
-
Optionally, add the following configuration to enable distributed cache invalidation within the Key Manager nodes.
[apim.cache_invalidation] enabled = true domain = "km-domain" -
If you need to configure High Availability (HA) for the Key Manager, use a copy of the active instance configured above as the second Key Manager active instance and configure a load balancer fronting the two Key Manager instances.
For information on configuring the load balancer, see Configuring the Proxy Server and the Load Balancer.
-
Start the WSO2 API-M Key Manager node(s).
For more information on starting a WSO2 server, see Starting the server.
cd <API-M_HOME>/bin/ sh wso2server.sh -Dprofile=api-key-managercd <API-M_HOME>\bin\ wso2server.bat --run -Dprofile=api-key-manager
Sample configuration for the Key Manager
[server]
server_role = "api-key-manager"
hostname = "km.wso2.com"
node_ip = "127.0.0.1"
offset=0
[user_store]
type = "database_unique_id"
[super_admin]
username = "admin"
password = "admin"
create_admin_account = true
[database.apim_db]
type = "mysql"
hostname = "db.wso2.com"
name = "apim_db"
port = "3306"
username = "root"
password = "root"
[database.shared_db]
type = "mysql"
hostname = "db.wso2.com"
name = "shared_db"
port = "3306"
username = "root"
password = "root"
[keystore.tls]
file_name = "wso2carbon.jks"
type = "JKS"
password = "wso2carbon"
alias = "wso2carbon"
key_password = "wso2carbon"
[truststore]
file_name = "client-truststore.jks"
type = "JKS"
password = "wso2carbon"
[apim.throttling]
throttle_decision_endpoints = ["tcp://tm.wso2.com:5675"]
[[apim.throttling.url_group]]
traffic_manager_urls=["tcp://tm.wso2.com:9614"]
traffic_manager_auth_urls=["ssl://tm.wso2.com:9714"]
[[event_listener]]
id = "token_revocation"
type = "org.wso2.carbon.identity.core.handler.AbstractIdentityHandler"
name = "org.wso2.is.notification.ApimOauthEventInterceptor"
order = 1
[event_listener.properties]
notification_endpoint = "https://tm.wso2.com:9446/internal/data/v1/notify"
username = "${admin.username}"
password = "${admin.password}"
'header.X-WSO2-KEY-MANAGER' = "default"
[apim.cache_invalidation]
enabled = true
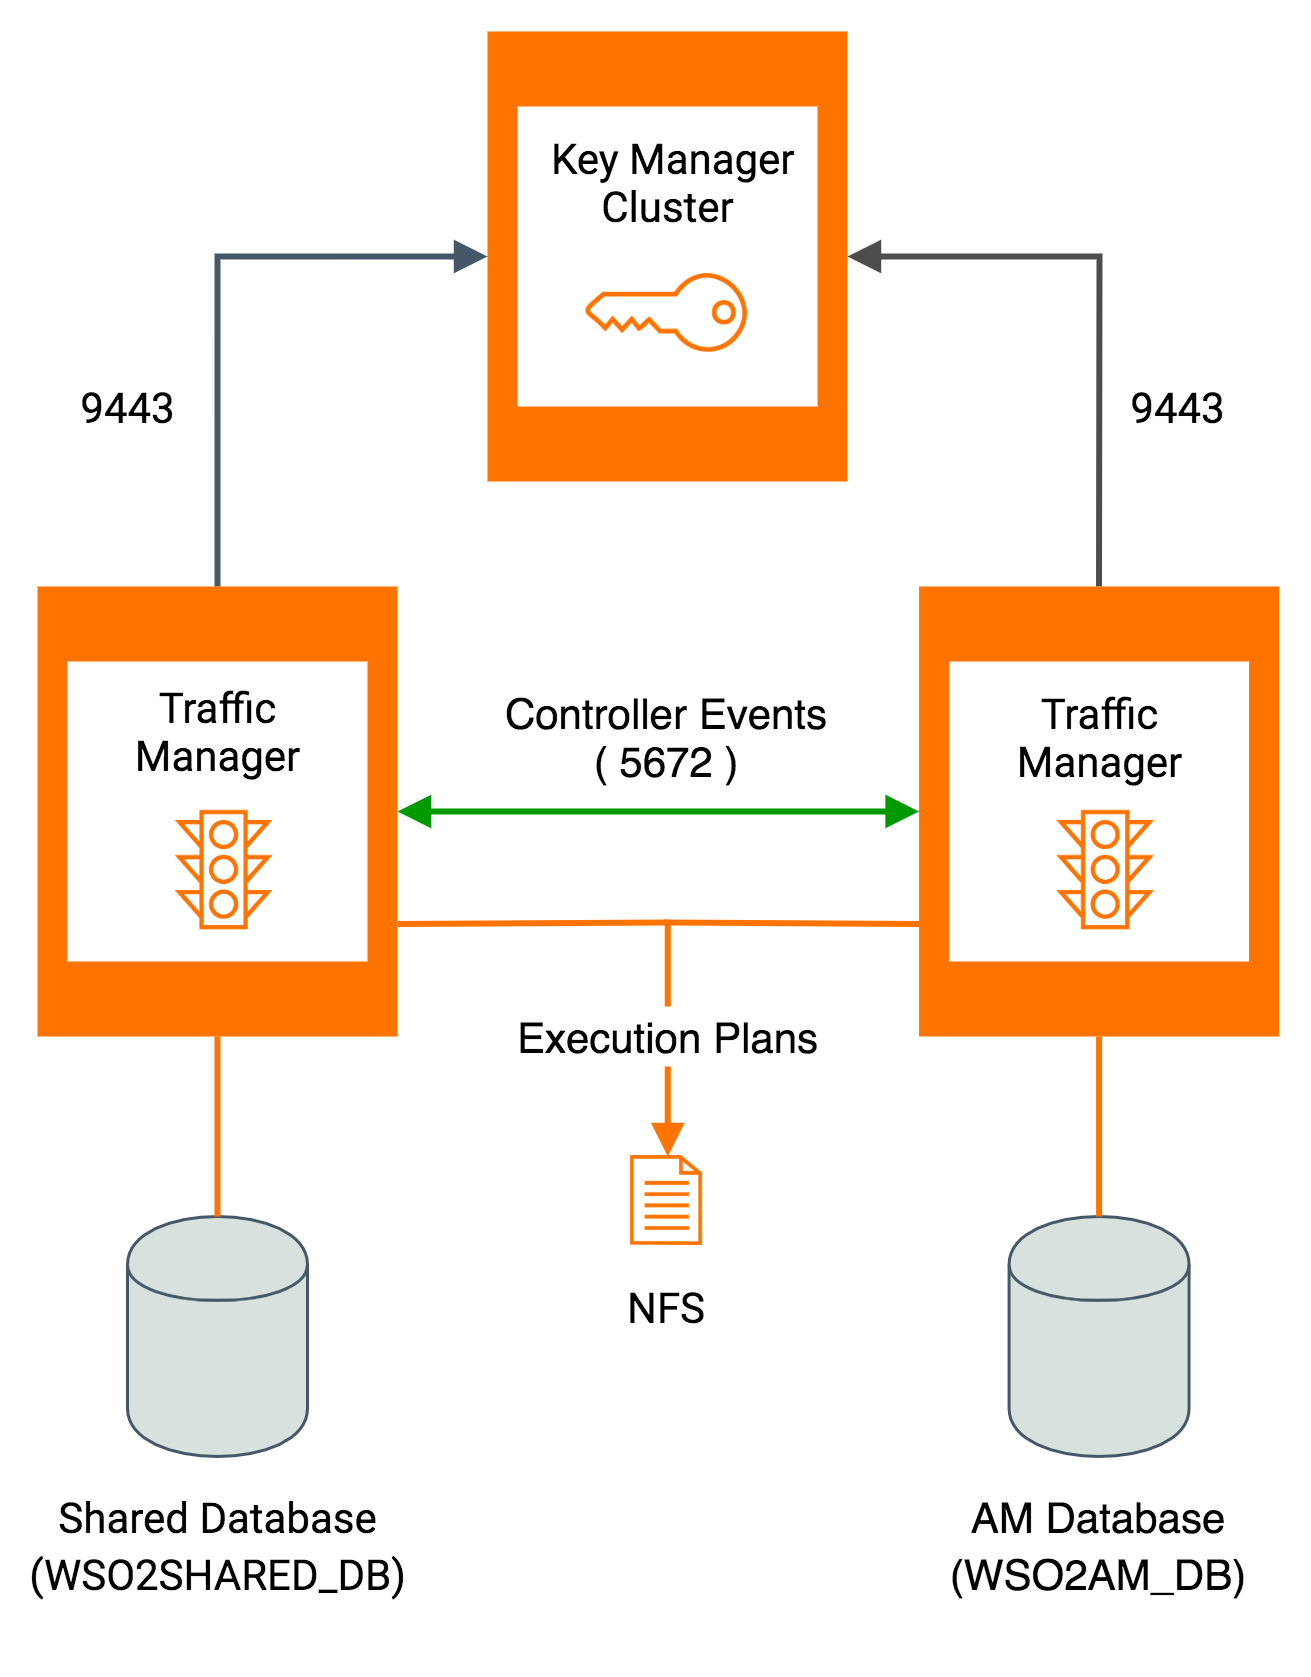
domain = "km-domain"Step 6.2 - Configure and start the Traffic Manager
This section involves setting up the Traffic Manager node(s) and enabling it to work with the other components in a distributed deployment.
-
Open the
<API-M_HOME>/repository/conf/deployment.tomlfile in the Traffic Manager node and change as following to point to Key Manager nodes.[apim.key_manager] service_url = "https://[Key-Manager-LB-host]/services/" username = "$ref{super_admin.username}" password = "$ref{super_admin.password}"[apim.key_manager] service_url = "https://[Key-Manager-host]:${mgt.transport.https.port}/services/" username = "$ref{super_admin.username}" password = "$ref{super_admin.password}" -
Optionally, configure High Availability (HA) for the Traffic Manager
-
If you need to configure High Availability (HA) for the Traffic Manager, use a copy of the existing Traffic Manager instance as the second Traffic Manager active instance and configure a load balancer fronting the two Traffic Manager instances.
-
Mount the
<API-M_HOME>/repository/deployment/server/executionplansdirectory of all Traffic Manager nodes to a shared file system. This will synchronize the content among nodes allowing the throttling policies to be shared among them. -
Open the
<API-M_HOME>/repository/conf/deployment.tomlfile in the Traffic Manager node and add the following configuration to publish events to the other node.[apim.throttling] event_duplicate_url = ["tcp://Traffic-Manager-2-host:5672"][apim.throttling] event_duplicate_url = ["tcp://Traffic-Manager-1-host:5672"]
-
-
Start the WSO2 API-M Traffic Manager node(s) by running the following command in the command prompt.
For more information on starting a WSO2 server, see Starting the server.
cd <API-M_HOME>/bin/ sh wso2server.sh -Dprofile=traffic-managercd <API-M_HOME>\bin\ wso2server.bat --run -Dprofile=traffic-manager
Sample configuration for the Traffic Manager
[server]
hostname = "tm.wso2.com"
node_ip = "127.0.0.1"
server_role = "traffic-manager"
offset=3
[user_store]
type = "database"
[super_admin]
username = "admin"
password = "admin"
create_admin_account = true
[database.apim_db]
type = "mysql"
hostname = "db.wso2.com"
name = "apim_db"
port = "3306"
username = "root"
password = "root"
[database.shared_db]
type = "mysql"
hostname = "db.wso2.com"
name = "shared_db"
port = "3306"
username = "root"
password = "root"
[keystore.tls]
file_name = "wso2carbon.jks"
type = "JKS"
password = "wso2carbon"
alias = "wso2carbon"
key_password = "wso2carbon"
[truststore]
file_name = "client-truststore.jks"
type = "JKS"
password = "wso2carbon"
[apim.key_manager]
service_url = "https://km.wso2.com:9443/services/"
username= "$ref{super_admin.username}"
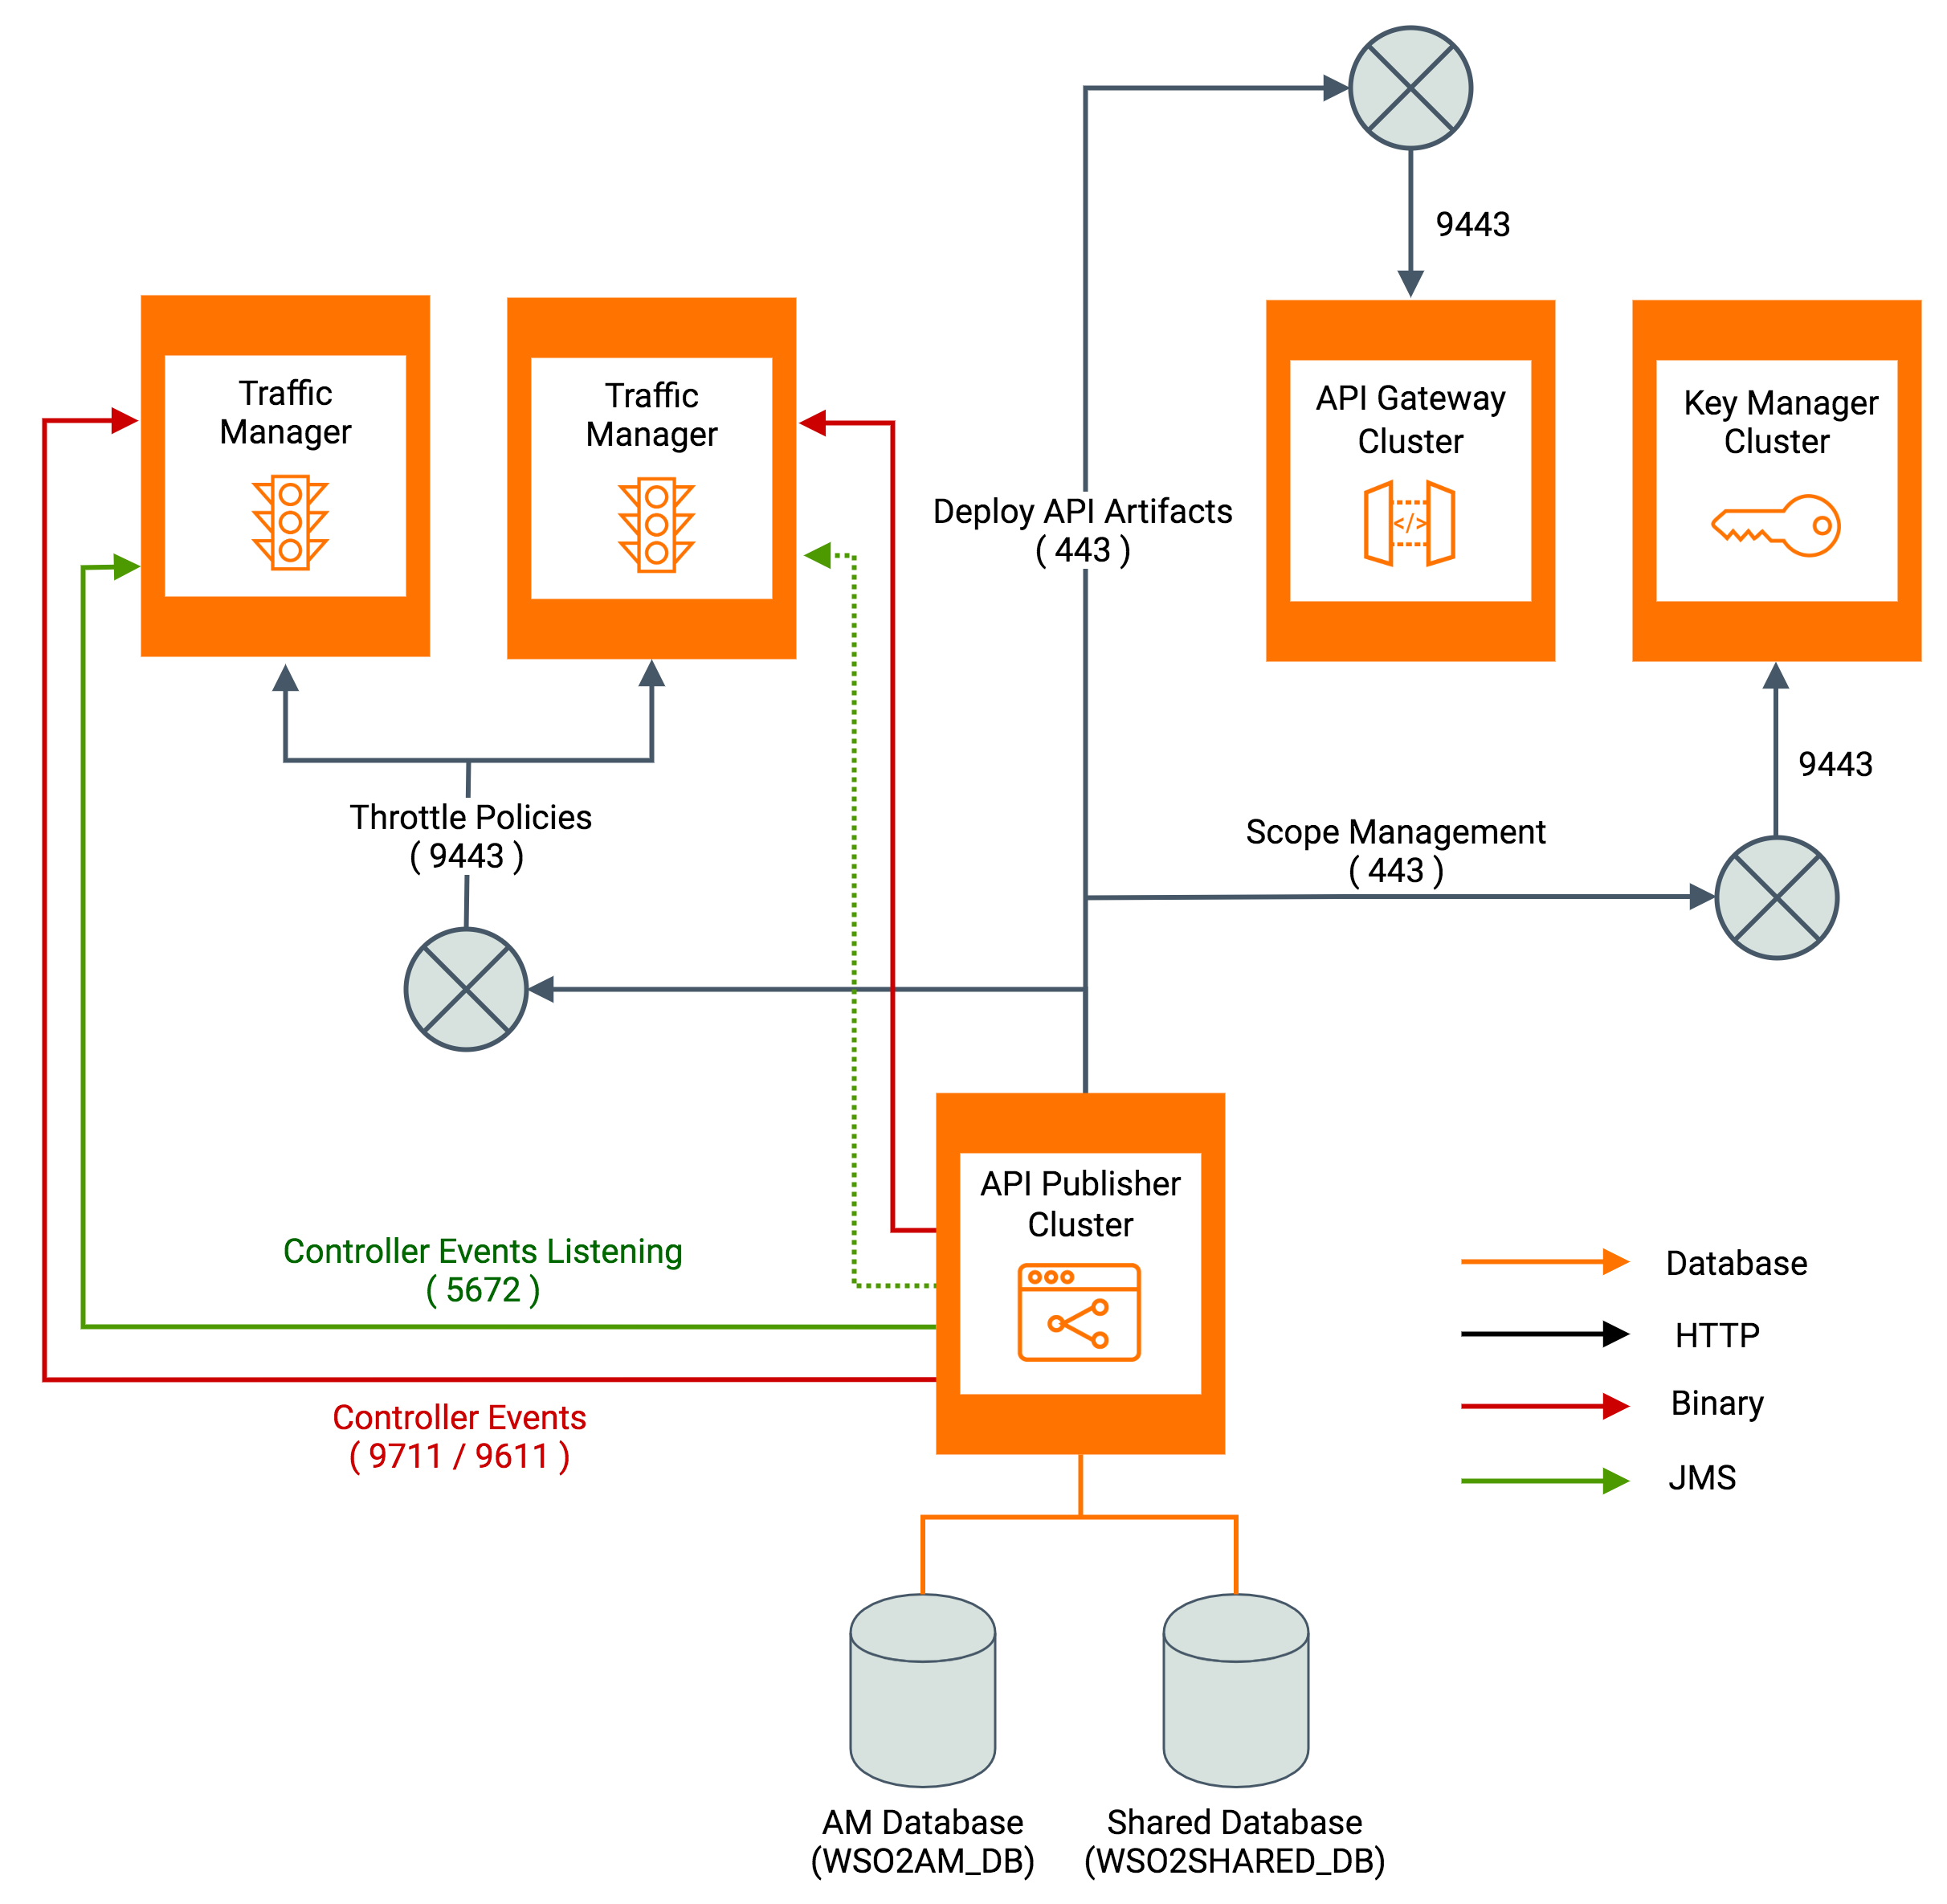
password= "$ref{super_admin.password}"Step 6.3 - Configure and start the API Publisher
This section involves setting up the API Publisher node and enabling it to work with the other components in the distributed deployment.
-
Open the
<API-M_HOME>/repository/conf/deployment.tomlfile in the API Publisher node and make the following changes.-
Configure the Publisher with the Traffic Manager. This configuration enables the publishing of throttling policies, custom templates, block conditions, API events to the Traffic Manager node.
Note
When publishing throttle policies, the admin/publisher portal communicates with traffic manager using the
service_url. Hence in HA mode, it is recommended to point this to the Traffic Manager LB. In case you do not have a load balancer fronting traffic manager nodes, you can point this to any traffic manager hostname with port. But note that in the events of throttle policies are being published, and the configured node is unavailble, that policy will not work.[apim.throttling] service_url = "https://[Traffic-Manager-LB-Host]/services/" throttle_decision_endpoints = ["tcp://Traffic-Manager-1-host:5672","tcp://Traffic-Manager-2-host:5672"] [[apim.throttling.url_group]] traffic_manager_urls = ["tcp://Traffic-Manager-1-host:9611"] traffic_manager_auth_urls = ["ssl://Traffic-Manager-1-host:9711"] [[apim.throttling.url_group]] traffic_manager_urls = ["tcp://Traffic-Manager-2-host:9611"] traffic_manager_auth_urls = ["ssl://Traffic-Manager-2-host:9711"][apim.throttling] service_url = "https://Traffic-Manager-host:${mgt.transport.https.port}/services/" throttle_decision_endpoints = ["tcp://Traffic-Manager-host:5672"] [[apim.throttling.url_group]] traffic_manager_urls = ["tcp://Traffic-Manager-host:9611"] traffic_manager_auth_urls = ["ssl://Traffic-Manager-host:9711"] -
Configure the Publisher with the Gateway. This configuration enables pushing the synapse artifact file to the gateway when an API is published.
-
If you are using a single Gateway node, configure Publisher with the Gateway as follows:
[[apim.gateway.environment]] name = "Production and Sandbox" type = "hybrid" display_in_api_console = true description = "This is a hybrid gateway that handles both production and sandbox token traffic." show_as_token_endpoint_url = true service_url = "https://[API-Gateway-Host-or-IP]:${mgt.transport.https.port}/services/" username= "${admin.username}" password= "${admin.password}" ws_endpoint = "ws://[API-Gateway-Host-or-IP]:9099" wss_endpoint = "wss://[API-Gateway-Host-or-IP]:8099" http_endpoint = "http://[API-Gateway-Host-or-IP]:${http.nio.port}" https_endpoint = "https://[API-Gateway-Host-or-IP]:${https.nio.port}" -
If you are using multiple Gateway nodes, configure Publisher with the Gateway nodes as follows based on your content synchronization mechanism.
[[apim.gateway.environment]] name = "Production and Sandbox" type = "hybrid" display_in_api_console = true description = "This is a hybrid gateway that handles both production and sandbox token traffic." show_as_token_endpoint_url = true service_url = "https://[API-Gateway-LB-Host]/services/" username= "${admin.username}" password= "${admin.password}" ws_endpoint = "ws://[API-Gateway-LB-Host-or-IP]:9099" wss_endpoint = "wss://[API-Gateway-LB-Host-or-IP]:8099" http_endpoint = "http://[API-Gateway-LB-Host]" https_endpoint = "https://[API-Gateway-LB-Host]"[[apim.gateway.environment]] name = "Production and Sandbox" type = "hybrid" display_in_api_console = true description = "This is a hybrid gateway that handles both production and sandbox token traffic." show_as_token_endpoint_url = true service_url = "https://[API-Gateway-LB-Host]/services/" username= "${admin.username}" password= "${admin.password}" ws_endpoint = "ws://[API-Gateway-LB-Host]:9099" wss_endpoint = "wss://[API-Gateway-LB-Host]:8099" http_endpoint = "http://[API-Gateway-LB-Host]" https_endpoint = "https://[API-Gateway-LB-Host]"
-
-
Configure the Developer Portal URL to appear in the Publisher UI.
[apim.devportal] url = "https://[devportal-LB-hostname]/devportal"[apim.devportal] url = "https://[devportal-hostname]:${mgt.transport.https.port}/devportal" -
Configure the Publisher with the Key Manager.
[apim.key_manager] service_url = "https://[Key-Manager-LB-host]/services/" username = "$ref{super_admin.username}" password = "$ref{super_admin.password}"[apim.key_manager] service_url = "https://[Key-Manager-host]:${mgt.transport.https.port}/services/" username = "$ref{super_admin.username}" password = "$ref{super_admin.password}"
-
-
Optionally, add the following configuration to enable distributed cache invalidation within the Publisher nodes.
[apim.cache_invalidation] enabled = true domain = "publisher-domain" -
If you need to configure High Availability (HA) for the API Publisher nodes, use a copy of the instance configured above as the second active Publisher instance. Thereafter, configure a load balancer fronting the two Publisher instances.
For information on configuring the load balancer, see Configuring the Proxy Server and the Load Balancer.
-
Start the WSO2 API-M Publisher node(s) by running the following command in the command prompt.
For more information on starting a WSO2 server, see Starting the server.
cd <API-M_HOME>/bin/ sh wso2server.sh -Dprofile=api-publishercd <API-M_HOME>\bin\ wso2server.bat --run -Dprofile=api-publisher
Sample configuration for the Publisher
[server]
hostname = "pub.wso2.com"
node_ip = "127.0.0.1"
server_role = "api-publisher"
offset=1
[user_store]
type = "database"
[super_admin]
username = "admin"
password = "admin"
create_admin_account = true
[database.apim_db]
type = "mysql"
hostname = "db.wso2.com"
name = "apim_db"
port = "3306"
username = "root"
password = "root"
[database.shared_db]
type = "mysql"
hostname = "db.wso2.com"
name = "shared_db"
port = "3306"
username = "root"
password = "root"
[keystore.tls]
file_name = "wso2carbon.jks"
type = "JKS"
password = "wso2carbon"
alias = "wso2carbon"
key_password = "wso2carbon"
[truststore]
file_name = "client-truststore.jks"
type = "JKS"
password = "wso2carbon"
[[apim.gateway.environment]]
name= "Production and Sandbox"
type= "hybrid"
display_in_api_console= true
description= "This is a hybrid gateway that handles both production and sandbox token traffic."
service_url= "https://gw.wso2.com:9447/services/"
http_endpoint = "http://gw.wso2.com:8284"
https_endpoint = "https://gw.wso2.com:8247"
username= "${admin.username}"
password= "${admin.password}"
[apim.throttling]
service_url = "https://tm.wso2.com:9446/services/"
throttle_decision_endpoints = ["tcp://tm.wso2.com:5675"]
username= "$ref{super_admin.username}"
password= "$ref{super_admin.password}"
[[apim.throttling.url_group]]
traffic_manager_urls=["tcp://tm.wso2.com:9614"]
traffic_manager_auth_urls=["ssl://tm.wso2.com:9714"]
[apim.devportal]
url = "https://store.wso2.com:9445/devportal"
[apim.key_manager]
service_url = "https://km.wso2.com:9443/services/"
username = "$ref{super_admin.username}"
password = "$ref{super_admin.password}"
[apim.cache_invalidation]
enabled = true
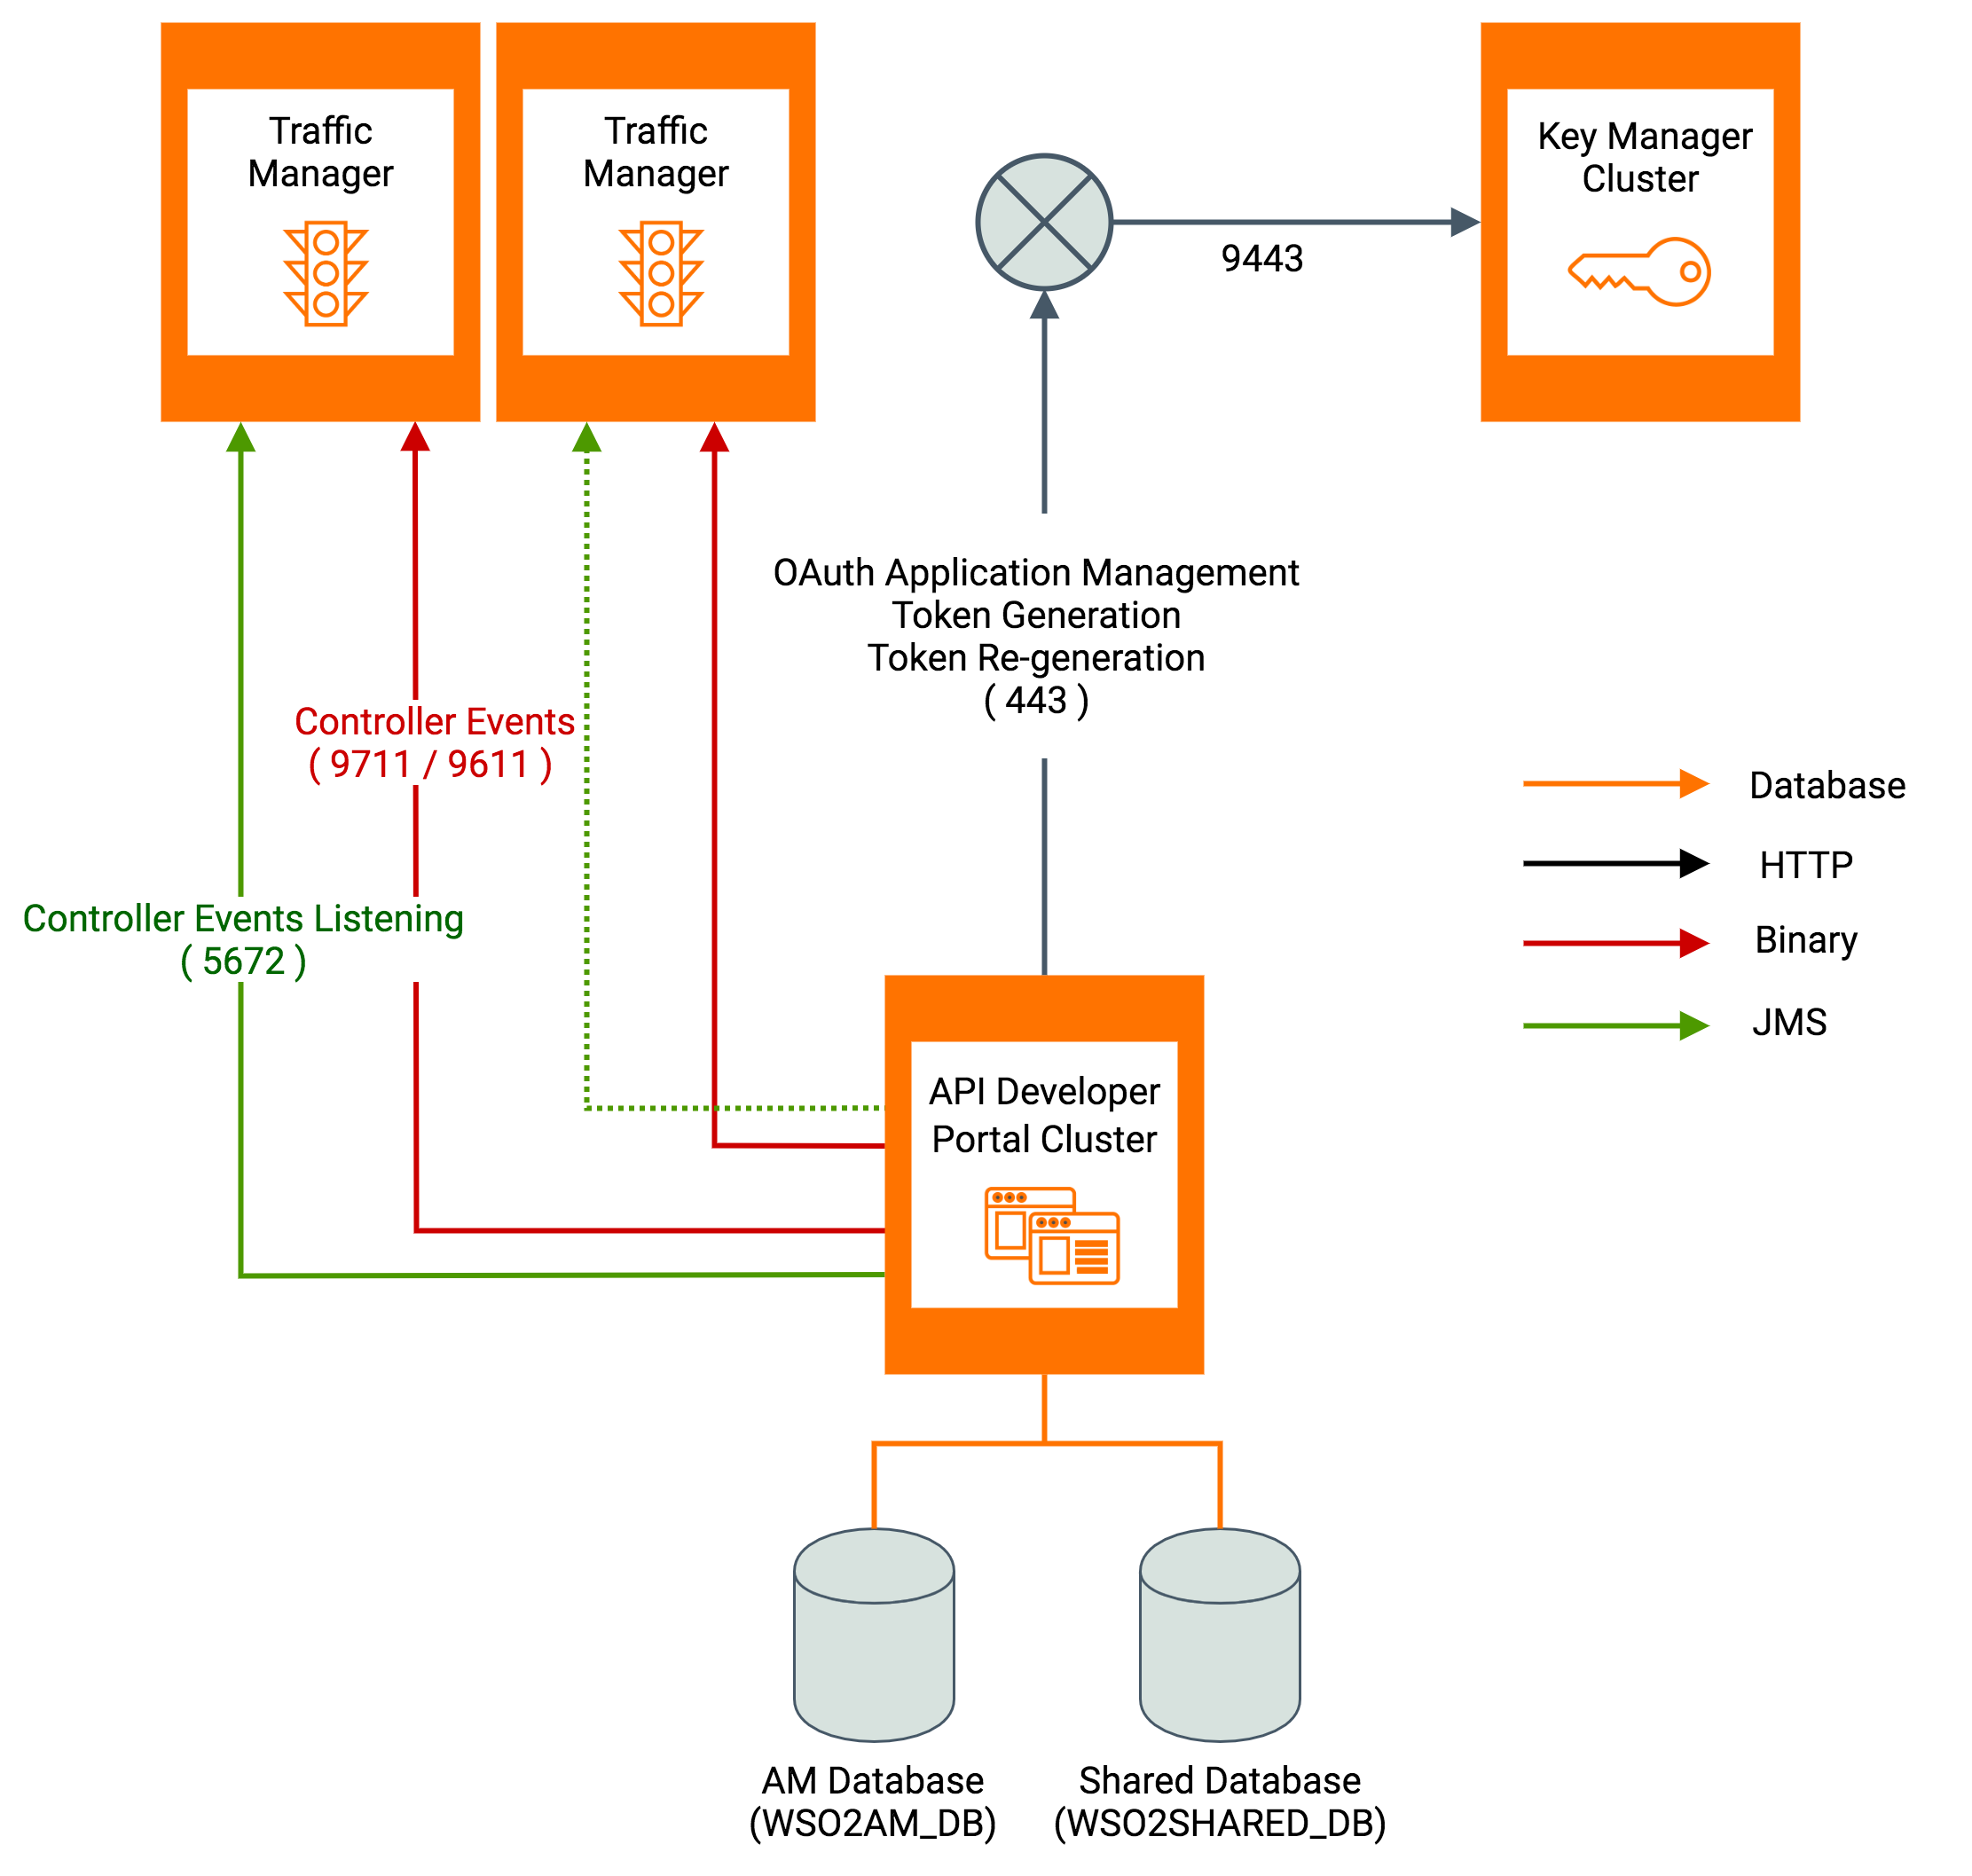
domain = "publisher-domain"Step 6.4 - Configure and start the Developer Portal
This section involves setting up the Developer Portal node and enabling it to work with the other components in the distributed deployment.
-
Open the
<API-M_HOME>/repository/conf/deployment.tomlfile in the Developer Portal node and make the following changes.-
Configure the Developer Portal with the Key Manager.
[apim.key_manager] service_url = "https://[Key-Manager-LB-host]/services/" username = "$ref{super_admin.username}" password = "$ref{super_admin.password}"[apim.key_manager] service_url = "https://[Key-Manager-host]:${mgt.transport.https.port}/services/" username = "$ref{super_admin.username}" password = "$ref{super_admin.password}" -
Configure the Developer Portal with the Traffic Manager.
[apim.throttling] throttle_decision_endpoints = ["tcp://Traffic-Manager-1-host:5672","tcp://Traffic-Manager-2-host:5672"] [[apim.throttling.url_group]] traffic_manager_urls = ["tcp://Traffic-Manager-1-host:9611"] traffic_manager_auth_urls = ["ssl://Traffic-Manager-1-host:9711"] [[apim.throttling.url_group]] traffic_manager_urls = ["tcp://Traffic-Manager-2-host:9611"] traffic_manager_auth_urls = ["ssl://Traffic-Manager-2-host:9711"][apim.throttling] throttle_decision_endpoints = ["tcp://Traffic-Manager-host:5672"] [[apim.throttling.url_group]] traffic_manager_urls = ["tcp://Traffic-Manager-host:9611"] traffic_manager_auth_urls = ["ssl://Traffic-Manager-host:9711"] -
Configure the Token Revoke endpoint to point to the Key Manager.
[apim.oauth_config] revoke_endpoint = "https://[API-Key-Manager-LB-Host]/oauth2/revoke"[apim.oauth_config] revoke_endpoint = "https://[API-Key-Manager-host-or-IP]:${mgt.transport.https.port}/oauth2/revoke" -
Configure the Developer Portal with the Gateway.
[[apim.gateway.environment]] name = "Production and Sandbox" type = "hybrid" display_in_api_console = true description = "This is a hybrid gateway that handles both production and sandbox token traffic." show_as_token_endpoint_url = true ws_endpoint = "ws://[API-Gateway-LB-Host-or-IP]:9099" wss_endpoint = "wss://[API-Gateway-LB-Host-or-IP]:8099" http_endpoint = "http://[API-Gateway-LB-Host]" https_endpoint = "https://[API-Gateway-LB]"[[apim.gateway.environment]] name = "Production and Sandbox" type = "hybrid" display_in_api_console = true description = "This is a hybrid gateway that handles both production and sandbox token traffic." show_as_token_endpoint_url = true ws_endpoint = "ws://[API-Gateway-host-or-IP]:9099" wss_endpoint = "wss://[API-Gateway-host-or-IP]:8099" http_endpoint = "http://[API-Gateway-host-or-IP]:${http.nio.port}" https_endpoint = "https://[API-Gateway-host-or-IP]:${https.nio.port}"
-
-
Optionally, add the following configuration to enable distributed cache invalidation within the Developer Portal nodes.
[apim.cache_invalidation] enabled = true domain = "devportal-domain" -
If you need to configure High Availability (HA) for the Developer Portal nodes, use a copy of the active instance configured above as the second active Developer Portal instance and configure a load balancer fronting the two Developer Portal instances.
For information on configuring the load balancer, see Configuring the Proxy Server and the Load Balancer
-
Start the Developer Portal node(s) by running the following command in the command prompt.
For more information on starting a WSO2 server, see Starting the server.
cd <API-M_HOME>/bin/ sh wso2server.sh -Dprofile=api-devportalcd <API-M_HOME>\bin\ wso2server.bat --run -Dprofile=api-devportalSample configuration for the Developer Portal
[server]
hostname = "store.wso2.com"
node_ip = "127.0.0.1"
server_role="api-store"
offset=2

[user_store]
type = "database"

[super_admin]
username = "admin"
password = "admin"
create_admin_account = true

[database.apim_db]
type = "mysql"
hostname = "db.wso2.com"
name = "apim_db"
port = "3306"
username = "root"
password = "root"

[database.shared_db]
type = "mysql"
hostname = "db.wso2.com"
name = "shared_db"
port = "3306"
username = "root"
password = "root"

[keystore.tls]
file_name =  "wso2carbon.jks"
type =  "JKS"
password =  "wso2carbon"
alias =  "wso2carbon"
key_password =  "wso2carbon"

[truststore]
file_name = "client-truststore.jks"
type = "JKS"
password = "wso2carbon"

[[apim.gateway.environment]]
name= "Production and Sandbox"
type= "hybrid"
display_in_api_console= true
description= "This is a hybrid gateway that handles both production and sandbox token traffic."
ws_endpoint= "ws://gw.wso2.com:9099"
http_endpoint = "http://gw.wso2.com:8284"
https_endpoint = "https://gw.wso2.com:8247"
show_as_token_endpoint_url = true

[apim.key_manager]
service_url = "https://km.wso2.com:9443/services/"
username= "$ref{super_admin.username}"
password= "$ref{super_admin.password}"

[apim.oauth_config]
revoke_endpoint = "https://km.wso2.com:9443/revoke"

[apim.throttling]
throttle_decision_endpoints = ["tcp://tm.wso2.com:5675"]

[[apim.throttling.url_group]]
traffic_manager_urls=["tcp://tm.wso2.com:9614"]
traffic_manager_auth_urls=["ssl://tm.wso2.com:9714"]

[apim.cache_invalidation]
enabled = true
domain = "devportal-domain"
Step 6.5 - Configure and start the Gateway
This section involves setting up the Gateway node and enabling it to work with the other components in the distributed deployment.
-
If you need to configure High Availability (HA) for the Gateway nodes, follow the instructions given below.
-
Open the
<API-M_HOME>/repository/conf/deployment.tomlfile and locate the<HostName>tag to add the cluster hostname.For example, if the hostname is
gw.am.wso2.com-[server] hostname = "gw.wso2.com" -
Specify the following incoming connection configurations in the same
deployment.tomlfile.[transport.http] properties.port = 9763 properties.proxyPort = 80 [transport.https] properties.port = 9443 properties.proxyPort = 443 -
Open the server's
/etc/hostsfile and map the hostnames to IPs.<GATEWAY-IP> gw.wso2.comxxx.xxx.xxx.xx4 gw.wso2.com -
Mount the
<API-M_HOME>/repository/deployment/server/synapse-configsdirectory and the<API-M_HOME>/repository/resources/security/client-truststore.jksfile of all the Gateway nodes to the shared file system to share all APIs and API-endpoint certificates between the Gateway nodes.Note
WSO2 recommends using a shared file system as the content synchronization mechanism to synchronize the artifacts among the WSO2 API-M Gateway nodes, because a shared file system does not require a specific node to act as a Gateway Manager, instead all the nodes have the worker manager capabilities. For this purpose, you can use a common shared file system such as Network File System (NFS) or any other shared file system.
For more information, see Synchronizing Artifacts in a Gateway Cluster.
-
-
Modify the
<API-M_HOME>/repository/conf/deployment.tomlfile in the Gateway node to configure the connection to the Key Manager component.[apim.key_manager] service_url = "https://[Key-Manager-LB-host]/services/" username = "$ref{super_admin.username}" password = "$ref{super_admin.password}"[apim.key_manager] service_url = "https://[Key-Manager-host]:${mgt.transport.https.port}/services/" username = "$ref{super_admin.username}" password = "$ref{super_admin.password}" -
If you need to enable JSON Web Token (JWT), you have to enable it in all the Gateway nodes. For more information on configuring JWT, see Generating JSON Web Token.
-
Modify the
<API-M_HOME>/repository/conf/deployment.tomlfile in the Gateway node to communicate with the Traffic Manager node(s).[[apim.throttling.url_group]] traffic_manager_urls = ["tcp://Traffic-Manager-1-host:9611"] traffic_manager_auth_urls = ["ssl://Traffic-Manager-1-host:9711"] [[apim.throttling.url_group]] traffic_manager_urls = ["tcp://Traffic-Manager-2-host:9611"] traffic_manager_auth_urls = ["ssl://Traffic-Manager-2-host:9711"] [apim.throttling] service_url = "https://[Traffic-Manager-LB-Host]/services/" throttle_decision_endpoints = ["tcp://Traffic-Manager-1-host:5672", "tcp://Traffic-Manager-2-host:5672"][[apim.throttling.url_group]] traffic_manager_urls = ["tcp://Traffic-Manager-host:9611"] traffic_manager_auth_urls = ["ssl://Traffic-Manager-host:9711"] [apim.throttling] service_url = "https://Traffic-Manager-host:${mgt.transport.https.port}/services/" throttle_decision_endpoints = ["tcp://Traffic-Manager-host:5672"] -
The public certificate of the private key that is used to sign the tokens should be added to the trust store under the
"gateway_certificate_alias"alias. For more information on importing certificates, see Create and import SSL certificates.Note
This is not applicable if you use the default certificates, which are the certificates that are shipped with the product itself.
-
If Gateways are configured for High Availability (HA), use a copy of the active instance configured above as the second active Gateway instance and configure a load balancer fronting the two Gateway instances.
For information on configuring the load balancer, see Configuring the Proxy Server and the Load Balancer
-
Start the Gateway node(s) by running the following command in the command prompt.
For more information on starting a WSO2 server, see Starting the server.
cd <API-M_HOME>/bin/ sh wso2server.sh -Dprofile=gateway-workercd <API-M_HOME>\bin\ wso2server.bat --run -Dprofile=gateway-workerSample configuration for the Gateway
[server] hostname = "gw.wso2.com" node_ip = "127.0.0.1" server_role = "gateway-worker" offset=4 [user_store] type = "database_unique_id" [super_admin] username = "admin" password = "admin" create_admin_account = true [database.shared_db] type = "mysql" hostname = "db.wso2.com" name = "shared_db" port = "3306" username = "root" password = "root" [keystore.tls] file_name = "wso2carbon.jks" type = "JKS" password = "wso2carbon" alias = "wso2carbon" key_password = "wso2carbon" [truststore] file_name = "client-truststore.jks" type = "JKS" password = "wso2carbon" [apim.key_manager] service_url = "https://km.wso2.com:9443/services/" [apim.throttling] service_url = "https://tm.wso2.com:9446/services/" throttle_decision_endpoints = ["tcp://tm.wso2.com:5675"] [[apim.throttling.url_group]] traffic_manager_urls=["tcp://tm.wso2.com:9614"] traffic_manager_auth_urls=["ssl://tm.wso2.com:9714"] [apim.cors] allow_origins = "*" allow_methods = ["GET","PUT","POST","DELETE","PATCH","OPTIONS"] allow_headers = ["authorization","Access-Control-Allow-Origin","Content-Type","SOAPAction"] allow_credentials = false