Adding an API State Change Workflow
This section explains how to add a custom workflow to control the API state changes in the API Manager. Before you begin, see Workflow Extensions for more information on the different types of workflow executors, and also, see API Lifecycle to get a better understanding on the API states.
Note
You will only need to configure either WSO2 EI or WSO2 BPS. The WSO2 API Manager configuration will be common for both.
Configuring WSO2 EI
- Download WSO2 Enterprise Integrator (WSO2 EI).
-
Set an offset of 2 to the default BPS port in
<EI_HOME>/conf/carbon.xmlfile.This prevents port conflicts that occur when you start more than one WSO2 product on the same server. For more information, see Changing the Default Ports with Offset.
<Offset>2</Offset>Tip
- If you run the API Manager and EI on different machines set the
hostnameto a different value thanlocalhost - If you change the EI port offset to a value other than 2 or run the API Manager and EI on different machines, you need to do the following:
- Search and replace the value 9765 in all the files (
.epr) inside the<APIM_HOME>/business-processesdirectory with the new port (9763 + port offset).
- Search and replace the value 9765 in all the files (
- If you run the API Manager and EI on different machines set the
-
Start the EI server and sign in to its management console (
https://<Server Host>:9443+<port offset>/carbon).Warning
If you are using Mac OS with High Sierra, you may encounter the following warning when you sign in to the management console due to a compression issue that exists in High Sierra SDK.
WARN {org.owasp.csrfguard.log.JavaLogger} - potential cross-site request forgery (CSRF) attack thwarted (user:<anonymous>, ip:xxx.xxx.xx.xx, method:POST, uri:/carbon/admin/login_action.jsp, error:required token is missing from the request)To avoid this issue open the
<EI_HOME>/conf/tomcat/catalina-server.xmlfile and changecompression="on"tocompression="off"in the Connector configuration and restart WSO2 EI. -
Select Processes > Add > BPMN and upload the
<APIM_HOME>/business-processes/api-state-change/APIStateChangeApprovalProcess.barfile to EI.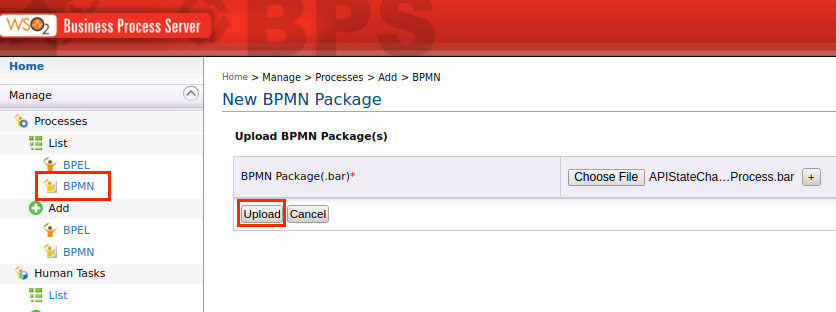
Configuring WSO2 BPS
- Download WSO2 Business Process Server.
-
Set an offset of 2 to the default BPS port in the
<BPS_HOME>/repository/conf/carbon.xmlfile.This prevents port conflicts that occur when you start more than one WSO2 product on the same server. For more information, see Changing the Default Ports with Offset.
<Offset>2</Offset>Tip
- If you run the API Manager and EI on different machines set the
hostnameto a different value thanlocalhost - If you change the BPS port offset to a value other than 2 or run the API Manager and BPS on different machines, you need to do the following:
- Search and replace the value 9765 in all the files (
.epr) inside the<APIM_HOME>/business-processesdirectory with the new port (9763 + port offset).
- Search and replace the value 9765 in all the files (
- If you run the API Manager and EI on different machines set the
-
Start the BPS server and sign in to its management console (
https://<Server Host>:9443+<port offset>/carbon).Warning
If you are using Mac OS with High Sierra, you may encounter the following warning when you sign in to the management console due to a compression issue that exists in High Sierra SDK.
WARN {org.owasp.csrfguard.log.JavaLogger} - potential cross-site request forgery (CSRF) attack thwarted (user:<anonymous>, ip:xxx.xxx.xx.xx, method:POST, uri:/carbon/admin/login_action.jsp, error:required token is missing from the request)To avoid this issue open the
<BPS_HOME>/repository/conf/tomcat/catalina-server.xmlfile and changecompression="on"tocompression="off"in the Connector configuration and restart the BPS. -
Select Processes > Add > BPMN and upload the
<APIM_HOME>/business-processes/api-state-change/APIStateChangeApprovalProcess.barfile to BPS.
Configuring the API Manager
- Open the
<APIM_HOME>/repository/conf/deployment.tomlfile and uncomment all the configuration that is set in the[apim.workflow]section and setenabletotrue.[apim.workflow] enable = true service_url = "https://localhost:9445/bpmn" username = "$ref{super_admin.username}" password = "$ref{super_admin.password}" callback_endpoint = "https://localhost:${mgt.transport.https.port}/api/am/admin/v0.15/workflows/update-workflow-status" oken_endpoint = "https://localhost:${https.nio.port}/token" client_registration_endpoint = "https://localhost:${mgt.transport.https.port}/client-registration/v0.15/register" client_registration_username = "$ref{super_admin.username}" client_registration_password = "$ref{super_admin.password}" - Change the
service_urlif you have configured the BPS/EI to run on a different port offset.
Engaging the WS Workflow Executor in the API Manager
First, enable the API state change workflow.
-
Sign in to the APIM management console (
https://<Server Host>:9443/carbon). -
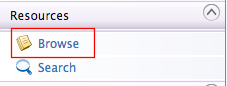
Click Resources > Browse.
-
Go to the
/_system/governance/apimgt/applicationdata/workflow-extensions.xmlresource, disable the Simple Workflow Executor and enable WS Workflow Executor.<WorkFlowExtensions> .... <!-- Publisher related workflows --> <!--<APIStateChange executor="org.wso2.carbon.apimgt.impl.workflow.APIStateChangeSimpleWorkflowExecutor" />--> <APIStateChange executor="org.wso2.carbon.apimgt.impl.workflow.APIStateChangeWSWorkflowExecutor"> <Property name="processDefinitionKey">APIStateChangeApprovalProcess</Property> <Property name="stateList">Created:Publish,Published:Block</Property> </APIStateChange> .... </WorkFlowExtensions>You have now engaged the API WS Workflow. The default configuration is set for the Created to Publish and Published to Block state changes. See Advanced Configurations for information on configuring more state changes.
-
Sign in to the API Publisher (
https://<Server Host>:9443/publisher) and publish an API.For more information, see Create a REST API and Publish an API.
-
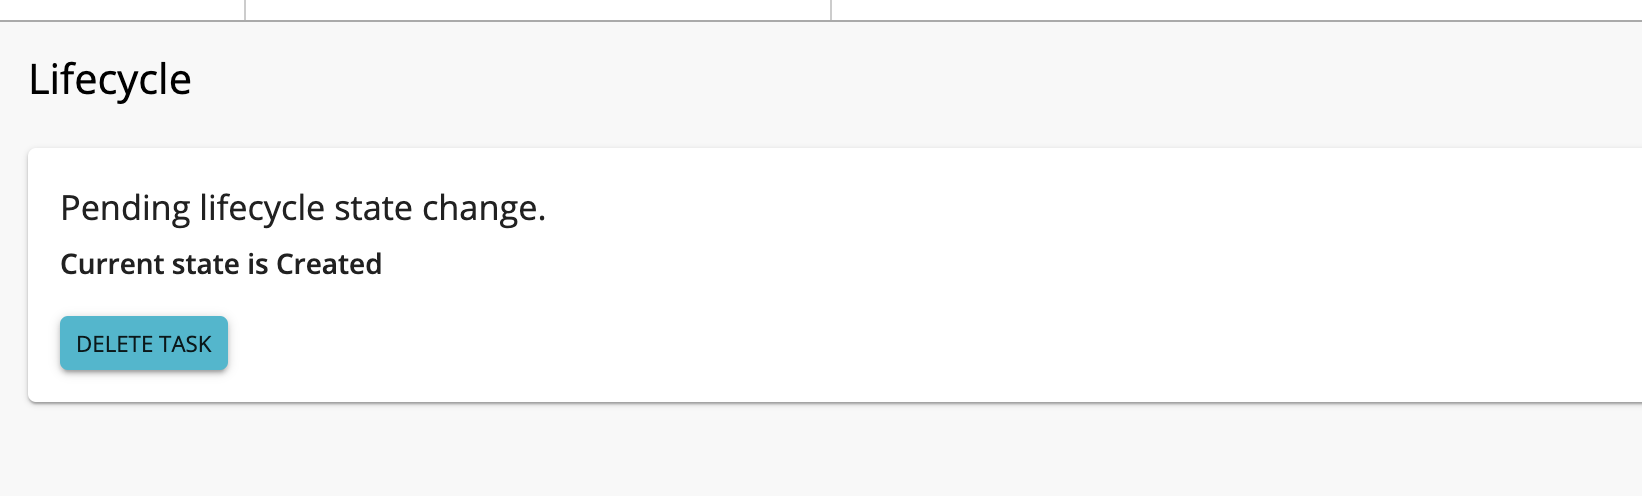
Click Lifecycle.
A message related to the publish workflow will be displayed because the workflow is enabled for Created to Publish state change.
Info
Note that the publish button will be disabled in the overview page until the workflow task is completed or deleted.

-
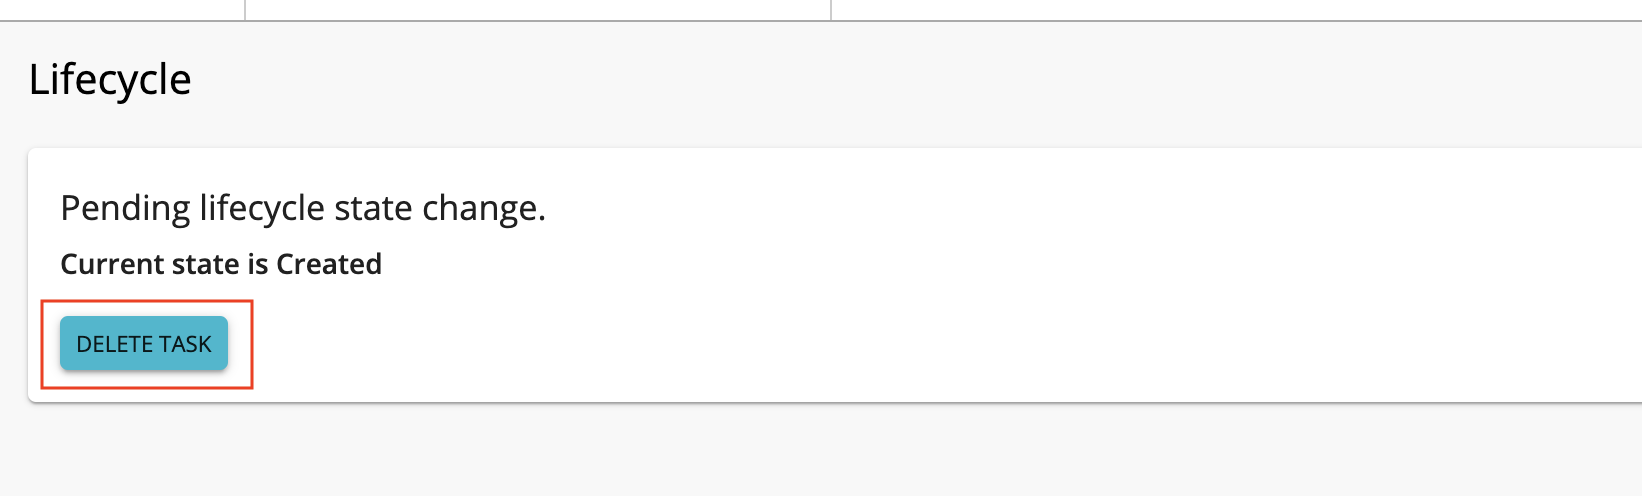
You can revoke the state change by clicking Delete Task.
-
Sign in to the Admin Portal (
https://<Server Host>:9443/admin) -
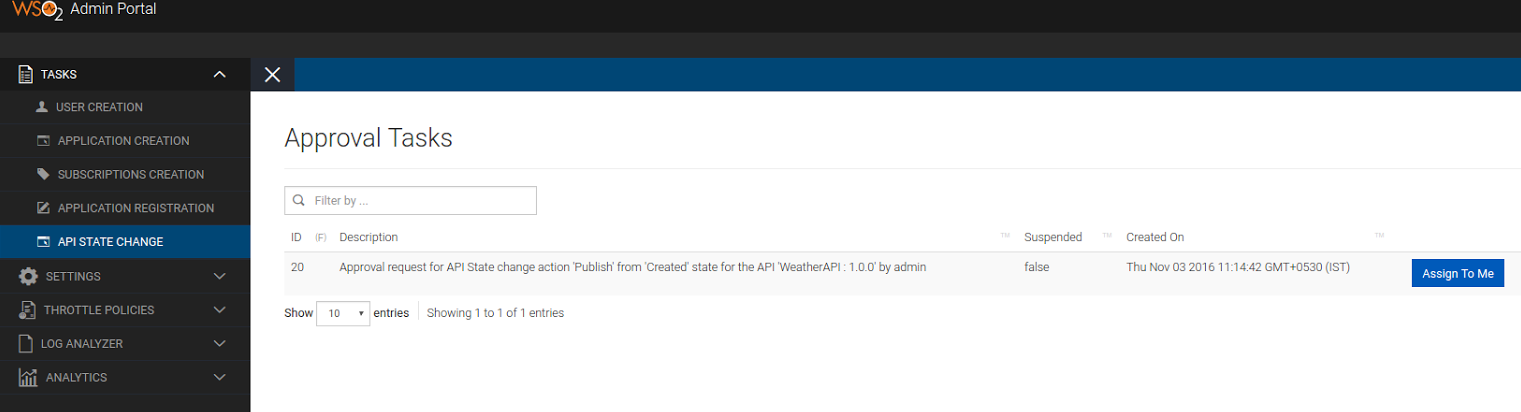
Click API State Change to see the list of tasks awaiting for approval.
-
Click Assign to Me to approve the task.
-
Select Approve and click Complete to resume and complete the API state change.

Configuring the BPS for tenants
Using the EI
-
Sign in to the EI with the credentials of the tenant.
-
Select Processes > Add > BPMN and upload the
<APIM_HOME>/business-processes/api-state-change/APIStateChangeApprovalProcess.barfile to EI. -
Copy the
<EI_HOME>/wso2/business-process/repository/deployment/server/webapps/bpmn.warweb app into the<EI_HOME>/wso2/business-process/repository/tenants/<tenant_id>/webappsdirectory. -
To engage the WS Workflow Executor, sign in to the admin console using the credentials of the tenant and repeat step 2 from the Engaging the WS Workflow Executor in the API Manager section.
Using the BPS
-
Sign in to the BPS with the credentials of the tenant. Select Processes > Add > BPMN and upload the
<APIM_HOME>/business-processes/api-state-change/APIStateChangeApprovalProcess.barfile to BPS. -
Copy the
<BPS_HOME>/repository/deployment/server/webapps/bpmn.warweb app into the<BPS_HOME>/repository/tenants/<tenant_id>/webappsdirectory. -
To engage the WS Workflow Executor, sign in to the admin console using the credentials of the tenant and repeat step 2 from the Engaging the WS Workflow Executor in the API Manager section.
Advanced configurations
Given below are the configurations that can be changed by editing the <APIM_HOME>/repository/conf/deployment.toml file.
[apim.workflow]
enable = true
service_url = "https://localhost:9445/bpmn"
username = "$ref{super_admin.username}"
password = "$ref{super_admin.password}"
callback_endpoint = "https://localhost:${mgt.transport.https.port}/api/am/admin/v0.15/workflows/update-workflow-status"
oken_endpoint = "https://localhost:${https.nio.port}/token"
client_registration_endpoint = "https://localhost:${mgt.transport.https.port}/client-registration/v0.15/register"
client_registration_username = "$ref{super_admin.username}"
client_registration_password = "$ref{super_admin.password}"The elements of the above configuration are explained below.
| Element name | Description |
|---|---|
Enabled |
Enables the Admin Portal to approve state change tasks. |
ServerUrl |
The URL of the BPMN server. |
ServerUser |
User accessing the BPMN REST API. |
ServerPassword |
Password of the user accessing the BPMN REST API. |
WorkflowCallbackAPI |
The REST API invoked by the BPMN to complete the workflow. |
TokenEndPoint |
The API call to generate the access token is passed to the BPMN process. Once the access token is received, it is used to call the workflow callback API. |
DCREndPoint |
Endpoint to generate OAuth application. This application is used by the BPMN process to generate the token. |
DCREndPointUser |
Endpoint user. |
DCREndPointPassword |
Endpoint password. f |
Note
Setting a DCREndPointUser
Create a user with exclusive apim:apiworkflow scope permissions when setting a DCREndPointUser. Please avoid using super admin credentials. If super admin credentials are used, the created OAuth application will have all the permissions related to scopes in the other REST APIs. Follow the instructions below to create a user with the apim:apiworkflow scope permissions:
- Sign in to APIM management console (
https://<Server Host>:9443/carbon) and create a role namedworkflowCallbackRole. Set the create and publisher or subscriber permissions to this role. - Go to Resources and click Browse.
-
Go to
/_system/config/apimgt/applicationdata/tenant-conf.jsonand update the role related to ‘apim:api_workflow’ scope with the newly created role.... { "Name": "apim:api_workflow", "Roles": "workflowCallbackRole" } ... -
Assign this role to a user.
- Update
<DCREndPointUser>and<DCREndPointPassword>with this user's credentials.
For more details on how to create users and roles see managing users and roles.
The configurations that can be changed by editing the /_system/governance/apimgt/applicationdata/workflow-extensions.xml are given below.
Simple workflow
<APIStateChange executor="org.wso2.carbon.apimgt.impl.workflow.APIStateChangeSimpleWorkflowExecutor" />WS workflow
<APIStateChange executor="org.wso2.carbon.apimgt.impl.workflow.APIStateChangeWSWorkflowExecutor">
    <Property name="processDefinitionKey">APIStateChangeApprovalProcess</Property>
    <Property name="stateList">Created:Publish,Published:Block</Property>
</APIStateChange>
The elements of the above configuration are explained below.
| Element Name | Mandatory/Optional | Description |
|---|---|---|
processDefinitionKey |
Mandatory | BPMN process definition ID. BPMN process provided with AM as default has APIStateChangeApprovalProcess as the ID |
stateList |
Mandatory | This is a comma separated list of the current state and intended action. For example, Created:Publish,Published:Block |
serviceEndpoint |
Optional | The URL of the BPMN process engine. This overrides the global <ServerUrl> value from the api-manager.xml file. This can be used to connect a separate workflow engine for a tenant. |
username |
Optional | Username for the external BPMN process engine. This overrides <ServerUser> defined in the api-manager.xml file for the tenant. |
password |
Optional | Password for the external BPMN process engine. This overrides <ServerPassword> defined in the api-manager.xml file for the tenant. |