Configuring an Active-Active Deployment
This page walks you through how to manually configure WSO2 API Manager (WSO2 API-M) with two active nodes that each has all the components of the API-M together in one instance (all-in-one instance).
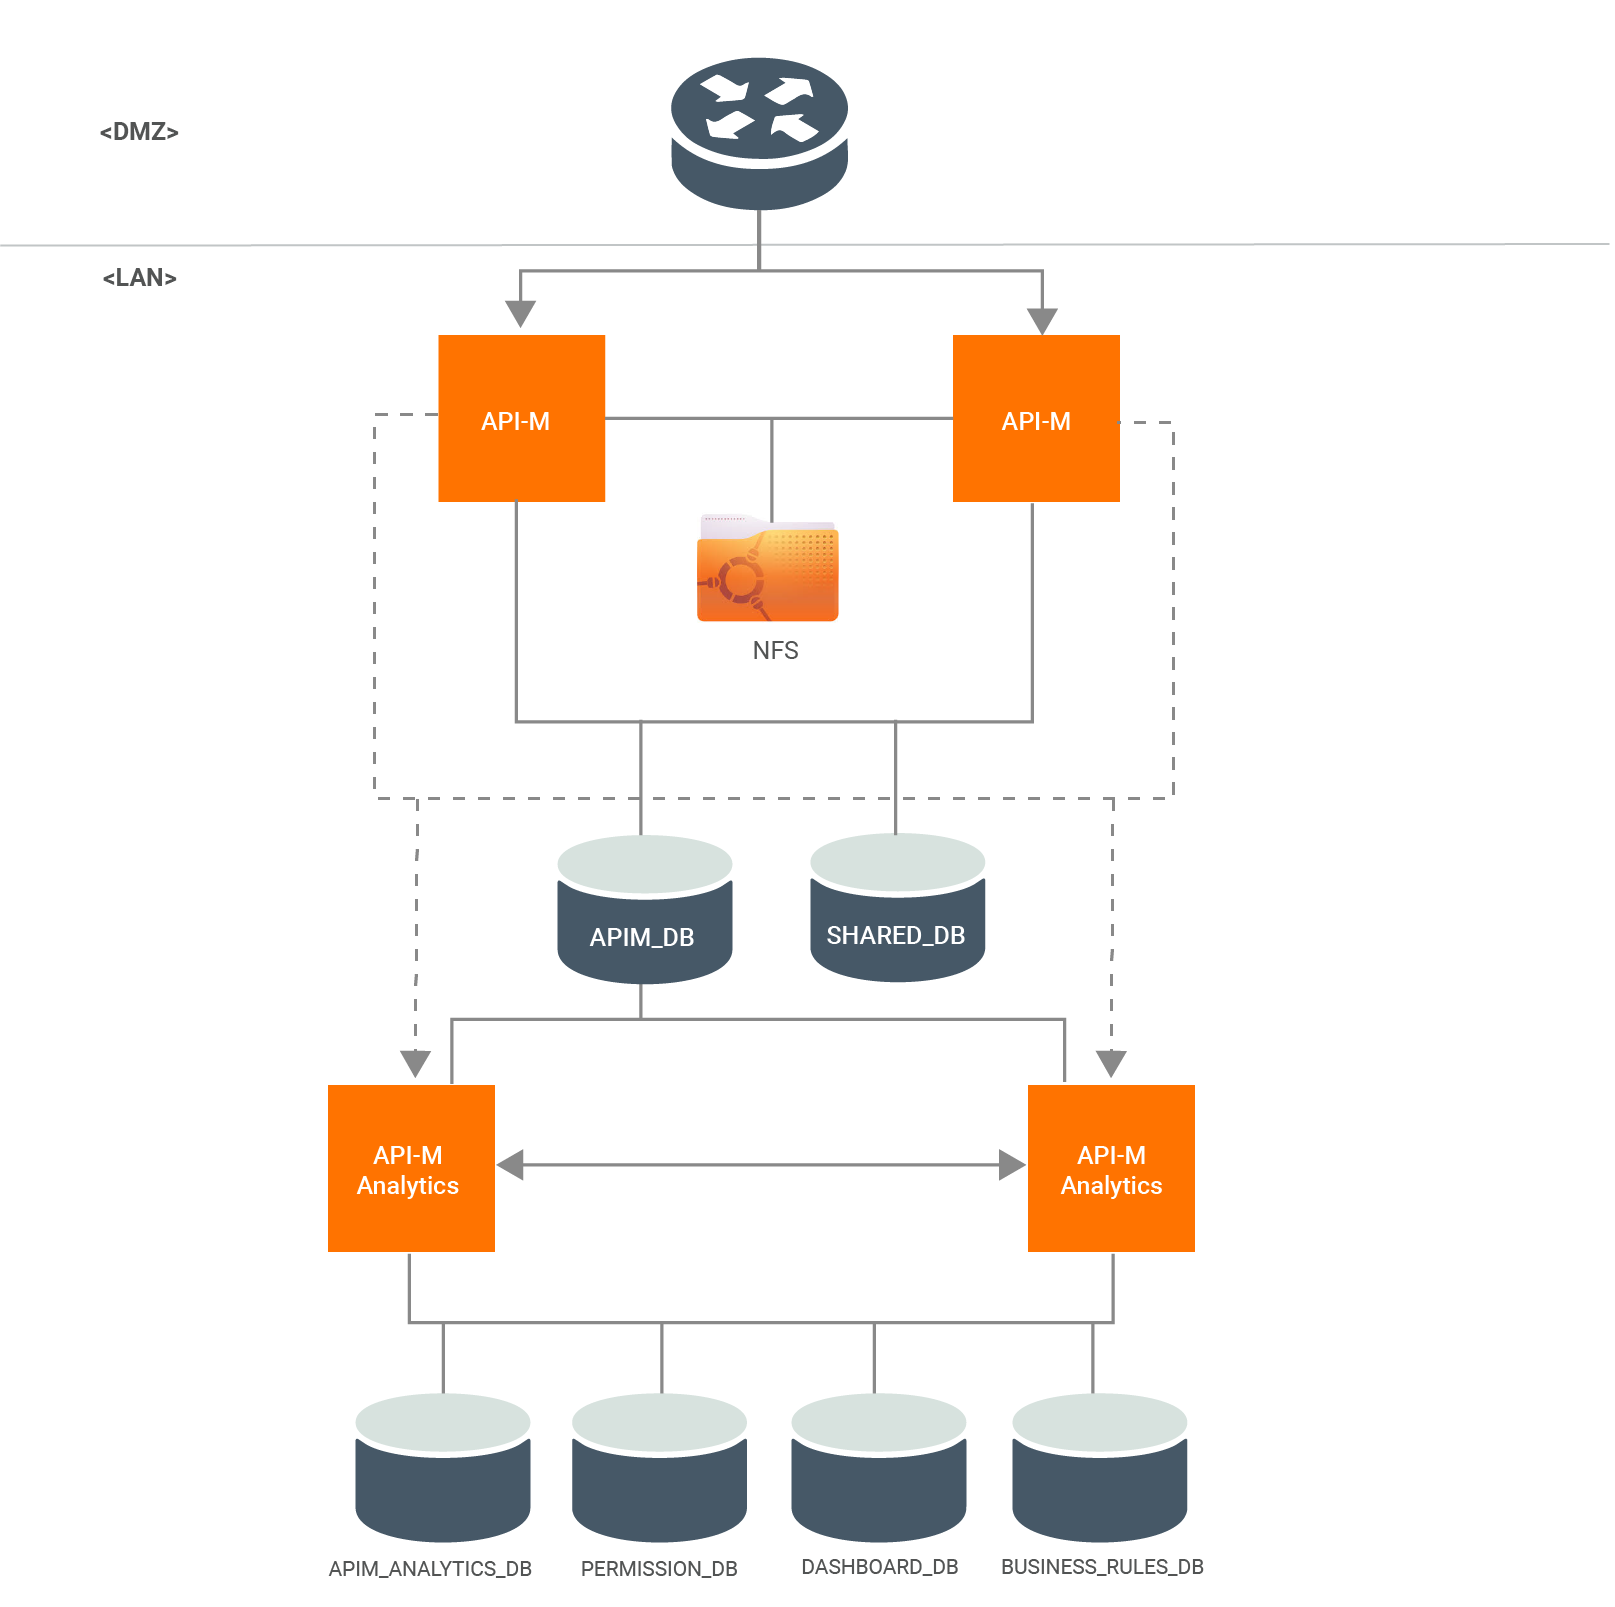
Follow the instructions below to configure and deploy API-M by using an Active-Active deployment:
- Step 1 - Create a SSL Certificate
- Step 2 - Configure the Load Balancer
- Step 3 - Configure the Databases
- Step 4 - Configure the Second WSO2 API-M Node
- Step 5 - Configure the Artifact Synchronization
- Step 6 - Configure Publisher with the Gateway
- Step 7 - Configure Gateway URLs to Expose APIs
- Step 8 - Configure Throttling
- Step 9 - Configure API-M Analytics
- Step 10 - Configure Production Hardening
- Step 11 - Start the WSO2 API-M Servers
Step 1 - Create a SSL Certificate
Info
All WSO2 products are by default shipped with a keystore file and truststore file stored in the
<PRODUCT_HOME>/repository/resources/security/ directory. The default keystore that is shipped with a WSO2 product,
wso2carbon.jks is configured with private key and self signed public key pair for all purposes, such as encrypting
sensitive information, communicating over SSL etc.
In a production setup, it is advised to set up several different keystores with separate trust chains for different use cases. For more information, see Recommendations for setting up keystores in WSO2 products.
To create an all purpose keystore or multiple keystores for authentication and protection of data, follow the steps in Creating New Keystores.
Tip
You should use the same keystore and trusstore for SSL in both WSO2 API-M instances.
Step 2 - Configure the Load Balancer
In order to access the WSO2 API-M Portals and Gateway, you need to front the system with a load balancer. You can use any load balancer that is available to your system.
Follow the steps in Configuring the Proxy Server and the Load Balancer to configure the load balancer/reverse proxy which is fronting the API-M nodes in the demiliterized zone (DMZ).
Tip
For example, if you are using the hostname api.am.wso2.com is used to access all portals (publisher, store, admin, and carbon) and gw.am.wso2.com is used to invoke APIs, the deployment.toml in <API-M_HOME>/repository/conf directory of both
nodes, should have the following reverse proxy configurations.
NOTE : Following is a sample configuration. Therefore parameter values might be different.
[server]
hostname = "api.am.wso2.com"
[transport.https.properties]
proxyPort = 443
Step 3 - Configure the Databases
The WSO2AM_DB and WSO2SHARED_DB databases need to be shared between the two API-M nodes. It is recommended to use an
industry-standard RDBMS databases for this purpose. For more
information on default databases and changing them into RDBMS databases, see Working with Databases.
Tip
If you have configured the apim and shared databases correctly, the deployment.toml in <API-M_HOME>/repository/conf
directory, should have the following configurations.
NOTE : Following is a sample configuration for MySQL 8.0. Therefore parameter values might be different.
[database.apim_db]
type = "mysql"
url = "jdbc:mysql://mysql.wso2.com:3306/WSO2AM_DB?useSSL=false"
username = "wso2carbon"
password = "wso2carbon"
driver="com.mysql.cj.jdbc.Driver"

[database.shared_db]
type = "mysql"
url = "jdbc:mysql://mysql.wso2.com:3306/WSO2SHARED_DB?useSSL=false"
username = "wso2carbon"
password = "wso2carbon"
driver="com.mysql.cj.jdbc.Driver"
Step 4 - Configure the Second WSO2 API-M Node
Make a copy of the active instance configured above and use this copy as the second active instance.
Info
When making a copy of the node, you need to also make a copy of the SSL certificate that you created for node 1 in step 1.
Step 5 - Configure the Artifact Synchronization
To enable synchronization for runtime artifacts of the two all in one WSO2 API-M instances, it is recommended to have a shared file system. Configure a shared file system as the content synchronization mechanism. You can use a common shared file system such as Network File System (NFS) or any other shared file system that is available.
You need to mount the <API-M_HOME>/repository/deployment/server directory of the two nodes to the shared file system,
in order to share all APIs and throttling policies between all the nodes.
NFS configuration
For more information on setting up NFS on Ubuntu, see Network File System (NFS). Note that these configurations may change depending on the OS.
If you are unable to maintain a shared file system
However, if you are unable to maintain a shared file system, you can synchronize content using rsync. For information on setting up a rsync based deployment synchronization, see Configuring rsync for Deployment Synchronization.
Warning
Shared file system is the first preference that WSO2 recommends to synchronize the artifacts among the nodes, because APIs and throttling decisions can be published to any of the nodes; thereby, avoiding the vulnerability of a single point of failure that is present when using remote synchronization (rsync).
Step 6 - Configure Publisher with the Gateway
When underlined file system is shared, the artifacts are available to both Gateway nodes. Therefore, a single node
can publish the API artifacts to their own nodes. Therefore, you can point the service_url to localhost in the
deployment.toml of both nodes.
[[apim.gateway.environment]]
...
service_url = "https://localhost:${mgt.transport.https.port}/services/"
...
If you are using RSYNC for artifact synchronization
The API artifacts will be synchronized in one direction. The synchronization will take place from manager to the worker as explained in the Configuring rsync for Deployment Synchronization section. Therefore, the API artifact should be only created on one node that acts as a manager node for the purpose of artifact synchronization. Follow the instructions below to configure the manager node:
Let's assume that node-1 is the manager node for artifact synchronization.
- Open the
<API-M_HOME>/repository/conf/deployment.tomlfile innode-1. -
Configure the Gateway Service URL to point to it's self (localhost):
[[apim.gateway.environment]] ... service_url = "https://localhost:${mgt.transport.https.port}/services/" ... -
Open the
<API-M_HOME>/repository/conf/deployment.tomlfile innode-2. - Configure the Gateway Service URL to point to
node-1:
Note that[[apim.gateway.environment]] ... service_url = "https://<node1-hostname>:<node-1-mgt-transport-port>/services/" ...<node-1-mgt-transport-port>is the management transport port, which is by default 9443.
Step 7 - Configure Gateway URLs to Expose APIs
You need to configure the environment URLs which are used to expose the deployed APIs in the Gateways of both nodes.
Add the Gateway hostname when you configure environments in the <API-M_HOME>/repository/conf/deployment.toml file in both
API-M nodes.
Update the endpoints with your chosen hostname for Gateways as shown below.
In this case, let's use gw.am.wso2.com as the hostname.
[[apim.gateway.environment]]
...
ws_endpoint = "ws://gw.am.wso2.com:9099"
wss_endpoint = "wss://gw.am.wso2.com:8099"
http_endpoint = "http://gw.am.wso2.com:${http.nio.port}"
https_endpoint = "https://gw.am.wso2.com:${https.nio.port}"
Step 8 - Configure Throttling
-
Configure the data publisher in the
apim.throttling.url_groupsection which comes under theapim.throttling.url_groupblock in the<API-M_HOME>/repository/conf/deployment.tomlfile of both nodes.-
You need to update these configurations so that the Gateway can publish data to the Traffic Manager in its own node and the Traffic Manager in the other node, so that the same event is sent to both servers at the same time.
The WSO2 Complex Event Processor (WSO2 CEP) component that lies within the Traffic Manager acts as the data receiver and processes the data to come up with Throttling decisions.
[[apim.throttling.url_group]] traffic_manager_urls = ["tcp://<node1-hostname>:<node1-port>"] traffic_manager_auth_urls = ["ssl://<node1-hostname>:<node1-port>"] type = "loadbalance" [[apim.throttling.url_group]] traffic_manager_urls = ["tcp://<node2-hostname>:<node2-port>"] traffic_manager_auth_urls = ["ssl://<node2-hostname>:<node2-port>"] type = "loadbalance"[[apim.throttling.url_group]] traffic_manager_urls = ["tcp://127.0.0.1:9611"] traffic_manager_auth_urls = ["ssl://127.0.0.1:9711"] type = "loadbalance" [[apim.throttling.url_group]] traffic_manager_urls = ["tcp://127.0.0.1:9612"] traffic_manager_auth_urls = ["ssl://127.0.0.1:9712"] type = "loadbalance" -
Save your changes.
-
-
Configure the Traffic Manager of each node to be able to publish events to the Traffic Manager node of the other node by following the below steps.
-
Create an additional JNDI config file, namely
jndi2.properties, in the<API-M_HOME>/repository/conflocation of both nodes. -
Add the configuration given below to the
jndi2.propertiesfile that you just created for Node 1 and 2.Node 1
connectionfactory.TopicConnectionFactory = amqp://admin:admin@clientid/carbon?brokerlist='tcp://<node2-hostname>:<node2-JMS-port>' topic.throttleData = throttleDataconnectionfactory.TopicConnectionFactory = amqp://admin:admin@clientid/carbon?brokerlist='tcp://127.0.0.1:5673' topic.throttleData = throttleDataNode 2
connectionfactory.TopicConnectionFactory = amqp://admin:admin@clientid/carbon?brokerlist='tcp://<node1-hostname>:<node1-JMS-port>' topic.throttleData = throttleDataconnectionfactory.TopicConnectionFactory = amqp://admin:admin@clientid/carbon?brokerlist='tcp://127.0.0.1:5672' topic.throttleData = throttleData -
Create two new JMS Event Publishers by creating two XML files with names,
jmsEventPublisher-2.xmlandjmsEventPublisher_1.10.0-2.xmlin the<API-M_HOME>/repository/deployment/server/eventpublishersdirectory of each of the two nodes. -
Add the configurations given below to the JMSEventPublisher files created above in both of the nodes. Note that you refer to the JNDI properties file that you created in Step 1 in the configurations shown below.
jmsEventPublisher-2.xml
<?xml version="1.0" encoding="UTF-8"?>
<eventPublisher name="jmsEventPublisher2" statistics="disable"
trace="disable" xmlns="http://wso2.org/carbon/eventpublisher">
<from streamName="org.wso2.throttle.globalThrottle.stream" version="1.0.0"/>
<mapping customMapping="disable" type="map"/>
<to eventAdapterType="jms">
    <property name="java.naming.factory.initial">org.wso2.andes.jndi.PropertiesFileInitialContextFactory</property>
    <property name="java.naming.provider.url">repository/conf/jndi2.properties</property>
    <property name="transport.jms.DestinationType">topic</property>
    <property name="transport.jms.Destination">throttleData</property>
    <property name="transport.jms.ConcurrentPublishers">allow</property>
    <property name="transport.jms.ConnectionFactoryJNDIName">TopicConnectionFactory</property>
</to>
</eventPublisher>
jmsEventPublisher_1.10.0-2.xml
<?xml version="1.0" encoding="UTF-8"?> <eventPublisher name="jmsEventPublisher-1.0.0-2" statistics="disable" trace="disable" xmlns="http://wso2.org/carbon/eventpublisher"> <from streamName="org.wso2.throttle.globalThrottle.stream" version="1.1.0"/> <mapping customMapping="disable" type="map"/> <to eventAdapterType="jms"> <property name="java.naming.factory.initial">org.wso2.andes.jndi.PropertiesFileInitialContextFactory</property> <property name="java.naming.provider.url">repository/conf/jndi2.properties</property> <property name="transport.jms.DestinationType">topic</property> <property name="transport.jms.Destination">throttleData</property> <property name="transport.jms.ConcurrentPublishers">allow</property> <property name="transport.jms.ConnectionFactoryJNDIName">TopicConnectionFactory</property> </to> </eventPublisher> -
Save your changes.
-
Step 9 - Configure API-M Analytics
If you wish to view reports, statistics, and graphs related to the APIs deployed in the WSO2 API Manager, you need to configure API-M Analytics. If not, you can skip this step.
Follow the Configuring API-M Anlaytics - Quick Setup to configure API-M Analytics in a development setup and, follow Configuring API-M Analytics - Standard Setup to configure API-M Analytics in a production setup.
Step 10 - Configure Production Hardening
In a production setup, ensure that you have taken into account the respective security hardening factors (e.g., changing and encrypting the default passwords, configuring JVM security etc.) and other production deployment guidelines (e.g., tuning parameters, backup and recovery remmendations etc.) before deploying WSO2 API-M nodes.
For more information on security hardening guidelines, see Security Guidelines for Production Deployment.
For more information on other production deployment guidelines, see Production Deployment Guidelines.
Step 11 - Start the WSO2 API-M Servers
Start the WSO2 API-M servers using the standard start-up script. For more information, see Starting the server.
cd <API-M_HOME>/bin/
sh wso2server.shcd <API-M_HOME>\bin\
wso2server.bat --run Info
If you want to deploy WSO2 API-M using a hybrid active-active deployment pattern, where WSO2 Identity Server is used as the Key Manager in high availability mode while the rest of the WSO2 API-M components are all in one node, configure and start the Key Manager (e.g., configure and start WSO2 Identity Server as the Key Manager) before starting the API-M servers.