Configuring the Gateway in a Distributed Environment with rsync
Note
As the first preference WSO2 recommends using a shared file system over rsync as the content synchronization mechanism. For more information, see Distributed Deployment of the Gateway.
You need to use remote synchronization (rsync) only if you are unable to have a shared file system, because when using rsync it needs one node to act as the Gateway Manager as it only provides write permission to one node. Thereby, when using rsync there is the vulnerability of a single point of failure.
Follow the instructions below to configure the API-M Gateway in a distributed environment when using rsync as a content synchronization mechanism:
- Step 1 - Configure the load balancer
- Step 2 - Configure the Gateway Manager
- Step 3 - Configure the Gateway Worker
- Step 4 - Optionally configure Hazelcast
- Step 5 - Start the Gateway Nodes
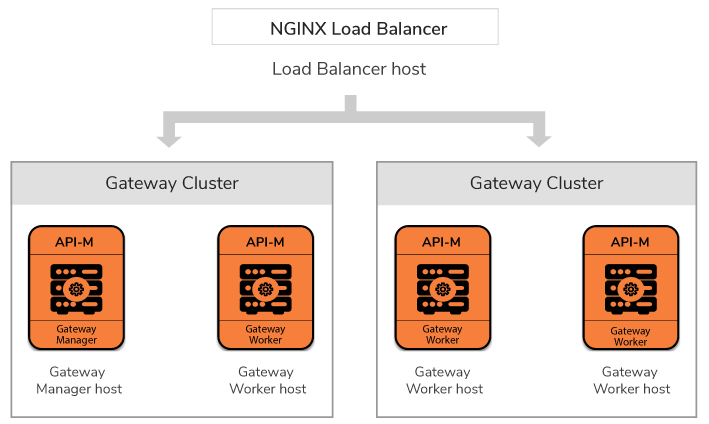
Note that the configurations in this topic are done based on the following pattern. This pattern is used as a basic Gateway cluster where the worker nodes and manager nodes are separated.
Step 1 - Configure the load balancer
For more information, see Configuring the Proxy Server and the Load Balancer.
Step 2 - Configure the Gateway Manager
These nodes refer to the management nodes that specialize in the management of the setup. Only management nodes are authorized to add new artifacts into the system or make configuration changes. Management nodes are usually behind an internal firewall and are exposed to clients running within the organization only. This section involves setting up the Gateway node and enabling it to work with the other components in the distributed setup.
Click here for information on configuring the Gateway Manager
-
Configure the
deployment.tomlfile.- Open
<API-M_GATEWAY_MANAGER_HOME>/repository/conf/deployment.tomlfile on the management node and add the cluster hostname.[server] hostname = "mgt.am.wso2.com"
- Open
-
Specify the following incoming connection configurations
    [transport.http]
    properties.port = 9763
    properties.proxyPort = 80

    [transport.https]
    properties.port = 9443
    properties.proxyPort = 443
The TCP
portnumber is the value that thisConnectoruses to create a server socket and await incoming connections. The operating system will allow only one server application to listen to a particular port number on a particular IP address. -
Map the hostnames to IPs. Open the server's
/etc/hostsfile and add the following.<GATEWAY-WORKER-IP> am.wso2.comExample Format
xxx.xxx.xxx.xx4 am.wso2.comOnce you replicate these configurations for all the manager nodes, your Gateway manager is configured.
Step 3 - Configure the Gateway Worker
Worker nodes specialize in serving requests to deployment artifacts and reading them. They can be exposed to external clients.
Click here for information on configuring the Gateway Worker
-
Configure the
carbon.xmlfile.- Open
<API-M_GATEWAY_MANAGER_HOME>/repository/conf/deployment.tomlfile on the management node and add the cluster hostname.[server] hostname = "am.wso2.com"
- Open
-
Specify the following incoming connection configurations
[transport.http] properties.port = 9763 properties.proxyPort = 80 [transport.https] properties.port = 9443 properties.proxyPort = 443 -
Map the hostnames to IPs. Open the server's
/etc/hostsfile and add the following in order to map the hostnames with the specified real IPs.<GATEWAY-MANAGER-IP> mgt.am.wso2.com -
Configure rsync. For information on configuring rsync, see Configuring rsync for Deployment Synchronization.
Step 4 - Optionally configure Hazelcast
You can seamlessly deploy WSO2 API Manager using local caching in a clustered setup without Hazelcast clustering. However, there are edge case scenarios where you need to enable Hazelcast clustering. For more information, see Working with Hazelcast Clustering to identify whether you need Hazelcast clustering and to configure it.
Step 5 - Start the Gateway Nodes
Start the Gateway Manager and then the Gateway Worker nodes
Click here for information on starting the Gateway nodes
Step 5.1 - Start the Gateway Manager
Start the Gateway Manager by typing the following command in the command prompt.
sh <API-M_GATEWAY_MANAGER_HOME>/bin/wso2server.shStep 5.2 - Start the Gateway Worker
Tip
It is recommendation to delete the <API-M_HOME>/repository/deployment/server directory and create an empty server directory in the worker node. This is done to avoid any SVN conflicts that may arise. Note that when you do this, you have to restart the worker node after you start it in order to avoid any errors from occurring .
Start the Gateway Worker by typing the following command in the command prompt.
sh <GATEWAY_WORKER_HOME>/bin/wso2server.sh -Dprofile=gateway-workerThe additional -Dprofile=gateway-worker argument indicates that this is a worker node specific to the Gateway. You need to use this parameter to make a server read-only. Changes (i.e., writing or making modifications to the deployment repository, etc.) can not be made in the Gateway worker nodes. Furthermore, starting a node as a Gateway worker ensures that the Developer Portal and Publisher related functions are disabled in the respective node. This parameter also ensures that the node starts in the worker profile, where the UI bundles are not activated and only the backend bundles are activated when the server starts up. For more information on the various product profiles available in WSO2 API Manager, see API Manager product profiles .