Secure APIs with API Keys
An API key is the simplest form of application-based security that you can configure for an API. You can obtain an API key for a client application from WSO2 API Manager's Developer Portal, via the UI, or via REST APIs. Thereafter, the client application can use the API key to invoke the APIs that are secured with the API key security scheme.
WSO2 API Manager uses a self-contained JSON Web Token (JWT) as the API key, and this JWT access token is generated via the Developer Portal without communicating with the Key Manager.
When an API is invoked specifying an API key as the authentication method, the APIM Gateway performs the following two basic validations.
- Signature validation
- Subscription validation
Prerequisites for API keys
-
The API key should be a valid JWT signed using the primary KeyStore private key of the Developer Portal.
-
The expected token format is as follows:
base64(header).base64(payload).base64(signature) -
The public certificate of the private key that is used to sign the tokens should be added to the trust store under the
"gateway_certificate_alias"alias. For more information, see Import the public certificate into the client trust store.Note
The latter mentioned prerequisite is not applicable if you use the default certificates, which are the certificates that are shipped with the product itself.
Validation of API subscriptions
The subscription validation is mandatory for the API keys, and the keys generated before an application subscribes to an API will not contain the subscription information under the token details. As a result, these keys will not be allowed to access that specific API. Therefore, API Keys should be generated after the application has subscribed to the required API.
Using API keys to secure an API
Follow the instructions below to use API key Authentication in WSO2 API Manager.
Step 1 - Create and publish an API
Create and publish an API that is secured with the API key security scheme as the application-level security. Let's work with the sample app for this purpose.
-
Sign in to the Publisher Portal.
https://<hostname>:9443/publisher -
Click DEPLOY SAMPLE API to deploy the sample PizzaShack API.
-
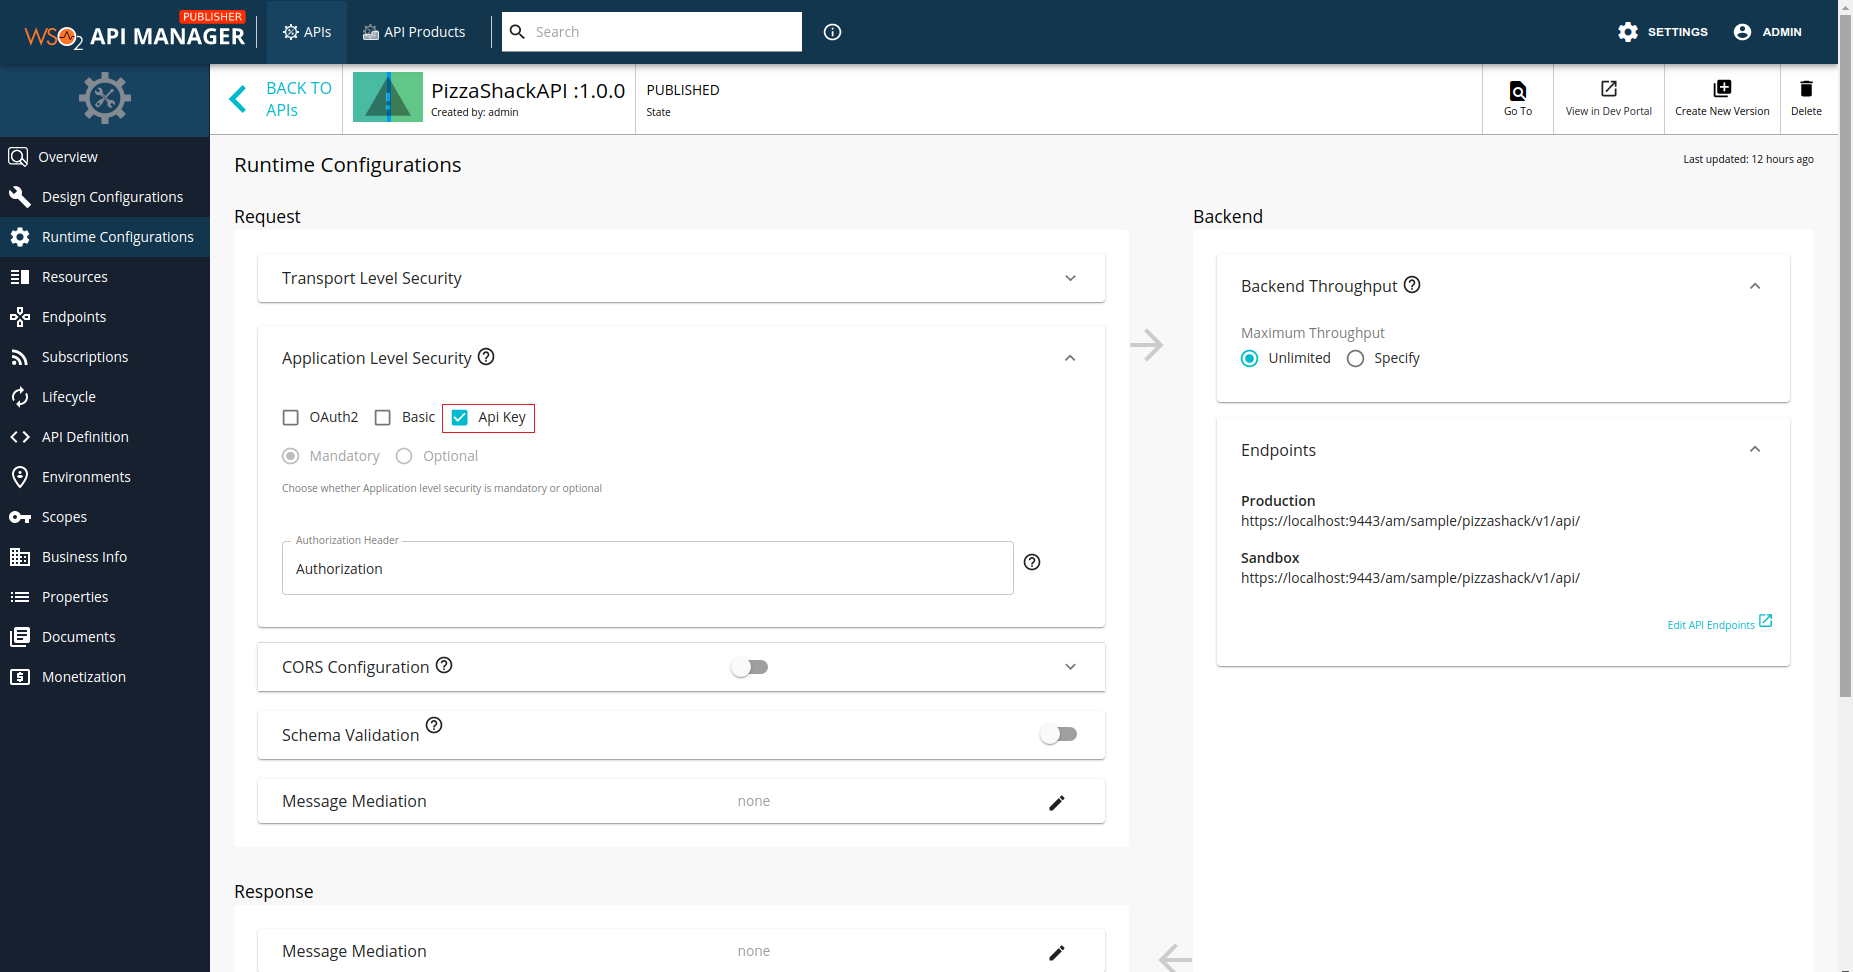
Click Runtime Configurations.
-
Select API Key and click SAVE.
Step 2 - Generate the API Key
-
Click APIs and click on the respective API (
PizzaShackAPI). -
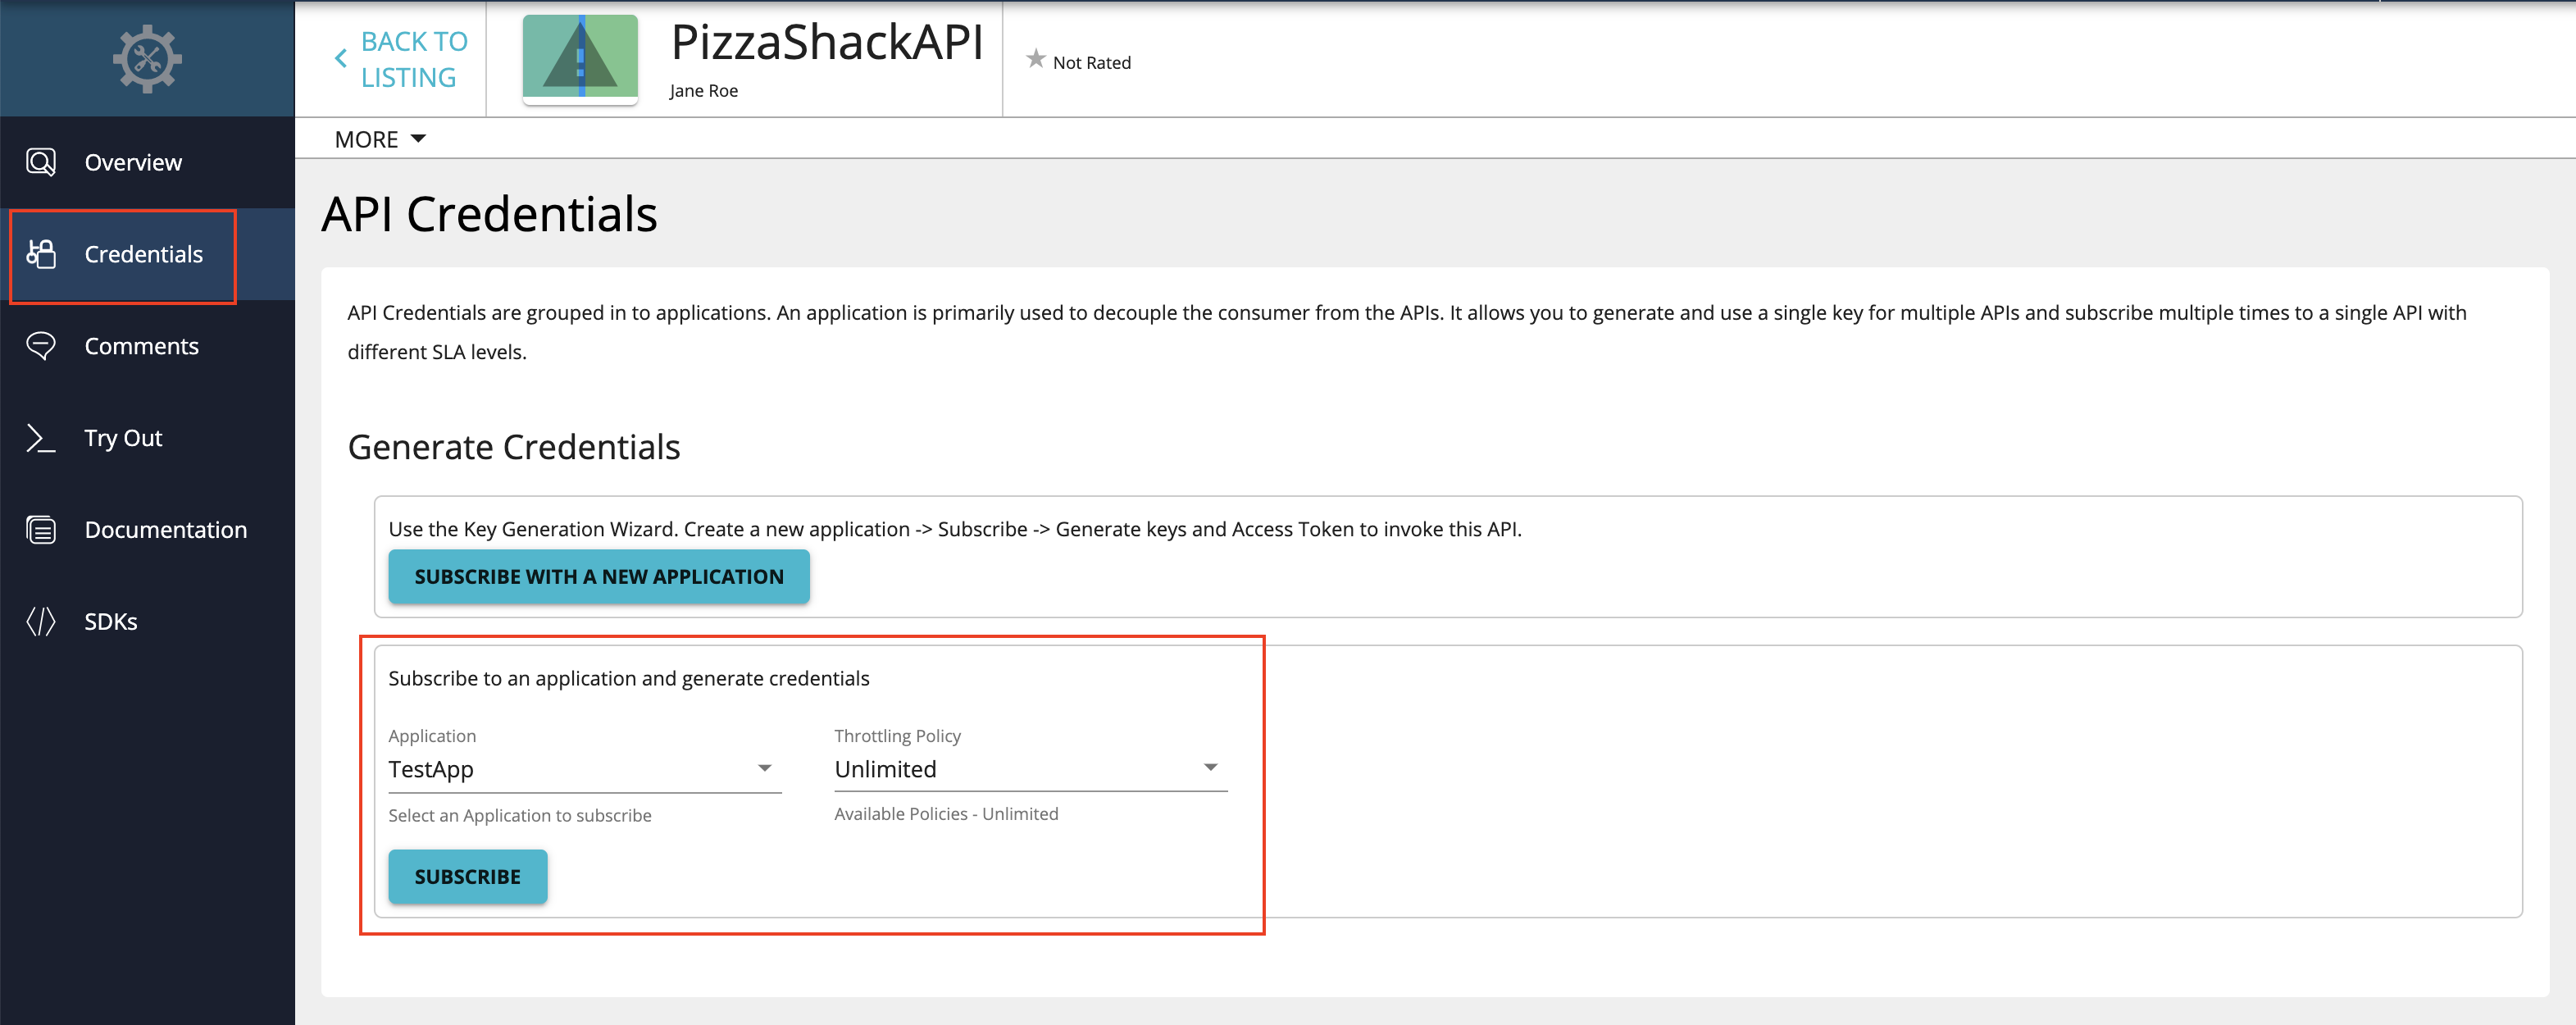
Click Credentials.
-
Select an application and select a throttling policy.
Note
API Keys can work with any application, which is either JWT or OAuth.
-
Click Subscribe.
-
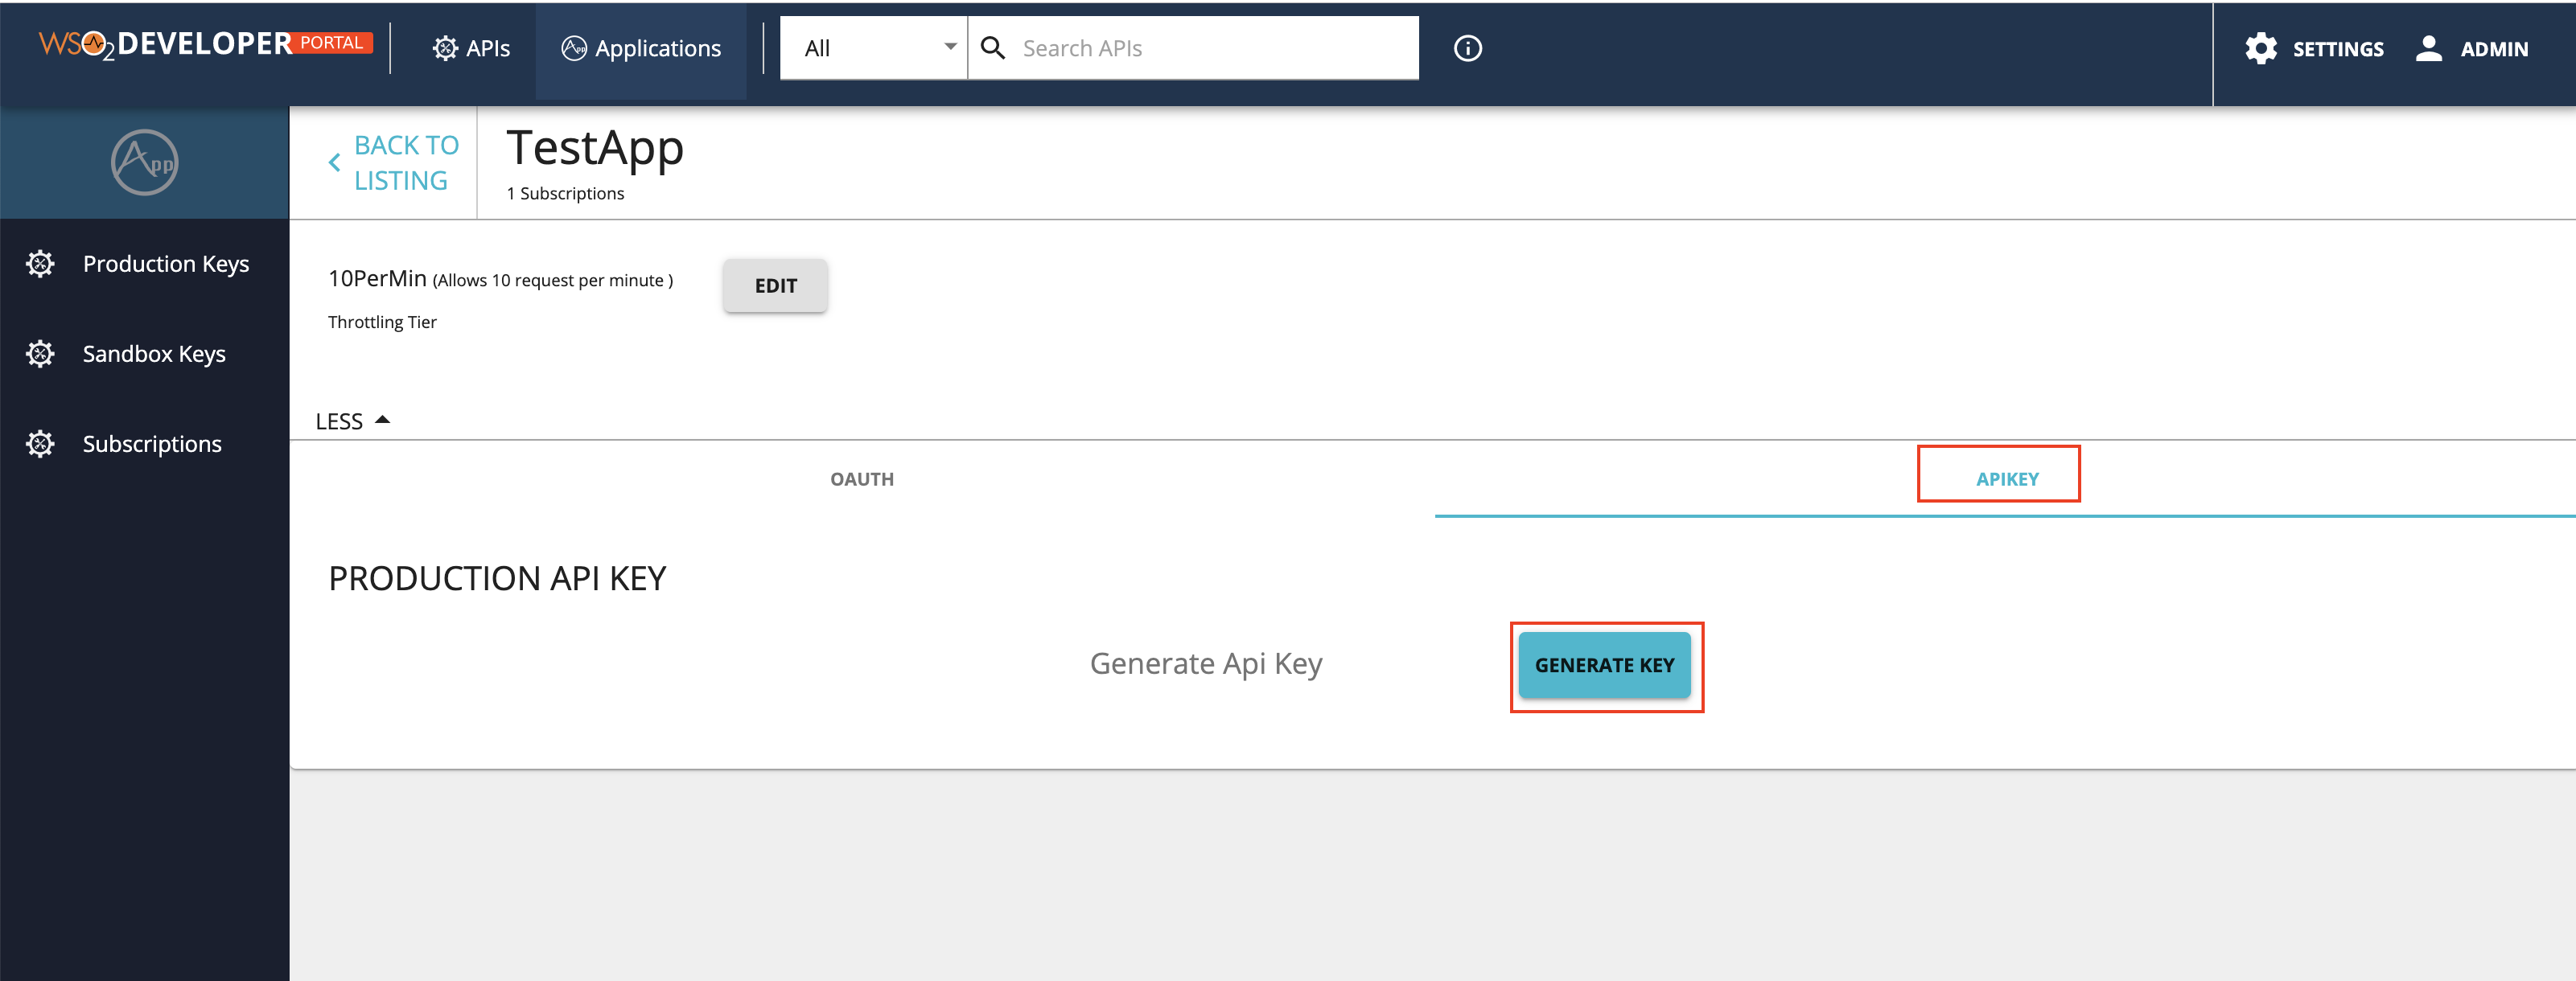
Click MANAGE APP, which corresponds to the application that you used to subscribe to the API.

-
Click APIKEY and click GENERATE KEY.
-
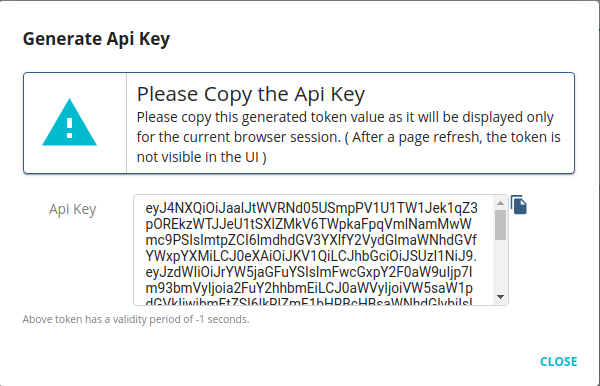
Optionally, define a validity period for the token.
By default, the API Key does not expire. However, optionally, you can define a validity period for the token as follows:
-
Uncheck Api Key with infinite validity period.
-
Enter the expiry time in seconds.
-
-
Copy the API key.
Step 3 - Invoke the API
Invoke the API using the API key.
You can use any one of the following methods to invoke the API.
-
Specify the API Key in the
apikeyheadercurl -k -X GET "https://localhost:8243/pizzashack/1.0.0/menu" -H "accept: application/json" -H "apikey: <API_key_value>"curl -k -X GET "https://localhost:8243/pizzashack/1.0.0/menu" -H "accept: application/json" -H "apikey: eyJ4NXQiOiJaalJtWVRNd05USmpPV1U1TW1Jek1qZ3pOREkzWTJJeU1tSXlZMkV6TWpkaFpqVmlNamMwWmc9PSIsImtpZCI6ImdhdGV3YXlfY2VydGlmaWNhdGVfYWxpYXMiLCJ0eXAiOiJKV1QiLCJhbGciOiJSUzI1NiJ9.eyJzdWIiOiJrYW5jaGFuYSIsImFwcGxpY2F0aW9uIjp7Im93bmVyIjoia2FuY2hhbmEiLCJ0aWVyIjoiVW5saW1pdGVkIiwibmFtZSI6IkRlZmF1bHRBcHBsaWNhdGlvbiIsImlkIjozNSwidXVpZCI6IjFmYjBiYjZlLTNiNWUtNDVmZS04Y2I1LTEwN2QzMGJmOTU0NyJ9LCJ0aWVySW5mbyI6eyJVbmxpbWl0ZWQiOnsic3RvcE9uUXVvdGFSZWFjaCI6dHJ1ZSwic3Bpa2VBcnJlc3RMaW1pdCI6MCwic3Bpa2VBcnJlc3RVbml0IjpudWxsfX0sImtleXR5cGUiOiJQUk9EVUNUSU9OIiwic3Vic2NyaWJlZEFQSXMiOlt7InN1YnNjcmliZXJUZW5hbnREb21haW4iOiJjYXJib24uc3VwZXIiLCJuYW1lIjoiUGl6emFTaGFja0FQSSIsImNvbnRleHQiOiJcL3Bpenphc2hhY2tcLzEuMC4wIiwicHVibGlzaGVyIjoiYWRtaW4iLCJ2ZXJzaW9uIjoiMS4wLjAiLCJzdWJzY3JpcHRpb25UaWVyIjoiVW5saW1pdGVkIn0seyJzdWJzY3JpYmVyVGVuYW50RG9tYWluIjoiY2FyYm9uLnN1cGVyIiwibmFtZSI6IlBpenphU2hhY2tBUEkiLCJjb250ZXh0IjoiXC9waXp6YXNoYWNrXC8xLjAuMCIsInB1Ymxpc2hlciI6ImFkbWluIiwidmVyc2lvbiI6IjEuMC4wIiwic3Vic2NyaXB0aW9uVGllciI6IlVubGltaXRlZCJ9XSwiaWF0IjoxNTcxNzY1Njk2LCJqdGkiOiJhOWVmMDFmYi1kNDA1LTQ0YTYtOWVkMi02ZTdhZjUyZGQ3ODMifQ==.KbxcrZv7buRSqtyI44eCGA_4mrGTRc0-ik4hmsYsmoFs5wbTXrcC1vZ7-fe9KMEWnyW6VeWJq-PnqDZzc4wOno02YMlUH9kGZ6bWj3z4RH9vVLd_xeBV50EXEDm7MbyeI-t7ADMYoOWOBBafNfiigm_86gj7LfeoSkGjsreFIJyhWIxepm3lO54cfYcDJAk3pB-T2bKC0aHJzFn_N_HuBN9lOy2yCPdJyoThQEbedBwtvh8WlTNKh7kL9Nj2E1ZwhKli0M9tuIsp08aztwUP3a-QPF4oIx4Lid0rYIr5jyQCHHor55wtzxJKH2VayZnEFIdySEjQBBj7SAfjcLXvXw=="[{"name":"BBQ Chicken Bacon","description":"Grilled white chicken, hickory-smoked bacon and fresh sliced onions in barbeque sauce","price":"24.99","icon":"/images/6.png"},{"name":"Chicken Parmesan","description":"Grilled chicken, fresh tomatoes, feta and mozzarella cheese","price":"11.99","icon":"/images/1.png"},{"name":"Chilly Chicken Cordon Bleu","description":"Spinash Alfredo sauce topped with grilled chicken, ham, onions and mozzarella","price":"23.99","icon":"/images/10.png"},{"name":"Double Bacon 6Cheese","description":"Hickory-smoked bacon, Julienne cut Canadian bacon, Parmesan, mozzarella, Romano, Asiago and and Fontina cheese","price":"20.99","icon":"/images/9.png"},{"name":"Garden Fresh","description":"Slices onions and green peppers, gourmet mushrooms, black olives and ripe Roma tomatoes","price":"11.99","icon":"/images/3.png"},{"name":"Grilled Chicken Club","description":"Grilled white chicken, hickory-smoked bacon and fresh sliced onions topped with Roma tomatoes","price":"14.99","icon":"/images/8.png"},{"name":"Hawaiian BBQ Chicken","description":"Grilled white chicken, hickory-smoked bacon, barbeque sauce topped with sweet pine-apple","price":"12.99","icon":"/images/7.png"},{"name":"Spicy Italian","description":"Pepperoni and a double portion of spicy Italian sausage","price":"23.99","icon":"/images/2.png"},{"name":"Spinach Alfredo","description":"Rich and creamy blend of spinach and garlic Parmesan with Alfredo sauce","price":"25.99","icon":"/images/5.png"},{"name":"Tuscan Six Cheese","description":"Six cheese blend of mozzarella, Parmesan, Romano, Asiago and Fontina","price":"24.99","icon":"/images/4.png"}] -
Specify as a query parameter in the API request.
<url_encoded_API_key_value>- Encode the API key using a URL encoder (e.g., https://www.urlencoder.org).
curl -k -X GET "https://localhost:8243/pizzashack/1.0.0/menu?apikey=<url_encoded_API_key_value>"curl -k -X GET "https://localhost:8243/pizzashack/1.0.0/menu?apikey=eyJ4NXQiOiJaalJtWVRNd05USmpPV1U1TW1Jek1qZ3pOREkzWTJJeU1tSXlZMkV6TWpkaFpqVmlNamMwWmc9PSIsImtpZCI6ImdhdGV3YXlfY2VydGlmaWNhdGVfYWxpYXMiLCJ0eXAiOiJKV1QiLCJhbGciOiJSUzI1NiJ9.eyJzdWIiOiJrYW5jaGFuYSIsImFwcGxpY2F0aW9uIjp7Im93bmVyIjoia2FuY2hhbmEiLCJ0aWVyIjoiVW5saW1pdGVkIiwibmFtZSI6IkRlZmF1bHRBcHBsaWNhdGlvbiIsImlkIjozNSwidXVpZCI6IjFmYjBiYjZlLTNiNWUtNDVmZS04Y2I1LTEwN2QzMGJmOTU0NyJ9LCJ0aWVySW5mbyI6eyJVbmxpbWl0ZWQiOnsic3RvcE9uUXVvdGFSZWFjaCI6dHJ1ZSwic3Bpa2VBcnJlc3RMaW1pdCI6MCwic3Bpa2VBcnJlc3RVbml0IjpudWxsfX0sImtleXR5cGUiOiJQUk9EVUNUSU9OIiwic3Vic2NyaWJlZEFQSXMiOlt7InN1YnNjcmliZXJUZW5hbnREb21haW4iOiJjYXJib24uc3VwZXIiLCJuYW1lIjoiUGl6emFTaGFja0FQSSIsImNvbnRleHQiOiJcL3Bpenphc2hhY2tcLzEuMC4wIiwicHVibGlzaGVyIjoiYWRtaW4iLCJ2ZXJzaW9uIjoiMS4wLjAiLCJzdWJzY3JpcHRpb25UaWVyIjoiVW5saW1pdGVkIn0seyJzdWJzY3JpYmVyVGVuYW50RG9tYWluIjoiY2FyYm9uLnN1cGVyIiwibmFtZSI6IlBpenphU2hhY2tBUEkiLCJjb250ZXh0IjoiXC9waXp6YXNoYWNrXC8xLjAuMCIsInB1Ymxpc2hlciI6ImFkbWluIiwidmVyc2lvbiI6IjEuMC4wIiwic3Vic2NyaXB0aW9uVGllciI6IlVubGltaXRlZCJ9XSwiaWF0IjoxNTcxNzY1Njk2LCJqdGkiOiJhOWVmMDFmYi1kNDA1LTQ0YTYtOWVkMi02ZTdhZjUyZGQ3ODMifQ%3D%3D.KbxcrZv7buRSqtyI44eCGA_4mrGTRc0-ik4hmsYsmoFs5wbTXrcC1vZ7-fe9KMEWnyW6VeWJq-PnqDZzc4wOno02YMlUH9kGZ6bWj3z4RH9vVLd_xeBV50EXEDm7MbyeI-t7ADMYoOWOBBafNfiigm_86gj7LfeoSkGjsreFIJyhWIxepm3lO54cfYcDJAk3pB-T2bKC0aHJzFn_N_HuBN9lOy2yCPdJyoThQEbedBwtvh8WlTNKh7kL9Nj2E1ZwhKli0M9tuIsp08aztwUP3a-QPF4oIx4Lid0rYIr5jyQCHHor55wtzxJKH2VayZnEFIdySEjQBBj7SAfjcLXvXw%3D%3D"[{"name":"BBQ Chicken Bacon","description":"Grilled white chicken, hickory-smoked bacon and fresh sliced onions in barbeque sauce","price":"24.99","icon":"/images/6.png"},{"name":"Chicken Parmesan","description":"Grilled chicken, fresh tomatoes, feta and mozzarella cheese","price":"11.99","icon":"/images/1.png"},{"name":"Chilly Chicken Cordon Bleu","description":"Spinash Alfredo sauce topped with grilled chicken, ham, onions and mozzarella","price":"23.99","icon":"/images/10.png"},{"name":"Double Bacon 6Cheese","description":"Hickory-smoked bacon, Julienne cut Canadian bacon, Parmesan, mozzarella, Romano, Asiago and and Fontina cheese","price":"20.99","icon":"/images/9.png"},{"name":"Garden Fresh","description":"Slices onions and green peppers, gourmet mushrooms, black olives and ripe Roma tomatoes","price":"11.99","icon":"/images/3.png"},{"name":"Grilled Chicken Club","description":"Grilled white chicken, hickory-smoked bacon and fresh sliced onions topped with Roma tomatoes","price":"14.99","icon":"/images/8.png"},{"name":"Hawaiian BBQ Chicken","description":"Grilled white chicken, hickory-smoked bacon, barbeque sauce topped with sweet pine-apple","price":"12.99","icon":"/images/7.png"},{"name":"Spicy Italian","description":"Pepperoni and a double portion of spicy Italian sausage","price":"23.99","icon":"/images/2.png"},{"name":"Spinach Alfredo","description":"Rich and creamy blend of spinach and garlic Parmesan with Alfredo sauce","price":"25.99","icon":"/images/5.png"},{"name":"Tuscan Six Cheese","description":"Six cheese blend of mozzarella, Parmesan, Romano, Asiago and Fontina","price":"24.99","icon":"/images/4.png"}]
Additional Information
Importing the public certificate into the client trust store
Note
Make sure to import the Developer Portal certificate to the APIM gateway client-truststore under the same alias.
Follow the instructions below to import the public certificate into the client trust store.
-
Navigate to the
<API-M_HOME>/repository/resources/security/directory. -
Run the following command to export the public certificate from WSO2 API Manager's keystore (
wso2carbon.jks).keytool -export -alias wso2carbon -file wso2.crt -keystore wso2carbon.jks -
Enter
wso2carbonas the default password of the keystore when prompted. -
Run the following command to import the public certificate into the trust store.
keytool -import -trustcacerts -keystore client-truststore.jks -alias gateway_certificate_alias -file wso2.crt -
Enter
wso2carbonas the default password of the trust store when prompted.
Changing the alias name in the JWT
By default, the alias name is gateway_certificate_alias. Follow the instructions below if you need to change the alias name in the JWT.
-
Navigate to the
<API-M_HOME>/repository/conf/deployment.tomlfile. -
Configure the
api_key_aliasvalue under[apim.devportal]as follows:[apim.devportal] api_key_alias = "<alias-name>"
Configuring a custom Keystore to sign an API Key
By default, the primary Keystore is used to sign the API Key. In addition, the user can configure a custom Keystore to sign the API Keys.
Follow the instructions below to configure a custom Keystore to sign the API Keys:
-
Add the custom Keystore into the
<API-M_HOME>/repository/resources/securitydirectory. -
Export the public certificate from the custom Keystore and import that into the client trust store as described in Importing the public certificate into the client truststore.
-
Add the custom Keystore configuration in the
<API-M_HOME>/repository/conf/deployment.tomlfile as follows:[custom_keystore.KeyStoreName] file_name = "<key-store-file-name>" type = "<type>" password = "<key-store-password>" alias = "<alias-name>" key_password = "<private-key-password>"[custom_keystore.KeySignKeyStore] file_name = "apikeysigner.jks" type = "JKS" password = "wso2carbon" alias = "apikeysigner" key_password = "wso2carbon"Note
The Keystore name field is taken from the configuration header, which is
[custom_keystore.KeySignKeyStore]. The rightmost part divided by the full stop refers to the Keystore name. In the above example, the keystore name isKeySignKeyStore. -
Define the custom Keystore name in the
<API-M_HOME>/repository/conf/deployment.tomlfile under[apim.devportal]as follows:[apim.devportal] api_key_keystore = "KeySignKeyStore" -
Configure the alias name value as described in Changing the alias name in the JWT.
API key restriction for IP address and HTTP referrer
Anyone can use an API key issued for an application, to invoke an API subscribed to the same application. However, if an unauthorized party gets hold of the token, they can create unnecessary invocations to the APIs. To prevent this issue, you can define the authorized parties when generating a token.
WSO2 API Manager allows API keys to be restricted based on two approaches.
1) IP address restriction
The IP address restriction allows only the clients with a specific IP addresses to use the token. The supported formates to specify the IP addresses is as follows.
- IPv4 (e.g.,
192.168.1.2) - IPv6 (e.g.,
2002:eb8::2) - IP range in CIDR notation (e.g.
152.12.0.0/13,1001:ab8::/14)
Generating an API key with an IP restriction
-
Navigate to the API key generation window of the specific application in the Developer Portal.
-
Select
IP Addresses, add the IP addresses in the text input as shown below.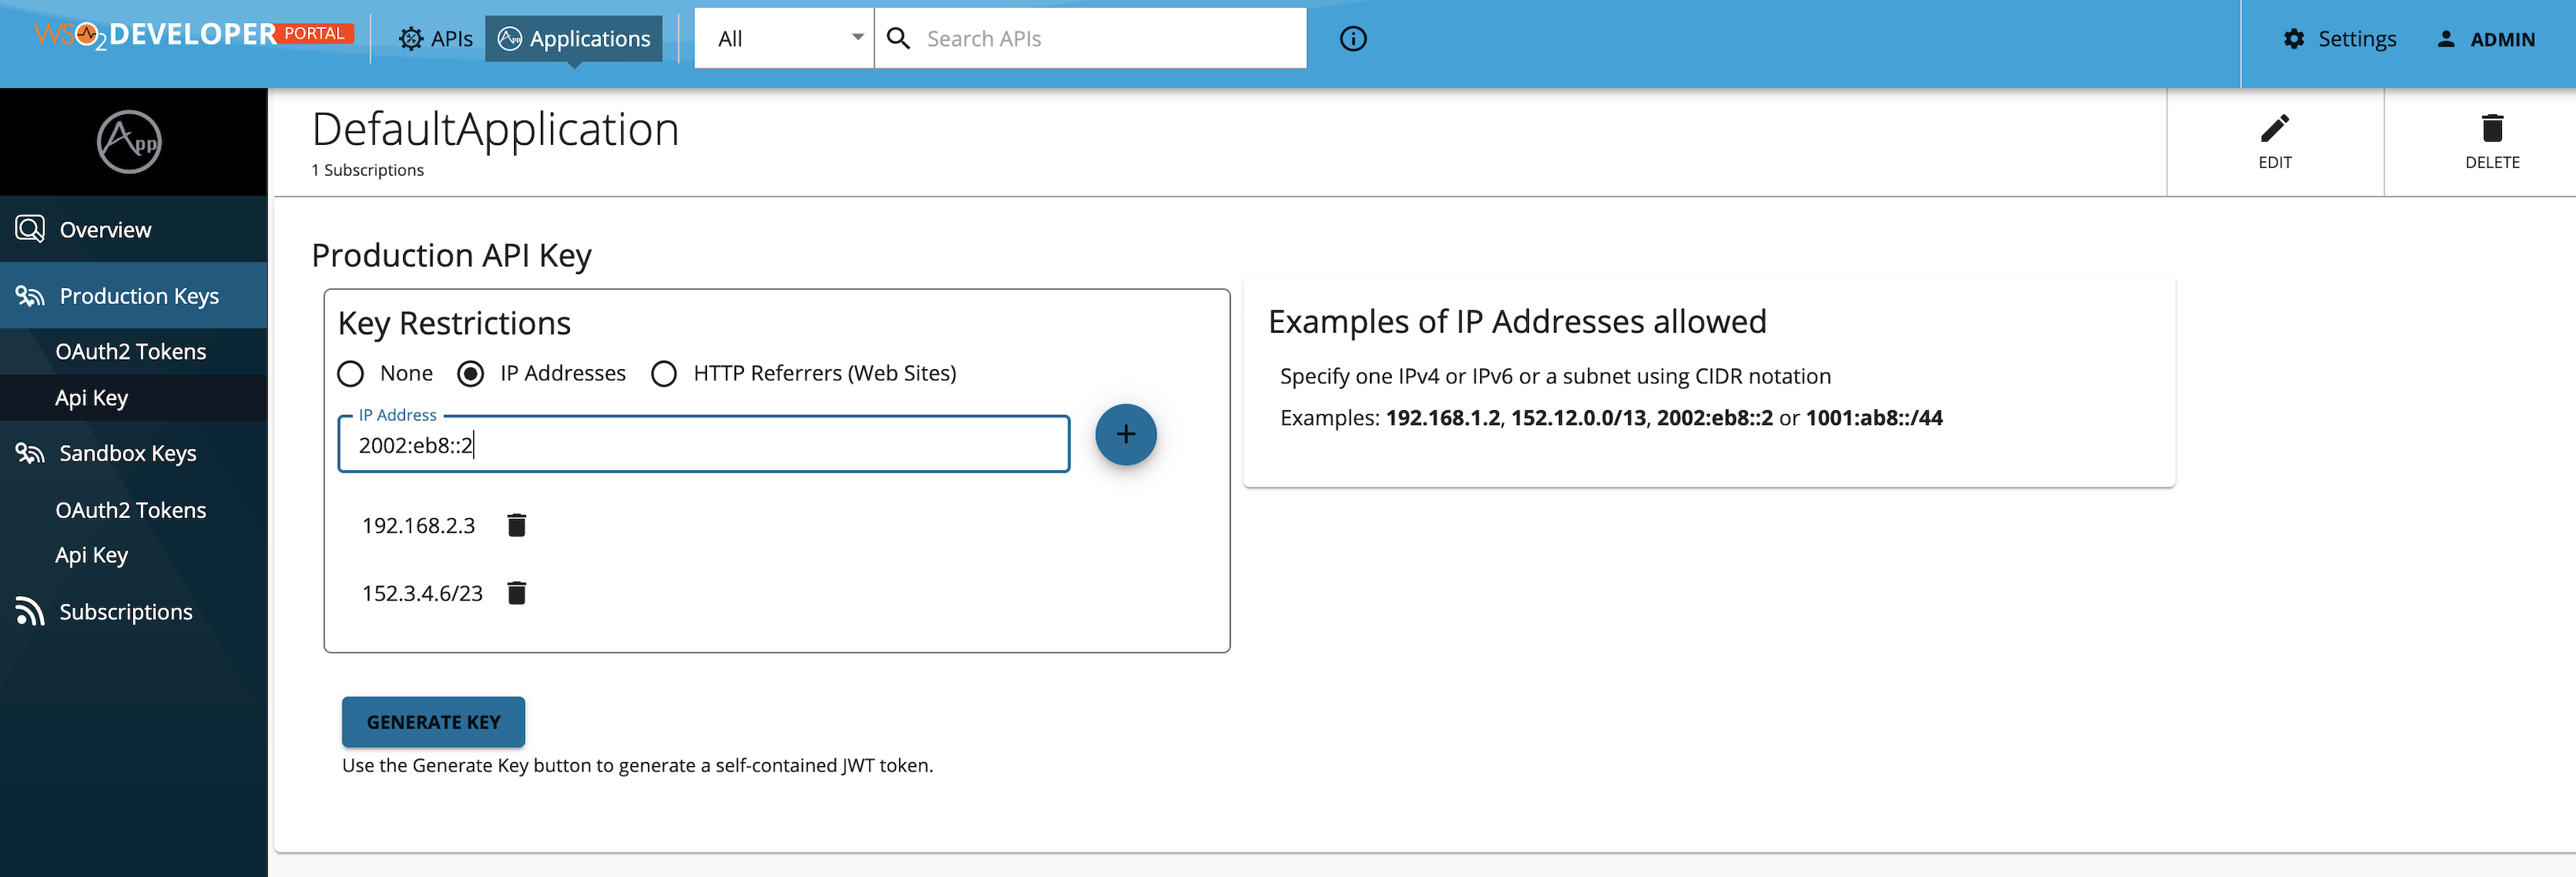
-
Generate the key.
2) HTTP referer restriction
The specific HTTP referrers can use the token only when the HTTP referer restriction is enabled. Therefore, by using this restriction, when API clients run on web browsers, you can limit the access to an API only through specific web pages. The supported formates to specify the referrer is as follows.
- A specific URL with an exact path:
www.example.com/path - Any URL in a single subdomain, using a wildcard asterisk (*):
sub.example.com/* - Any subdomain or path URLs in a single domain, using wildcard asterisks (*):
*.example.com/*
Generating an API key with the HTTP referer restriction
-
Navigate to API key generation window of that specific application in the Developer Portal.
-
Select
HTTP Referrers (Web Sites)and add the referrers in the text input as shown below.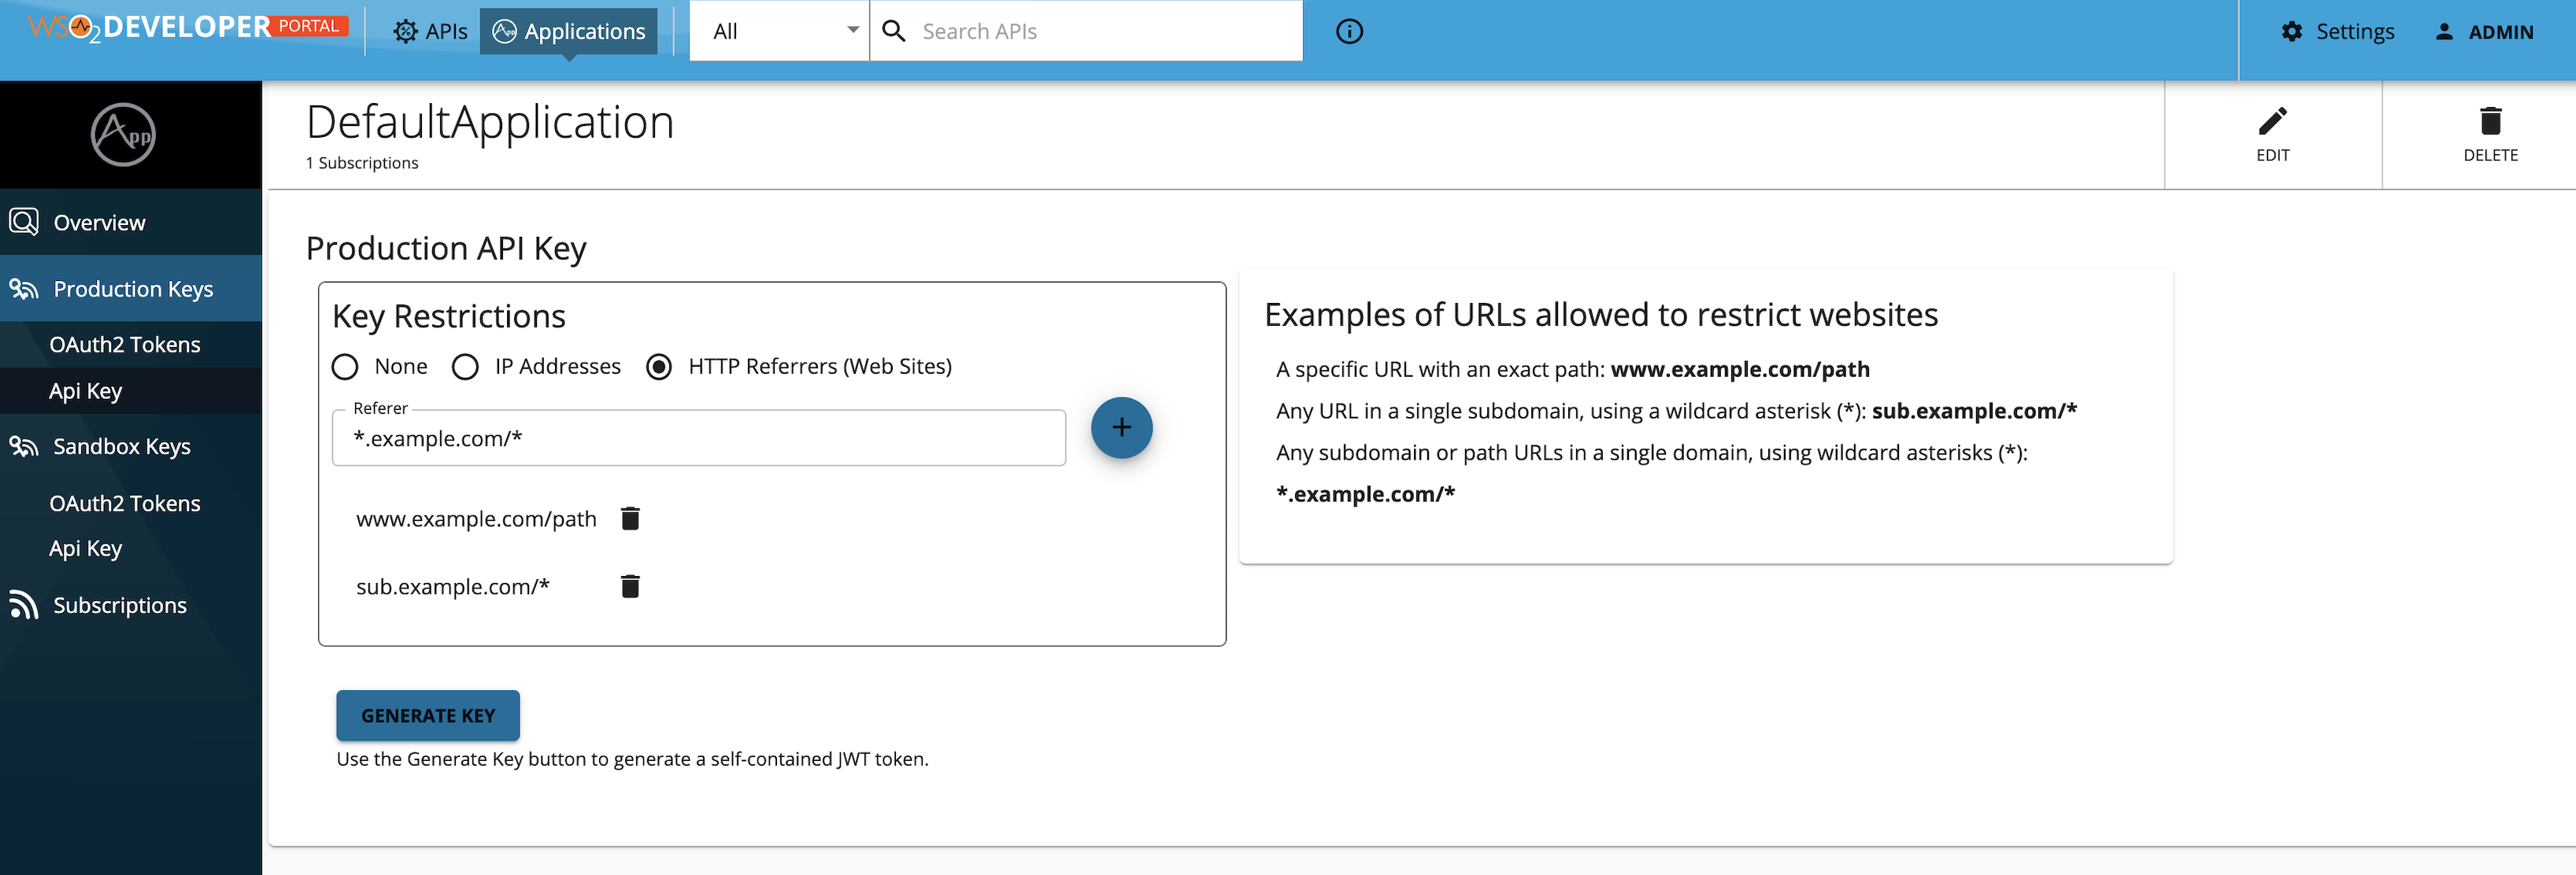
-
Generate the key.