Monetizing an API
API Monetization allows organizations to expand their business and generate higher revenue by exposing their services and data via APIs. API Publishers can publish their APIs with competitive business plans to the Developer Portal. Thereafter, API subscribers (e.g., Application Developers) can discover, subscribe, and invoke these monetized APIs, and pay for their API usage based on dynamic or fixed business plans.
WSO2 API Manager (WSO2 API-M) allows API Publishers to manage, govern, and monetize their APIs based on their business monetization goals. API Publishers can use the monetization capability in WSO2 API Manager to define various business plans for the same service; therefore, API subscribers have the freedom of selecting a preferred business plan as their subscription.
WSO2 API Manager provides an extendable interface that allows API Management solution developers to provide custom implementations with any third-party billing engine for the purpose of monetizing APIs based on paid business plans.
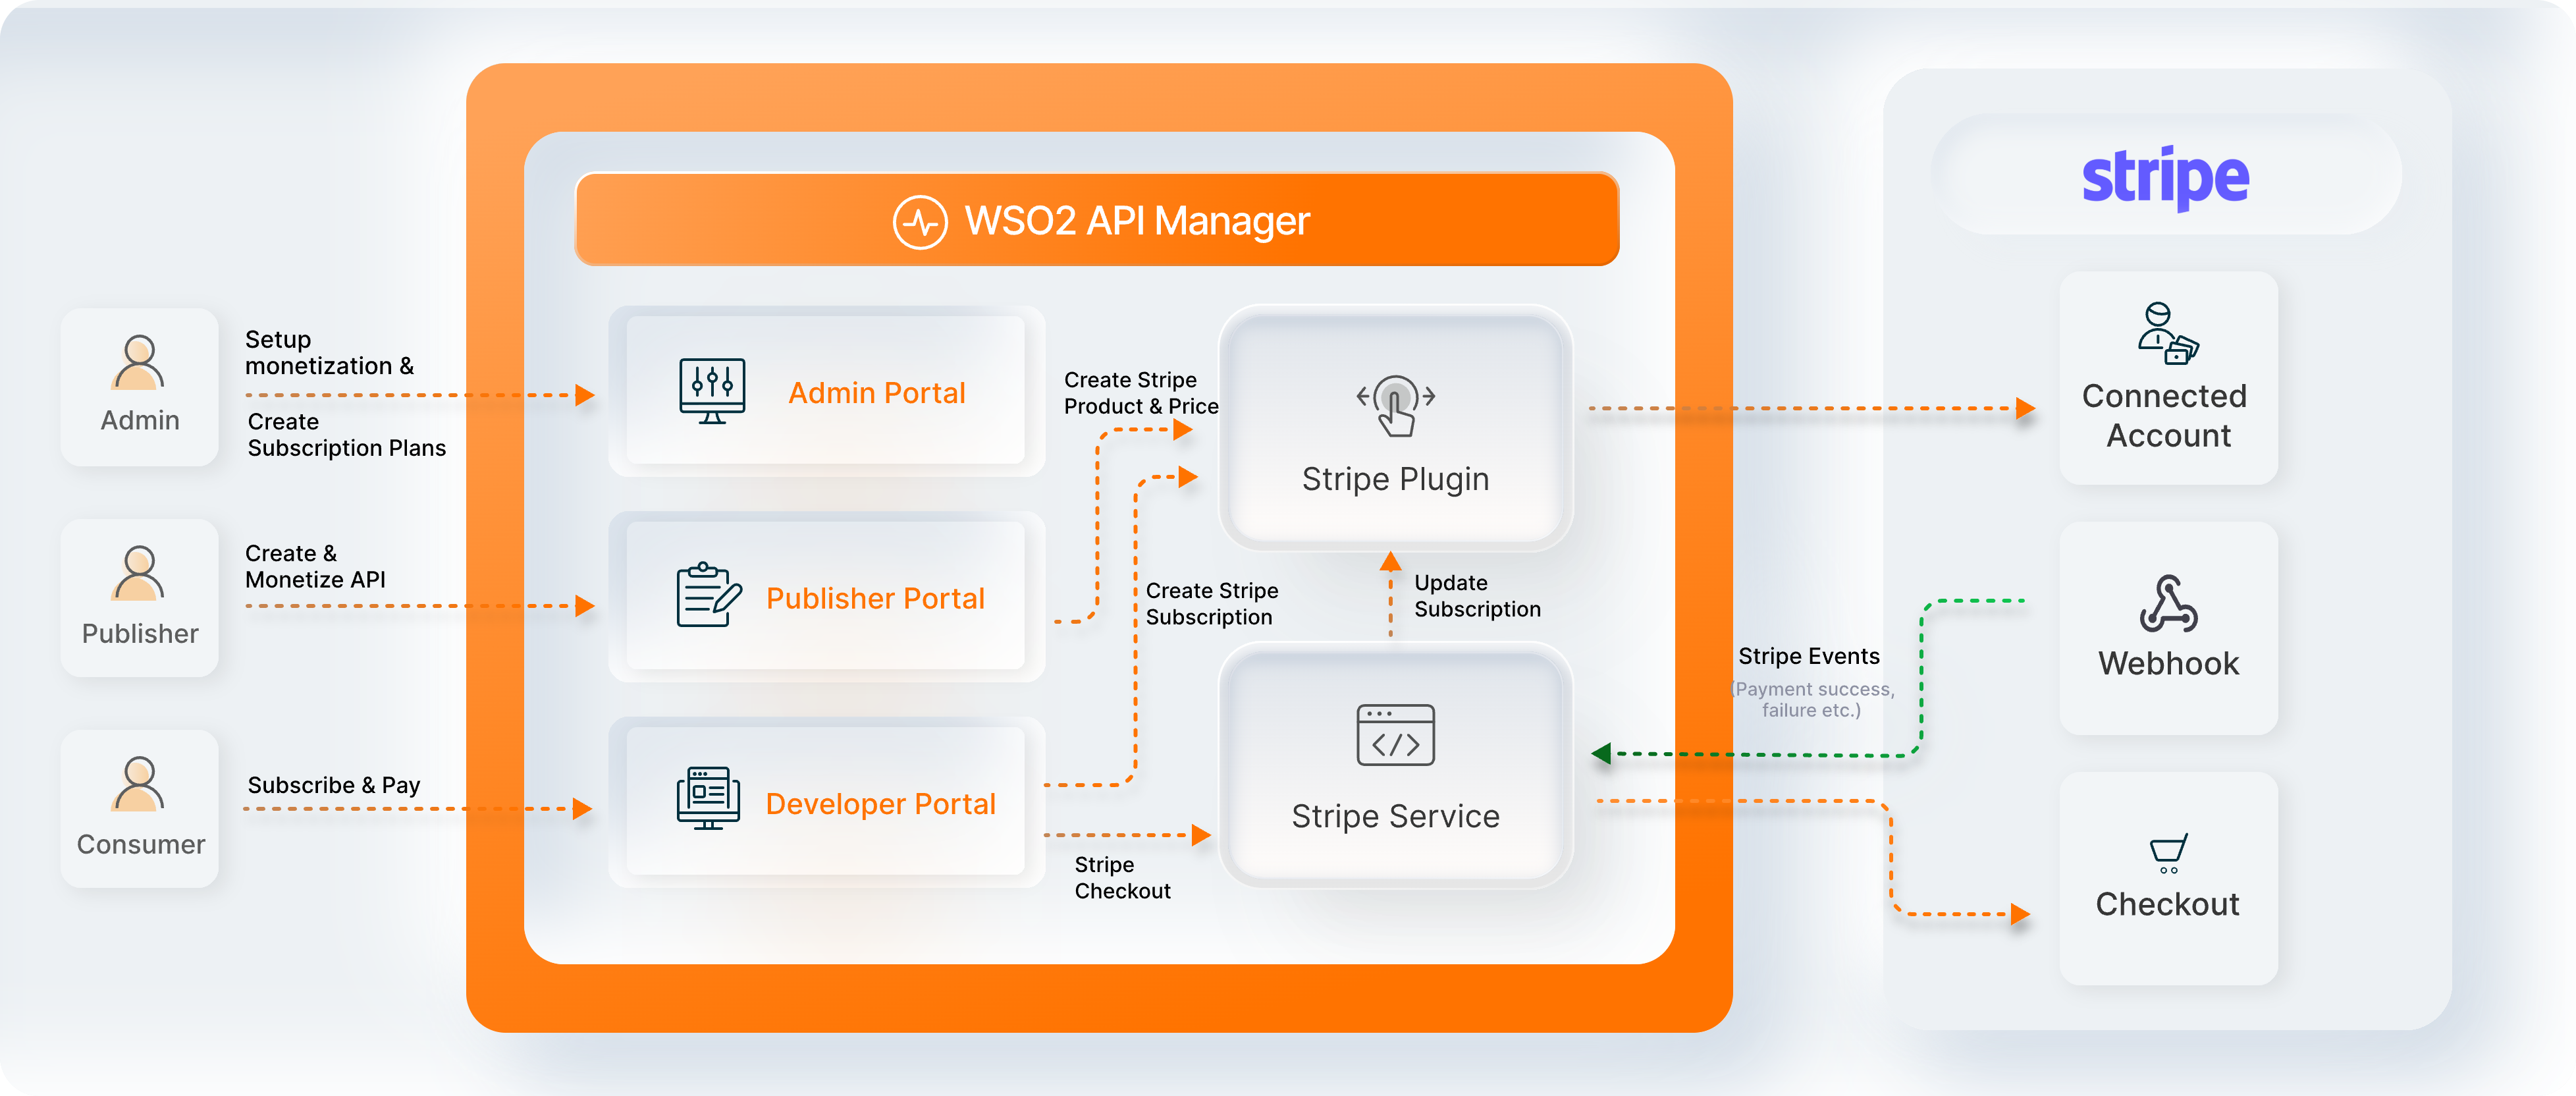
WSO2 API Manager uses Stripe as its sample implementation billing engine via the wso2-am-stripe-plugin. When a subscriber selects a monetized tier, APIM redirects them to a Stripe-hosted Checkout page to collect payment details. Once payment is confirmed, the APIM subscription is activated automatically. Subscribers can subsequently manage their payment method, view invoices, and cancel their subscription via a Stripe-hosted Customer Portal. However, you can use any custom implementation with WSO2 API Manager's API Monetization capabilities based on your requirement.
The following diagram provides an overview of the monetization architecture between WSO2 API Manager and Stripe.
Monetize an API
Warning
The following steps are based on the Stripe billing engine. If you wish to work with another third-party billing engine, you need to first create a custom implementation by extending the monetization interface, and only thereafter will you be able to monetize your API.
Before you begin
(A) - Configure the billing engine
Create a connected account to configure the Stripe billing engine.
The Stripe connected account will connect all the API Publisher accounts to the Tenant Admin's account. This allows the Tenant Admin to authenticate all Stripe API calls and create Checkout sessions on behalf of each connected Publisher account.
For more information go to, Using Connect with Standard Accounts.
Note
- Make sure to configure the timezone to UTC before creating any objects in the Stripe accounts.
- Create the following two Stripe accounts only if you do not have an existing Stripe account.
-
Create an account for the Tenant Admin.
The Tenant Admin account will be used to create connected accounts in order to centrally manage payments for the Publisher accounts.
-
Use the details of the Tenant Admin and verify the account. Let's name this account as Tenant Admin.
-
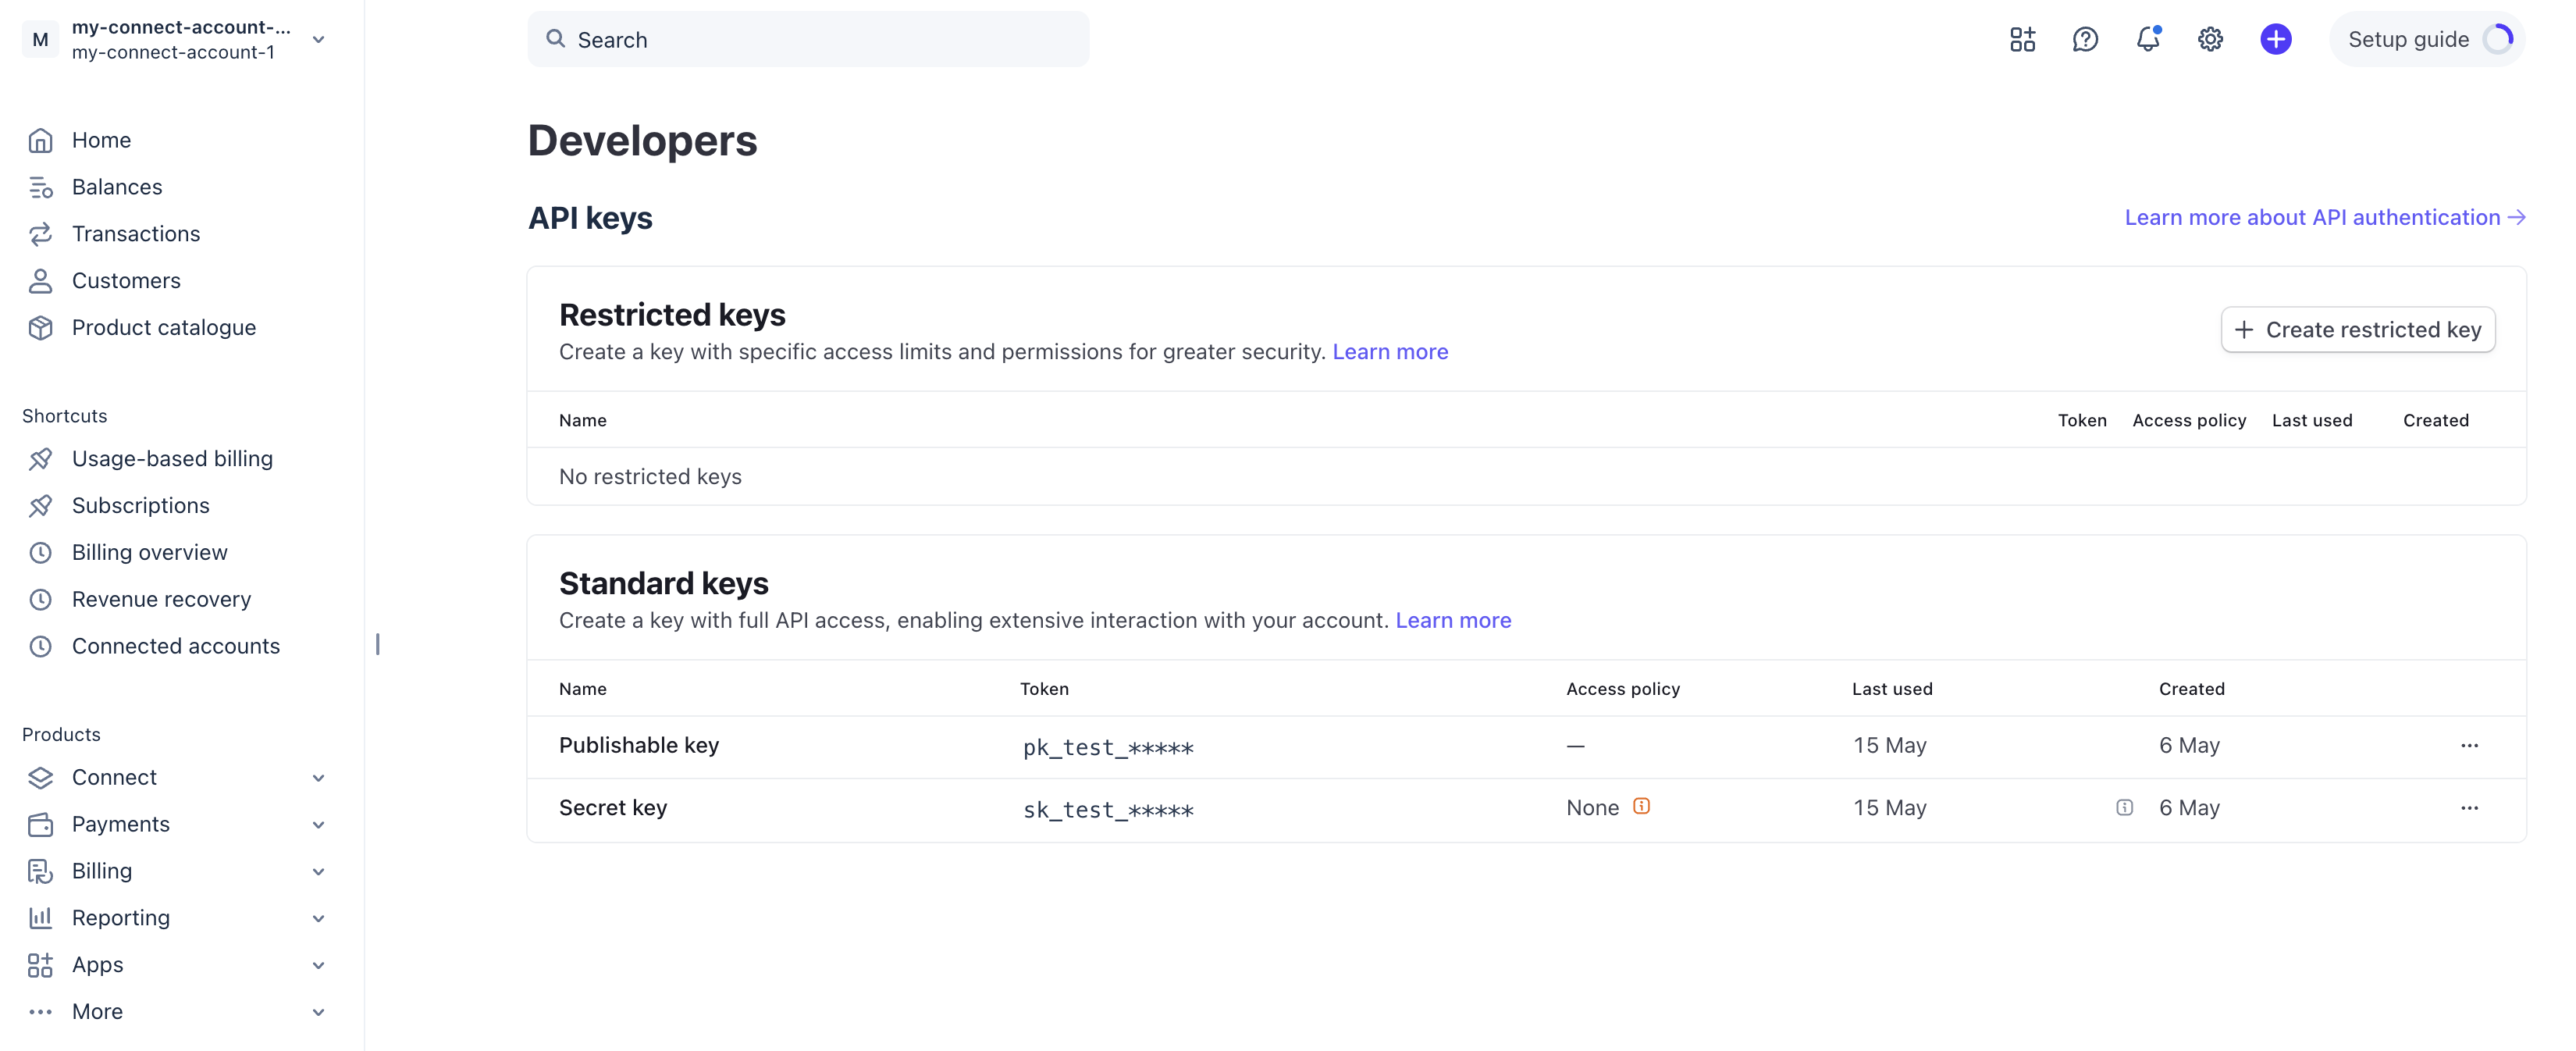
Navigate to Developers > API keys. The Standard keys section lists your Publishable key and Secret key. Copy the Secret key — this is the Tenant Admin's platform account key required later in the APIM configuration.
-
-
Create an account for the API Publisher.
Each Publisher Stripe account corresponds to a specific Publisher in WSO2 API Manager. Every Publisher should create a separate Stripe account if they wish to monetize their APIs.
-
Enable Connect and create a connected account in Stripe.
-
Sign in to the Tenant Admin's Stripe account.
-
Navigate to Connect > Connected accounts and click + Create.
-
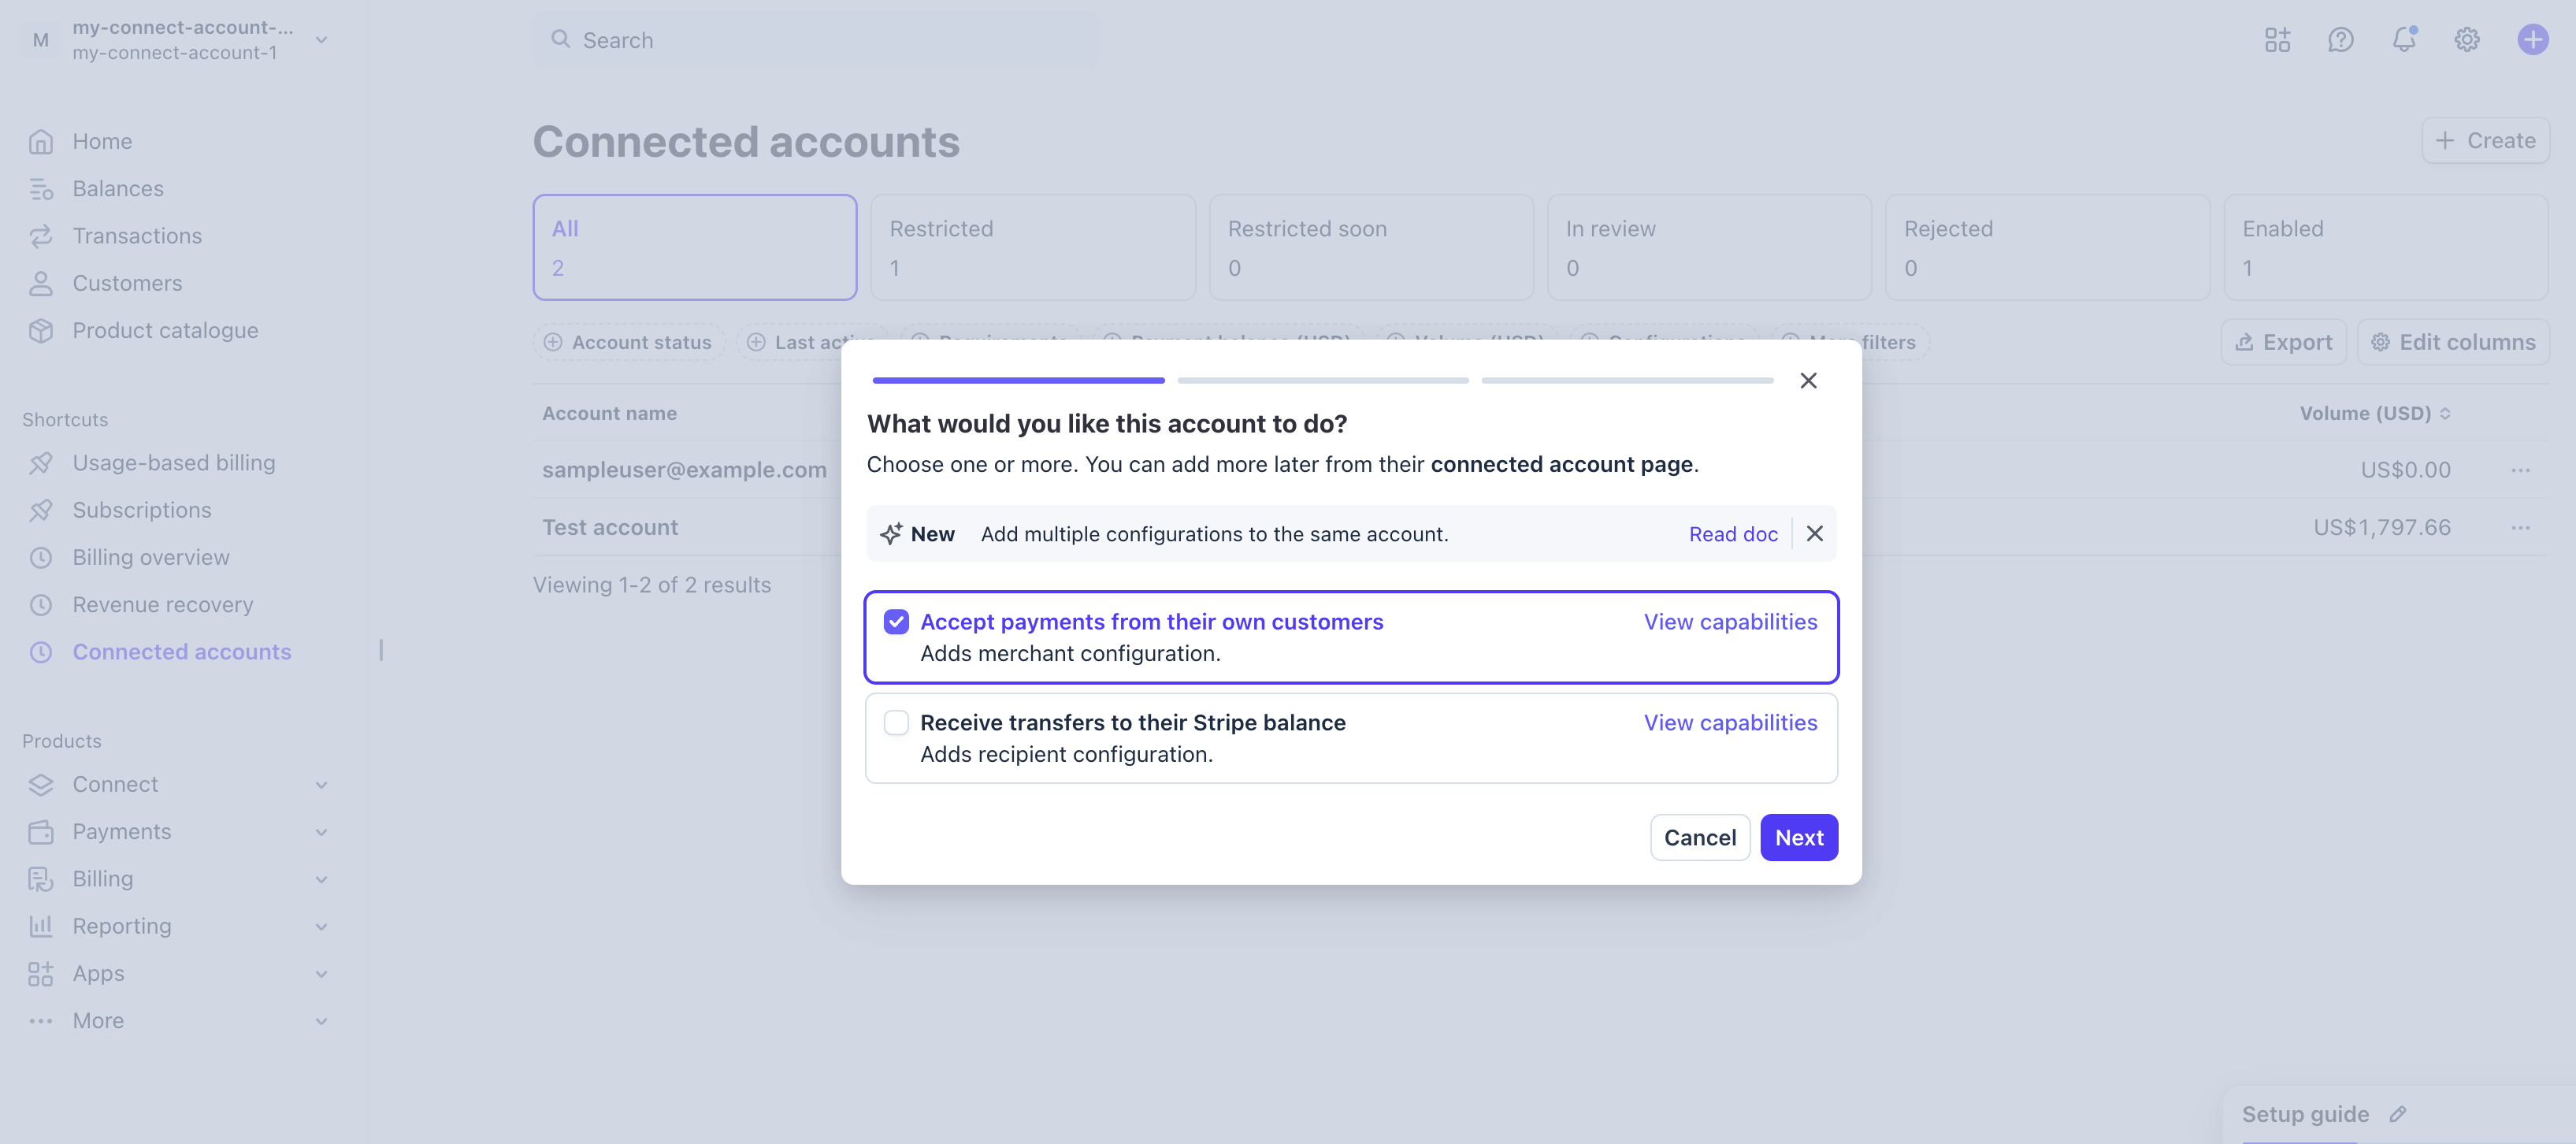
In the What would you like this account to do? dialog, select Accept payments from their own customers (adds merchant configuration) and click Next.
-
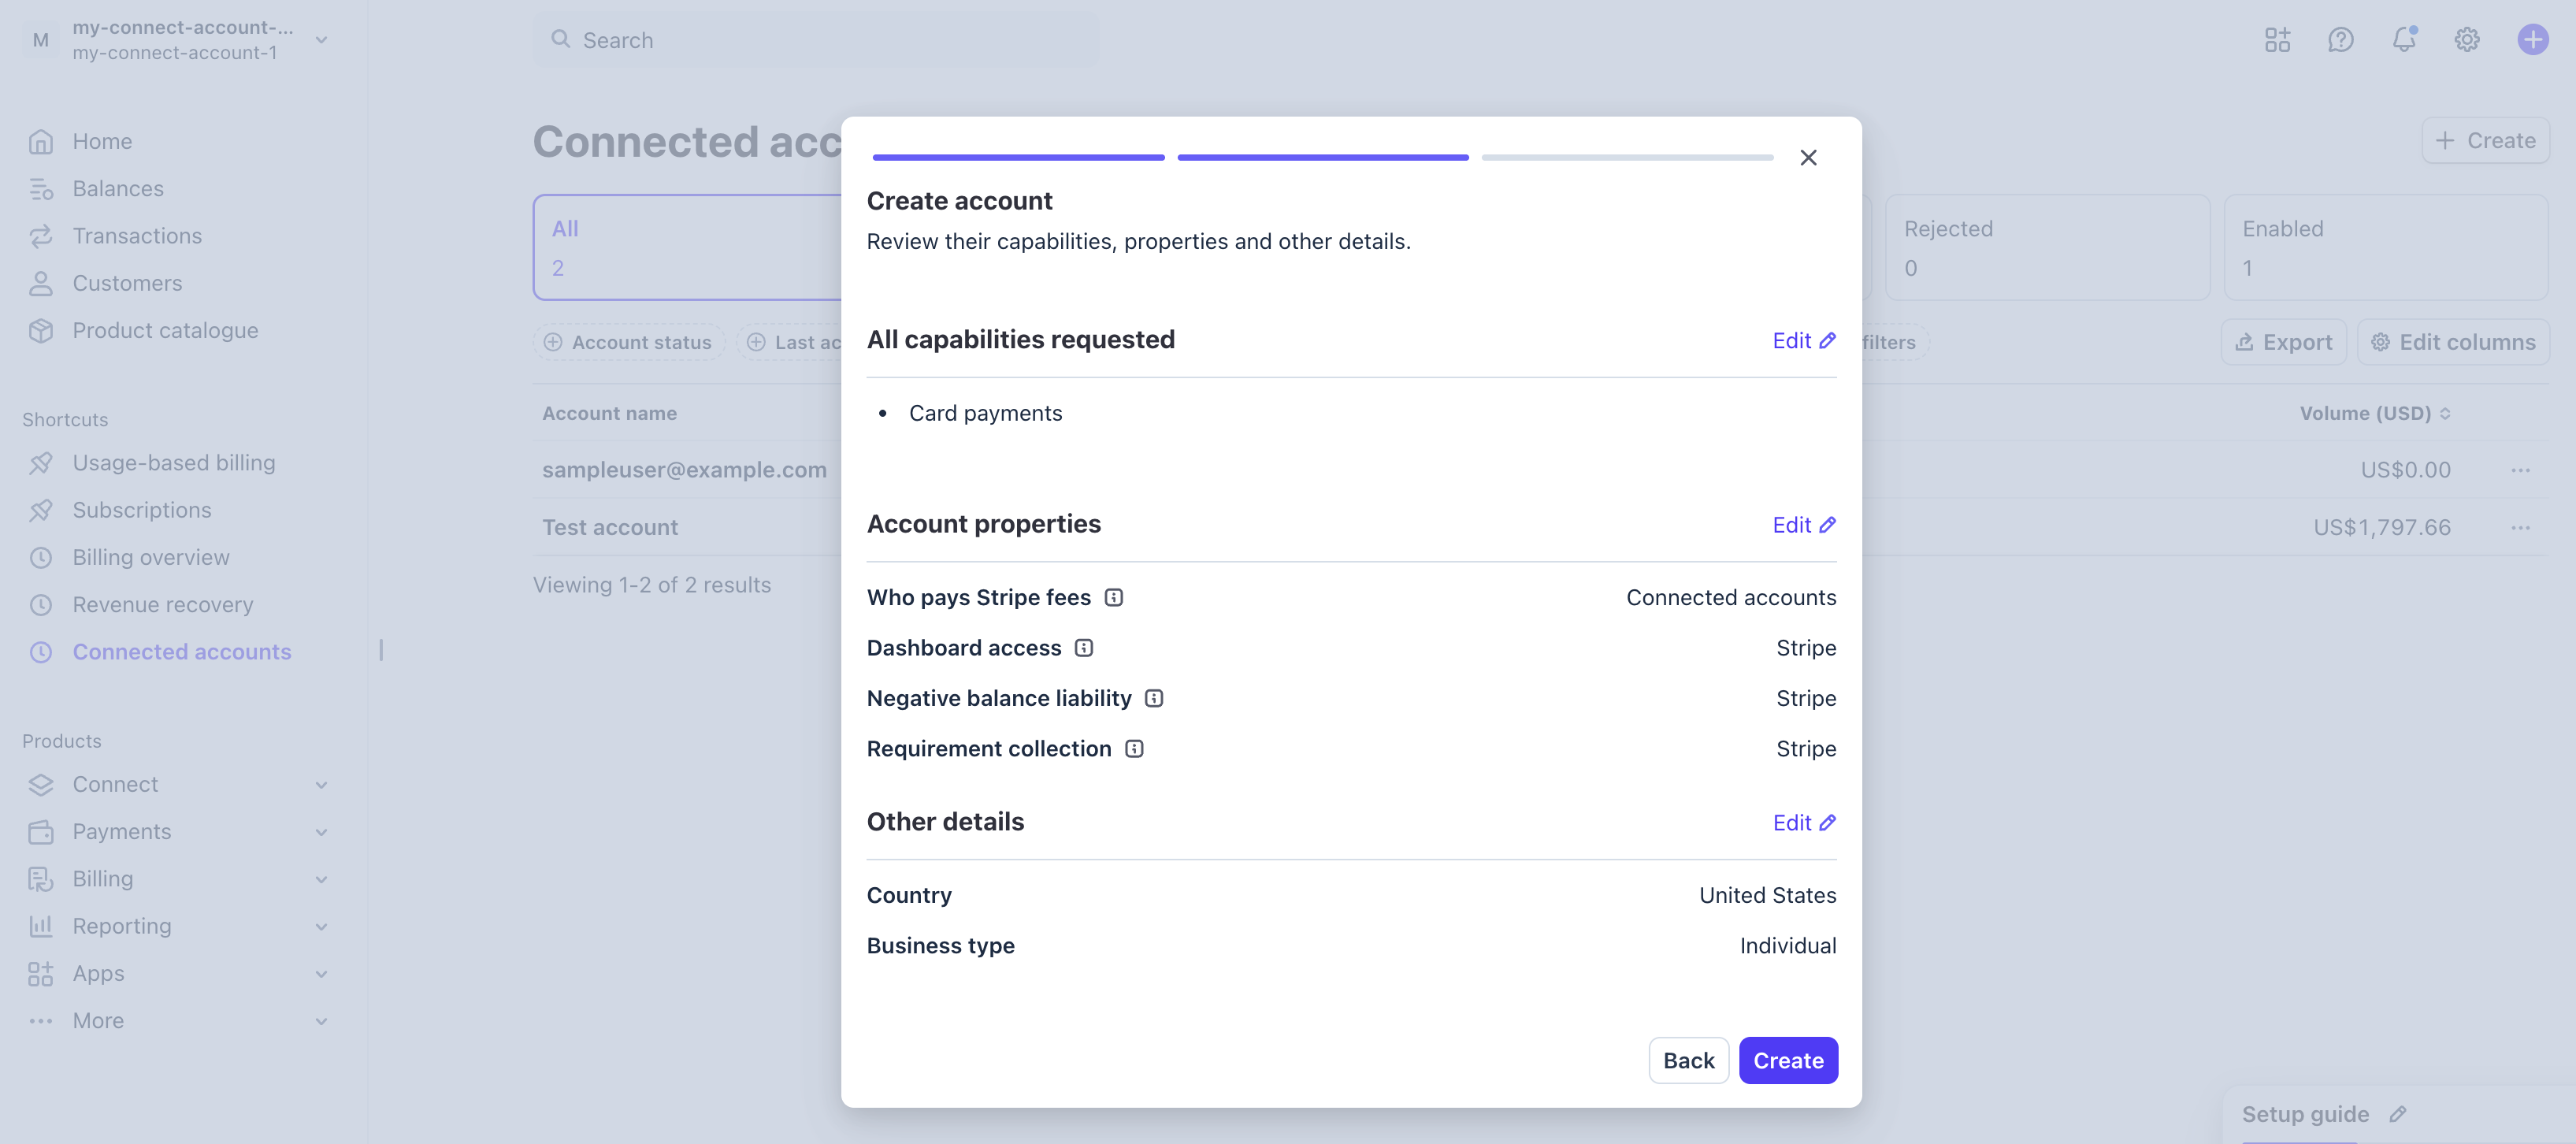
A Create account dialog appears summarising the capabilities, account properties, and other details for the connected account. Review these and click Create.
The dialog shows the requested capabilities (Card payments), account properties such as who pays Stripe fees and dashboard access, and the country and business type for the connected account.
-
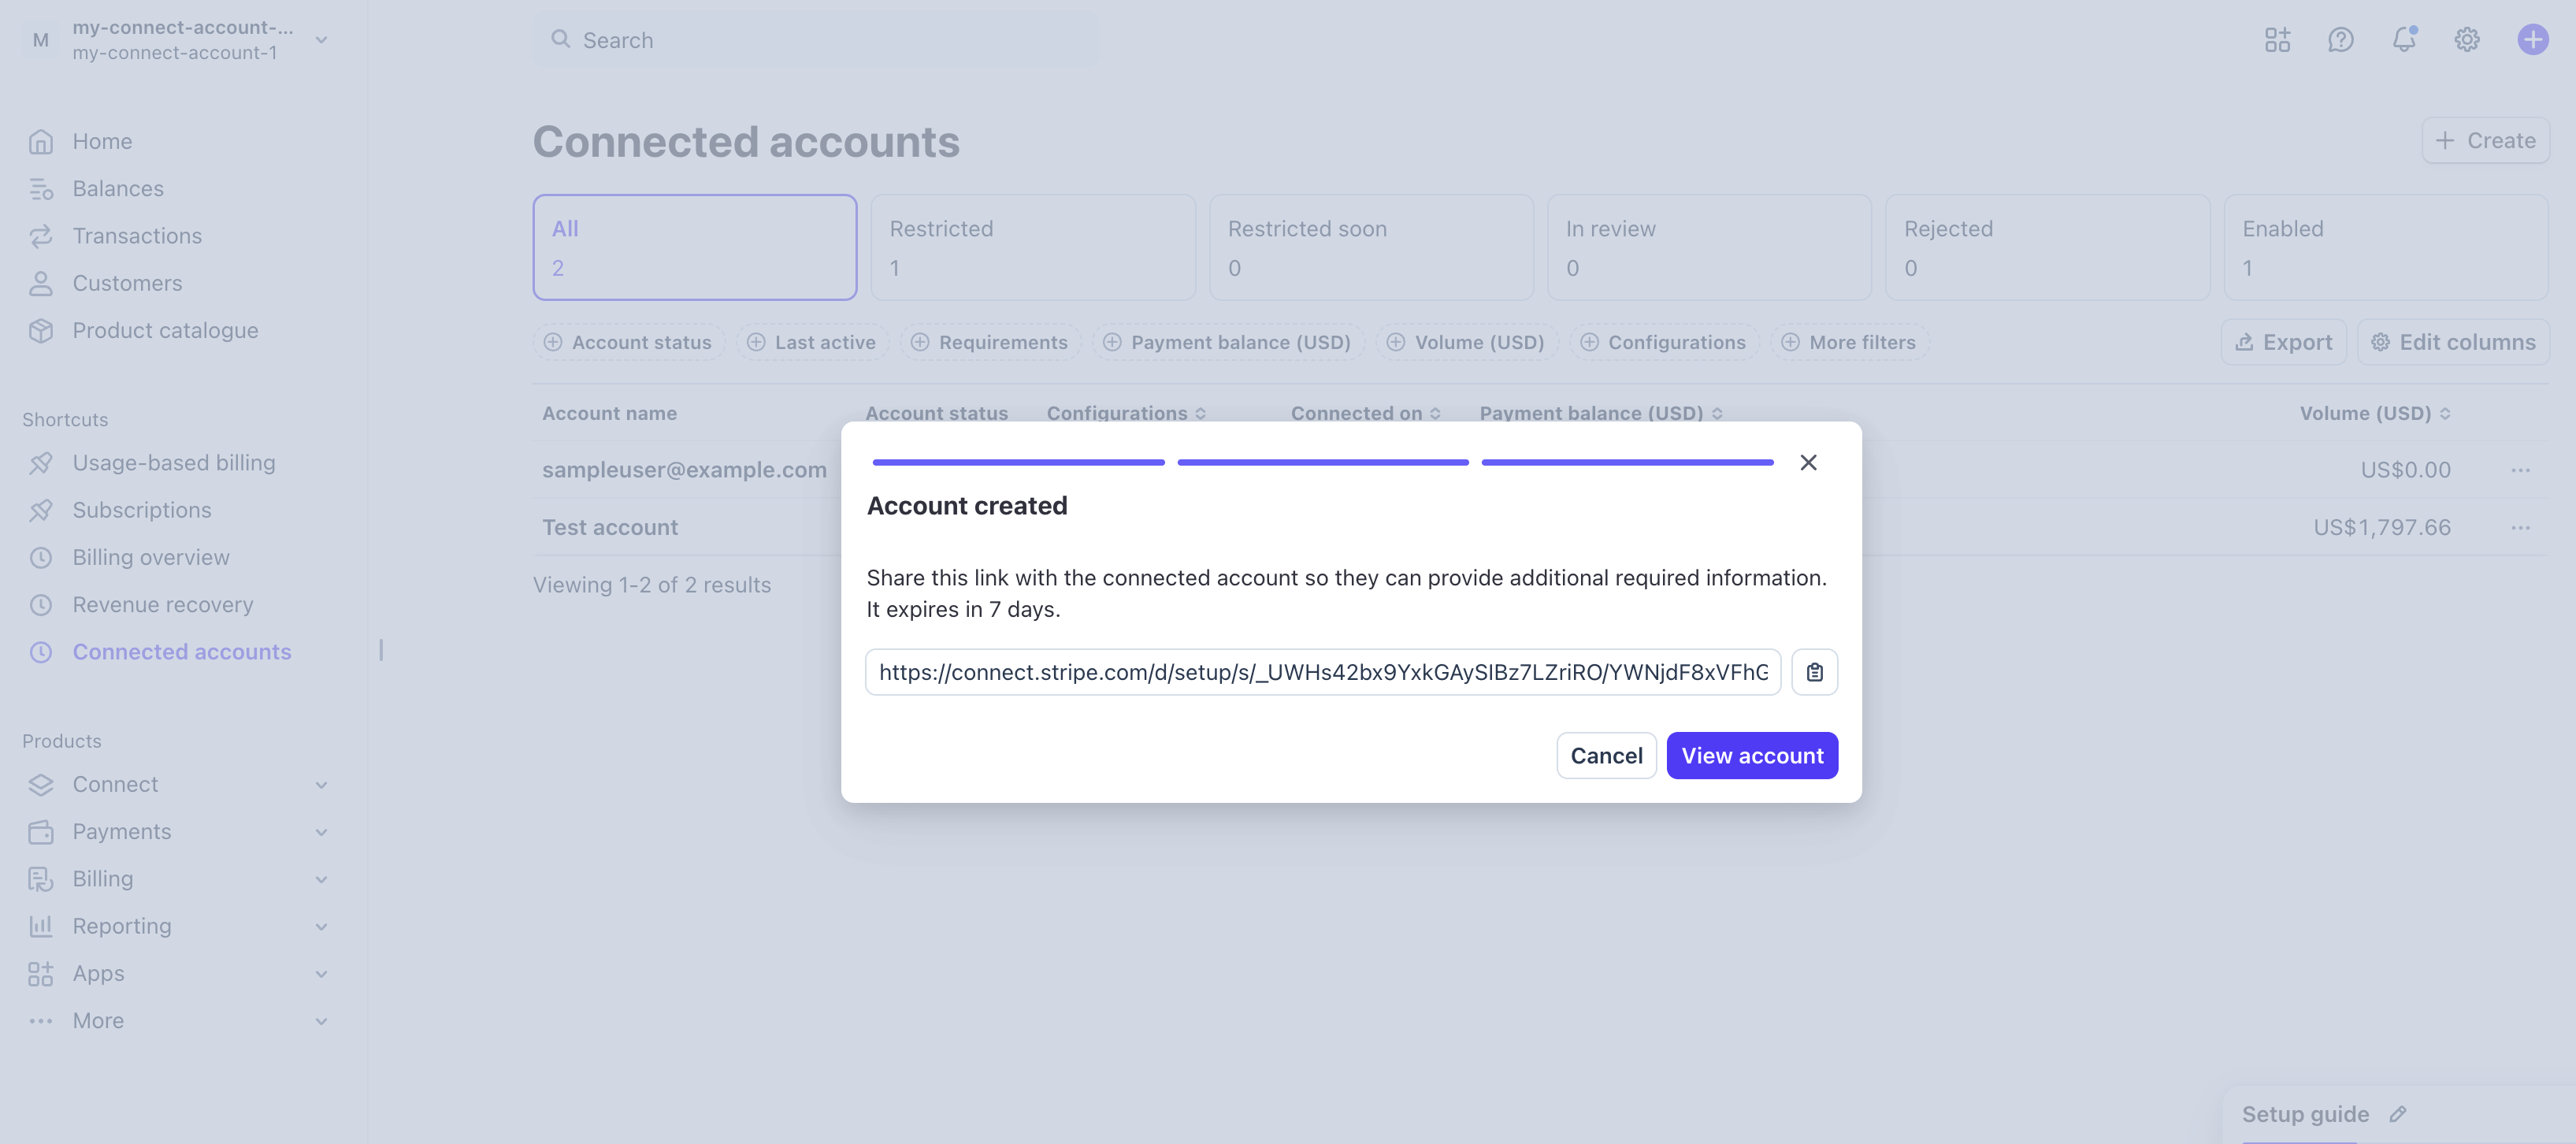
An Account created dialog appears with a one-time onboarding link. Share this link with the API Publisher so they can provide additional required information.
-
After the Publisher completes onboarding, click View account in the dialog (or locate their account in the Connected accounts list). Copy the Connect ID. It is required when enabling monetization for an API in the APIM Publisher Portal.
-
-
Register a Stripe webhook endpoint.
The stripe-service component receives Stripe push events (payment success, failure, subscription cancellation, etc.) to automatically manage the lifecycle of APIM subscriptions.
-
In the Stripe Dashboard, go to Developers > Webhooks and click Create an event destination.
-
Under Event destination scope, select Connected accounts.
This ensures that subscription lifecycle events from your connected Publisher accounts are delivered to this destination.
-
Under API version, select
2026-04-22.dahlia. -
Under Events, select the following events to listen for:
checkout.session.completedcheckout.session.expiredinvoice.payment_succeededinvoice.payment_failedinvoice.payment_action_requiredcustomer.subscription.updatedcustomer.subscription.deleted
-
Click Continue and choose Webhook as the destination type.
-
Set the endpoint URL to:
For the
carbon.supertenant: -
After saving, copy the Webhook Signing secret. You will need this when configuring the Tenant Admin settings in APIM.
-
(B) - Configure WSO2 API Manager
Note
In a distributed WSO2 API Manager deployment, you need to do the following configurations in the Publisher and the Developer Portal nodes.
-
Connect WSO2 API Manager to the billing engine.
-
Download the following JARs and place them in the
<API-M_HOME>/repository/components/libdirectory. -
Deploy the Stripe service WAR.
Download api#am#stripe.war.
Note
Rename the downloaded file from
api.am.stripe.wartoapi#am#stripe.warbefore placing it in the<API-M_HOME>/repository/deployment/server/webappsdirectory. The#separator in the filename is required for the service to be accessible at/api/am/stripe/.Once deployed, the service is accessible at
https://<host>:9443/api/am/stripe/and handles webhook events, Checkout URL retrieval, session completion, and Customer Portal redirects. -
Define the monetization implementation in WSO2 API Manager.
If you are using the wso2-am-stripe-plugin, add the full qualified class name of the monetization implementation in the
<API-M_HOME>/repository/conf/deployment.tomlfile as follows.
-
-
Configure the database.
-
Download and add the database related connector JAR into the
<API-M_HOME>/repository/components/libdirectory.As a MySQL database is used for this example scenario, download and copy the MySQL connector JAR into the latter mentioned
libfolder.Tip
Look for the compatible MySQL Connector version based on the MySQL version being used.
- For MySQL version 8.0.x, the compatible MySQL Connector version is 8.0.x.
- For MySQL version 8.4.x, the compatible MySQL Connector version is 8.4.x.
-
Configure the WSO2 API Manager related datasource.
Add the following configuration in the
<API-M_HOME>/repository/conf/deployment.tomlfile under thedatabase.apim_dbsection. Make sure to add the parameters based on your setup. -
Navigate to the
<API-M_HOME>/dbscripts/apimgt/directory and execute the database script that corresponds to the database management system that you are working on.As a MySQL database is used for this example scenario, execute the
mysql.sqlscript. -
Execute one of the following database scripts in the
WSO2AM_DBdatabase, based on the RDBMS that you are using, to create the Stripe monetization tables.CREATE TABLE IF NOT EXISTS AM_MONETIZATION ( API_ID INTEGER NOT NULL, TIER_NAME VARCHAR(512), STRIPE_PRODUCT_ID VARCHAR(512), STRIPE_PLAN_ID VARCHAR(512), FOREIGN KEY (API_ID) REFERENCES AM_API (API_ID) ON DELETE CASCADE ) ENGINE=InnoDB; CREATE TABLE IF NOT EXISTS AM_POLICY_PLAN_MAPPING ( POLICY_UUID VARCHAR(256), PRODUCT_ID VARCHAR(512), PLAN_ID VARCHAR(512), FOREIGN KEY (POLICY_UUID) REFERENCES AM_POLICY_SUBSCRIPTION(UUID) ) ENGINE=InnoDB; CREATE TABLE IF NOT EXISTS AM_MONETIZATION_SHARED_CUSTOMERS ( ID INTEGER NOT NULL AUTO_INCREMENT, APPLICATION_ID INTEGER NOT NULL, API_PROVIDER VARCHAR(256) NOT NULL, TENANT_ID INTEGER NOT NULL, SHARED_CUSTOMER_ID VARCHAR(256) NOT NULL, PRIMARY KEY (ID), FOREIGN KEY (APPLICATION_ID) REFERENCES AM_APPLICATION(APPLICATION_ID) ON DELETE CASCADE ) ENGINE=InnoDB; CREATE TABLE IF NOT EXISTS AM_MONETIZATION_SUBSCRIPTIONS ( ID INTEGER NOT NULL AUTO_INCREMENT, SUBSCRIBED_APPLICATION_ID INTEGER NOT NULL, SUBSCRIBED_API_ID INTEGER NOT NULL, TENANT_ID INTEGER NOT NULL, SUBSCRIPTION_ID VARCHAR(256) NOT NULL, SHARED_CUSTOMER_ID INTEGER NOT NULL, PRIMARY KEY (ID), FOREIGN KEY (SUBSCRIBED_APPLICATION_ID) REFERENCES AM_APPLICATION(APPLICATION_ID) ON DELETE CASCADE, FOREIGN KEY (SUBSCRIBED_API_ID) REFERENCES AM_API(API_ID) ON DELETE CASCADE, FOREIGN KEY (SHARED_CUSTOMER_ID) REFERENCES AM_MONETIZATION_SHARED_CUSTOMERS(ID) ON DELETE CASCADE ) ENGINE=InnoDB; CREATE TABLE IF NOT EXISTS AM_STRIPE_CHECKOUT_SESSIONS ( SESSION_ID VARCHAR(255) NOT NULL, WORKFLOW_REFERENCE VARCHAR(255) NOT NULL, SUBSCRIBER_ID INTEGER NOT NULL, TENANT_ID INTEGER NOT NULL, API_UUID VARCHAR(255) NOT NULL, CHECKOUT_URL VARCHAR(2048) NOT NULL, STATUS VARCHAR(20) NOT NULL, CREATED_AT TIMESTAMP NOT NULL, UPDATED_AT TIMESTAMP, PRIMARY KEY (SESSION_ID) ) ENGINE=InnoDB;CREATE TABLE IF NOT EXISTS AM_MONETIZATION ( API_ID INTEGER NOT NULL, TIER_NAME VARCHAR(512), STRIPE_PRODUCT_ID VARCHAR(512), STRIPE_PLAN_ID VARCHAR(512), FOREIGN KEY (API_ID) REFERENCES AM_API (API_ID) ON DELETE CASCADE )/ CREATE TABLE IF NOT EXISTS AM_POLICY_PLAN_MAPPING ( POLICY_UUID VARCHAR(256), PRODUCT_ID VARCHAR(512), PLAN_ID VARCHAR(512), FOREIGN KEY (POLICY_UUID) REFERENCES AM_POLICY_SUBSCRIPTION(UUID) )/ CREATE TABLE IF NOT EXISTS AM_MONETIZATION_SHARED_CUSTOMERS ( ID INTEGER NOT NULL AUTO_INCREMENT, APPLICATION_ID INTEGER NOT NULL, API_PROVIDER VARCHAR(256) NOT NULL, TENANT_ID INTEGER NOT NULL, SHARED_CUSTOMER_ID VARCHAR(256) NOT NULL, PRIMARY KEY (ID), FOREIGN KEY (APPLICATION_ID) REFERENCES AM_APPLICATION(APPLICATION_ID) ON DELETE CASCADE )/ CREATE TABLE IF NOT EXISTS AM_MONETIZATION_SUBSCRIPTIONS ( ID INTEGER NOT NULL AUTO_INCREMENT, SUBSCRIBED_APPLICATION_ID INTEGER NOT NULL, SUBSCRIBED_API_ID INTEGER NOT NULL, TENANT_ID INTEGER NOT NULL, SUBSCRIPTION_ID VARCHAR(256) NOT NULL, SHARED_CUSTOMER_ID INTEGER NOT NULL, PRIMARY KEY (ID), FOREIGN KEY (SUBSCRIBED_APPLICATION_ID) REFERENCES AM_APPLICATION(APPLICATION_ID) ON DELETE CASCADE, FOREIGN KEY (SUBSCRIBED_API_ID) REFERENCES AM_API(API_ID) ON DELETE CASCADE, FOREIGN KEY (SHARED_CUSTOMER_ID) REFERENCES AM_MONETIZATION_SHARED_CUSTOMERS(ID) ON DELETE CASCADE )/ CREATE TABLE IF NOT EXISTS AM_STRIPE_CHECKOUT_SESSIONS ( SESSION_ID VARCHAR(255) NOT NULL, WORKFLOW_REFERENCE VARCHAR(255) NOT NULL, SUBSCRIBER_ID INTEGER NOT NULL, TENANT_ID INTEGER NOT NULL, API_UUID VARCHAR(255) NOT NULL, CHECKOUT_URL VARCHAR(2048) NOT NULL, STATUS VARCHAR(20) NOT NULL, CREATED_AT TIMESTAMP NOT NULL, UPDATED_AT TIMESTAMP, PRIMARY KEY (SESSION_ID) )/IF NOT EXISTS (SELECT * FROM SYS.OBJECTS WHERE OBJECT_ID = OBJECT_ID(N'[DBO].[AM_MONETIZATION]') AND TYPE IN (N'U')) CREATE TABLE AM_MONETIZATION ( API_ID INTEGER NOT NULL, TIER_NAME VARCHAR(512), STRIPE_PRODUCT_ID VARCHAR(512), STRIPE_PLAN_ID VARCHAR(512), FOREIGN KEY (API_ID) REFERENCES AM_API (API_ID) ON DELETE CASCADE ); IF NOT EXISTS (SELECT * FROM SYS.OBJECTS WHERE OBJECT_ID = OBJECT_ID(N'[DBO].[AM_POLICY_PLAN_MAPPING]') AND TYPE IN (N'U')) CREATE TABLE AM_POLICY_PLAN_MAPPING ( POLICY_UUID VARCHAR(256), PRODUCT_ID VARCHAR(512), PLAN_ID VARCHAR(512), FOREIGN KEY (POLICY_UUID) REFERENCES AM_POLICY_SUBSCRIPTION(UUID) ); IF NOT EXISTS (SELECT * FROM SYS.OBJECTS WHERE OBJECT_ID = OBJECT_ID(N'[DBO].[AM_MONETIZATION_SHARED_CUSTOMERS]') AND TYPE IN (N'U')) CREATE TABLE AM_MONETIZATION_SHARED_CUSTOMERS ( ID INTEGER NOT NULL AUTO_INCREMENT, APPLICATION_ID INTEGER NOT NULL, API_PROVIDER VARCHAR(256) NOT NULL, TENANT_ID INTEGER NOT NULL, SHARED_CUSTOMER_ID VARCHAR(256) NOT NULL, PRIMARY KEY (ID), FOREIGN KEY (APPLICATION_ID) REFERENCES AM_APPLICATION(APPLICATION_ID) ON DELETE CASCADE ); IF NOT EXISTS (SELECT * FROM SYS.OBJECTS WHERE OBJECT_ID = OBJECT_ID(N'[DBO].[AM_MONETIZATION_SUBSCRIPTIONS]') AND TYPE IN (N'U')) CREATE TABLE AM_MONETIZATION_SUBSCRIPTIONS ( ID INTEGER NOT NULL AUTO_INCREMENT, SUBSCRIBED_APPLICATION_ID INTEGER NOT NULL, SUBSCRIBED_API_ID INTEGER NOT NULL, TENANT_ID INTEGER NOT NULL, SUBSCRIPTION_ID VARCHAR(256) NOT NULL, SHARED_CUSTOMER_ID INTEGER NOT NULL, PRIMARY KEY (ID), FOREIGN KEY (SUBSCRIBED_APPLICATION_ID) REFERENCES AM_APPLICATION(APPLICATION_ID) ON DELETE CASCADE, FOREIGN KEY (SUBSCRIBED_API_ID) REFERENCES AM_API(API_ID) ON DELETE CASCADE, FOREIGN KEY (SHARED_CUSTOMER_ID) REFERENCES AM_MONETIZATION_SHARED_CUSTOMERS(ID) ON DELETE CASCADE ); IF NOT EXISTS (SELECT * FROM SYS.OBJECTS WHERE OBJECT_ID = OBJECT_ID(N'[DBO].[AM_STRIPE_CHECKOUT_SESSIONS]') AND TYPE IN (N'U')) CREATE TABLE AM_STRIPE_CHECKOUT_SESSIONS ( SESSION_ID VARCHAR(255) NOT NULL, WORKFLOW_REFERENCE VARCHAR(255) NOT NULL, SUBSCRIBER_ID INTEGER NOT NULL, TENANT_ID INTEGER NOT NULL, API_UUID VARCHAR(255) NOT NULL, CHECKOUT_URL VARCHAR(2048) NOT NULL, STATUS VARCHAR(20) NOT NULL, CREATED_AT TIMESTAMP NOT NULL, UPDATED_AT TIMESTAMP, PRIMARY KEY (SESSION_ID) );CREATE TABLE AM_MONETIZATION ( API_ID INTEGER NOT NULL, TIER_NAME VARCHAR(512), STRIPE_PRODUCT_ID VARCHAR(512), STRIPE_PLAN_ID VARCHAR(512), FOREIGN KEY (API_ID) REFERENCES AM_API (API_ID) ON DELETE CASCADE ) / CREATE TABLE AM_POLICY_PLAN_MAPPING ( POLICY_UUID VARCHAR(256), PRODUCT_ID VARCHAR(512), PLAN_ID VARCHAR(512), FOREIGN KEY (POLICY_UUID) REFERENCES AM_POLICY_SUBSCRIPTION(UUID) ) / CREATE TABLE AM_MONETIZATION_SHARED_CUSTOMERS ( ID INTEGER NOT NULL AUTO_INCREMENT, APPLICATION_ID INTEGER NOT NULL, API_PROVIDER VARCHAR(256) NOT NULL, TENANT_ID INTEGER NOT NULL, SHARED_CUSTOMER_ID VARCHAR(256) NOT NULL, PRIMARY KEY (ID), FOREIGN KEY (APPLICATION_ID) REFERENCES AM_APPLICATION(APPLICATION_ID) ON DELETE CASCADE ) / CREATE TABLE AM_MONETIZATION_SUBSCRIPTIONS ( ID INTEGER NOT NULL AUTO_INCREMENT, SUBSCRIBED_APPLICATION_ID INTEGER NOT NULL, SUBSCRIBED_API_ID INTEGER NOT NULL, TENANT_ID INTEGER NOT NULL, SUBSCRIPTION_ID VARCHAR(256) NOT NULL, SHARED_CUSTOMER_ID INTEGER NOT NULL, PRIMARY KEY (ID), FOREIGN KEY (SUBSCRIBED_APPLICATION_ID) REFERENCES AM_APPLICATION(APPLICATION_ID) ON DELETE CASCADE, FOREIGN KEY (SUBSCRIBED_API_ID) REFERENCES AM_API(API_ID) ON DELETE CASCADE, FOREIGN KEY (SHARED_CUSTOMER_ID) REFERENCES AM_MONETIZATION_SHARED_CUSTOMERS(ID) ON DELETE CASCADE ) / CREATE TABLE AM_STRIPE_CHECKOUT_SESSIONS ( SESSION_ID VARCHAR(255) NOT NULL, WORKFLOW_REFERENCE VARCHAR(255) NOT NULL, SUBSCRIBER_ID INTEGER NOT NULL, TENANT_ID INTEGER NOT NULL, API_UUID VARCHAR(255) NOT NULL, CHECKOUT_URL VARCHAR(2048) NOT NULL, STATUS VARCHAR(20) NOT NULL, CREATED_AT TIMESTAMP NOT NULL, UPDATED_AT TIMESTAMP, PRIMARY KEY (SESSION_ID) ) /CREATE TABLE IF NOT EXISTS AM_MONETIZATION ( API_ID INTEGER NOT NULL, TIER_NAME VARCHAR(512), STRIPE_PRODUCT_ID VARCHAR(512), STRIPE_PLAN_ID VARCHAR(512), FOREIGN KEY (API_ID) REFERENCES AM_API (API_ID) ON DELETE CASCADE ); CREATE TABLE IF NOT EXISTS AM_POLICY_PLAN_MAPPING ( POLICY_UUID VARCHAR(256), PRODUCT_ID VARCHAR(512), PLAN_ID VARCHAR(512), FOREIGN KEY (POLICY_UUID) REFERENCES AM_POLICY_SUBSCRIPTION(UUID) ); CREATE SEQUENCE IF NOT EXISTS AM_MONETIZATION_SHARED_CUSTOMERS_ID_SEQ START WITH 1 INCREMENT BY 1; CREATE TABLE IF NOT EXISTS AM_MONETIZATION_SHARED_CUSTOMERS ( ID INTEGER PRIMARY KEY DEFAULT nextval('AM_MONETIZATION_SHARED_CUSTOMERS_ID_SEQ'), APPLICATION_ID INTEGER NOT NULL, API_PROVIDER VARCHAR(256) NOT NULL, TENANT_ID INTEGER NOT NULL, SHARED_CUSTOMER_ID VARCHAR(256) NOT NULL, FOREIGN KEY (APPLICATION_ID) REFERENCES AM_APPLICATION(APPLICATION_ID) ON DELETE CASCADE ); CREATE SEQUENCE IF NOT EXISTS AM_MONETIZATION_SUBSCRIPTIONS_ID_SEQ START WITH 1 INCREMENT BY 1; CREATE TABLE IF NOT EXISTS AM_MONETIZATION_SUBSCRIPTIONS ( ID INTEGER PRIMARY KEY DEFAULT nextval('AM_MONETIZATION_SUBSCRIPTIONS_ID_SEQ'), SUBSCRIBED_APPLICATION_ID INTEGER NOT NULL, SUBSCRIBED_API_ID INTEGER NOT NULL, TENANT_ID INTEGER NOT NULL, SUBSCRIPTION_ID VARCHAR(256) NOT NULL, SHARED_CUSTOMER_ID INTEGER NOT NULL, FOREIGN KEY (SUBSCRIBED_APPLICATION_ID) REFERENCES AM_APPLICATION(APPLICATION_ID) ON DELETE CASCADE, FOREIGN KEY (SUBSCRIBED_API_ID) REFERENCES AM_API(API_ID) ON DELETE CASCADE, FOREIGN KEY (SHARED_CUSTOMER_ID) REFERENCES AM_MONETIZATION_SHARED_CUSTOMERS(ID) ON DELETE CASCADE ); CREATE TABLE IF NOT EXISTS AM_STRIPE_CHECKOUT_SESSIONS ( SESSION_ID VARCHAR(255) NOT NULL, WORKFLOW_REFERENCE VARCHAR(255) NOT NULL, SUBSCRIBER_ID INTEGER NOT NULL, TENANT_ID INTEGER NOT NULL, API_UUID VARCHAR(255) NOT NULL, CHECKOUT_URL VARCHAR(2048) NOT NULL, STATUS VARCHAR(20) NOT NULL, CREATED_AT TIMESTAMP NOT NULL, UPDATED_AT TIMESTAMP, PRIMARY KEY (SESSION_ID) );
-
-
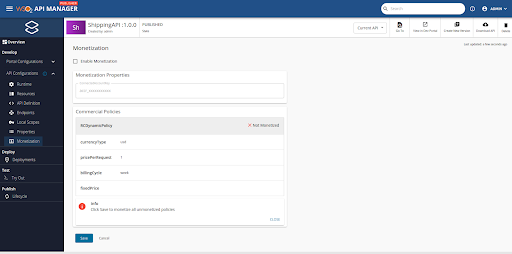
If you are using the wso2-am-stripe-plugin, configure the additional monetization properties in WSO2 API Manager.
Add the following configuration in the
<API-M_HOME>/repository/conf/deployment.tomlfile.[[apim.monetization.additional_attributes]] name = "ConnectedAccountKey" display_name = "ConnectedAccountKey" required = "true" description = "connected account of the publisher"After saving these configurations, these additional properties appear in the Monetization page under the Monetization properties section in the API Publisher Portal.
-
Optionally, configure WSO2 API Manager to work with Choreo Analytics.
These configurations are required only if you intend to create dynamic plans (usage-based plans) where consumers are charged based on the usage of the API. In such situations, you need analytics to record and retrieve the usage of the monetized APIs.
Note
For instructions on configuring API Manager with ELK Analytics, see Monetization Support via Elasticsearch.
-
Enable analytics.
-
Create a new application on Choreo devportal and subscribe to the Insight API. To subscribe to the Insight API, follow this documentation.
-
Define the Insight API endpoint, analytics access token, Choreo token endpoint URL, and consumer key/secret pair of the Insight application you created in step 2 under the monetization configuration.
[apim.monetization] analytics_query_api_endpoint = "<Endpoint of the Insight API>" analytics_access_token = "<Analytics on prem key>" choreo_token_endpoint = "<Choreo token endpoint>" choreo_insight_app_consumer_key = "<Consumer key of the subscribed application>" choreo_insight_app_consumer_secret = "<Consumer secret of the subscribed application>"[apim.monetization] analytics_query_api_endpoint = "https://choreocontrolplane.choreo.dev/93tu/insights/1.0.0/query-api" analytics_access_token = "xxxxxxxxxxxxxxxxxxxxxxxxxxxx" choreo_token_endpoint = "https://sts.choreo.dev/oauth2/token" choreo_insight_app_consumer_key = "xxxxxxxxxxxxxxxxxxxxxxxxxxxx" choreo_insight_app_consumer_secret = "xxxxxxxxxxxxxxxxxxxxxxxxxxxx"
-
-
Configure the Tenant Admin on WSO2 API Manager.
-
Start the WSO2 API Manager server.
-
Follow the steps provided in Advanced Configurations section.
-
Add the following configuration to the Advanced Configurations.
BillingEnginePlatformAccountKey— The secret key that corresponds to the Tenant Admin's Stripe account.StripeWebhookSecret— The webhook signing secret (whsec_...) copied from the Stripe Dashboard when you registered the webhook endpoint. This is used to verify that incoming webhook events are genuine.
-
-
Configure the workflows.
Note
It is mandatory to comment out or delete the existing default
SubscriptionCreationandSubscriptionDeletionworkflow executors before adding the Stripe-specific ones.You need to do this to ensure that the correct workflows are engaged when a subscription is added or removed.
-
Navigate to the Browse page.
-
Sign in to the WSO2 API-M Management Console.
https://<hostname>:9443/carbon -
Click Main, navigate to Resources, and click Browse.
-
-
Enter the following path in the Location: text-box and click Go.
/_system/governance/apimgt/applicationdata/workflow-extensions.xml -
Edit the workflow executors in the
workflow-extensions.xmlfile.Set
checkoutSuccessUrlandcheckoutCancelUrlto your preferred redirect URLs.<SubscriptionCreation executor="org.wso2.apim.monetization.impl.workflow.StripeSubscriptionCreationWorkflowExecutor"> <Property name="checkoutSuccessUrl">https://<hostname>:9443/devportal/<your-success-redirect-uri></Property> <Property name="checkoutCancelUrl">https://<hostname>:9443/devportal/<your-cancel-redirect-uri></Property> </SubscriptionCreation> <SubscriptionDeletion executor="org.wso2.apim.monetization.impl.workflow.StripeSubscriptionDeletionWorkflowExecutor"/><SubscriptionCreation executor="org.wso2.apim.monetization.impl.workflow.StripeSubscriptionCreationWorkflowExecutor"> <Property name="checkoutSuccessUrl">https://localhost:9443/devportal/<your-success-redirect-uri></Property> <Property name="checkoutCancelUrl">https://localhost:9443/devportal/<your-cancel-redirect-uri></Property> </SubscriptionCreation> <SubscriptionDeletion executor="org.wso2.apim.monetization.impl.workflow.StripeSubscriptionDeletionWorkflowExecutor"/>
-
-
Configure the OIDC service provider for the stripe-service.
This is a one-time setup for the APIM instance. The stripe-service registers its OAuth2 application (
apim_stripe_service) automatically when you call the/configureendpoint. After registration, a few settings must be applied manually in the Management Console.-
Start WSO2 API Manager, then trigger the registration by calling:
A successful response looks like:
-
Sign in to the Management Console at
https://<hostname>:9443/carbon. -
Go to Service Providers > List and click Edit next to
apim_stripe_service. -
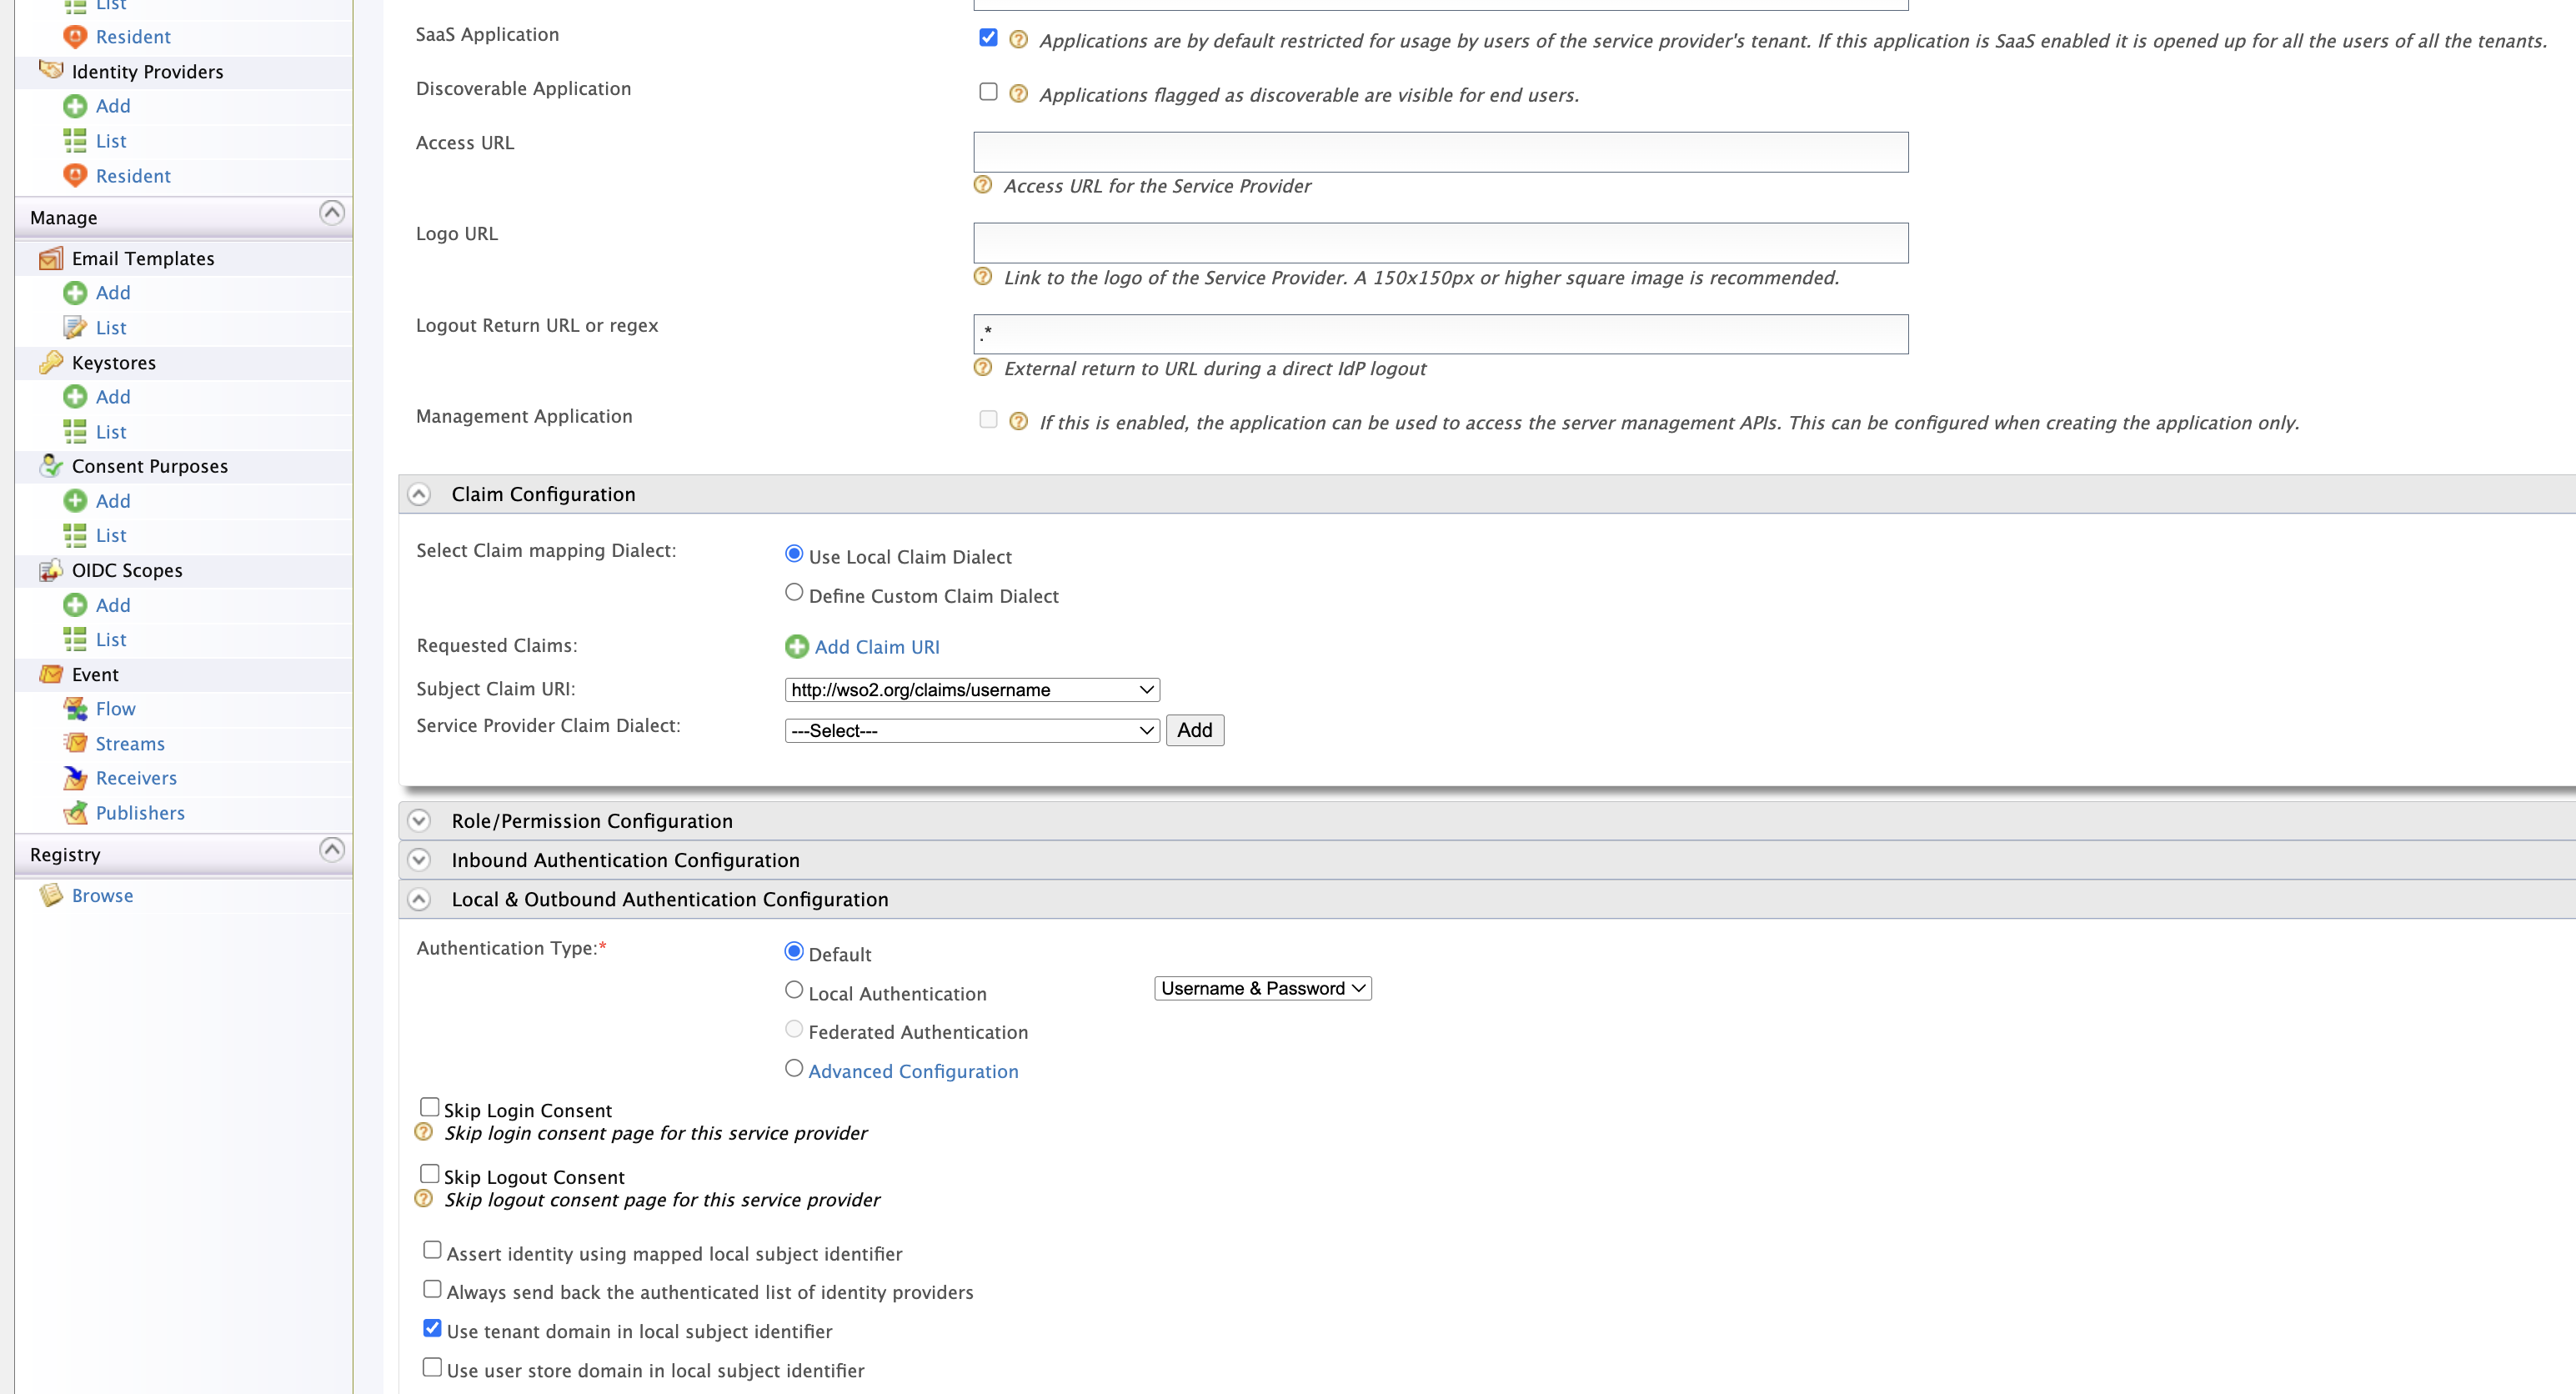
Apply the following settings and click Update:
- Under Basic Information, enable SaaS Application.
- Under Claim Configuration, set Subject Claim URI to
http://wso2.org/claims/username. - Under Local & Outbound Authentication Configuration, enable Use tenant domain in local subject identifier.
-
Step 1 - Create a subscription policy
-
Navigate to the WSO2 API Manager admin dashboard.
https://<API-M_host>:<port>/admin -
Create a subscription policy.
Specify the subscription policy-related data based on your monetization goals. For more information, see Adding a new subscription-level throttling policy.
Note
When using Stripe as a billing engine it only allows you to create monetization plans for commercial business plans. Therefore, make sure to create a subscription policy that has a paid business plan.

Step 2 - Enable monetization
-
Sign in to the API Publisher Portal.
https://<hostname>:9443/publisher -
Click on the API that you wish to monetize.
-
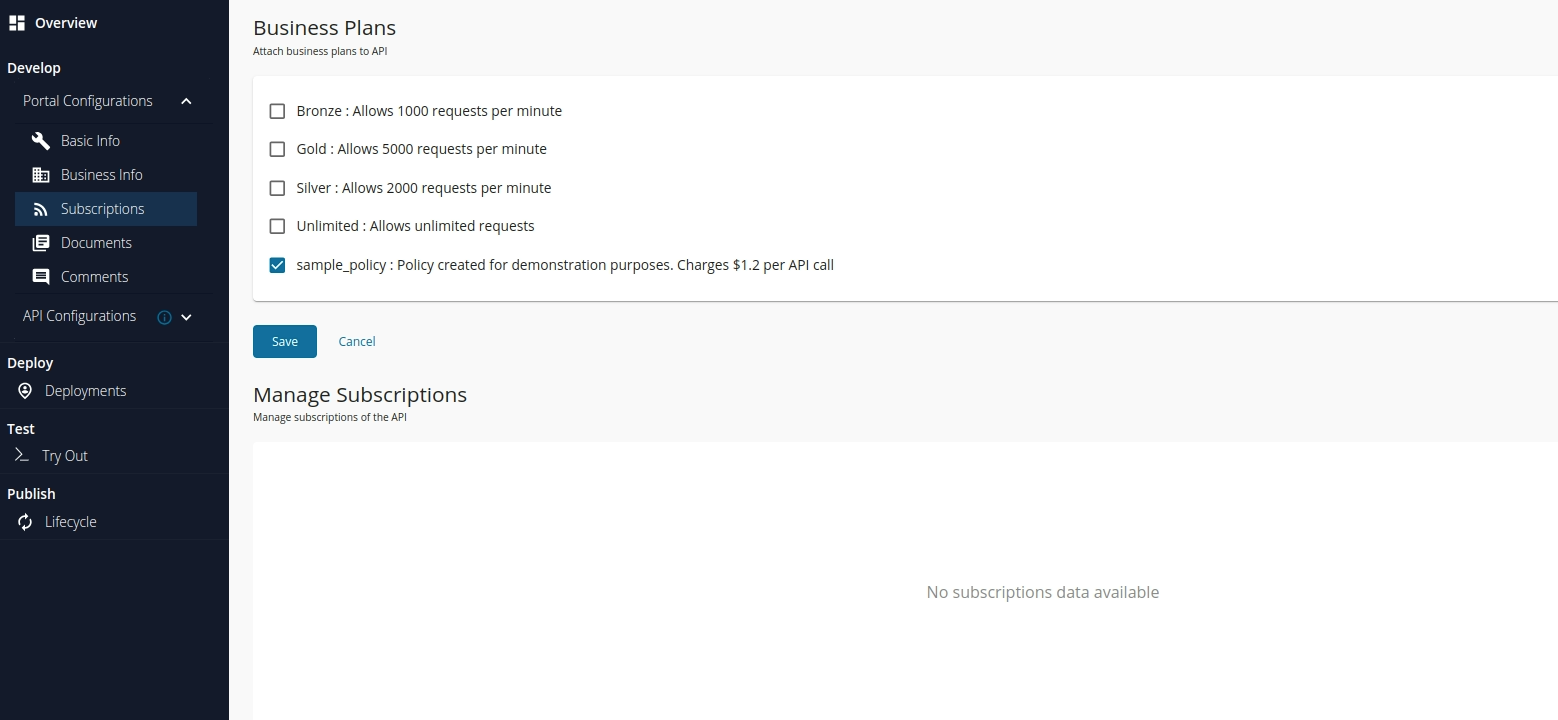
Click Subscriptions to see the available business plans including the one you recently created.
-
Select the subscription policy you created and click Save.
-
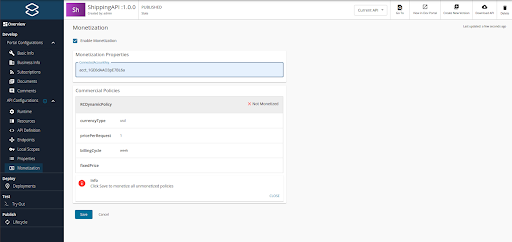
Click Monetization to navigate to the Monetization configurations.
-
Enter the Connect ID as the connected account key and click Save.
The product and price are created in the Publisher's Stripe connected account based on the business plan attached to the API.
Step 3 - Subscribe to a monetized API
When a subscriber selects a monetized API tier in the Developer Portal, APIM initiates a Stripe Checkout flow to collect payment details before activating the subscription.
-
Sign in to the API Developer Portal.
https://<hostname>:9443/devportal -
Find the monetized API and click Subscribe. Select the paid tier and click Subscribe to confirm.
The subscription is created in APIM with a pending status while payment is being collected.
-
The Developer Portal can be configured to display a Complete Payment link that redirects the subscriber to the Stripe-hosted Checkout page. See Step 4 - Customize the Developer Portal for Stripe payment flows for details.
Note
The Checkout link is valid for 24 hours. If the subscriber does not complete payment within that window, the pending subscription is automatically cancelled when Stripe fires a
checkout.session.expiredevent. -
On the Stripe Checkout page, enter payment details and complete the subscription. Once activated, the subscriber can invoke the API.
Step 4 - Customize the Developer Portal for Stripe payment flows
After a subscriber creates a subscription to a monetized API, the Developer Portal needs to guide them through the Stripe payment flow. You can customize the Developer Portal to use the Stripe service endpoints directly to drive these interactions.
Redirecting to the Checkout page
When a subscription is created, APIM places it in an ON_HOLD state until payment is collected. Your customized Developer Portal should present a Complete Payment button or link that redirects the subscriber to the Stripe-hosted Checkout page.
Construct the redirect URL using the subscriptionId returned when the subscription was created:
The subscriber must be authenticated (via OIDC) to access this endpoint. If no valid session exists, they are automatically redirected to the APIM login page and then back.
Note
The Checkout link is valid for 24 hours. If the subscriber does not complete payment within that window, Stripe fires a checkout.session.expired event and the pending subscription is automatically cancelled.
On the Stripe Checkout page, the subscriber enters their payment details and confirms. For details on how the subscription is activated after payment, see Step 3 - Subscribe to a monetized API.
Redirecting to the Customer Portal
Once a subscription is active, you can provide subscribers access to the Stripe-hosted Customer Portal where they can manage their payment method, view invoice history, and cancel their subscription.
Construct the Customer Portal URL using the subscriptionId and your tenant domain:
https://<apim-host>:9443/api/am/stripe/portal-url?subscriptionId=<apim-subscription-uuid>&tenantDomain=<tenant-domain>
The subscriber must be authenticated to access this endpoint. On success, they are redirected to the Stripe Customer Portal where they can:
- Update their credit card or payment method
- Download past invoices
- Cancel their subscription
When a subscription is cancelled from the Customer Portal, Stripe fires a customer.subscription.deleted event, and the stripe-service automatically removes the APIM subscription.
Step 5 - Send usage data to the billing engine
You can use the admin REST API, which is available in WSO2 API Manager, to publish the summarized data to Stripe. After this API call takes place, it pushes the usage data to Stripe. After Stripe gets the usage data, it checks for the subscriptions that have completed their billing cycle and charges the customer based on their API usage.
Note
This step is only required for APIs on dynamic (metered) business plans. Subscribers on fixed-rate plans are charged a flat amount by Stripe automatically at each billing cycle — no usage publishing is needed.
-
Obtain the consumer key and secret key pair by calling the dynamic client registration endpoint.
For more information, see Admin REST API v4.2.
curl -X POST -H "Authorization: Basic <base64encoded-admin-account-credentials>" \ -H "Content-Type: application/json" \ -d @payload.json \ https://localhost:9443/client-registration/v0.17/register<base64encoded-admin-account-credentials>— base64 encoded admin user account credentials (in<username>:<password>format). WSO2 does not recommend the use of online base64 encoders for this purpose.payload.jsonshould take the following format:
-
Obtain a token with the monetization usage scope (
scope=apim:monetization_usage_publish).curl -X POST https://localhost:9443/oauth2/token \ -H 'Authorization: Basic <base64encoded-registration-credentials>' \ -d 'grant_type=password&username=admin&password=admin&scope=apim:monetization_usage_publish'<base64encoded-registration-credentials>— base64 encoded client credentials received as the response in the client registration step (in<client-id>:<client-secret>format). WSO2 does not recommend the use of online base64 encoders for this purpose.
-
Publish usage data to the Stripe billing engine.
curl -k -H "Authorization: Bearer <monetization-usage-publish-token>" \ -X POST -H "Content-Type: application/json" \ https://localhost:9443/api/am/admin/v4/monetization/publish-usage<monetization-usage-publish-token>— Token obtained using client credentials withmonetization_usage_publishscope in the previous step.
The REST API response is as follows:
After making an admin API call the bill gets generated in the Stripe connected account.
The charging process takes place at the end of the billing cycle. As this example scenario uses a usage-based business plan, the payment that the subscribers make for their bills are sent to the API Publisher via the billing engine.
-
Monitor the status of the last usage publishing job.
When you call the Admin API to publish usage data, a separate job in a separate thread is created to publish usage data to the billing engine. The status of the above job can be monitored as follows.
curl -k -H "Authorization: Bearer <monetization-usage-publish-token>" \ -X GET -H "Content-Type: application/json" \ https://localhost:9443/api/am/admin/v4/monetization/publish-usage/statusThe sample response will be as follows:
Step 6 - Monitor usage and manage billing
Two types of business plans are available for monetized APIs namely, the fixed business plan and the dynamic business plan. Dynamic business plans are based on the subscribers' API usage. However, users who are on fixed business plans are charged a fixed price irrespective of their API usage. When deciding on a business plan, the Publisher takes into account the type of the API, the value that the API creates, and its organization business model.
The monitoring of API usage is only done for APIs associated with dynamic business plans (metered billing). When an API request is initiated, the API Gateway publishes the analytics related to that request. The successful API calls are recorded in the database, and this data is used to calculate the API usage and charge the subscriber.
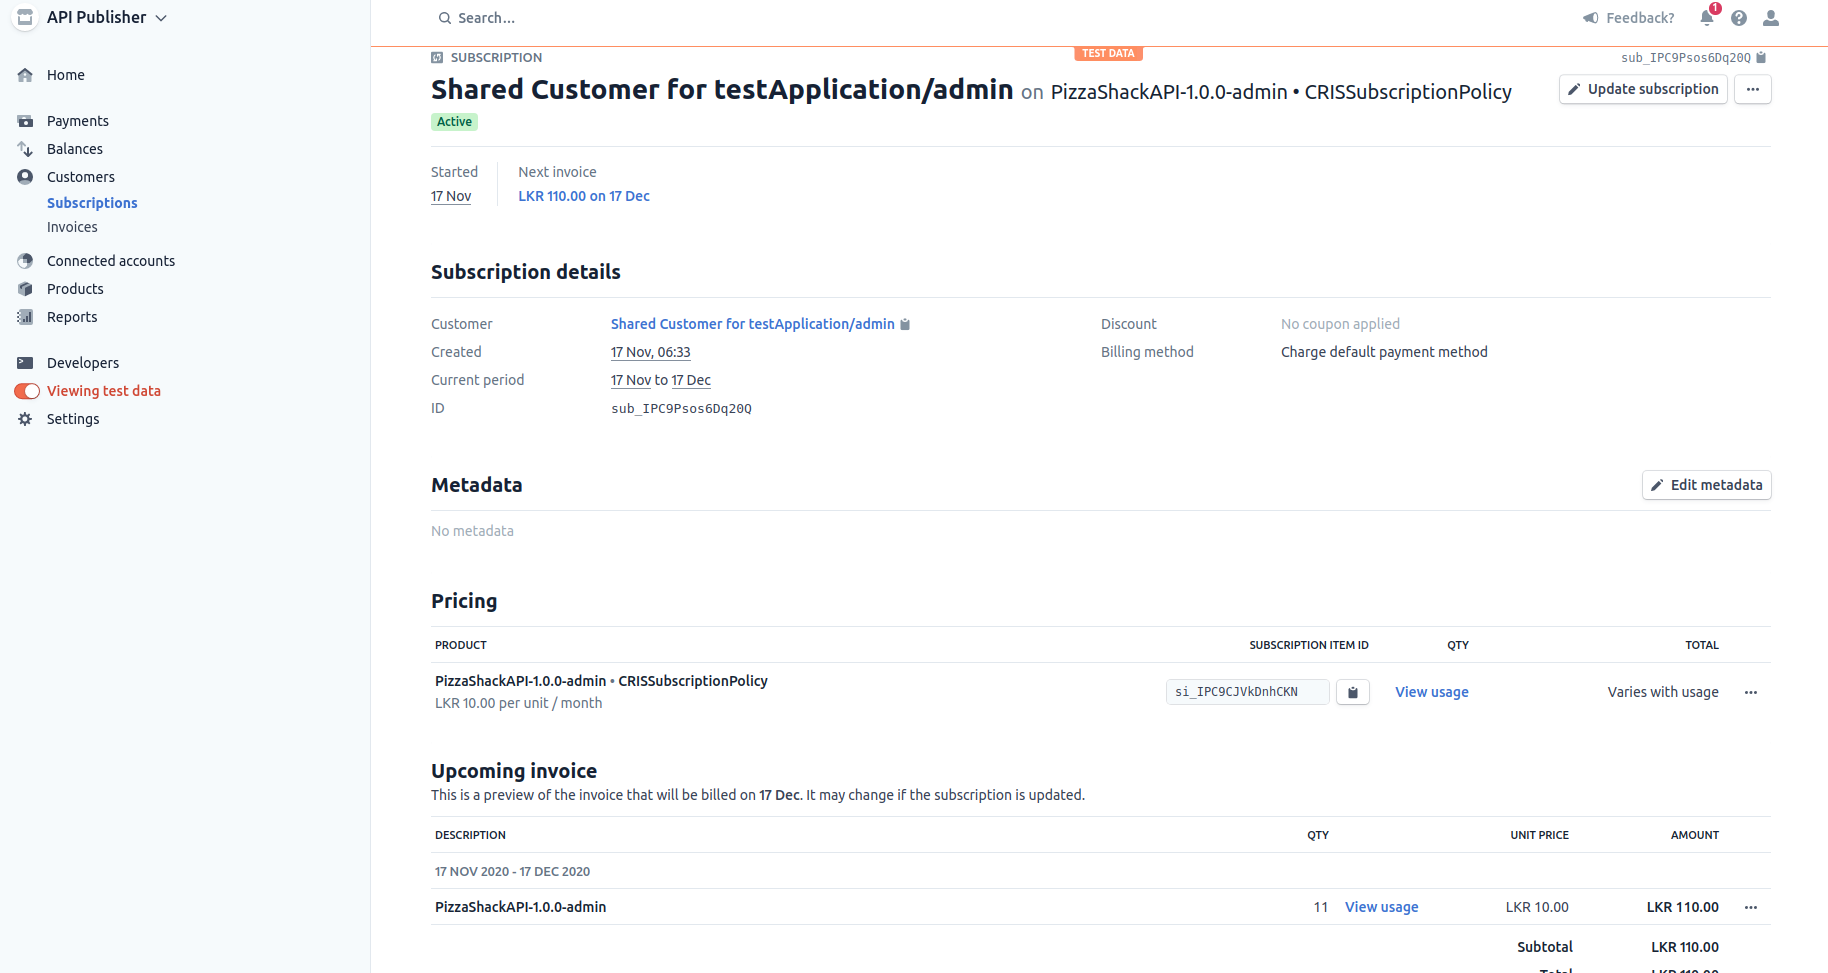
View the invoice via the API Developer Portal
The Application Developers who are subscribed to a dynamic business plan can sign in to the API Developer Portal to view the billing details of their subscription from the start of the current billing cycle to the current date, which is the date of viewing the bill.
-
Sign in to the API Developer Portal.
https://<hostname>:9443/devportal -
Click Applications and click Subscriptions.
The list of subscriptions that correspond to the API appears.

-
Click View Invoice to view the invoice corresponding to a specific API.

View the invoice via the API Publisher
The API Publisher can access the billing information related to each of the subscriptions that correspond to a specific API via the API Publisher Portal to view their revenue.
-
Sign in to the API Publisher Portal.
https://<hostname>:9443/publisher -
Click on the specific monetized API.
-
Click Subscriptions.
The list of subscriptions that correspond to the API appears.
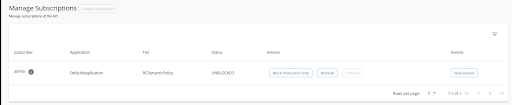
-
Click View Invoice to view the invoice that corresponds to a specific subscriber.
Access the Stripe Customer Portal
Subscribers can open a Stripe-hosted Customer Portal to update their payment method, view full invoice history, and cancel their subscription without contacting the API Publisher.
The Customer Portal is available at:
https://<hostname>:9443/api/am/stripe/portal-url?subscriptionId=<subscription-uuid>&tenantDomain=<tenant-domain>
Note
The subscriber must be authenticated (via OIDC) to access this endpoint. If not already signed in, they will be redirected to the APIM login page and then back to the Customer Portal automatically.
Accessing this URL opens a Stripe-hosted page where the subscriber can:
- Update their credit card or payment method
- Download past invoices
- Cancel their subscription
When a subscription is cancelled from the Customer Portal, Stripe fires a customer.subscription.deleted event. The stripe-service receives this webhook and automatically removes the APIM subscription.
Disable monetization
Follow the instructions below to disable monetization for an API:
-
Sign in to the API Publisher Portal.
https://<hostname>:9443/publisher -
Click on the monetized API for which you need to disable monetization.
-
Click Monetization to go to the Monetization configurations.
-
Enter the Connect ID as the connected account key.
-
Click Enable Monetization to deselect the enable monetization option.
-
Click Save.
The products and prices are removed from the Publisher's Stripe connected account.
Stripe Service Endpoints
The stripe-service WAR (api#am#stripe.war) is deployed at https://<host>:9443/api/am/stripe/ and exposes the following endpoints used during the subscription lifecycle.
Get Checkout Page
Redirects the subscriber to the Stripe-hosted Checkout page to complete payment for a pending subscription.
| Parameter | Description |
|---|---|
subscriptionId |
The UUID of the APIM subscription in ON_HOLD state |
The subscriber must be authenticated. If no valid session exists, the request is redirected to the APIM login page and then back to this URL automatically.
On success, the browser is redirected to the Stripe Checkout page. Once the subscriber enters their payment details and confirms, the subscription is activated automatically (see Webhook Events below).
Note
The Checkout link is valid for 24 hours. If the subscriber does not complete payment within that window, Stripe fires a checkout.session.expired event and the pending subscription is automatically cancelled.
Get Customer Portal Page
Redirects the subscriber to the Stripe-hosted Customer Portal to manage their active subscription.
https://<host>:9443/api/am/stripe/portal-url?subscriptionId=<apim-subscription-uuid>&tenantDomain=<tenant-domain>
| Parameter | Description |
|---|---|
subscriptionId |
The UUID of the active APIM subscription |
tenantDomain |
The WSO2 tenant domain (e.g. carbon.super) |
The subscriber must be authenticated. If no valid session exists, the request is redirected to the APIM login page and back automatically.
On success, the browser is redirected to the Stripe Customer Portal where the subscriber can:
- Update their credit card or payment method
- View and download past invoices
- Cancel their subscription
When a subscription is cancelled from the Customer Portal, Stripe fires a customer.subscription.deleted event, which automatically removes the APIM subscription.
Webhook Events
The /webhook endpoint receives push events from Stripe and automatically keeps APIM subscription states in sync with the billing state. No manual intervention is required.
Each incoming event is verified using the webhook signing secret (whsec_...) configured for your tenant. Events with an invalid or missing signature are rejected.
| Event | Effect on the APIM subscription |
|---|---|
checkout.session.completed |
Activates the pending subscription |
checkout.session.expired |
Cancels the pending subscription (subscriber did not pay within 24 hours) |
invoice.payment_succeeded |
Unblocks a previously blocked subscription |
invoice.payment_failed |
Blocks the subscription — subscriber cannot invoke the API until payment succeeds |
invoice.payment_action_required |
Blocks the subscription — subscriber must re-authenticate with their bank (SCA/3DS) |
customer.subscription.updated |
Blocks the subscription when the Stripe status transitions to past_due or unpaid |
customer.subscription.deleted |
Removes the APIM subscription and its billing record when the Stripe subscription is cancelled |
Monetization Support via Elasticsearch
The Monetization Support via Elasticsearch feature allows you to enable Stripe monetization with Elasticsearch and utilize ELK-based analytics in WSO2 API Manager. This feature can be enabled by following the configuration changes described below.
Note that the following is a sample configuration that uses ELK 8.0.0 and Elasticsearch. You can follow the sample and build your own monetization implementation with your preferred analytics platform and billing engine.
Configuration Changes
To enable ELK-based analytics in WSO2 API Manager and configure the Elasticsearch host, port, and authentication details, add the following configuration changes to the deployment.toml file:
[apim.analytics]
enable = true
type = "ELK"
[apim.monetization]
monetization_impl = "org.wso2.apim.monetization.impl.StripeMonetizationImpl"
analytics_host = "<hostname-of-elastic-instance>"
analytics_port = "<port-of-elastic-instance>"
analytics_username = "<elastic-username>"
analytics_password = "<elastic-password>"
Replace <hostname-of-elastic-instance>, <port-of-elastic-instance>, <elastic-username>, and <elastic-password> with the appropriate values for your Elasticsearch instance.