Pattern 5: API-M Deployment with Simple Scalable Setup with Key Manager Separated
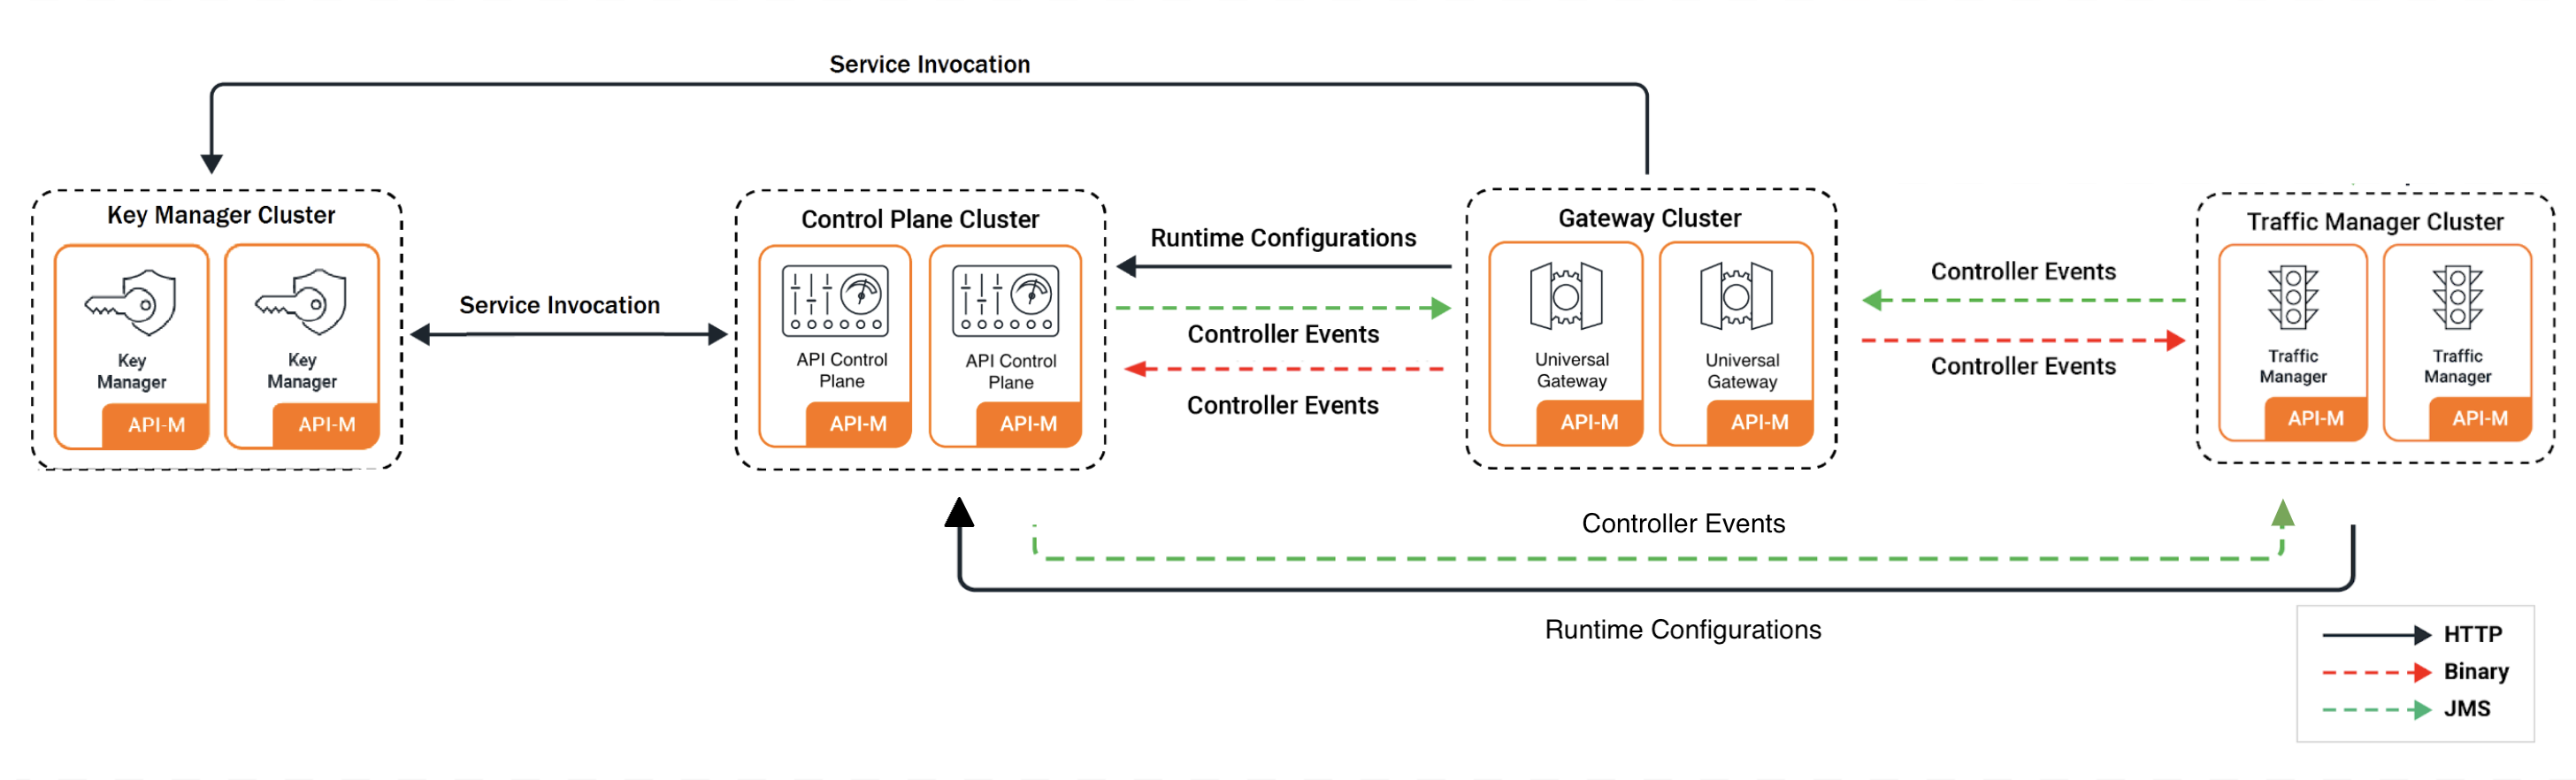
This document provides step-by-step instructions to deploy WSO2 API Manager in a standard distributed setup on Kubernetes. This pattern consists of a single API Control Plane (All-in-One), two Key Manager instances, and two Universal Gateway instances. It provides an optimal balance between high availability and resource utilization.
About this Pattern
This deployment pattern consists of:
- 1 Control Plane instance (All-in-One)
- 2 Key Manager instances
- 2 Universal Gateway instances
- External databases for high availability
Info
For advanced details on this deployment pattern, please refer to the official WSO2 API Manager documentation.
Contents
- WSO2 API Manager Pattern 5: API-M Deployment with Simple Scalable Setup
- Contents
- Prerequisites
- Minimal Configuration
- Advanced Configuration
Prerequisites
Before you begin, ensure you have met the following requirements:
Prerequisites
The following tools and configurations are necessary for deploying WSO2 API-M in a Kubernetes environment:
- Git
- Helm (version 3 or newer)
- Kubernetes client
- A running Kubernetes cluster (version 1.16 or newer)
- A routing controller:
- Envoy Gateway (disabled by default in 4.5.x) - RECOMMENDED
- NGINX Ingress Controller (enabled by default in 4.5.x for backward compatibility) - LEGACY
- Access to a container registry (Docker Hub or private registry)
- Database server (MySQL, MSSQL, PostgreSQL, etc.) accessible from the Kubernetes cluster
Deployment Steps
Step 1 - Set Up Basic Configurations
- Add the WSO2 Helm chart repository:
Step 2 - Build Docker Images
Docker Images
This pattern requires docker images for the WSO2 API Manager components. You can either use the official images or build custom images.
WSO2 provides Docker images in two ways: - Public DockerHub: WSO2 DockerHub offers General Availability (GA) versions with no additional updates - Private Docker Registry: WSO2 Private Docker Registry provides production-grade images with WSO2 Updates (requires an active WSO2 Subscription)
For this pattern, you will need: - All-in-One image - wso2am (for Control Plane and Key Manager) - Universal Gateway image - wso2am-universal-gw
Key Manager Image
There is no separate Docker image for the Key Manager component. The All-in-One image should be used for the Key Manager component.
Building Custom Docker Images
If you need to customize the Docker images (e.g., adding JDBC drivers, custom libraries):
- Include JDBC Drivers: Since products need to connect to databases, include JDBC drivers in your custom image:
ADD --chown=wso2carbon:wso2 https://repo1.maven.org/maven2/mysql/mysql-connector-java/8.0.28/mysql-connector-java-8.0.28.jar ${WSO2_SERVER_HOME}/repository/components/lib
- Sample Dockerfiles:
All-in-One (Control Plane/Key Manager):
FROM registry.wso2.com/wso2-apim/am:4.5.0.0

ARG USER=wso2carbon
ARG USER_HOME=/home/${USER}
ARG WSO2_SERVER_NAME=wso2am
ARG WSO2_SERVER_VERSION=4.5.0
ARG WSO2_SERVER=${WSO2_SERVER_NAME}-${WSO2_SERVER_VERSION}
ARG WSO2_SERVER_HOME=${USER_HOME}/${WSO2_SERVER}

# Copy JDBC MySQL driver
ADD --chown=wso2carbon:wso2 https://repo1.maven.org/maven2/mysql/mysql-connector-java/8.0.28/mysql-connector-java-8.0.28.jar ${WSO2_SERVER_HOME}/repository/components/lib
Universal Gateway:
FROM registry.wso2.com/wso2-apim/am-universal-gw:4.5.0.0

ARG USER=wso2carbon
ARG USER_HOME=/home/${USER}
ARG WSO2_SERVER_NAME=wso2am-universal-gw
ARG WSO2_SERVER_VERSION=4.5.0
ARG WSO2_SERVER=${WSO2_SERVER_NAME}-${WSO2_SERVER_VERSION}
ARG WSO2_SERVER_HOME=${USER_HOME}/${WSO2_SERVER}

# Copy JDBC MySQL driver
ADD --chown=wso2carbon:wso2 https://repo1.maven.org/maven2/mysql/mysql-connector-java/8.0.28/mysql-connector-java-8.0.28.jar ${WSO2_SERVER_HOME}/repository/components/lib
# Copy jdbc mysql driver
ADD --chown=wso2carbon:wso2 https://repo1.maven.org/maven2/mysql/mysql-connector-java/8.0.28/mysql-connector-java-8.0.28.jar ${WSO2_SERVER_HOME}/repository/components/lib
```- Once the required changes have been made to the Dockerfile, you can use the following command to build the custom image. Replace CONTAINER_REGISTRY, IMAGE_REPO, and TAG accordingly.
- After building your custom Docker image, you need to push it to your container registry so it can be accessed by your Kubernetes cluster. Use the following command, replacing
CONTAINER_REGISTRY,IMAGE_REPO, andTAGwith your values:
Step 3 - Configure Database
-
Before running the API Manager, you must configure the databases and populate them with the initial data. All required database scripts are available in the
dbscriptsdirectory of the product pack. Locate the appropriate scripts for your chosen database engine and execute them accordingly. It is recommended to use two separate database users with limited permissions for enhanced security. -
An example for MySQL is provided below:
Minimal Configuration
If you want to quickly try out WSO2 API Manager on Kubernetes with minimal configuration, you can use the default values provided in the pre-configured YAML files.
Quick Start Configuration
This minimal setup provides:
- External database connection (requires setup as per Step 3)
- Default keystores and truststores
- Basic settings for a simple scalable deployment
- Ready-to-use configuration for testing environments
- Create Kubernetes Secret for Keystores:
# Create secret with default WSO2 keystores and truststores
kubectl create secret generic apim-keystore-secret --from-file=wso2carbon.jks --from-file=client-truststore.jks
Before deploying, download the default values files for each component:
# Download values files

curl -o default_values.yaml https://raw.githubusercontent.com/wso2/helm-apim/4.5.x/docs/am-pattern-5-all-in-one_GW_KM/default_values.yaml
curl -o default_km_values.yaml https://raw.githubusercontent.com/wso2/helm-apim/4.5.x/docs/am-pattern-5-all-in-one_GW_KM/default_km_values.yaml
curl -o default_gw_values.yaml https://raw.githubusercontent.com/wso2/helm-apim/4.5.x/docs/am-pattern-5-all-in-one_GW_KM/default_gw_values.yaml
Edit default_values.yaml, default_km_values.yaml, and default_gw_values.yaml as needed for your environment (e.g., database connection, secrets, etc.).
Important
Naming conventions are crucial. If you modify the component names, ensure consistency throughout your configuration files.
Deploy Control Plane (All-in-One):
Deploy Key Manager:
Deploy Universal Gateway:
- Choose the routing approach:
In 4.5.x, the default values keep NGINX Ingress enabled for backward compatibility. If you want to use Gateway API instead, follow the steps in 1.1 Add Gateway API controller or Ingress controller, install Envoy Gateway, apply the sample Gateway manifest, and enable Gateway API in your Helm values before deploying.
Advanced Configuration
1. General Configuration of Helm Charts
The Helm charts for the API Manager deployment are available in the WSO2 Helm Chart Repository. You can either use the charts from the repository or clone the repository and use the charts from the local copy.
- The Helm naming convention for APIM follows a simple pattern. The following format is used for naming the resources:
<RELEASE_NAME>-<CHART_NAME>-<RESOURCE_NAME>
1.1 Add Gateway API controller or Ingress controller
You can use either Envoy Gateway (Gateway API-based) or NGINX Ingress Controller (Ingress-based) for routing traffic to API Manager. In 4.5.x, charts keep NGINX Ingress enabled by default for backward compatibility. If you want to use Gateway API instead, disable Ingress and enable Gateway API in your Helm values.
Note: It is recommended to use Gateway API with Envoy Gateway instead of NGINX Ingress Controller (Deprecated).
TLS Certificate Configuration (Required for both options)
Create a Kubernetes secret containing the TLS certificate and private key. This secret is used for TLS termination at the load balancer level.
kubectl create secret tls my-tls-secret --key <private key filename> --cert <certificate filename> -n <namespace>
If you use Gateway API, reference this secret in the TLS listeners of your Gateway manifest.
If you use NGINX Ingress Controller, set tlsSecret to this secret name in Helm values.
Option 1: Envoy Gateway (Gateway API-based approach) - RECOMMENDED
It is recommended to use Gateway API with Envoy Gateway instead of NGINX Ingress Controller. Gateway API provides a more expressive, extensible, and role-oriented API for configuring traffic routing in Kubernetes.
- Install Envoy Gateway.
helm install envoy-gateway oci://docker.io/envoyproxy/gateway-helm \
  --version v1.7.0 -n envoy-gateway-system \
  --set config.envoyGateway.extensionApis.enableBackend=true \
  --set envoyGateway.gateway.experimentalFeatures.enabled=true \
  --create-namespace
- Create and apply Gateway and GatewayClass resources.
kubectl apply -f https://raw.githubusercontent.com/wso2/helm-apim/4.5.x/docs/assets/sample-gateway.yaml -n <namespace>
Ensure that the hostnames and Gateway name in your Gateway manifest match the values configured in your Helm chart. Also ensure that the TLS secret created above is referenced in the Gateway listeners.
- Create a ConfigMap containing the CA certificate for backend TLS verification and reference it under
backendTLSPolicy.caCertificateConfigMapin the Helm chart values if backend TLS verification is enabled.Note: A default ConfigMap with the name
wso2-ca-certis created when thedefaultConfigMapCreationoption is enabled in the values.yaml. This default ConfigMap uses the default certificates provided in the APIM truststore. However, for production deployments, it is recommended to create and manage the ConfigMap with the CA certificate yourself, and setdefaultConfigMapCreationto false
kubectl create configmap wso2-ca-cert --from-file=ca.crt=/path/to/your/certificate.pem -n <namespace>
-
Configure the backend traffic policy in the Gateway configuration to enable session affinity if required.
-
Update
values.yamlto enable Gateway API and configure backend TLS policy.
kubernetes:
  gatewayAPI:
    enabled: true
    gatewayName: "wso2-apim-gateway"
    defaultConfigMapCreation: false
    management:
      enabled: true
      hostname: "am.wso2.com"
    gateway:
      enabled: true
      hostname: "gw.wso2.com"
    websocket:
      enabled: true
      hostname: "websocket.wso2.com"
    websub:
      enabled: true
      hostname: "websub.wso2.com"
    backendTLSPolicy:
      enabled: true
      caCertificateConfigMap: "wso2-ca-cert"
      hostname: "<hostname used in the TLS certificate>"
    backendTrafficPolicy:
      enabled: true
      cookie:
        name: "WSO2_CP_STICKY_SESSION"
        ttl: "0s"
Option 2: NGINX Ingress Controller (Ingress-based approach) - DEFAULT IN 4.5.x
You can install the NGINX Ingress Controller using the official Helm chart
Some sample annotations that can be used with Ingress resources are as follows:
- The ingress class should be
nginxif you are using NGINX Ingress Controller. - The following annotations can be included in Helm values for Ingress resources depending on requirements. Refer to NGINX annotation documentation for details.
ingressClass: "nginx"
ingress:
  tlsSecret: ""
  ratelimit:
    enabled: false
    zoneName: ""
    burstLimit: ""
  controlPlane:
    hostname: "am.wso2.com"
    annotations:
      nginx.ingress.kubernetes.io/backend-protocol: "HTTPS"
      nginx.ingress.kubernetes.io/affinity: "cookie"
      nginx.ingress.kubernetes.io/session-cookie-name: "route"
      nginx.ingress.kubernetes.io/session-cookie-hash: "sha1"
1.2 Mount Keystore and Truststore
If you are not including the keystore and truststore in the Docker image, you can mount them using a Kubernetes secret. The following steps show how to mount the keystore and truststore using a Kubernetes secret.
-
Create a keystore using the following command. Since WSO2 API Manager currently supports only JKS keystores, and newer Java versions default to generating PKCS keystores, we need to explicitly specify the store type as JKS.
-
Upload the newly created keystore certificate to the trust store.
You can locate the existing trust store atkeytool -export -keystore wso2carbon.jks -alias wso2carbon -storepass wso2carbon | keytool -import -alias wso2carbonssl -keystore client-truststore.jks -storepass wso2carbon -nopromptrepository/resources/security/client-truststore.jks -
Create a Kubernetes secret with the keystore and truststore files.
-
The secret should contain the primary keystore file, secondary keystore file, internal keystore file, and the truststore file. Note that the secret should be created in the same namespace in which you will be setting up the deployment.
-
Make sure to use the same secret name when creating the secret and when configuring the Helm chart.
-
If you are using a different keystore file name and alias, make sure to update the Helm chart configurations accordingly. In addition to the primary, internal keystores and truststore files, you can also include the keystores for HTTPS transport as well.
-
Refer to the following sample command to create the secret and use it in the APIM.
-
-
Update the values.yaml file.
security:
    # -- Kubernetes secret containing the keystores and truststore
    jksSecretName: "jks-secret"
By default, this deployment uses the default keystores and truststores provided by the relevant WSO2 product. For advanced details regarding managing custom Java keystores and truststores in a container-based WSO2 product deployment, please refer to the official WSO2 container guide.
1.3 Encrypting Secrets
The apictl can be used to encrypt passwords as in the below steps. For further guidance, refer Encrypting Secrets with apictl
- Initialize the apictl using the trust store.
Example
apictl secret init
Enter Key Store location: /home/wso2am-4.5.0/repository/resources/security/wso2carbon.jks
Enter Key Store password:
Enter Key alias: wso2carbon
Enter Key password:
Response:
-
Encrypt the values listed below using the command,
- admin_password
- keystore_password
- keystore_key_password
- ssl_keystore_password
- ssl_key_password
- internal_keystore_password
- internal_keystore_key_password
- truststore_password
- apim_db_password
- shared_db_password
Example
apictl secret create
Enter plain alias for secret:db_password
Enter plain text secret:
Repeat plain text secret:
Response:
-
Replace all the above listed values with the encrypted values in the relevant fields of
values.yaml. -
Enable secure vault by adding the following configuration.
-
If you have configured a cloud provider, enable it by adding the following configuration.
-
Since the internal keystore password is required to resolve the encrypted value at runtime, you need to store the value in the cloud provider's secret manager. You can use the cloud provider's secret store to store the password of the internal keystore. The following section can be used to add the cloud provider's credentials to fetch the internal keystore password. Configuration for AWS can be as below:
internalKeystorePassword:
  # -- AWS Secrets Manager secret name
  secretName: ""
  # -- AWS Secrets Manager secret key
  secretKey: ""
Please note that currently AWS, Azure, and GCP Secrets Managers are only supported for this.
1.4 Configure Docker Image and Databases
-
Add the following configurations to reflect the Docker image created previously in the Helm chart.
Info
If you are using a private Docker registry, you must enable imagePullSecrets.enabled and provide the username and password.
-
Provide the database configurations under the following section.
- If you need to change the hostnames, update them under the Kubernetes ingress section. - Update the keystore passwords in the security section of thewso2: apim: configurations: databases: apim_db: url: "" username: "" password: "" shared_db: url: "" username: "" password: ""values.yamlfile. - Review the descriptions of other configurations and modify them as needed to meet your requirements. A simple deployment can be achieved using the basic configurations provided in thevalues.yamlfile. All configuration options for each Helm chart are documented in their respective component guides: - All-in-one - Universal Gateway - Update the admin credentials in the configuration directory.
1.5 Configure SSL in Service Exposure
- For WSO2 recommended best practices in configuring SSL when exposing the internal product services outside of the Kubernetes cluster, please refer to the official WSO2 container guide.
2. All-in-one Configurations
2.1 Configure Multiple Gateways
If you need to distribute the Gateway load, you can configure multiple API Gateway environments in WSO2 API Manager to publish to a single Developer Portal. See more...
    gateway:
        # -- APIM Gateway environments
        environments:
        - name: "Default"
          type: "hybrid"
          gatewayType: "Regular"
          provider: "wso2"
          visibility:
          displayInApiConsole: true
          description: "This is a hybrid gateway that handles both production and sandbox token traffic."
          showAsTokenEndpointUrl: true
          serviceName: "apim-gw-wso2am-gateway-service"
          servicePort: 9443
          wsHostname: "websocket.wso2.com"
          httpHostname: "gw.wso2.com"
          websubHostname: "websub.wso2.com"
        - name: "Default_apk"
          type: "hybrid"
          provider: "wso2"
          gatewayType: "APK"
          displayInApiConsole: true
          description: "This is a hybrid gateway that handles both production and sandbox token traffic."
          showAsTokenEndpointUrl: true
          serviceName: "apim-gw-wso2am-gateway-service"
          servicePort: 9443
          wsHostname: "websocket.wso2.com"
          httpHostname: "default.gw.wso2.com:9095"
          websubHostname: "websub.wso2.com"
2.2 Configure User Store Properties
You can configure user store properties to customize authentication and user management according to your requirements:
User Store Configuration
For detailed information on user store properties, refer to the WSO2 API-M documentation.
userStore:
  # -- User store type.
  type: "database_unique_id"
  # -- User store properties
  properties:
    ReadGroups: true
Important
If you don't need to configure any user store properties, you must remove the properties block from the YAML file to avoid configuration errors.
2.3 Configure JWKS URL
For the super tenant, the Resident Key Manager's default JWKS URL is https://<HOSTNAME>:9443/oauth2/jwks. When using virtual hosts like am.wso2.com, you need to configure the correct JWKS URL:
wso2:
  apim:
    configurations:
      oauth_config:
        oauth2JWKSUrl: "https://<ALL-IN-ONE_SERVICE_NAME>:9443/oauth2/jwks"
Tip
Using a properly configured JWKS URL ensures that token validation works correctly between components.
2.4 Deploy All-in-One
Deploy the Control Plane (All-in-One) component with your custom configuration:
# Create namespace for deployment
kubectl create namespace <namespace>

# Install using Helm
helm install <release-name> wso2/wso2am-all-in-one \
  --version 4.5.0-3 \
  --namespace <namespace> \
  --dependency-update \
  -f values.yaml \
  --create-namespace
3. Key Manager Configuration
3.1 Configure Eventhub
The Key Manager component needs to connect to the Control Plane's event hub for synchronizing data:
eventhub:
  # -- Event hub (control plane) loadbalancer service url
  serviceUrl: "<ACP_SERVICE_NAME>"
  # -- Event hub service urls (for high availability setup)
  urls:
    - "<ACP-1_SERVICE_NAME>"
    - "<ACP-2_SERVICE_NAME>"
Event Hub
The Event Hub enables communication between API Manager components. Configure the service URLs to point to your Control Plane instances.
3.2 Deploy Key Manager
Deploy the Key Manager component with your custom configuration:
# Install Key Manager component
helm install <release-name> wso2/wso2am-acp \
  --version 4.5.0-3 \
  --namespace <namespace> \
  --dependency-update \
  -f km-values.yaml \
  --create-namespace
Tip
Store your Key Manager configuration in a separate file (e.g., km-values.yaml) to keep your configurations organized.
4. Universal Gateway Configuration
4.1 Configure Key Manager, Eventhub, and Throttling
The Universal Gateway needs to connect to several components to function properly:
Gateway Configuration
Configure the Gateway to connect to the Control Plane and Key Manager components for proper operation.
Configure Key Manager Connection:
Configure Event Hub Connection:
Configure Throttling:
throttling:
  # -- Traffic Manager service URL
  serviceUrl: "<CONTROL_PLANE_SERVICE_NAME>"
  # -- Port offset
  portOffset: 0
  # -- Service port
  servicePort: 9443
  # -- Traffic manager service URLs
  urls:
    - "<CONTROL_PLANE_1_SERVICE_NAME>"
  # -- Enable unlimited throttling tier
  unlimitedTier: true
  # -- Advanced throttling options
  headerBasedThrottling: false
  jwtClaimBasedThrottling: false
  queryParamBasedThrottling: false
```yaml
throttling:
# -- Traffic Manager service URL
serviceUrl: "
Choose the configuration that matches your deployment pattern. For high availability, specify all Control Plane service URLs under urls for both eventhub and throttling sections.
4.2 Enable Replicas
To ensure high availability and scalability of the Universal Gateway, you can configure the number of replicas in the wso2.deployment section of your values.yaml file.
Info
replicas: The initial number of pods to start with (e.g., 2).minReplicas: The minimum number of pods that should always be running (e.g., 1).maxReplicas: The maximum number of pods that can be scaled up to (e.g., 3).
4.3 Deploy Universal Gateway
Deploy the Universal Gateway component with your custom configuration:
# Install Gateway component
helm install <release-name> wso2/wso2am-universal-gw \
  --version 4.5.0-3 \
  --namespace <namespace> \
  --dependency-update \
  -f gw-values.yaml \
  --create-namespace
Tip
Store your Gateway configuration in a separate file (e.g., gw-values.yaml) for better organization and maintenance.
5. Add DNS Records
After deploying the components, configure DNS records for the routing mode you selected.
If you are using Gateway API, get the external address from the Gateway resources.
If you are using Ingress instead, get the external IP from the Ingress resources.
Use the value from ADDRESS or EXTERNAL-IP as the external IP.
If you have a DNS service, add records that map the hostnames to the external IP. For local testing, add entries to your hosts file.
For Gateway API:
<EXTERNAL-IP> <kubernetes.gatewayAPI.management.hostname> <kubernetes.gatewayAPI.gateway.hostname> <kubernetes.gatewayAPI.websub.hostname> <kubernetes.gatewayAPI.websocket.hostname>
For Ingress:
<EXTERNAL-IP> <kubernetes.ingress.management.hostname> <kubernetes.ingress.gateway.hostname> <kubernetes.ingress.websub.hostname> <kubernetes.ingress.websocket.hostname>
6. Access Management Consoles
If you enabled Gateway API:
| Console | URL | Description |
|---|---|---|
| API Publisher | https://<kubernetes.gatewayAPI.management.hostname>/publisher |
Create and manage APIs |
| Developer Portal | https://<kubernetes.gatewayAPI.management.hostname>/devportal |
Discover and subscribe to APIs |
| Carbon Console | https://<kubernetes.gatewayAPI.management.hostname>/carbon |
Administrative tasks |
| Universal Gateway | https://<kubernetes.gatewayAPI.gateway.hostname> |
API Gateway endpoint |
If you are using Ingress:
| Console | URL | Description |
|---|---|---|
| API Publisher | https://<kubernetes.ingress.management.hostname>/publisher |
Create and manage APIs |
| Developer Portal | https://<kubernetes.ingress.management.hostname>/devportal |
Discover and subscribe to APIs |
| Carbon Console | https://<kubernetes.ingress.management.hostname>/carbon |
Administrative tasks |
| Universal Gateway | https://<kubernetes.ingress.gateway.hostname> |
API Gateway endpoint |
Default Credentials
The default username is admin with password admin. For production environments, change these credentials immediately after first login.