Deploying WSO2 API Manager on AWS EKS
This guide provides a step-by-step approach to deploying WSO2 API Manager on Amazon Elastic Kubernetes Service (EKS). This deployment follows the standard WSO2 Kubernetes architecture, extended to use AWS-specific services such as Amazon RDS/Aurora for databases and Application Load Balancer (ALB) for ingress.
Info
This deployment aligns with the standard deployment models described in WSO2 API Manager Deployment Patterns and API-M Deployment with All-in-One HA Setup.
Contents
- Deploying WSO2 API Manager on AWS EKS
- Contents
- Prerequisites
- Architecture Overview
- Step 1: Create and Prepare the EKS Cluster
- Step 2: Configure the Databases
- Step 3: Set Up Docker Images
- Step 4: Generate Keystore and Truststore
- Step 5: Deploy Helm Charts
- Step 6: Configure Ingress and DNS
- Step 7: Access Management Consoles
- Troubleshooting
- Next Steps
- See Also
Prerequisites
Before deploying WSO2 API Manager on AWS EKS, ensure you have the following prerequisites in place:
AWS Requirements
- AWS account with admin or strong IAM permissions
- VPC with private subnets across at least two Availability Zones (AZs)
- Amazon EKS cluster (or ability to create one)
- kubectl and Helm installed locally
- AWS Load Balancer Controller installed on the cluster
- AWS CLI configured with appropriate credentials
- Amazon RDS or Aurora PostgreSQL/MySQL database provisioned
WSO2 Requirements
- Access to WSO2 API Manager (APIM) Docker images
- Kubernetes deployment artifacts (Helm charts or YAML manifests from the WSO2 docs repository)
- Knowledge of:
- API-M database schemas
- Deployment patterns
- Clustering requirements
- Keystore and TLS configuration
Architecture Overview
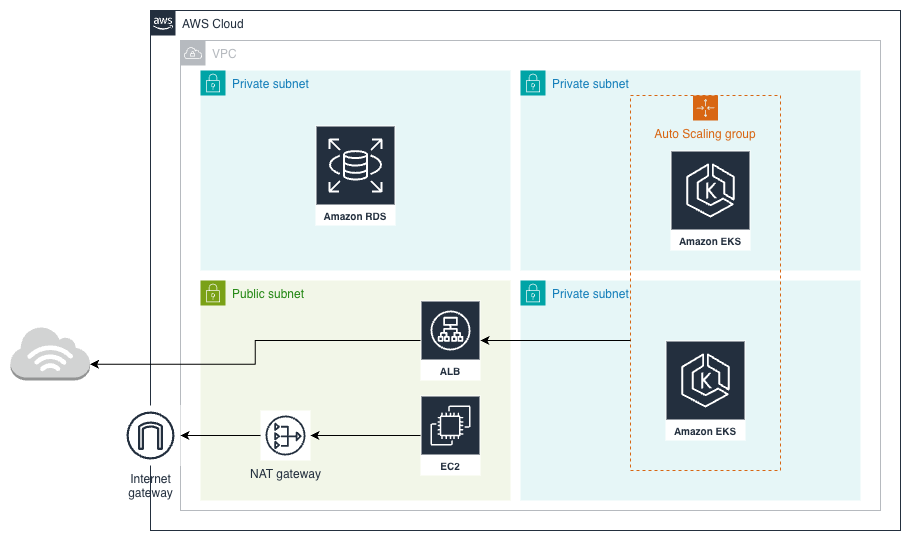
This deployment follows the standard WSO2 Kubernetes architecture, extended to use AWS-specific services:
- A single ALB Ingress exposes the APIs and portals
- Amazon RDS/Aurora hosts API Manager databases
- EKS manages the Kubernetes cluster and worker nodes
- AWS Load Balancer Controller manages ingress resources
AWS Deployment Architecture
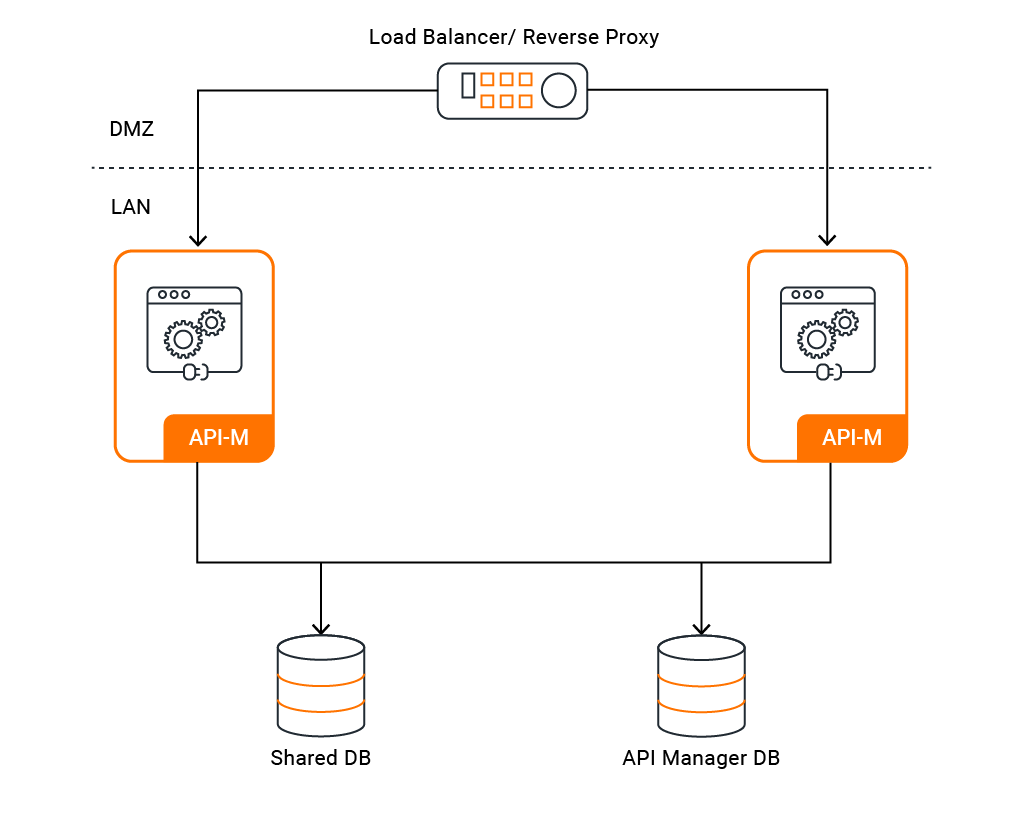
WSO2 API Manager Deployment Architecture
Step 1: Create and Prepare the EKS Cluster
If you do not have an existing EKS cluster, you can create one using eksctl.
Info
If eksctl is not installed, refer to the AWS installation documentation for setup instructions.
Create an EKS cluster with the following command:
eksctl create cluster \
  --name apim \
  --region us-east-1 \
  --nodegroup-name apim-ng \
  --node-type t3.medium \
  --nodes 2 \
  --nodes-min 1 \
  --nodes-max 4 \
  --managed
Tip
Adjust the --region, --node-type, and node count parameters based on your requirements and expected load.
Step 2: Configure the Databases
WSO2 API Manager requires external databases to store API metadata, user data, and other configurations. Navigate to Amazon Aurora or Amazon RDS to create your preferred database instance.
Note
WSO2 APIM supports MySQL, Microsoft SQL Server, PostgreSQL, Oracle, and DB2. This guide uses MySQL for simplicity.
Create Database Instances
WSO2 APIM requires two databases:
- apim_db – Main API-M database
- shared_db – Common user and permission data
Connect to your RDS/Aurora instance and create the databases:
CREATE DATABASE apim_db;
CREATE DATABASE shared_db;
Initialize Database Schemas
Download the WSO2 APIM distribution from the official website. Once unzipped, you can find all the necessary SQL scripts within the dbscripts directory.
Execute the database scripts using the following commands:
mysql -h <DB_HOST> -P 3306 -u sharedadmin -p -Dshared_db < './dbscripts/mysql.sql'
mysql -h <DB_HOST> -P 3306 -u apimadmin -p -Dapim_db < './dbscripts/apimgt/mysql.sql'
Replace <DB_HOST> with your RDS/Aurora endpoint.
Warning
Ensure that the database users have appropriate permissions and that the security groups allow connections from your EKS cluster.
Step 3: Set Up Docker Images
The official WSO2 APIM Docker image does not include JDBC drivers. You need to build a custom image containing the necessary driver and push it to Amazon Elastic Container Registry (ECR).
Create a Custom Dockerfile
Create a Dockerfile with the following content:
FROM registry.wso2.com/wso2-apim/am:4.6.0.0

ARG USER=wso2carbon
ARG USER_HOME=/home/${USER}
ARG WSO2_SERVER_NAME=wso2am
ARG WSO2_SERVER_VERSION=4.6.0
ARG WSO2_SERVER=${WSO2_SERVER_NAME}-${WSO2_SERVER_VERSION}
ARG WSO2_SERVER_HOME=${USER_HOME}/${WSO2_SERVER}

USER root

RUN curl -fSL https://repo1.maven.org/maven2/mysql/mysql-connector-j/8.0.33/mysql-connector-j-8.0.33.jar \
    -o ${WSO2_SERVER_HOME}/repository/components/lib/mysql-connector-j-8.0.33.jar \
    && chown wso2carbon:wso2 ${WSO2_SERVER_HOME}/repository/components/lib/mysql-connector-j-8.0.33.jar

USER wso2carbon
Build and Push to ECR
Build the custom Docker image:
docker build -t wso2am-mysql:4.6.0 .
Tag and push the image to your ECR repository:
aws ecr get-login-password --region us-east-1 | docker login --username AWS --password-stdin <AWS_ACCOUNT_ID>.dkr.ecr.us-east-1.amazonaws.com

docker tag wso2am-mysql:4.6.0 <AWS_ACCOUNT_ID>.dkr.ecr.us-east-1.amazonaws.com/wso2am-mysql:4.6.0

docker push <AWS_ACCOUNT_ID>.dkr.ecr.us-east-1.amazonaws.com/wso2am-mysql:4.6.0
Note
Replace <AWS_ACCOUNT_ID> with your actual AWS account ID. Ensure your ECR repository exists before pushing.
Step 4: Generate Keystore and Truststore
WSO2 APIM uses Java keystores for internal communication and encryption. While self-signed certificates are sufficient for internal traffic, you should use publicly trusted certificates for external communication (configured via Ingress).
Locate Default Keystores
You can find the existing keystore and truststore in the WSO2 APIM distribution under the /repository/resources/security/ directory.
Create a New Keystore
Generate a new JKS keystore with the following command:
keytool -genkey -alias wso2carbon -keyalg RSA -keysize 2048 -validity 3650 \
  -keystore wso2carbon.jks \
  -dname "CN=<your-domain>, OU=MS,O=WSO2,L=Colombo,ST=Colombo,C=LK" \
  -ext san=dns:<your-domain>,dns:gateway.<your-domain>,dns:localhost \
  -storepass wso2carbon -keypass wso2carbon
Important
WSO2 APIM currently only supports JKS keystores. Newer JDK versions default to PKCS12 format, so ensure you specify JKS explicitly when creating keystores.
Import Certificate to Truststore
Import the certificate from the keystore into the client truststore:
keytool -export -keystore wso2carbon.jks -alias wso2carbon -storepass wso2carbon | \
  keytool -import -alias wso2carbonssl -keystore client-truststore.jks \
  -storepass wso2carbon -noprompt
Replace <your-domain> with your actual domain name.
Step 5: Deploy Helm Charts
Connect to EKS Cluster
Configure kubectl to connect to your EKS cluster:
aws eks update-kubeconfig --region us-east-1 --name apim
Add WSO2 Helm Repository
Add the WSO2 Helm chart repository:
helm repo add wso2 https://helm.wso2.com && helm repo update
Create Kubernetes Secret for Keystores
Create a Kubernetes secret to store the keystore and truststore files:
kubectl create secret generic apim-keystore-secret \
  --from-file=wso2carbon.jks \
  --from-file=client-truststore.jks \
  -n <namespace>
Replace <namespace> with your target namespace (e.g., wso2).
Configure values.yaml
Create a values.yaml file with the following configuration:
kubernetes:
  ingress:
    management:
      hostname: "am.example.com"
    gateway:
      hostname: "gw.example.com"
    websocket:
      hostname: "websocket.example.com"
    websub:
      hostname: "websub.example.com"

wso2:
  apim:
    configurations:
      databases:
        type: "mysql"
        jdbc:
          driver: "com.mysql.cj.jdbc.Driver"
        apim_db:
          url: "jdbc:mysql://<DB_HOST>:3306/apim_db?useSSL=false"
          username: "apimadmin"
          password: "db_password"
        shared_db:
          url: "jdbc:mysql://<DB_HOST>:3306/shared_db?useSSL=false"
          username: "sharedadmin"
          password: "db_password"

      security:
        jksSecretName: "apim-keystore-secret"
        keystores:
          tls:
            enabled: true
            password: "wso2carbon"
            keyPassword: "wso2carbon"
        truststore:
          name: "client-truststore.jks"
          password: "wso2carbon"

  deployment:
    highAvailability: true
    image:
      registry: "<AWS_ACCOUNT_ID>.dkr.ecr.us-east-1.amazonaws.com"
      repository: "wso2am-mysql"
      digest: "4.6.0"
      imagePullSecrets:
        enabled: false
        username: ""
        password: ""
Advanced Configuration
WSO2 APIM offers extensive configuration options. You can review the full values.yaml file in the WSO2 Helm APIM repository. For example:
- The chart uses NGINX Ingress by default. To switch to AWS ALB, update the
kubernetes.ingresssection - AWS-specific configurations can be found under the
awssection - For production deployments, review and adjust resource requests, limits, and autoscaling parameters
Deploy the Helm Chart
Deploy WSO2 API Manager using Helm:
kubectl create namespace wso2

helm install apim wso2/wso2am-all-in-one \
  --version 4.6.0-1 \
  --namespace wso2 \
  -f values.yaml \
  --dependency-update
Verify the Deployment
Check the deployment status:
kubectl get pods -n wso2
kubectl get svc -n wso2
kubectl get ingress -n wso2
Wait for all pods to be in the Running state before proceeding.
Step 6: Configure Ingress and DNS
Obtain the Load Balancer Address
Get the external address of the ingress:
kubectl get ingress -n wso2
Note the ADDRESS field, which will be the AWS Load Balancer DNS name.
Configure DNS Records
Add DNS records (A or CNAME) in your DNS provider mapping your hostnames to the Load Balancer address:
am.example.com→ ALB DNS namegw.example.com→ ALB DNS namewebsocket.example.com→ ALB DNS namewebsub.example.com→ ALB DNS name
Note
If you're using Route 53, you can create alias records pointing to the ALB for better performance.
Step 7: Access Management Consoles
Once DNS propagation is complete, you can access the API Manager consoles:
- Publisher Portal:
https://am.example.com/publisher - Developer Portal:
https://am.example.com/devportal - Admin Portal:
https://am.example.com/admin - Carbon Console:
https://am.example.com/carbon - Gateway:
https://gw.example.com
Tip
Default admin credentials are admin/admin. Change these immediately in a production environment.
Troubleshooting
Pods Not Starting
Check pod logs for errors:
kubectl logs <pod-name> -n wso2
kubectl describe pod <pod-name> -n wso2
Database Connection Issues
Verify:
- Security groups allow traffic from EKS to RDS
- Database credentials are correct in values.yaml
- Database schemas are properly initialized
Ingress Not Working
Check: - AWS Load Balancer Controller is installed and running - Ingress annotations are correct for ALB - Security groups and subnet tags are properly configured
Next Steps
- Set up Rate Limiting
- Enable Analytics