Configure a Azure AD as a Key Manager
WSO2 API Manager supports multiple Key Managers. As a result, WSO2 API Manager is prepacked with an inbuilt resident Key Manager and with the use of connectors it is capable of supporting any authorization server as a Key Manager.
Therefore, WSO2 API Manager can connect Azure AD out-of-the-box using the WSO2 API-M KM Azure AD Connector.
Follow the instructions given below to configure AzureAD as a third-party Key Manager.
Info
For more information, see the Getting Started Guide, which is under the official Azure Entra ID documentation.
Configure AzureAD
-
Create An Azure account that has an active subscription. Create an account for free.
-
The Azure account must have permission to manage applications in Azure Active Directory (Azure AD). Any of the following Azure AD roles include the required permissions:
- Application administrator
- Application developer
- Cloud application administrator
This will complete the Set up a tenant quickstart.
Step 1 - Create Application
- Visit Azure Home.
- Navigate to Microsoft Entra ID.
- Navigate to App Registration.
- Navigate to New registration, Give a name
(Ex : KeyManger Client)and Click Register.
Step 2 - Create secrets
- Navigate to
Certificates & secrets>Client secrets>New client secret. - Fill the form with relevant information and give
Customas the value for Expire. - Make sure to copy the secret, it only shows once.
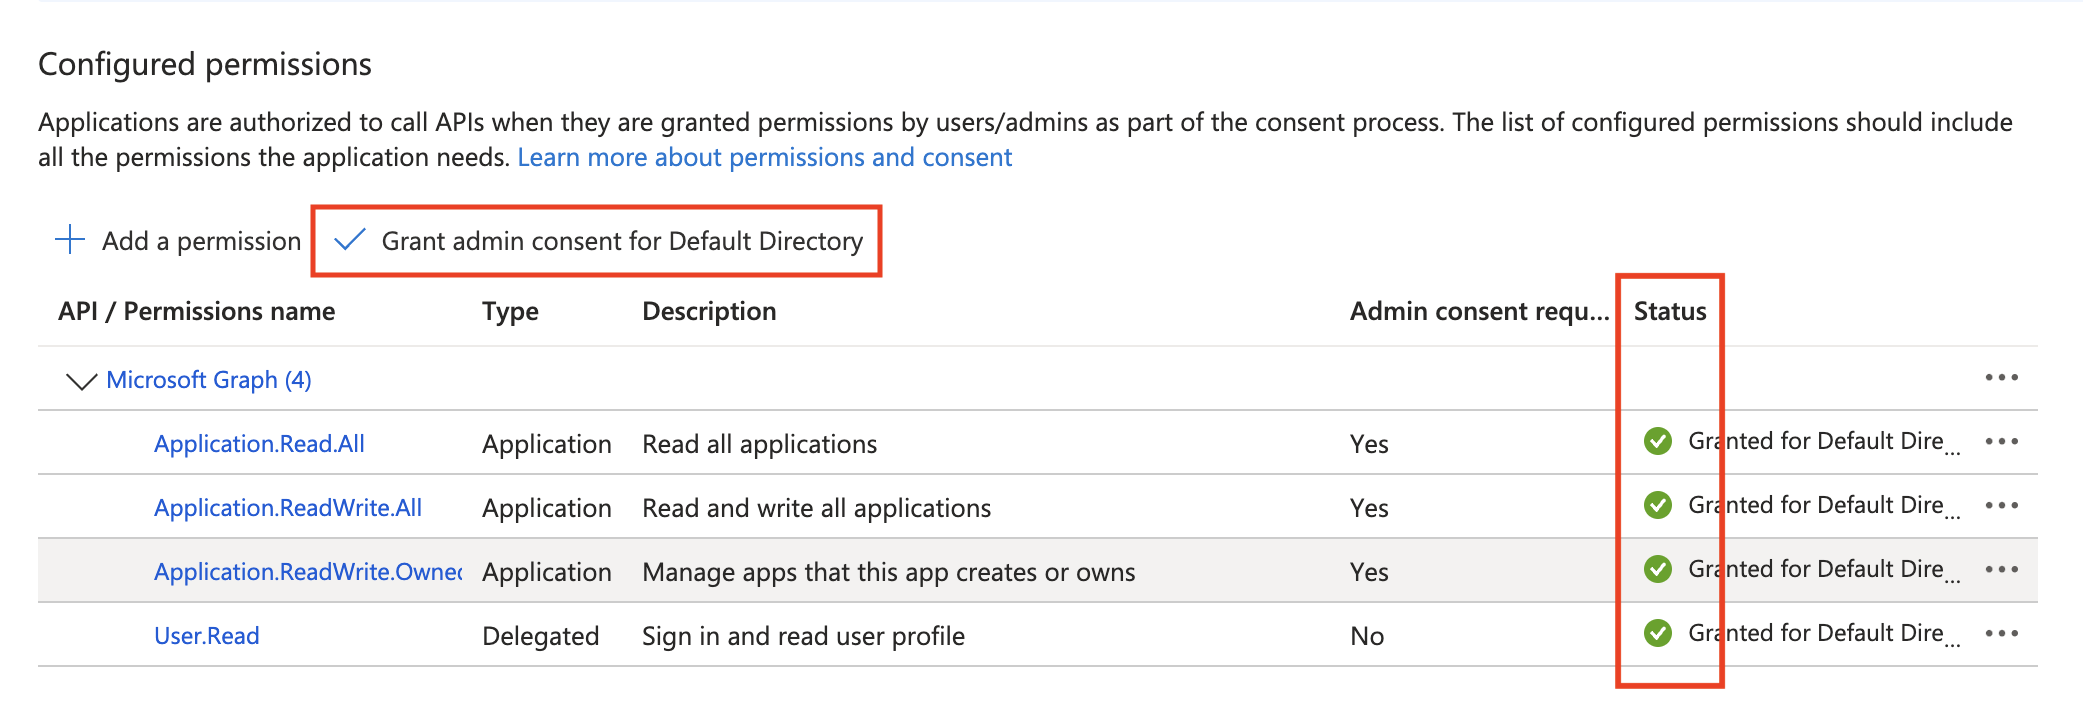
Step 3 - Configured permissions
- Navigate to
API Permissions. - Click
Add a permission. - Select
APIs my organization uses. - Select
Microsoft Graphfrom the list. - Click on
Application permissions. - Expand
Applicationand check- Application.Read.All
- Application.ReadWrite.All
- Application.ReadWrite.OwnedBy
- Click
Add permissions. - Click
Grant admin consent for Default Directory.
Ensure that the newly added permissions display a green checkmark to indicate successful configuration.
Step 4 - Copy Application Details
- Navigate to Microsoft Entra ID.
- Click on 'Endpoints' and Note down
- OAuth 2.0 token endpoint (v2.0)
e.g.
https://login.microsoftonline.com/{tenant-id}/oauth2/v2.0/token - OpenID Connect metadata document (v2.0)
e.g.
https://login.microsoftonline.com/{tenant-id}/v2.0/.well-known/openid-configuration - Microsoft Graph API endpoint
e.g.
https://graph.microsoft.com
- OAuth 2.0 token endpoint (v2.0)
e.g.
- Under
Owned applicationsclick on the newly created application. - Copy the Application (client) ID.
Configure API manager
Start the API Manager server and log-in to the Admin portal to configure Azure AD as a Key Manager.
Step 1 - Configure Key Manager
- Click on
Key Managersfrom the side panel and then clickAdd Key Manager. - Fill the following
- Name:
AzureAD - Display Name:
Azure AD Key Manager - Description (optional)
- Name:
-
Select the Key manager type as
Azure ADand provide the relevant details in theKey Manager Endpointssection.Configuration Instruction Well-known URL Paste the OpenID Connect metadata document (v2.0)URL collected from the endpoints and click onImportIssuer The issuer that consumes or validates access tokens.
Example:
https://login.microsoftonline.com/{tenent-id}/v2.0Mandatory Client Registration Endpoint Paste the Microsoft Graph API endpointMandatory Introspection Endpoint Paste the OAuth 2.0 token endpoint (v2) URL (token introspection is not supported in Azure AD) Mandatory Token Endpoint Paste the OAuth 2.0 token endpoint (v2) URL Mandatory Display Token Endpoint Paste the OAuth 2.0 token endpoint (v2) URL Optional Revoke Endpoint Paste the OAuth 2.0 token endpoint (v2) URL (token revocation is not supported in Azure AD) Mandatory Display Revoke Endpoint Paste the OAuth 2.0 token endpoint (v2) URL Optional Userinfo Endpoint The endpoint that allows clients to verify the identity of the end-user based on the authentication performed by an authorization server, as well as to obtain basic profile information about the end-user.
Example:
https://graph.microsoft.com/oidc/userinfoMandatory Authorize Endpoint The endpoint is used to obtain an authorization grant from the resource owner via the user-agent redirection.
Example:
https://login.microsoftonline.com/{tenant-id}/oauth2/v2.0/authorizeOptional Scope Management Endpoint The endpoint is used to manage the scopes. Mandatory -
Fill the Consumer Key Claim URI:
appidin theClaim URIssection. - Set the Grant Types:
client_credentials(Only use this grant type). - Provide the relevant details in the
Connector Configurationssection.Configuration Instruction Microsoft Graph API Endpoint Paste the Microsoft Graph API endpointMandatory Microsoft Graph API Endpoint Version Select the checkbox for v1.0Mandatory Client ID Paste the Application (client) IDMandatory Client Secret Paste the client secret value that is generated Mandatory
Handling Azure Application Synchronization Delays
This capability is supported only from U2 level 60 onwards Due to eventual consistency in Azure, there can be delays when creating Applications and Service Principals. To mitigate issues caused by these synchronization delays, polling is performed for all Azure creation-related interactions. The polling behavior can be configured using the Initial Delay and Maximum Waiting Time parameters, which are available in the Connector Configuration section. These fields are described in the table below. Backoff strategy: The delay between polling attempts is doubled after each retry, up to the given maximum delay.
| Configuration | Instruction | Default Value |
|---|---|---|
| Initial Delay (in ms) for Application Polling | Provide an initial time to wait before starting polling for Azure Application creation | 500 ms |
| Maximum Waiting Time (in ms) for Application Polling | Provide the maximum time to wait for Azure Application creation | 5000 ms |
- Set the Permissions:
- Key Manager Permission: Permission type for role-based Key Manager restriction.
e.g.,PUBLIC,ALLOW,DENY(Optional)
- Key Manager Permission: Permission type for role-based Key Manager restriction.
- Click on
Add.
Step 2 - Create an Application & Generate Keys
- Click on
Add New Application. - Fill the required information and click on
Add. - Once created, navigate to the
Production Keyssection of that Application. - Select the
Azure AD Key Managerand click onGenerate Keys.
Troubleshooting Invalid Credentials Error
If you encounter the following error message when using a token generated by the Key Manager to invoke an API deployed in APIM:
{
  "code": "900901",
  "message": "Invalid Credentials",
  "description": "Access failure for API: /exampleapi/1.0.0, version: 1.0.0 status: (900901) - Invalid Credentials. Make sure you have provided the correct security credentials."
}
iss (issuer) claim in the token matches the issuer configured in the Key Manager Endpoints section. If there is a difference, update the issuer in the Key Manager Endpoints section to align with the iss value present in the token.
Post checks
Under App registration there should be a newly created application. The value should be
`api://<Application (client) ID>`We can also get this value by clicking the set link right next to the label. Default value is what we will see above.
Without this in the app, the token will be generate in a version 1 format and will not work with APIM KM due to failed signature.
Update the client_password
Update password is not supported by providing new one from the APIM. Whenever the application is updated via APIM a new client_secret is set.
Failed to add password. Error detail: Unable to save changes because the credential limit has been reached. Please delete a credential and try again.
If you see this message in logs or while updating the application several times, The issue is with limitation with Azure AD client_secret. At a given application max number of client_secrets can have is 2. Delete old one from AzureAD console web client.
Adding Existing Key with APIM
Note
Microsoft Entra ID does not allow retrieving a previously generated client_secret. Therefore, when an application is mapped using Provide Existing OAuth Keys, the Developer Portal cannot display the client secret afterward.
If you want to use existing OAuth keys created in Microsoft Entra ID with WSO2 API Manager, follow the steps below.
Microsoft Entra ID supports two versions of JWT tokens, namely V1 and V2.
To validate both token types in WSO2 API Manager, you must configure two separate Key Managers.
APIM Configuration
Configure Key Manager for V1 Tokens
Follow the same steps described earlier to configure a Key Manager. However, apply the following changes.
- In the Key Manager Endpoints section, update the Issuer value as follows:
https://sts.windows.net/{tenant-id}/ - In the Claim URIs section, configure the Consumer Key Claim URI as:
appidfor V1 tokens.
Configure Key Manager for V2 Tokens
Follow the same Key Manager configuration steps but apply the following changes.
- In the Key Manager Endpoints section, set the Issuer value as follows:
https://login.microsoftonline.com/{tenant-id}/v2.0 - In the Claim URIs section, configure the Consumer Key Claim URI as:
azpfor V2 tokens.
Microsoft Entra ID Configuration
Configure the application to generate V1 or V2 tokens
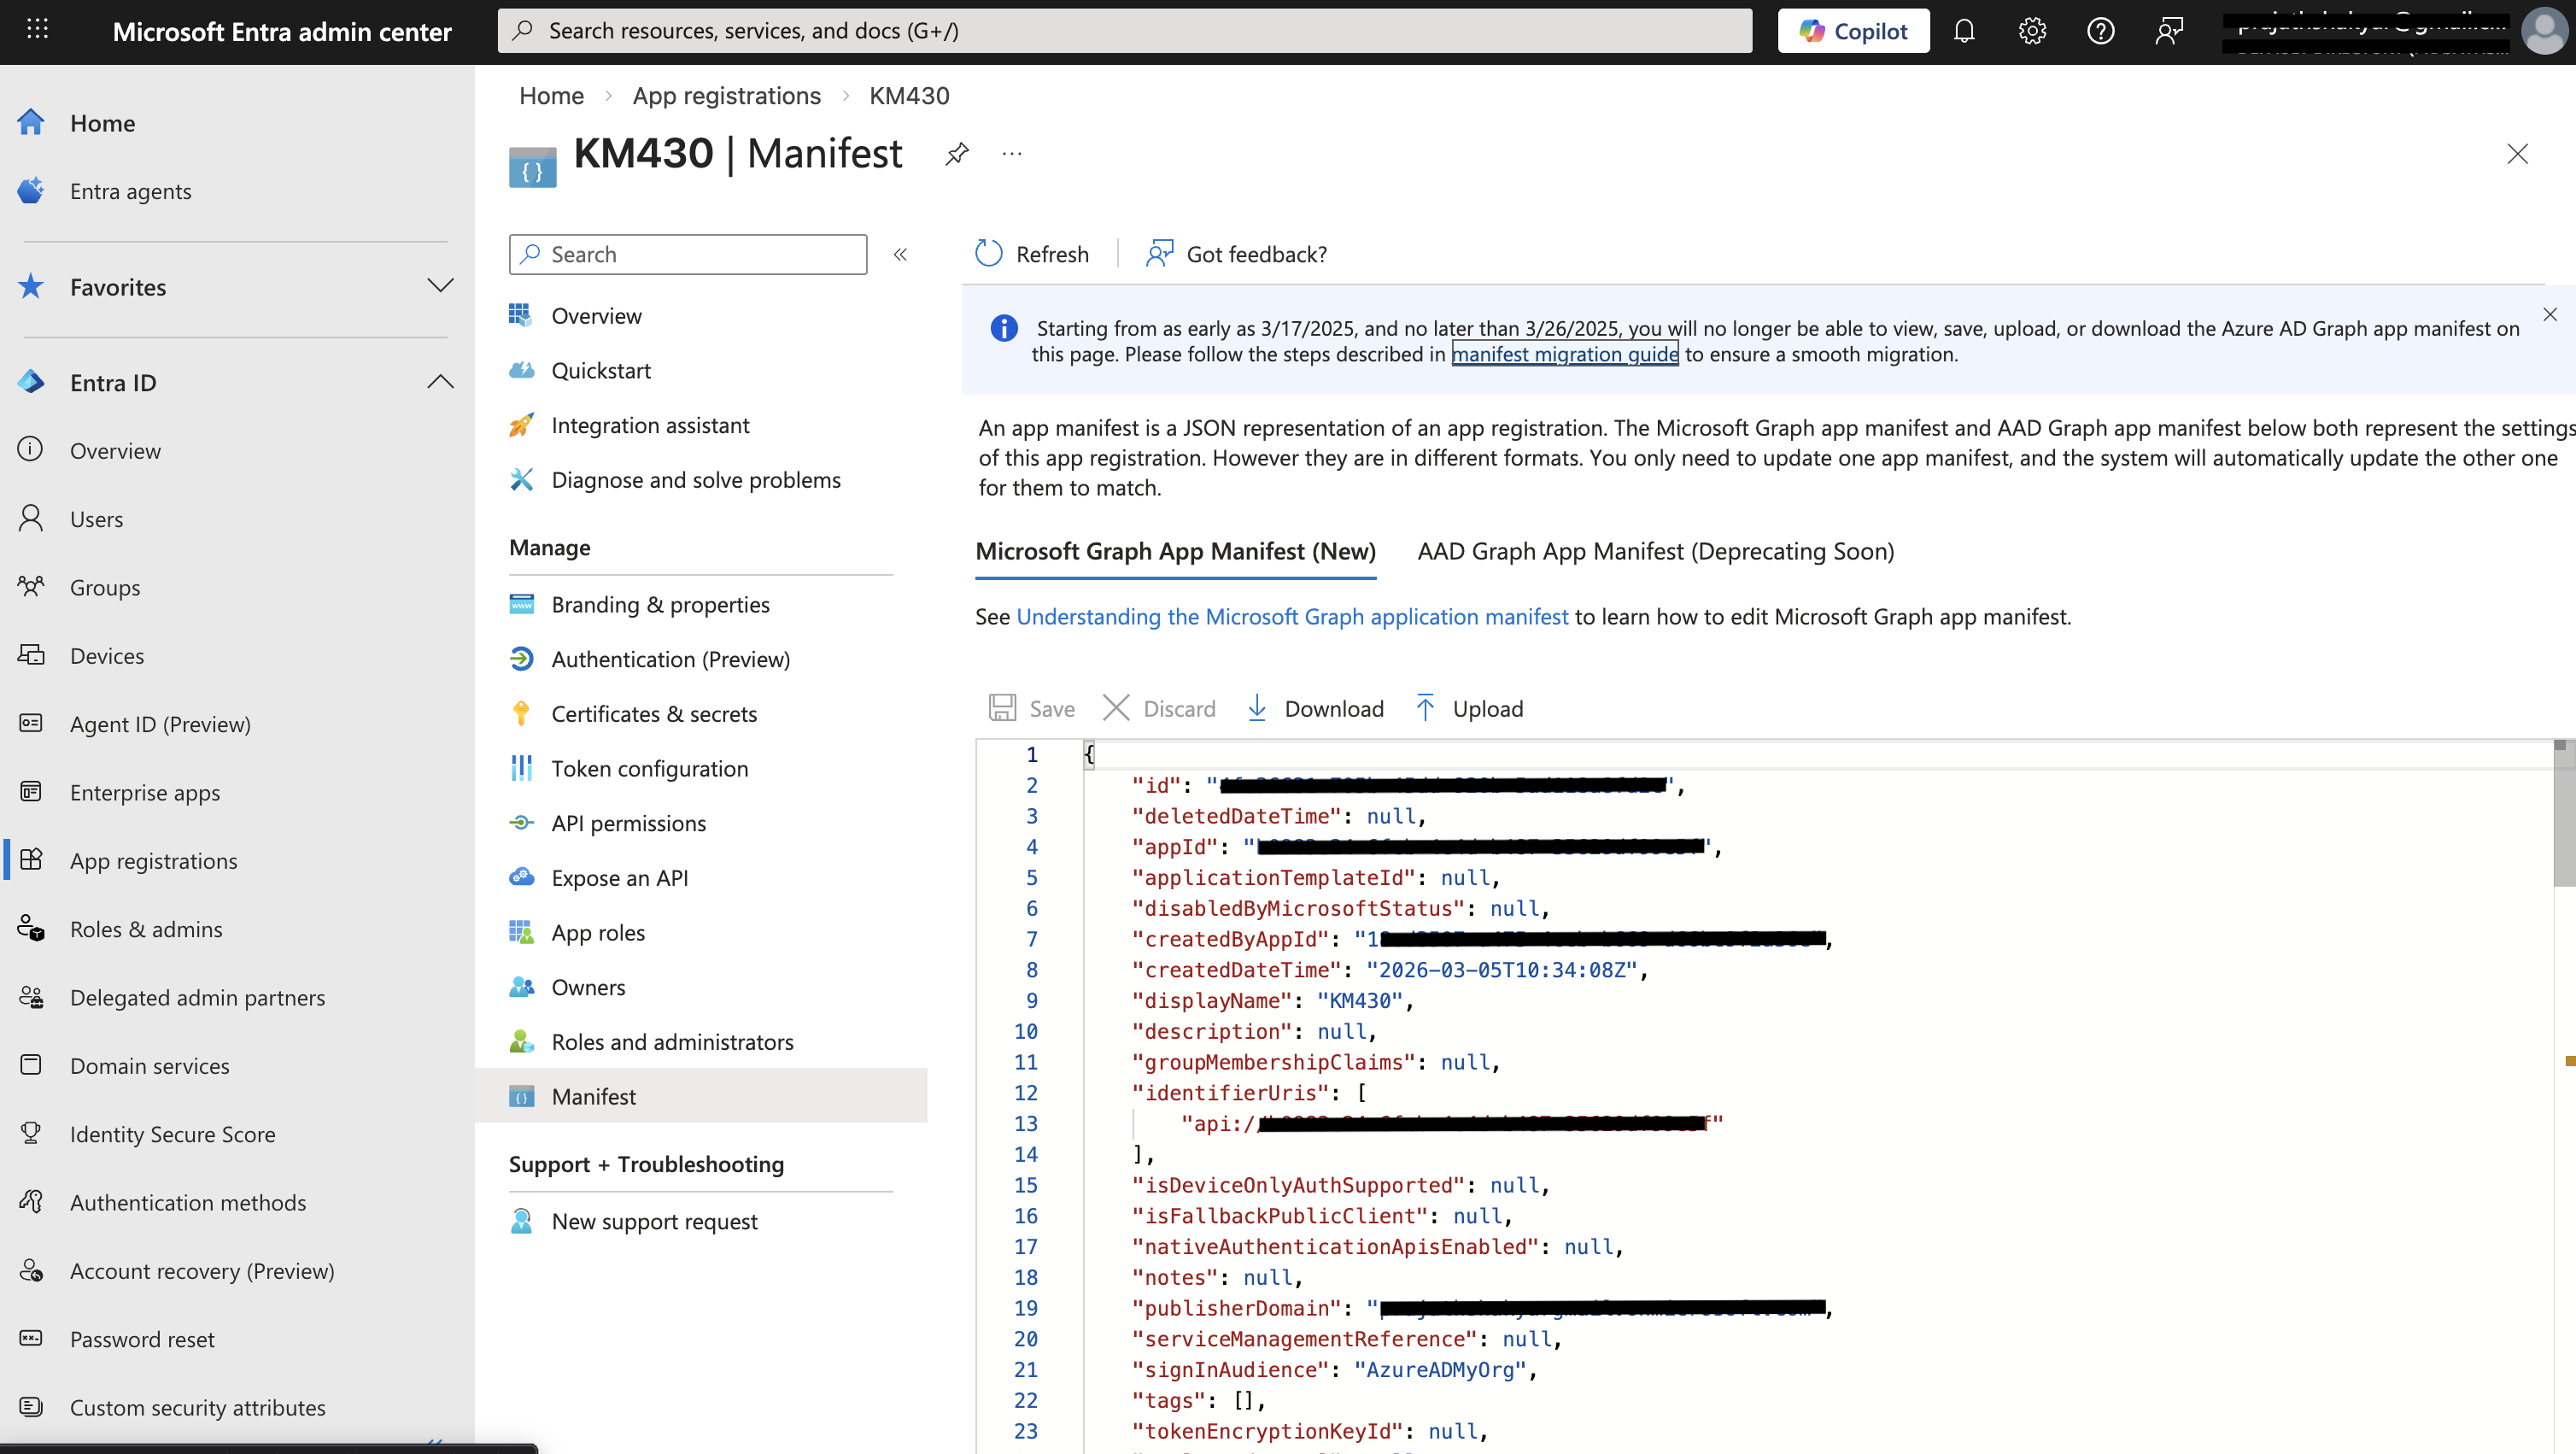
The steps to create the application and generate client secrets remain the same as described in the previous section. However, if you need to generate V2 tokens, make sure the value of requestedAccessTokenVersion is set to 2 in the application manifest. If the value is null or 1, the generated tokens will be of version 1. To update the manifest, follow the steps below.
- Navigate to the Microsoft Entra Admin Center and select App registrations from the left-hand menu.
- Click on the application you want to configure.
- In the left-hand menu, select Manifest.
- In the manifest editor, locate the
requestedAccessTokenVersionproperty and set its value.
Note
If you plan to use Microsoft Entra External ID as a third-party Key Manager, you can follow the same configuration steps described above. Ensure that the correct Application ID URI is configured because this value is used as the scope parameter when generating access tokens.
Map Application in Developer Portal
When an application is created in the WSO2 Developer Portal, it must be mapped to an existing application created in Microsoft Entra ID.
- Navigate to the Production Keys section of the application.
- Click Provide Existing OAuth Keys.
-
Enter the following values:
- Consumer Key : Application (client) ID from Microsoft Entra ID
- Consumer Secret : Client secret generated in Microsoft Entra ID
Note
When using Provide Existing OAuth Keys, the client secret cannot be retrieved from Microsoft Entra ID after it is created. Therefore, the Developer Portal cannot display the client secret once it has been added, and you have to use the below curl to generate the token by providing the client secret that you have generated in Microsoft Entra ID.
curl --location 'https://login.microsoftonline.com/<tenant-id>/oauth2/v2.0/token' \
--header 'Content-Type: application/x-www-form-urlencoded' \
--data-urlencode 'client_id=<client-id>' \
--data-urlencode 'client_secret=<client-secret>' \
--data-urlencode 'grant_type=client_credentials' \
--data-urlencode 'scope=api://<application-id>/.default'
Replace the placeholders with the appropriate values from your Microsoft Entra ID application.