Managing Streaming Data with Errors
Introduction
In this tutorial, let's learn how you can handle streaming data that has errors (e.g., events that do not have values for certain attributes). WSO2 Streaming Integrator allows you to log such events, direct them to a separate stream or store them in a data store. If these errors occur at the time of publishing (e.g., due to a connection error), WSO2 SI also provides the option to wait and then resume to publish once the connection is stable again. For detailed information about different ways to handle errors, see the Handling Errors guide.
In this scenario, you are handling erroneous events by directing them to a MySQL store.
Before you begin
In order to save streaming data with errors in a MySQL store, you need to have access to a MySQL instance. Examples in this page are based on the following credentials of a MySQL instance:
- Host:
localhost - Port:
3306 - Username:
root - Password:
root
Step 1: Create the data store
Let's create the MySQL data store in which the events with errors can be saved. To do this, follow the steps below:
-
Download the MySQL JDBC driver from the MySQL site.
-
Unzip the archive.
-
Copy the
mysql-connector-java-5.1.45-bin.jarto the<SI_HOME>/libdirectory. -
Start the MySQL server as follows:
mysql -u <USERNAME> -p <PASSWORD> -
Create a new database named
use siddhierrorstoredb;by issuing the following command in the MySQL console.mysql> create database siddhierrorstoredb; -
To switch to the new database, issue the following command.
mysql> use siddhierrorstoredb;
Step 2: Enable the error store
To enable the error store, open the <SI_HOME>/conf/server/deployment.yaml file and add a configuration as follows:
error.store:
  enabled: true
  bufferSize: 1024
  dropWhenBufferFull: true
  errorStore: org.wso2.carbon.streaming.integrator.core.siddhi.error.handler.DBErrorStore
  config:
    datasource: SIDDHI_ERROR_STORE_DB
    table: SIDDHI_ERROR_STORE_TABLE
This configuration refers to a data source named Error_Store_DB. Define this data source as follows under wso2.datasources in the <SI_HOME>/conf/server/deployment.yaml file.
- name: SIDDHI_ERROR_STORE_DB
  description: The datasource used for Siddhi error handling feature
  jndiConfig:
    name: jdbc/SiddhiErrorStoreDB
  definition:
    type: RDBMS
    configuration:
      jdbcUrl: 'jdbc:mysql://localhost:3306/siddhierrorstoredb?useSSL=false'
      username: root
      password: root
      driverClassName: com.mysql.jdbc.Driver
      minIdle: 5
      maxPoolSize: 50
      idleTimeout: 60000
      connectionTestQuery: SELECT 1
      validationTimeout: 30000
      isAutoCommit: false
Step 3: Create and deploy the Siddhi applications
To create and deploy the Siddhi applications, follow the steps below:
-
Start the SI server by navigating to the
<SI_HOME>/bindirectory and issuing one of the following commands as appropriate, based on your operating system:- For Windows:
server.bat --run - For Linux:
sh server.sh
The following log appears in the Streaming Integrator console once you have successfully started the server.
INFO {org.wso2.carbon.kernel.internal.CarbonStartupHandler} - WSO2 Streaming Integrator started in 4.240 sec - For Windows:
-
Start the Streaming Integrator Tooling by navigating to the
<SI_TOOLING_HOME>/bindirectory and issuing one of the following commands as appropriate, based on your operating system:-
For Windows:
tooling.bat -
For Linux:
./tooling.sh
Then access the Streaming Integrator Tooling via the URL that appears in the start up log with the text
Editor Started on:. -
-
Copy paste the following Siddhi applications to separate new files and save.
    @App:name("MappingErrorTest")

    @Source(type = 'http',
             receiver.url='http://localhost:8006/productionStream',
             basic.auth.enabled='false',
         @map(type='json', @attributes(name='name', amount='amount')))
    define stream ProductionStream(name string, amount double);

    @sink(type='log', prefix='Successful mapping: ')
    define stream LogStream(name string, amount double);

    from ProductionStream
    select *
    insert into LogStream;
@App:name("SinkTransportErrorTest") @sink(type = 'http', on.error='STORE', blocking.io='true', publisher.url = "http://localhost:8090/unavailableEndpoint", method = "POST", @map(type = 'json')) define stream TestPublisherStream (name string, amount double); @Source(type = 'http', receiver.url='http://localhost:8007/testUnavailableEP', basic.auth.enabled='false', @map(type='json', enclosing.element='$.event', @attributes(name='name', amount='amount'))) define stream TestInput(name string, amount double); from TestInput#log('Sending to unavailableEndpoint: ') select name, amount insert into TestPublisherStream;@App:name("ReceiveAndCount") @App:description('Receive events via HTTP transport and view the output on the console') @Source(type = 'http', receiver.url='http://localhost:8090/unavailableEndpoint', basic.auth.enabled='false', @map(type='json')) define stream SweetProductionStream (name string, amount double); @sink(type='log') define stream TotalCountStream (totalCount long); -- Count the incoming events @info(name='query1') from SweetProductionStream select count() as totalCount insert into TotalCountStream;@App:name("StoreRdbmsError") @App:description('Receive events via HTTP and persist the received data in the store.') @sink(type='log') define stream LogStream(batchID int, amount double, factoryID int); @Store(type="rdbms", on.error="STORE", jdbc.url="jdbc:mysql://localhost:3306/production?useSSL=false", username="root", password="root", jdbc.driver.name="com.mysql.jdbc.Driver") @primaryKey('batchID') define table SweetProductionTable (batchID int, amount double, factoryID int); @Source(type = 'http', receiver.url='http://localhost:8006/insertStream', basic.auth.enabled='false', @map(type='json')) define stream InsertStream (batchID int, amount double, factoryID int); from InsertStream insert into SweetProductionTable; -
To deploy the Siddhi file, follow the procedure below:
-
Click the Deploy menu and then click Deploy to Server. This opens the Deploy Siddhi Apps to Server dialog box.
-
In the Add New Server section, enter the host, port, user name and the password of your Streaming Integrator server as shown below.
Tip
To check the port of your streaming integrator server, open the
<SI_HOME>/conf/server/deployment.yaml fileand search forwso2.transport.http->Listener Configurations. The port of your WSO2 Streaming Integrator port is specified under the listener configuration that hasmsf4j-httpsas the ID as shown in the extract below. In this example, it is9443.
listenerConfigurations:
    -
      id: "default"
      host: "0.0.0.0"
      port: 9090
    -
      id: "msf4j-https"
      host: "0.0.0.0"
      port: 9443
      scheme: https
      keyStoreFile: "${carbon.home}/resources/security/wso2carbon.jks"
      keyStorePassword: wso2carbon
      certPass: wso2carbon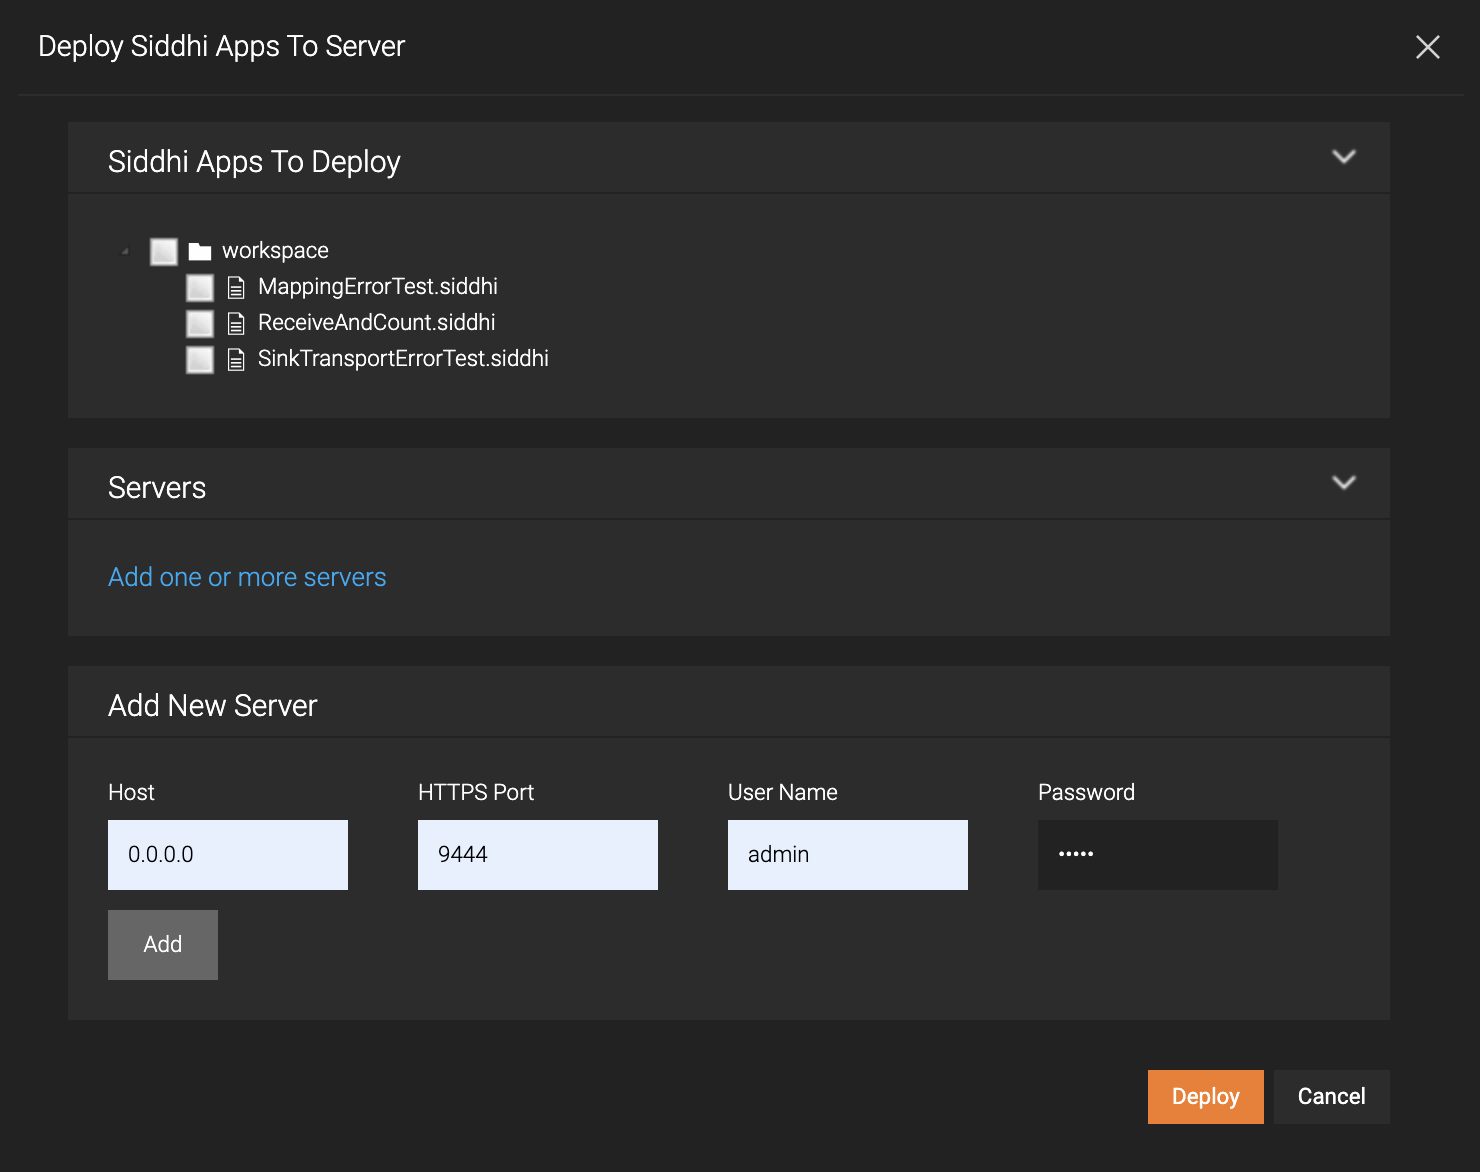
Then click Add.
-
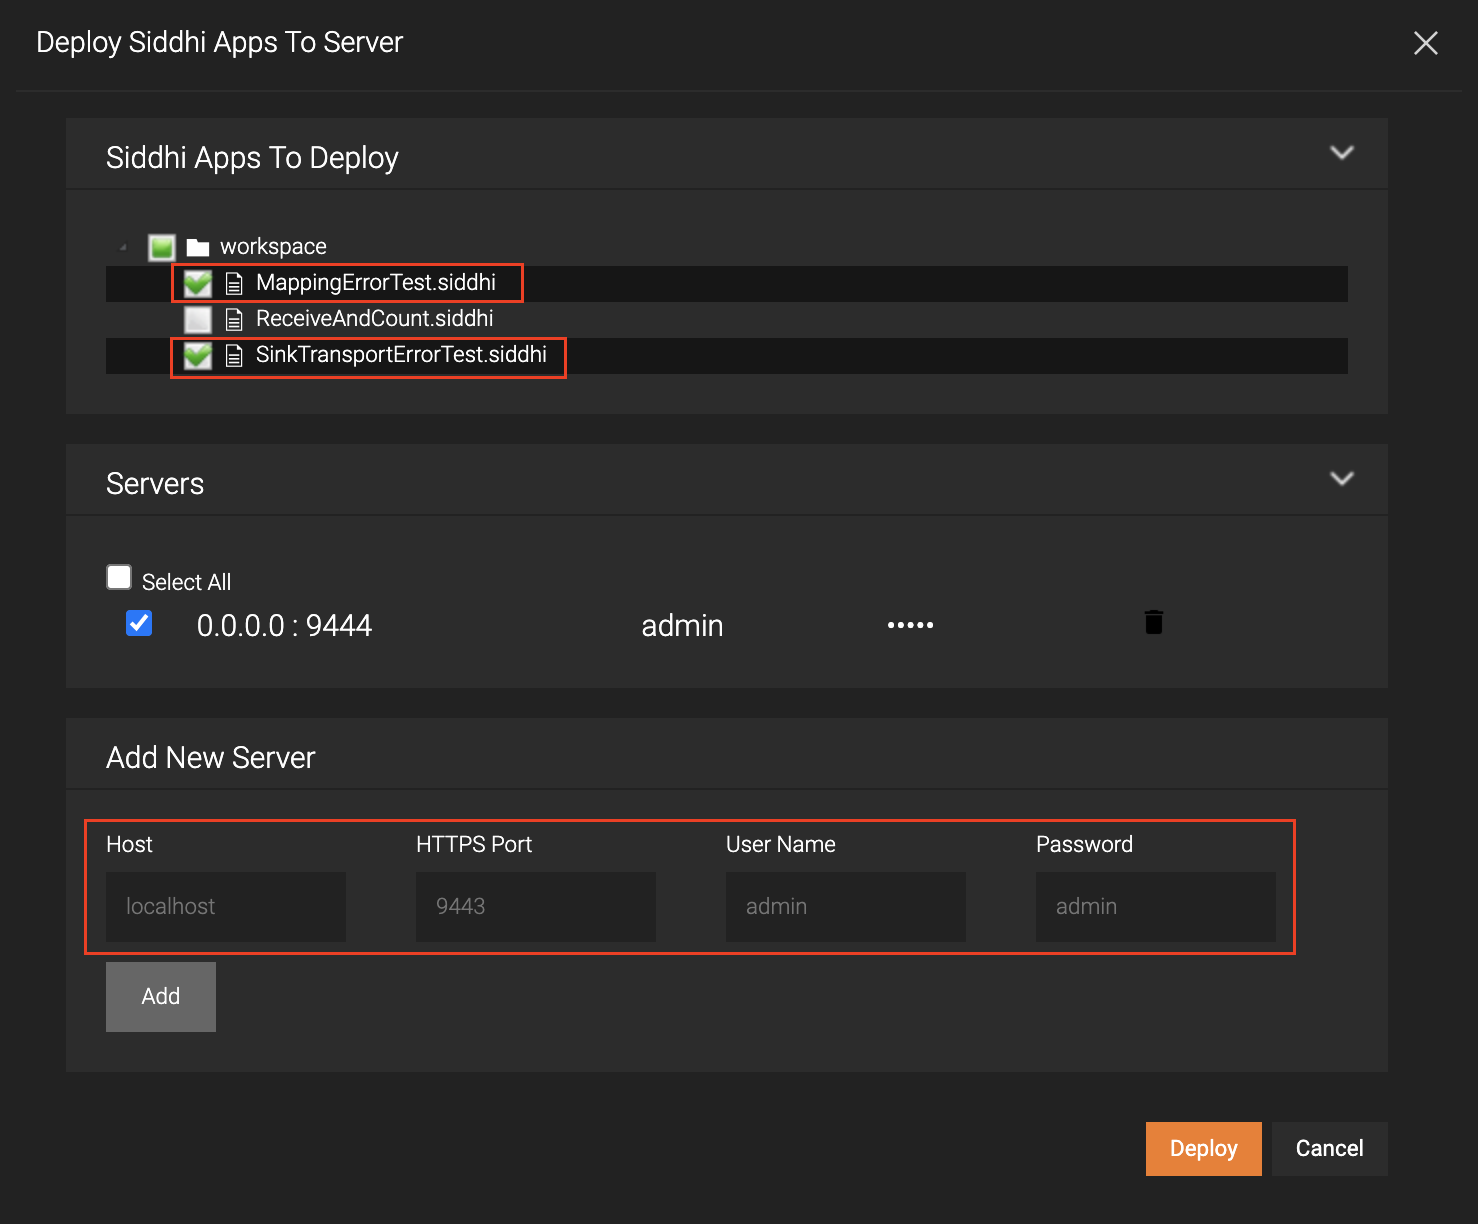
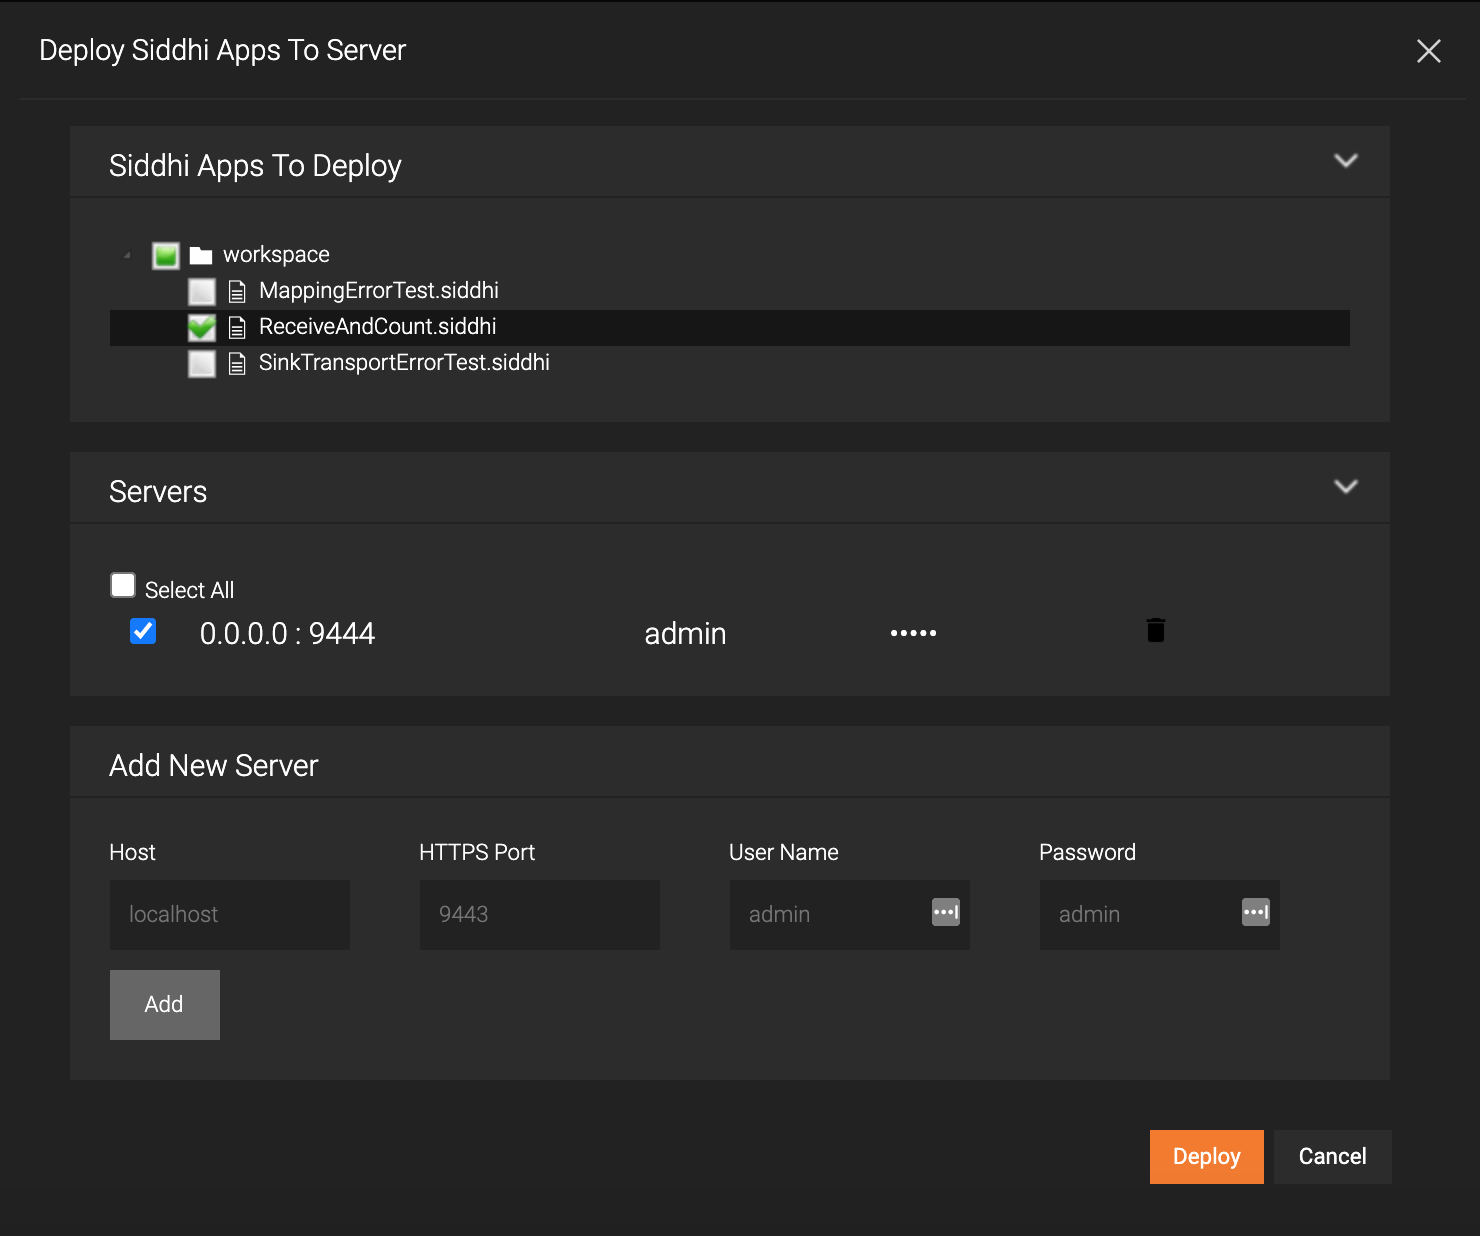
In the Siddhi Apps to Deploy section, select the check boxes for the MappingErrorTest.siddhi and SinkTransportErrorTest.siddhi applications. In the Servers section, select the check box for the server you added. Then click Deploy.
-
Step 4: Connect the Error Store Explorer to the SI server
The Error Store Explorer is a tool that allows you to view, correct and replay events with errors. In order to use it, it needs to be connected to the SI server on which, error store has been enabled.
To connect the Error Store Explorer to the SI server, follow the procedure below:
-
Start the Streaming Integrator Tooling server by navigating to the
<SI_TOOLING_HOME>/bindirectory and issuing one of the following commands as appropriate, based on your operating system:-
For Windows:
tooling.bat -
For Linux:
./tooling.sh
Then Access the Streaming Integrator Tooling via the URL that appears in the start up log with the text
Editor Started on:. -
-
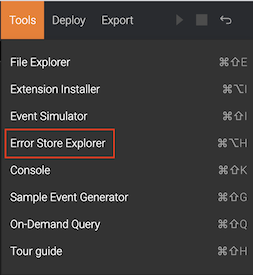
To open the Error Store Explorer, click Tools and then click Error Store Explorer.
The Error Store Explorer opens as shown below.
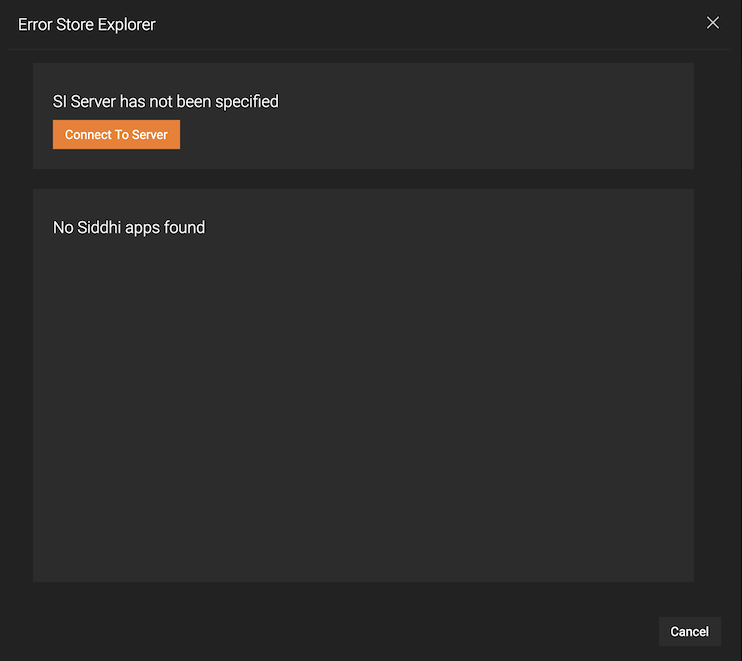
-
Click Connect to Server. Then enter information as follows: To check the port of the Streaming Integrator Server, Open
/conf/server/deployment.yaml file. Under Listener Configurations of wso2.transport.http, locate the listener configuration with msf4j-https as the ID and specify its port as shown in the extract below. 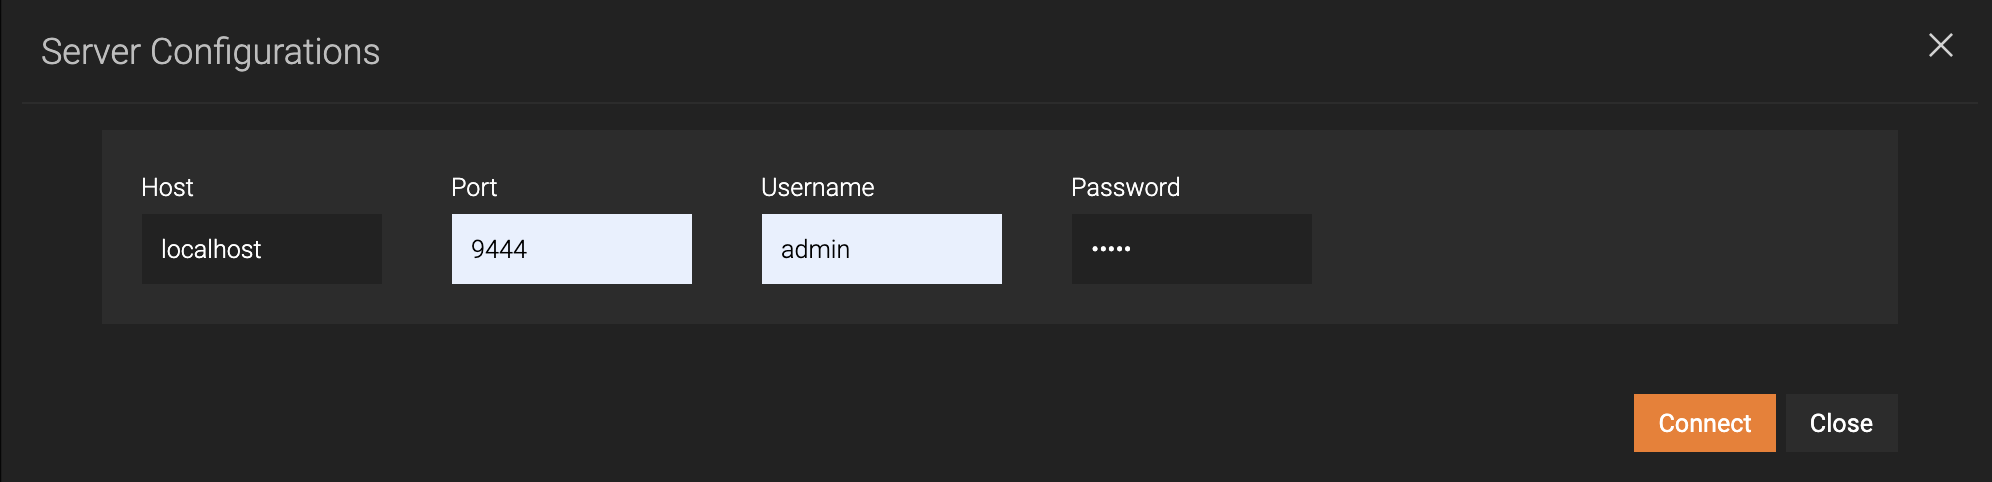
Parameter Value Host localhostPort 9444Username adminPassword adminThen click Connect.
Step 5: Test the event mapping failing scenario
Step 5.1: Publish an event with a mapping error in MappingErrorTest Siddhi application
Send an event to the ProductionStream stream of the MappingErrorTest' Siddhi application by issuing the following CURL command.
curl --location --request POST 'http://localhost:8006/productionStream' \
--header 'Content-Type: application/json' \
--data-raw '{
                "foo": "Cake",
                "amount": 20.12
            }'
MappingFailedException. This is because the ProductionStream expects an event in the following format which is specified via a custom mapping.
{
    "name": "Cake",
    "amount": 20.12
}
Step 5.2: Manage the error in the Error Store Explorer
To manage the error in the Error Store Explorer, follow the procedure below:
-
To open the Error Store Explorer, open Streaming Integrator Tooling, click Tools and then click Error Store Explorer.
The Error Store Explorer opens as shown below.
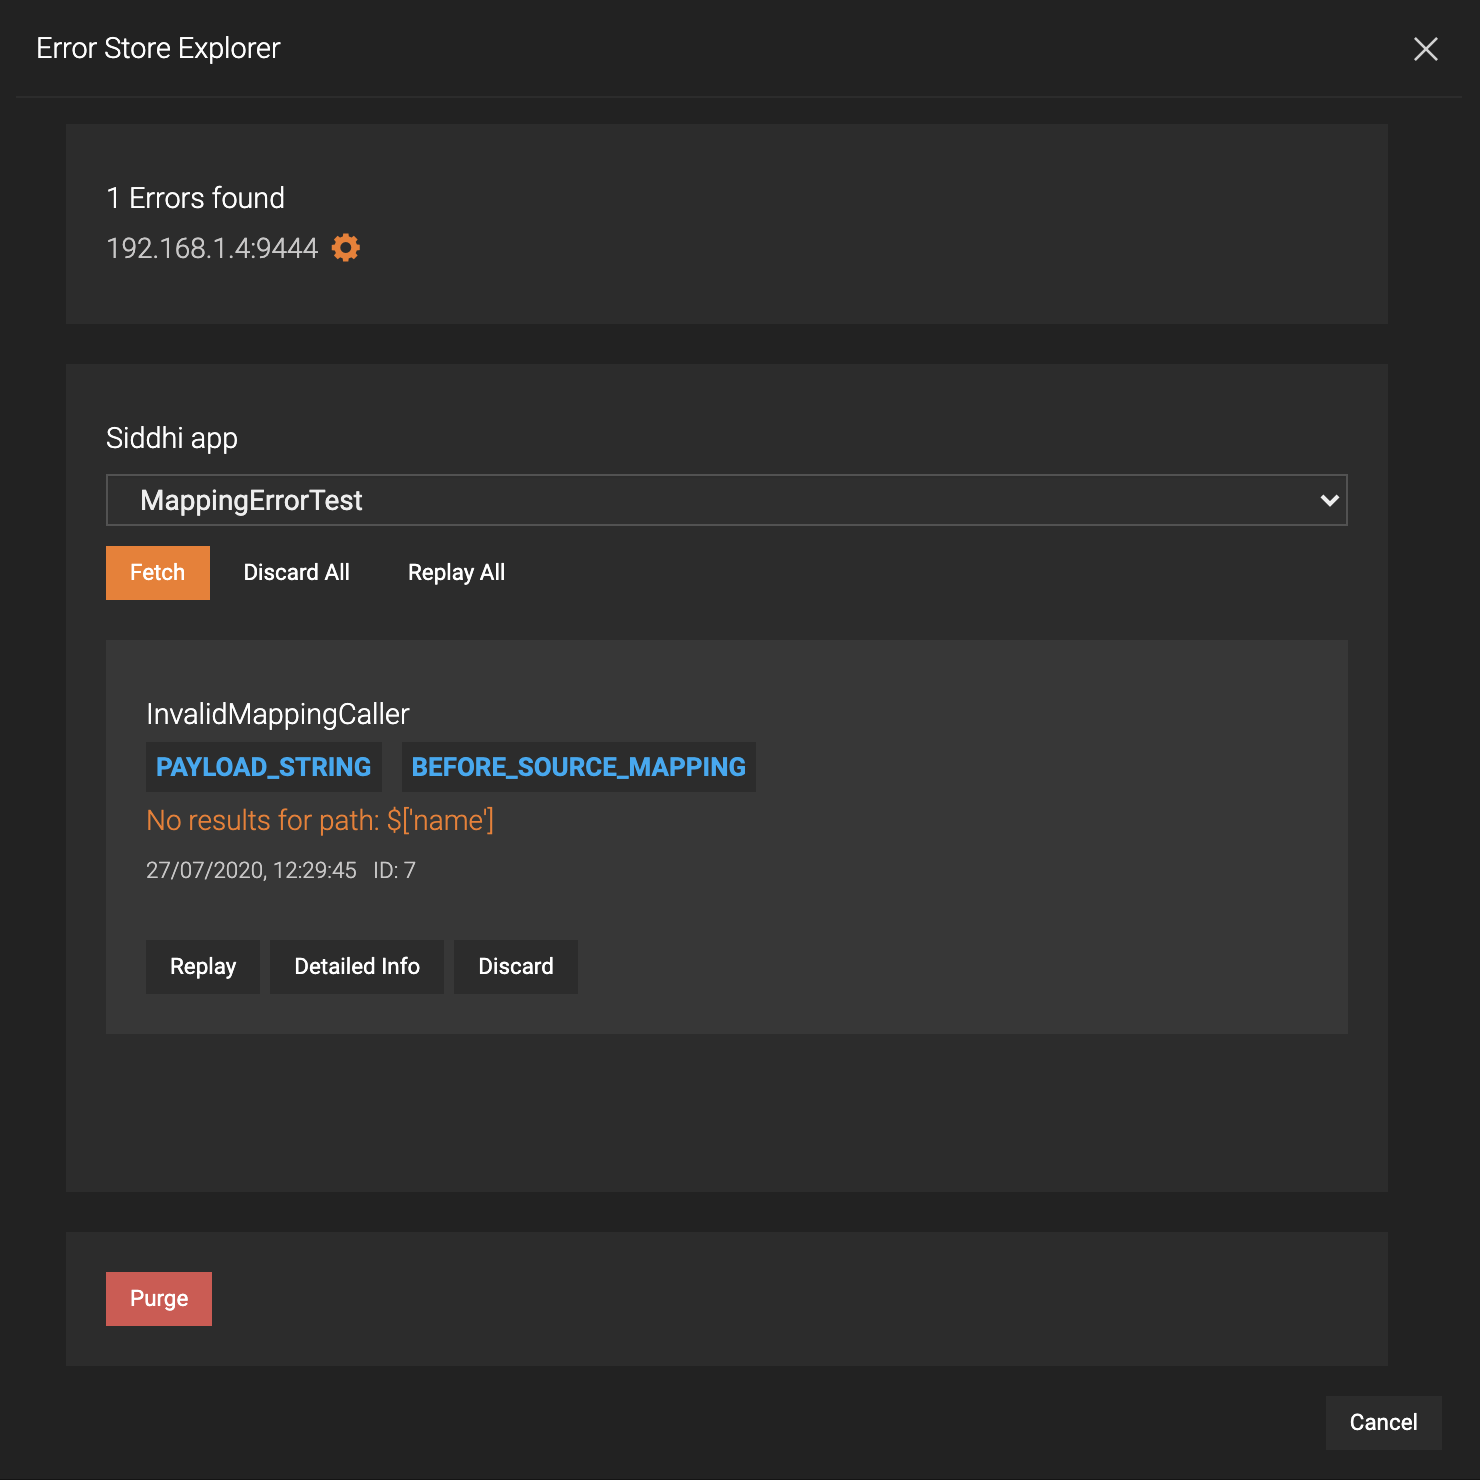
The single error displayed is the mapping error that you previously simulated.
-
To view details of the error, click Detailed Info. The following is displayed.
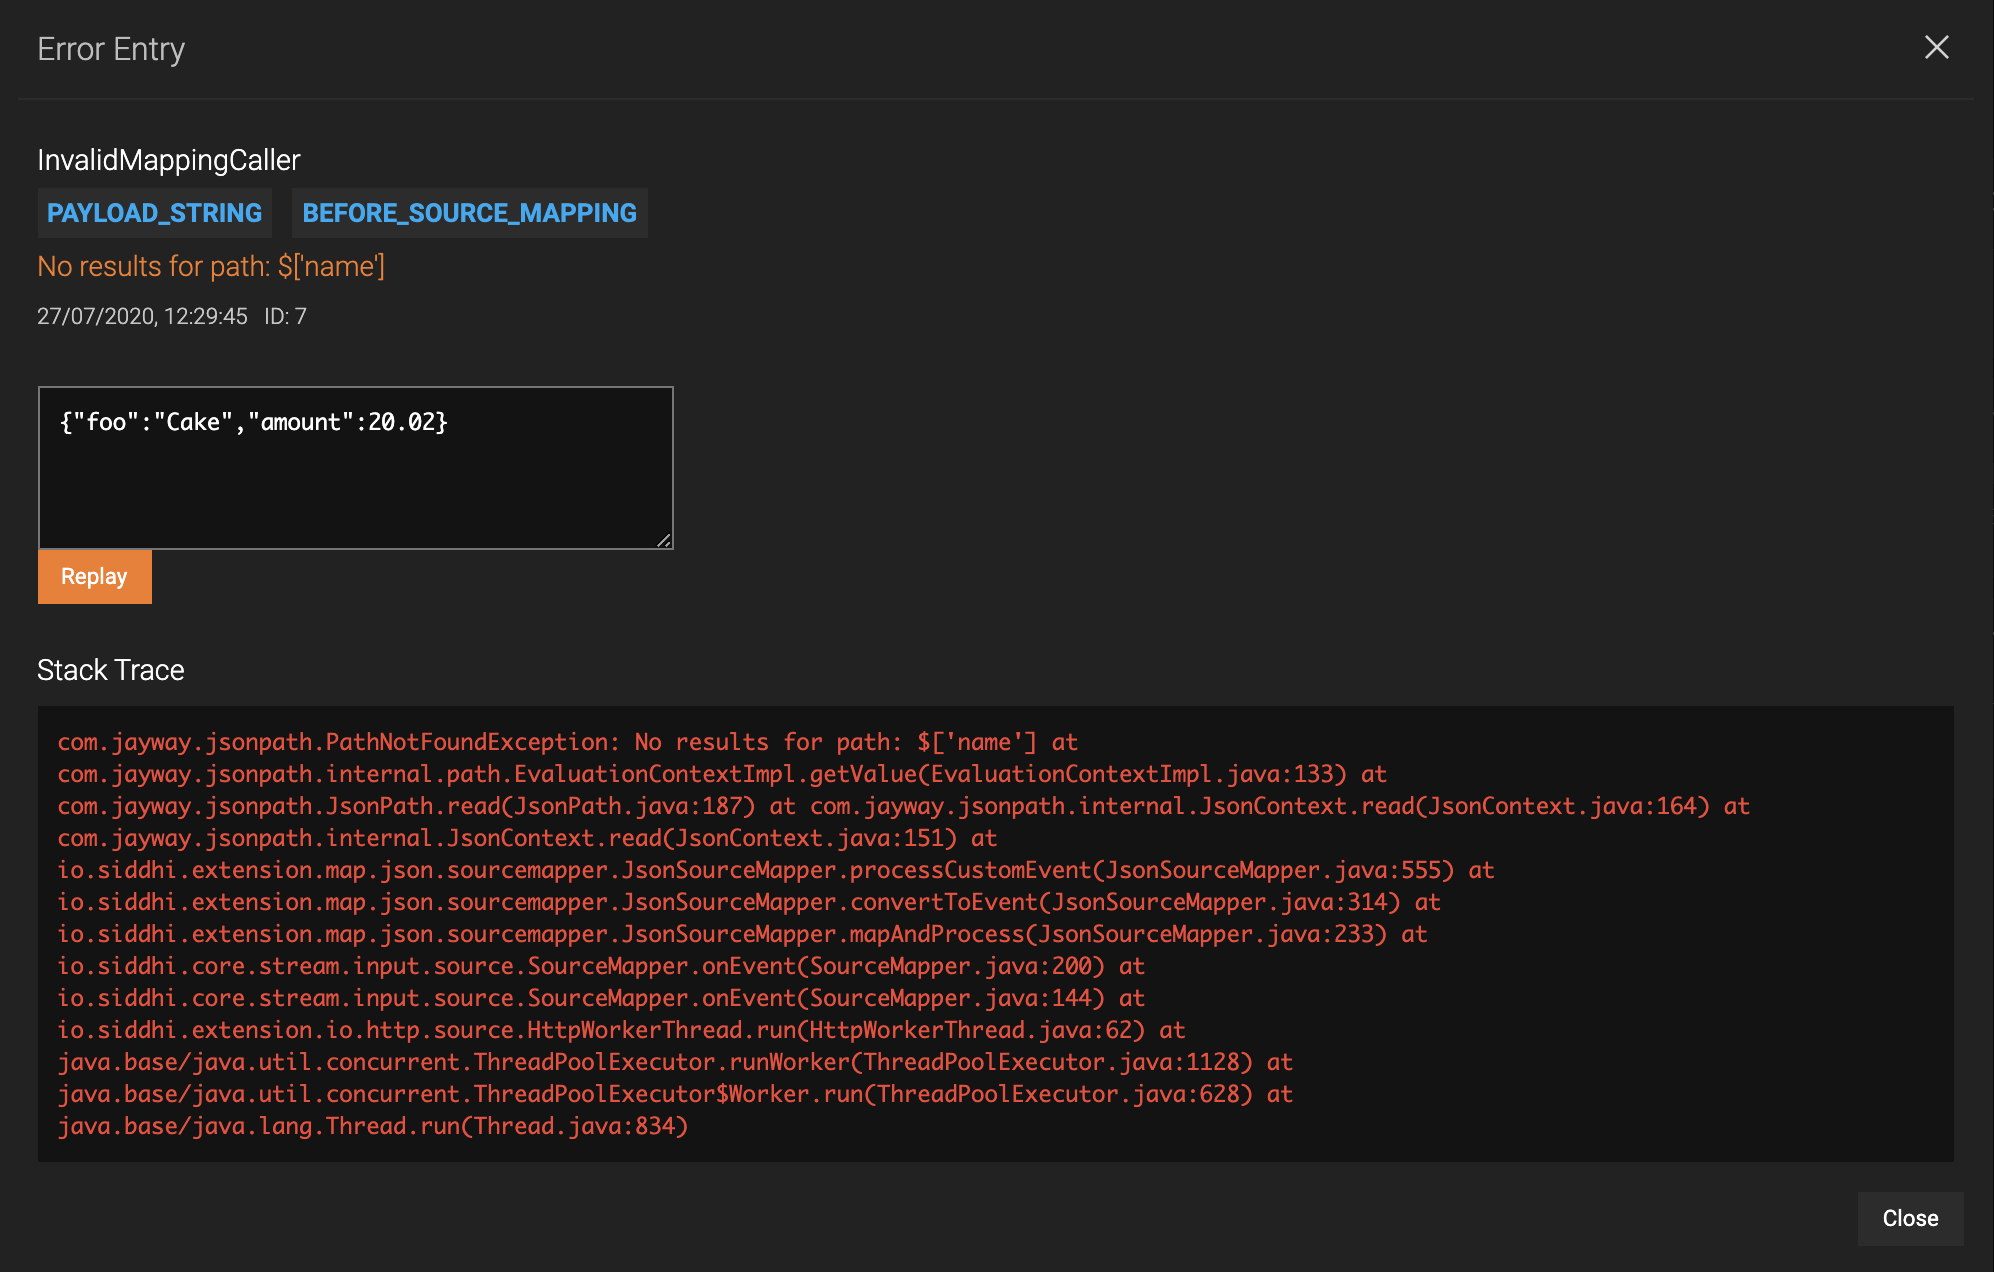
-
You can correct the mapping and replay the event. To do this, change
fooin the event tonameand clickreplay.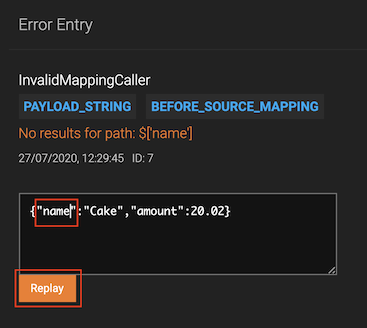
As a result, the Error Entry dialog box closes, and the Error Store Explorer dialog box is displayed with no errors.
At the same time the following is logged for the Streaming Integrator Server.
INFO {io.siddhi.core.stream.output.sink.LogSink} - Successful mapping: : Event{timestamp=1595574091411, data=[Cake, 20.02], isExpired=false}
Step 6: Test the event failing scenario at sink level
Step 6.1: Trigger an event flow that publishes an event to the SinkTransportErrorTest Siddhi application
Send an HTTP event to the TestInput stream of the SinkTransportErrorTest Siddhi application by issuing the following CURL command.
curl --location --request POST 'http://localhost:8007/testUnavailableEP' --header 'Content-Type: application/json' --data-raw ' { "event": { "name": "Cake2", "amount": 20.222 } }'
The following is logged in the Streaming Integrator Server console
INFO {io.siddhi.core.query.processor.stream.LogStreamProcessor} - SinkTransportErrorTest: Sending to unavailableEndpoint: , StreamEvent{ timestamp=1597853565942, beforeWindowData=null, onAfterWindowData=null, outputData=[Cake2, 20.222], type=CURRENT, next=null}
http://localhost:8007/testUnavailableEP is unavailable, the event is dropped at the sink level and then stored in the ErrorStore.
Step 6.2: Start service via the ReceiveAndCount Siddhi application
In this step, let's start the service at http://localhost:8007/testUnavailableEP via the ReceiveAndCount Siddhi application
In the Siddhi Apps to Deploy section, select the check box for the ReceiveAndCount.siddhi application. In the Servers section, select the check box for the server you added. Then click Deploy.
The following log is displayed in the Streaming Integrator console.
INFO {org.wso2.carbon.streaming.integrator.core.internal.StreamProcessorService} - Siddhi App ReceiveAndCount deployed successfully
Step 6.3: Manage the error in the Error Store Explorer
To manage the error in the Error Store Explorer, follow the procedure below:
-
To open the Error Store Explorer, open Streaming Integrator Tooling, click Tools and then click Error Store Explorer.
-
In the Siddhi app field, select SinkTransportErrorTest Siddhi application and then click Fetch.
As a result, an error is displayed as follows.
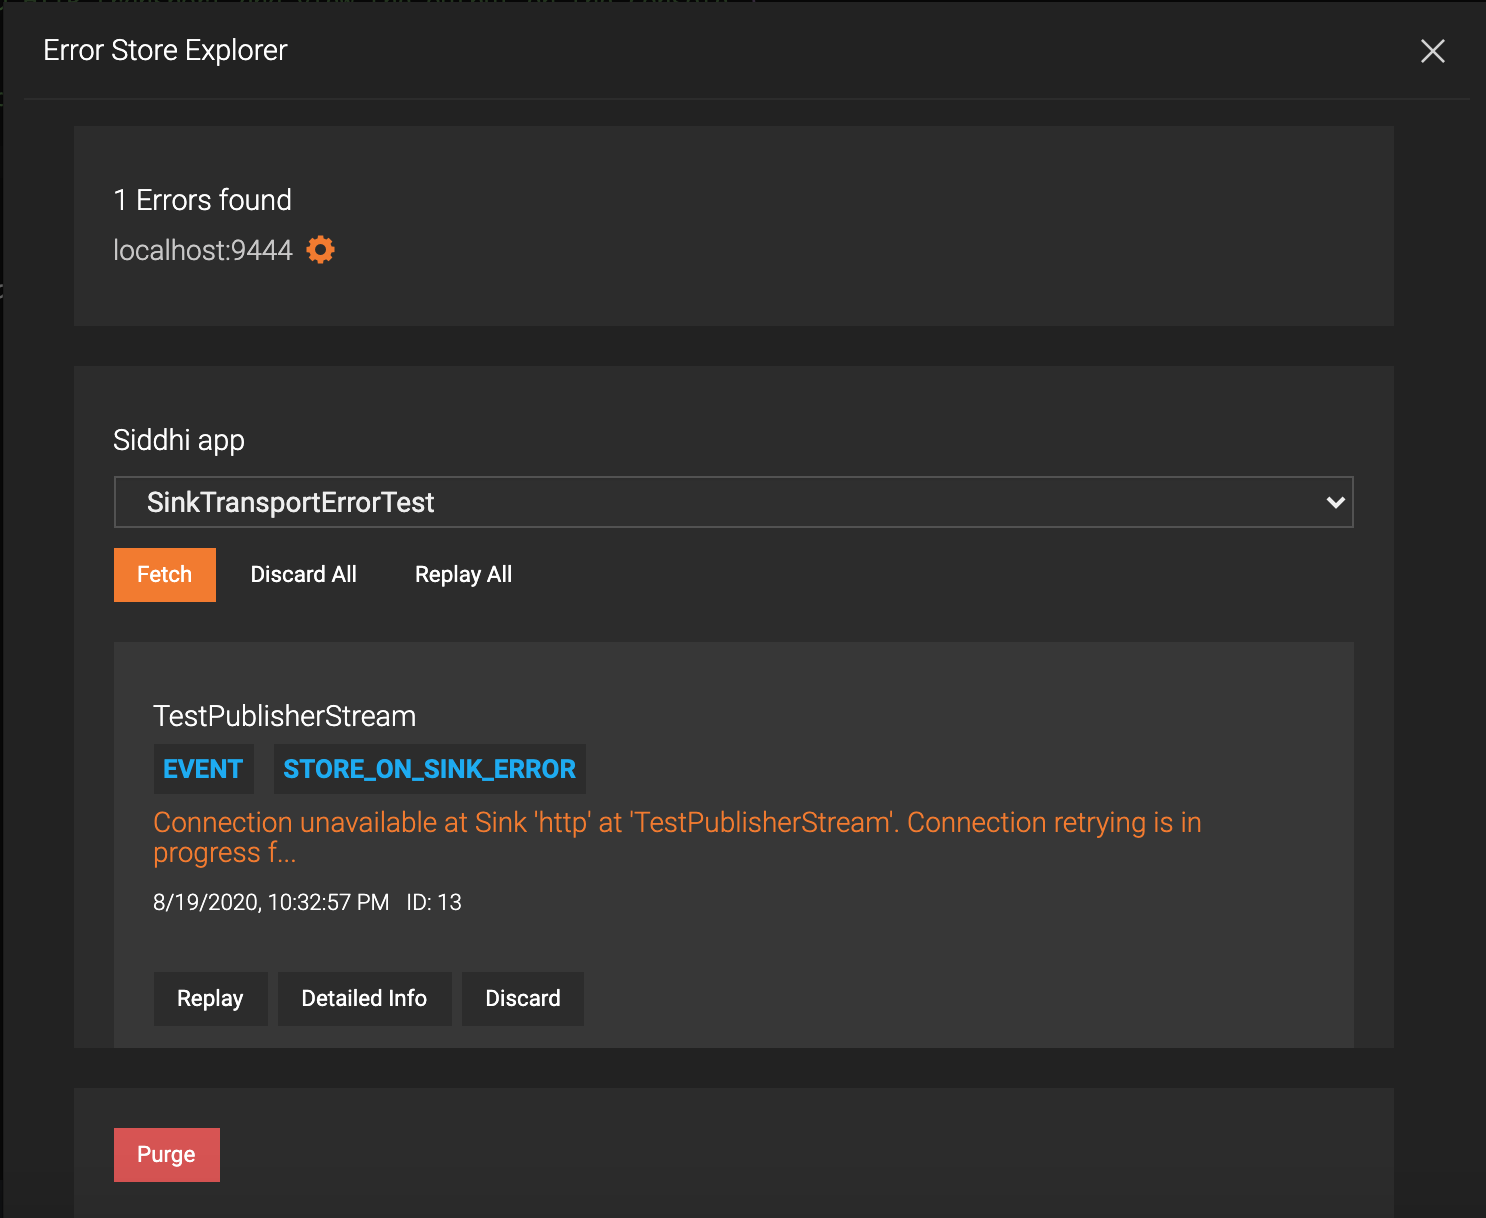
This indicates that the event was dropped because the end point was not available.
-
To view details of the error, click Detailed Info. The following is displayed.
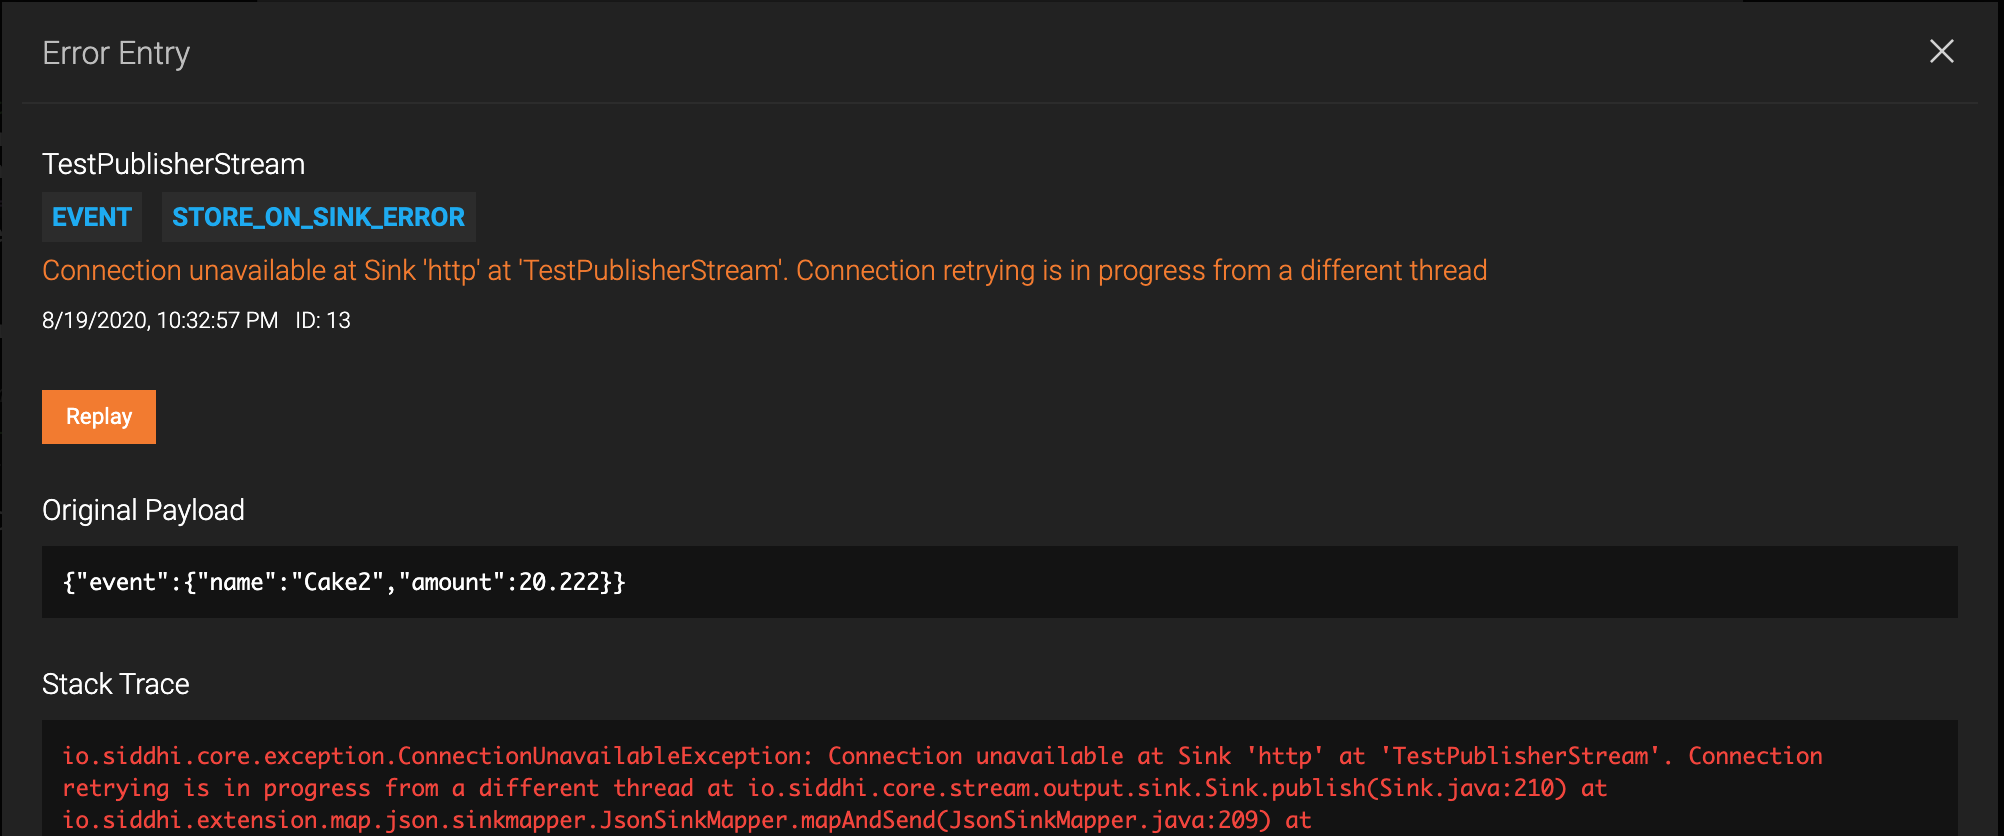
Previously, you deployed the
ReceiveAndCountSiddhi application. Therefore, you can send the event again by clicking Replay.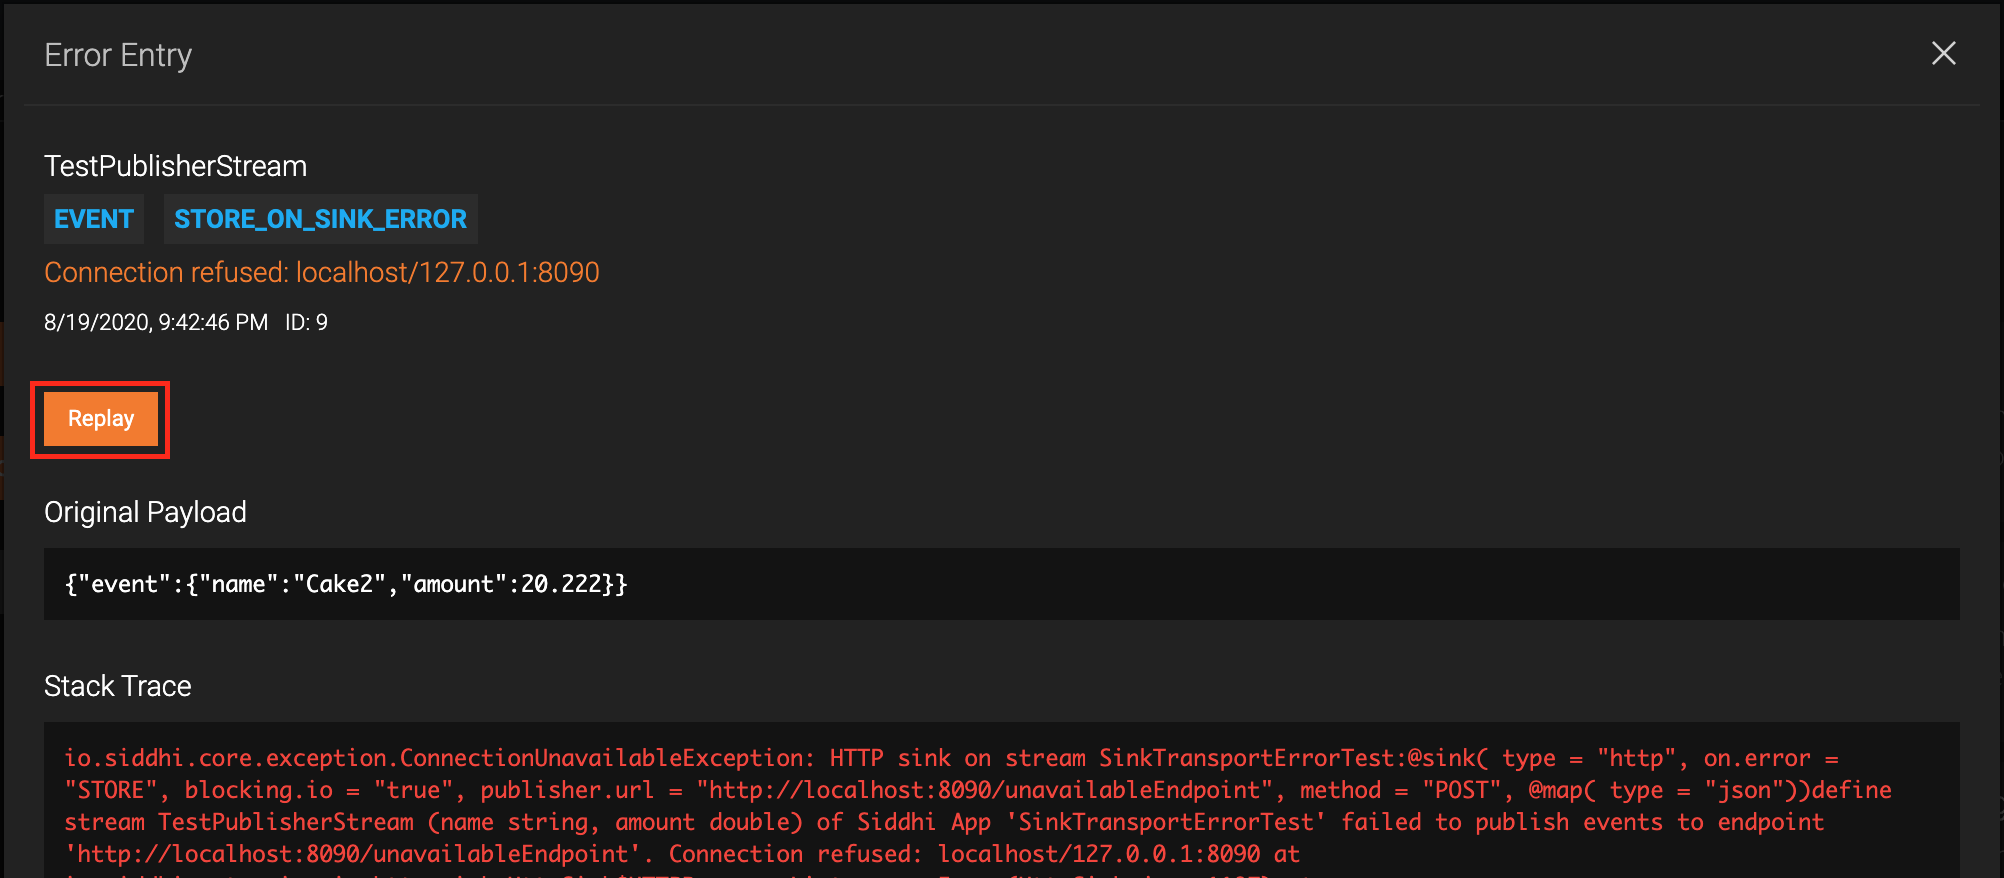
As a result, the Error Entry dialog box closes, and the Error Store Explorer dialog box is displayed with no errors.
At the same time the following is logged for the Streaming Integrator Server which is logged by the ReceiveAndCount Siddhi application.
INFO {io.siddhi.core.stream.output.sink.LogSink} - ReceiveAndCount : TotalCountStream : Event{timestamp=1597857170244, data=[1], isExpired=false}Step 7: Handle events that fail at database level
Step 7.1: Create a MySQL database table
Create a MySQL table as follows:
-
To create a database named
production, issue the following MySQL command.CREATE SCHEMA production; -
To create a table in the
productiondatabase, issue the following commands:use production;CREATE TABLE SweetProductionTable ( batchID int NOT NULL, amount double, factoryID int, PRIMARY KEY (batchID) );
Step 7.2: Deploy the StoreRdbmsError Siddhi application
In this step, let's start the service at http://localhost:8006/insertStream via the StoreRdbmsError Siddhi
application as follows:
-
Click the Deploy menu and then click Deploy to Server. This opens the Deploy Siddhi Apps to Server dialog box.
-
In the Siddhi Apps to Deploy section, select the check box for the StoreRdbmsError.siddhi application. In the Servers section, select the check box for the server you added. Then click Deploy.
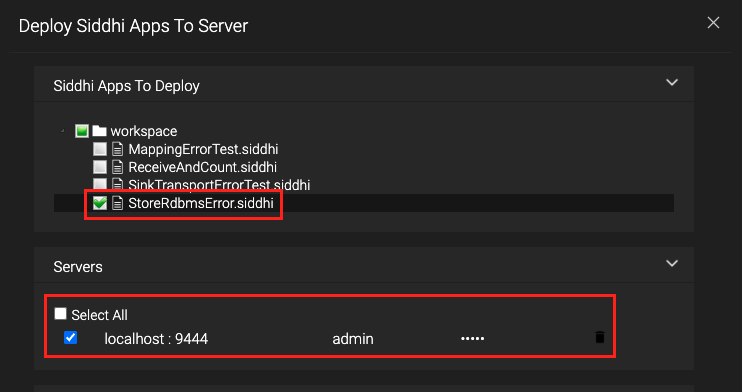
The following log is displayed in the Streaming Integrator console.
INFO {org.wso2.carbon.streaming.integrator.core.internal.StreamProcessorService} - Siddhi App StoreRdbmsError deployed successfully
Step 7.3: Publish an event to the StoreRdbmsError Siddhi application
Send an event to the InsertStream input stream of the StoreRdbmsError Siddhi application by issuing the following CURL
command.
curl --location --request POST 'http://localhost:8006/insertStream' --header 'Content-Type: application/json' --data-raw ' { "event": { "batchID": 1, "amount": 45.6, "factoryID": 102 } }'
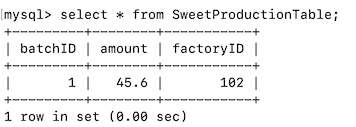
To check whether the published event is successfully saved in the SweetProductionTable table, issue the following command:
select * from SweetProductionTable;
The following is displayed:
Use the same curl command as above to publish another event. However, this time the event fails because the batchID
column that is defined as the primary key has a duplicate value of 1 in the second message. Due to this, the Siddhi application logs the following
in the wso2si terminal. It shows that the erroneous event has been captured and stored in the error store.
[2020-11-03 11:48:28,951] ERROR {io.siddhi.core.table.Table} - Error on 'StoreRdbmsError' while performing add for events at 'SweetProductionTable'. Events saved 'EventChunk{first=StreamEvent{ timestamp=1604384308930, beforeWindowData=null, onAfterWindowData=null, outputData=[1, 45.6, 102], type=CURRENT, next=null}}'
Step 7.4: Manage the error in the Error Store Explorer
To manage the error in the Error Store Explorer, follow the procedure below:
-
To open the Error Store Explorer, open Streaming Integrator Tooling, click Tools and then click Error Store Explorer.
-
In the Siddhi app field, select StoreRdbmsError Siddhi application and then click Fetch.
As a result, an error is displayed as follows.
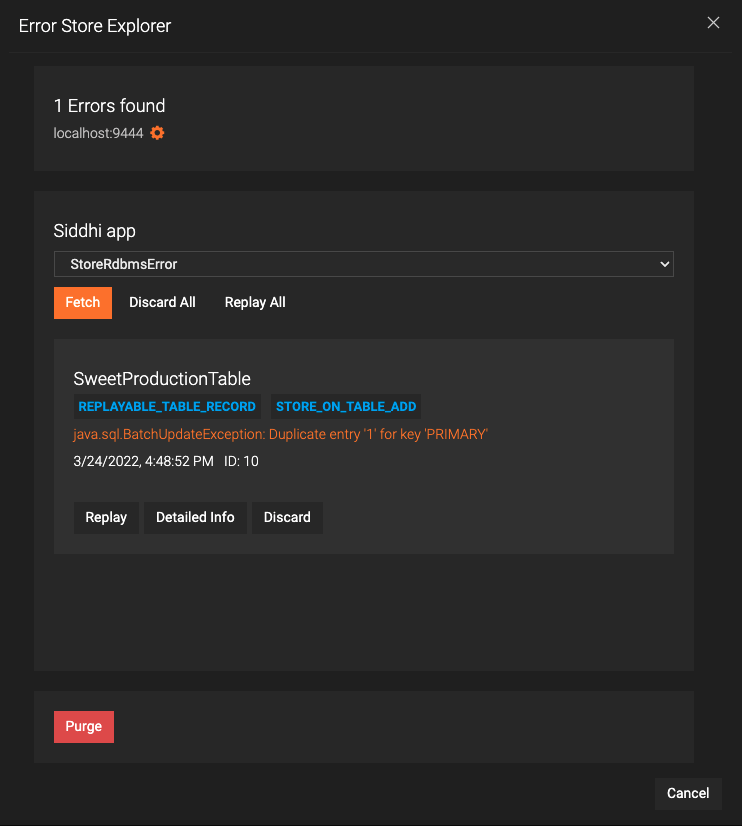
This indicates that the event was dropped due to database constrained violation.
-
To view details of the error, click Detailed Info. The following is displayed.
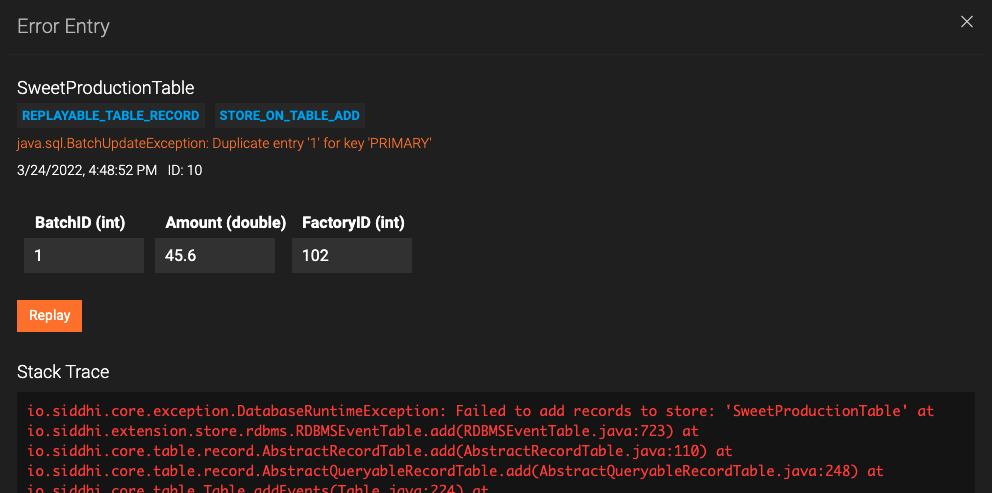
The erroneous event is displayed as a editable table as shown below. Change the value of batchID from
1to2and click Replay.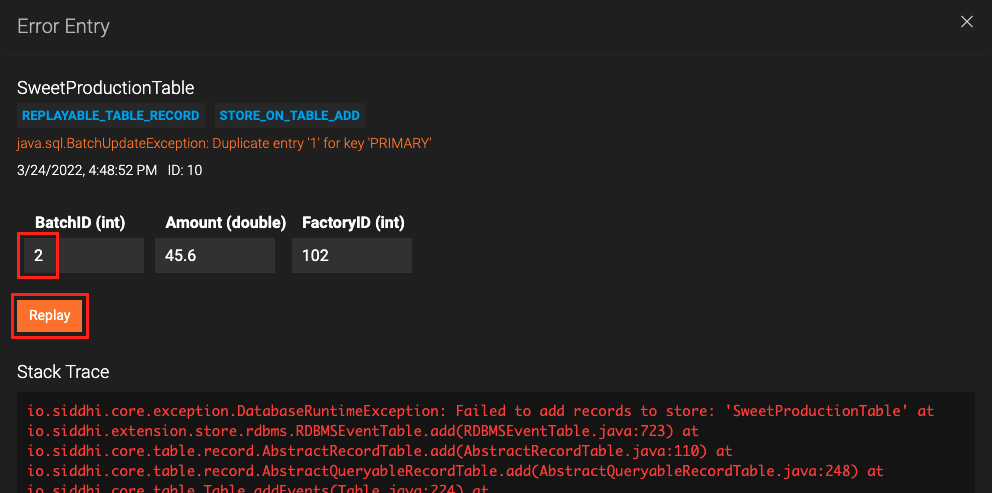
As a result, the Error Entry dialog box closes, and the Error Store Explorer dialog box is displayed with no errors.
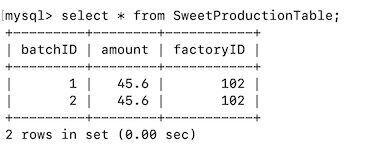
You can view the records in the
SweetProductionTableto verify if the edited event has been added successfully. To do this, issue the following MySQL command.select * from SweetProductionTable;The following is displayed
Info
The following are other types of database errors that WSO2 Streaming Integrator can capture and store in the error store so that you can correct and replay them.
- Database errors such as violation of foreign key, not null errors etc.
- Database connection errors that can occur if the database goes down when an event is published