DB Event Inbound Endpoint Example
Following are the main features of the event generator.
- Trigger an event with the data of table row when a new record is added or updated. Optionally, delete the row associated with the event after triggering the event
- Trigger an event when a boolean field is flipped in a particular table row.
What you'll build
In this example let us see how to configure DB-event Inbound Endpoint so that it can listen to data changes done to a MySQL table. Out of the features mentioned above feature no:1 is used here. Please refer to reference guide if you need to use other features.
In an enterprise system, a relational database table is used to store customer information. Customers' information is added by an external system to the database which is not in enterprise's control. As soon as a new customer is inserted, the system need to pick up and process its data. The integration runtime is used here to listen to DB changes and invoke the relevant processes. It can invoke backend APIs or place data into a message bus after required data transformations. However, for simplicity of this example, we will just log the message. You can extend the sample as required using WSO2 mediators.
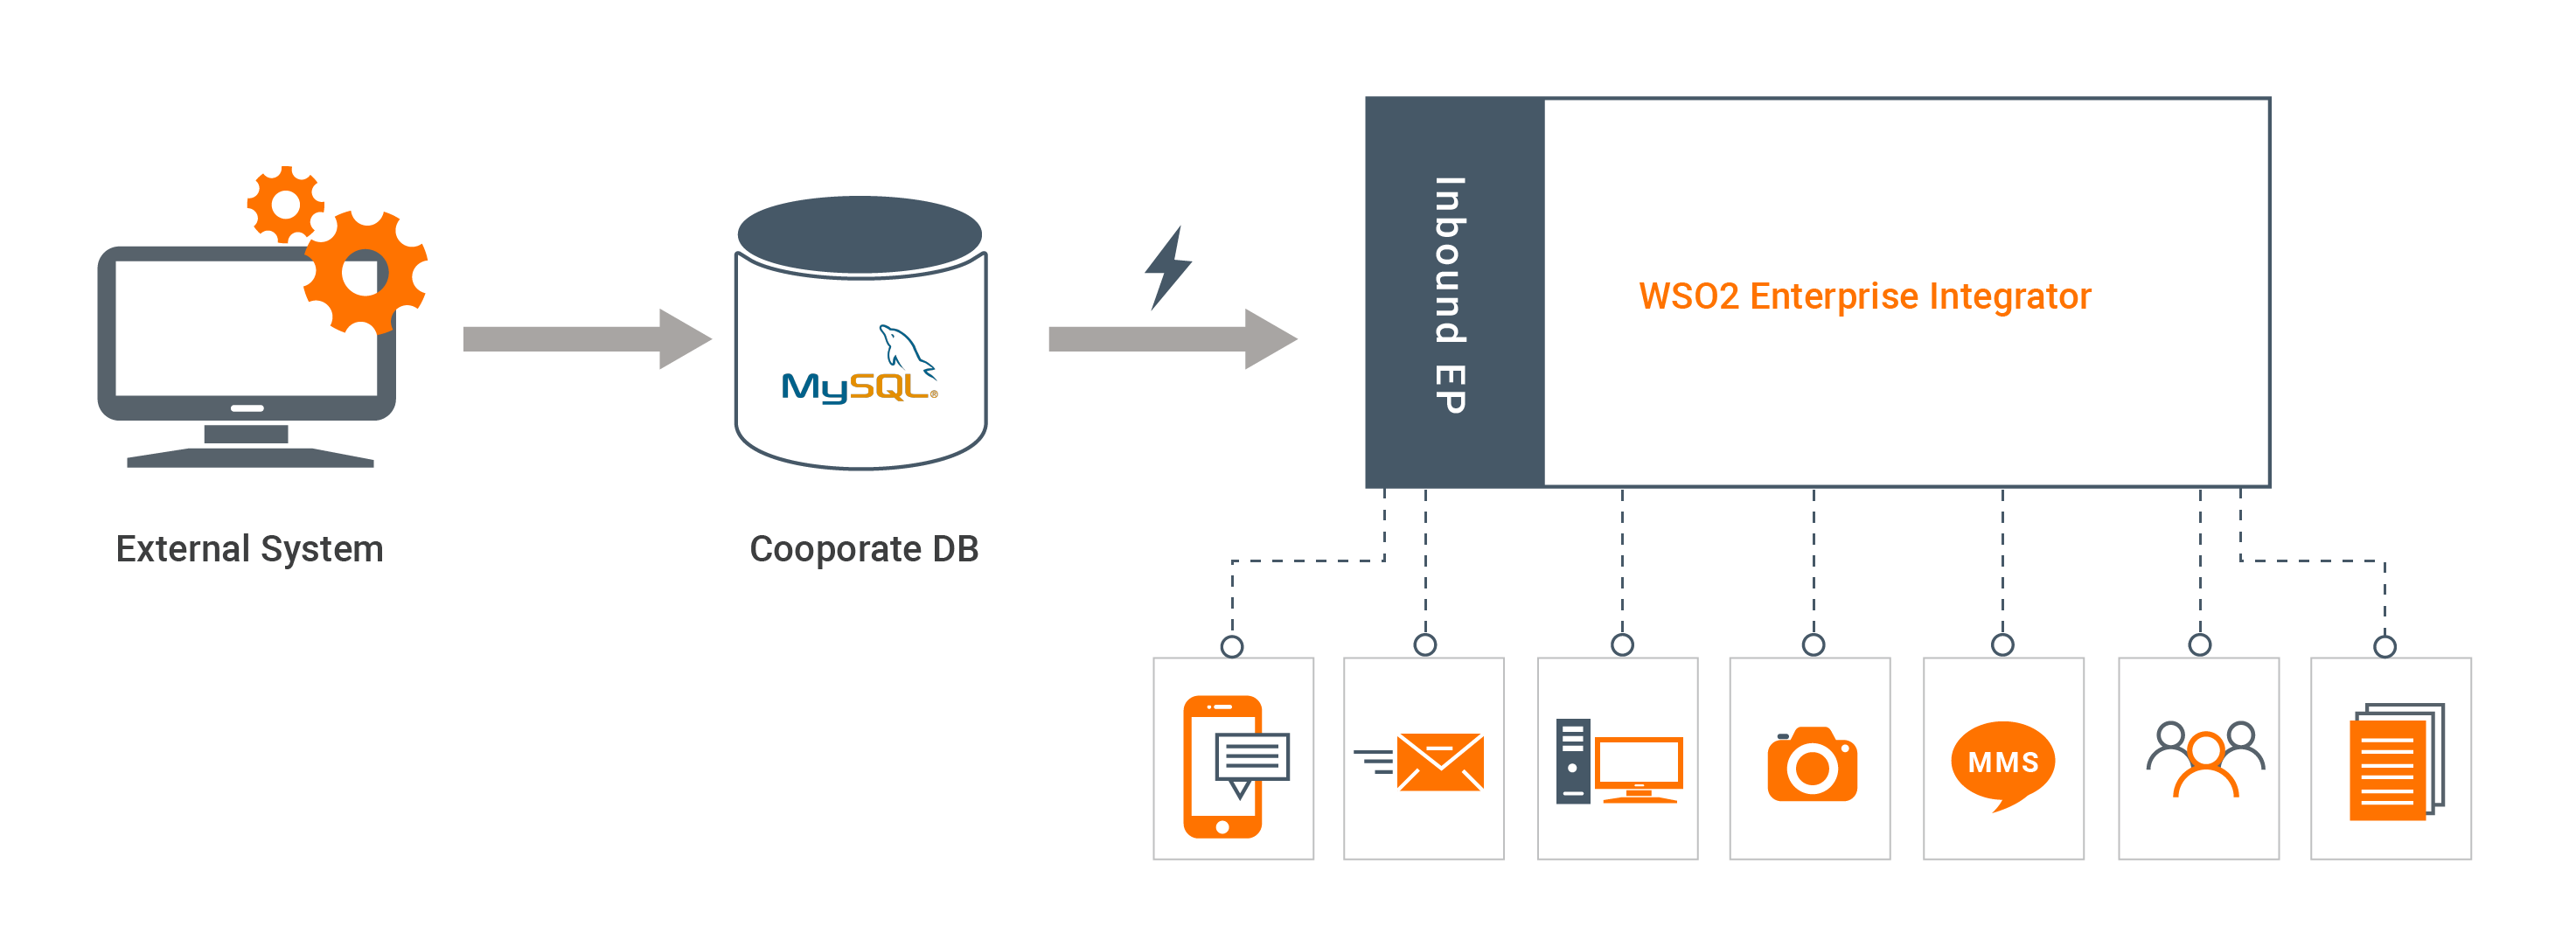
Following diagram shows the overall solution we are going to build. External system will update the MySQL DB and the integration runtime will trigger events based on the inserts and updates.

If you do not want to configure this yourself, you can simply get the project and run it.
Setting up the environment
First, install MySQL database locally. If you have a remote server, please obtain credentials required to connect. In this example, database credentials are assumed as username=root and password=root.
-
Create a database called
test. Then create a table calledCDC_CUSTOMunder that database using following SQL script.CREATE TABLE `test`.`CDC_CUSTOM` ( `ID` INT NOT NULL, `NAME` VARCHAR(45) NULL, `ADDRESS` VARCHAR(45) NULL, `AMOUNT` INT NULL, PRIMARY KEY (`ID`)); -
We need an additional column in order to track new records. If you apply this feature to an existing database table, you can alter the table as shown below. It will add a column of type
TIMESTAMP, which gets automatically updated when you insert or update of a record.ALTER TABLE CDC_CUSTOM ADD COLUMN UPDATED_AT TIMESTAMP DEFAULT CURRENT_TIMESTAMP ON UPDATE CURRENT_TIMESTAMP;
Configure inbound endpoint using WSO2 Integration Studio
-
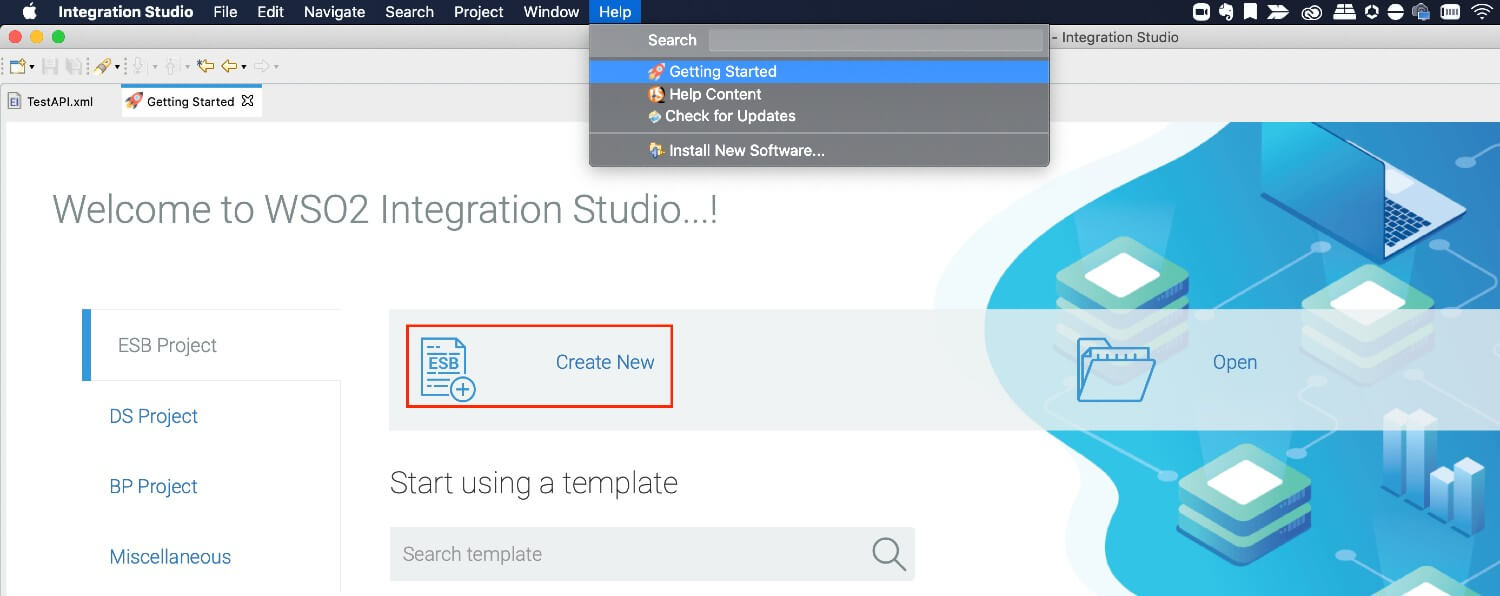
Download WSO2 Integration Studio. Create an Integration Project as below.

-
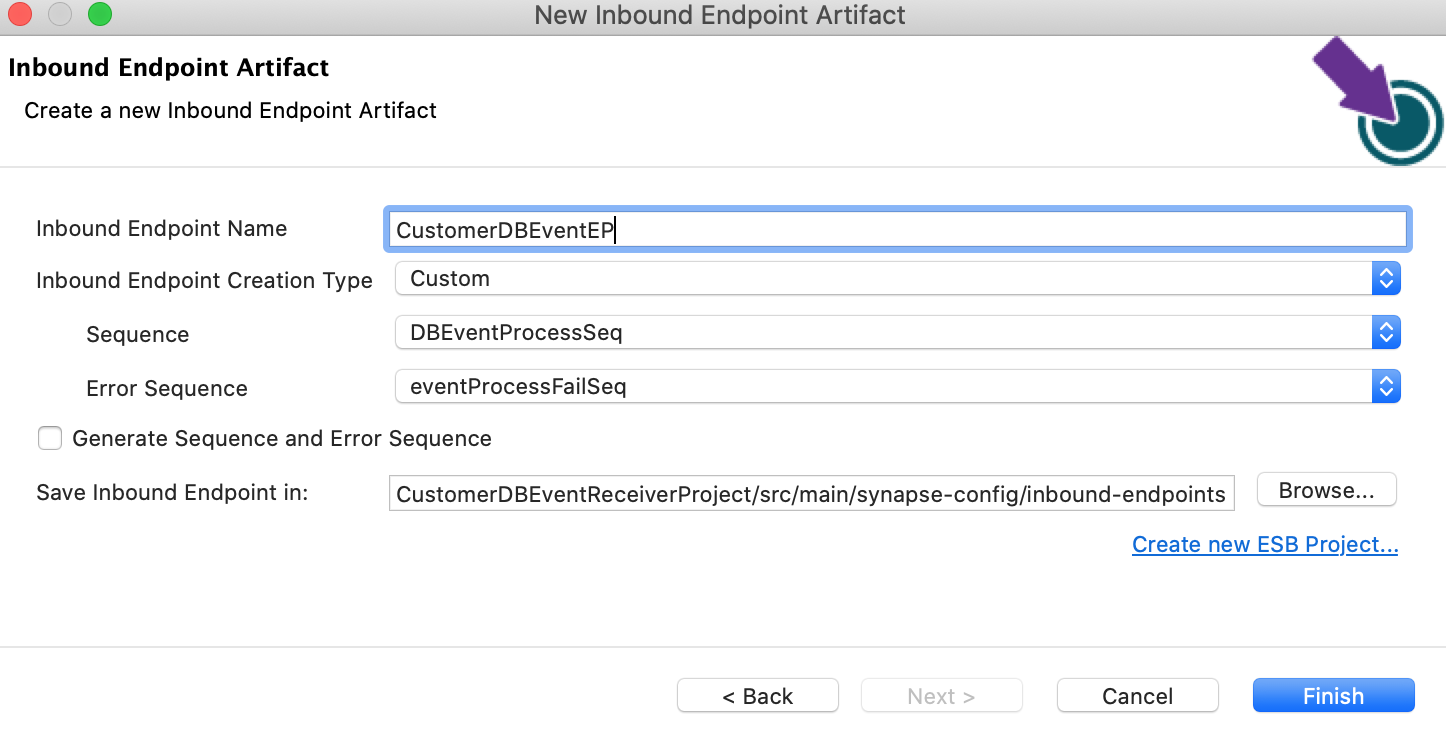
Right click on Source -> main -> synapse-config -> inbound-endpoints and add a new custom inbound endpoint.

-
Click on Inbound Endpoint in design view and under
propertiestab, update class name toorg.wso2.carbon.inbound.poll.dbeventlistener.DBEventPollingConsumer. -
Navigate to source view and update it with following config. Please note that you need to update url, username and password as required.
<?xml version="1.0" encoding="UTF-8"?>
<inboundEndpoint class="org.wso2.carbon.inbound.poll.dbeventlistener.DBEventPollingConsumer" name="CustomerDBEventEP" onError="eventProcessFailSeq" sequence="DBEventProcessSeq" suspend="false" xmlns="http://ws.apache.org/ns/synapse">
    <parameters>
        <parameter name="interval">1000</parameter>
        <parameter name="class">org.wso2.carbon.inbound.poll.dbeventlistener.DBEventPollingConsumer</parameter>
        <parameter name="sequential">true</parameter>
        <parameter name="coordination">true</parameter>
        <parameter name="inbound.behavior">polling</parameter>
        <parameter name="driverName">com.mysql.jdbc.Driver</parameter>
        <parameter name="url">jdbc:mysql://localhost/test</parameter>
        <parameter name="username">root</parameter>
        <parameter name="password">root</parameter>
        <parameter name="tableName">CDC_CUSTOM</parameter>
        <parameter name="filteringCriteria">byLastUpdatedTimestampColumn</parameter>
        <parameter name="filteringColumnName">UPDATED_AT</parameter>
        <parameter name="primaryKey">ID</parameter>
        <parameter name="connectionValidationQuery">SELECT 1</parameter>
        <parameter name="registryPath">dbEventIE/timestamp</parameter>
    </parameters>
</inboundEndpoint>
Exporting Integration Logic as a CApp
CApp (Carbon Application) is the deployable artefact on the integration runtime. Let us see how we can export integration logic we developed into a CApp. To export the Solution Project as a CApp, a Composite Application Project needs to be created. Usually, when a solution project is created, this project is automatically created by Integration Studio. If not, you can specifically create it by navigating to File -> New -> Other -> WSO2 -> Distribution -> Composite Application Project.
-
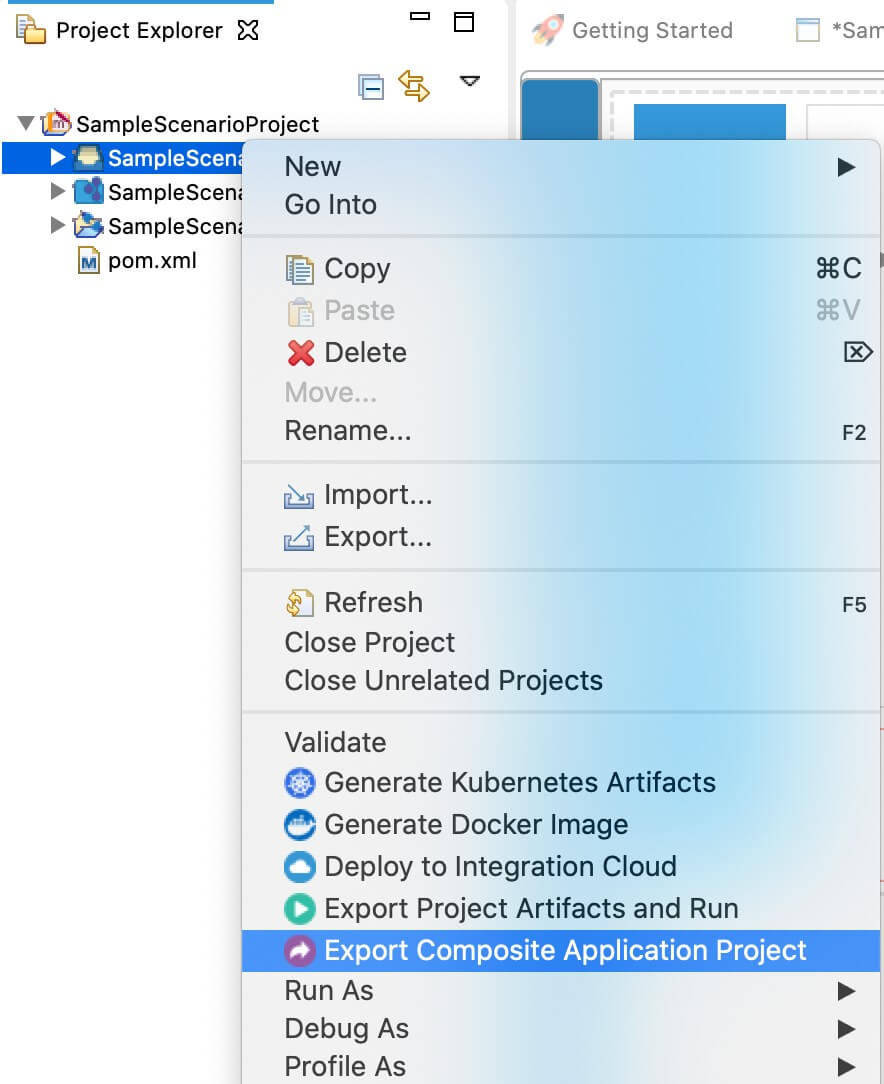
Right click on Composite Application Project and click on Export Composite Application Project.

-
Select an Export Destination where you want to save the .car file.
-
In the next Create a deployable CAR file screen, select inbound endpoint and sequence artifacts and click Finish. The CApp will get created at the specified location provided at the previous step.
Get the project
You can download the ZIP file and extract the contents to get the project code.
Tip
You may need to update the database details and make other such changes before deploying and running this project.
Deploying on WSO2 Enterprise Integrator
-
Navigate to the connector store and search for
DB Event Listener. Click onDB Event Listenerand download the .jar file by clicking onDownload Inbound Endpoint. Copy this .jar file into the/lib folder. -
Download
mysql-connector-javaassociated withMySQLserver version and add it to the/lib folder.` -
Copy the exported carbon application to the
<PRODUCT-HOME>/repository/deployment/server/carbonappsfolder. -
Start the server
Now the integration runtime will start listening to the data changes of CDC_CUSTOM table.
Testing
Adding a new record
- Using MySQL terminal, execute the following SQL to insert a new customer record into the table.
INSERT INTO `test`.`CDC_CUSTOM` (`ID`, `NAME`, `ADDRESS`, `AMOUNT`) VALUES (001, "john", "22/3, Tottenham Court, London" , 1000); -
You can see a log entry in WSO2 server console similar to the following.
[2020-03-26 17:40:00,871] INFO {org.apache.synapse.mediators.builtin.LogMediator} - To: , MessageID: urn:uuid:4B1D55C3ABCEE82B961585224600739, Direction: request, message = event received, Envelope: <?xml version='1.0' encoding='utf-8'?><soapenv:Envelope xmlns:soapenv="http://www.w3.org/2003/05/soap-envelope"><soapenv:Body><Record><ID>1</ID><NAME>john</NAME><ADDRESS>22/3, Tottenham Court, London</ADDRESS><AMOUNT>1000</AMOUNT><PAID>false</PAID><UPDATED_AT>2020-03-26 16:57:57.0</UPDATED_AT></Record></soapenv:Body></soapenv:Envelope> -
If you add another new record, only that new record will get notified to the integration runtime and the old records will be ignored.
Update an existing record
- Using MySQL terminal, execute the following SQL to update the added record.
UPDATE `test`.`CDC_CUSTOM` SET AMOUNT = 2000 WHERE ID = 001; - You can see a log entry in WSO2 server console similar to the following.
[2020-03-27 18:13:06,906] INFO {org.apache.synapse.mediators.builtin.LogMediator} - To: , MessageID: urn:uuid:1958A94F892D158A661585312986834, Direction: request, message = event received, Envelope: <?xml version='1.0' encoding='utf-8'?><soapenv:Envelope xmlns:soapenv="http://www.w3.org/2003/05/soap-envelope"><soapenv:Body><Record><ID>1</ID><NAME>john</NAME><ADDRESS>22/3, Tottenham Court, London</ADDRESS><AMOUNT>2000</AMOUNT><PAID>false</PAID><UPDATED_AT>2020-03-27 18:13:06.0</UPDATED_AT></Record></soapenv:Body></soapenv:Envelope>
Note: You can do any type of advanced integration using the rich mediator catalog, not just logging.
What's Next
- To customize this example for your own scenario, see DB Event Inbound Endpoint Configuration documentation for all configuration options of the endpoint.
