Control the number of retries and delay message in case of error
This sample demonstrates how the WSO2 Micro Integrator can guarantee message delivery to an endpoint by controlling the number of delivery retries during errors. You can also configure a delay in message delivery from the RabbitMQ broker.
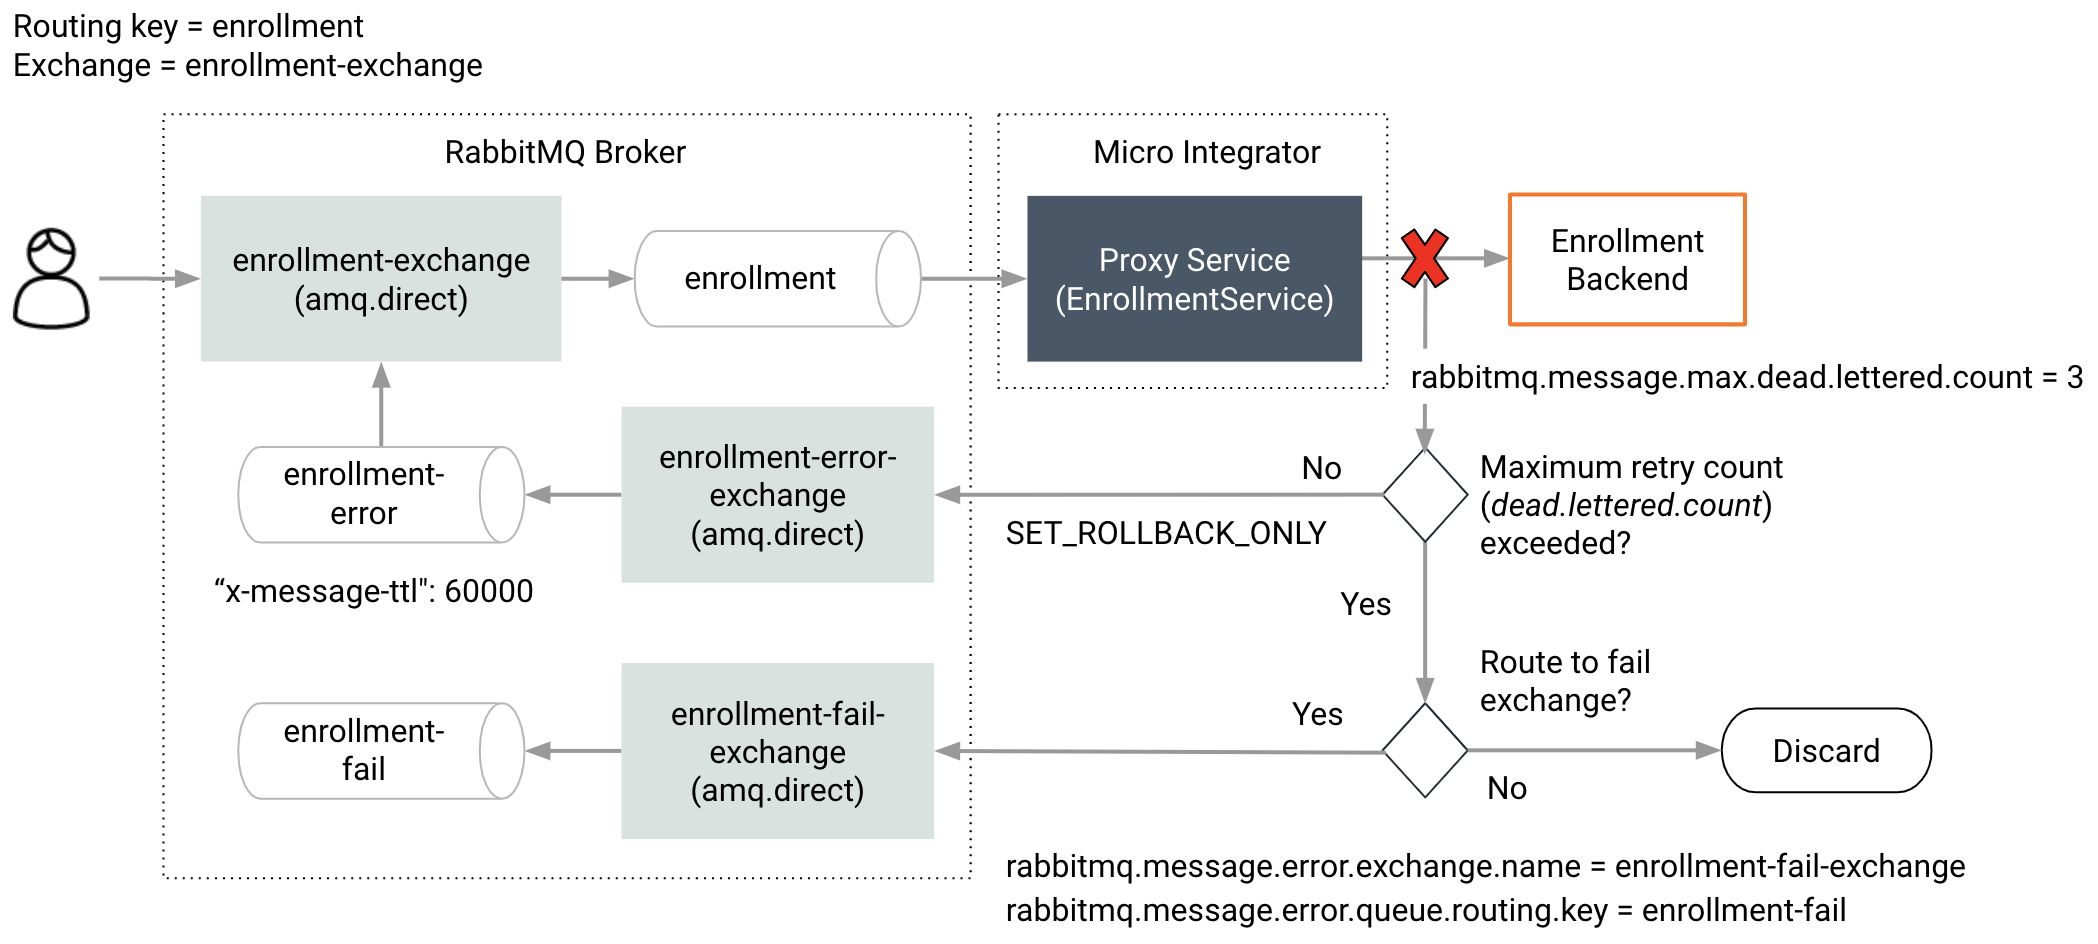
- The Micro Integrator first consumes a message from RabbitMQ and attempts to deliver it to the endpoint.
- When there is an error in delivery, the
SET_ROLLBACK_ONLYproperty in the Micro Integrator moves the message to the dead letter exchange (DLX) configured in RabbitMQ. - The message will then be re-queued by RabbitMQ subject to a specified delay. Note that you have to configure this delay in the RabbitMQ broker itself (using the
x-message-ttlproperty). - If the message delivery to the endpoint continuous to fail, the Micro Integrator will retry for the number times specified by the
rabbitmq.message.max.dead.lettered.countparameter in the proxy. - When the maximum retry count is exceeded, the message will be either discarded or moved to a different
queue in RabbitMQ (specified by the
rabbitmq.message.error.exchange.nameandrabbitmq.message.error.queue.routing.keyparameters in the proxy.
Synapse configurations
See the instructions on how to build and run this example.
<?xml version="1.0" encoding="UTF-8"?>
<proxy xmlns="http://ws.apache.org/ns/synapse"
    name="EnrollmentService"
    startOnLoad="true"
    statistics="disable"
    trace="disable"
    transports="rabbitmq">
   <target>
    <inSequence>
      <log level="custom">
          <property expression="$body" name="Message Received"/>
      </log>
      <call blocking="true">
          <endpoint>
            <http uri-template="http://localhost:8280/enrollment"/>
          </endpoint>
      </call>
      <log level="custom">
          <property name="Status" value="The message process successfully"/>
      </log>
    </inSequence>
    <faultSequence>
      <log level="custom">
          <property name="Status" value="Could not process the message"/>
      </log>
      <property name="SET_ROLLBACK_ONLY" scope="axis2" value="true"/>
    </faultSequence>
   </target>
   <parameter name="rabbitmq.queue.autodeclare">false</parameter>
   <parameter name="rabbitmq.message.max.dead.lettered.count">3</parameter>
   <parameter name="rabbitmq.exchange.name">enrollment-exchange</parameter>
   <parameter name="rabbitmq.queue.auto.ack">false</parameter>
   <parameter name="rabbitmq.queue.name">enrollment</parameter>
   <parameter name="rabbitmq.queue.autodeclare">false</parameter>
   <parameter name="rabbitmq.connection.factory">AMQPConnectionFactory</parameter>
   <description/>
</proxy>
Build and run
- Make sure you have a RabbitMQ broker instance running.
-
Declare exchange to route enrollment
rabbitmqadmin declare exchange --vhost=/ --user=guest --password=guest name=enrollment-exchange type=direct durable=true -
Declare a queue to store enrollment. At the same time define DLX, DLK to control the error scenario.
rabbitmqadmin declare queue --vhost=/ --user=guest --password=guest name=enrollment durable=true arguments='{"x-dead-letter-exchange": "enrollment-error-exchange", "x-dead-letter-routing-key": "enrollment-error"}' -
Bind enrollment with enrollment-exchange.
rabbitmqadmin declare binding --vhost=/ --user=guest --password=guest source=enrollment-exchange destination=enrollment routing_key=enrollment -
Declare exchange to route enrollment-error.
rabbitmqadmin declare exchange --vhost=/ --user=guest --password=guest name=enrollment-error-exchange type=direct durable=true -
Declare queue to store enrollment-error. Define DLX, DLK and TTL for control retries and delay message.
rabbitmqadmin declare queue --vhost=/ --user=guest --password=guest name=enrollment-error durable=true arguments='{"x-dead-letter-exchange": "enrollment-exchange", "x-dead-letter-routing-key": "enrollment", "x-message-ttl": 60000}' -
Bind enrollment-error with enrollment-error-exchange.
rabbitmqadmin declare binding --vhost=/ --user=guest --password=guest source=enrollment-error-exchange destination=enrollment-error routing_key=enrollment-error - Create an integration project with an ESB Configs module and an Composite Exporter.
- Create the proxy service with the configurations given above.
- Enable the RabbitMQ sender and receiver in the Micro-Integrator from the deployment.toml. Refer the configuring RabbitMQ documentation for more information.
- Deploy the artifacts in your Micro Integrator.
- Make the
http://localhost:8280/enrollmentendpoint unavailable temporarily. - Publish a message to the enrollment queue.
- You will see that the failed message will be retried 3 times for delivery by the EnrollmentService proxy and then be discarded.