A topic used to broadcast a message to all consumers
This sample demonstrates how WSO2 Micro Integrator can be used to implement a publisher-subscriber messaging scenario using RabbitMQ topics. That is, a message publisher can broadcast a message to multiple consumers through the RabbitMQ topic.
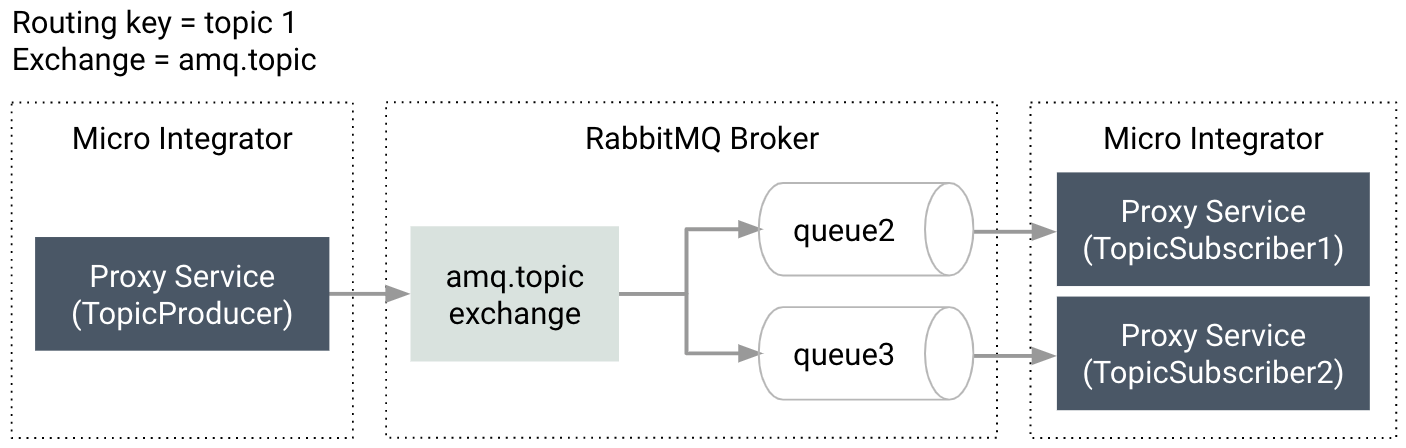
As shown below, the publisher proxy in the Micro Integrator will publish messages to a RabbitMQ topic, which multiple subscriber proxies (defined in the Micro Integrator) will consume.
Synapse configurations
See the instructions on how to build and run this example.
<?xml version="1.0" encoding="UTF-8"?><proxy xmlns="http://ws.apache.org/ns/synapse" name="TopicSubscriber1" transports="rabbitmq" startOnLoad="true">
<description/>
<target>
    <inSequence>
        <log level="custom">
            <property name="Message Received" expression="//Message"/>
        </log>
        <call>
            <endpoint>
                <http uri-template="http://localhost:8280/employees" method="post"/>
            </endpoint>
        </call>
    </inSequence>
</target>
<parameter name="rabbitmq.queue.routing.key">topic1</parameter>
<parameter name="rabbitmq.exchange.name">amq.topic</parameter>
<parameter name="rabbitmq.queue.name">queue2</parameter>
<parameter name="rabbitmq.connection.factory">AMQPConnectionFactory</parameter>
</proxy>
<?xml version="1.0" encoding="UTF-8"?><proxy xmlns="http://ws.apache.org/ns/synapse" name="TopicSubscriber2" transports="rabbitmq" startOnLoad="true">
<description/>
<target>
    <inSequence>
        <log level="custom">
            <property name="Message Received" expression="//Message"/>
        </log>
        <call>
            <endpoint>
                <http uri-template="http://localhost:8280/employees" method="post"/>
            </endpoint>
        </call>
    </inSequence>
</target>
<parameter name="rabbitmq.queue.routing.key">topic1</parameter>
<parameter name="rabbitmq.exchange.name">amq.topic</parameter>
<parameter name="rabbitmq.queue.name">queue3/parameter>
<parameter name="rabbitmq.connection.factory">AMQPConnectionFactory</parameter>
</proxy>
<?xml version="1.0" encoding="UTF-8"?><proxy xmlns="http://ws.apache.org/ns/synapse" name="TopicPublisher" transports="http https" startOnLoad="true">
<description/>
<target>
<inSequence>
<property name="OUT_ONLY" value="true"/>
<property name="FORCE_SC_ACCEPTED" value="true" scope="axis2"/>
<send>
<endpoint>
<address uri="rabbitmq:/topic1?rabbitmq.server.host.name=localhost&rabbitmq.server.port=5672&rabbitmq.server.user.name=guest&rabbitmq.server.password=guest&rabbitmq.exchange.name=amq.topic"/>
</endpoint>
</send>
</inSequence></target></proxy>
Build and run
Create the artifacts:
- Set up WSO2 Integration Studio.
- Create an integration project with an ESB Configs module and an Composite Exporter.
- Create the proxy service with the configurations given above.
- Enable the RabbitMQ sender and receiver in the Micro-Integrator from the deployment.toml. Refer the configuring RabbitMQ documentation for more information.
- Deploy the artifacts in your Micro Integrator.
- Make sure you have a RabbitMQ broker instance running.
- Create queue1 and queue2 and add bind them in the
amq.topicexchange with the routing keytopic1. -
Publish the following payload to the topic using the publisher proxy (TopicPublisher).
<Message>
<Name>John Doe</Name>
<Age>27</Age>
</Message>