A queue used to deliver a message to a consumer
This example demonstrates how WSO2 Micro Integrator can be used to implement an asynchronous point-to-point messaging scenario using queues in a RabbitMQ broker instance.
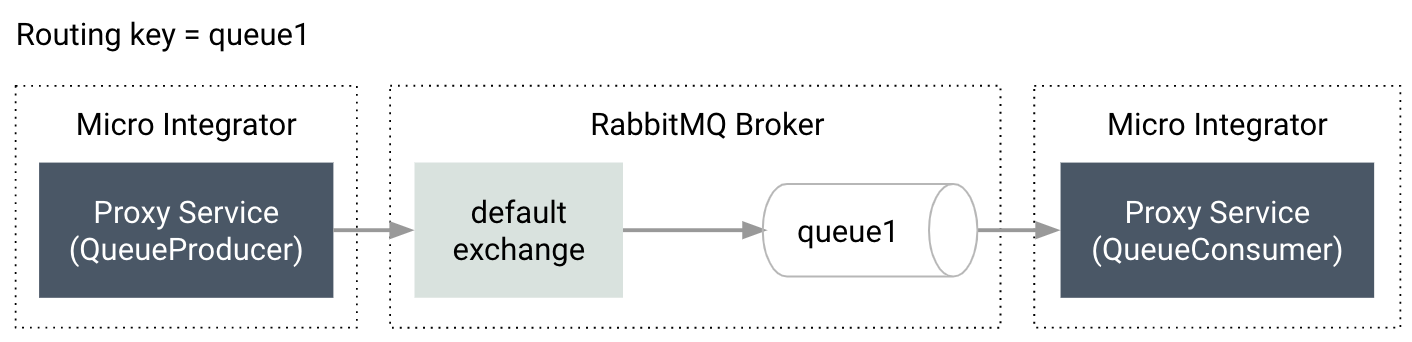
As shown below, a proxy service configured in the Micro Integrator sends messages to the RabbitMQ queue, which are then consumed by another proxy service in the Micro Integrator.
Synapse configurations
See the instructions on how to build and run this example.
<?xml version="1.0" encoding="UTF-8"?><proxy xmlns="http://ws.apache.org/ns/synapse" name="QueueConsumer" transports="rabbitmq" startOnLoad="true">
  <description/>
  <target>
      <inSequence>
          <log level="custom">
              <property name="Message Received" expression="//Message"/>
          </log>
          <call>
              <endpoint>
                  <http uri-template="http://localhost:8280/employees" method="post"/>
              </endpoint>
          </call>
      </inSequence>
  </target>
  <parameter name="rabbitmq.queue.name">queue1</parameter>
  <parameter name="rabbitmq.connection.factory">AMQPConnectionFactory</parameter>
</proxy>
<?xml version="1.0" encoding="UTF-8"?>
<proxy xmlns="http://ws.apache.org/ns/synapse"
name="QueueProducer"
transports="http https"
startOnLoad="true">
<description/>
<target>
<inSequence>
<property name="OUT_ONLY" value="true"/>
<property name="FORCE_SC_ACCEPTED" value="true" scope="axis2"/>
<send>
<endpoint>
<address uri="rabbitmq:/queue1?rabbitmq.server.host.name=localhost&rabbitmq.server.port=5672&rabbitmq.server.user.name=guest&rabbitmq.server.password=guest”/>
</endpoint>
</send>
</inSequence>
</target>
</proxy>
Build and run
Create the artifacts:
- Set up WSO2 Integration Studio.
- Create an integration project with an ESB Configs module and an Composite Exporter.
- Create the proxy service with the configurations given above.
- Enable the RabbitMQ sender and receiver in the Micro-Integrator from the deployment.toml. Refer the configuring RabbitMQ documentation for more information.
- Deploy the artifacts in your Micro Integrator.
- Make sure you have a RabbitMQ broker instance running.
- Configure a queue named
queue1with required exchanges and routing keys. -
Send the following payload to the RabbitMQ publisher proxy (QueueProducer).
<Message>
<Name>John Doe</Name>
<Age>27</Age>
</Message>