Installing Siddhi Extensions
Streaming Integrator Tooling uses Siddhi extensions to connect with various data sources. Siddhi extensions can be installed or uninstalled using the Extension Installer.
Tip
The Extension Installer can install/uninstall extensions within Streaming Integrator Tooling. When deploying Siddhi applications in Streaming Integrator Server, these have to be manually done. For more information, see Downloading and Installing Siddhi Extensions.
Managing Siddhi extensions
The following topics cover how to manage Siddhi extensions in Streaming Integrator Tooling
Finding the Siddhi extensions to install/uninstall
To access the Extension installer and find the extensions you need to install/uninstall, follow the steps below:
-
To start Streaming Integrator Tooling, navigate to the
<SI_TOOLING_HOME>/bindirectory and issue the appropriate command out of the following based on your operating system:-
For Windows:
tooling.bat -
For Linux:
./tooling.sh
-
-
Click Tools menu option, and then click Extension Installer.
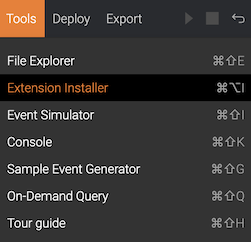
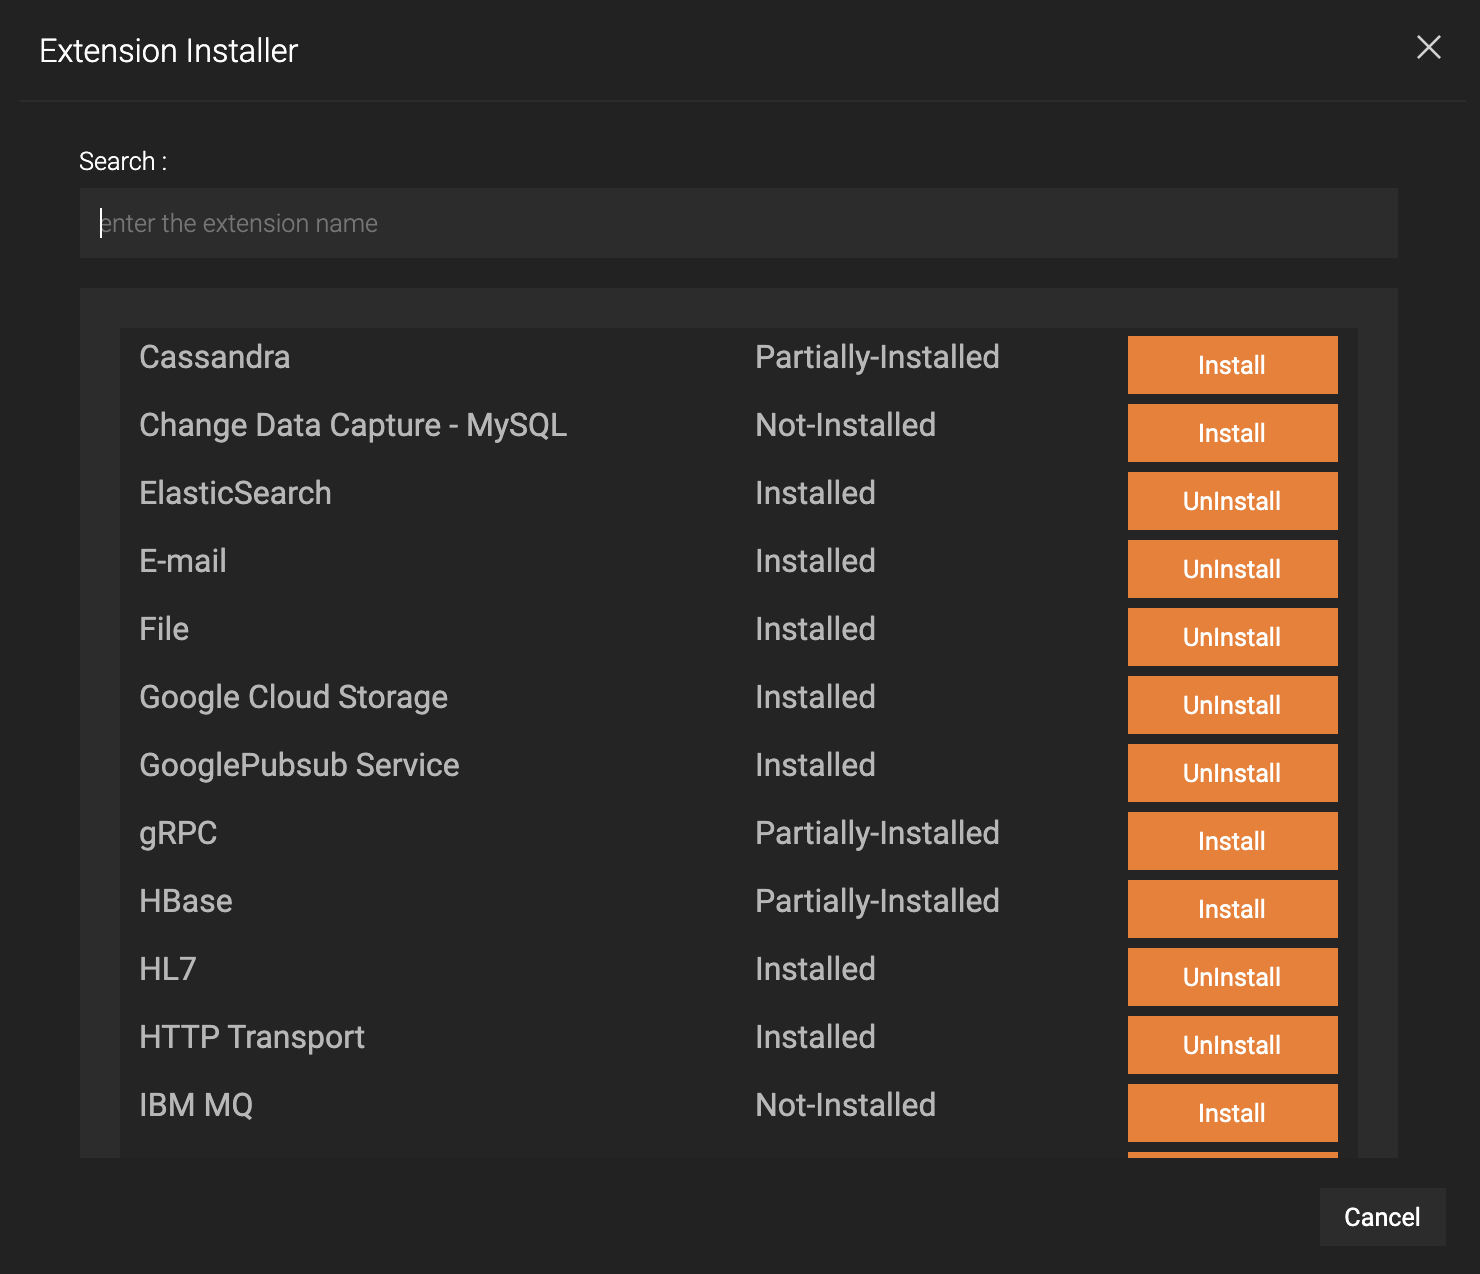
The Extension Installer dialog box opens as shown below.
-
Locate the extension that you want to install/uninstall. You can enter the name, or a part of the name of the relevant extension in the Search field. It filters one or more extensions that match the entered key word.
Info
The status of the extension can be one of the following.
- Installed
This indicates that the extension is completely installed. The installation includes the JAR of the extension itself as well as all its dependencies (if any).
- Not-Installed
This indicates that the extension has not been installed. The JAR of the extension itself has not been installed. Dependencies (if any) may be already installed due to shared dependencies. For more information about shared dependencies, see step 2 of Un-installing an extension.
- Partially-Installed
This indicates that the JAR of the extension itself has been installed, but one or more dependencies of the extension still need to be installed.
If these extensions need to be manually installed, it is indicated by an information icon next to the status. For more information, see Manually installable dependencies.
- Restart-Required
This indicates that you need to restart Streaming Integrator Tooling in order to complete the installation/un-installation of the extension.
Installing an extension
-
To install an extension, click Install for it.

Then click Install in the confirmation dialog box that appears to confirm whether you want to proceed with the installation.
-
Once the installation is complete, restart Streaming Integrator Tooling.
After restarting Streaming Integrator Tooling, you can open the Extension installer and view the extension you installed with the updated status.

Uninstalling an extension
-
To uninstall an extension, click UnInstall for it.

Then click UnInstall in the confirmation dialog box that appears to confirm whether you want to proceed to uninstall the extension.
-
If the extension you are uninstalling has shared dependencies with one or more other extensions, a message appears with information as shown in the example below.
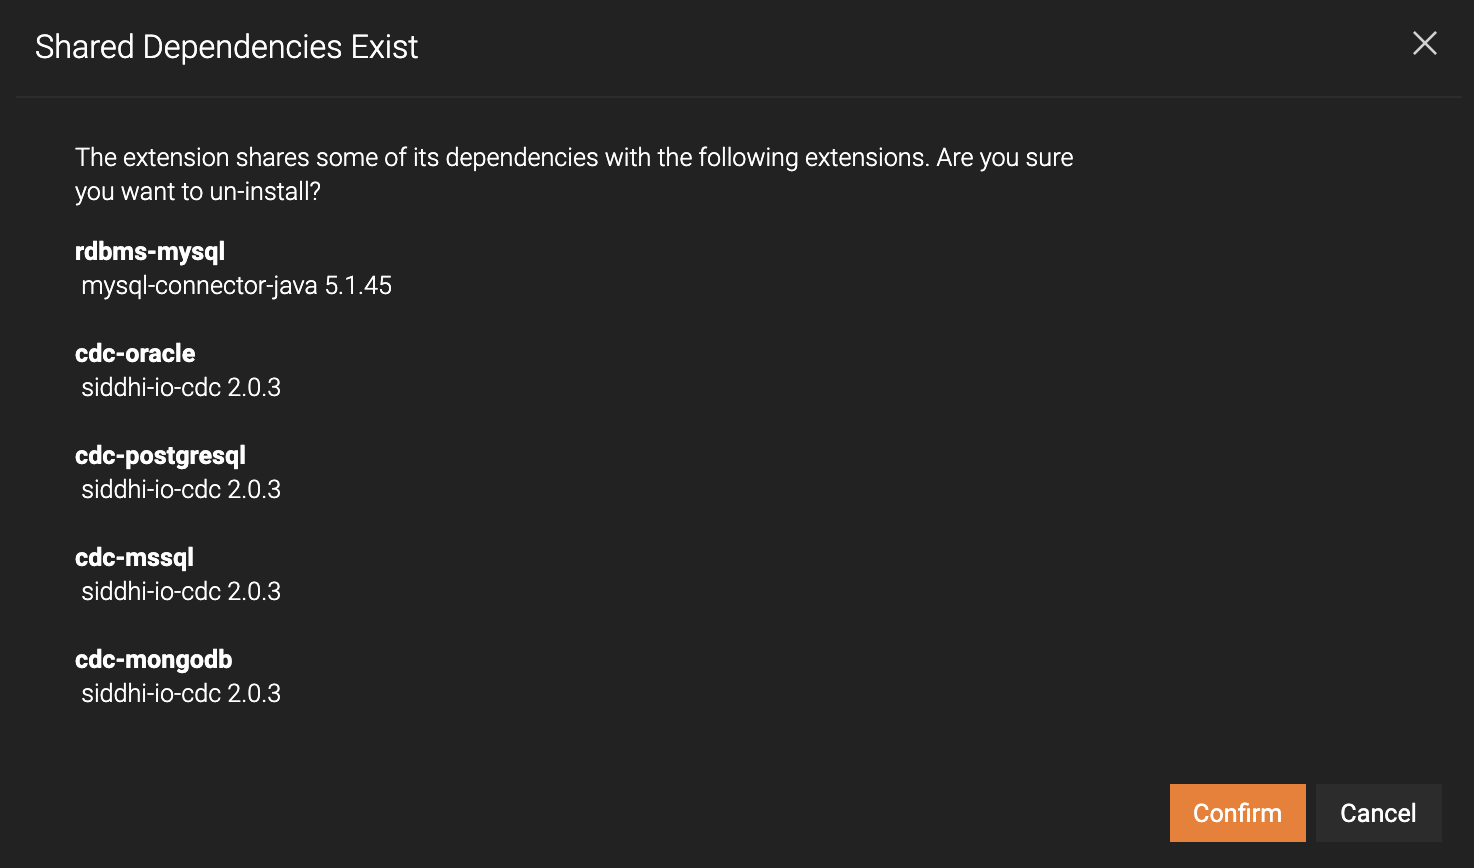
The names of the other extensions are in bold. The dependencies each extension shares with the extension you are deleting are listed under the extension name. In this example, the extension being uninstalled shares the
mysql-connector-javadependency with therdbms-mysqlextension, and thesiddhi-io-cdcdependency with thecdc-oracle,cdc-postgresql,cdc-mssql, andcdc-mongodbextensions.If you want to proceed, click Confirm.
Note
If you click Confirm the other extensions that use the shared dependencies lose some of their dependencies. Therefore, if you need to continue to use those extensions, you need to reinstall them.
If there are no shared dependencies, click UnInstall in the confirmation dialog that appears to confirm whether you want to proceed to un-install the extension.
-
Once the uninstallation is completed, restart Streaming Integrator Tooling for the uninstallation to be effective.
Manually installable dependencies
Certain dependencies of some extensions cannot be automatically downloaded via the Extension Installer. These dependencies should be manually downloaded and installed in order to complete the installation of the extensions that use them.
When there is at least one such dependency for an extension, an icon is displayed next to the status of the extension as shown below.

Click this information to open a dialog box as shown below with information about the dependency.
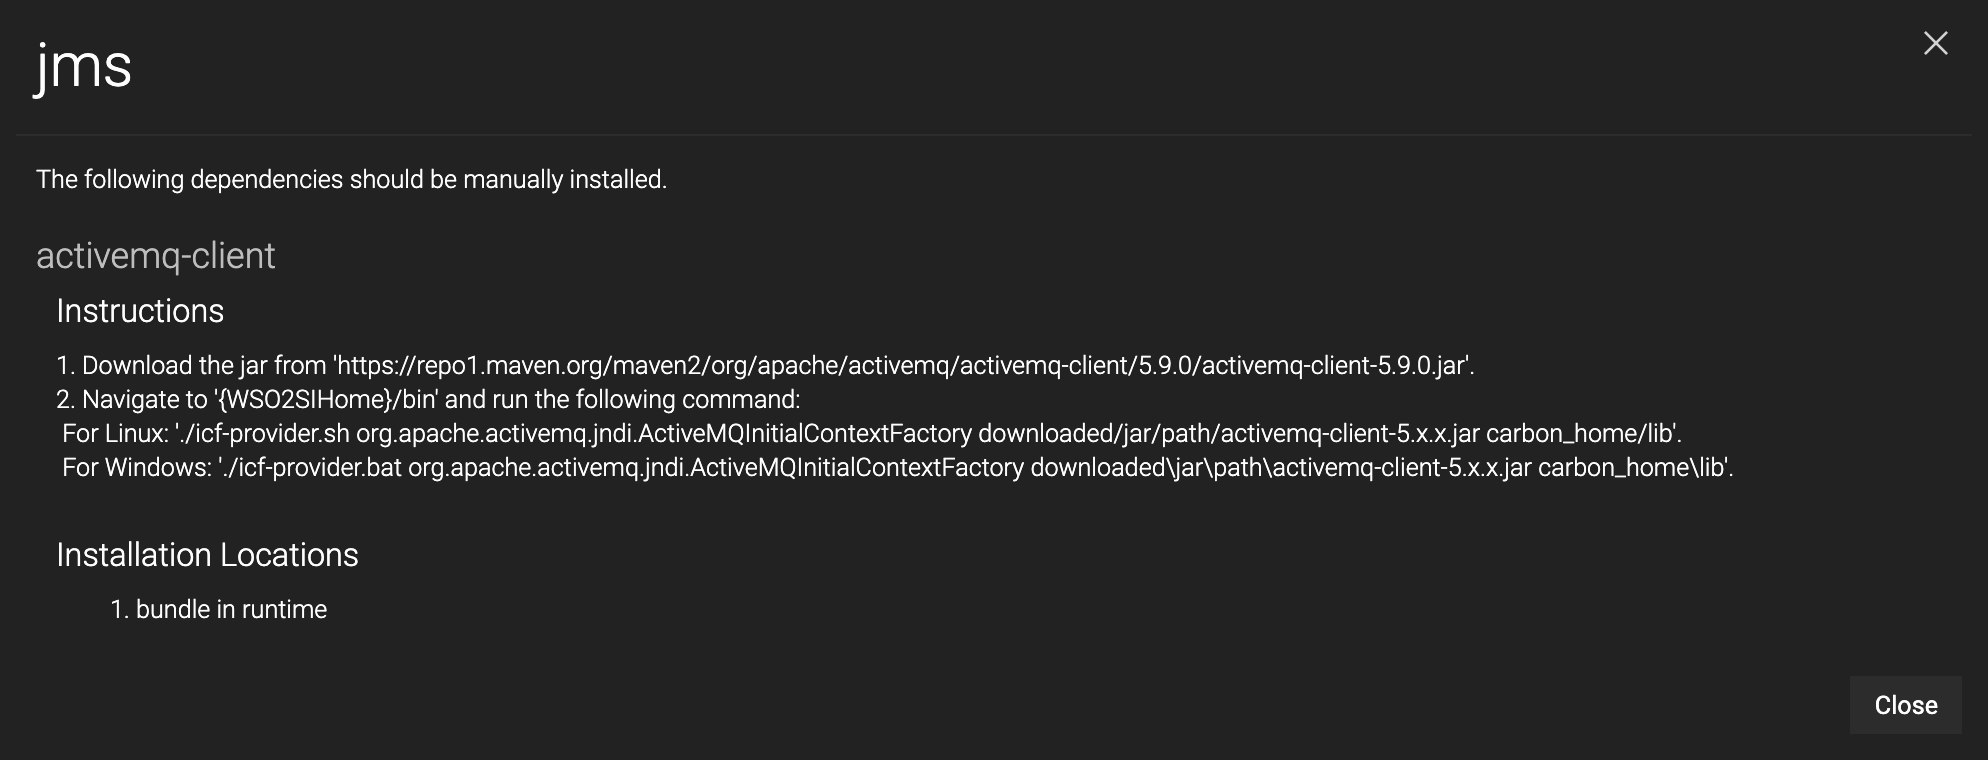
The dialog box displays all the dependencies that need to be manually installed. For each dependency, the dialog box provides the following information.
-
Instructions to download (and depending on the dependency, to convert) the JAR of the dependency.
-
Installation Location where the downloaded JAR (and depending on the dependency, the converted OSGi bundle) needs to be placed in order to install the dependency. The following table specifies the directory in which you need to place the JAR/OSGi bundle depending on the installation location.
Installation Location Directory bundle in runtime Place the OSGi bundle you downloaded/converted in either the <SI_HOME>/libor the<SI_HOME>/bundlesdirectory based on the instructions.jar in runtime Place the non-OSGi bundle you downloaded in the <SI_HOME>/jarsdirectory.jar in samples Place the non-OSGi bundle you downloaded in the <SI_HOME>/samples/sample-clients/libdirectory.
Configuring Extension Dependencies
Configurations of extensions are loaded from the <SI_HOME>/wso2/server/resources/extensionsInstaller/extensionDependencies.json configuration file.
When you are working with custom extensions, and if you want a custom extension to be installable from the Extension Installer, you need to add the configuration of the extension to this configuration file.
The configuration of an extension is a JSON object that looks as follows:
    "<extension_name>": {
      "extension": {...},
      "dependencies": [
        {...},
        {...}
      ]
    }
<extension_name> which is the key of this JSON object, is the uniquely identifiable name of the extension. The extension is described under extension.
extension
This object contains information about the extension, denoted by the following properties.
| Property | Description |
|---|---|
name
|
The uniquely identifiable name of the extension. |
displayName
|
The displayable name of the extension. |
version
|
The version of the extension. |
The following is an example of the extension object, taken from the configuration of the jms extension.
  "jms": {

    "extension": {
      "name": "jms",
      "displayName": "JMS",
      "version": "2.0.2"
    },

    "dependencies": [...]
  }
dependencies
This is an array. Each member of this array is an object that denotes information of a dependency of the extension via the following properties.
Info
The jar of the Siddhi extension itself should be added as a dependency too. e.g., In the configuration of the jms extension, you can see that siddhi-io-jms has been listed as a dependency under dependencies.
| Property | Description |
|---|---|
name
|
The uniquely identifiable name of the dependency. If this dependency denotes the jar of the Siddhi extension itself, it starts with siddhi-.
|
version
|
The version of the dependency. |
download |
This denotes download information of the dependency via the following properties.
|
usages
|
This is an array. Each member of this array is an object that denotes a directory where the jar of the dependency needs to be placed. Each such directory (location) is denoted by the following properties:
|
lookupRegex
|
The regex pattern for the file name of the JAR. This is useful for to looking up and detecting whether the JAR is available in the locations mentioned under usages.
|
The following examples, taken from the configuration of the jms extension, show the members of the dependencies array.
Example 1: Auto downloadable dependency
This denotes the hawtbuf dependency of the jms extension, which is auto downloadable from the URL specified in download.url.
  "jms": {
    "extension": {...},

    "dependencies": [

      {
        "name": "hawtbuf",
        "version": "1.9",
        "download": {
          "autoDownloadable": true,
          "url": "https://repo1.maven.org/maven2/org/fusesource/hawtbuf/hawtbuf/1.9/hawtbuf-1.9.jar"
        },
        "usages": [
          {
            "type": "BUNDLE",
            "usedBy": "RUNTIME"
          },
          {
            "type": "JAR",
            "usedBy": "SAMPLES"
          }
        ],
        "lookupRegex": "hawtbuf([_-])1.9.jar"
      },

      ...
    ]
  }
Example 2: Manually installable dependency
This denotes the activemq-client dependency of the jms extension. This dependency needs to be manually downloaded, and the conversions should be done based on the given download.instructions.
  "jms": {
    "extension": {...},

    "dependencies": [
      ...,

      {
        "name": "activemq-client",
        "version": "5.9.0",
        "download": {
          "autoDownloadable": false,
          "instructions": "Download the jar from 'https://repo1.maven.org/maven2/org/apache/activemq/activemq-client/5.9.0/activemq-client-5.9.0.jar' and convert ..."
        },
        "usages": [
          {
            "type": "BUNDLE",
            "usedBy": "RUNTIME"
          }
        ],
        "lookupRegex": "activemq([_-])client([_-])5.9.0(.*).jar"
      }
    ]
  }