Configuring a Micro Integrator Cluster
See the instructions on how to set up a cluster of WSO2 Micro Integrator nodes in an on-premise VM deployment. A third-party load balancer is used for this deployment.
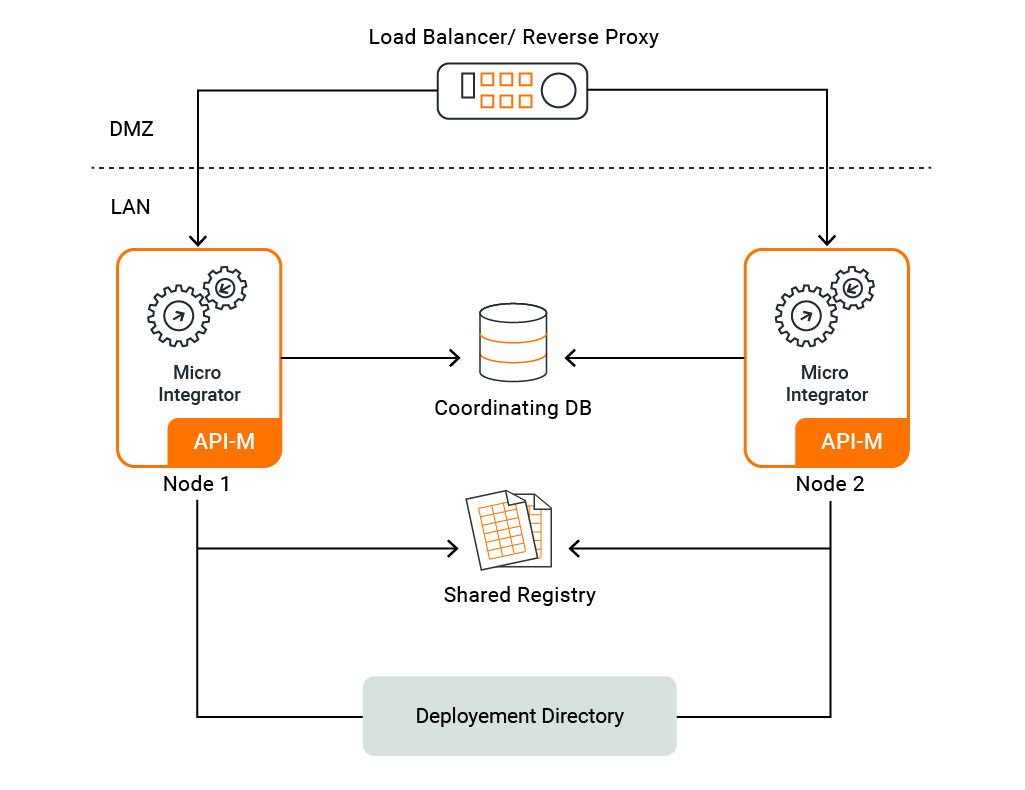
The deployment pattern
This deployment scenario is a two-node Micro Integrator deployment. That is, two Micro Integrator nodes are configured to serve requests with high availability and scalability. The product nodes in the deployment are fronted by an external third-party load balancer, which routes requests to the two nodes on a round-robin basis.
Install the Micro Integrator
Download and install WSO2 Micro Integrator.
Let's set up two instances of the Micro Integrator server.
Hostnames
Open the deployment.toml file (stored in the <MI_HOME>/conf folder) of each server instance and update the hostname.
[server]
hostname = "localhost"
Find more parameters for deployment settings.
Service catalog
If you want the integrations deployed in the Micro Integrator to be exposed to the API management layer of API-M, enable the service catalog in both Micro Integrator nodes.
[[service_catalog]]
apim_host = "https://localhost:9443"
enable = true
username = "admin"
password = "admin"
See the descriptions of the service catalog parameters.
Cluster coordination
Most of the integration artifacts in your deployment are stateless and don't actually require coordination when there is more than a single instance of the server running. However, the following set of artifacts require coordination among themselves when deployed in more than a single instance of the server.
- Scheduled Tasks
- Message Processors
- Polling Inbound Endpoints
- Event-Based Inbound Endpoints
Database
When the nodes in the cluster need to communicate with each other, the Micro Integrator uses RDBMS-based coordination among the server nodes. That is, all the nodes communicate via a database. Hence, you need to have a database to enable coordination among the artifacts.
-
Create a database named
clusterdb. -
Open the
deployment.tomlfile and see that the configurations are updated as shown below.[[datasource]] id = "WSO2_COORDINATION_DB" url= "jdbc:mysql://localhost:3306/clusterdb" username="root" password="root" driver="com.mysql.jdbc.Driver" pool_options.maxActive=50 pool_options.maxWait = 60000 pool_options.testOnBorrow = true[[datasource]] id = "WSO2_COORDINATION_DB" url= "jdbc:sqlserver://<IP>:1433;databaseName=clusterdb;SendStringParametersAsUnicode=false" username="root" password="root" driver="com.microsoft.sqlserver.jdbc.SQLServerDriver" pool_options.maxActive=50 pool_options.maxWait = 60000 pool_options.testOnBorrow = true[[datasource]] id = "WSO2_COORDINATION_DB" url= "jdbc:oracle:thin:@SERVER_NAME:PORT/SID" username="root" password="root" driver="oracle.jdbc.OracleDriver" pool_options.maxActive=50 pool_options.maxWait = 60000 pool_options.testOnBorrow = true[[datasource]] id = "WSO2_COORDINATION_DB" url= "jdbc:postgresql://localhost:5432/clusterdb" username="root" password="root" driver="org.postgresql.Driver" pool_options.maxActive=50 pool_options.maxWait = 60000 pool_options.testOnBorrow = true[[datasource]] id = "WSO2_COORDINATION_DB" url="jdbc:db2://SERVER_NAME:PORT/clusterdb" username="root" password="root" driver="com.ibm.db2.jcc.DB2Driver" pool_options.maxActive=50 pool_options.maxWait = 60000 pool_options.testOnBorrow = true
Note
RDBMS-based coordination needs the system time of each node to be synchronized. Having them not synchronized will lead to unexpected behavior. Please refer EI_1758 for one of the possible issues.
Node ID
The node ID is a unique identifier, which is used to identify a node within the cluster. This is useful in situations where certain requests need to be routed to the server node based on the node ID. For example, scheduled tasks should only run in specific nodes.
By default, a random UUID value will be used as the node ID. However, you can assign a specific node ID using the following methods:
- System property (
nodeId) - Environment variable (
nodeId) -
TOML configuration
Open the
deployment.tomlfile (stored in the<EI_HOME>/confdirectory) and add the following section:[cluster_config] node_id = "node-1"
If the node ID is specified using multiple methods, the applicable node ID will be fetched in the given order.
Task resolver
When you have scheduled tasks in your integration deployment, each task should only run in one node of the cluster. The task resolver configuration in your server nodes specifies the logic for allocating tasks to the server nodes.
-
Default resolver
By default, tasks are resolved by selecting a random node from the available list of nodes in the cluster. All the tasks are resolved to the selected node. The tasks will be resolved to some other node only if the first node leaves the cluster.
This resolver is useful when you want all the tasks to run on a single node at a given point of time.
-
Round robin resolver
This class distributes the tasks among the nodes in a round robin manner. In addition to that, it accepts a parameter named
task_server_count, which specifies the number of nodes that should be present in the cluster before starting the task resolving process.This resolver can be used in scenarios where you want to distribute the tasks equally among all the nodes available in the cluster.
[task_handling]
resolver_class = "org.wso2.micro.integrator.ntask.coordination.task.resolver.RoundRobinResolver"

[[task_resolver]]
task_server_count = "3"
Note
The
task_server_countapplies each time a task is resolved. That is, when a node leaves the cluster, the task will be resolved (assigned) to another node only if thetask_server_countis satisfied. -
Task node resolver
This class will resolve tasks to a predefined set of nodes (task nodes) in a round robin manner. The
task_nodesneed to be defined as theresolver_classproperty.This resolver can be used in scenarios where you want to run tasks only on particular nodes of the cluster.
[task_handling]
resolver_class= "org.wso2.micro.integrator.ntask.coordination.task.resolver.TaskNodeResolver"

[[task_resolver]]
task_nodes = "node-1,node-2 ,node-3,node-4"
Advanced parameters
The resolving_period and resolving_frequency properties are set by default as shown below. It is not recommended to change these default values.
[task_handling]
resolving_period = "6"
resolving_frequency = "3"| Parameter | Default Value | Possible Values | Description |
|---|---|---|---|
resolving_period
|
2
|
Any integer greater than 0. | The period in seconds. The the time gap for resolving unassigned tasks from the coordination database. |
resolving_frequency
|
5
|
Any integer greater than 0. | The coordination database is periodically cleaned to remove invalid tasks. This parameter specifies the frequency at which the unassigned tasks get resolved (per cleaning event). |
Deployment synchronization
When you have a cluster of nodes, the integration artifacts deployed in each server node needs to be identical. This can be achieved by synchronizing the deployment directories of each server.
See deployment synchronization for instructions.
Registry synchronization (sharing)
Note
Registry sharing is only required if you have Message Processors in your deployment.
The shared registry maintains the state (active/inactive) of the Message Processor artifact. This ensures that the same state is maintained for Message Processor in all the Micro Integrator nodes of the cluster.
- Follow the instructions on configuring the file-based registry for a two-node deployment of the Micro Integrator.
- The
<MI_HOME>/registryfolder of each node in the cluster should be shared with each other. You can follow the same instructions as for deployment synchronization.
Load balancing
If you need the HTTP/HTTPS traffic to be distributed among the nodes, you need to front them via a load balancer of your choice and balance the loads among the node URLs.
Follow the instructions on setting up a load balancer for a two-node deployment of the Micro Integrator.
Deployment hardening
Ensure that you have taken into account the respective security hardening factors (e.g., changing and encrypting the default passwords, configuring JVM security, etc.) before deploying the Micro Integrator. For more information, see the production deployment guidelines.
Testing the cluster
Start one server in the cluster by executing the server startup script from the MI_HOME>/bin folder.
sh micro-integrator.shmicro-integrator.batWhen you start one server, you can observe the following logs indicating that it joined the cluster.
[2020-04-17 17:09:14,768] INFO {RDBMSCoordinationStrategy} - Successfully joined the cluster with id [506b71d5-0ba3-4a76-8959-7fde798c56de]When you start the second server, you can observe the following member addition log in the other server. This indicates to other servers in the cluster that a new node has joined.
[2020-04-17 17:12:37,072] INFO {ClusterCoordinator} - Member added [f5fc78fb-c147-4f66-8e5b-c0feae2b8c53]You could observe the following member removal log in other servers when one node is removed from the cluster.
[2020-04-17 17:12:52,270] INFO {ClusterCoordinator} - Member removed [506b71d5-0ba3-4a76-8959-7fde798c56de]Testing task coordination
Create a simple scheduled task using WSO2 Integration Studio and deploy it in the two Micro Integrator servers. See the instructions on creating a scheduled task.
<?xml version="1.0" encoding="UTF-8"?>
<task xmlns="http://ws.apache.org/ns/synapse" name="sample-task" class="org.apache.synapse.startup.tasks.MessageInjector" group="synapse.simple.quartz">
  <trigger interval="5000"/>
  <property xmlns:task="http://www.wso2.org/products/wso2commons/tasks" name="message">
     <test xmlns="">sample-task</test>
  </property>
</task>
Observe the following log in the server.
[2020-04-20 11:13:21,982] INFO {AbstractQuartzTaskManager} - Task scheduled: [ESB_TASK][sample-task].The above log can be observed in only one server and this implies that the task is scheduled only in one node when coordination is enabled.
Shutdown the node in which the task is scheduled and observe the following log in the other node.
[2020-04-20 11:13:21,982] INFO {AbstractQuartzTaskManager} - Task scheduled: [ESB_TASK][sample-task].The above log describes the failover capability of the tasks when the task server becomes unavailable.
Top