CI/CD for APIs - Using the CLI
When you implement CI/CD for your APIs, there are two approaches you can use.
-
Using the CLI
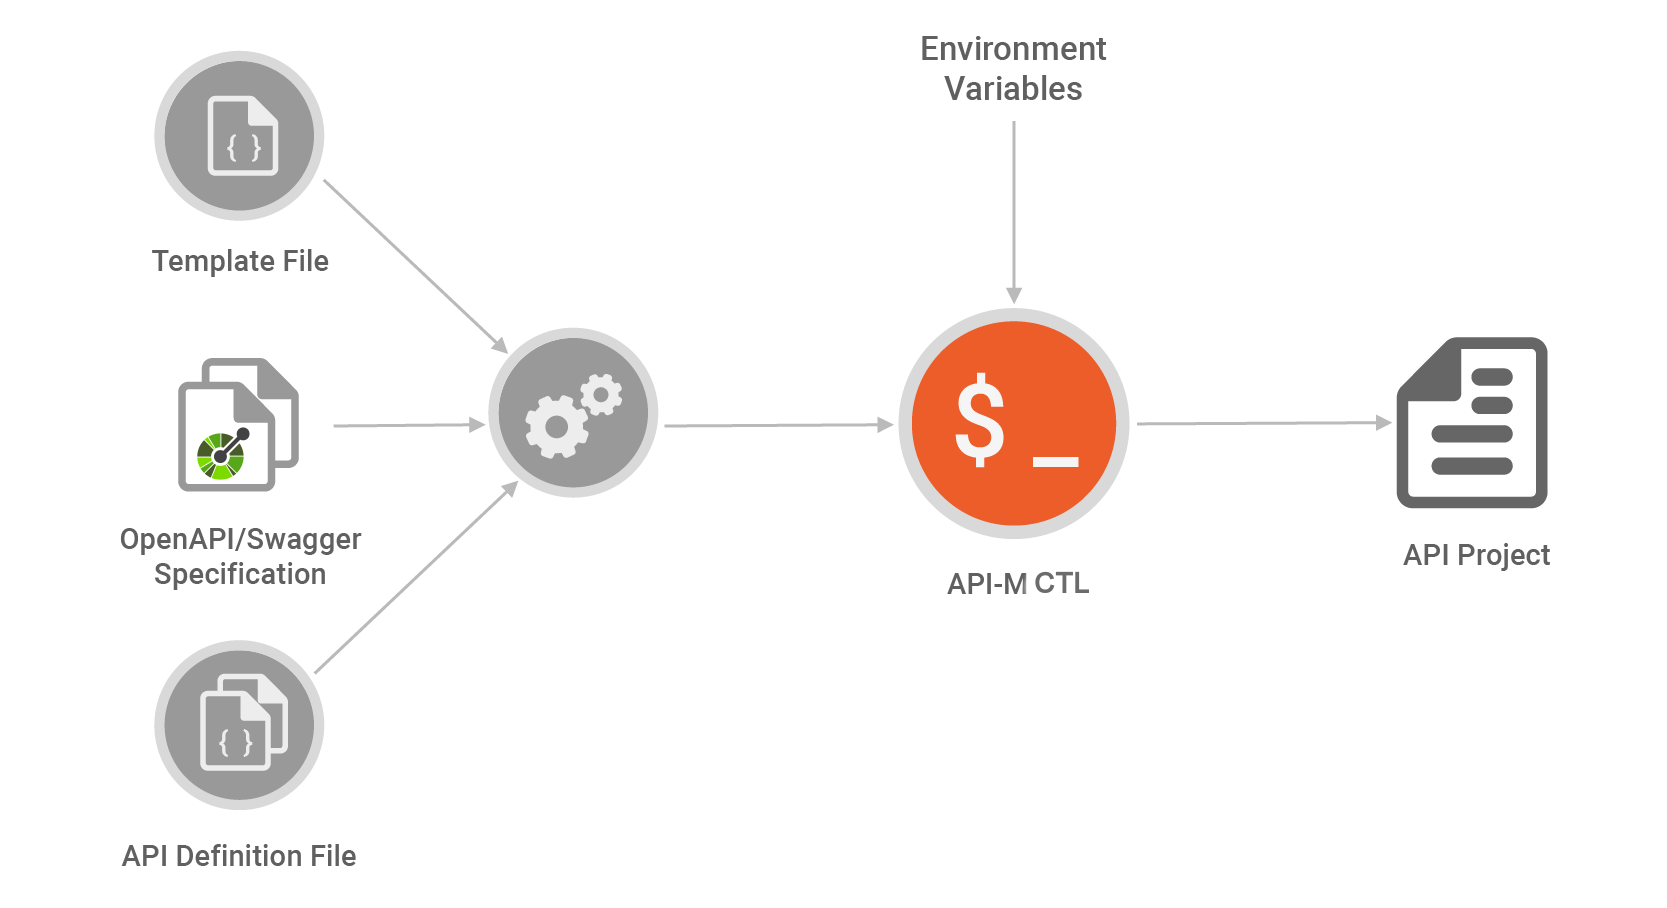
WSO2 API Manager (WSO2 API-M) supports OpenAPI/Swagger specifications to create APIs. WSO2 API Controller (apictl) can generate projects with Swagger/OpenAPI specifications without using the API Publisher in WSO2 API-M. This powerful feature can be used to design pipelines that depend on Swagger/OpenAPI specifications.
Based on the API Project generation, a powerful pipeline for API automation can be developed using OpenAPI/Swagger. This allows rapid API development and increases developer productivity.
To migrate APIs using the Developer First approach via CI/CD carry out the steps 1, 4, 5, 6 and 7 in sequential order, which is listed under the Building blocks for creating a CI/CD pipeline section.
-
Using the Publisher and CLI
API Developers can use the API Publisher in WSO2 API-M to create APIs in a lower environment. CI/CD for WSO2 API-M relies on a Version Control system that acts as a Single Source of Truth for the pipeline. Therefore, after the API Developer exports the APIs from the lower environment, the API Developer can commit the exported API artifacts to a source code management repository, run the tests in the lower environment, promote the APIs to an upper environment and generate keys for promoted APIs. This process of promoting the API seamlessly to multiple environments can be automated via the apictl tool and other CI/CD tools (e.g., Jenkins, GitHub). The apictl tool makes this process simpler as it handles per environment-related configurations.
To migrate the existing APIs using the API Publisher via CI/CD carry out the steps mentioned in 1, 2, 3, 5, 6 and 7 in sequential order, which is listed under the Building blocks for creating a CI/CD pipeline section.
Building blocks for creating a CI/CD pipeline
Let us check out the basic building blocks for creating a CI/CD pipeline with WSO2 API-M in sequential order.
Step 1 - Prepare the environments
-
Download and install WSO2 API-M 4.1.0 in your environments.
For more information, see Installation Prerequisites.
-
Download and setup apictl 4.1.0 version.
For more information, see Download and initialize the apictl.
-
Add WSO2 API-M environments using the
add envcommand.Example
apictl add env dev \ --apim https://localhost:9443 apictl add env prod \ --apim https://localhost:9444apictl add env dev --apim https://localhost:9443 apictl add env prod --apim https://localhost:9444For more information, see Add an environment.
Note
apictl add-envcommand has been deprecated from apictl 4.0.0 onwards. Instead useapictl add envas shown above.
Step 2 - Create, Deploy and Publish an API in a lower environment
Now, you have added two different environments. Our end goal is to automate the API migration between the dev and prod environments.
Therefore, first, the API should be created with relevant information, create a new revision, deploy the revision in relevant gateways
and publish in the dev environment using the API Publisher in WSO2 API-M.
For more information on deploying an API in the WSO2 API-M, see the Quick Start Guide.
For this example, let us use the Swagger Petstore - OpenAPI 3.0.
-
Sign in to the WSO2 API Publisher.
https://<hostname>:9443/publisher(e.g.,https://localhost:9443/publisher) -
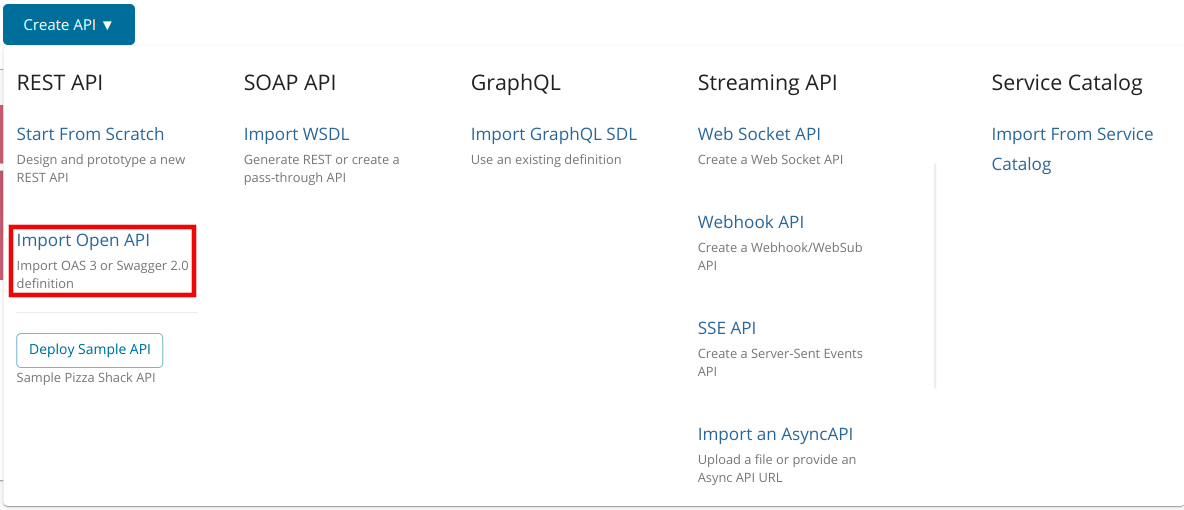
Click Create API and then click Import Open API.
-
Provide the OpenAPI URL (
https://petstore3.swagger.io/api/v3/openapi.json) and proceed to the next step. -
Define the API name as
SwaggerPetstoreand Version as1.0.0and click on the Create button (For more information, see Create a REST API from an Open API Definition).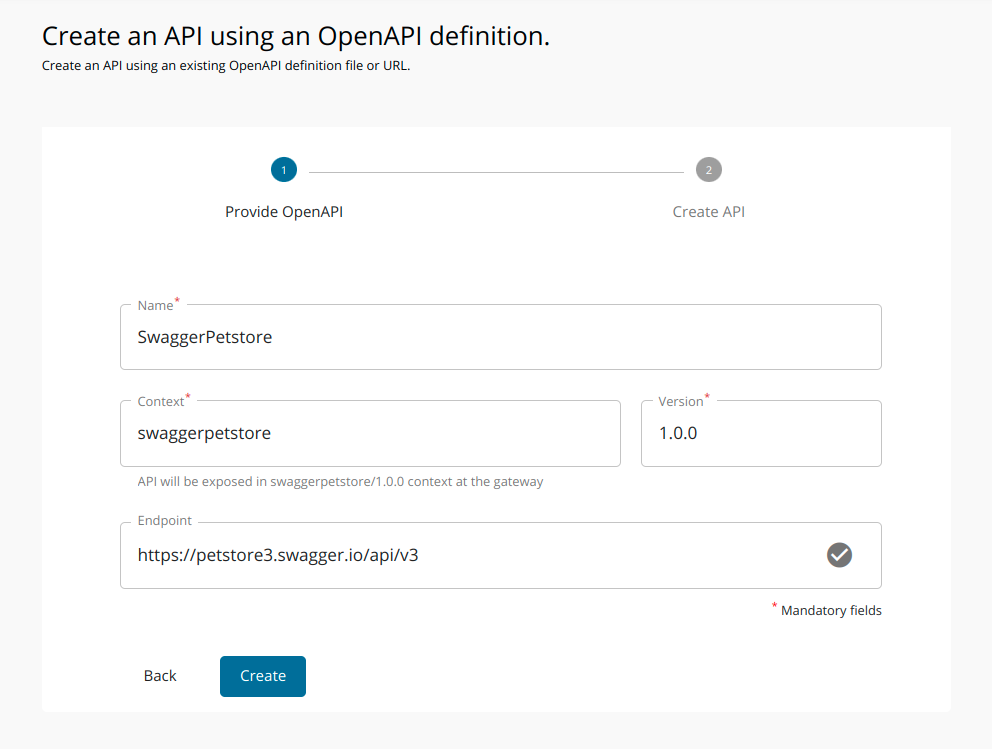
-
Go to the API Configurations > Endpoints and enter the backend URLs for the Production and Sandbox environments.
For this example, let us use the following endpoints.
Production: https://dev.wso2.com
Sandbox: https://dev.sandbox.wso2.com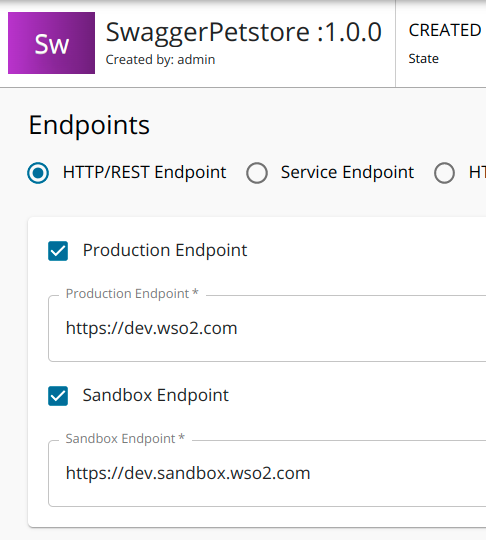
-
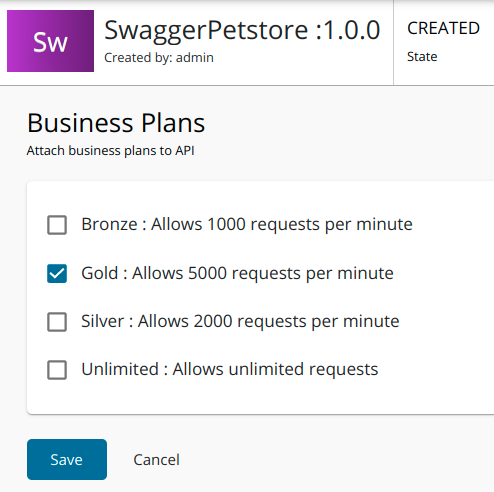
Go to the Portal Configurations > Subscriptions, select business plain and save the API.
For this example, let us select the plan Gold.
Step 3 - Export an API from a lower environment
The apictl can export an API as an archive from a lower environment (i.e., dev), which contains all the information to recreate the API on another upper environment (i.e., prod).
-
Sign in to the WSO2 API-M in the lower environment via the apictl.
Example
apictl login dev -u admin -p adminFor more information, see Login to an Environment.
Tip
A user with
Internal/devopsrole oradminrole are allowed to export APIs. To create a custom user who can export APIs, refer Steps to Create a Custom User who can Perform API Controller Operations. -
Export the latest revision of the API from the lower environment using the
export apicommand.Example
apictl export api -e dev -n SwaggerPetstore -v 1.0.0 --provider admin --latestFor more information, see Export an API.
Note
- Here we are assuming that the latest revision is up to date with all the changes. If needed, you can remove the
--latestflag and export the working copy without deployment information. apictl export-apicommand has been deprecated from apictl 4.0.0 onwards. Instead useapictl export apias shown above.
- Here we are assuming that the latest revision is up to date with all the changes. If needed, you can remove the
-
Extract the content (API will be exported as an archive to the
<USER_HOME>/.wso2apictl/exported/apis/dev/directory). After extraction, you will find a directory namedSwaggerPetstore-1.0.0.
Step 4 - Initialize the project using a Swagger/OpenAPI specification
Execute the following command to directly generate the PetstoreAPI project using a Swagger/OpenAPI specification. (You can download the Swagger/OpenAPI specification from here.
Example
apictl init SwaggerPetstore-1.0.0 --oas path/to/openapi.json- This generates an API project in the
SwaggerPetstore-1.0.0directory using the provided specification. This project can be directly imported into the WSO2 API-M. - The apictl allows further customization to the project initialization using a template file. Organization-specific common details can be added into this template file and shared across developers to increase productivity.
- To further fine tune API creation, an additional API Definition file can be used. This definition file supports detecting environment variables during the creation process. It can be combined with scripting to develop powerful tools for automating API Project creation.
- Using this method, the Swagger/OpenAPI specification becomes a single source of truth for API deployment. By combining templating and the definition file, the automation servers can be configured to initialize API Projects from Swagger/OpenAPI specifications and also have custom parameter files. This reduces human intervention and boosts productivity.
- For example, when an organization depends on a microservices architecture, this method can be utilized to create an automated pipeline to move Swagger/OpenAPI specifications to upper environments.
For more information on initializing an API Project using OpenAPI/Swagger Specification, see Initialize an API Project.
Open the api.yaml and api_meta.yaml files inside the SwaggerPetstore-1.0.0 repository in a text editor, and change the name and version to SwaggerPetstore and 1.0.0 accordingly in each file, for easy reference.
Step 5 - Prepare an API project for CI/CD
Create two (2) repositories in your Version Control System. You can give any names to these repositories, but in this example we will be naming those as Source and Deployment. Note that, Deployment repository is only needed if you want to Configure Environment Specific Parameters.
-
Copy the created/exported API project into the Source repository.
- If you are using the Dev First approach - Copy the initialized project directory.
- If you are using the Publisher based approach - Copy the extracted project directory.
-
Follow the below steps if you want to define the environment-specific details for the API.
-
Generate the deployment artifacts directory for the API project using the below command.
apictl gen deployment-dir -s path/to/Source/SwaggerPetstore-1.0.0 -d path/to/DeploymentThe generated individual deployment repository with the name
DeploymentArtifacts_SwaggerPetstore-1.0.0can be found inside the Deployment repository. For more information, see Generating the Deployment Directory.In this example, let's define the backend URLs using the parameters file inside the generated deployment repository.
-
Open the
params.yamlinside theDeploymentArtifacts_SwaggerPetstore-1.0.0in a text editor and define the prod.wso2.com and prod.sandbox.wso2.com as the backend URLs.Example
environments:
    - name: dev
      configs:
          endpoints:
              production:
                  url: 'https://dev.wso2.com'
              sandbox:
                  url: 'https://dev.sandbox.wso2.com'
    - name: prod
      configs:
          endpoints:
              production:
                  url: 'https://prod.wso2.com'
              sandbox:
                  url: 'https://prod.sandbox.wso2.com'
Info
- The tool reduces the pipeline’s complexity and provides a simple and powerful mechanism to handle environment-specific configurations.
- For more information on the parameters file of an API, see Defining the parameters file for an API.
- For more information on the parameters file of an API Products, see Defining the parameters file for an API Product.
- The apictl supports detecting environment variables defined. If an environment variable is not set, the tool will fail. Also, the system will request the user for a set of required environment variables to ensure that information is not missing during the migration process. For more information, see Using Dynamic Data in apictl Projects.
- It is recommended to store API and environment-specific parameters in separate repositories (i.e, Source and Deployment).
-
-
Commit the changes to the version control system.
Step 6 - Import the API to an upper environment
The Automation Server can be configured to run a specific pipeline for promoting artifacts to other environments. The DevOps team can develop this pipeline further to include automated tests, workflow approvals, and other tasks.
The apictl tool should be installed in the automation servers to begin the process. As the tool supports a variety of platforms, including Linux/Windows and macOS, this can be done easily.
a. Promoting APIs in a Git repository to upper environments via CI/CD
The repositories (Source and Deployment) that you committed the project files in the above step 5 need to be cloned into the instance that is executing the CI/CD process. The apictl has inbuilt support for integrating with a Git-based version control system. It gives a unified command vcs deploy to deploy any type of project (e.g., APIs, API Products, and Applications).
-
Set the Source and the Deployment directory paths.
$ apictl set --vcs-source-repo-path path/to/Source
$ apictl set --vcs-deployment-repo-path path/to/Deployment
Note
- Setting the Source repository path is mandatory before executing
vcs deployin the latter steps. - If you do not want environment specific information to be maintained, you do not need to maintain a Deployment repository, only the Source repository will be enough. Hence, setting the Deployment repository path is optional.
- If you have not set the Deployment Repository path, only the artifacts inside the Source Repository will be considered when pushing to the environment when the
vcs deploycommand is executed.
- Setting the Source repository path is mandatory before executing
-
Navigate to the Source directory.
$ cd path/to/Source -
As this is the first time that the Source repository is used for Git Integration functionality of apictl, run
vcs initcommand to initialize the repository with apictl. This needs to run only once for the repository.Example
$ apictl vcs init
Successfully initialized GIT repository
Once
vcs initcommand is executed, a new filevcs.yamlwill be created in the root location of the repository.Make sure to commit this file to the repository.
Tip
vcs.yamlwill contain a unique identifier for the repository which is used to store deployed commits related meta-information.
-
Run
vcs statuscommand to see the available changes that needs to be deployed to the production environment (You can do the same by navigating and executing the below command in the Deployment repository as well).Example
$ apictl vcs status -e prod Projects to Deploy (1) APIs (1) ... 1: [save] SwaggerPetstore-1.0.0: (SwaggerPetstore-1.0.0) -
If you have a Deployment repository, perform the steps a(2) - a(4) for that as well.
-
Import the SwaggerPetstore API into the production environment by running the following sample command.
Tip
-
Make sure you have already logged-in to the
prodenvironment. For more information, see Login to an Environment. -
A user with
Internal/devopsrole oradminrole are allowed to import APIs. To create a custom user who can import APIs, see Steps to Create a Custom User who can Perform API Controller Operations.
Example
$ apictl vcs deploy -e prod
Deploying Projects (1)...

APIs (1) ...
1: SwaggerPetstore-1.0.0: (SwaggerPetstore-1.0.0)
Successfully imported API.
The above command will detect the target environment and provision the API to it.
If you run
vcs deploycommand again, you will see the following output indicating that the deployment is already up-to-date.Example
$ apictl vcs deploy -e prod Everything is up-to-date -
-
Adding a new API to the Git repository
Multiple APIs can be promoted through CI/CD by committing the respective API projects and the deployment artifacts to the repositories.
-
Create another API Project (Pizzashack-1.0.0) by following the steps (2,3) OR 4.
-
Follow the steps in 5 to copy the created project to the Source repository and generate the individual deployment repository if needed.
-
Commit all the new changes in both the Source and the Deployment repositories.
-
Navigate to the Source repository and run
vcs statuscommand to verify the new project addition (You can do the same by navigating to the Deployment repository as well).$ apictl vcs status -e prod Projects to Deploy (1) APIs (1) ... 1: [save] Pizzashack-1.0.0: (Pizzashack-1.0.0) -
Run
vcs deploycommand to deploy the new API to the production environment.$ apictl vcs deploy -e prod Deploying Projects (1)... APIs (1) ... 1: Pizzashack-1.0.0: (Pizzashack-1.0.0) Successfully imported API.Here, apictl will deploy only the new API Pizzashack-1.0.0 without re-deploying the other unchanged API SwaggerPetstore-1.0.0.
Important
For deploying an API using
vcs deploycommand:- It is mandatory to have your API projects in a Git based version control system.
- The directories inside the Source repository should have the naming format
<API_Name>-<API_Version>. - The directories inside the Deployment repository should have the naming format
DeploymentArtifacts_<API_Name>-<API_Version>. - It is mandatory to have
api_meta.yamlfile either inside the Soure API Project (This is created by default when you export an API usingexport apior initialized an API Project usinginit) or inside the individual deployment repository (This is created when you generate the individual deployment repository using theapictl gen deployment-dircommand). - During the
vcs deploy, if theapi_meta.yamlis inside both the source API project and the individual deployment repository, the priority will be given to the file that is inside the individual deployment repository. - The following configuration section in the
api_meta.yamlfile is used to deploy the API.
You can change the above fields accordingly.deploy: import: preserveProvider: true rotateRevision: false update: trueField Description preserveProvider Preserve the existing provider of the API after importing it rotateRevision When importing (updating) the API multiple times, if the maximum revision limit reached, delete the oldest revision and create a new revision update Used to specify whether to update the API if it already exists during the deployment
-
b. Promoting a single API via CI/CD to upper environments
You can use the following alternative approach to promote a single API via CI/CD. This method is ideal if your CI/CD pipeline is not built based on Git.
-
Import the SwaggerPetstore API into the production environment and test the API by running the following sample command.
Example
apictl import api -f path/to/Source/SwaggerPetstore-1.0.0 -e prod --preserve-provider=false --update=true --rotate-revision --params path/to/Deployment/DeploymentArtifacts_SwaggerPetstore-1.0.0Note
- When the
--updateflag is present, WSO2 API-M will attempt to seamlessly update if an existing API is found with the same name and version. Here, the Current API (Working Copy) will get updated. Meanwhile, if you have specified deployment gateway environments related information (i. e, if thedeployment_environments.yamlis specified inside the Source project, or if you have mentioned those details in the parameters file in the Deployment repository), a new revision will be created during the import. If the maximum number of revisions (5) reached for the API and--rotate-revisionflag is present, the earliest revision for that API will be deleted and a new revision will be created. - The import command prepares an API Project for WSO2 API-M by processing the parameter file. It determines which configuration should be processed to create an API Project by detecting the environment that has been used to import it. Note that, if you do not need to overwrite the parameters using the Deployment repository, no need to specify the
paramsfile path. - For more information on importing an API to an environment, see Import an API.
apictl import-apicommand has been deprecated from apictl 4.0.0 onwards. Instead useapictl import apias shown above.
The above command will detect the target environment and provision the API to it.
- When the
-
Sign in to the WSO2 API Publisher.
https://<hostname>:9444/publisher(e.g.,https://localhost:9444/publisher) -
Check the details of the API.
You will see that the API has been imported with correct environment-specific details that you defined.
Info
-
When exporting an API, the apictl tool will also export the API’s lifecycle status. When importing to another environment, this lifecycle status will be preserved. This ensures that the API has the same state across environments.
-
For example, if an API is in the
PUBLISHEDstate in the development environment, it will also be in the same state in the testing environment. This default behavior can be changed via the apictl tool, which assigns APIs theCREATEDstate after importing. See Change status of an API or API Product in an environment for more information.
Step 7 - Get keys for an API/API Product
Follow the instructions below to generate a JWT/OAuth token for testing purposes using apictl in order to invoke an API or an API Product by subscribing to it using a new application created by apictl.
Tip
- Make sure that WSO2 API-M is started and the apictl is set up. For more information, see Download and Initialize the apictl.
- You should log in to the WSO2 API-M in the environment by following the instructions in Login to an Environment.
Run any of the following apictl commands to get keys for the API/API Product.
-
Command
apictl get keys -n <API or API Product name> -v <API version> -r <API or API Product provider> -e <environment>apictl get keys --name <API or API Product name> --version <API version> --provider <API or API Product provider> --environment <environment>Example
apictl get keys -n PizzaShackAPI -e devExample
apictl get keys -n PizzaShackAPI -v 1.0.0 -e dev -r admin -t https://localhost:9443/oauth2/tokenInfo
Flags:
- Required :
--environmentor-e: Key generation environment
--nameor-n: API or API Product to generate keys for - Optional :
--tokenor-t: New token endpoint of the environment (This overrides the previously provided token endpoint that was provided using theadd envcommand)
--provideror-r: Provider of the API or API Product
--versionor-v: Version of the API (Currently API Products do not have versions)
Note
-
Both the flags (
--name(-n) and--environment(-e)) are mandatory. -
You can override the given token endpoint or the default token endpoint using the
--token(-t) optional flag together with the new token endpoint. -
apictl get-keyscommand has been deprecated from the API Controller 4.0.0 onwards. Instead useapictl get keysas shown above.
- Required :
Info
- Upon running the above command, the apictl tool will create a default application in the environment, subscribe to the API, and generate keys based on the token type defined in the
<USER_HOME>/.wso2apictl/main-config.yamlfile. - Using apictl tool the HTTP request timeout, and export directory can be set up and changed. For more information on changing the HTTP request timeout, see Set HTTP request timeout and Set export directory accordingly.
- When running the above command, if you have not specified the --version (-v), the tool will consider the version as 1.0.0 by default. If you have specified the version, then that value will be considered.
Step 8 - Extending a CI/CD pipeline to support API Products
For example, let us consider there is an API Product PetsInfo in the development environment with a subset of operations of SwaggerPetstore API.
-
Export the API Product using
export api-productcommand from the development environment (dev). For more information, see Export an API Product.$ apictl export api-product -n PetsInfo -e dev --latest Successfully exported API Product! Find the exported API Product at /home/wso2user/.wso2apictl/exported/api-products/dev/PetsInfo_1.0.0.zip -
Extract the exported API Product Project.
-
Similar to APIs, follow the steps in 5 to copy the created project to the Source repository and generate the individual deployment repository if needed.
-
Commit all the new changes in both the Source and the Deployment repositories.
-
Run
vcs statuscommand to see the available changes that needs to be deployed to the production environment.Example
$ apictl vcs status -e prod
Projects to Deploy (1)

API Products (1) ...
1: [save]       PetsInfo-1.0.0: (PetsInfo-1.0.0)
Important
If you haven't initialized the repository with API Controller, you will get the below error.
$ apictl vcs status -e prod
apictl: The repository info: vcs.yaml is not found in the repository root. If this is the first time you are using this repo, please initialize it with 'vcs init'.
Exit status 1
make sure to follow Promoting APIs in a Git repository to upper environments via CI/CD - Step 2 to initialize the repository.
-
Import the PetsInfo Product into the production environment by running the following sample command.
Example
$ apictl vcs deploy -e prod
Deploying Projects (1)...

API Products (1) ...
1: PetsInfo-1.0.0: (PetsInfo-1.0.0)
Successfully imported API Product
The above command will detect the target environment and create the PetsInfo Product in the target environment.
Important
For deploying an API using
vcs deploycommand:- It is mandatory to have your API Product projects in a Git based version control system.
- The directories inside the Source repository should have the naming format
<API_Product_Name>-<API_Product_Version>(Since API Products do not have a version, theAPI_Product_Versionshould be 1.0.0 by default). - The directories inside the Deployment repository should have the naming format
DeploymentArtifacts_<API_Product_Name>-<API_Product_Version>. - It is mandatory to have
api_product_meta.yamlfile either inside the Soure API Product Project (This is created by default when you export an API usingexport api product) or inside the individual deployment repository (This is created when you generate the individual deployment repository using theapictl gen deployment-dircommand). - During the
vcs deploy, if theapi_product_meta.yamlis inside both the source API Product project and the individual deployment repository, the priority will be given to the file that is inside the individual deployment repository. - The following configuration section in the
api_product_meta.yamlfile is used to deploy the API Product.
You can change the above fields accordingly.deploy: import: importApis: true preserveProvider: true rotateRevision: false updateApiProduct: trueField Description importApis Import the dependant API(s) along with the API Product if the dependant API(s) are not available in the target environment preserveProvider Preserve the existing provider of the API Product after importing it rotateRevision When importing (updating) the API Product multiple times, if the maximum revision limit reached, delete the oldest revision and create a new revision updateApiProduct Used to specify whether to update the API Product if it already exists during deployment
Tip
Multiple API product projects can be promoted through CI/CD by committing them to the same repository.
Step 9 - Extending a CI/CD pipeline to support applications
Let us assume that the PetsApp application is in the development environment which is already subscribed to the SwaggerPetstore API.
-
Export the Application using the
export appcommand from the development environment (dev). Note that--with-keysoption is used to export the subscriptions and keys (if any) of the application.$ apictl export app --name PetsApp --owner david -e dev --with-keys Successfully exported Application! Find the exported Application at /home/wso2user/.wso2apictl/exported/apps/dev/david_PetsApp.zipNote
apictl export-appcommand has been deprecated from the API Controller 4.0.0 onwards. Instead useapictl export appas shown above. -
Extract the exported Application Project.
- Commit the project to the same git repository.
-
Run the
vcs statuscommand to see the available changes that need to be deployed to the production environment.Example
$ apictl vcs status -e prod
Projects to Deploy (1)

Applications (1) ...
1: [save]       PetsApp: (PetsApp)
Important
If you haven't initialized the repository with API Controller, you will get the below error.
$ apictl vcs status -e prod
apictl: The repository info: vcs.yaml is not found in the repository root. If this is the first time you are using this repo, please initialize it with 'vcs init'.
Exit status 1
make sure to follow Promoting APIs in a Git repository to upper environments via CI/CD - Step 2 to initialize the repository.
-
Import the PetsApp Application into the production environment by running the following sample command.
Example
$ apictl vcs deploy -e prod
Deploying Projects (1)...

Applications (1) ...
1: PetsApp: (PetsApp)
Successfully imported Application
The above command will detect the target environment and create the application in the target environment.
Important
For deploying an application using
vcs deploycommand:- It is mandatory to have your Application projects in a Git based version control system.
- It is mandatory to have
application_params.yamlfile inside each application project. This is created by default when you export an Application usingexport app. The following configuration section in theapplication_params.yamlfile is used to deploy the application.
deploy:
    import:
        update: true
        preserveOwner: true
        skipSubscriptions: false
        skipKeys: true
You can change the above fields accordingly.
Field Description update Used to specify whether to update the application if it already exists during the deployment preserveOwner Preserve existing owner of the application after importing it skipSubscriptions Specifies whether to import the subscriptions of the application skipKeys Specifies whether to import the credentials of the application Tip
Multiple applications could be promoted through CI/CD by committing those application projects to the same repository.
Now, you know the building blocks of creating a CI/CD pipeline using apictl. By using the above, you can create an automated pipeline for API promotion between environments using either one of the latter mentioned approaches.
More
Next let us use the above knowledge to create a Jenkins CI/CD Pipeline with WSO2 API Management for a Dev First Approach.