Securing APIs using OAuth2 Access Tokens
APIs published on WSO2 API Gateway can be secured by OAuth 2.0, which is the de facto standard for access delegation in the REST API world. Any client application invoking an OAuth2 secured API needs to have a valid subscription to that particular API and present a valid OAuth2.0 Access Token when invoking it. For more information on how to subscribe to an application to an API and generate credentials for it, see Subscribe to an API.
After you have got the required credentials, namely the consumer key and consumer secret for your application, you (application users) can obtain access tokens to invoke the APIs that are subscribed under the given application. WSO2 API Manager offers a set of OAuth2 grant types for obtaining access tokens depending on the type of the access token owner, type of the application, and the trust relationship with the application. For more information, see OAuth2 Grant Types.
OAuth 2.0 access token types
WSO2 APIM only allows creating applications of JWT token type. See JWT Access Tokens. Hence all the access tokens issued under any application are JWTs.
Authentication via access tokens
HTTP Authorization header is the most common method of providing authentication information for REST APIs. The access token (followed by Bearer) needs to be sent via the authorization header, for the client application to authenticate the API that is being accessed. The format of the header is as follows:
Default Format
    Authorization : Bearer <access-token>

Format for customized authorization header
    <customized-authorization-header> : Bearer <access-token>
Example with default authorization header
Authorization : Bearer NtBQkXoKElu0H1a1fQ0DWfo6IX4a
Example with customized authorization header
SERVER_AUTH : Bearer NtBQkXoKElu0H1a1fQ0DWfo6IX4a
The string `NtBQkXoKElu0H1a1fQ0DWfo6IX4a` is a sample value of the access token that is being sent from the client application.For more information, see Customizing Authorization Header.
Customizing the authorization header
If the value of the authorization header needs to be changed due to organizational policies, legacy APIs, or for any other reason, it can be done at three levels in WSO2 API Manager (WSO2 API-M) as described below.
Customize across all tenants
Follow the instructions below to change the value of the authorization header at the server level configurations:
-
Navigate to the
<API-M_HOME>/repository/conf/deployment.tomlfile and make the following changes.-
Uncomment the
auth_headerunder the[apim.oauth_config]section and add the customized authorization header.You need to make this change on all the profiles of WSO2 API Manager.
auth_header = "{authorization-header}"auth_header = "SERVER_AUTH" -
Add the custom authorization header to the list of allowed headers defined in the
allow_headersunder the[apim.cors]section.allow_headers = {authorization-header}allow_headers = ["authorization","Access-Control-Allow-Origin","Content-Type","SOAPAction","SERVER_AUTH"]
-
-
Restart the WSO2 API Manager server to reload the changes.
-
If you have already published and deployed APIs, sign in to the WSO2 API Publisher (
https://<hostname>:9443/publisher) and save and redeploy those APIs.
Customize per tenant
Each tenant can define their name for the authorization header by following the instructions below:
Note
The tenant wide authorization header customizations take precedence over the server-wide authorization header customizations.
-
Sign in to the WSO2 API Manager Management Console with your tenant credentials.
https://<server-host>:9443/carbonTip
For information on creating a tenant, see Managing Tenants.
-
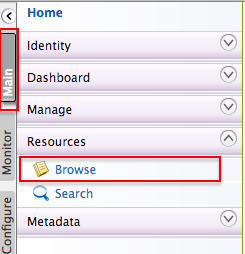
Click Main, then click Browse which is under Resources.
-
Enter /
_system/config/apimgt/applicationdata/tenant-conf.jsonas the location and click Go to access thetenant-conf.jsonfile that is in the WSO2 Registry. - Click Edit as text to be able to edit the JSON file.
-
Add the following configuration with the customized authorization header to the JSON file and save the file.
"AuthorizationHeader" : "<tenant-authorization-header>""AuthorizationHeader" : "TENANT_AUTH"{ "EnableMonetization":false, "IsUnlimitedTierPaid":false, "ExtensionHandlerPosition":"bottom", "RESTAPIScopes":{ "Scope":[ { "Name":"apim:api_publish", "Roles":"admin,Internal/publisher" }, { "Name":"apim:api_create", "Roles":"admin,Internal/creator" }, { "Name":"apim:api_view", "Roles":"admin,Internal/publisher,Internal/creator" }, { "Name":"apim:subscribe", "Roles":"admin,Internal/subscriber" }, { "Name":"apim:tier_view", "Roles":"admin,Internal/publisher,Internal/creator" }, { "Name":"apim:tier_manage", "Roles":"admin" }, { "Name":"apim:bl_view", "Roles":"admin" }, { "Name":"apim:bl_manage", "Roles":"admin" }, { "Name":"apim:subscription_view", "Roles":"admin,Internal/creator" }, { "Name":"apim:subscription_block", "Roles":"admin,Internal/creator" }, { "Name":"apim:mediation_policy_view", "Roles":"admin" }, { "Name":"apim:mediation_policy_create", "Roles":"admin" }, { "Name":"apim:api_workflow", "Roles":"admin" } ] }, "NotificationsEnabled":"false", "Notifications":[ { "Type":"new_api_version", "Notifiers":[ { "Class":"org.wso2.carbon.apimgt.impl.notification.NewAPIVersionEmailNotifier", "ClaimsRetrieverImplClass":"org.wso2.carbon.apimgt.impl.token.DefaultClaimsRetriever", "Title":"Version $2 of $1 Released", "Template":" <html> <body> <h3 style=\"color:Black;\">We’re happy to announce the arrival of the next major version $2 of $1 API which is now available in Our Developer Portal.</h3><a href=\"https://localhost:9443/devportal\">Click here to Visit WSO2 Developer Portal</a></body></html>" } ] } ], "DefaultRoles":{ "PublisherRole":{ "CreateOnTenantLoad":true, "RoleName":"Internal/publisher" }, "CreatorRole":{ "CreateOnTenantLoad":true, "RoleName":"Internal/creator" }, "SubscriberRole":{ "CreateOnTenantLoad":true } }, "AuthorizationHeader":"TENANT_AUTH" } -
If you have already published and deployed the APIs, sign in to the API Publisher using your tenant credentials, and save and redeploy those APIs.
Customize per API
The API Publisher application allows an API Developer or Product Manager to specify the name of the authorization header when creating or modifying an API.
Note
The customized authorization header defined per API takes precedence over the customized authorization headers that are defined server and tenant wide.
Follow the instructions below to add a customized authorization header for an API:
-
Sign in to the Publisher.
https://<server-host>:9443/publisher -
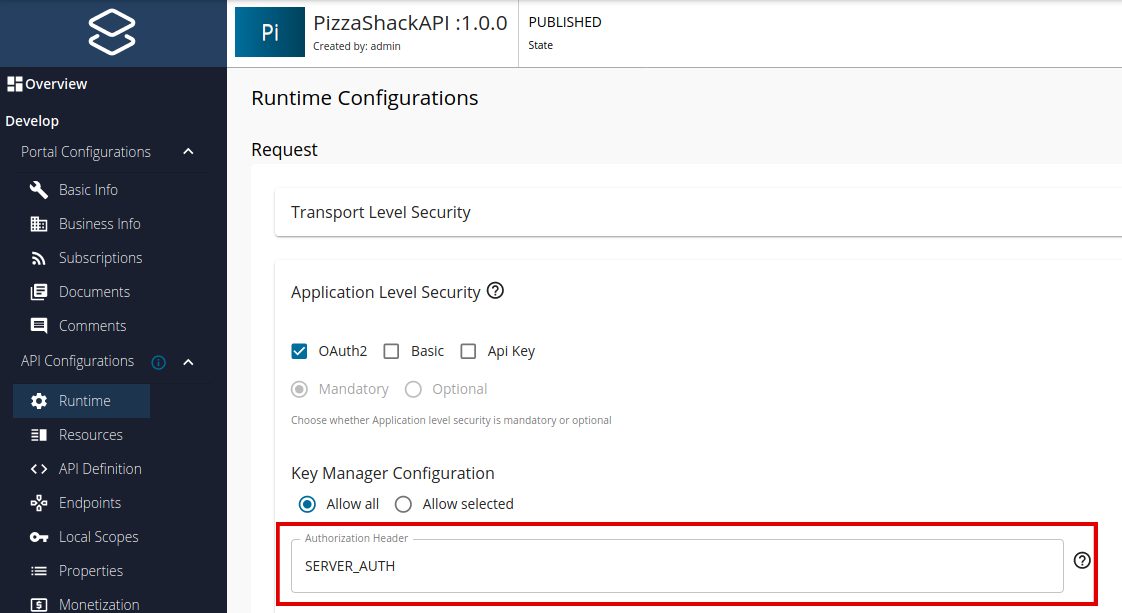
When creating or updating an API, define the customized authorization header in the Runtime tab under Develop -> API Configurations.
-
Save and Deploy the API.
Note
When creating an API by importing a Swagger or OpenAPI definition, the user can define the customized authorization header in the OAS definition using the “x-wso2-auth-header” extension.
x-wso2-auth-header: "CustomAuthorizationHeader"Try out the customized authorization header
Before you start, sign in to the API Publisher and deploy the sample API (PizzaShackAPI) if you have not done so already, as the following example is based on the PizzaShackAPI API.
curl -H "<customized-authorization-header>: Bearer <access-token>" -H "accept: application/json" "https://<server-IP>:<port>/pizzashack/1.0.0/menu" -k -vcurl -H "SERVER_AUTH: Bearer 3c536e3f-397c-3df9-a89c-9c40efedfa9e" -H "accept: application/json" "https://10.100.0.112:8243/pizzashack/1.0.0/menu" -k -v> GET /pizzashack/1.0.0/menu HTTP/1.1
> Host: 10.100.0.112:8243
> User-Agent: curl/7.54.0
> accept: application/json
> SERVER_AUTH: Bearer 3c536e3f-397c-3df9-a89c-9c40efedfa9e
>
< HTTP/1.1 200 OK
< Access-Control-Allow-Origin: *
< Access-Control-Allow-Methods: GET
< Access-Control-Allow-Headers: authorization,Access-Control-Allow-Origin,Content-Type,SOAPAction,SERVER_AUTH
< Content-Type: application/json
< Date: Fri, 19 Jan 2018 06:02:29 GMT
< Transfer-Encoding: chunked
<
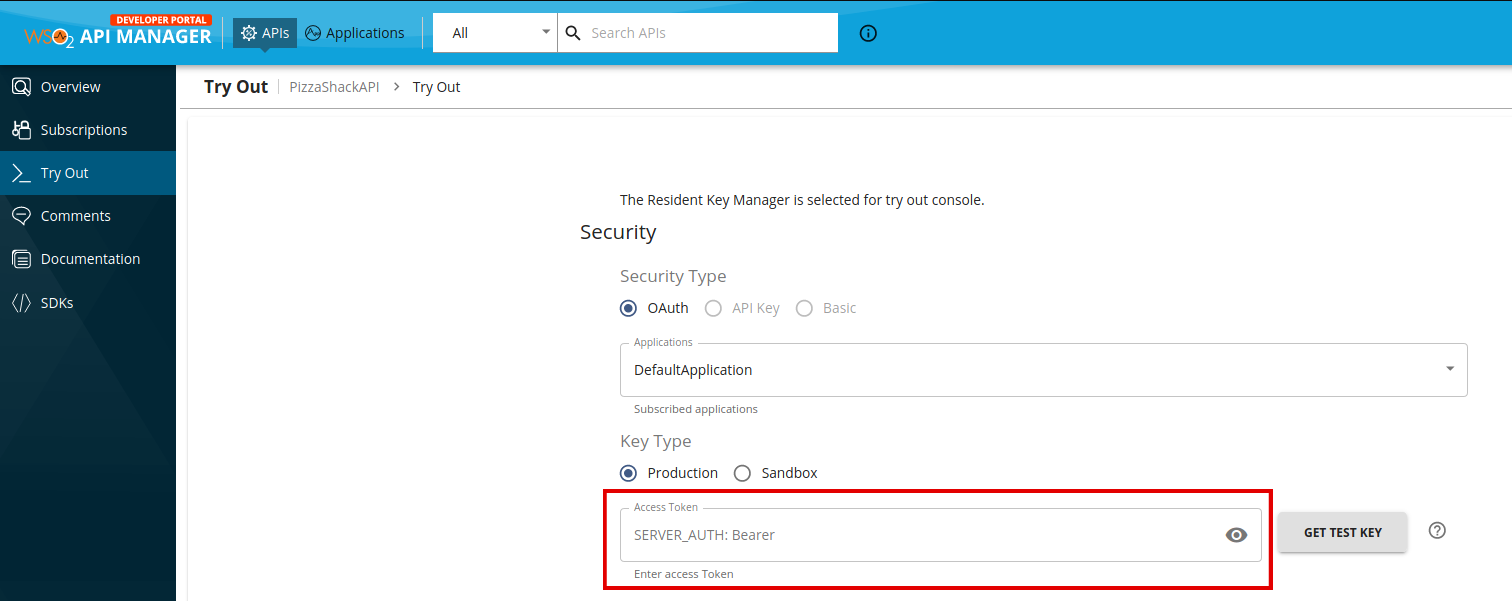
[{"name":"BBQ Chicken Bacon","description":"Grilled white chicken, hickory-smoked bacon and fresh sliced onions in barbeque sauce","price":"22.99","icon":"/images/6.png"},{"name":"Chicken Parmesan","description":"Grilled chicken, fresh tomatoes, feta and mozzarella cheese","price":"21.99","icon":"/images/1.png"},{"name":"Chilly Chicken Cordon Bleu","description":"Spinash Alfredo sauce topped with grilled chicken, ham, onions and mozzarella","price":"28.99","icon":"/images/10.png"},{"name":"Double Bacon 6Cheese","description":"Hickory-smoked bacon, Julienne cut Canadian bacon, Parmesan, mozzarella, Romano, Asiago and and Fontina cheese","price":"25.99","icon":"/images/9.png"},{"name":"Garden Fresh","description":"Slices onions and green peppers, gourmet mushrooms, black olives and ripe Roma tomatoes","price":"14.99","icon":"/images/3.png"},{"name":"Grilled Chicken Club","description":"Grilled white chicken, hickory-smoked bacon and fresh sliced onions topped with Roma tomatoes","price":"15.99","icon":"/images/8.png"},{"name":"Hawaiian BBQ Chicken","description":"Grilled white chicken, hickory-smoked bacon, barbeque sauce topped with sweet pine-apple","price":"19.99","icon":"/images/7.png"},{"name":"Spicy Italian","description":"Pepperoni and a double portion of spicy Italian sausage","price":"14.99","icon":"/images/2.png"},{"name":"Spinach Alfredo","description":"Rich and creamy blend of spinach and garlic Parmesan with Alfredo sauce","price":"20.99","icon":"/images/5.png"},{"name":"Tuscan Six Cheese","description":"Six cheese blend of mozzarella, Parmesan, Romano, Asiago and Fontina","price":"22.99","icon":"/images/4.png"}]Note that the customized authorization header appears in the Developer Portal UI as well.