User Account Management
The following sections explain how to manage Developer Portal, Publisher, and the Admin Portal related user accounts.
Enable password recovery
The password recovery feature does not work out-of-the-box because an email server needs to be configured to be able to send the password recovery email.
Follow the steps below to enable the password recovery feature for the Developer Portal, Publisher, and the Admin Portal:
-
Shut down the server if it is running.
-
Open the
<API-M_HOME>/repository/conf/deployment.tomlfile. -
Add the following properties to configure the a e-mail server.
For more information, see Configuring the Email Sending Module.
[output_adapter.email]
from_address = "[email protected]"
username = "wso2amtest"
password = "Wso2@am70"
signature = "do not reply"
hostname = "smtp.gmail.com"
port = "587"
enable_start_tls = true
enable_authentication = true
Property Description from_address The email address you use to send emails. username The email address used to authenticate the mail server. This can be the same email address as the from_address.password Password used to authenticate the mail server. signature Signature of the sender account. -
Re-start the server.
Account locking
You can lock user accounts with the Account recovery and credential management feature, pre-installed in WSO2 API Manager. Account locking is applicable to the user accounts related to the Developer Portal, Publisher, and the Admin Portal.
Account locking by failed login attempts
The following steps show how to enable account locking. See Account Locking by Failed Login Attempts for more information.
-
Sign in to the Management Console (
https://<API-M_HOST>:<API-M_PORT>/carbon) using admin credentials. -
Click Resident under Identity Providers found in the Main tab.
-
Expand the Login Policies tab.
-
Expand the Account Locking tab and tick the Account Lock Enabled checkbox. Click Update to save changes.

Info
- If you have configured the email sending module as mentioned in Configuring the Email Sending Module and if the particular locked user's email address is correct in his profile, he/she will receive an email stating that the account is locked.
- Again another email will be sent when the account is unlocked.
Account locking by an administrative user
An administrative user can lock and unlock a particular user's account through the management console. See Locking a Specific User Account for more information.
-
Sign in to the Management Console (
https://<API-M_HOST>:<API-M_PORT>/carbon) using admin credentials. -
Go to Claims > List on the Main tab and select the
http://wso2.org/claimsclaim dialect. -
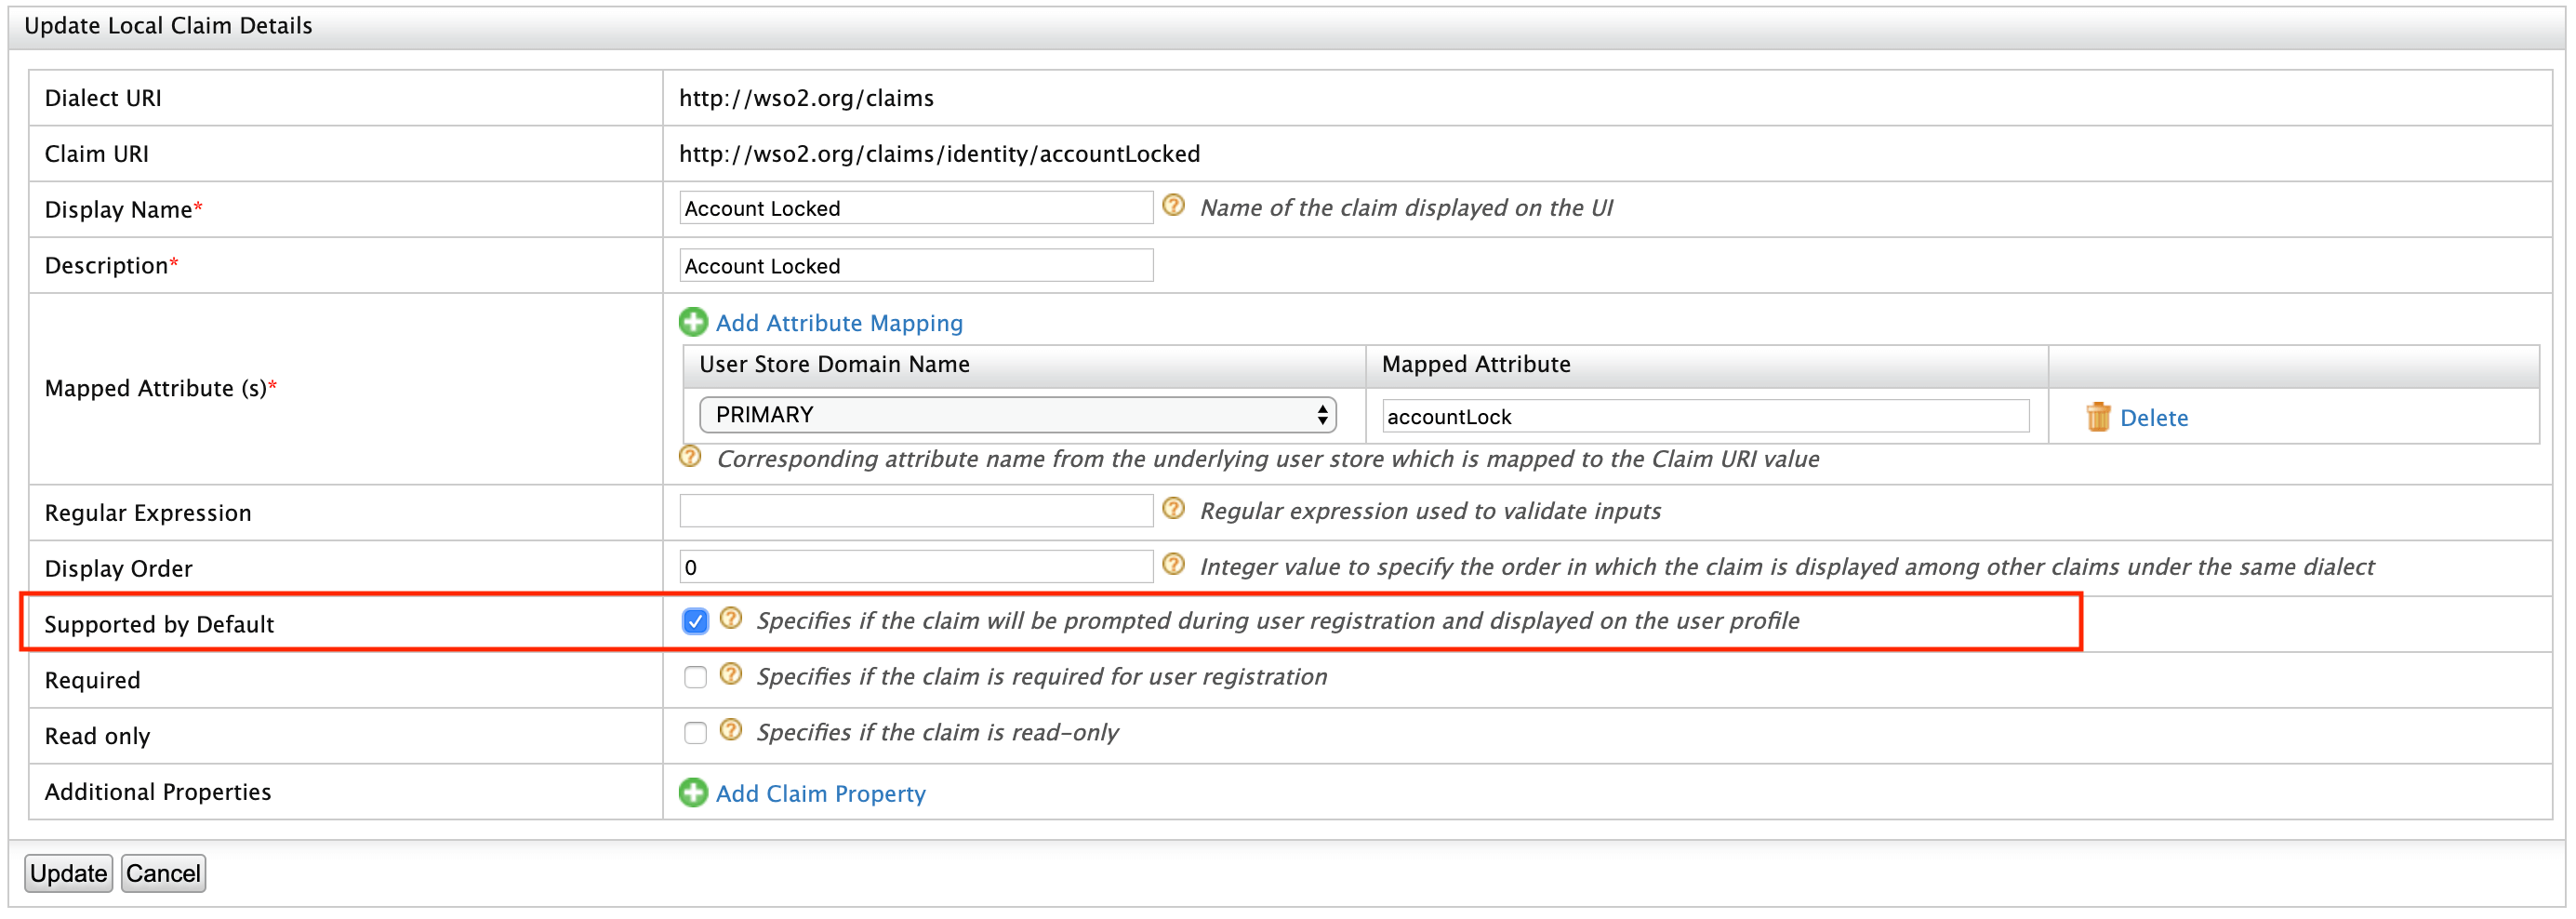
Expand the Account Locked claim and click Edit.
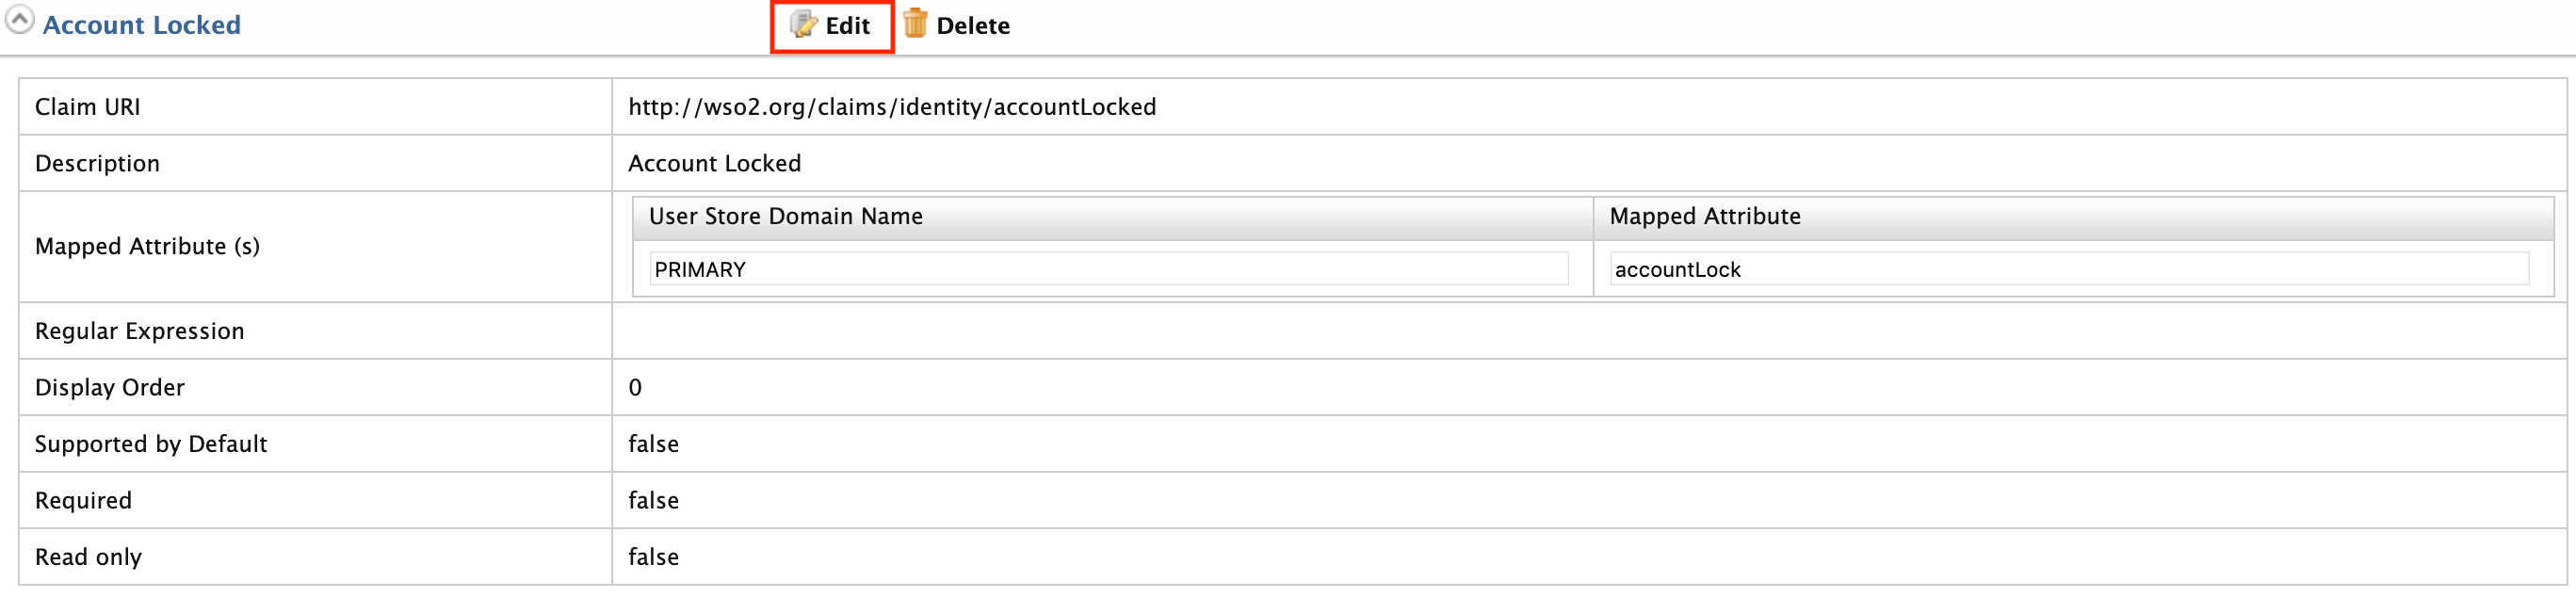
-
Tick the Supported by Default checkbox and click Update. This is done to make the Account Locked status appear in the user's profile.
-
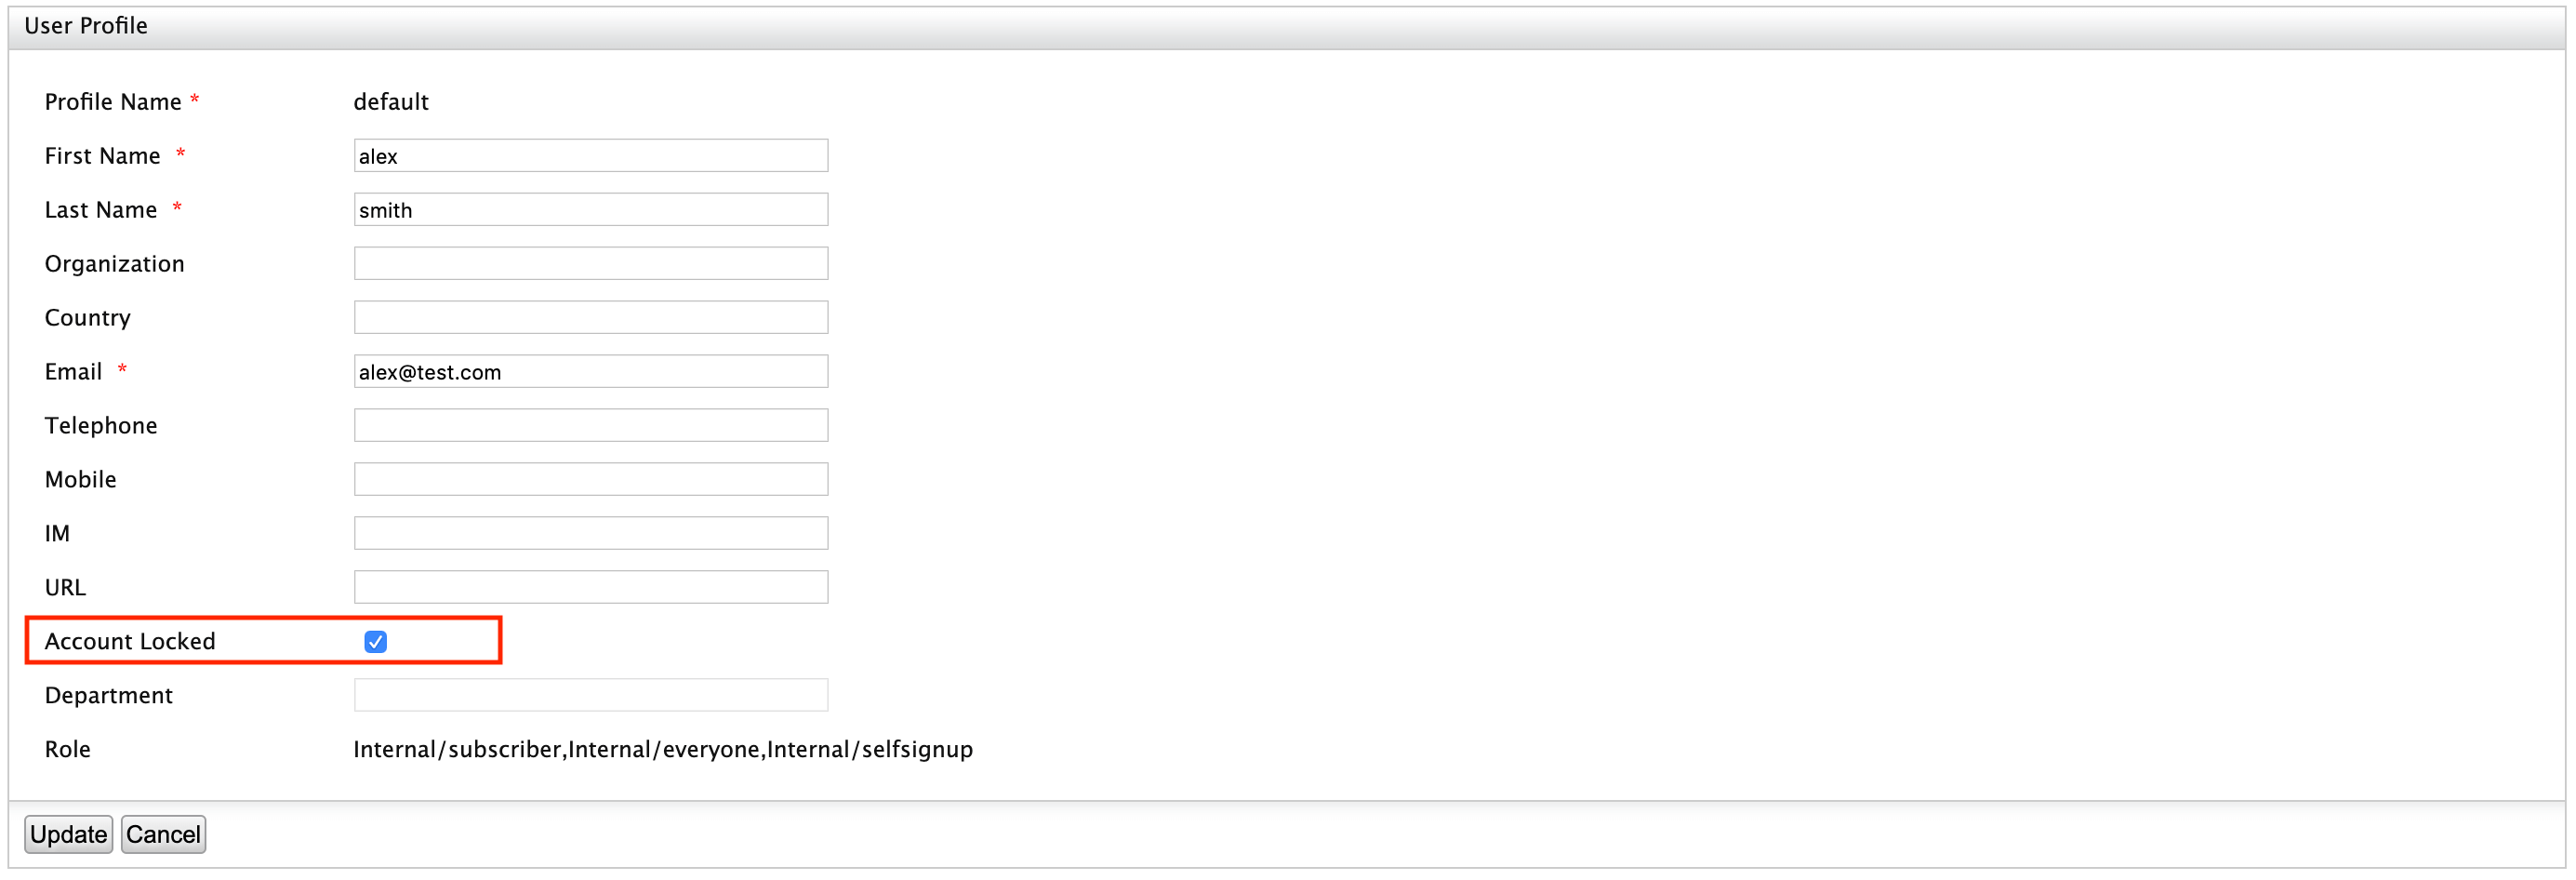
Go to Users and Roles > List > Users on the Main menu and click on User Profile of the user you want to lock.
-
Tick the checkbox in front of the Account Locked field to lock the account for the user and click Update.
Password policies
Change the password policy
You can define your custom password policy for the Developer Portal, Publisher and Admin Portal by defining one or both of the followings.
User store password RegEx
For more information, see Configuring a JDBC User Store
Example:
[user_store]
type = "database_unique_id"

[user_store.properties]
PasswordJavaRegEx = "^[\\S]{6,30}$"
Identity management password policies
You can define custom password policies for the Developer portal, Publisher user sign up. Open the <API-M_HOME>/repository/conf/deployment.toml file and add the password policy configuration based on your preference as shown below. See Writing a Custom Password Validator for more information.
[identity_mgt.events.schemes]
passwordPolicy.properties.enable = true
passwordPolicy.properties.'min.length' = 4
passwordPolicy.properties.'max.length' = 10
passwordPolicy.properties.pattern = "^((?=.*\\\\d)(?=.*[a-z])(?=.*[A-Z])(?=.*[!@#$%&*])).{0,100}$"
passwordPolicy.properties.errorMsg = "Password pattern policy violated. Password should contain a digit[0-9], a lower case letter[a-z], an upper case letter[A-Z], one of !@#$%&* characters"
passwordPolicy.properties.'class.PasswordLengthPolicy' = "org.wso2.carbon.identity.mgt.policy.password.DefaultPasswordLengthPolicy"
passwordPolicy.properties.'class.PasswordNamePolicy' = "org.wso2.carbon.identity.mgt.policy.password.DefaultPasswordNamePolicy"
passwordPolicy.properties.'class.PasswordPatternPolicy' = "org.wso2.carbon.identity.mgt.policy.password.DefaultPasswordPatternPolicy"
Note
The password policy set by the identity management password policies via the configuration file can be overridden using the Management Console for each tenant.
-
When changing the password, the new password will be validated against the user store password RegEx and conditions enforced by the Identity Management password policy. Therefore, you will not be able to change your password, if these conditions/RegEx patterns are set in a way that they conflict with each other.
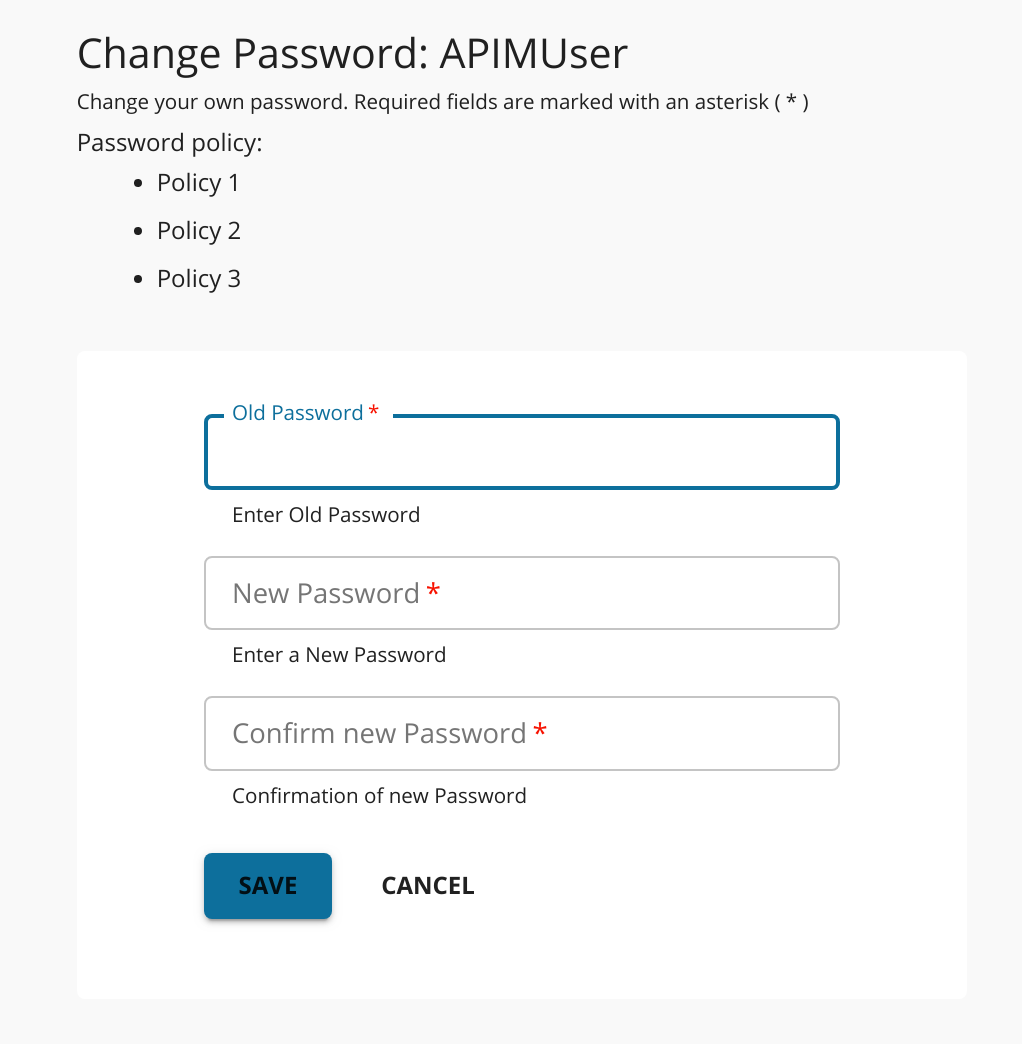
Display password policy guidelines in the Developer Portal
You can display a list of policy guidelines in the change password page that appears in the Developer Portal.
-
Enable password changing guidelines in the
settings.jsfile.-
Open the
<API-M_HOME>/repository/deployment/server/jaggeryapps/devportal/site/public/theme/settings.jsfile. -
Edit the configuration as follows:
 const Settings = {
    ...
    passwordChange: {
        guidelinesEnabled: true,
        ...
    },
 };
-
-
List your custom guidelines under
policyList.const Settings = { ... passwordChange: { guidelinesEnabled: true, policyList: [ 'Policy 1', 'Policy 2', 'Policy 3', ], }, };Note
If the guideline list is empty, the change password UI will not show the Password Policy guidelines section.
Disabling anonymous access to the Developer Portal
By default, anonymous access to the Developer Portal is enabled. Therefore, users do not need to authenticate themselves by way of signing in when accessing the Developer Portal in WSO2 API Manager. However, if required, you can disable anonymous access to the Developer Portal to prevent anonymous users from accessing the Developer Portal. When anonymous access is disabled, users will not be allowed to access the Developer Portal UI without appropriate login details or an access token.
Follow the instructions below to disable anonymous access to the Developer Portal for a particular tenant:
-
Sign in to the WSO2 API-M Management Console as a tenant admin user.
https://<API-M_host>:<API-M_port>/carbon -
Navigate to Main > Resources > Browse
-
Enter
/_system/config/apimgt/applicationdata/tenant-conf.jsonas the location and click Go to browse the registry and locate the required resource. -
Add the field named
EnableAnonymouswith the valuefalseto thetenant-conf.jsonas shown below.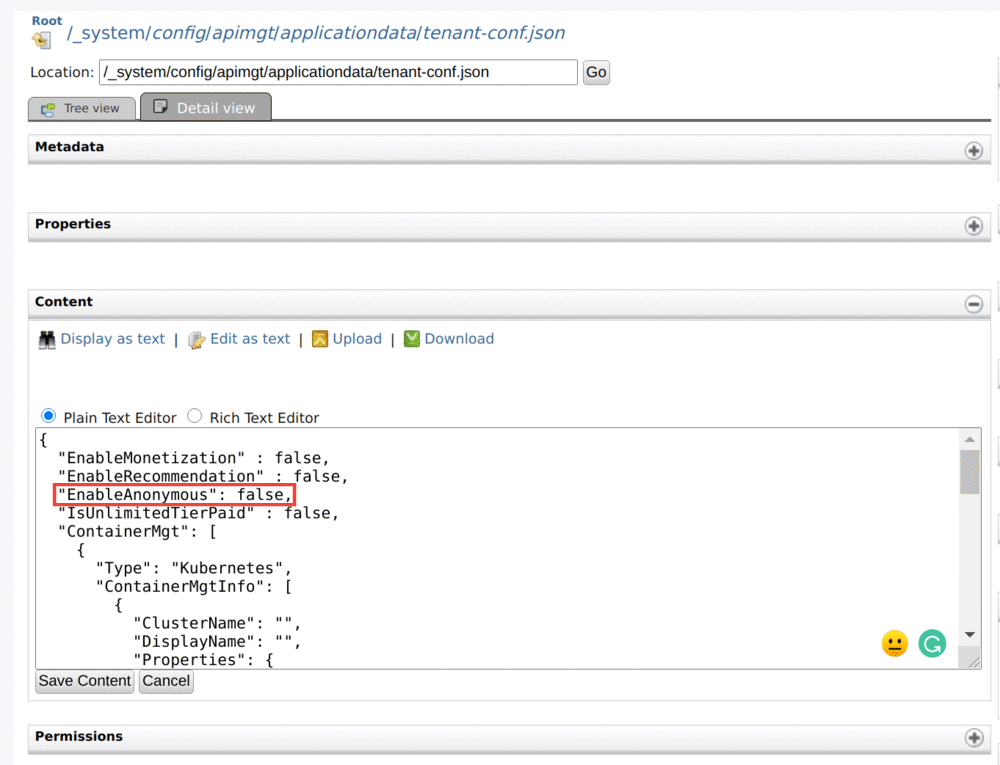
Note
To disable anonymous access globally, add the following to the
<API-M_HOME>/repository/conf/deployment.tomlfile. ```toml [apim.devportal] enable_anonymous_mode=false -
Restart the server or wait for 15 mins until the registry cache expires.
-
Navigate to the Developer Portal.
https://<API-M_host>:<API-M_port>/devportalYou will be automatically redirected to the Sign In page if you have not previously authenticated yourself by signing in to the Developer Portal.
Info
If you have a multi-tenant environment, when you navigate to
https://<API-M_host>:<API-M_port>/devportal, it will ask you to select the tenant first. When you select a tenant, if the anonymous mode is disabled for that tenant (by following the above steps), you will be redirected to the Sign In page if you have not previously authenticated yourself by signing in to the Developer Portal.