Build a CI/CD Pipeline for Integrations (VM deployment)
There are two kinds of jobs in Jenkins that we need to maintain. One for the Integration project repositories. Another kind is for the Deployment Descriptor repositories.
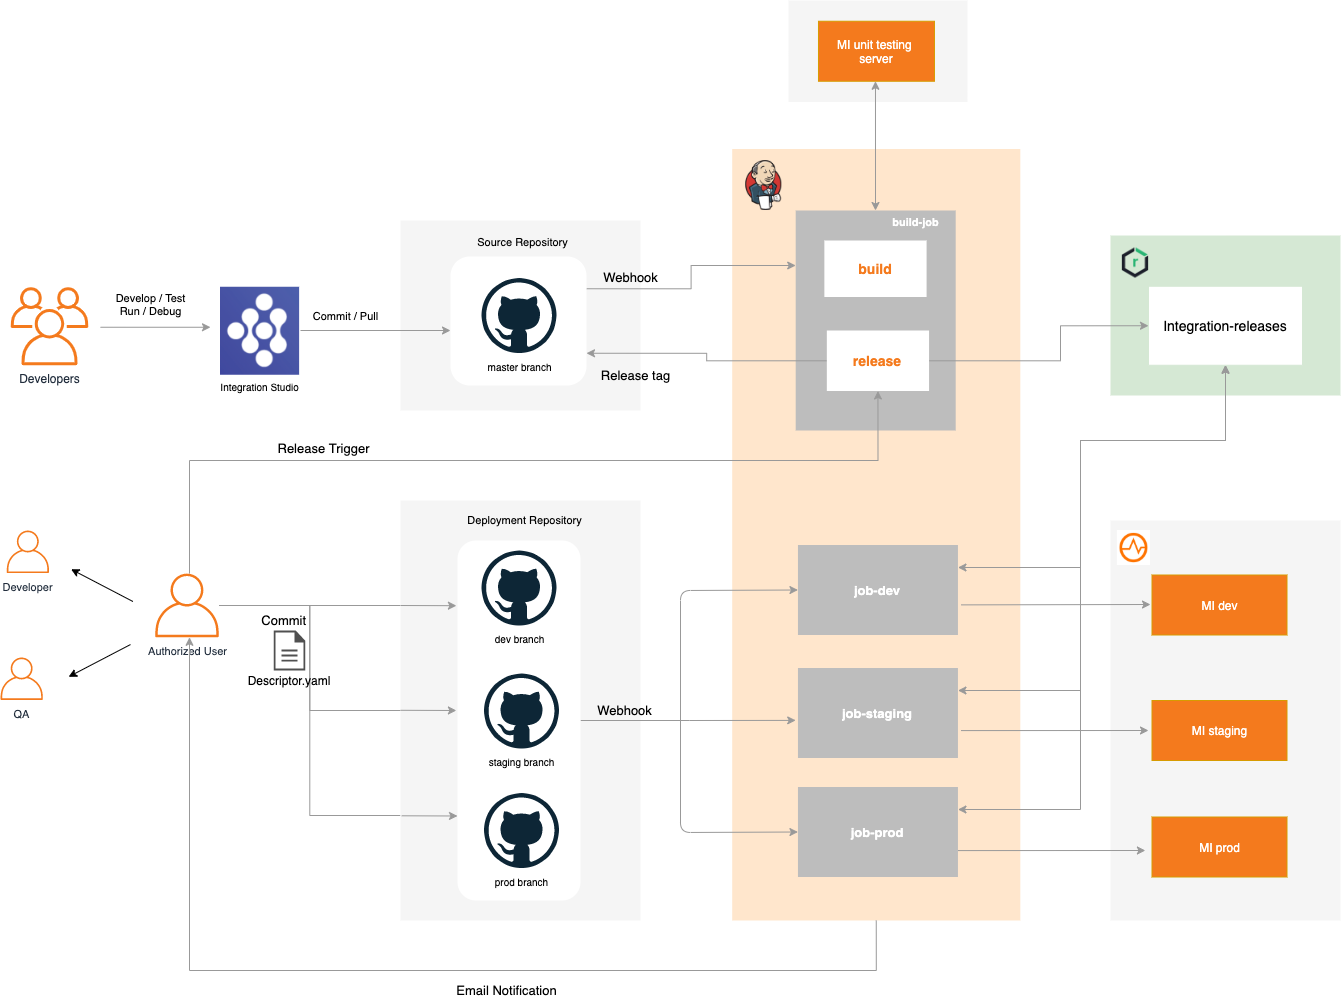
Integration Project Build Job
- We need to maintain one Jenkins job per Integration Project repository.
- The Integration Project has to be a Maven Multi Module project and it has to contain one Composite Exporter module. By default, the sample scripts provided, supports one Exporter module. Users can customize it to support multiple Exporter modules per Integration Project.
- The build phase of the job will build the Integration project and run the unit tests if a Unit test server, if configured.
- The release phase of the job will publish the CApps to the Nexus repository and create a release tag in GitHub.
Deployment Descriptor Build Job
- We need to maintain one Jenkins job per Environment.
- There will be descriptor files for each project inside a separate folder.
- To use a new version / rollback to a previous version, the user should define the change inside the respective descriptor and commit to the respective branch.
- This job contains only the build phase. This will delete the CApps from the VM instance and fetch the defined CApps from the Nexus and add it to the VM instance.
Setting up the environment
Prerequisites
-
Integration Studio 8.0.0 or higher
-
Two GitHub repositories
-
Source repository - To maintain the source of the project
-
Deployment repository - To maintain the descriptor files of the environment
-
Jenkins server for Continuous Integration
-
Nexus server - To store the deployable composite artifacts (CApps).
-
Micro Integrator instances in 3 environment (Standalone or Clustered)
-
Separate Micro Integrator instance as Unit Testing Server (Optional)
Sample User guide
-
Clone the samples-apim repository
-
Create Integration Project for your solution via the Integration Studio. By default, Integration studio adds parent maven details in the submodule POMs. You can customize maven details while creating the solution.
-
Update Project pom scm details by filling the git location.
<scm> <connection>scm:git:https://github.com/username/repository.git</connection> <developerConnection>scm:git:https://github.com/username/repository.git</developerConnection> <url>https://github.com/username/repository.git</url> </scm> -
Commit your changes to the GitHub source repository
- Set up Jenkins server
- Login to the Jenkins server using the credentials given in the Dockerfile of Jenkins instance.
- Navigate to the project build job and trigger a build.
- Create WebHooks in relevant GitHub repositories pointing to the Jenkins server. (Source & Deployment)
- Set up Nexus server
- Login to the Nexus server using the credentials given in the Dockerfile of nexus instance and confirm that the ‘Integration’ repository has been created.
- Go to the Jenkins server and perform a maven release by giving release and development versions.
- Once the release build is passed, confirm that the CApp is available in the Integration repository under the given release version in Nexus.
-
Create a descriptor.yaml inside a folder specific to each environment by including solution project details.
--- - <group-id> <artifact-id> <capp-version> - ... -
Commit the above created folder to the dev branch (environment) of the deployment repository.
- Once you commit the changes, you can observe that the descriptor-dev job starts running and it pulls the CApps from the nexus and copies it to the configured Micro Integrator instance in the Dev environment.
- Verify that the new changes are available in the Dev environment.
- You can repeat steps 13, 14 and 15 for the Staging and Prod environment.
Setting up Jenkins Server
-
Docker scripts for setting up a Jenkins environment are provided here. This will spin up a preconfigured Docker image. By default, 4 Jenkins jobs will be created. One project for the Integration project and three more for the environment descriptor repositories (dev, staging, prod).
-
Both the Integration project, and descriptor repositories will be in GitHub.
Note: You can customize the Docker scripts to create Jenkins jobs for multiple Integration projects.
-
Navigate to the docker-vm-artifacts directory.
cd sample-apim/mi-cicd/docker-vm-artifacts/jenkins -
Open up the Dockerfile and fill up the project and environment related details.
vi Dockerfile -
[Optional] If you want to customize the Jenkins configuration, update the Jenkins_casc_vm.yaml file.
vi jenkins_casc_vm.yaml -
[Optional] Set up Synapse Unit testing server
-
Run the following build command to build the Docker image.
docker build -t <image-name>:<image-tag> . -
Run the following command to run the image. You need to configure the .ssh folder to access the dev, staging and production environment and mount the folder to the container.
docker run -d -p 8080:8080 -v ~/.ssh:/root/.ssh <image-name>:<image-tag>Info
We need to share the host .ssh configurations with the Docker container as in above. The host machine needs to have ssh access to copy the CApps files to the remote instance where the Micro Integrator instances are running.
-
After installing Jenkins, the jobs can be accessed via http://localhost:8080/
Setting up Nexus Server
-
Docker scripts for setting up a Nexus environment are provided here. This will spin up a preconfigured Docker image. This Nexus container will be used to host the Carbon applications for different versions. The default repository is named as ‘Integration’
-
Navigate to the Docker VM artifacts directory.
cd sample-apim/mi-cicd/docker-vm-artifacts/nexus -
Open up the Dockerfile and fill up the project and environment related details.
vi Dockerfile -
[Optional] If you want to customize the Nexus configuration, update the nexus_casc.yaml file.
vi nexus_casc.yaml -
Run the following build command to build the Docker image.
docker build -t <image-name>:<image-tag> . -
Run the following command to run the image.
docker run -d -p 8081:8081 <image-name>:<image-tag> -
After installing nexus, the repository browser can be accessed via http://localhost:8081/ .
Setting up Synapse Unit testing server
If you have written Synapse unit tests for your Integration project, you can run them during the Jenkins build.
To set up the Synapse Unit testing server, please follow the below steps.
-
Run a separate Micro Integrator Instance in Unit testing mode. To start the server in Unit testing mode please pass this argument
-DsynapseTest.If you want to change the synapse testing port, you can pass the
-DsynapseTestPort=<new Port>to the above command. Default port is 9008 -
Update Jenkins Dockerfile as below.
SYNAPSE_TEST_FRAMEWORK_CONFIGS= -DtestServerType=remote -DtestServerHost=<IP of testing server> -DtestServerPort=9008