Fine Grained Access Control with OAuth Scopes
Scopes enable fine-grained access control to API resources based on user roles. You define scopes to an API's resources. When a user invokes the API, his/her OAuth 2 bearer token cannot grant access to any API resource beyond its associated scopes.
For example, there can be requirements such as restricting the access to a given API resource to admin users only, while other resources of the same API access should be allowed to consumers with less privileges. Let's see how this kind of role based access control can be managed with the use of OAuth2 scopes.
Shared Scopes
In WSO2 API-M, an OAuth scope can be created before the API is created and shared across multiple APIs of the same tenant. The API-M Publisher portal provides a scope management UI to view, create, edit and delete these shared scopes.
Info
Shared scopes can be viewed by any Publisher portal user with a role associated with apim:api_view Publisher
REST API scope. Shared scope create, update and delete operations are only allowed for user roles associated with
apim:shared_scope_manage Publisher REST API scope.
By default, only an admin user can perform create, update and delete operations of shared scopes.
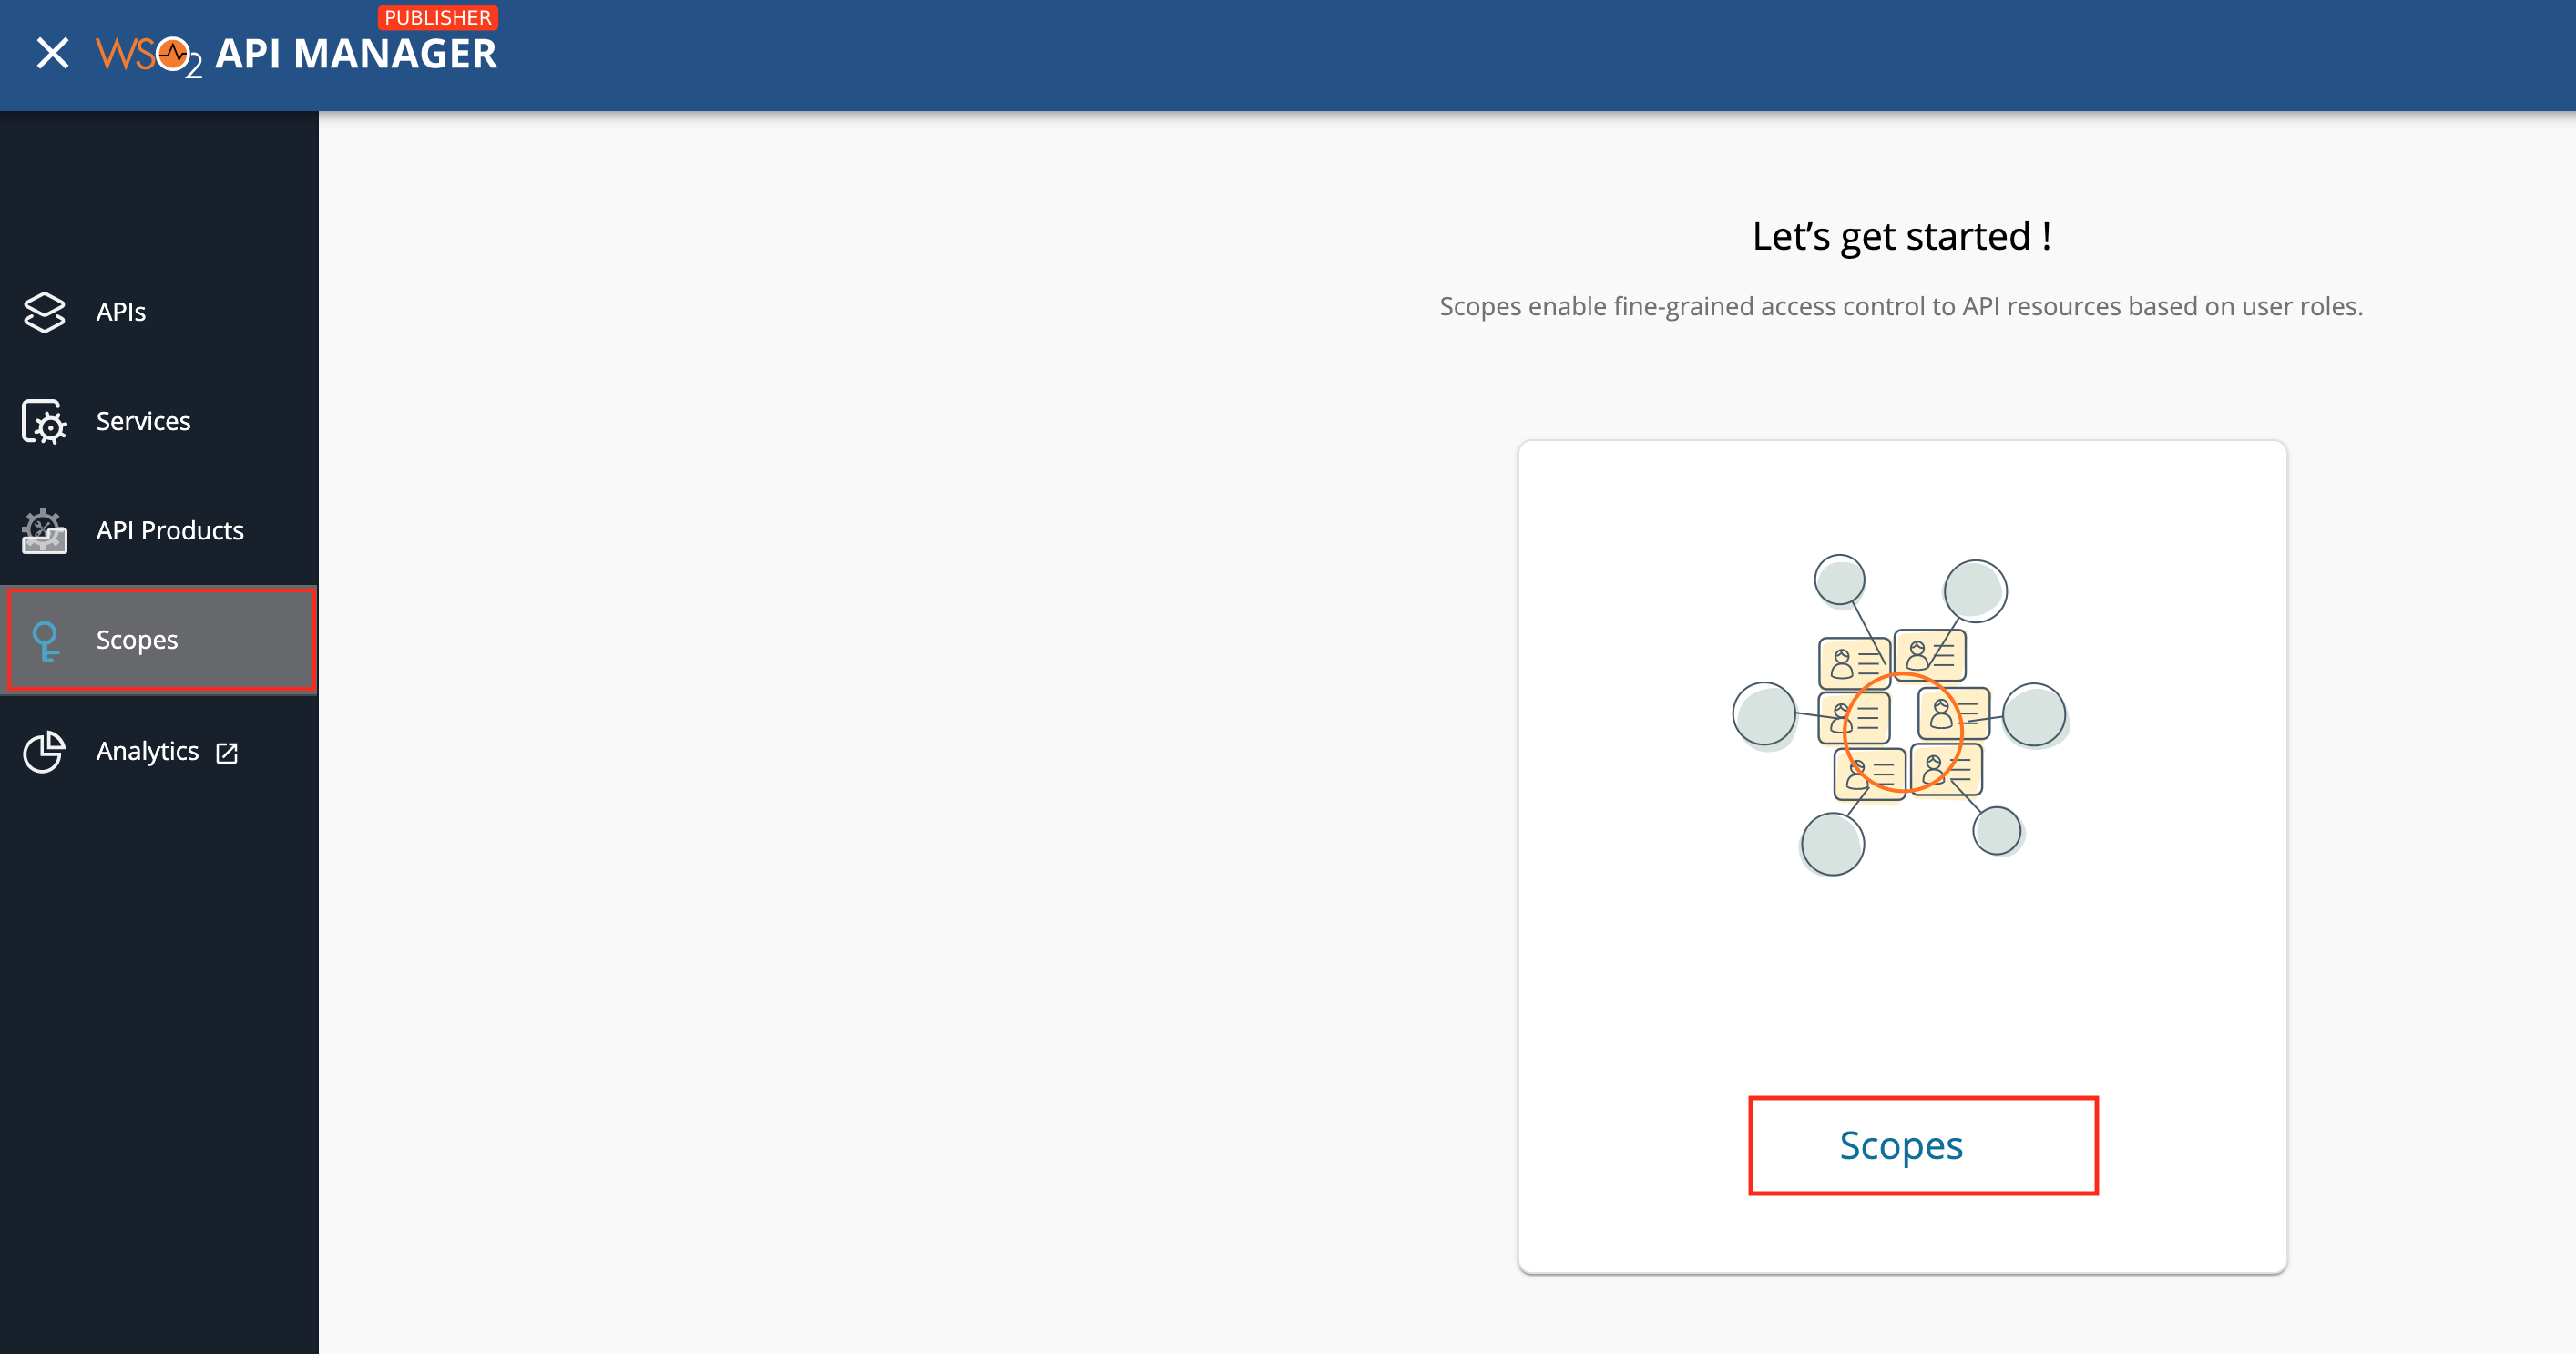
Creating a Shared Scope
The shared scope need to be created before API creation/update time. Follow below steps to create a new shared scope.
-
Login to API Publisher (https://localhost:9443/publisher).
-
Navigate to Scopes from the top menu and click on Create a new scope button.
-
In Create New Scope wizard, you will be prompted to enter a scope name, scope display name and optionally, scope description and allowed roles. Fill in required details of the scope and click Save button.
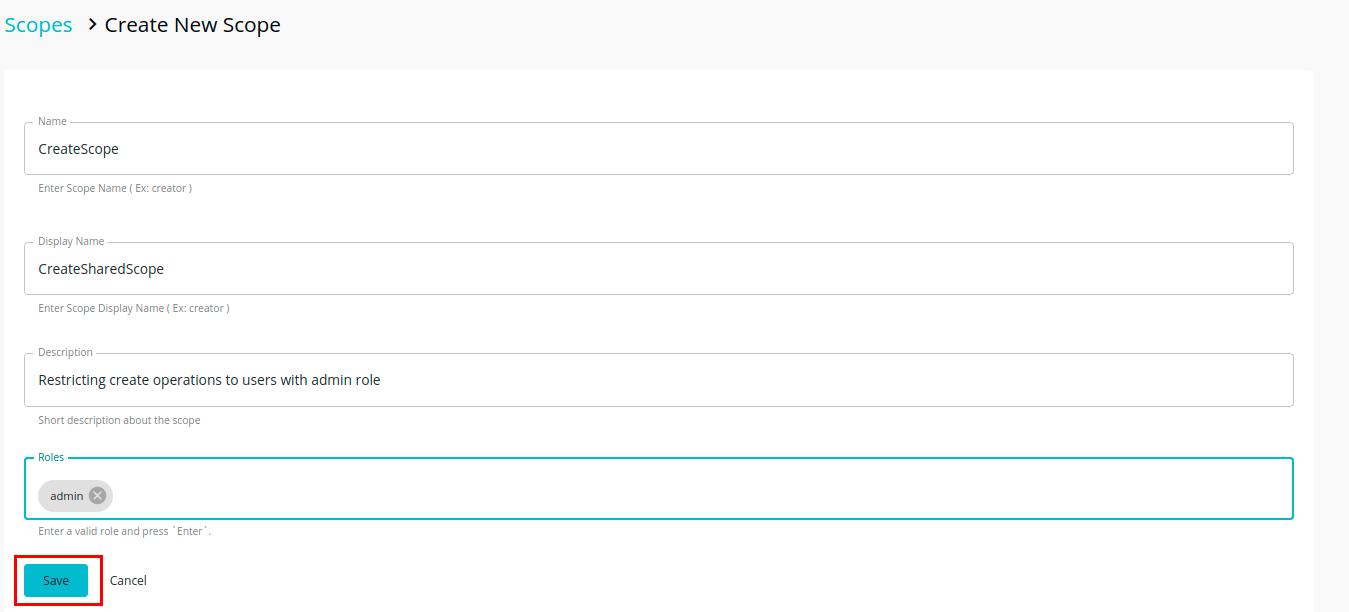
Scope Name A unique key for identifying the scope. Scope Display Name A human-readable name for the scope. It typically says what the scope does. This is used for consent screens. Scope Description The description for the scope.
Roles The user role(s) that are allowed to obtain a token against this scope. E.g., manager, employee.
Note that the role name is case sensitive in the DBMSs that are case sensitive, such as PostgreSQL.
When the role you specify is in a secondary user store, you have to give the role as
<userstore name>/<role name>.
Applying a Shared Scope to an API Resource
A shared scope has to be applied to a resource, in order to restrict the access to a user group/groups. A shared scope can be attached to more than one APIs of the same tenant. Follow below steps to apply a shared scope to a resource.
-
Go to API Resources section and click on the resource you would like to apply the scope.

-
Select the created scope from the dropdown. The created shared scope will be listed under Shared Scopes in the drop down.

Once you select the scope from dropdown, it will be shown as follows.

-
Click on Save button to save changes.
-
Publish the API.
Info
Once a shared scope is created and attached to an API, you are restricted to delete the shared scope. In order to delete a shared scope, first you need to remove its resource attachments from relevant APIs.
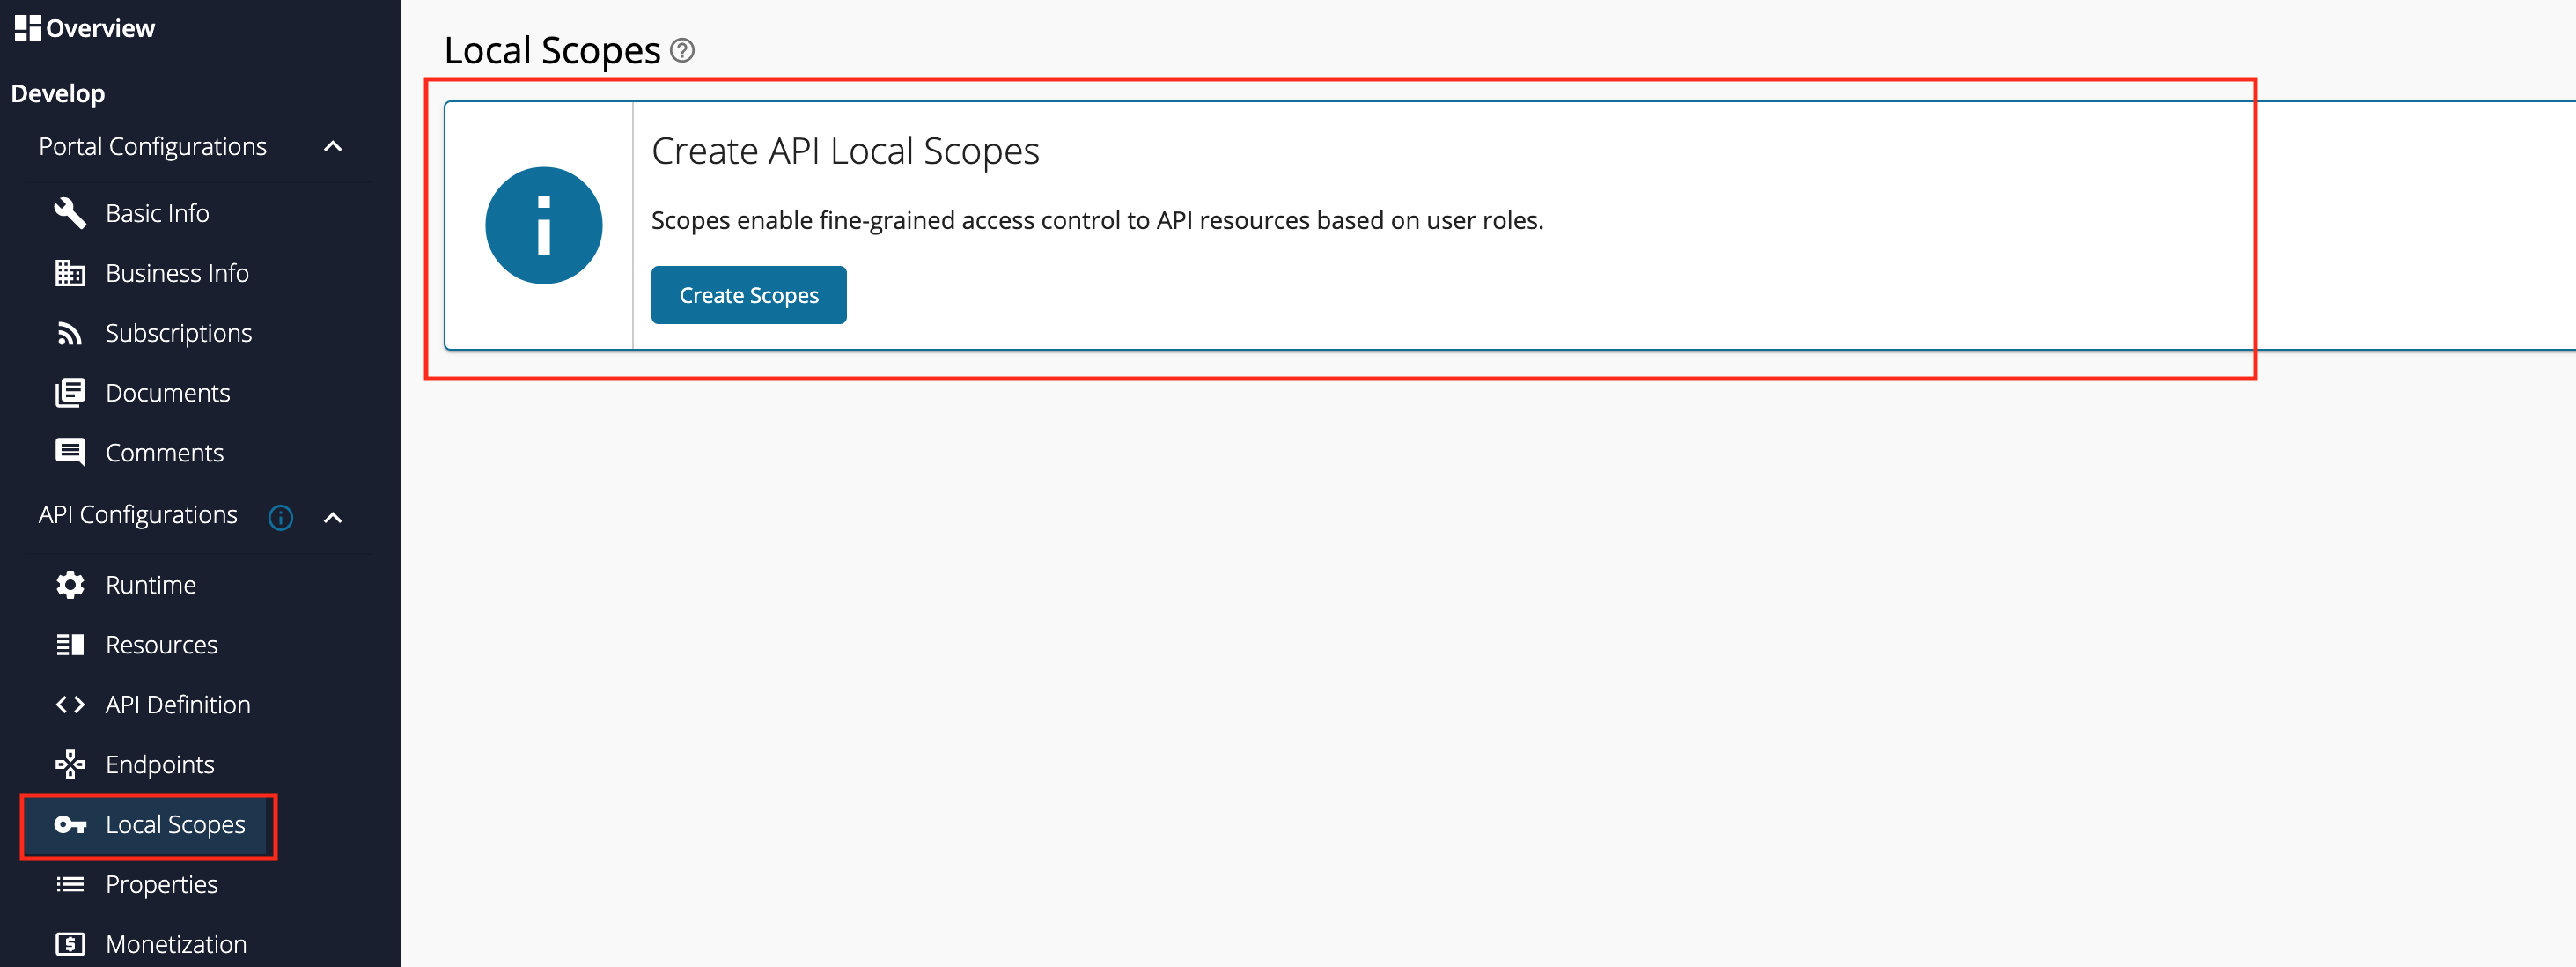
Local Scopes
In WSO2 API-M, API developers can also create OAuth scopes during the API creation time and attach them locally to the API. These scopes are local and unique to the relevant API.
Creating a Local Scope
A local scope can be created and applied to a resource at API creation time by following below steps.
-
Login to API Publisher (https://localhost:9443/publisher)
-
Start creating an API as described here.
-
Navigate to Scopes section and click on CREATE SCOPES button.
-
In Create New Scope wizard, you will be prompted to enter a scope name and optionally, allowed roles and a description. Fill in required details of the scope and click Save button.
Scope Name A unique key for identifying the scope. This should be unique across all the APIs of the tenant. Scope Description The description for the scope.
Roles The user role(s) that are allowed to obtain a token against this scope. E.g., manager, employee.
Note that the role name is case sensitive in the DBMSs that are case sensitive, such as PostgreSQL.
When the role you specify is in a secondary user store, you have to give the role as
<userstore name>/<role name>.
Applying a Local Scope to a Resource
A local scope, when applied to a resource, will restrict access for a user group(s). A local scope can only be attached to the relevant API in which it is created under. Follow below steps to apply a local scope to a resource.
-
Go to API Resources section and click on the resource you would like to apply the scope.
-
Select the created local scope from the dropdown. The created local scope will be listed under API Scopes in the dropdown.

-
Click on Save button to save changes.
-
Publish the API.
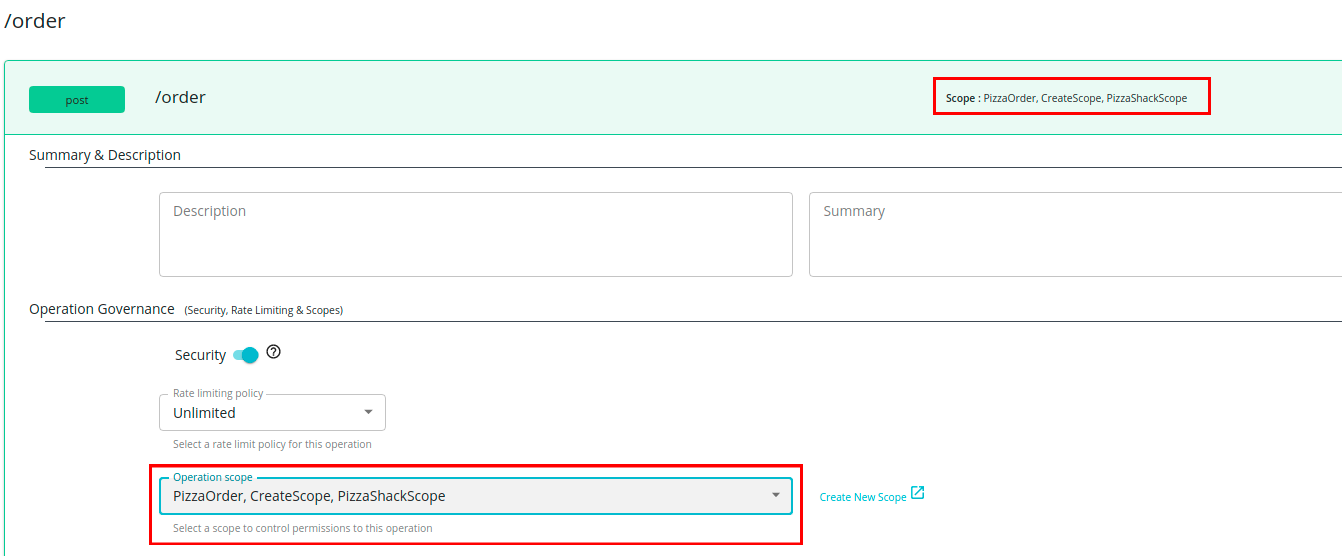
Applying Multiple Scopes Per Resource
From API-M Publisher Portal, you can attach multiple scopes to each API resource.
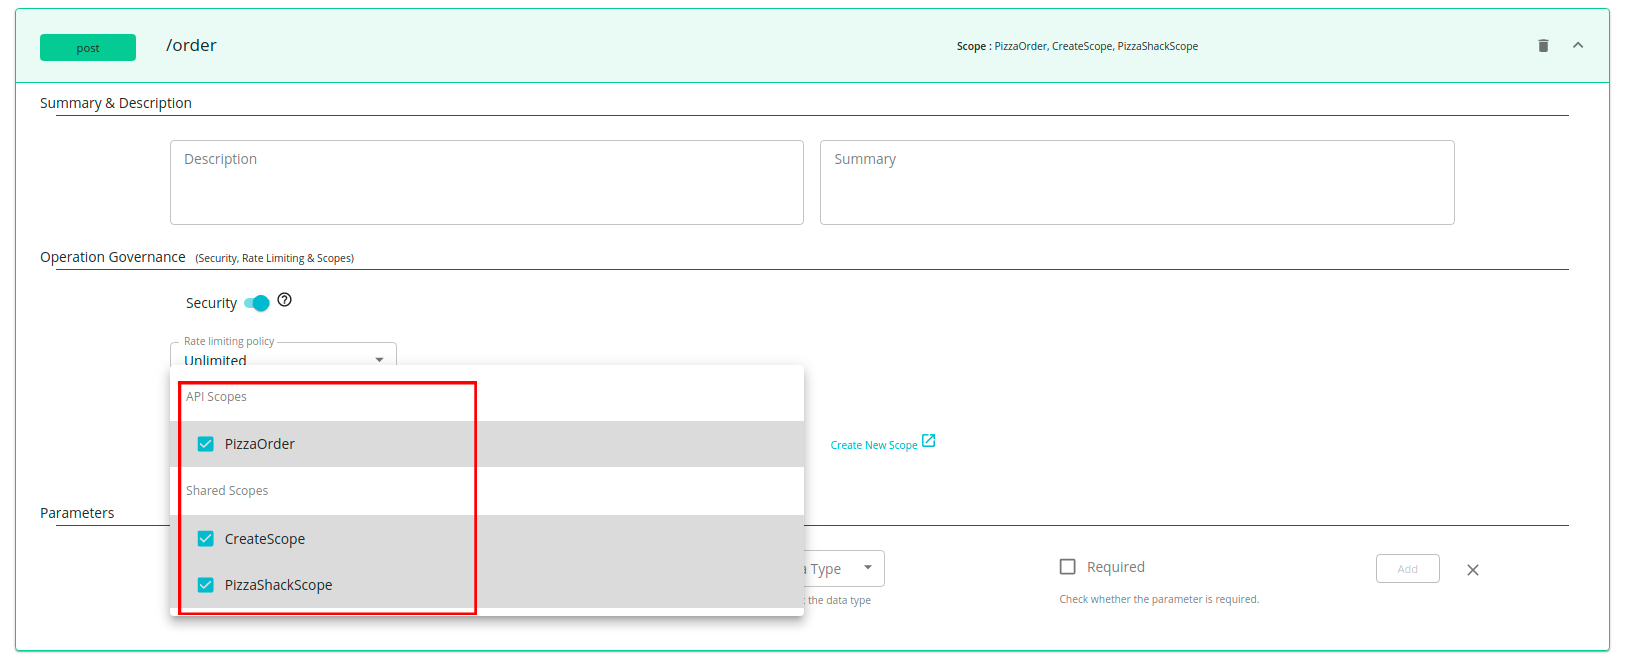
Once you attach multiple scopes per resource, the resource will look as follows.
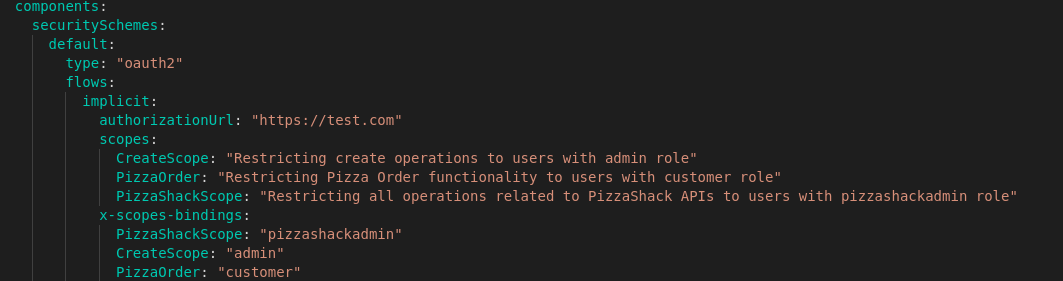
Defining OAuth Scopes in API Definition
Both Shared Scopes and Local Scopes should be defined in same way in the OpenAPI definition as follows.

Disable role validation at scope creation
When creating scopes, it validates the added roles against the underline user store to check if they exist. However, we can override this behavior such that it does not validate the roles in the user store. For this purpose, set the Java system property disableRoleValidationAtScopeCreation to true at the server startup:
This can be done in one of two ways.
Option 1: Adding in startup script
     Open <API-M_HOME>/bin/api-manager.(sh|bat) file.
     Add -DdisableRoleValidationAtScopeCreation=true at the end of the file.
     Restart the server.
Option 2: Provide as a parameter during server startup
Restart the server with the parameter set as below.
-
Linux/Mac OS
./api-manager.sh -DdisableRoleValidationAtScopeCreation=<boolean_value>./api-manager.sh -DdisableRoleValidationAtScopeCreation=true -
Windows
api-manager.bat -DdisableRoleValidationAtScopeCreation=<boolean_value>api-manager.bat -DdisableRoleValidationAtScopeCreation=true
Obtaining Tokens with Scopes
When a scope is attached to an API resource, access to it gets restricted based on the role(s) that is specified in the scope. In order to invoke the API resource, the API consumer has to generate an access token bound to the scope that is attached to the API resource. Follow below steps to obtain an access token specifying the requested scopes.
-
Login to API Developer Portal (https://localhost:9443/devportal/).
-
Navigate to the API which has the scope protected API resource and go to Subscription section to subscribe to an application.

-
Generate PRODUCTION or SANDBOX keys for the application.

-
Click GENERATE ACCESS TOKEN button. Then select the scope from dropdown in the prompted window and click GENERATE button to generate the access token.

-
If the user has the roles specified in the scope, the access token will be issued with the requested scope. Otherwise, only the default scopes will be returned with the access token.
Info
By default in WSO2 API-M, if no scopes are requested or if none of requested scopes are allowed, the token will be issued with
defaultscope. In addition, a token obtained using client credentials grant will be issued witham_application_scope.
-
Invoke the API resource with the above generated access token. If the user is assigned with the authorized roles, the API invocation will be successful. An API resource access by an unauthorized user will be failed giving 403 Forbidden error.

Info
If you first create a local scope and then create a shared scope with same scope name before attaching the local scope to any API resource, the local scope will removed from local scope UI. However, it will not be reflected in the API Definition, unless you save the API. This is an identified limitation in supporting both local and shared scopes.