Implicit Grant
Note
The Implicit Grant has been deprecated in WSO2 API Manager 3.2.0 and will be removed from the future releases. This has been done since the OAuth 2.1.0 has removed/discouraged the use of the implicit grant type due to security concerns. For more information, see OAuth 2.0 Security Best Current Practice.
Implicit grant type is used to obtain access tokens if your application (client) is a mobile application or a browser based app such as a JavaScript client. Similar to authorization code grant, the implicit grant type is also based on redirection flow. The redirection URI includes the access token in the URI fragment. Therefore, the client application is capable of interacting with the resource owner user agent to obtain the access token from the redirection URI which is sent from the authorization server.
Flow
The implicit grant type does not require client authentication, and relies on the presence of the resource owner and the registration of the redirection URI. The resource owner is authenticated by the authorization server to obtain the access token. The access token is encoded into the redirection URI. This may be exposed to the resource owner and other applications residing inside the same device.
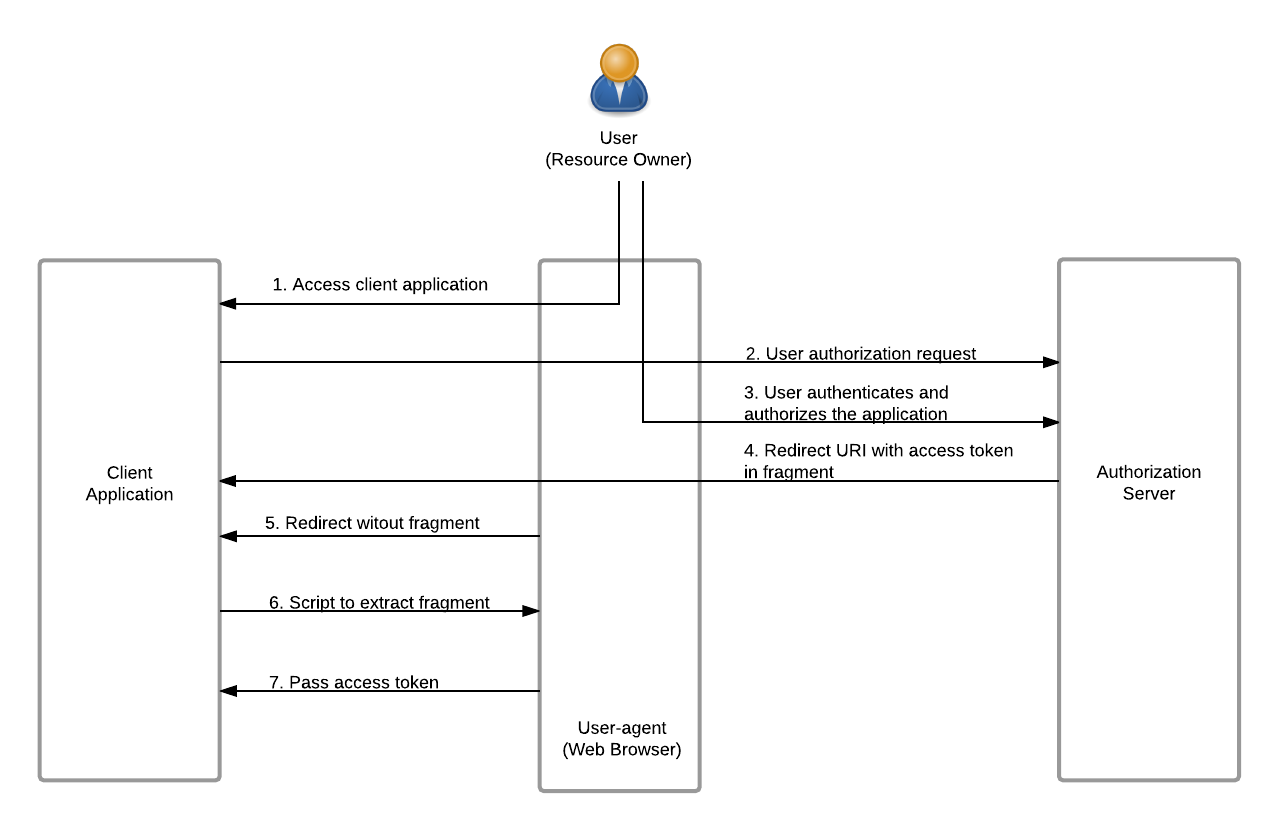
The diagram below depicts the flow of Implicit Grant :
-
The client requests for the access token with the client ID and grant type, and other optional parameters.
-
Since the resource owner authenticates directly with the authorization server, their credentials will not be shared with the client.
-
The Authorization Server sends the access token through a URI fragment to the client.
-
The client extracts the token from the fragment and sends the API request to the Resource Server with the access token.
Note
The refresh token will not be issued for the client with this grant, as the client type is public. Also note that, Implicit grant does not include client authentication using client secret of the application
The following parameters are required to implement the Implicit grant type in WSO2 API Manager.
| Name | Description | Sample value |
|---|---|---|
| scope | The OAuth scope you are requesting for the particular token | openid |
| response_type | The required response format | id_token |
| redirect_uri | The URL of the Oauth application requesting for the token | http://wso2is.local:8080/playground2/oauth2client |
| nonce | Any random value | 13e2312637dg136e1 |
| client_id | Client ID of the OAuth application | mzdQQ0RZOIqAf549ucIImB4h0SIa |
Tip
The playground application will send a authorization request the authorize endpoint using the following format.
https://<host>:<port>/oauth2/authorize?response_type=token
&client_id=<client-ID>
&redirect_uri=<callback-url>
&scope=<scope>https://localhost:9443/oauth2/authorize?response_type=id_token+token
&client_id=Cx4LKFNObeuXocx7xgOpz5vfzFoa
&redirect_uri=http://wso2is.local:8080/playground2/oauth2client
&scope=openidTry implicit grant to generate tokens
In this example we use the WSO2 Playground app, which is hosted as a web application, to obtain the access token with implicit grant.
Note
Before you begin
The following instructions use the sample playground webapp. For instructions on how to set up the sample webapp, see Setting up the Sample Webapp.
-
Open a terminal window and add the following entry to the
/etc/hostsfile of your machine to configure the hostname.127.0.0.1 wso2is.local 127.0.0.1 localhost.comWhy is this step needed?
Some browsers do not allow you to create cookies for a naked hostname, such as
localhost. Cookies are required when working with SSO . Therefore, to ensure that the SSO capabilities work as expected in this tutorial, you need to configure the/etc/hostfile as explained in this step.The
/etc/hostfile is a read-only file. Therefore, you won't be able to edit it by opening the file via a text editor. Instead, edit the file using the terminal commands. For example, use the following command if you are working on a Mac/Linux environment.sudo nano /etc/hosts -
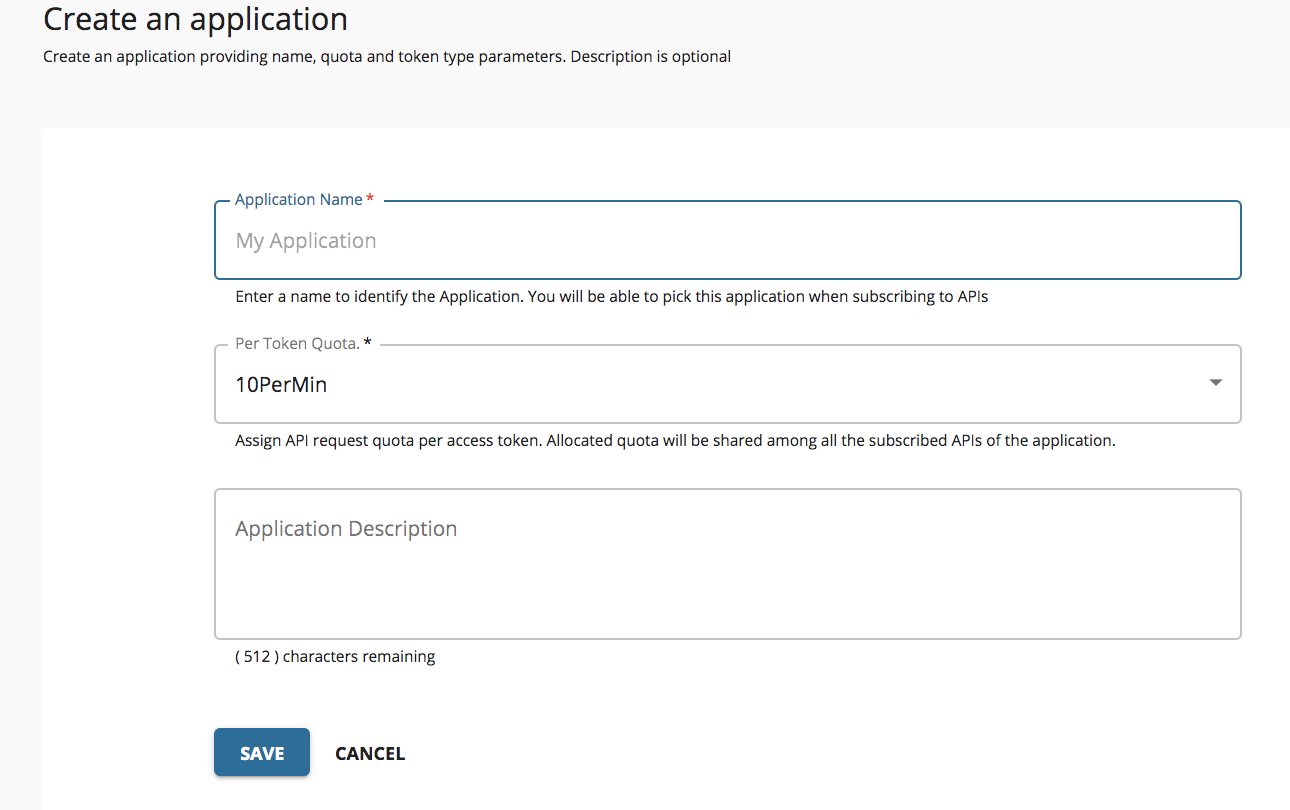
Login to WSO2 API Manager Store and create an application as shown below.
-
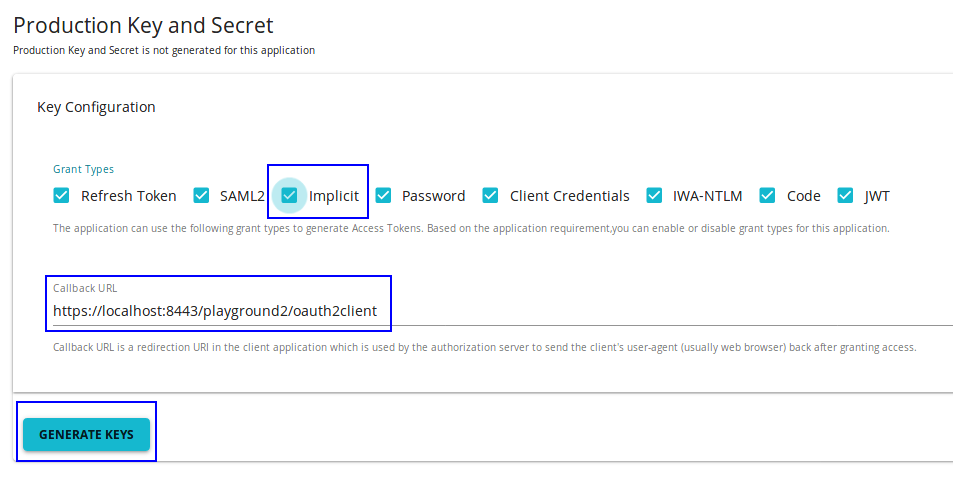
Go to the Production keys tab for the application. Add http://wso2is.local:8080/playground2/oauth2client as the Callback URL. Select Implicit from the list of grant types and click Generate Keys.
Note
The Implicit grant and Code grant type checkboxes are disabled by default in the UI. To enable selecting the checkboxes, enter the Callback URL for the application.
-
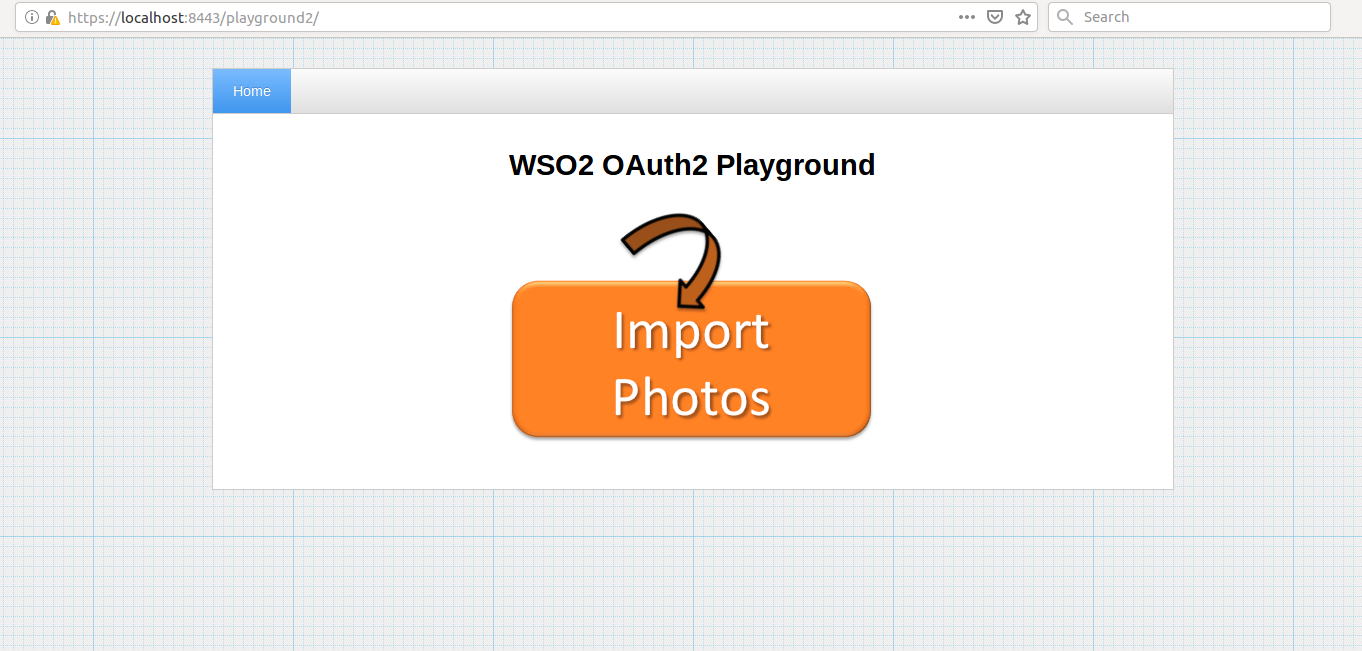
Go to playground app http://wso2is.local:8080/playground2/ and click import photos.
-
Give the information in the table below and click Authorize.
Field Sample value Authorization Grant Type Implicit Client Id Consumer Key obtained for your application Scope The scope you have selected for your applicaton Implicit Response Type ID token Only or ID token & Access Token Callback URL The callback URL of your application Authorize Endpoint https://localhost:9443/oauth2/authorize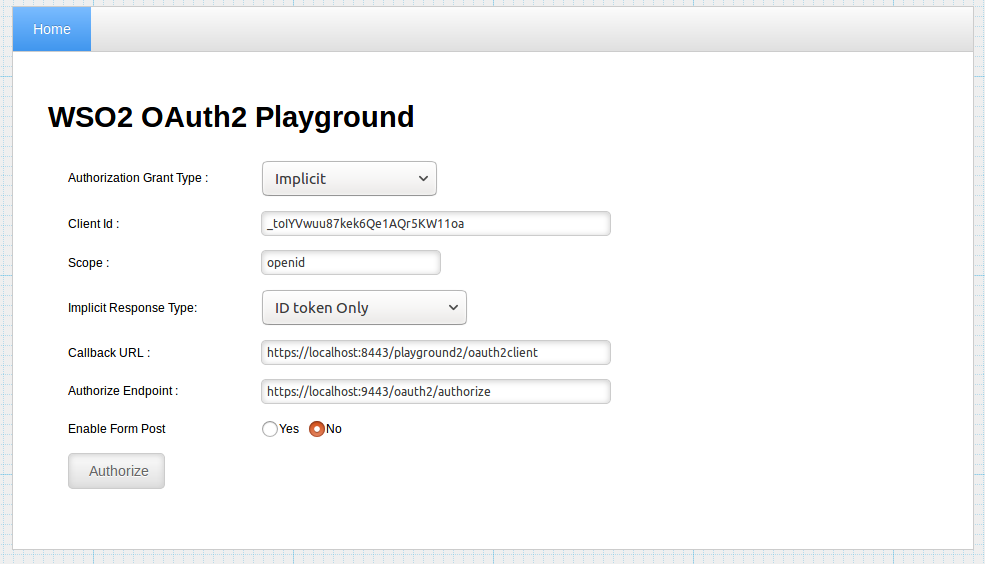
-
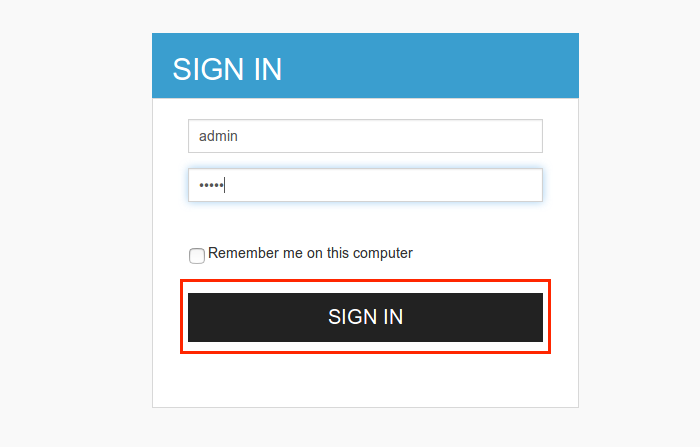
The playground application redirects to the login page. Enter you username and password and click Sign In.
-
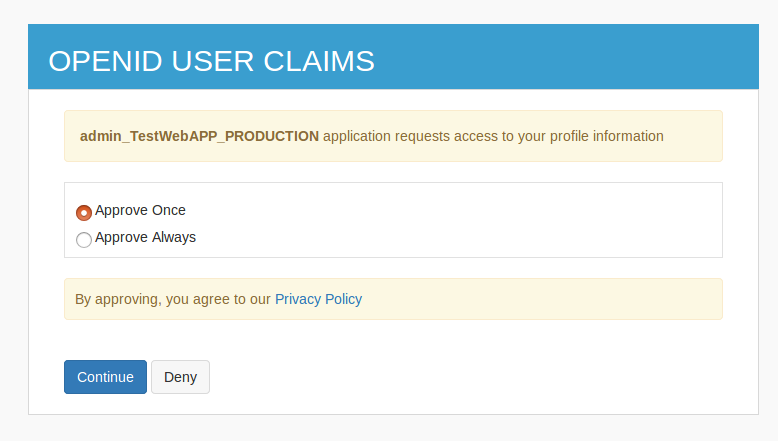
Select Approve Once or Approve Always to provide access to your profile information.
-
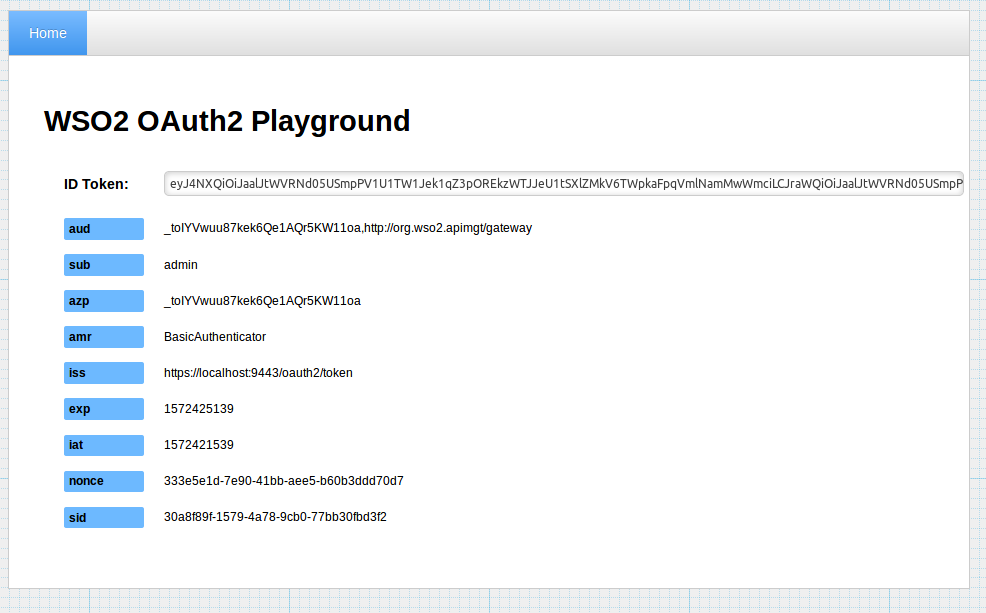
You will receive the access token as follows
Tip
If you want to disable the Implicit grant type in the APIM instance, add the following entry to the deployment.toml file in the <APIM_HOME>/repository/conf/ folder.
[oauth.response_type.token]
enable = false

[oauth.response_type.id_token]
enable = false

[oauth.response_type.id_token_token]
enable = false