Secure APIs using JWT (Self Contained) Access Tokens
JSON Web Token (JWT) is an open standard of transmitting information securely between two parties. As the tokens are digitally signed, the information is secured. The authentication and authorization process uses JWT access tokens. It is ideal to use JWT access tokens as API credentials because JWT access tokens can carry claims (data) that are used in order to authenticate and authorize requests.
WSO2 API Manager supports the use of self-contained and signed JWT formatted OAuth2.0 access tokens as API credentials. Therefore, you can use JWT formatted OAuth2.0 access tokens to authenticate any API that is secured using the OAuth2 security scheme. The App Developer can create a JWT or OAuth2.0 application via the Developer Portal, in WSO2 API Manager, in order to subscribe to an API. JWT type applications in WSO2 API Manager uses self-contained signed JWT formatted access tokens.
When an API is invoked using a JWT access tokens, the API Gateway validates the request by itself. In the case of regular opaque access tokens, the API Gateway communicates with the Key Manager (in a distributed deployment) to validate the token.
Prerequisites for JWT based tokens
The following prerequisites have to be satisfied for JWT based tokens to work.
-
Only signed JWT access tokens are allowed.
-
The expected token format is as follows:
base64(header).base64(payload).base64(signature) -
The public certificate of the private key that is used to sign the tokens should be added to the trust store under the
"gateway_certificate_alias"alias. For more information, see Import the public certificate into the client trust store.Note
The latter mentioned prerequisite is not applicable if you use the default certificates, which are the certificates that are shipped with the product itself.
Mandatory attributes of a JWT access token
The following are the mandatory attributes that are required for a JWT access token.
Headertyp- The type of the token (JWT).alg- The algorithm used to sign the token (e.g., RS256).
Payloadsub- The subject of the token, which identifies as to whom the token refers to.application- Application for which the token is generated.consumerKeyiat- The time the token was issued.exp- The expiry time of the token.
Using JWT access tokens
Follow the instructions below to work with JWT Authentication in WSO2 API Manager.
Step 1 - Access the Developer Portal
Sign in to the Developer Portal.
https://<hostname>:9443/devportal
Step 2 - Create a JWT access token based application
-
Click Applications.
-
Click ADD NEW APPLICATION.

-
Enter the application details.
Let's create an application with the following details.
Field Value Application Name TestApp Per Token Quota 10PerMin Token Type JWT Description Test App 
Step 3 - Generate a JWT access token
-
Click APIs and click on the PizzaShackAPI.
-
Click Credentials.
-
Select the JWT based application that you created and select a throttling policy.
-
Click Subscribe.

-
Click PROD KEYS, which corresponds to the JWT based application.

-
Click GENERATE ACCESS TOKEN, click Generate, and copy the JWT.
Step 4 - Invoke the API using the JWT access token
Invoking an API with a JWT formatted access token is similar to invoking the API with a regular opaque access token. Use the cURL command below to invoke the API via the API Gateway.
curl -k -X GET "<API_URL>" -H "accept: application/json" -H "Authorization: Bearer <JWT_TOKEN>"curl -k -X GET "https://localhost:8243/pizzashack/1.0.0/menu" -H "accept: application/json" -H "Authorization: Bearer eyJ0eXAiOiJKV1QiLCJhbGciOiJSUzI1NiIsIng1dCI6IlpqUm1ZVE13TlRKak9XVTVNbUl6TWpnek5ESTNZMkl5TW1JeVkyRXpNamRoWmpWaU1qYzBaZz09In0.eyJhdWQiOiJodHRwOlwvXC9vcmcud3NvMi5hcGltZ3RcL2dhdGV3YXkiLCJzdWIiOiJhZG1pbkBjYXJib24uc3VwZXIiLCJhcHBsaWNhdGlvbiI6eyJvd25lciI6ImFkbWluIiwidGllciI6IjEwUGVyTWluIiwibmFtZSI6IlRlc3RBcHAiLCJpZCI6MiwidXVpZCI6bnVsbH0sInNjb3BlIjoiYW1fYXBwbGljYXRpb25fc2NvcGUgZGVmYXVsdCIsImlzcyI6Imh0dHBzOlwvXC9sb2NhbGhvc3Q6OTQ0M1wvb2F1dGgyXC90b2tlbiIsInRpZXJJbmZvIjp7IlVubGltaXRlZCI6eyJzdG9wT25RdW90YVJlYWNoIjp0cnVlLCJzcGlrZUFycmVzdExpbWl0IjowLCJzcGlrZUFycmVzdFVuaXQiOm51bGx9fSwia2V5dHlwZSI6IlBST0RVQ1RJT04iLCJzdWJzY3JpYmVkQVBJcyI6W3sic3Vic2NyaWJlclRlbmFudERvbWFpbiI6ImNhcmJvbi5zdXBlciIsIm5hbWUiOiJQaXp6YVNoYWNrQVBJIiwiY29udGV4dCI6IlwvcGl6emFzaGFja1wvMS4wLjAiLCJwdWJsaXNoZXIiOiJhZG1pbiIsInZlcnNpb24iOiIxLjAuMCIsInN1YnNjcmlwdGlvblRpZXIiOiJVbmxpbWl0ZWQifV0sImNvbnN1bWVyS2V5IjoiWWpfVWVmaHRpdjE1Tm1meDFBOFJqUldDVGY0YSIsImV4cCI6MTU3MTkxNTQ0MSwiaWF0IjoxNTcxOTExODQxLCJqdGkiOiI3NjU3Yjk3OC1jZjc1LTRjMWUtYmFmOC02OGJiZDFkMWEyNjMifQ.BBXefDL4DeePYIzBZdZDE_fJDZVza4e0qBU7_Xwrtjut66NKx4xOv8zyjEELudo_q15fpcb0_bwZ4fwRbKECz_TXIH08snivqH0IgDNJDGbEocBbQBj0nQa6eL363lxkDjq-sTrEdKgXjr9rwdEh5SJWE6pkM9rHlLWMFpJKEWOPp726DRqOC60BERvdcHGTN5Bhh029o4eGCFINfzmfpu6bwFqOTIgk9O70WhoYZIi-YiZnG3HHp4kV3T8r3JoW4Ywuy1ANKC3U1cCKHbSS_LmrkM6Z7AR8T_kigCZq0qvMz-8tqEjauUf8avOnpF5GXozDJzU-Y7nwWpmQnIWpwA"[
{
"name":"BBQ Chicken Bacon",
"description":"Grilled white chicken, hickory-smoked bacon and fresh sliced onions in barbeque sauce",
"price":"24.99",
"icon":"/images/6.png"
},
{
"name":"Chicken Parmesan",
"description":"Grilled chicken, fresh tomatoes, feta and mozzarella cheese",
"price":"27.99",
"icon":"/images/1.png"
},
{
"name":"Chilly Chicken Cordon Bleu",
"description":"Spinash Alfredo sauce topped with grilled chicken, ham, onions and mozzarella",
"price":"13.99",
"icon":"/images/10.png"
},
{
"name":"Double Bacon 6Cheese",
"description":"Hickory-smoked bacon, Julienne cut Canadian bacon, Parmesan, mozzarella, Romano, Asiago and and Fontina cheese",
"price":"26.99",
"icon":"/images/9.png"
},
{
"name":"Garden Fresh",
"description":"Slices onions and green peppers, gourmet mushrooms, black olives and ripe Roma tomatoes",
"price":"18.99",
"icon":"/images/3.png"
},
{
"name":"Grilled Chicken Club",
"description":"Grilled white chicken, hickory-smoked bacon and fresh sliced onions topped with Roma tomatoes",
"price":"11.99",
"icon":"/images/8.png"
},
{
"name":"Hawaiian BBQ Chicken",
"description":"Grilled white chicken, hickory-smoked bacon, barbeque sauce topped with sweet pine-apple",
"price":"25.99",
"icon":"/images/7.png"
},
{
"name":"Spicy Italian",
"description":"Pepperoni and a double portion of spicy Italian sausage",
"price":"16.99",
"icon":"/images/2.png"
},
{
"name":"Spinach Alfredo",
"description":"Rich and creamy blend of spinach and garlic Parmesan with Alfredo sauce",
"price":"22.99",
"icon":"/images/5.png"
},
{
"name":"Tuscan Six Cheese",
"description":"Six cheese blend of mozzarella, Parmesan, Romano, Asiago and Fontina",
"price":"10.99",
"icon":"/images/4.png"
}
]Additional Information
Validation of API subscriptions
The subscription validation is applied only if the JWT payload contains the subscribedAPIs attribute. The default Key Manager in WSO2 API Manager ensures that this property is added to all the tokens it issues even if the relevant applications have not subscribed to an API. Tokens that are generated before an application subscribes to an API will not contain that API under its subscription details, and will not be allowed to access that specific API. Therefore, JWTs should be generated after the application has subscribed to the required API.
Importing the public certificate into the client trust store
Follow the instructions below to import the public certificate into the client trust store.
-
Navigate to the
<API-M_HOME>/repository/resources/security/directory. -
Run the following command to export the public certificate from WSO2 API Manager's key store (
wso2carbon.jks).keytool -export -alias wso2carbon -file wso2.crt -keystore wso2carbon.jks -
Enter
wso2carbonas the default password of the key store when prompted. -
Run the following command to import the public certificate into the trust store.
keytool -import -trustcacerts -keystore client-truststore.jks -alias gateway_certificate_alias -file wso2.crt -
Enter
wso2carbonas the default password of the trust store when prompted.
Validating JWTs generated by external OAuth providers
JWTs generated by an external OAuth provider can be validated by the gateway as per the following diagram.
Signature validation
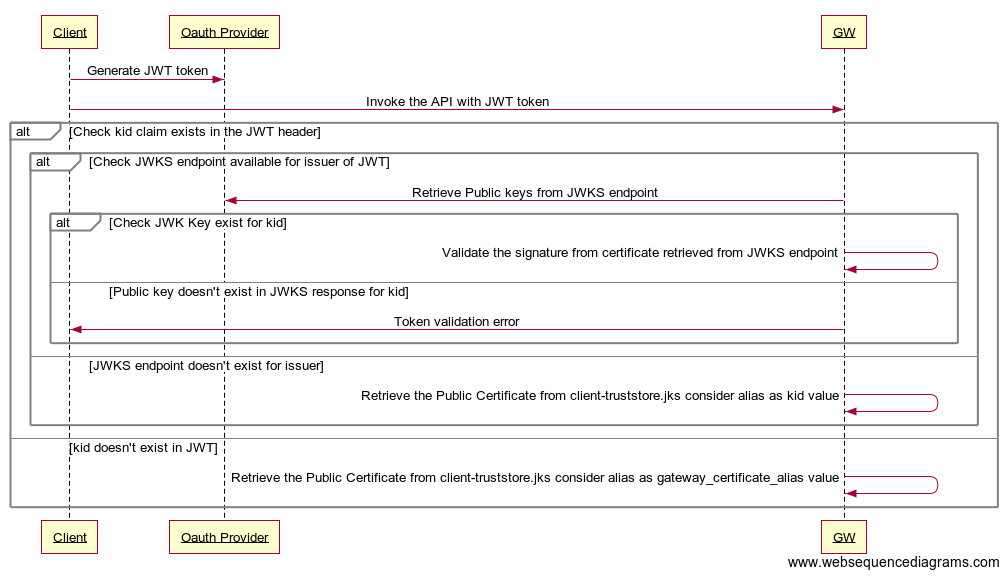
In order to do the signature validation of JWTs, you can use one of the following options.
-
Import the public certificate into the client-truststore.jks located at
<API-M_HOME>/repository/resources/security/with the kid value of the certificate as the alias.If kid is not present in JWT, it will validate with the public certificate under
gateway_certificate_aliasalias from client-truststore.jks. -
Use the JWKS endpoint of the OAuth provider. (kid value should be present in JWT)
- Navigate to the
deployment.tomlunder the<API-M_HOME>/repository/conf/folder. - Add the following configuration under the
[[apim.jwt.issuer]]with the issuer details.
[[apim.jwt.issuer]] name = "<issuer value of jwt>" [apim.jwt.issuer.jwks] url = "<jwks endpoint of oauth provider>"[[apim.jwt.issuer]] name = "https://localhost:9443/oauth2/token" jwks.url = "https://localhost:9443/oauth2/jwks" [[apim.jwt.issuer]] name = "wso2is" jwks.url = "https://localhost:9445/oauth2/jwks" - Navigate to the
JWT claim transformation
In order to convert the incoming JWT claims into desired claims, you can configure the claim mapping as below.
- Navigate to the
deployment.tomlunder the<API-M_HOME>/repository/conf/folder. - Add the claim mapping as following under the
[[apim.jwt.issuer]].
By default, the claim mapping is done in a one-to-one manner. But, if the mapping needs to be done in an advanced manner, the users can write custom JWT transformers which can be attached to each token issuer.[[apim.jwt.issuer.claim_mapping]] remote_claim = "<remote claim value>" local_claim = "<local claim value to map>" ....
Scope validation
By default, the WSO2 API Manager validates the scopes coming in the scope claim of the JWT. If the JWT contains the scopes in a different claim, users can map that claim into the scope claim as per Transform JWT Claims section.
Subscription validation
By default, the WSO2 API Manager does not validate subscriptions if the JWT is generated by an external OAuth provider. In order to enable subscription validation for such JWTs, the following need to be satisfied.
-
The JWT needs to have the consumer key of the generated OAuth client application. By default, the API Manager expects the consumer key to be in the
azpclaim or theconsumerKeyclaim. If the consumer key comes in a different claim than these 2, the user can map that claim into one of the above 2 claims as per Transform JWT Claims section. This step depends on the preferred external Key Manager. -
The consumer key needs to be mapped to the application. For that, you can use Provisioning Out-of-Band OAuth2 Clients.
-
. Navigate to the
deployment.tomlunder the<API-M_HOME>/repository/conf/folder. -
Add the subscription_validation_via_km configuration under the
[apim.jwt_authenitcation].[apim.jwt_authenitcation] subscription_validation_via_km = true