Kerberos OAuth2 Grant
Kerberos is a security protocol that has support built into various operating systems and open-source distributions (e.g., Ubuntu, Windows, RedHat, Open Solaris, etc.). In addition, a majority of browsers support some Kerberos functions as well. As WSO2 API Manager uses the OAuth 2.0 protocol, the Kerberos OAuth2 grant type allows organizations to exchange a Kerberos ticket for an OAuth 2.0 token. Thereby allowing organizations to re-use their existing Kerberos infrastructure, while easier adopting OAuth 2.0 within these organizations.
Kerberos OAuth2 grant flow
The following section describes the flow involved in exchanging a Kerberos ticket for an OAuth2 token.

-
The Kerberos client requests the Kerberos Service Ticket from the Kerberos Key Distribution Center (KDC) to invoke the service.
The Kerberos Key Distribution Center can be any Kerberos Server.
-
The Kerberos Key Distribution Center sends a response with the Kerberos Service Ticket.
If the client and the requested service are valid, the Key Distribution Center (KDC) sends a Kerberos ticket encrypted with the service owner's private key. The API handles the exchanging of the Ticket Granting Ticket (TGT), Service Granting Ticket (SGT), and all other low-level Kerberos details.
-
The Kerberos client requests the OAuth2 token. For more information on how to generate the kerberos token, see step 7 below.
The message format of the OAuth2 token request should be as follows. You can use one of the following two cURL commands to request for the OAuth2 token.
Format 1:
curl -v -X POST -H "Authorization: Basic <base64-encoded(client-id:client-secret)>" -k -d "grant_type=kerberos&kerberos_realm=<kerberos-realm>&kerberos_token=<kerberos-token>&scope=<scope>" -H "Content-Type:application/x-www-form-urlencoded" https://localhost:8243/tokencurl -v -X POST -H "Authorization: Basic <base64-encoded(client-id:client-secret)>" -k -d "grant_type=kerberos&kerberos_realm=example.com&kerberos_token=YII1...&scope=my_scope" -H "Content-Type:application/x-www-form-urlencoded" https://localhost:8243/tokenFormat 2:
curl -u <client-id>:<client-secret> -k -d "grant_type=kerberos&kerberos_realm=<kerberos-realm>&kerberos_token=<kerberos-token>&scope=<scope>" -H "Content-Type:application/x-www-form-urlencoded" https://localhost:8243/tokencurl -u <client-id>:<client-secret> -k -d "grant_type=kerberos&kerberos_realm=example.com&kerberos_token=YII1...&scope=my_scope" -H "Content-Type:application/x-www-form-urlencoded" https://localhost:8243/tokencURL Response
POST /token HTTP/1.1
Host: idp.example.com:8243
Content-Type: application/x-www-form-urlencoded
Authorization: Basic
MW91TDJmTzZTeGxmRDJMRHcxMjVjVG8wdlFrYTp1VUV0bTg5dFk2UVp1WlVtcVpmTDkyQ
kRGZUFh
grant_type=kerberos&kerberos_realm=example.com&kerberos_token=YII1...
Example
grant_type=kerberos&scope=my_scope&kerberos_realm=example.com&kerberos_token=YII1...The
“scope=my_scope”is an optional parameter that you can add to the string in the token request body. -
The Kerberos client receives the OAuth2 token.
The Kerberos Grant validates the received token with the provided Identity Provider (IDP) credentials. If it is a valid token, it issues an OAuth2 token to the client.
Example
{
    "access_token":"636ce45f-c7f6-3a95-907f-d1f8aca28403",
    "refresh_token":"831271d9-16ba-3bad-af18-b9f6592a8677",
    "scope":"my_scope",
    "token_type":"Bearer",
    "expires_in":521
}
Configuring Kerberos Grant using IS as KM
Follow the instructions below to configure Kerberos Grant using the Identity Server as the Key Manager pack:
-
Download the Identity Server as the Key Manager pack from the WSO2 API Manager product page.
-
Navigate to https://wso2.com/api-management/previous-releases/.
-
Select Version 3.0.0.
-
Click Download respective to Identity Server as a Key Manager.
-
-
Download the kerberos grant.jar file.
- Copy the JAR into the
<IS-KM_HOME>/repository/components/libdirectory. -
To enable the Kerberos grant, add the following entry to the
deployment.tomlfile in the<IS-KM_HOME>/repository/conf/folder.[oauth.grant_type.kerberos_grant] enable = true -
Configure OAuth2 with IWA as an allowed grant type.
- Sign in to the WSO2 Identity (WSO2 IS) Management Console.
https://<Server-Host>:9443/carbon - Navigate to the Main menu, click Add under the Service
Providers menu.
-
Add a new Service Provider and configure OAuth2 for your client application with kerberos as an allowed grant type.
Click for instructions to configure OAuth2
To enable OAuth support for your client application, you must first register your application. Follow the instructions below to add a new OAuth2 application.
- Expand the OAuth/OpenID Connect Configuration and click Configure.
- Fill in the form that appears. For the Allowed Grant
Types you can disable the ones you do not require or wish
to block. Select the kerberos grant type as an allowed grant type.
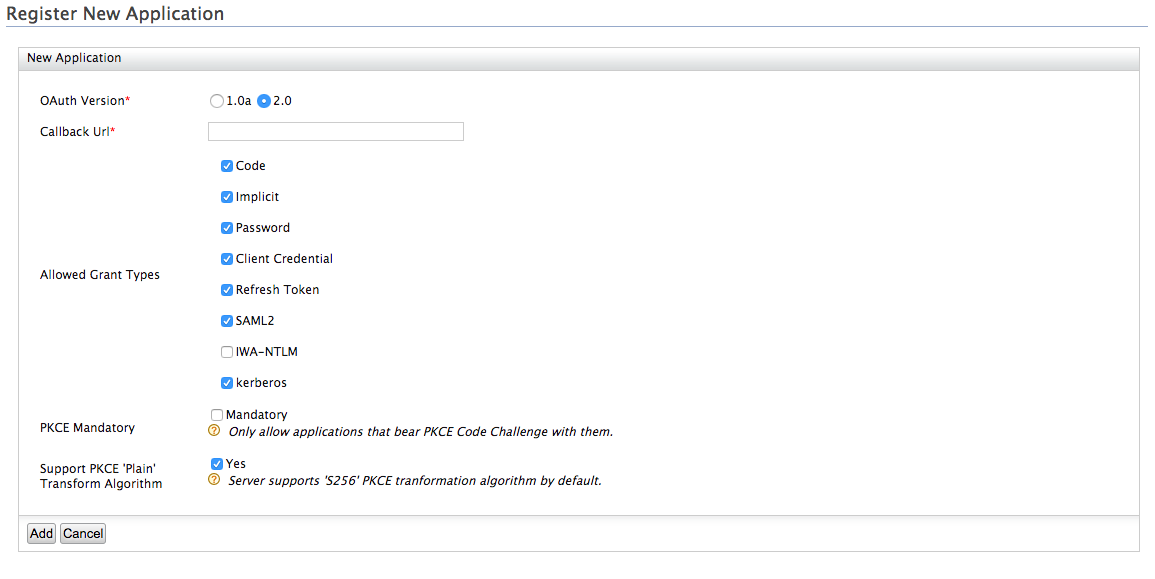
- Click Add. The following information is added to your
service provider.

-   **OAuth Client Key** - This is the client key of the
    service provider, which will be checked for
    authentication by the Identity Server before providing
    the access token.
-   **OAuth Client Secret** - This is the client secret of
    the service provider, which will be checked for
    authentication by the Identity Server before providing
    the access token. Click the **Show** button to view the
    exact value of this.
-   **Actions -**
    -   **Edit:** Click to edit the OAuth/OpenID Connect
        Configurations
    -   **Revoke:** Click to revoke (deactivate) the OAuth
        application. This action revokes all tokens issued
        for this application. In order to activate the
        application, you have to regenerate the consumer
        secret.
    -   **Regenerate Secret:** Click to regenerate the
        secret key of the OAuth application.
    -   **Delete:** Click to delete the OAuth/OpenID Connect
        Configurations.
- Sign in to the WSO2 Identity (WSO2 IS) Management Console.
-
Configure the Service Principal Name (
SPNName) and Service Principal Password (SPNPassword).-
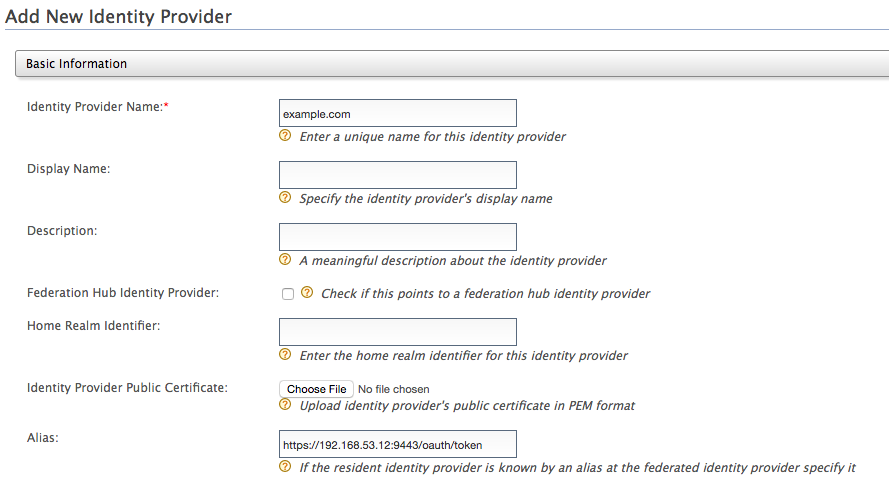
Navigate to the Main menu, click Add under the Identity Providers menu.
-
Add a new Identity Provider (IDP). Enter the basic information as follows.
Note
The IDP name should be the name of the realm as specified in the token request in step 3. Based on this example, it should be
example.com.-
Identity Provider Name : example.com
-
-
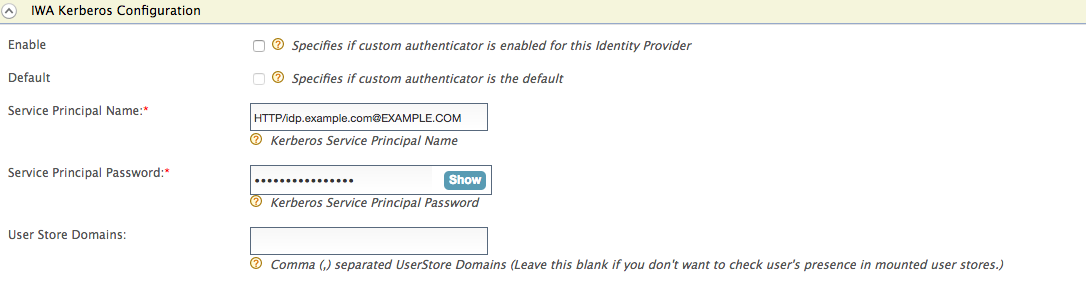
Expand the Federated Authenticators tab, and then the IWA Kerberos Configuration tab. Enter the required details as follows.
- Server Principal Name : HTTP/idp.example.com@EXAMPLE.COM
- Server Principal Password: <password>
-
-
Generate the kerberos token.
-
Git clone the
KerbClientProject.git clone https://github.com/erandacr/KerbClientProject -
Run KerbClient.cs using an IDE.
You can run it using Visual Studio by downloading and installing the following required libraries and programs.- Visual Studio sdk (.NET Core 2.1)
- Microsoft Visual Studio (Professional Edition)
- Install the
System.Net.Http.dlland define the path in theKerbClientProject.csprojfile.
Tip
You can also use any other IDE to run this project.
-
Configure the following parameters in the project according to your setup.
// Service Name goes here static string serviceName = "HTTP/[email protected]"; // Token endpoint URL static string URI = "https://idp.example.com:9443/oauth2/token"; // Client ID static string username = "1ouL2fO6SxlfD2LDw125cTo0vQka"; // Client Secret static string password = "uUEtm89tY6QZuZUmqZfL92BDFeAa"; // Kerberos realm name static string realm_Name = "example.com"; -
Run the project by selecting the Start without Debugging option on the Visual Studio editor.
This project generates a Kerberos ticket and a Kerberos token is generated using the ticket. The generated token can be used to get the OAuth token.
-
-
Invoke the token endpoint using the message format discussed in step 3.
